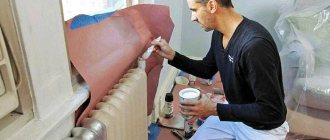
To prevent repairs from becoming force majeure, it is better to carry out diagnostics and maintenance of the system before the heating season begins
The optimal time to start repairing heating radiators in an apartment is the warm season. The heating season has already ended, the new one has not yet begun, and you can restore the damaged appliance without haste. However, troubles often happen when you least expect them. So, the battery can break through in winter. It’s good if someone is at home at this time, then you can quickly react and prevent the neighbors below from flooding. If a breakdown occurs during the heating season, it will take a lot of effort and patience to restore. For some time you will have to turn off the heat supply and live in a somewhat uncomfortable environment. It is also important to warn your neighbors about the upcoming work and ask them to be more tolerant, because you all want to quickly get the same comfort and coziness.
If the repair of heating batteries cannot be delayed, do not hesitate and start repairing. The amount of effort and money spent depends on the efficiency and thoughtfulness of actions.
If you are not very agile and do not know how to repair a heating battery yourself, it is better to seek the help of a professional. However, if you have the necessary set of tools and the desire to repair the damage yourself, get down to business. First you just need to understand the features of different types of radiators.
Common causes of radiator failures
Incorrect selection of model.
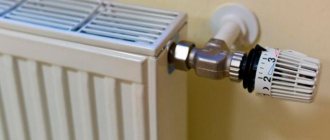
The choice of battery type depends on the diameter of the pipes, pressure and temperature of the coolant. Repair of heating radiators may result from incorrect connection to the pipes. If the coolant contains a large amount of chemical impurities or pressure changes occur too often, the battery metal will corrode. Low-quality water contributes to the formation of plaque at the joints of radiator sections and also clogs the pipes, which entails the need for cleaning. Repair of heating radiators is often necessary due to the destruction of threaded nipples. To prevent a leak from catching you by surprise, it is important to systematically change the gaskets. Battery noise - if you hear clicks, this does not always indicate a malfunction. However, it is better to call a team of plumbers who will carry out soundproofing. Air locks are formed due to low pressure or due to leaking pipes. Due to scale in the boiler and leaks at the pipe junction, the pressure drops.
Types of leaks and their causes
Batteries and adjacent pipes are constantly exposed to pressure, high temperature and impurities contained in coolants. Therefore, over time, materials deteriorate and leaks occur. The longer a radiator is used, the higher the likelihood that it will leak.
What causes leaks:
- Corrosion. Elements of the heating system oxidize from contact with hot liquid. The process spreads deep into the metal and destroys it. The situation is often aggravated by the owners themselves, who use the heating circuit for grounding. As a result, microcurrents arise that enhance oxidation. Corrosion is also caused by oxygen gas produced in empty batteries. Therefore, it is not recommended to leave the system unfilled for more than 15 days.
- Freezing of liquid in pipes. Found in the private sector and at dachas. The reasons are poor quality anti-freezing and boiler shutdown in the heating system into which water is poured. The coolant turns into ice, increases in volume and breaks the metal.
- Overheat. Occurs in apartment buildings due to improper operation of the central heating network. Old radiators and cheap Chinese aluminum and bimetallic models mainly suffer from too hot water in the pipes. Modern, high-quality radiators are not afraid of overheating. An example of such heating devices are batteries that operate at coolant temperatures of up to 110 degrees.
- Destruction of sealants (fum tape, sanitary flax). Causes leakage at the joints of heating system elements. The tap on the heating radiator often leaks due to the seals.
- Poor quality radiators, improper installation. The choice of heating devices must be approached carefully, and their installation should be trusted only to experienced specialists.
There is an opinion among residents that a small radiator leak is not worth attention. They are sure that over time this place will “stick” and the heater will stop flowing.
But often the situation ends badly - at some point the leak intensifies sharply, the water floods the room and apartments below. Therefore, if the radiator is leaking even a little, it needs to be repaired urgently.
Preparing for disassembly
At this stage, you need to prepare all the necessary tools and remove the battery from its mounting location. For work, depending on the type and condition of the radiator, you may need the following tools:
- radiator (nipple) key;
- an adjustable wrench or a set of wrenches with different head sizes;
- autogen or grinder;
- construction hair dryer;
- hammer, sledgehammer;
- chisel.
Tools for disassembling radiators
A nipple wrench is an iron rod with a spade-shaped head at one end, and a hole or bent “ear” at the other. A tool purchased in a store has serifs, the distance between which is equal to the width of the heating radiator sections. They will help you find the location of the required nipple nut.
After preparing the tools, it is necessary to arrange a place for disassembling the radiator. A floor or a sturdy table will do. It is necessary to take into account that dirty water will flow out of the battery, and do not forget to place a waterproof cloth under it.
Restoration of old cast iron radiators
Restoration of old batteries is carried out on the eve of the heating season. The possibility of pipes and radiators bursting during the cold season is checked by testing the heating system. The radiator built into the niche must be located at a distance from the wall, otherwise restoration will be more difficult.
Before repairing the heating battery, you should prepare the following tools and materials:
- adjustable plumbing wrench No. 2, 3;
- a key for radiators for nipple 5/4 (when the battery is old), for nipple 1 (if the radiator is modern);
- chalk;
- a steel pipe 50-70 centimeters long that helps turn the key.
Restoration of cast iron products begins with dismantling the devices and draining the remaining coolant from the cavities. Sections are placed on a horizontal surface. Then remove the end cap or fittings. It should be remembered that plugs always have a left-handed thread, while regular footings always have a right-handed thread.
Waking up a sleeping lithium-ion battery
Lithium-ion batteries contain a protection circuit that protects the battery from accidents when it is over-discharged. Hibernation can occur when the lithium-ion pack is stored in a discharged state for any period of time, with self-discharge gradually depleting the remaining charge. Depending on the manufacturer, the Li-ion protection circuit is disabled between 2.2 and 2.9 V, and you need to know how to repair a laptop battery in this case.
Some chargers have a wake-up or “boost” feature to restart and recharge batteries that have gone to sleep. Without this provision, the charger renders them unusable.
Boost applies a small charging current to activate the protection circuit. If the correct cell voltage can be achieved, the charger begins normal charging. If storing lithium-ion batteries presents obvious uncertainty, manufacturers recommend keeping them at a 40-50% state of charge. But at the same time, they warn about the possible loss of the device due to excessive discharge. There is a wide range between these criteria, and if the user is in doubt, it is better to store the battery with a higher charge and in a cool place.
Reasons why depressurization occurs
Leakage problems in heating systems do not arise on their own. In each case, shortcomings are revealed that led to sad consequences.
The most common causes of leaks in the heating system:
- Exposure to external factors (impact or attempt to move the battery using force, for example, during apartment renovation).
- Manufacturing defects.
- Violation of technology during system installation.
- Radiator wear and tear over time.
- Exceeding the permissible level of water pressure in the heating system.
If the cause of depressurization is associated with an excessive increase in pressure, responsibility for the malfunction of the system lies with the management company, which is called upon to monitor the normal level of water pressure in the general heating system.
If it is possible to shut off the coolant supply to your apartment, this must be done during testing and startup of the system at the beginning of the heating season.
DIY HP laptop battery repair
Laptop batteries are made up of lithium cells called 18650 cells. They do not last forever and have a lifespan of about 2 years. If the laptop is fully charged, but charging does not last even half an hour, this means that the cells inside the battery are dead.
With an old laptop battery, some wires, and tools like a wire cutter and duct tape, you can start rebuilding your laptop battery yourself:
- Open the old battery and take out the 6 cells that are in a 2 x 2 parallel connection.
- Check the voltage of your original battery with a multimeter. As a rule, a battery voltage of less than 3.6 volts indicates that they need urgent replacement.
- Using one wire, connect all cells in a series connection. The circuit should provide about 12 volts.
- Open the original block, remove the faulty cells and, saving the circuit, replace them with working cells.
- Assemble the circuit using the original battery. The battery pack will also have 4 wires - 1 negative and 3 positive (one attaches to the end and two between the battery pack).
- Check the circuit with a multimeter before closing the unit.
- Close the battery case, insert into the PC and start charging.
Cold welding - what is it, application for heating system
For gluing various materials, adhesives of different compositions and purposes are used. Thus, for paper, office glue and PVA are used, in construction, synthetic glue with vinyl fillers is used for wallpapering, and rubber glue is used for shoe repair.
Unfortunately, universal adhesives have not yet been invented, but there are already compounds that can reliably glue metal. An example of such a composition is cold welding.
Cold welding technology is based on epoxy adhesive, consisting of epoxy resin and a hardener. In its normal state, it is a substance reminiscent of thick sour cream, only yellow in color, but when mixed with a hardener, epoxy resin becomes more liquid and is suitable for application to even the most complex surfaces. This moment lasts relatively short - only 10-15 minutes, after which the resin begins to harden, forming a durable coating.
The advantage of this technology is the high strength of the connection due to the high adhesion of the substance to the surface of the metal being bonded and resistance to aggressive chemical materials. Unfortunately, there are also disadvantages: the glue itself can withstand high pressure, but under mechanical stress there is a high probability of breaking the strength of the connection.
In cold welding compositions offered on the market for gluing metal, the hardener and resin are not in a liquid, but in a paste state. The glue is in a stable state and can be stored in packaging for a long time. It consists of an inner layer - consisting of a hardener, and an outer layer, which includes a resin. The third component included in the adhesive for gluing metals is sulfur or aluminum powder; these substances play the role of a reaction catalyst - when mixed, they heat up, as a result of which the hardening process accelerates, so that a welding effect is obtained.
The second option for cold welding is a traditional two-component adhesive based on epoxy resin - the resin and hardener are stored in tubes. To obtain the required amount, you must mix the components according to the instructions and apply to the surfaces to be bonded. To obtain a more durable connection, aluminum powder or bronze powder is added to the composition.
Safe removal
Before disassembling, you need to make sure that the laptop battery is completely discharged. Once the charge is completely depleted, you need to double check your laptop before removing the battery
It is important!
How to repair an Asus laptop battery yourself:
Open the battery case
To do this, carefully unpack it using a flathead screwdriver and a utility knife. Once the battery case is opened, you can analyze the type of batteries needed and learn the connection diagram for their installation
Before disassembling, it is better to take a photo or draw a diagram of the connection of the elements, so as not to forget before restoration. It is also important when opening to take all measures to prevent deformation or breakage of the plastic battery case. Replacing Cells Use a voltmeter to make sure the old cells are completely discharged before removing them. This will prevent possible electric shock. To find the correct replacement cells, you must use the model number on the battery. Solder the new cells to the wires, making sure they connect to the correct wires. When replacing lithium-ion cells, wear safety glasses. They are handled with care as they are explosive. Once the battery case is closed and placed back into the laptop, it needs to be fully charged.
Pipe connection is leaking
Leaks at pipe joints can be eliminated using the same homemade or factory-made clamps. If there is a difference in diameter, you can first wind the rubber band and then make or put on a clamp.
If the connection is threaded and drips from under the winding, you can pour alcohol onto the tow and then spread it with BF glue. It is alcohol soluble. Once on the alcohol-contained tow, it liquefies and can flow into the joint. Then, when the alcohol evaporates, the glue dries, and the “drops” stop. But this method only works if you have “drops” and not a “fountain”. And one more thing: such a processed connection is then very difficult to disassemble.
If it is possible to stop the system or disconnect the radiator (if there is a leak at the junction with it), it is better to repack the threaded connection. To do this, carefully and slowly unscrew the nut (lock nut). It needs to be turned away and then wrapped. Don’t make significant efforts - there is a high chance of breaking it, and then you will definitely have to stop the system and redo everything. After tightening the nut, remove all the tow or fum tape, remove any remaining sealant, and in general, thoroughly clean the threads. Wipe it until clean, you can treat it with a degreaser (acetone or pure gasoline).
If it leaks under the locknut, it can be repacked
Please note that there is no excess tow - just a little, and paste on top. Take the winding and paste (sealant), wind the flax and coat everything with paste
Now you can twist it. First with your hand, then with a key. But here you also need to work carefully: it’s very easy to break the thread. Therefore, hold the key not by the edge, but in the middle - it’s easier to calculate the effort. Don’t overdo it with the amount of tow either. If cast iron, in principle, does not matter how much winding you wind, then aluminum and bimetallic, as well as steel, can crack from a large amount. A microcrack first appears in the collector, into which water leaks. The metal corrodes, the paint swells, a section (or the entire radiator) is damaged
Take the winding and paste (sealant), wind the flax and coat everything with the paste. Now you can twist it. First with your hand, then with a key. But here you also need to work carefully: it’s very easy to break the thread. Therefore, hold the key not by the edge, but in the middle - it’s easier to calculate the effort. Don’t overdo it with the amount of tow either. If cast iron, in principle, does not matter how much winding you wind, then aluminum and bimetallic, as well as steel, can crack from a large amount. A microcrack first appears in the collector, into which water leaks. The metal corrodes, the paint swells, a section (or the entire radiator) is damaged.
But this is all in cases where the threaded connection is leaking. If a fitting under a press (metal-plastic pipes) has leaked, you can try to simply tighten it. In the case of copper pipes, only soldering will work. If there is a leak at the junction of polypropylene pipes, there is also only one option - cut out the damaged piece and weld a new one.
It doesn't matter what you use. The result is important
Disassembling a cast iron battery
At first glance, disassembling a cast iron battery with your own hands is quite simple, but it is not so. So, first you need to heat the plugs on the battery, for this I use a blowtorch. Once the plugs are heated, they can be unscrewed much easier than without heating. (See also: Cast iron heating radiators)
Using a grinder, the battery is cut extremely carefully between sections. After cutting, the radiator sections are disconnected
Cast iron batteries have a nipple that must be carefully knocked out of the battery using a chisel. This is required if you decide to clean the radiator or replace a separate section
When completely replacing the radiator, there is naturally no need to clean anything. It is enough to cut it with a grinder and take it out.
The nipple must be removed so that the thread is not damaged. It is subsequently thoroughly cleaned of rust. Next, grouping and collection of individual sections is performed. In order for the battery to have a good seal between the sections, you need to install gaskets and coat all joints with silicone. A little later, when everything is dry, the battery can be carefully washed using a hose.
Repair work
Over time, every heating device that heats an apartment requires preventive maintenance and repairs. Preventative maintenance work on equipment is carried out at the discretion of the owners, but at least once a year. Repair work is carried out when the need arises. The best time to replace outdated or faulty heating devices is during a major overhaul of the entire apartment building. In the event of an emergency, replacement is carried out immediately after the breakdown occurs.
In apartments of multi-storey buildings, it is not uncommon for there to be a need to begin performing various types of work. After assessing the condition of the heating system, you can see how much money will need to be invested and how long it will take to repair the required area. According to experts, when repairing the heating system in an apartment, the repairs should be carried out in stages.
Here is a rough plan for repairing cast iron batteries:
- Having shut off the water supply to the heating device, it is necessary to drain the coolant;
- then the radiators are removed from the brackets;
- repair of the heating riser in the apartment;
- if necessary, flush the insides of the pipes;
- if there is damage to shut-off or control valves, then repair or replace them;
- installation of heating devices. If necessary, install additional equipment;
- carry out pressure testing - test work that is carried out at the established operating pressure;
- after, the system is checked for functionality;
- The heating system is being painted.
If possible, it is better to postpone such work to the summer; this approach provides the advantage of combining it with apartment renovation work.
We recommend: How do we carry out heating repairs in a private home?
Design and principle of operation of cast iron radiators
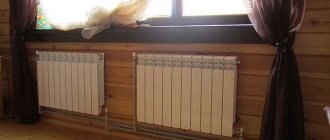
Radiators have a sectional design. In appearance, the sections resemble metal columns, inside of which there are channels for coolant. These elements are connected to each other using a nipple system. The joints are sealed with paronite or rubber gaskets. The height of the devices is 350-1500 mm, the depth reaches 65-500 mm. The power of radiators depends on the number of sections and heat transfer area. Indoors, cast iron batteries are placed under window sills. Usually wall mounts are brackets, but there are floor models with legs.
Depending on the model, cast iron radiators have a power of 100-300 W. Approximately 25-35% of heat is transferred by radiation (radiation), part by convection. Thanks to radiation, heating is better: the radiator heats objects, not just air. Warm layers of air rise upward, and radiation provides heating to the lower part of the room. This creates the most comfortable temperature conditions.
Selecting a heating device
The selection is made based on the following factors:
- number of floors and room location;
- the need for shut-off and control elements is determined;
- pipe material;
- temperature regime of the system;
- selection of installation scheme;
- heating system wiring;
- region of residence.
In addition, when choosing, you need to take into account the dimensions of the batteries. Having counted the number of sections, you can begin installing the heating device. The sales consultant, based on the size of the room, will suggest the required number of sections. However, you can perform such calculations yourself. If the apartment's ceiling height is no more than 3 m, then 1 section will heat 2 square meters. m. If during the calculations you get a non-integer number, round it up.
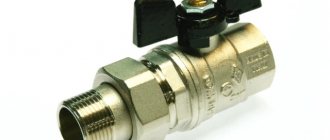
Joint repair
To carry out repairs you will need:
- special radiator key;
- gas key No. 2 or No. 3.
We will assume that the radiator has been removed. It must be laid on a flat surface. Then remove the plugs and fittings (plugs with holes for pipes) using a gas wrench.
The radiator sections are connected to each other by nipples. This is a short cast iron pipe with an external pipe thread (half right-handed, half left-handed) and an internal hole in which there are two protrusions.
These protrusions are where the edges of the radiator key will rest. Essentially, these are stops.
At this stage, you will need an assistant who will fix the heating device in a stationary position. The key is inserted into the hole of the section so that the edges of the tool rest against the protrusions of the nipple. Now you need to forcefully turn the key at least a quarter of a turn.
The thing is that long-term operation of cast iron batteries, where a high-temperature coolant is used, creates conditions under which the nipple and section of the device are soldered together. The result is a monolith.
Therefore, great efforts will have to be made to break these ties. As soon as the nipple moves a little from the dead center, move on to the second parallel element. You cannot untwist the sections on one side only, otherwise a skew will occur, which will complicate subsequent operations.
This way all sections are disassembled. Now you need to clean the joint surfaces with a wire brush and sandpaper. All you need to do is remove the rust.
Be sure to inspect the nipples; if their condition is in doubt, it is better to replace them with new ones
Focus on the thread
At this stage it is best to wash the battery sections. A hose stream and a pin (wooden or metal) will do the job perfectly.
After which you can proceed to assembly, having previously prepared the gaskets. You can make them yourself from heat-resistant paranit or rubber 1 mm thick. Currently, craftsmen suggest using silicone sealant, which can withstand high temperatures.
Reassembling the battery is carried out in the reverse order. Be careful when tightening nipples
It is important here not to twist, so as not to compress the gasket to a critical level. It just might break
As with disassembly, the two nipples must be screwed in alternately.
Situations often occur when the stops inside the nipple become covered with rust due to prolonged contact with the coolant. And under pressure from the radiator key, these stops are cut off. What to do in this case, because the sections simply cannot be untwisted. Option one is to break the section where the fistula appeared.
This can be done in two ways:
- Just break the battery section with a sledgehammer. Do this carefully so as not to break the good elements.
- You can cut it with a grinder. But the connection point will still have to be broken with a hammer.
Depressurization of the radiator wall or fin
This kind of damage brings big trouble. It is extremely difficult to fix a problem when the battery is leaking, but for a short time you can find a way out of the situation. The method is quite simple.
The small hole on the battery needs to be enlarged. Before doing this, you need to turn off the water and reduce the pressure. Using a drill, make a hole larger than it was. A wooden peg is inserted into the drilled hole. When exposed to water, it swells and stops water leakage.
You can also use a self-tapping screw with a rubber washer instead of a peg.
Of course, leaving the battery in this state for a long time is dangerous; the section must be urgently replaced with a new one.
How to assemble an aluminum radiator
We assemble in reverse order. We place the sections on a flat surface (a suitable sized table or simply place it on the floor). If the radiator is not new, unscrew the end cap and Mayevsky tap.
Before installation, you should carefully examine the threads and grooves; they must be of high quality, without chips or changes. On the mounted section for testing, we “drive” the thread by screwing in and unscrewing the nipple
Here you need to pay attention to the fact that there may be a gasket under the layer of factory paint in front of the thread. Lightly rub the end with fine sandpaper; if it is found there, it must be carefully cut off with a knife with a sharp blade.
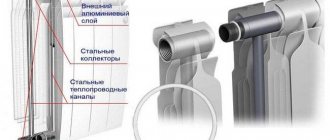
This is what an aluminum radiator looks like in cross section
Before adding sections of the heating radiator, be sure to clean the ends to a smooth surface. We even remove factory paint. It is not needed at the ends of radiators, but will only contribute to the early appearance of leaks. Sooner or later, coolant will begin to seep under the paint. In the case of non-freezing liquids, this will happen very quickly; if water is used in the system, then not very much, but it will definitely happen. And then coolant will begin to leak between the sections, although the gaskets are still in perfect condition. The whole point is that the paint on the ends has peeled off or been corroded, and microcracks have appeared. So we make sure to clean the ends to bare metal, but use fine sandpaper so that the surface of the metal is smooth and without scratches. This guarantees the operation of the system without leaks in the radiators.
For better tightness, the ends then need to be degreased (using gasoline). Gaskets are also degreased, but they need to be washed with ordinary soapy water. For a system that will be filled with water, degreasing is an optional procedure, but for systems that will run on antifreeze it is necessary. Antifreezes have high fluidity and seep into the smallest pores. After everything is dry, we begin to assemble the aluminum radiators.
Then tighten both nipple nuts half a turn. Heat-resistant paronite (silicone) gaskets are placed on top of the nipple to seal the joints. Now we take the section that needs to be screwed and place it tightly against the nuts, checking the tightness of their fit. Next, insert the key into the upper hole and tighten it 1-2 turns. At the same time, we do not use the lever yet. We twist our hands. Then we perform the same operation in the lower hole. We repeat several times, alternately tightening both nuts several turns.
We unscrew the sections gradually, one or two turns of the nut, either from below or from above.
Tighten as much as you can. Only after tightening by hand can the lever be used. This must be done in two stages on each nipple. It is better not to use excessive force when final tightening the nipples, since you can easily break the threads: aluminum is a soft metal, don’t forget.
If the section is completely assembled, screw a plug onto the unused holes on one side, and a Mayevsky valve on the other (to bleed air from the system). Now you know how to assemble sections of a heating radiator and, if necessary, you can add several sections.
How to fix a leak in a heating battery
It is important to take action immediately:
- Place a basin, jar or bowl under the place where the coolant is oozing. If water splashes, cover the leak with a blanket and redirect the liquid into a large container.
- Residents of apartment buildings need to call the dispatcher of the management company or another organization that services heating in the building. The call will be recorded in the emergency log, and a repair team will urgently go to the specified address.
- Shut off the water flow to the radiator. If a shut-off valve is installed on the battery, it is enough to close it. If there is no valve or it does not close, you need to wait until the management company employee, who has the keys to the basement, closes the riser.
- After this you can do the repairs. All batteries in apartment buildings must be repaired by the management company. This is directly stated in clause 6 of the Rules for the maintenance of common property, approved by Decree of the Government of the Russian Federation of August 13, 2006 No. 491, as amended. dated June 29, 2020. This position is confirmed in the letter of the Ministry of Regional Development of Russia dated September 4, 2007 No. 16273-SK/07, and in 2022 it was repeatedly supported by the Supreme Court.
However, management companies do not always comply with the laws, and when repairmen arrive they often simply shut down the line, leaving the owners to repair the radiators themselves. It is not always possible to quickly hire specialists, so it is advisable to have an idea of how to fix battery leaks yourself. These skills will also be useful to owners of private houses and summer cottages, who themselves monitor the condition of the heating system.
Dismantling old batteries
A key is required to assemble and disassemble the cast iron battery.
To disassemble old cast iron batteries, since the threads in them stick, they must be heated at the location of the nipple with an autogen or a blowtorch. Warming up is done in a circular motion at the location of the nipple, sequentially heating the parallel joints of the battery.
After heating the joints, while they are hot, a radiator key is inserted inside and made about half a turn, then the key is quickly moved to another nipple.
In the same way, stuck plugs and fittings are removed from cast iron batteries.
Sometimes it is impossible to unscrew the nipple because its key protrusions have been completely eaten away by corrosion. In this case, the sections at the joints are cut with a hacksaw or grinder. Then the cut nipples are turned out of the sections using the heating method. After that, the threads are cleaned with a metal brush.
If the old heating radiator cannot be untwisted using the above methods, then there is only one thing left to do - use a sledgehammer to break some of the sections. To do this, the battery is placed horizontally on the floor, and the middle part of the sections is struck with a sledgehammer until a through piece of the section breaks off. Then the battery is turned over to the other side and the other half of the section is broken.
After that, the cast-iron radiator is installed in a vertical position and blows are applied to the remaining pieces of the sections, then they are untwisted. However, when this operation is performed, the heating radiator loses its seal at other joints. And you can lose half the battery.
Dismantling and disassembling cast iron radiators is a rather difficult process, but sometimes it is necessary, so it is very useful to know how this operation is performed correctly.
Correct check of radiators before the heating season
Battery checks should be carried out in the summer. Immediately after the heating season, it is recommended to perform pressure testing. To do this, increase the hydraulic pressure in order to identify weak points. If leaks are detected, they are repaired.
Checking radiators should consist of several stages:
- Thorough external cleaning of radiators . Dirty batteries weaken the system and cause unpleasant odors. In addition, uncleaned batteries can become sources of harmful microorganisms that can bring illness into the home. When servicing equipment, detergents should be used.
- Cleaning the batteries inside . To do this, you can use dust brushes with a long handle. You can buy periscopic devices on the market to get to the most inconvenient corners. It is advisable to carry out internal cleaning at least every 5-7 years.
- Adding water . When the radiators are already clean, you can begin ventilating the heating equipment. During downtime, a large number of air pockets could appear that block water circulation. The air should be completely expelled from the system.
Poll: Do you carry out annual inspection and pressure testing of your heating system?
Battery leaks in heating systems occur quite often. You always need to be prepared for this. Scheduled maintenance of the heating system guarantees uninterrupted operation for a long time. But it’s still better to always play it safe and keep the necessary tools and supplies at home in case of breakthroughs. The equipment must be monitored at all times to avoid unpleasant consequences.
Heating radiator designs
If a heating element breaks down, especially in the cold season, it must be repaired or replaced immediately. Whether it is possible to disassemble the radiator depends on the type of its design. Quite often, non-removable types of radiators are installed in apartments, which cannot be restored. In this case, it is better to immediately purchase a new battery. But there are also collapsible models that can be dismantled to replace a damaged element and installed back.
Products are divided into two main types:
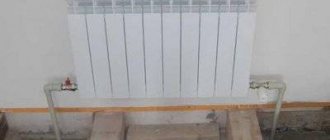
- Sectional batteries assembled from several identical sections reliably connected to each other. Each of them has a channel through which water circulates, and heat-emitting ribs warm the room. Sectional batteries are the most popular because the cost of such radiators is lower. If a breakdown occurs, it is enough to replace only the damaged section, and if necessary, you can always add or remove ribs.
Sectional heating radiators
- Monolithic products are one solid structure that does not have separate sections. In appearance, these radiators may resemble sectional counterparts, but the differences between them are obvious. Monolithic devices do not have connecting joints, due to which they are able to withstand greater pressure. Because of this, the trouble-free operation of these structures is almost twice as long as that of sectional ones. But in case of leakage, the monolithic device will have to be changed completely. In sectional products, it will be enough to replace the damaged element.
Bimetallic monolithic radiator
Bimetal battery design
The uniqueness of this type of heaters lies in their design. Combining two types of metals in one design is an opportunity to take the best from each of them, while replacing their weaknesses.
On sale are:
- Combination of stainless steel core with aluminum casing. In this case, these metals complement each other in the following:
- Steel has a thermal conductivity of only 47 W, which is quite a bit for high-quality heating of a room. Aluminum has a heat output of 190 W. Heated by the core, the casing effectively transfers heat to the room.
- Aluminum is “afraid” of water, namely high acidity, as it causes corrosion. Stainless steel is so named because it is not afraid of any coolant. The installation of steel collectors inside the aluminum body protected it from interaction with water. Thanks to this, the service life of bimetallic radiators is 20-25 years, while for models consisting exclusively of aluminum, it rarely exceeds 10 years.
- The strength of steel allows batteries of this type to withstand any water hammer, which gives consumers the opportunity to install them in houses with a centralized and unstable heating system.
Thus, the combination of two such different metals created a strong and reliable structure, although its heat transfer is slightly lower than that of its aluminum counterparts.
- The combination of a copper core with an aluminum top is a real breakthrough, since these metals cannot even be kept close together, but together they create a device with the highest heat output. The separation of copper and aluminum ensures their durability and the strength of the entire structure.
- Semi-bimetallic radiators are equipped only with vertical steel collectors, while the horizontal ones are made of aluminum. They are cheaper, but less durable, although their strength and heat transfer are high.
This is how a bimetallic heating radiator works. If such a reliable design fails, it means that errors were made during its installation.
Do-it-yourself repair of cast iron radiators
Usually the location of the leak is easily determined. If difficulties arise with diagnostics, remove the radiator, immerse it in a bath of water and monitor the appearance of air bubbles. The place from which they rise is not airtight. When the leaking area is identified, materials and tools should be prepared:
- thin metal cable;
- putty;
- a piece of fabric;
- a metal clamp or something that can replace it: electrical tape, wire, etc.
Work order
- Cover the floor with oilcloth and place a rag on top to absorb excess moisture.
- Using a thin cable, clean the leaking area of the radiator down to the metal, degrease it with any solvent or gasoline.
- Seal the leak. Apply the putty to a strip of fabric and wrap it tightly around the damaged area in several layers. If metal powder or epoxy resin is used as putty, then 2-3 layers are enough. If zinc white is 4-5. Cold welding is also used as a putty. It doesn't need fabric.
- Place a metal clamp over the putty and tighten with bolts and nuts. Make sure that the connection is on the side opposite the leak. If electrical tape is used instead of a clamp, wrap it in several layers and secure with wire.
Repairing cast iron batteries is not difficult and does not require special knowledge and skills, but if you have doubts about your abilities or the leak is really serious, it is better to contact specialists. It makes sense to replace old radiators that have leaked more than once, otherwise their repair will become a constant task during each heating season.
How to fix a leaking heating battery
There are different ways to repair defects in the radiator housing:
- powder sealant;
- a bandage made of a mixture of plaster and cement;
- cloth impregnated with waterproof glue;
- cold or conventional welding.
All these measures provide only a temporary effect. A battery that has already leaked will most likely leak again. Therefore, it is better to replace the radiator, especially if it has worked for more than a dozen years.
Hermetic seal
To repair batteries, you can use different sealants:
- liquid or gel, which are used to fill the resulting defects;
- two-component - both components are mixed and the mixture is applied to the leak site;
- cold welding - sold in tubes, in an uncured state it resembles plasticine. The leak area is covered with it in accordance with the instructions for use. The method of using the composition can be found in the attached instructions.
Special sealants are produced for the heating system, which can even be used to repair wet radiators and pipes. This is convenient because you don’t have to wait for the leak to dry out.
Before applying an airtight seal, clean the area around the defect from paint and rust. It is convenient to do this with a knife sharpening stone (sharpening stone). Degrease the surface and apply a sealing compound to it so that it completely covers the leak and protrudes slightly beyond its limits.
Wait until the adhesive, sealant, or cold weld is completely cured. Previously, it was impossible to supply water to the pipes - the liquid would destroy the seal and the radiator would again begin to leak and leak.
Repair using a clamp and gasket
This is how the pipes that go to the heating radiator are repaired. Take a rubber gasket, wrap it around the damaged area and put an aluminum clamp on top.
If you don't have a clamp and gasket, cut a patch of the required size from a bicycle tire, wrap it around the pipe and secure tightly with wire.
Bandage with cement and plaster
This method is also used to seal pipes leading to the battery. Dilute a small amount of cement with water at room temperature to obtain a mixture similar to thick sour cream. Soak a bandage in the solution and wrap the damaged area with such a bandage. The battery can be used after the solution has hardened.
To speed up the work, you can replace the cement with alabaster, diluted with water to a creamy state. Alabaster mortar sets instantly, so leaks need to be sealed quickly.
How to seal a leak with moisture-resistant heat-resistant glue
They seal leaking joints between battery sections. Take a moisture-resistant, heat-resistant glue, saturate the fabric with it, and place the patch on the defect. Wait for the glue to dry before opening the supply tap.
Battery repair by welding
The most reliable way to get rid of a leak is to weld it. To do this, you need to contact professional welders who have the tools and the necessary skills. Trying to do this yourself will end badly - the weld will quickly begin to leak and become unusable.
Preventing the problem from recurring
It is easier to prevent problems in the heating circuit than to suddenly look for ways to eliminate them. So before the start of the heating season, communications are checked by testing, especially focusing on dangerous areas.
These include:
- level spans;
- threaded connections and welds;
- zone of joining sections at radiators;
- places of implantation of heating equipment;
- near fittings;
- hard-to-reach areas.
First, everything is checked by eye, then with the circuit running.
How to solve a problem?
When water circulates under pressure in the pipes, most major repairs cannot be done. Therefore, you have to act in other available ways in order to at least temporarily stop the leak and wait for emergency services.
Using a self-tapping screw
This option is applicable only for minor holes with a diameter of no more than 3-4 mm .
To plug the hole, you need a galvanized self-tapping screw, which is additionally equipped with a press washer.
It is simply screwed into the hole and secured . As a result, the water is blocked. After such repairs, the pipe can last up to 3 years, but it is better to replace the burst fragment as soon as possible. In addition, a self-tapping screw inside the pipeline leads to clogging of the system.
Cementing
Cast iron or steel pipes can be easily patched using cementation.
The sequence of actions is as follows:
- Using a special hard metal brush, carefully remove the layer of rust in the area of the fistula. The metal that is being painted is also removed, even if this leads to an enlargement of the hole.
- Cut the bandage to a certain length and dip it in the cement solution.
- They wrap it around the crack in several passes to form a kind of cocoon.
- The top is coated with cement to secure the result.
Clamp
A clamp is a fairly simple design consisting of a metal ring, a rubber gasket and a tightening bolt.
This device is sold in stores, but in emergency situations you can quickly make it yourself. You will need a piece of plastic rubber, scissors and a metal clamp corresponding to the diameter of the pipe.
Further actions:
- clean the damaged area from rust;
- put on a clamp, and slip a rubber gasket under it;
- The coupling is pressed tightly.
If the pipe is very rusty, a clamp will be almost the only way to disguise the leak. This is because welding cannot be used here.
Bandage and table salt
Salt is ideal for sealing leaks in hot water pipes under pressure. Step-by-step instruction:
- Distribute digestive salt over the bandage in as large a layer as possible.
- Wrap it around the hole, preferably more tightly.
Sealant
Using sealant (also called “cold welding”) to eliminate leaks in existing pipelines is not productive, since there is no guarantee that the problem will be solved 100%.
This is due to the fact that such compositions are designed to work with dry surfaces , and condensate is present on pressure pipes.
But if there is a small crack, you can try to seal it with a heat-resistant sealant. Outwardly, it is similar to plasticine.
Break off a small piece, carefully crumple it with your fingers and insert it into the hole, followed by smearing it to the sides . Large holes cannot be masked this way; first you will need to insert a wooden chip.
Here you will need fiberglass fabric and BF-2 glue.
Step by step steps:
- the problem area is thoroughly cleaned of rusty particles and degreased with aviation gasoline (acetone is an alternative);
- wait 15 minutes until the surface dries;
- cut a tape from the fiberglass of such a width that it completely covers the area of the leak;
- an adhesive composition is applied along the edges, and epoxy resin is applied to the center;
- apply to the crack, press with your hand and wrap;
- fixed with copper wire.
Wire or harness
A method somewhat reminiscent of the one with a clamp . Only instead of it they take a medical tourniquet and any metal wire. Rubber is tightly wrapped around the damaged pipe fragment and tightened with wire.
Wooden chop
It is necessary to quickly plan a wedge-shaped peg of a suitable diameter from any piece of wood. Then they hammer it into the hole with a hammer.
Connection methods
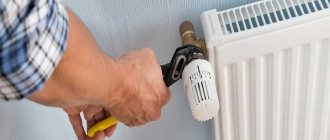
SNiP prescribes the basic rules for installing heating radiators
The ability of the radiator to withstand pressure is important. The manufacturing material should not react with the pipes that are connected to the product in order to avoid corrosion processes
The battery should be placed 10 centimeters below the protruding part of the window sill to release heat flow.
The distance between the floor and the bottom of the radiator should be more than 10 and less than 15 centimeters. This is a fundamental issue, otherwise the processes of uniform heat transfer will be disrupted. All sections must be connected evenly and have no significant differences in height.
In order for heat transfer to occur most efficiently, it is important to place the heating radiator correctly. Experts recommend placing it under the windows to minimize heat loss through these areas.
If there is an external cold wall, it is recommended to place additional devices on it.
In general, batteries in an apartment can be located in several ways:
- lateral location;
- lower;
- diagonal;
- sequential.
The most popular is the side arrangement of batteries. It is characterized by high heat transfer. The pipe through which hot water flows is inserted into the upper pipe, and the outlet comes from the lower one. In the case of bottom placement, both pipes are located at the bottom. The diagram is relevant if the pipes are located in the floor or under the baseboard.
Diagonal is used when the battery has a large number of sections, 12 or more. The coolant enters through the top pipe and exits from the bottom. Consistent is relevant when the plumbing system has sufficient pressure so that hot water passes through all radiators.
In cases where it is necessary to install an additional radiator, the coolant must first be removed from the system. After securing the brackets, the radiator is attached, the connections are secured with a special key. You need to install a Mayevsky tap on the free hole, and close all the others with a plug. Next, you should attach the battery itself and carefully align it. After this, the remaining elements are brought in and everything is connected into a single system, which must be absolutely sealed.
How does the pipeline material affect the solution to the problem?
Metal pipes are distinguished by their enviable resistance and durability. Almost their only drawback is their susceptibility to corrosion. This is often what causes a leak in the circuit.
Less commonly, other pipelines also fail: plastic, polypropylene (mainly in places of threaded or fitting connections).
It is enough to compress the plastic pipe in the problem area, and all manipulations can be carried out under water pressure. The main thing is not to overdo it with the screed, otherwise the plastic will crack, and then you will have to replace the entire pipe.
A polypropylene pipeline can be easily repaired by soldering a separate fragment; a metal-plastic pipeline requires inserts . In the latter case, if the damage is not extensive, wrapping with electrical tape or treating with an adhesive (polyurethane, epoxy) will be sufficient.