Firing ceramics is considered the most important technological process, and the most energy-intensive. Without knowing the basics of chemistry, it is quite difficult to understand what exactly happens to clay during firing. However, the theory of making ceramics is accessible to anyone, since you can use ready-made recipes without going into the details of the technology. Firing allows us to obtain ceramics in our usual form from clay through many physical and chemical transformations. The so-called sintering occurs, this is the final stage of firing.
Depending on the firing technology, different results can be obtained. The main purpose of heat treatment is to increase the strength of shards, increase their water resistance, and give the ceramics a stable shade. In more detail, for each type of ceramic, firing makes its own changes.
Scrap (ceramics produced with just one firing and characterized by the absence of decoration and glaze) must become durable, but remain porous in order to subsequently absorb the glaze. After firing, bisque porcelain will become white and silky, and the glaze will shine perfectly.
The firing parameters and its technology were obtained by trial and error. It takes a lot of practice to learn all the secrets of making ceramics. An experienced master does not act spontaneously. He intuitively assumes what properties the clay will acquire after firing.
It is noteworthy that the basics of pottery art were comprehended by people far from sciences such as physics or chemistry. Indeed, from a scientific point of view, the firing technology looks quite complicated. Clay contains many chemical compounds that undergo various changes during high-temperature processing. To understand the theory, you need to have an understanding of processes such as dehydration, phase transitions, chemical reactions, crystallization and melting, as well as dissolution.
Even today there is no single method of accurate calculations to obtain one or another result. Sometimes it takes a dozen experiments to get the desired shade or the desired physical properties. However, you can control the firing process by knowing its principles and features.
Advantages of making clay products at home
There are several advantages of making ceramics at home that determine the popularity of this craft:
- It's cheaper in the long run because you don't need to rent a studio.
- All supplies of materials are always at hand.
- This saves time, no need to travel anywhere.
- Minimal investment required.
- Allows you to do this in the comfort of your home.
There are also a few disadvantages to doing this at home:
- You won't have a teacher to help you.
- You have to study everything yourself.
- You may not have the super professional tools that studios have.
- You may be limited in the items you want to make.
If you're just learning how to make ceramics, the first thing you need to do is work on your technique, and doing this at home is a good way to create a comfortable space and learn the basics of the craft. But if you don't have a home studio, then it's also worth trying to work in a specialized studio, especially if you don't have your own materials. This will allow you to quickly learn the basics of the technique and see if you can create a more comfortable environment for making clay products in your home.
How to choose clay for ceramics?
One detail you'll want to get right is the types of clay. If you were working in a studio we would say just use regular clay that is used for firing depending on the temperature of your kiln, you can even work with porcelain.
Clay and ceramics are different materials that are widely used in pottery making. However, the main difference between these two materials is that clay is a natural material that is naturally mined. On the other hand, ceramics are different groups of substances that are added to clay to harden it when heated.
Because ceramics contain metal oxides, when heated they change the molecular structure of the clay. Therefore, all clays can be considered ceramics, but not all ceramics are considered clay. While there are different types of ceramic clays, the main types used in pottery are porcelain, pottery clay and stone clay.
potting clay
Pot clay has a low firing temperature and consists of fine-grained particles. Products made from such clay can last for years. This type of clay is easy to work with, it is sticky and very malleable in nature. Fired at 1100°C. The result is a hard but brittle material with a porous structure. To make the piece non-porous, a glaze is applied to the ceramic and then fired a second time.
Porcelain
China clay is a fine-grained white clay used to make ceramics. It is very durable and produces a white color due to higher levels of kaolin concentration. Porcelain can be fired at very high temperatures - from 1200 to 1450°C. The result is very hard, white, translucent, shiny products.
Stone clay
The color of such ceramics varies from dark brown to buff. The difference in color is due to impurities and iron content in the clay. Rock clay has coarse particles that are fired at 1200°C. The result is a denser, more durable material that is inherently waterproof. This clay does not require the application of glaze. Although these are the best ceramic clays that are used for pottery, if you are a beginner and just looking into pottery, you can start with self-setting clay . It is very plastic, which allows you to create a wide variety of pottery products. You can read more about materials for ceramics in our separate article.
During firing, all the major changes occur in the clay and glaze, after which what we call ceramics is formed. Firing is a technological process, the parameters of which have been determined by practical tests, and it must be carried out in the manner required by the fired products. It's intuitively clear what we want to take out of the oven. The scrap is expected to have ringing strength and some porosity so that it absorbs the glaze. Biscuit porcelain gives a pleasant silkiness and whiteness. Shiny glazes should have a good shine, while matte glazes should be truly matte. Nobody wants crooked and crackling glaze stuck to the shelf, and all kinds of bubbles and pinholes.
It is more difficult to formulate this understanding in the language of numbers. During heating, many of the chemical compounds that make up our raw product undergo major changes. Dehydration, phase transformations, chemical interactions, dissolution and crystallization - this is an incomplete list. There is still no complete theoretical model by which the result could be predicted in advance, and if it existed, we would need a month of research into the composition of clay and glaze to give an accurate calculation task. We are left to carry out experiment after experiment, finding out what is important and what is not, what the temperature should be, whether exposure is needed, and why everything was fine there and then, but here and now it is a complete disgrace.
But we want to obtain the intended effects and planned properties of the products, and for this we need to be able to control and manage the firing parameters, knowing the basic, most general principles.
Now specifically about these principles.
1. Types of firing, why they are needed and what needs to be controlled first of all.
2. Electric ovens and a few words about others.
Types of firing, why they are needed and what needs to be controlled first of all.
- We will conditionally divide all materials into 4 groups:
- — Porcelain is a lot smoother; when heated, a lot of liquid phase is formed in the shard. We also include stone masses here.
- - Earthenware - there is almost no liquid phase. By the way, no one produces earthenware in its previously classic version...
- — Majolica — here we will call products made from red clay, including pottery, terracotta, etc.
- — Chamotte — according to its chemical composition — any of the above materials. It differs from them in that it contains grains of already fired material bound by plastic clay.
For each group of materials, we will conditionally highlight some points that unite them.
Porcelain firing pattern.
First, the first, waste, firing is carried out. That is, dried products are fired without glaze. The temperature is chosen in the range 800 - 1000°C. After the first firing, the products acquire strength sufficient even for machine glazing (on a conveyor line). The products remain porous, but if there are cracks, they can be easily identified (by characteristic rattling) by tapping with a wooden stick. When glazing, there is no need to stand on ceremony with the product as is the case with raw materials (one-time firing). You can easily glaze products by dipping, even if they are meters in size. Products after this firing are called scrap.
Then a second firing is carried out. Before glazing and, accordingly, before the second, poured, firing, an underglaze painting is applied to the product. Technological pedants then also carry out an intermediate fixative firing so that the paints are not washed off when dipped into the glaze. Watered firing, i.e. The firing of a semi-fired glazed product is carried out at the ripening temperature of the shard. These are different temperatures for different types of porcelain (and we also included stone masses here). Real porcelain requires 1380 - 1420°C, ordinary table porcelain - 1300 - 1380°C, sanitary porcelain - 1250 - 1280°C, and stone masses - depending on what is used as flux. The second firing finally forms the structure of the ceramic and, thus, determines all its physical and chemical properties. Products after this firing (if it is not painted) are called linen.
It is very pleasant to drink tea from white porcelain cups in the countryside. Traditions dictate a different look for porcelain: with floral painting, a picture, a gold or blue border. Porcelain receives decorations in the third, decorating, firing. Conventional overglaze paints are burned at 800 - 830°C, luster paints and gold preparations - at the same or slightly lower temperature. Nowadays high-temperature decorative firing at 1000 - 1100°C has also become widespread. Painting for it is carried out with high-fire paints (intraglaze paints) or fusible colored glazes. Sometimes, to obtain bright colors, two or more decorative firings are carried out. All of them, from a classification point of view, are third. Products after the third firing are named at the enterprise’s Art Council.
Faience firing scheme
The first firing of faience is high. There are practically no fluxes in earthenware masses, therefore, during firing, a minimal amount of liquid phase is formed, or not at all, and the clays included in its composition have high refractoriness. This makes it possible to fire earthenware products immediately at the temperatures required for the shard to mature. As a rule, this is 1200-1250°C. Unlike porcelain, the shard will remain porous and can easily be coated with a layer of glaze.
And the second firing, poured, can be carried out at any temperature! That is, at the temperature required for normal spreading of the glaze: 1150 - 1250°C, if these are “faience” glazes, 900 – 1000°C, if these are lead majolica; You can apply white enamel and use the technique of painting on raw enamel. In all cases, if the glazes are chosen correctly, we will receive a product with the same strength as it was after the first firing.
The third, decorating, firing is carried out in the same way as in the porcelain scheme. If it is needed. After all, compared to porcelain, the low temperature of poured firing allows the use of glazes and paints of a wide range of colors.
Firing majolica
Red-burning clays with low refractoriness are used here. Over-burning can lead to their swelling and severe deformation. Red clays also have a narrow firing interval. For example, at 950°C it is still fragile, friable, and at 1050°C it is a densely sintered, glassy body. Of course, there are exceptions, but there and then. In principle, majolica is characterized by low firing temperatures - 900 - 1100oC. And it is precisely at approximately these temperatures that the processes of decomposition of clay materials are completed, which (the processes) are accompanied by the release of gaseous substances. This makes the so-called single firing - both the shard and the glaze - at one time extremely difficult. If you refer to the table below, it will be clear how close the firing temperatures of majolica are to the critical temperatures for ceramics. The most common technology is the first, waste, and the second, poured, firing.
The first firing mode is chosen such that all processes of transformation of clay minerals take place to the maximum extent. The incompleteness of these processes will certainly affect the quality of the glaze surface after the second firing. The temperature of waste firing can be either higher or lower than the temperature of poured firing. Usually lower, somewhere around 900 - 950°C.
The second firing mode is selected based on the characteristics of the glaze, but, of course, the temperature at which the shard begins to deform cannot be exceeded.
Fireclay firing
The main difference between fireclay masses and the above is the presence in the mass of a rigid frame made of dense grains that have already undergone appropriate firing. The grain size can vary from 100 microns to several millimeters, which is determined more by the requirements of the texture of the material rather than by the requirements of the technology. The rigid frame prevents shrinkage of the mass during the firing process. (By the way, during drying, the shrinkage of fireclay masses is not much less than that of thin plastic masses). This allows firing to be carried out at slightly higher temperatures without fear of serious deformation of the product. Often the grain material has a different composition than the plastic component of the mass. If the refractoriness of the grains is higher, the firing temperature can be increased significantly.
But in general, the fireclay firing scheme is the same as for other types of masses: first, waste, then (if necessary) poured, then (if necessary) decorative firing.
Single firing
Single firing is when a glaze is applied to a dried product and everything is fired in one step, combining waste and water firing. This is the dream of any production economist:
- energy is spent on heating only once;
- placing products in the oven and removing them is done once;
- no intermediate waste storage required;
- The cycle from raw material to finished product is halved, i.e. lower relative costs for renting space and wages due to increased productivity.
In principle, apart from very low-temperature decorative firing, any material can be fired once.
- But:
- you have to apply both the underglaze design and the glaze itself on a simply dried product, which, of course, does not have the strength of scrap;
- because of this, machine processing is excluded, and everything must be done with your hands very carefully so as not to break anything;
- glazing by dipping - the most economical in terms of glaze consumption - can be carried out only for small products, taking a long pause between glazing inside and outside;
- there is no scrap, no intermediate quality control (ovality, thin edge cracks, etc.), i.e. a higher percentage of defects is planned in advance
- Glazes must be specified for single firing.
How can we determine whether we need single or double firing? The decisive criterion for an artist or an art studio is the final result - that is, the implementation of the artistic concept. For workshops that produce more or less serial products, and for ceramic factories, economic considerations may be decisive. Here's what to keep in mind.
- For porcelain:
- Energy consumption for low-utility firing is significantly lower than the cost of high-firing. For the first, temperatures of about 900°C, an air oxidizing environment, and an electric furnace with a weak lining are sufficient. For the second - a well-lined and preferably fiery furnace. Is it worth saving on scrap?
- Porcelain glazes begin to melt at a temperature close to the maturation temperature of the porcelain shard. In the temperature range where the decomposition processes of clay minerals occur, the glaze layer resembles powder, and gases easily pass through it. Thus, there is no need to worry about glaze defects arising due to the gas impermeability of the melt. Is it worth doing waste firing?
- Porcelain masses are skinny masses that get wet quickly. Glazing raw material requires skill. Scrap needed!
- Many large products, such as tiles, often need to be spray-glazed. And when firing onto a biscuit, there is no need to glaze at all. Then why do you need scrap?!
- For earthenware:
- Recycling firing (remember, it is carried out at a high temperature) is necessary if we are going to use low-melting glazes. Otherwise, in a single firing we will not get faience, but something unfired, reminiscent of papier-mâché.
- Waste firing is not necessary if we use high-temperature glazes, which, like porcelain, begin to melt above 1100°C. In this case, they are usually applied by spraying with compressed air.
- For majolica this is the most difficult case.
- Scrap is almost always needed, and at the highest possible temperature. Many technologists of the Western school recommend firing majolica almost to a glassy state in order to burn out all the impurities and decompose everything that can decompose in the waste firing. The question is, how to glaze it later? Can. Read about this in the section on glazes.
- If you use engobes or something like terra sigilate as a coating, or if you have special glazes with a very short melting interval, you can do without scrap.
For all materials, a single firing is possible subject to carefully adjusted technology, which in the case of ceramics, two-thirds consists of the experience of the workers.
It seems that in our presentation of the problems of firing everything is already so confused that another layout is required.
What happens during the heating and cooling process.
| Interval,C | Process |
| 20 — 100 | Removing moisture from the mass. You need to heat it slowly and, most importantly, evenly. The thicker the walls of the product, the slower the heating. |
| 100 — 200 | Removing moisture from the mass continues! If the instruments show 150°C, this does not mean that the product has heated up to that temperature, especially if it is thick, especially on a thick stand. The glaze coating undergoes shrinkage. Water vapor released from the volume of the product can lead to cracking and flying off of the coating. Volatile organic compounds are released from chandelier coatings. Don't force the heat! |
| 200 — 400 | Burnout of organic substances. If for some reason there are a lot of them, good air flow should be ensured (decals, chandeliers, binders of overglaze paints and mastics). |
| 550 — 600 | Serious phase transformation of quartz. It rarely appears at the heating stage, but at the cooling stage it can lead to the so-called. "cold" cod. |
| 400 — 900 | Decomposition of clay minerals. Chemically bound water is released. Nitrate and chloride salts (if used) decompose. |
| 600 — 800 | The beginning of melting of lead and other low-melting fluxes and overglaze paints. At 750 - 800°C in the third decorative firing, the surface of the glaze is softened and paints, gold, etc. are baked in. Burnout of sulfides. |
| 850 — 950 | Decomposition of chalk, dolomite. The beginning of the interaction of calcium and magnesium carbonates with silica. These processes are accompanied by the release of carbon dioxide. In general, all transformations of clay substances are completed. Their smallest particles have already sintered and provided noticeable strength to the shard. By the end of the interval, the majolica glazes are completely melted. |
| 1000 -1100 | The intense interaction of lime and silica is accompanied by the appearance of a liquid phase (for example, in limestone faience), compaction and deformation of the shard. Beginning of softening of feldspars. Melting of nepheline-syenite. Intensive decomposition of sulfates, which is accompanied by the release of sulfur dioxide. |
| 1200 -1250 | Sintering interval for white-burning clays and earthenware mass. Dissolution of silica and kaolinite in melted feldspar. |
| 1280 — 1350 | The process of mullite formation. Mullite needles penetrate the porcelain mass, which will further provide it with high strength and heat resistance. Transformation of fine quartz into cristobalite. |
| 1200 — 1420 | This temperature range is typical for porcelain. Here, the processes of reduction of red iron oxides into more noble blue ones occur, if appropriate redox firing conditions are provided. Temperatures are high, viscosities are moderate, diffusion occurs very quickly: for example, underglaze painting loses its clear outlines. |
| 1420 — 1000 | Nothing special happens during the cooling process. Both the glaze and the mass are in a fairly plastic state, so they can be cooled as quickly as the oven allows. If glazes that are prone to crystallization are used, slow cooling or holding for 1-10 hours in this range will cause crystal growth. |
| 1000 — 700 | The oxidation of lower oxides of copper, manganese and other metals (if used) into higher ones begins. A lack of oxygen in the furnace space can result in a metallized surface. If restoration is required, now is the time for it. The reducing environment should be maintained close to room temperature, at least 250-300°C. |
| 900 — 750 | Both the shard and the glaze become brittle and then cool as a single solid body. If the CTRs are not agreed upon, a click or rebound of the glaze and even destruction of the product is possible. |
| 600 — 550 | Reverse phase transformation of quartz with a sharp volume change. Passing this interval at high speed can cause a “cold” crackling noise. |
| 300 — 200 | Phase transformation of cristoballite. It was formed if the mass contained very finely dispersed silica at 1250 - 1300°C. Do not rush to open the oven door. |
| 250 — 100 | Cooling continues! In the depths of the bet, in the thick parts of the products, the temperature is much higher than in the thin edges and than indicated by a thermocouple. Allow the items to cool evenly. |
The table describes the main processes. Therefore, now we will once again briefly indicate what is most important in firing.
- 01 First firing. We put the raw material in the oven. There is a lot of water in it, even if it looks dry. We heat up to 200 - 300°C slowly, for example in 2 - 3 hours. We provide good ventilation so that all impurities burn out. Final temperature - 900 - 1000°C. If you are not sure about the temperature, hold it for 1 - 3 hours, allowing the entire cage to warm up evenly. We carry out cooling at the same speed as the furnace cools down. We carry out forced cooling only after several experiments - there will be no cracking of glazes, since there are no glazes, but cold crackling due to quartz may occur.
- 02 Firing with glaze after scrap. We place the glazed products in the oven. The shard has already been fired for scrap, so the speed in the initial heating phase may be higher; The main thing is to dry the glaze well. Heating to the final temperature is carried out as quickly as the oven and, most importantly, the rate of heating of the products allows. At the final temperature, we hold it for 15 minutes to 1-2 hours in order to heat it evenly. If the rate of temperature rise at the end of heating is low (50°C per hour or less), we consider that the exposure has already taken place. It is better, of course, to use Seger cones here. “Shelves” (holding at a constant temperature) during the cooling stage - only for crystalline glazes and some matte ones. The rest is as in point 1.
- 03 Single firing with glaze. We take into account everything in clause 1 and clause 2. We do not force the temperature rise in the range of 500 - 900°C - all gases must be removed from the shard before the glaze begins to melt!
- 04 Firing of decals, luster paints, overglaze paints. We raise the temperature very slowly (over 2 - 4 hours) to 400°C - all organic matter must be burned. In this case, the environment should be oxidizing (air), and ventilation should be intensive. From 400 to 800°C - as fast as you like. Exposure 5 - 15 minutes.
Read below about the firing conditions dictated by the kiln.
Electric ovens and a few words about others.
Ceramics are fired in a variety of heating units called kilns. If the heat of an electric current is used for heating, the furnaces are called electric, if the heat from the combustion of organic fuel is called fuel, and usually more specifically: gas, wood, fuel oil, etc. Over thousands of years of ceramic firing, many designs of fuel furnaces have been invented, and over the last hundred years, no fewer designs of electric furnaces have been invented.
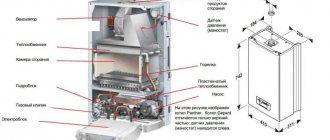
- Regardless of the type and design, the furnace contains:
- free space for placing products, for short - chamber;
- fire-resistant and heat-insulating shell, for short - lining;
- heat source - heater, burner, etc.
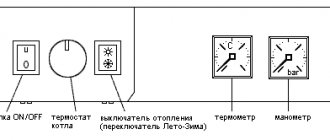
- a device for monitoring and regulating the degree of heating - a regulator.
Each stove can be classified according to the characteristics of the listed attributes. If you need to order a stove, be sure to indicate these features.
The volume of the chamber determines the productivity of the kiln in one firing in a batch kiln or per cycle of pushing one trolley in a tunnel kiln. In the future we will only talk about batch furnaces. The volume of the chamber can be 1 - 2 liters; Such small kilns are convenient for test firings and for making small items such as ceramic jewelry. The volume of furnace chambers, usually used in workshops and studios, ranges from 50 - 100 liters to 1 - 1.5 cubic meters. m. For factory conditions, ovens with a volume of 3 to 20 cubic meters are typical. m.
The lining and heater determine the maximum temperature that can be reached in the chamber. The higher the temperature required, the higher class the refractories must be, which, we note, immediately and sharply affects the cost of the furnace. Sometimes the chamber is separated from the heater by an additional lining called a muffle. (You shouldn’t call all small furnaces muffles!)
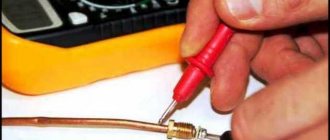
The regulator contains a device for measuring temperature, which is usually a thermocouple, a device for regulating the power of the heater and a control device that coordinates the action of the first two.
Below are some oven configurations.
Bonfire
| PARAMETER | MEANING |
| Camera | 10 - 100 liters |
| Lining | layer of earth |
| Thermal insulation | layer of earth |
| Heater | the warmth of burning wood |
| Thermometer | by eye by glow |
| Power regulator | throwing firewood |
| Control | own experience |
Electric furnace 200.1250.L (Termokeramika LLC), option
| 200 liters | |
| Lining | fireclay-fiber board ShVP-350 |
| Thermal insulation | ShVP-350, ShL-0.4 |
| Heater | electric, wire spirals Х23У5Т |
| Thermometer | platinum-platinumrhodium thermocouple Chamber of Commerce and Industry |
| Power regulator | thyristor block |
| Control | Software, KTP programmer |
Such different thermal devices are given here in order to gain a deeper understanding of the functions of the furnace elements.
The chamber is a workspace where products and shelves with stands are placed; from the total volume “from wall to wall” you need to subtract the volume required for heaters. And the calculation of the useful load of the chamber must be made taking into account the thickness of the shelves.
Example. The usable width, depth and height of the chamber is 40 cm. There is a fireproof plate 39x39 cm, 2 cm thick and four 7x7 cm racks, 18 cm high. How many pots with a diameter of 18 cm and a height of 16 cm can be placed in the oven? Answer: if without a shelf - 4 pcs., and if with a shelf - 6 pcs. (not 8; see picture).
Continuing with the example, let’s ask ourselves the question: what is actually more profitable - firing 4 pots at a time or 6? The answer lies in the analysis of the amount of heat required to heat the additional mass of the ammunition. If the pot weighs 300 grams, and the stove and stands weigh 5 kilograms... That is. Almost all the heat will be used to heat the fire supply! And the oven will take longer to cool down. It may happen that during the firing of six pots, two firings of 4 pots each can be carried out.
In fact, it is not only the pots and fire supplies that heat up, but also the walls of the oven. In a fire it is a solid mass of earth. It is difficult to warm it up, and it is also difficult to cool it down. A modern furnace must contain refractories with low heat capacity, low thermal conductivity and high refractoriness. The vacuum-formed fibrous material ShVP-350 is well suited for the construction of furnaces with an operating temperature of 1200°C. If the entire furnace is made of heavy fireclay bricks, it will require enormous heating and cooling time, and, accordingly, energy consumption. Such a heavy “lifting” stove will not allow you to implement high-speed heating modes if you need them for something. However, you can increase the power of the heaters.
Electric heaters come in wire and ceramic types. The wire is made from nichrome (expensive, maximum temperature is 1100°C, but remains flexible after work) or from iron alloys. The latter are often called “fechral”, and imported analogues are called “kanthal”; domestic brands have the exact name - X23YU5T or X27YU5T. Fechral operates up to 1200 - 1350°C depending on the wire diameter. After the first heating, it becomes irreversibly brittle; a heater that has burned out in one place cannot be repaired by twisting!
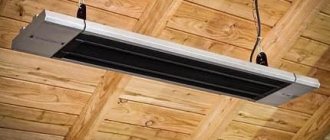
Ceramic heaters include silicon carbide, also known as silit, or carborundum rods: operating temperature up to 1400°C. In the last 10 years, expensive lanthanum chromite heaters with an operating temperature of up to 1700°C have been persistently advertised, which have a very long service life at the same 1300-1400°C (if they don’t break when you install a heavy stove :-)). Read elsewhere about how to calculate electric heaters. Here we recommend seeking help from specialized companies.
If heating is carried out by gas burners, any temperature up to 1700°C can be reached in the furnace space, and if oxygen-enriched air is used, up to 2000°C. Gas (and other fuel) furnaces are good because they allow firing not only in an oxidizing, but also in a neutral and reducing environment. The degree of “recovery” is regulated by changing the gas/air ratio; in modern gas furnaces this is done automatically. Wood-burning stoves, unfortunately, are more difficult to automate, but they are easy to manufacture, cheap to operate, do not require approval from the gas inspectorate, and easily produce 1200°C.
The more powerful the heaters, the faster heating they can provide. And the more careful you need to work with them. Imagine what will happen in the first five minutes to the pots if one side of them is facing an instantly hot wall with heaters, and the other is facing a cold neighboring pot. The easiest way to achieve smooth heating (or rather, uniform throughout the entire chamber) is to use thyristor power units. The output power in them is regulated according to the principle “more current” - “less current”, and not according to the principle “on” - “off”. If you have only the last control method at your disposal, then set low temperatures at the first stage (first 100°C, after half an hour - 200°C, after an hour - 300°C, and only then - the final temperature). And if there is no control device in the oven at all, do not leave it and flip the switch every five minutes (This is not a joke!)
While naming different temperatures, we still haven’t specified what we are talking about—the temperature on the heater? on the product? on a thermocouple? If a thermocouple is installed in the furnace, then the device connected to it will naturally indicate the temperature of the tip of the thermocouple. For various reasons, about which volumes of scientific literature have been written, this temperature only approximately reflects the thermal situation in the furnace. During the heating process, heaters are always hotter and products are always cooler than a thermocouple. The thermocouple shows the temperature at some point in the chamber, but what is happening in other places is unknown. Nevertheless, the thermocouple produces an electrical signal that is understandable to electronic devices, including automatic power control. From this point of view, she is irreplaceable. Long-term practice of operating a furnace provides information about where in the chamber it is hotter and where it is colder. Sooner or later we get used to the habits of this device. But for a long time (since the end of the 19th century), another method has been known to determine the moment of reaching the required firing point. This is Seger cone firing.
Firing is considered completed on a given cone if the cone, deforming during the firing process, touches the stand on which it is installed. The cone is made of masses whose behavior is similar to that of the material being fired. If in practice it is found that the best result is achieved when firing on a cone, say, 114, then all firing should be carried out on this cone, without paying special attention to the readings of the thermocouple. And no thermocouple is needed! The use of cones is extremely common in artistic ceramics in the West. And this is no coincidence...
How to choose clay for working at home?
1. However, at home, things may be a little different. You choose from three different types of clay :
- Fired in a kiln.
- Polymer.
- Air dried.
2. Each of them has its own pros and cons . Fired has several advantages and disadvantages that you need to consider:
- Typically withstands higher temperatures.
- Better for ceramics used in consumption.
- Typically more durable.
- The biggest drawback is that it is more difficult to work with.
3. Air-dried clay also has its advantages and disadvantages , namely:
- You don't need a stove or heat source.
- As a rule, you can create most products from it.
- The downside is that it is usually not as durable as kiln fired.
- Takes forever to dry.
This option is generally less similar to the actual pottery making process, but it is sometimes used when you just want to make something the simplest way possible.
4. Finally, there is polymer clay , which has advantages and disadvantages similar to the second option:
- This is a great clay for beginners.
- Allows you to work with the form.
- As a rule, durable, but not as much as fireable.
- Not the most pliable compared to the other two.
- Typically used for molding and nothing more.
The ideal situation would be if you had a kiln and clay specialized for it, but if you are on a budget and don't want to invest a lot of money in expensive equipment just yet, then these are your options.
DIY construction process
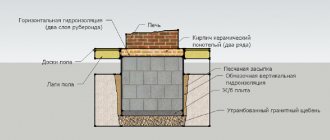
Following pottery traditions, craftsmen continue to make kilns for firing with their own hands. So, a do-it-yourself dome stove is often found in workshops and other other options. First of all, it is necessary to prepare the body of the future device. Even a washing machine can act as it; it would be better to say its body. You can also make the body yourself from a galvanized sheet. In this case, you should adhere to the following dimensions: width – 50 cm, length – 50 cm, height – slightly less than 100 cm.
Next, you need to strengthen the bottom of the box using a corner or pipes that are welded around the perimeter of the base and through the center. It is recommended to make the legs using the same pipes. In addition, it would not hurt to strengthen the edge with hinges for the door and the door itself.
The bottom and walls are covered with 10 mm thick basalt wool; to preserve it, it is necessary to lay out several pieces of square pipe and cover everything with a metal sheet. Do not be afraid that the appearance of the pottery stove does not resemble the beautiful Duo fireplace stove, because they have completely different functions. Fiber boards and fireclay bricks can be used as refractory materials. The sealant for fireplaces and stoves in the case of fireclay bricks will be represented by a special mixture.
Tightly joined bricks serve as masonry; they can be cut to the required size. First of all, the bottom of the body is laid out, the fireproof mixture is diluted with water, and cement is also added for the outer layer. Bricks must be soaked in water before laying begins. Next, the masonry is spread onto the walls and ceiling. Moving to the top, it is necessary to equip the middle with blocks laid out in a trapezoidal shape. Do not forget that the door must also be lined with brick. After this, the door is welded to fit.
Next comes the labor-intensive process of installing electric heating coils. Grooves are formed for the spirals along the entire perimeter, and the depth of the grooves must correspond to the diameter of the wire. Here you can choose nichrome wire or ready-made spirals from it. Do not allow the coils of the spirals to touch each other under any circumstances.
After laying the spirals, its ends must be brought up, then install the ceramic plate from the electric stove and secure the ends with bolts. Next, a spiral switch with two contacts on one side and three on the other is installed, and the wires are connected. The pottery kiln is ready, it needs to be dried and tiles laid for stoves and fireplaces
It is important to remember that this stove is dangerous and you must always be on guard when using it.
Firing ceramics at home
Oven firing is an option if you are working with fire clay. But, if you're willing to spend a little more money, you can buy an inexpensive stove.
Benefits of oven roasting:
- It's cheap because you already have it.
- Usually allows you to create decent ceramics.
- The resulting products are quite durable.
But if you want to take the process more seriously , then you need an oven , because your home oven will not give the desired temperature. It has many advantages over the oven:
- Your products can be more varied.
- You will be able to create the right atmosphere for work.
- You will be able to work with a wider variety of glazes and clays.
- The process is easier to manage because it is slower.
- Allows the use of high-temperature (bisque) firing, which makes the ceramic stronger.
An oven is a good place to start if you're going to learn how to do this at home. But we advise you, once you have learned a little, consider buying a kiln or firing at a studio near you.
Scrap firing
Waste firing is a certain first stage of hardening a ceramic workpiece, during which the product becomes the most durable. Without it, the item will not meet the declared properties.
Firing pottery is different from firing clay. This occurs due to the derivative composition of the mixtures and the density of the working material. The temperature and time required for firing ceramics is lower than for firing clay. This is an interval from 600 to 650 degrees. Hardening occurs already at these temperatures.
How to make ceramics at home
How to work with ceramics in such a limited space? It's actually quite simple, and we'll talk about how you can use different techniques depending on the environment you're working in.
First let's talk about creating a clay mold , for this we'll start with the following:
- Take clay and roll it out.
- Cut to desired length and width.
- If using sculpting, roll the clay into a ball shape.
- Select a technique for further work.
If you create ceramics without a potter's wheel, then it is hand sculpted. Hand sculpting is, in our opinion, the best way to make ceramics because it is simple and requires fewer materials.
Let's look at three hand sculpting techniques :
- Modeling from clay plates.
- Spiral molding.
- Modeling from a whole piece of clay.
You can start by sculpting with clay plates . For this:
- Roll out the clay.
- Cut it to your desired length/width/height.
- Set aside and repeat.
- Once all the pieces are cut out, work on the joints by smearing them with liquid clay and then joining the pieces together.
- Smooth out the joints.
- Repeat these steps on each side.
For spiral strand molding, you do something similar at the beginning, but the process involves a lot more detail:
- Roll out the cylinder of clay so that it has the desired thickness and consistency.
- Place it around the bottom plate.
- When you get to the end, cut off the excess and then press the ends together.
- Smooth each ring as needed to even out the sides.
- Make sure everything is straight and there are no two joints ending at the same point because this will create holes.
When it comes to pottery, ring molding is handy for making bowls, cups and the like, and if you're working with fire clay, it's a great option because it's easy to work with and you can do so much.
And finally, sculpting from a whole piece of clay , which is perhaps the easiest for a beginner, but the products may turn out more uneven compared to other types of sculpting.
- Make a ball of clay.
- Pressing from the center, reach the bottom of the ball.
- Continue extruding from the bottom to the desired width and height of the bowl being made.
- Make all the walls as even as possible.
All of this can be done at home using your own simple materials, so you end up with a stunning product that you can already use.
Using a pottery wheel at home
You can use a potter's wheel, although we don't recommend starting with that. Here are some tips to help you master the potter's wheel:
- First, you need a pottery wheel that can hold at least a kilogram of clay.
- You may want to consider an electric pottery wheel as it is easier to use.
- Make sure you know how to use the clay you are working with, how to keep it moist, how to dry it, and how to fire it.
- Knead and roll the clay into a rope to prepare the workpiece.
- Remove any air bubbles to prevent oven cracking.
- Stick the resulting lump of clay onto the circle and center it.
- Wet your hands and keep them damp so they glide across the clay.
- Start the wheel, increase the speed and pull the clay up, smoothing the sides.
- Grab the clay with your hands and push it out from the center.
- Knead the bottom and pull out the clay to get the desired shape.
- Keep the walls as level as possible.
Ultimately, that's all you need to do to form a clay product on a potter's wheel.
Is it possible to add decoration to clay products?
Yes, you can! There are several ways to decorate clay products:
- Stamps with counter-relief. They can be found in specialized stores. Use them on slightly damp clay to make markings that are great for patterns or even "signatures".
- Tools: Forks, knives, needles, combs or the like can create amazing designs and textures that your pottery will benefit from.
- Imprints: leaves, stones, branches or similar. Press them gently into the clay to create an impression before firing or drying the piece.
The decoration really looks good, and unless you are creating pottery that requires glazing, these little decorations will make your pottery even more attractive.
How to dry clay?
Unless you are working with a kiln, you are most likely going to air dry your clay or bake it in the oven. There are several ways for each of them.
For baking in the oven:
- Preheat oven to desired temperature.
- Place the clay piece there on a tray.
- Bake for the required amount of time.
- Check the hardness of the product.
It's simple, but again, the heat isn't high enough for porcelain or earthenware.
For air drying:
- Place the product in a safe place.
- Wait. This may take up to 24 hours.
- Check the product for hardness and give it more time if necessary.
- If you're air drying, use fine-grit sandpaper to remove any minor imperfections before moving on to painting.
Drying pottery takes time, but proper drying techniques can help you avoid mishaps.
Painting clay products
You can paint the clay with acrylic or latex paint if it is allowed to air dry. It is important that you follow certain rules here too.
Some painting tips:
- Make sure that if you are firing clay, the paint is suitable for kiln use.
- Some paints do not require firing, which can sometimes be a convenient option.
- Choose a paint that matches the required temperature, as air-dried clay cannot be fired.
- Apply paint with brushes, sponges or other methods.
- Allow the paint to dry according to the paint instructions.
- If you are going to kiln cookware for food and liquids, use paint and sealant first, and then start firing after drying.
- If you are using a kiln, also use glaze to fully seal the paint.
Painting will add a unique touch to your artwork, and while it may not be necessary at first, you can really benefit from it if you have some interesting painting ideas. Some also prefer to paint the products after baking in the oven, you decide for yourself what you like best.
Pottery kiln manufacturing technology
“Factory” furnaces, especially those for professional purposes, are very expensive (over 35,000 rubles), but craftsmen have learned to make firing devices with their own hands. It is worth noting that, depending on the type of fuel used, such stoves can be:
We will consider only the first two, since it will be quite difficult to achieve the required temperature by burning wood. Let's start with electrical equipment. According to the method of location, these firing furnaces can be:
- muffle (in which the heating elements are located around a sealed vessel (muffle) made of fireclay material; Russian schools are often heated with the help of such stoves);
- chamber (the heating device is located inside).
The second option is more suitable for home production, since it is quite difficult to build a large muffle on your own, and the heat loss of the muffle structure is high. Let's look at how to make a chamber furnace.
Precautions when working with clay
Remember to take some precautions :
- Study the instructions for materials and equipment.
- Remember that the oven you are using is hot and you need to be careful with it.
- Be careful when shaping the clay to avoid injuring yourself.
- Learn what chemicals are in everything you handle.
Many people get great pleasure from making ceramics at home, and in this article we tried to tell you how to do it. If you want to get into pottery and are worried about whether what you do will make the right impression on someone, then just don't think about it. Improve your technique and always create to the maximum of your capabilities, and you will end up with unique clay products that will create coziness and comfort in your home, add color and festivity to your everyday home environment, and emphasize your individuality.
Furnace structure
The final stage of creating a ceramic product is firing it. In this case, pottery kilns are indispensable devices. Before you start building your own, or purchase a ready-made one, you need to understand the design of this invention. It has a very simple structure:
- Thermally insulated firing chamber made of refractory material
Gas burner, or heating device
Loading and unloading device
Regulating devices
A serious approach to the selection of equipment will ensure the production of quality products. Moreover, not only the design is important, but also the accompanying materials, be it a mixture for fireplaces and stoves, solutions and other means. All modern furnace equipment is equipped with a software system, thanks to which the heating or firing furnace has convenient control. With the help of this system, the execution of work can be regulated by dozens of specially established modes, in which it is possible to fire a wide variety of materials and objects.
Today, the production of bricks and other clay-based materials is a very profitable business. Large enterprises use large-format industrial ovens available in a wide range of sizes and shapes. (See also: DIY tandoor oven)
Of course, for your own production, by the way, a small-sized oven is ideal. Many enterprises today are engaged in the manufacture of custom-made devices at the request of the consumer. Moreover, this option for purchasing equipment is the most optimal, since the furnace will be made for a specific job.
Electric ovens are now very popular. They have a special welded chamber made of metal profiles. It goes without saying that it has high thermal insulation, since there are fire-resistant bricks and various fibrous materials here. Such furnaces are characterized by small dimensions. This design is often mistaken for a decorative stove, however, this is not so. Its small size is associated with the smaller thickness of the lining. The equipment is equipped with a swing door and high-level heating coils. This approach eliminates the possibility of deformation of the fired products. The equipment is equipped with a software system and a microprocessor temperature controller.