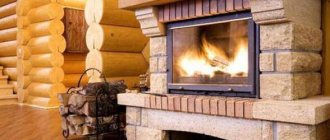
A closed fireplace insert is safer to use than an open one. Therefore, installing a fireplace with a cast iron firebox is the best solution if there are children in the house. We will talk about the pros and cons of such fireplaces, as well as how to install fireplaces with your own hands, in this article.
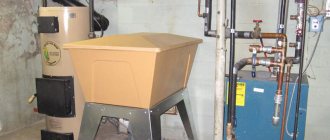
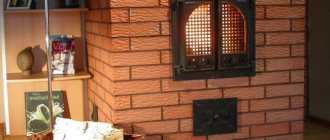
Fireplace with cast iron insert
A closed firebox is a chamber made of cast iron for burning wood, in which one of the walls is replaced by a glazed door. A very convenient door is equipped with a lifting mechanism that moves it upward, under the lining, and allows you to instantly turn a closed firebox into an open one. An ash pan is located under the combustion chamber, through which air enters it. And the smoke is discharged through a pipe installed in the upper part of the firebox. In principle, installing a fireplace insert involves constructing a base for it with your own hands and a decorative cladding that allows you to hide metal parts from view, leaving only the firebox visible and giving the fireplace a familiar appearance.
Fireplace design
Before you build a fireplace with your own hands, you need to figure out what parts such structures generally consist of, and study the structure of the fireplace and its components.
Any fireplace includes the following elements:
- Firebox;
- Ash pan;
- Grate;
- Housing (portal);
- Chimney.
The most important thing on which the quality of the fireplace and its efficiency depends is the choice of materials for its arrangement. A good option would be a structure made of brick. The firebox is usually made of fireclay bricks that can withstand high temperatures, and the rest of the masonry is made of ordinary red ceramic bricks. If we are building a brick fireplace with our own hands, we can purchase a ready-made metal combustion chamber, and then lay out the rest of the fireplace elements around it.
In order for an open brick fireplace to be sufficiently reliable, the firebox requires high-quality thermal insulation. This point is especially important in wooden houses, where the risk of fire is significantly higher than in buildings made of stone or brick. It is also important to pay attention to the remaining elements of the fireplace that operate at high temperatures - these parts must be positioned in compliance with fire safety rules.
Plasterboard cladding
It is not necessary to buy fireproof boards; you can also use moisture-resistant material. Cutting drywall parts is done using a simple paint knife. A cut is made along the marked line under any straight plank, after which the canvas is bent. The cardboard on the other side is trimmed.
When making a functional fireplace, the firebox and smoke exhaust box must be installed with thermal insulation and a foil reflector inside the device.
Do-it-yourself lining of a fireplace insert with plasterboard can cause difficulties in hard-to-reach places. And so the assembly technology is no different from any other gypsum board construction:
The smoke exhaust box can also be made of plasterboard. Thermal insulation and foil reflector should be installed inside the device. The chimney box has holes for ventilation grilles.
Combustion chamber
There are open and closed combustion chambers. The closed structure must necessarily include additional components - a gate and transparent doors made of fire-resistant glass. The simplest option would be to purchase a ready-made combustion chamber - this will significantly simplify the installation work, and cast-iron closed fireboxes look very good.
Arrangement of the fuel chamber is one of the most problematic and difficult stages of installing a fireplace. The firebox located under the chimney must have a chimney tooth, which is necessary for the efficient operation of the entire structure. To extend the service life of a metal firebox, it is advisable to line its internal walls with fireclay bricks, which will minimize the contact of open fire with the chamber material.
Since the main working process takes place in the firebox, it is worth considering it now:
- The fuel is removed from the fuel basket, which is usually located under the firebox, and placed on a grate located in the chamber;
- The ignited firewood is set on fire, and the intensity of its combustion is regulated using a slide valve, which provides oxygen access to the working area (if the fireplace has an open firebox, the combustion process can only be changed by adding firewood);
- The burned fuel becomes ash and ends up in the ash pan, located directly under the grate (collected ash must be removed periodically, so the best option would be a retractable ash pan);
- The gas released during combustion goes outside through the chimney (for maximum efficiency, it is worth equipping the chimney with a forced draft, which will also allow you to regulate the heat transfer of the fireplace).
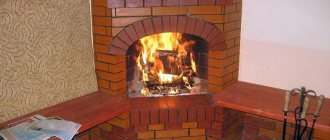
A special point is the masonry of the back wall of the fireplace. There are two common opinions on how it should be positioned. According to the first opinion, the back wall of the fireplace is simply laid out vertically. This option is extremely simple, but does not have any special features.
The second option is somewhat more difficult to arrange - it involves installing the back wall at an angle of 30 degrees towards the inside of the fireplace. If you make a fireplace with your own hands using such a scheme, the advantage will be increased reflection of thermal energy into the room.
Stages of installing a fireplace insert
Let's start with the fact that you must first choose a fireplace insert. Let’s not talk about the fact that the market offers a wide range of combustion chambers. It is present in only one copy - made of cast iron. Everyone understands why this metal was chosen as the main material.
But here you still have to take into account the size of the camera. They are associated with such an indicator as the power of the heating device. And the larger the heated area, the more heat will be required to heat it, and, therefore, the greater the power of the unit itself.
Fireplace insert lining
Preparing the base
So, the firebox has been selected. Let's move on to preparing the base for the fireplace. It must be smooth, durable and fireproof. Therefore, it is recommended to pour a slab foundation with a reinforcing frame laid in it. A metal mesh can be used as a frame.
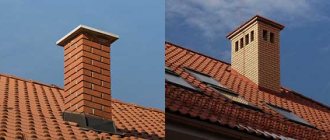
Chimney in a private house
The most traditional material used for chimney installation is brick. However, steel can also be used for these purposes - this item has virtually no effect on the efficiency of the fireplace. There are solid ceramic chimneys on the market, but they are very difficult to work with, so you won’t be able to build a fireplace with your own hands if you choose this option.
When designing fireplaces with your own hands with a detailed description of their parameters, it is necessary to consider fire safety measures, which are largely related to the design and location of the chimney:
- When installing a chimney, care must be taken to protect the interfloor ceilings from high temperatures. Typically, asbestos material is used for protection, which is also suitable for insulating walls in close proximity to the fireplace.
- Thermal insulation material (asbestos or sheet metal) must be installed under the base of the fireplace. To reliably protect the floor from flying sparks or firewood falling out of the firebox, the material must extend beyond the fireplace by at least half a meter.
- The foundation itself must be strong and powerful enough. If the fireplace is made of brick, then its weight may well exceed 1 ton, so the structure will require a separate foundation. This is due not only to the total weight of the fireplace, but also to the shrinkage of the building, during which the fireplace should not move so that the tightness of the chimney pipe is not compromised.
Chimney pipe installation
The chimney will be made of two parts. The lower part from the firebox through the first and second floors to the exit to the attic is a stainless steel sleeve. The steel was assembled “by smoke” and was firmly lined with brick. The upper part was made through a cold attic with access to the roof and a height according to SNiP of at least 0.5 m. Above the ridge is a stainless steel sandwich assembled over condensate. The structure is very heavy; the chimney was moved outside the stove and, as a result, has a separate base for the brickwork and does not come into contact with it in any way.
The chimney liner and sandwich were assembled independently after the firebox was in place and about half of the stove was laid out. The brickwork had to be done after the stove was laid. To attach the sleeve, stainless steel brackets were used, which were purchased along with the pipe. The chimney was installed autonomously, for which there were reasons:
- Nothing stopped him from making temperature fluctuations.
- Vibrations of other structures, such as interfloor ceilings, partitions, roofs and others did not affect it.
- Nobody excludes fire safety requirements and SNiP.
We did not encounter any difficulties during installation. Installing the chimney took half a day. A neighbor helped with difficult work, especially on the roof.
Fireplace base
The base is an element of the fireplace located under the combustion chamber. This element can be implemented in different ways - the size and shape of the base are selected individually depending on how the fireplace should ultimately turn out. The location of the base directly affects the height of the firebox.
A combustion chamber installed close to the floor has a serious advantage in the form of increased heat transfer. Of course, this design is more profitable, but it is not always possible to arrange it correctly - for example, in multi-storey cottages, the low location of the firebox will not allow the installation of an ash pit. However, this problem can be mitigated by using a retractable version of the ash pan - but then the installation becomes somewhat more complicated.
Post-operation report
The necessary heating of the premises is achieved, there is no doubt about it. The fire begins on Friday at 21:00. You must first warm up the chimney and firebox. Then dry firewood is laid in - in two hours the room is completely heated. Be sure to open the air supply valve from the basement and the hot air outlet door so that there is continuous circulation. In the morning the temperature in the room is +20-22. Work on the construction of the furnace took 3 months (May, June, July). As a result, the total cost of the furnace amounted to 80 thousand rubles. Concluding the story, it should be noted that prices in the field of construction of stoves, fireplaces and chimneys are very high.
A promising option for heating a home using a heat-intensive fireplace - Ferlux-701.
Fireplace portal
There are two basic types of portal ceilings - straight and arched. The straight design has the simplest appearance, but its installation is rightfully considered the most difficult. The main problem of arranging a direct floor is the exactingness of calculating the angle of the brick cut and the complexity of its installation.
The fuel tank located below is usually made in the shape of a rectangle or trapezoid. A mouth is formed right above the firebox, into which all the smoke released when the fuel burns goes. To regulate smoke removal, a damper is installed in the front part of the chimney. At the front edge of the mouth there is an overlap, and behind it is a chimney tooth.
Arched portals, depending on their shape, are divided into three categories:
- Semicircular . In such designs, the radius of the arch is exactly half the width of the combustion chamber. Semi-circular portals are considered the most reliable and simple.
- Bulbous . The bending angle of arched arches is slightly less than that of semi-circular arches, so this option is best suited for fireboxes that have a large width. In addition, the beam arch of the portal may well be used in situations where there is a need to limit the height of the combustion chamber.
- Direct.
We buy a firebox
A budget version of the firebox was chosen. Subsequent operation showed that secondary afterburning works perfectly, the lower damper and gate actually regulate combustion within the required limits. The “clean glass” system helps to leave glass behind during intense burning of dry hardwood firewood. When burning damp, resinous wood, as well as when laying a whole log and switching to a long burning mode, the glass smokes, but not much. In the morning, the cooled glass is simply wiped with a damp cloth. Operating practice shows that it is impossible to lift the glass to observe an open flame. Regular dry firewood is used for kindling.
Types of fireplaces and methods of their placement
Fireplaces are classified according to three parameters - shape, type of portal and size of the firebox. With a portal width of less than 51 cm, the fireplace is considered small, from 51 to 63 – medium, and all other devices are considered large.
Before you make a fireplace with your own hands, you need to think about its placement, which can be done as follows:
- Central location . Quite an interesting, but not very popular option. Of course, a fireplace installed directly in the center of the room with your own hands looks interesting and quite unusual, but the design will impede free movement and take up a significant part of the free space. However, the desire to maximize the heat from the fireplace and create an interesting interior may well outweigh the obvious disadvantages.
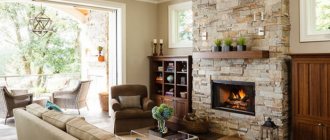
- Placement near the wall . The most popular fireplace layout. The advantages of such a scheme include good heat transfer, saving of free space and the possibility of visually separating the recreation area from the rest of the room. The only drawback is that when installing a wall-mounted fireplace, you will have to pay maximum attention to the thermal insulation of the walls.
- Corner placement . Quite a convenient option for small rooms - a corner fireplace requires very little space. Despite its apparent modesty, a fireplace located in the corner will be a very good addition to the interior of the room. In addition, the arrangement of such a fireplace is very simple, and its angular placement allows you to hide minor errors made during installation. Proper execution of finishing work will only contribute to the creation of a pleasant interior.
The following can be said about the decoration of the fireplace - the appearance of the structure is purely individual, and the materials for it are selected depending on personal preferences. Ceramic tiles, stone, artificial marble, etc. can be used for cladding. Sometimes a plasterboard box covered with decorative tiles on the outside is used as finishing.
When deciding how to properly build a fireplace in a house in terms of its placement, you should consider the following recommendations:
- It is highly undesirable to install a fireplace directly opposite the front door - cold air entering through it will interfere with the normal circulation of heated air;
- If there is a constant draft near the fireplace, then it is better to look for another place to install the structure.
Selection of facing material for the firebox
Fireplace inserts, unlike classic stoves, have certain advantages, differences and features, which you can read more about below:
| Advantages and features of fireboxes | Description |
| Decorative component | Fireplace inserts are distinguished by their simple and laconic design, which allows them to be combined and harmonized with different portals. |
| The need for a portal | Unlike stoves, fireplace inserts can be built into a specially prepared niche in the wall or into a portal. |
| Carrying out installation work | Stoves are easy to install, but to install the firebox, it is necessary to carry out a rather complex and labor-intensive installation. |
| Multifunctionality | The fireboxes are very functional and powerful. Even with one firebox, you can heat a house with a large area and several large rooms. |
| Stylish appearance | The fireboxes have a stylish appearance. They are complemented by a large sealed door, which has a transparent insert made of fire-resistant glass ceramics. |
Materials for lining the fireplace insert:
- Brick. It is one of the most common and good materials that is used for cladding fireplace inserts with your own hands. Brick is a good radiator; in addition, it also accumulates heat well and distributes it throughout the rooms of the house. The disadvantages of this material include the duration of masonry work, high cost and the need for a special and suitable order.
- Foam blocks. Foam blocks are also called aerated concrete. They are distinguished by their decent size and low weight. Due to this, they do not exert a large load and influence on the flooring and walls of the house. The disadvantages of foam blocks are that they are not as durable as drywall and especially natural stone.
- Drywall or gypsum board. Drywall is one of the most popular materials from which a fireplace box is made. This material is easy to process, easy to cut and takes the desired shape. In addition, it has a high level of fire resistance and thus can be heated to maximum temperatures without losing its strength or releasing substances that are harmful or hazardous to health.
- Stone. Stone cladding is a rather complex and painstaking process. Since creating a fireplace portal from artificial or natural stone requires a special tool, it is best to entrust this work to real professionals. There are several stone types that are most suitable for lining fireplace inserts - granite, marble and wild stone. Each of them has its own visual differences and different costs. The most expensive is marble.
Rules for arranging a fireplace with your own hands
Before assembling the fireplace correctly so that it is as reliable and durable as possible, you need to take into account a number of rules aimed at achieving these goals:
- When installing a brick fireplace, you need to create a separate foundation for it;
- The working part of the firebox can only be made of fireclay bricks, which should not be in contact with ordinary bricks;
- When installing the door and ash pan, you need to lay an asbestos cord and leave a small gap necessary for the thermal expansion of the metal elements;
- The interior of the firebox does not require plaster;
- It is advisable to place the rear wall of the fireboxes at a slight angle.
A separate point is the fire safety rules, compliance with which reduces the risk of fire to a minimum:
- Along the entire length of the smoke exhaust duct, special cuttings must be installed to increase the degree of fire safety;
- When placing a fireplace in close proximity to a wall, it is imperative to lay a layer of refractory material between them with a thickness of at least 20-25 mm;
- When installing a fireplace on a wooden floor, it is necessary to lay a metal sheet or ceramic coating under the structure so that it protrudes beyond the perimeter of the fireplace by at least 30-35 mm;
- At the point where the pipe passes through the interfloor floor or ceiling, a 15-cm layer of heat-insulating, heat-resistant material must be installed;
- A fireplace can only have one of its own chimneys.
The operation of the fireplace is also carried out according to certain rules:
- It is strongly not recommended to heat the fireplace to extreme temperatures;
- For normal operation, the fireplace must be regularly cleaned of soot deposits and ash;
- All flammable objects must be kept at least 70 cm away from the fireplace;
- You can only use the type of fuel in the fireplace for which the design was designed.
How did the search for a specialist take place?
I've been dreaming about a fireplace for a long time. Not a single stove was built independently, so it was decided to immediately entrust the construction process to specialists in their field. There were problems choosing a specialist. The stove makers immediately named the cost of their work, without even looking at the initial project and estimate, when asked “how is this possible”, they said that they were specialists, about satisfied customers, as well as knowledge of all projects. Another stove maker asked for travel allowances, immediately named the price, and said that “the project is in his head.” In short, it was not easy to find a good stove maker.
There was an unfinished country house on two floors, as well as a basement and attic. The living area is on two floors, which must be heated; it is a total of 100 square meters. m. Ceiling height – 2.75 m. The house is located in the Nizhny Novgorod region. In winter, the house is not used without heating, as well as in early spring and late autumn. It was clear in my head what I wanted to have after the construction of the furnace - so that I could come for the weekend on Friday evening and quickly heat up the premises on the first floor (50 sq. m.). Then continue heating, accumulating heat so that you can go to bed and have enough for the night. This situation is quite typical, plus everything, you want aesthetics and comfort in order to relax outside the city from the city. Besides, I want it to be beautiful! So that it is beautiful and also so that it warms effectively. You also need a safe design that will delight you with its exceptional characteristics.
How to calculate the size of a fireplace
One of the mandatory stages of designing a fireplace is calculating its dimensions. First of all, you need to decide on the size of the firebox, which is closely related to the area of the heated room. A simplified calculation formula looks like this: the area of the room is divided by 50, and the resulting value will reflect the dimensions of the firebox opening.
Another parameter is the depth of the firebox, which affects the efficiency of the fireplace. As a rule, the depth and height of the firebox have a ratio of 2:3. Excessive deepening of the firebox, which is done for the sake of beauty, can lead to a negative effect - all the heat will be transferred to the street, so you can forget about fully heating the room. If the depth of the firebox is insufficient, then almost all the smoke generated during combustion will enter the room.
You also need to calculate the dimensions of the chimney, which affects the level of fire safety and draft efficiency. The minimum diameter of the chimney pipe can be 150-170 mm. For a chimney with a rectangular cross-section, you can use the ratio according to which the width of the pipe is 1/10 of the size of the firebox.
The height of the chimney cannot be less than 5 meters. The maximum height is not limited, so you can safely mount the chimney outlet at the required level. In any case, before making a fireplace, it is necessary to calculate all its parameters and display them in the project.
Where to install a cast iron stove
Before installing a fireplace, it is important to ensure that the conditions in the room allow its use. The parameters of the room also determine the dimensions of the heating device. The main characteristic of the furnace is thermal power. It is calculated as follows: 1 kW of thermal power per 10 square meters of room area.
It is equally important to correlate the dimensions of the fireplace and the parameters of the room. To ensure a comfortable temperature in the room, a fireplace is sufficient, which occupies about 1/25-1/30 of the total area of the room. The distance from flammable objects, furniture, wallpaper and windows should be at least 30 cm. The best places for a fireplace are the corners of the room, as well as the wall that is opposite the door or on the left side of the window.
We recommend that you read more about cast iron stoves on our website.
It is also advisable to calculate the weight of the future structure. If there is a stove with a contact area with the floor of approximately 1 square meter, for example, it is placed on the second or third floor, then its permissible weight for wooden floors is no more than 120 kg, and for concrete floors no more than 750 kg. If the weight of the fireplace exceeds these values, then care must be taken to reduce the load on the floors. You can redistribute the load over a larger area by building a pedestal for the stove and chipboard sheets with refractory cladding. Such a pedestal is also necessary if the fireplace is installed in a room with a wooden floor.
For a cast iron hearth it is better to allocate your own corner
Tip: When choosing a location for a cast iron fireplace, it is necessary to ensure that there is space between the wall and the fireplace itself for a convection heating system. It is desirable that the entire structure affects as little living space as possible.
Example of fireplace arrangement
There are a lot of different orders that allow you to lay out fireplaces of very different configurations. However, the technology for carrying out work always includes the same steps, which will be discussed below.
As an example, we will consider making fireplaces with our own hands with the following parameters:
- Portal width – 62 cm;
- Height – 49 cm;
- Firebox depth – 32 cm;
- A square pipe with a side of 26 cm is used as a chimney;
- To lay the back side of the fireplace, half bricks are used, and the side walls are laid out of solid bricks.
Embroidery and decoration
When the stove is lined with brick, you must wait at least a week for the mortar to set properly. During this time, even at room temperature, the bulk of moisture will come out of the seams; it is only important not to allow hypothermia below 10 °C. Next, the masonry must be thoroughly dried, keeping the stove burning low for several hours, while the masonry should be heated to 50–60 °C; it is advisable to repeat the procedure several times for 2–3 days in a row. After this, you should arrange some kind of burning, heating the stove to maximum temperature and maintaining this combustion mode for 4–5 hours.
There are several ways to improve the appearance of brickwork. If smooth brick was used, the seams are opened, deepening them by 2–3 mm; you can also fill the joint flush and then sand the overall plane. For torn bricks, it is preferable that the depth of the joints be approximately equal to their thickness. If the solution was not painted in the mass, you can emphasize the jointing with ordinary water-soluble paint.
Fireplace design
When we build brick fireplaces, the first thing we need to do is create a project that displays all the necessary dimensions of the structure and its parameters:
- Creating a drawing . At this stage, a place to install the fireplace is usually selected and its dimensions are calculated. When these parameters are known, fireplaces with a detailed description must be depicted on paper, observing the scale and putting down all dimensions. Of course, the drawing must also take into account the proper passage of the chimney through all the ceilings, as well as the location of the blower and the design of the firebox.
- Preparation of tools and materials . Serious variability in materials is only possible when selecting them for cladding. Thus, finishing can be done using red ceramic bricks or decorative tiles. In this example, the first option will be considered.
The set of materials for laying a fireplace with the specified parameters is as follows:
- Fireclay brick of a grade not lower than M200 for forming a firebox;
- Red ceramic brick in the amount of 250 pieces (it is advisable to take with a margin of about 10%);
- Materials for pouring the foundation and laying bricks (cement, sifted sand, gravel and water);
- Waterproofing material for laying the foundation;
- Smooth boards for formwork;
- Grate;
- Metal door;
- flap;
- Blower;
- Metal wire and rods necessary for reinforcing the structure;
- Wire 0.8 mm thick for dressings;
- Asbestos cord.
Before you make a fireplace in your house with your own hands, you need to prepare the following set of tools:
- Master OK;
- Tape measure and marker;
- Smooth rule;
- Bulgarian;
- Level, plumb and square;
- Construction stapler;
- Bayonet and shovel;
- Construction mixer or drill with an appropriate attachment;
- Rubber hammer for leveling brickwork;
- A regular hammer for installing formwork.
Materials and tools
To build a brick fireplace, you can use solid brick, but interior finishing must be done only with special refractory bricks. This material is characterized by a high level of resistance to prolonged exposure to high temperatures and temperature changes, as well as the effects of chemical components that arise as a result of combustion. In addition, refractory brick heats up slowly and retains heat for a long time.
To prepare the solution, it is recommended to use a special fire-resistant mixture, which you can buy at a hardware store or prepare yourself. The simplest version of the mixture consists of clay and sand. The ratio between the components is calculated empirically. The finished mixture should have the consistency of thick sour cream. It is not recommended to use cement for laying a fireplace. It can be added in small proportions to a mixture of clay and sand only during the construction of the base.
To prepare a solution for the base or side walls of the fireplace, you can use any type of sand. For areas that will be constantly exposed to high temperatures, gully or quarry sand should be used. River or sea sand is too smooth and will have insufficient adhesion to the clay. Before preparing the solution, the sand must be sifted and washed.
The clay for the solution should be pre-soaked for a week, stirring daily and adding water if necessary. If you don’t have time to prepare the solution for a long time according to all the rules, it is better to purchase ready-made fireproof mixtures.
To build a fireplace with a closed firebox, you will additionally need metal doors. To ensure that the fire can be seen through them, it is better to choose doors with fire-resistant glass. For a fireplace with an open firebox, doors are not required. You will need a venting and cleaning door, as well as a damper to adjust the draft. It is best to use a round pipe to install a chimney. You can choose almost any metal, but the optimal solution is stainless steel.
For exterior decoration, you can use decorative plaster, fire-resistant ceramic tiles, and decorative stone. In some cases, you can leave the brick without decorative finishing if the fireplace fits into the decor of the room. For example, for a loft-style interior.
The construction of a brick fireplace is carried out using the following tools:
- Master OK;
- building level;
- shovel;
- roulette;
- container for mixing the solution;
- Sander;
- plumb line
After preparing the necessary tools and materials, as well as the necessary plans and drawings, you can proceed to the actual construction of the fireplace.
Preparatory work
The first step is to build the foundation, on which the durability and reliability of the fireplace depends. The foundation for the fireplace must be separate - the building shrinks to some extent, so the installed heating unit may become deformed. When creating a foundation in a house that is already in use, it is necessary to take into account all roofing elements that may interfere with the future structure or affect the installation process.
It is much easier to equip the foundation before building the house - all work will be reduced to the following sequence of operations:
- First you need to dig a pit, the depth of which is equal to or greater than the freezing depth of the soil;
- Next, the formwork is installed, and the bottom of the pit is filled with a mixture of crushed stone and sand;
- The next step is laying the selected waterproofing material;
- The foundation is reinforced with metal rods and filled with mortar to a mark located at a height of two bricks below the floor level;
- The poured foundation must be left until it hardens completely (usually this takes about three weeks).
If the foundation is poured from scratch, then there will be no special problems with it. A completely different matter is creating a foundation in an already built house, which will require dismantling part of the floor in the place where the fireplace will be installed.
The work process looks like this: first you need to mark the base of the fireplace on the floor and make indentations of about 20 cm in each direction. Using a grinder, the floor covering is cut along the marked lines. When this operation is completed, you can begin to extract the bare soil and perform the algorithm described above.
When the base of the fireplace is brought to the floor level, the gap between the stone and the floor covering must be decorated. In addition, after each stage of work, it is advisable to carry out cleaning, and immediately before building a fireplace in the house, the room should be covered with plastic film to minimize the amount of contamination of the floor and furniture.
After creating the foundation, you can begin work to ensure fire safety. If we make a fireplace with our own hands, located near the walls, it is necessary to protect each of them from exposure to high temperatures. Asbestos sheets are usually used for these purposes, but ceramic tiles are also a good option.
The last stage of preparatory work is to bring the purchased bricks into working condition. The bricks used need to be collected, sorted by size, and a small number of bricks that will be used in the near future need to be moistened - this way they will not take moisture from the mortar.
Before you build a fireplace in your house with your own hands, it is advisable to lay out a brick structure without mortar. This operation serves two purposes: firstly, preliminary installation will allow you to localize all difficult areas of the work and understand how to create them later during final installation, and secondly, this will prevent some installation errors. If during the dry laying process you number all the bricks in order, then further creation of the fireplace will be much easier.
Technology of masonry work during the construction of a brick fireplace
We will assume that the foundation of the fireplace has already been built, poured with durable concrete and will support the weight of the structure.
- The concrete surface should be waterproofed with an inexpensive coating cement-polymer mixture (for example, CeresitCR 65), coating it twice with a brush or spatula.
- If the fireplace is adjacent to a wall made of combustible material, fire protection must be installed.
An inexpensive and effective option for fireproofing a fireplace and a wooden wall is a slab of basalt wool (at least 5 cm thick), covered on the fireplace side with reflective foil.
Preparation of clay-sand mortar. When making your own, the clay should be soaked in advance. Water is added to the finished mixture before starting work in accordance with the instructions. The brick should be soaked - lower it into a trough of water for a few minutes. If this is not done, the masonry mortar may dry out too quickly and not gain the necessary strength.
In addition, the wet brick can be moved if necessary, which is important when a fireplace is laid by a not very experienced craftsman. Lay out the first row, it should be as even as possible, the horizontal level should be carefully controlled. If you “missed a little” with the foundation, the first row can be laid out on a cement-sand mortar, this makes it easier to correct flaws in the foundation. Next, the fireplace masonry is carried out in strict accordance with the serial plans
We recommend laying each subsequent row dry first, and only then applying the solution. If the fireplace is large, pull the cord; if the structure is small, control with a level and a square is sufficient.
If there is more than one brick in a row that needs to be split or sawn, we recommend that during dry laying you number all the elements, both solid and adjusted to size. The numbering should be duplicated on the serial plan
The vertical seams of the bricks should not be located one above the other; the need for bandaging should be taken into account when drawing up the drawings.
Laying begins with corner elements, strictly monitoring compliance with the horizontal level between them
Excess mortar is removed with a trowel, the seams are unstitched, and contaminated bricks are wiped with a wet rag.
The shape of the joint determines the profile of the seam, concave, convex or rectangular
Another way to make a neat seam is to lay the bricks along the guides
Take a closer look at the photo: a square metal profile is inserted into the seam from the outside; after a few minutes it is removed.
You should not place more than 8-10 rows in height in one shift.
Stages of constructing a fireplace
Fireplace laying - how to build and lay it out correctly
On a base previously covered with waterproofing, you can lay the fireplace yourself. For masonry, exactly the same mortar is usually used as in the case of brick kilns.
The technology for preparing the solution looks like this:
- First you need to leave the red clay in a container of water for several days so that it gets wet;
- To mix the solution, sand, clay and water are required in a ratio of 8:8:1, which are mixed using a mixer;
- A good solution has a consistency similar to sour cream, and to check, you can dip a trowel into the solution and see if the mixture flows;
- Sand must be added to a too thin solution, and water to a thick solution, after which it is mixed again and checked for quality.
Immediately before building a brick fireplace, you need to draw plumb lines that will allow you to lay the rows strictly vertically without any deviations.
The order of the fireplace is as follows:
- 1st row. The first row is the base of the fireplace, so you need to pay maximum attention to it. When laying the base, it is advisable to use a mortar with a small amount of cement and maintain a 5-mm thickness of the seam (to maintain this thickness, you should use wooden slats of the required thickness). All base elements must be checked for alignment. The base itself should be located at a height of about 25 cm above the floor level. Since in the example the fireplace is laid out “under the jointing”, you need to ensure that the mortar does not leak onto the outer wall of the structure. The laid bricks should be gently tapped with a rubber mallet for density.
- 2nd row. This row is laid out in the same way as the first, in exact accordance with the order. This series has no characteristic features.
- 3rd row. On the third row, the bottom of the firebox is laid out, for which fireclay bricks are laid on the edge. Ordinary bricks cannot be combined with refractory bricks. Also at this stage, the grate is installed (during installation, you need to create a small temperature gap).
- 4th row. Here the combustion chamber is formed. Bricks should be wiped with a dampened rag before laying to ensure better adhesion of the mortar. When laying the fourth row, the firebox door is installed (during installation, you need to remember the need to create a temperature gap). In order for the door to remain securely in place, it must be secured with a metal rod inserted into the seam between the bricks.
- 5th row. When laying the fifth row, a blower is installed.
- 6th and 7th row. These rows are laid out according to the order used.
- 8th row. In the process of laying the eighth row, you need to tilt the back wall by 30 degrees to create a so-called fireplace “mirror”.
- 9-14 row. When these rows are laid, a fireplace arch is formed. The simplest option for covering a portal would be a structure with metal corners on which bricks are placed, and all this is then covered with decorative finishing materials. In the example under consideration, the fireplace will be “expanded”, so an arch will be needed. The formation of a semi-cylindrical arch is carried out using plywood circles, the manufacture of which requires two semicircles of the required size and shape. 11-cm wooden blocks are inserted between them and screwed with self-tapping screws, after which the creation of the circle is completed. The bricks are ground onto a wedge so that they can be used to form an arch. Laying the arch starts from the corners, and then gradually moves towards the center on each side.
- 15-18 row. At this stage, you need to make a fireplace tooth, which is located in the fuel chamber. The tooth protects the fireplace from precipitation and makes it easier for oxygen necessary for the combustion process to enter the firebox.
- Row 19-20. Starting from the 19th row, the installation of the smoke exhaust duct begins.
- 21-22 row. Continuation of the chimney. A fireplace damper is installed on the twenty-second row.
- 23 row. In this row, the chimney pipe is fluffed out to create a structure resembling a dovetail. The height of this area usually varies from 29 to 36 cm. Above the fluffy area there is a drain, laid out before contact with the roof. The riser and chimney pipe must have the same cross-section. A metal umbrella is attached to the top of the chimney, protecting the structure from precipitation and foreign objects. It would not be superfluous to install a weather vane, which improves traction.
When the main elements of the fireplace are laid out, you can begin decorating it. The seams of the fireplace are embroidered with a thick composition consisting of the already known clay mortar and purified river sand.
Finishing is the last stage of work, after which the fireplace can be safely put into operation. However, not everything is so simple here either: first you need to wait until the structure dries. During the first week after installation, natural drying occurs, for which it will be enough to open the doors of the ash pan and combustion chamber. In the second week, the fireplace must be lit every day and brought to the maximum temperature, checking the efficiency of the draft in the process.
Material calculation
The required number of bricks is calculated in strict accordance with the drawings of the fireplace and the order of the masonry. Such schemes are developed in advance, and strict adherence to them is required when performing work.
When counting the number of pieces, the halves and three-fours indicated in the diagram are counted as a whole brick. The resulting number is multiplied by a factor of 1.2 to take into account defects and damage during transportation.
The seams are made no more than 3 mm; such masonry requires a bucket of mortar for 100 bricks.
Sand
Quarry sand is used to prepare masonry mortar for the firebox, roof and lower section of the chimney. For the construction of other parts of the fireplace, it is allowed to use river and sea sand.
Before adding sand to the solution, it must be sifted through a mesh with holes no larger than 3 cm and washed under water pressure through a burlap sieve.
Brick
For critical areas of the fireplace, such as those that heat up to high temperatures, fireproof material is used. The rest of the masonry requires the use of ordinary ceramic clay bricks.
If an arched vault is provided, wedge bricks are purchased for it, which can be made independently from fireclay bricks, turning it to the desired shape.
Sand-lime brick is not used for laying brick fireplaces due to its ability to absorb moisture.
It is not recommended to lay burnt dark brown bricks or insufficiently processed pale pink bricks. Its use in the construction of a piece foundation and the first row of a fireplace is allowed, no more than 20% of the total quantity.
Solution
For laying the firebox and pipe, a clay solution is used, which is related to the composition of the brick and expands with it in the same mode. The addition of sand to the solution depends on the test of the clay for fat content.
For laying the base, side surfaces, and bottom of the fireplace, use a mortar with the addition of cement at the rate of 1 kg per bucket of mortar.
The clay is soaked in water until completely wet for a week, stirring it every day. After this, add sand and mix the masonry mortar with your own hands.
It is allowed to use modern ready-made dry mixtures for bricklaying stoves, which are simply mixed with water. A description of the properties of various dry mixtures, their purpose and photos of the appearance of the packaging can be found in store catalogs.
Brick corner fireplaces
Finishing the fireplace - the last stage of work
Different options for finishing a fireplace can radically change its style. The vast majority of bricklayers would like to use natural texture as a decoration. But to achieve an aesthetic appearance, you have to practice bricklaying, and the stove does not tolerate mistakes. Then finishing will come to the rescue. Various options will allow you to put your artistic taste into practice. Decorative stone in the form of tiles will add originality to the composition, as it will return the observer to the primitive era.
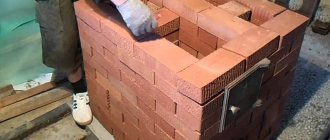
Making brickwork
Cast iron fireboxes begin to be lined from below. The lower part for any fireplaces is built according to a single scheme, according to which it is made in the form of an M-shaped structure with right angles. Particular attention should be paid to laying out the initial row, since the entire structure will rest on it. Improper laying of the first row of bricks can lead to cracks and breaks in the upper rows.
When forming the firewood wall, it is necessary to leave small distances between the bricks. They should be of such a size that air can easily penetrate, and not slowly leak out. It is from these holes that cold air will flow into the fireplace. These gaps should not be covered with mortar.
The top part of the firebox is called the tabletop. It is possible to veneer a fireplace insert with brick without forming a countertop, but it is this that gives the structure the greatest aesthetic appeal. Two such parts can be built. One will be placed at the bottom of the firebox, the other at the top. To build a tabletop, it is necessary to make wooden formwork, the brick is cut to its dimensions.
The fireplace insert is laid flat, the distance from the walls of the firebox to the lining, according to building codes, should be 3-7 cm. This ensures the required air circulation. This technique allows for the most efficient heating of the room without overheating the stove. If you leave a smaller distance, the service life of the fireplace can be significantly reduced.
It is worth remembering that the lining should not touch the walls of the cast iron firebox.
Pre-prepared countertops are laid in the lower and upper parts of the structure. In this case, take into account the weight of the resulting slab; it may be necessary to install a counterweight - the upper masonry.
The final stage is the formation of the chimney. It can be either straight or cone-shaped. The second type is considered more complex in execution, so it is necessary to describe the construction process using its example. First of all, it is necessary to determine the amount of the required slope; it should not exceed 4 cm per row. The bricks are laid with a uniform slope. At a distance of 30-40 cm from the ceiling, holes are made to remove superheated air.
The chimney should not be located near flammable structures, as this may lead to their deformation or fire. At a distance of up to 20 cm above the holes, the chimney turns into a metal pipe. If there is no pipe, this distance can be bricked. Thermal insulation of the chimney avoids heat loss.
Features of cast iron construction
A cast iron fireplace, like its traditional brother - a stone fireplace, is based on a standard design. It is equipped with a firebox where the wood combustion process takes place, an ash drawer and a chimney. The firebox and other elements of such a fireplace are usually made using casting technology, and then assembled into a single heating device. Often the fireplace is equipped with legs and doors made of fireproof glass - with the firebox closed. But the firebox can also be open - the combustion chamber is not isolated from the outside space. This fully conveys the smell and sounds of crackling wood. Cast iron itself as a material is particularly heat resistant. It easily withstands sudden temperature changes from minus to plus. Wood-burning cast iron fireplaces cool quite slowly and give off 2 times more heat than stoves made of other materials.
A closed wood fireplace heats a room much better
Cast iron corrodes easily. But with regular cleaning and proper use, it can maintain an attractive appearance for a long time. And the service life of such a fireplace is measured in decades.
Cast iron fireplace stoves are well suited for a country house. They are relatively light in weight (compared to a stone stove), which means they do not require a heavy foundation. They can be safely installed not only on the 1st floor, but also on floors above without the risk of damaging the floors and ceilings. Almost any ceiling between floors can withstand it.
Tip: A cast iron fireplace can also serve as an improvised gas stove. On its surface it is quite possible, for example, to boil a kettle or warm up food. For these purposes, you can install a special panel at the top of the fireplace.
Video: DIY fireplace with cast iron insert
But a cast iron hearth also has its drawbacks. First of all, it is the specific smell of hot cast iron. The fact is that when heated, the metal expands and its vapors are released into the air. It's no secret that odors spread much more easily in a warm environment.
Another disadvantage is the risk of injury during operation. If you awkwardly touch a hot fireplace, it is easy to burn an exposed area of skin. Therefore, it is better not to come close to the fireplace while warming up, but to work with it wearing special gloves.
A cast iron fireplace is quite lightweight and it is not difficult to drop it. Therefore, it is not suitable for homes with small children. If it falls, a working fireplace will, at best, go out. Some parts may fall off. Small dents may occur. In the worst case, a fire may occur that can easily develop into a large fire.
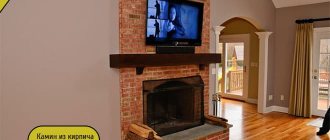
Almost all owners of country houses dream of a large, warm fireplace. A live fire in the room conveys an indescribable atmosphere of comfort. And a brick fireplace looks especially presentable and sophisticated. However, not every home has the opportunity to equip such a heating unit. In addition, a stone fireplace often takes up a lot of space and requires special attention: regular cleaning of the firebox and chimney, caring for the stone and polishing the exterior finish. But do not despair if it is impossible to install such a fireplace for some reason. A metal fireplace can be an excellent alternative to a brick one. And with its task - to warm you up on cold evenings and create a comfortable environment in the room - it copes no worse.
Aesthetes will not be pleased with the color of the fireplace. Unfortunately, the firebox for a cast iron fireplace can only be black. Cast iron is difficult to paint. And at high temperatures, the paint quickly falls off or melts. The problem can be solved by using gilding, silver or brass frame. However, you will have to pay a significant price for such pleasure. We previously wrote about what kind of fireplace inserts there are and recommended bookmarking the article.
Thanks to artistic casting, even a cast iron fireplace can look noble
Tip: An aesthetic defect can easily be eliminated with the help of artistic casting - plant patterns, monograms, animal figures - it all depends only on the owner’s imagination.