Some promising technical developments related to the design of home fireplaces can increase their efficiency. The design has been improved in all influencing aspects, thanks to which the efficiency indicator for a solid fuel fireplace has been raised from 20 to 80%. But even these successes do not contribute to the fireplace becoming a full-fledged device for heating a house or apartment. The heat generated is local in nature. A fireplace, no matter how efficient it may be, is only capable of heating the air in one room in which it is installed.
Air has poor thermal conductivity, so heat transfer will not occur, which means you need to use substance transfer. It is not advisable to use air as such a substance, since as it moves through the rooms it will cool quickly.
The air will already reach the farthest room cold, but water is perfect as a coolant due to its high specific heat capacity. In this article we will talk about how you can build a fireplace with a water circuit for heating with your own hands, and we will study the principle of operation of the entire system and its elements separately.
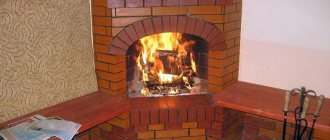
Self-built brick structure
A little about heating systems
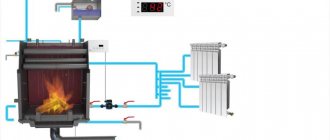
In order to deliver heat to every room of the house, a pipeline is required through which water will circulate. Plastic or metal pipes are used as such a pipeline. Water gives off heat in special radiators installed in the lower part of the rooms. The cooled water returns to the heat source.
According to the method of organization, heating systems are divided into open and closed.
- Open systems. In an open system, water circulates by tilting the pipes. It reaches the top point thanks to convection, and then goes around all the rooms without outside intervention, gradually lowering the level. It returns to the boiler through a pipe called return. The possibility of expansion with increasing temperature is ensured by the presence of an expansion tank installed in the attic. It is hidden from view and occupies the highest possible position. When heated, the volume of water increases and it is forced into the expander. After cooling, the reverse process occurs.
- Closed systems. A closed expander helps increase the pressure in the system when the water is heated. This additionally protects the system from overheating, since boiling occurs later at elevated pressure. A closed type system is characterized by forced circulation, which is provided by a special pump. Most often, the pipeline for a closed system is made of plastic pipes. They consist of several layers that provide heat insulation. In this way, water is delivered to the desired room without wasting energy. In metal pipes, heat leaves through the metal as it is transported. On the other hand, this heat does not go outside, but into the room, heating it. The debate between supporters of metal and plastic remains relevant at any time.
Heating system operation diagram
Requirements for chimneys
To be sure of the safety of a fireplace stove with a water heating boiler, you need to carefully approach the choice of every detail. It would be preferable to install a chimney duct made of ceramics or stainless steel produced by FERRUM, which can withstand temperatures up to 600 ºC. When passing ceilings and walls, roofs and outlets to the street, it is necessary to use insulated sandwich pipes, which prevent the formation of condensation and increase the fire safety of the passage of floors and are resistant to burnout. Ceramic chimneys are very expensive and their installation is also time-consuming and expensive. We recommend choosing FERRUM stainless steel chimneys. Regardless of which pipe was chosen, you must adhere to the established regulations.
- The diameter must be equal to the diameter of the pipe. It is possible to increase it up to 30% with the help of adapters, but it is absolutely impossible to narrow it.
- To regulate the draft and prevent cold air from getting inside, it is necessary to install a damper or valve.
- The permitted distance for horizontal sections that provide stable traction is one meter.
- Total chimney height. As a rule, this value is within 5 m.
- To pass ceilings, it is necessary to use polyurethane foam with mineralite produced by FERRUM. The chimney itself must be double-walled - a sandwich.
- It is necessary to provide access to the chimney for regular cleaning, as well as a condensate trap.
Source of thermal energy for the system
The part of the system that provides the transport function is not of interest to us. The theory of its functioning is needed in order to make heating with your own hands. As a source that would heat the water, you can use a gas boiler or an electric one.
Good to know: Outdoor fireplace with barbecue, how to build such a complex with your own hands
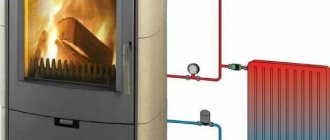
The fireplace as a water heater turns into a multifunctional device. He continues his mission to provide the external decoration of the room and create comfort from the opportunity to contemplate the combustion process, but to warm up all the rooms, they use a fireplace with water heating.
The rather low efficiency index, especially for a fireplace with an open firebox, does not allow us to hope for high-quality heating during periods of severe frost. But for a small house this option is quite suitable. If you provide the ability to connect and disconnect the fireplace from the heating system, then the ideal option can be realized.
Commissioned furnace
The idea is that the main heating is taken over by the device that is intended for this purpose. At the right moment, the fireplace turns on and provides additional energy. At dachas, when the owners leave for a while, the fireplace can be turned off and the main boiler left running.
Main stages of construction
The fireplace stove that heats the rooms is made from the most durable materials. Brick or steel with a thickness of 3 mm or more can be used as such material. The first stage of construction is work on preparing a working drawing. To do this, you need to select the location for the future installation of the fireplace and take the necessary measurements. Next, you need to calculate the main dimensions of the structure, and then transfer them to the graphic part.
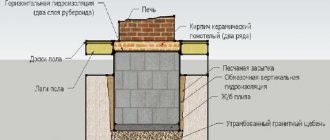
When the drawing is ready, you can begin to make markings according to which the foundation will be created. First, the floor is partially dismantled, a pit is dug in the shape of a rectangle, its depth should not exceed 0.5 m. The bottom of the resulting hole is filled with brick crumbs or crushed stone. Next, a layer of cement is poured, and the horizontalness of the poured layer is carefully checked using a level. The cement must dry completely. On a completely dried layer of poured cement, it is necessary to lay 2-3 layers of roofing material, which acts as a waterproofing agent, which helps to completely eliminate the influence of moisture.
Fireplace design
Compared to the fireplaces with which we associate, a fireplace with a water circuit has some differences, since it must be able to heat water. This happens with the help of a heat exchanger; a metal tank in which water circulates is heated by a flame. To increase the active area, the heat exchanger is made in the form of a labyrinth or coil.
The heated water does not immediately enter the heating system; it accumulates in the container. This battery allows you to select hot water as needed. It is possible to connect a water supply to supply the house with hot water.
Piping built into the fireplace
An accumulator in a fireplace will lead to an unjustified increase in the size of the latter, so the tank is installed separately, immediately after the line leaves the heat exchanger. The heat exchanger itself is less and less likely to feel the direct action of the flame. To prevent active destruction of the metal, the coil is immersed in the fireplace cavity filled with water. Such a fireplace with a water jacket is increasingly used when organizing heating of small country houses.
Good to know: Mortar for laying a fireplace, using a ready-made option and creating it yourself
Choosing a thermal fireplace
You should be responsible when purchasing a heating device. To make it easier to choose one or another water fireplace from the model range on the market, you need to know what characteristics and capabilities of the unit you should pay attention to first.
First of all, it's power. This indicator for devices equipped with a water circuit has two values: heat exchanger power and total heat. Let's take a closer look at them. As a result of the operation of the device, the heat exchanger releases a certain amount of heat to heat a certain area of the house through radiators. Such output is an integral part of the total thermal power, that is, the amount of heat that the stove distributes around itself through the heating system network, convection channels and firebox glass (infrared radiation).
Self-construction
Independent work without the involvement of specialists brings not only saving money, but also the indescribable pleasure of your own victory. Every craftsman will not miss the opportunity to install a water circuit for a fireplace with his own hands. To do this, all work must be divided into two parts: the construction of the building, the role of which is played by a brick fireplace, and the installation of a heat exchanger.
Construction of the building
The construction of any facility requires thorough preparation. First you need to find the necessary drawings showing the orderly laying of the fireplace. It is important to select only those materials that will allow you to build a fireplace with a water jacket in the form of separate channels. The walls of the jacket are framed with steel sheets for tightness.
Construction begins from the foundation. To do this, dig a pit, the area of which is slightly larger than the area of the future fireplace. To fill the foundation you will need the following material:
- crushed stone;
- sand;
- boards for formwork;
- cement;
- roofing felt
Initial stages of construction
The foundation level must be raised to the floor level. Before laying the fireplace, the surface is lined with sheets of roofing material for waterproofing. The fireplace body is lined with refractory bricks, and the firebox itself is lined with heat-resistant fireclay bricks. A clay mixture is used as a solution.
Preparing the solution is a long task. You will have to first test the clay for fat content, and then soak it to prepare a fine mixture of clay and sand. Today you can purchase already prepared and dosed mixtures, which just need to be diluted according to the instructions and they will be suitable for laying fireplaces. Due to the wide variety of mixtures, carefully read the instructions, which describe the scope of application.
The laying of the fireplace begins with horizontal rows that serve as the base. This is standard procedure for all models. At this stage, it is important to respect the horizon of the constructed foundation. Then the formation of the ash pan begins, as a mandatory part for all solid fuel fireplaces. The beginning of the construction of the firebox is also similar to most projects, but the finalization of this stage is distinctive. The fact is that you need to install the heat exchanger right now, otherwise there will be no such opportunity.
Good to know: Fireplace protective screen, ready-made solutions and self-production
Heat exchanger
The simplest model of a heat exchanger is a small tank with two flanges to which pipes will be connected. One pipe will supply cold water, and the other will drain hot water. Flame has a destructive effect on metal. In addition to temperature differences, one should not forget about the chemical effect of combustion products. The material for the heat exchanger can be metal, about 4 mm thick. A smaller thickness will significantly reduce the life of the container.
Construction of a fireplace
More precise dimensions of the heat exchanger depend on the specific design of the fireplace. According to the established dimensions, the sheet of iron is cut. You must know how to use welding to construct the tank.
If you have enough experience in welding, then immediately think about increasing the efficiency of the device by making it from sections, registers, in the form of a labyrinth or a coil. The labyrinth is made from pieces of metal pipes and turning angles of the same diameter.
Completion of construction
When the heat exchanger is ready, it needs to be built into the fireplace space. According to the diagram, stands are formed on which the tank will rest. The heat exchanger outlets should be outside the fireplace area, which will ensure the possibility and convenience of repairs in case of unforeseen situations.
The formation of the fuel chamber is completed by overlapping with the formation of a smoke hole. The last stage is the construction of the chimney. Its plan is often excluded from instructions, since it is believed that for solid fuel fireplaces the chimney duct must be straight and oriented vertically.
Once all the solution has dried (which can take up to ten days), you can begin to fill the system with water. During the first few days, carefully inspect all connections for leaks. If in an open system a leak only leads to a decrease in the water level, then in a closed system there will be no circulation at all.
When operating a fireplace that has a water circuit as an additional heat generator, it is necessary to ensure that the circuit is connected to or disconnected from the system. Using a bypass valve, you can shut off the water supply to the system and use the fireplace in the summer only for the purpose of relaxing near an open flame source.
We hope that now it is more clear to you how to make a fireplace with water heating with your own hands. This task is, of course, labor-intensive, but with due diligence it is completely solvable.
How to choose a wood-burning stove-fireplace with a water circuit for heating
The leading positions in the market are still retained by units operating on traditional fuel – wood. These are relatively inexpensive products with a familiar design.
To keep up with rising demand, manufacturers have to follow new trends and apply innovative technologies. Taking this fact into account, various changes are being made to the models.
Basically the devices are available:
- ash box;
- firebox
Additionally, you will have to purchase a chimney and other auxiliary elements.
There are two modes of use:
- long burning;
- intensive.
It is possible to purchase products with modifications: for example, the chamber can be protected with a layer of vermiculite or fireclay brick, which increases service life.
Special cast iron circles or an entire hob (cast iron, glass ceramics) can also be installed. Some stove modifications have a decorative lid that covers the cooking surface when not in use.
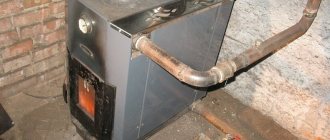
Homemade water boiler made from cast iron radiators
A boiler that is excellent in quality and efficiency can be obtained from ordinary cast iron heating radiators. You can use the M-140 radiator as a basis. It is easy to find, because large quantities of them are taken out for scrap during the dismantling and demolition of most old five-story buildings. The capacity of each section of such radiators is 1.5 liters of water, while the surface area reaches 0.254 square meters. When assembled, when 12 such sections are combined, the resulting volume of liquid is 18 liters and the total surface area is 3 square meters. m. Not every ready-made boiler assembled from sheet metal can boast of such parameters with similar dimensions. The performance of such a boiler from a radiator may be quite enough to heat a room of up to 100 square meters. m. So it will be suitable for an ordinary bath, and the supply will be quite large.
Before using the radiator, some modification is required. First you need to get rid of the cardboard spacers between the sections. It is best to replace them with asbestos cord impregnated with natural drying oil with an admixture of graphite. This way you can protect the gaskets from burning out at high temperatures.
While the sections are disassembled, they should be washed from the inside with a 6% concentration of hydrochloric acid solution, and then with a large amount of water. This way they can be cleaned of a large layer of rust and dirt accumulated over many years of use.
The procedure for assembling the radiator repeats the disassembly process, only in the opposite direction. To connect the sections, nipples are used, equipped with right and left threads on each side. Thus, sections both from below and from above are simultaneously attracted by turning the nipple. As soon as there is a gap of 2 cm between the sections, an impregnated asbestos cord is wound and the nipples are finally tightened.
Having finished assembling the entire radiator and waiting for the drying oil to dry, you should check the tightness of the joints by introducing liquid under pressure into the radiator. This is the only way to protect yourself from possible leaks during operation at high oven temperatures.
It is best to connect the supply and return pipes diagonally to the radiator. This way, the water will flow evenly throughout the new boiler. The two remaining holes should be closed with plugs. It is better to take inch pipes. On one side of the radiator there will be a right-hand thread and there will be no connection problems. On the other hand, where the thread is left-handed, it is better to use a nipple and a coupling with a drive.
Such a homemade boiler should not be placed in the firebox where wood is burned, but in the chimney chambers, which are located directly behind the firebox chamber. Since cast iron radiators are used, they should be heated not with a flame, but with hot gases that are removed from the firebox.
It is better to position the radiator so that the pipes come out of it perpendicular to the floor, and the return line is also lowered below the floor into the underground space. This way you can achieve better natural circulation of water when heating.
When assembling sections, you can experiment to improve the design of the resulting boiler. The result should be something similar to the image shown below. So it shows examples of the location of the boiler and how to connect it. Again, do not forget that in the case of cast iron, the boiler should be located in the chimney.
Installation of a boiler for a brick kiln
Review of some models
Among the leading manufacturers of loop furnaces, Russian companies occupy the leading positions. In order to navigate the choice provided, you should conduct a brief overview of the most popular representatives of heat supply systems.
The Angara Aqua model is the brainchild of Russian production. The fireplace is made of sheet iron. The inside of the firebox is lined with a heat-resistant substance. The heat exchange system works thanks to a tank with a volume of 4 liters. Among all the advantages, one can highlight such as the absence of soot, the ability to operate in long-term combustion mode, resistance to thermal expansion, and the absence of condensation.
Technical characteristics of the Angara Aqua system
- The Serbian company Guca, which presents a Guliver fireplace with a water circuit, has become a leader. This model wins due to its functionality. It has a hob and a built-in oven. But it wasn't without its drawbacks. The dimensions of the firebox are too small to accommodate large logs. In the summer, when there is no need for heating, you can exclude the heat exchanger from the cycle and use only the hob or oven.
- Another leader in Russian production, Ecofireplace, has developed the Bavaria Prismatic model. It is famous for its fuel economy during operation and at the same time has an efficiency of 78%. Here they made sure that logs 50 cm long fit freely in the firebox. The quality of materials allows the manufacturer to guarantee normal operation for 10 years.
- Among the expensive models, such as the Belt 10 Aqua is known. It is produced in the Czech Republic by ABX. Made in appearance beautifully and elegantly. However, there are serious complaints about the work, especially for such a high price. The complaints are related to the low power of the fireplace. Therefore, this model is designed for an area of no more than 90 m2. But the high efficiency compensates for the lack of power, although the price remains prohibitively high.
In all the options provided, you can find positive and negative sides. The variety of fireplaces with a water circuit indicates its extraordinary popularity. Pursuing a number of goals, you can choose the appropriate option that will satisfy a whole list of requirements. But at the same time, cast iron fireplaces remain suitable only in private homes. It's all in the chimney. The ventilation duct of an apartment building cannot be used as a chimney.
Advantages and disadvantages
Advantages:
- easily integrated into an existing heating system, and can also, if necessary, become a full replacement for it;
- multifunctional: used in heating and hot water supply systems, and also, due to its aesthetic appeal, serves as an excellent decoration in the house;
- can be used for heating houses with an area of about 250 m²;
- due to constant heat removal, the metal of the firebox does not overheat, therefore the thermal fireplace is durable;
- due to the closed type of firebox, it is a fireproof fireplace, which allows it to be installed anywhere at home;
- the open system does not require electricity connection, therefore it is very economical;
- fuel for thermal fireplaces is affordable and environmentally friendly;
- Some models have cooking capabilities.
Flaws:
- complete lack of automation: lighting the fireplace and adding fuel to it is possible only manually;
- rather low efficiency, which does not allow houses in regions with very low temperatures to be well heated in winter without an additional heating system.
When summing up the results of some economic calculations, it follows that the installation of fireplaces with a water circuit in comparison, for example, with the installation of an electric boiler of the same power, is quite expensive. Such a difference in cost will pay off in the best case within five years, and then only under the condition of permanent residence in the house.
Typically, houses that are built for periodic living in them have small areas and often only the first floor is heated. Installing water fireplaces in such houses is absolutely impractical. Thus, the choice of a water fireplace is justified when installing it as a backup source of heating for large houses and when the electric power is limited to 3 kW.
Parallel use of a thermal fireplace with the main electric or gas boiler will protect you from a complete shutdown of heating in the event of any malfunction with one or another heating device, and will also save more than 35% of fuel.