Introduction
Before starting work, carefully read the instructions for assembling the fireplace insert. The stove manufacturer does not accept any responsibility for any damage that may occur as a result of failure to follow the instructions in their manual, which will void the warranty. Damage to components may occur if assembly procedures are not followed. The manual for professional installation and assembly of the firebox must contain all local rules and regulations regarding national and European standards. Keep this manual in a safe place.
Rules for installing a fireplace
When choosing the correct position for the fireplace insert, the following requirements must be taken into account: 1. The installation of the fireplace insert must be approved by the fire service (EMERCOM). 2. There must be a sufficient supply of air in the room. To burn 1 kg of wood, approximately 12 m3 of air is required. 3. There should not be any electrical cables passing through the wall or ceiling at the installation location. 4. Distances from wooden walls and floors, as well as distances from electrical cables and flammable materials on walls and ceilings, such as wooden beams, must also be taken into account. 5. The fireplace must be installed with appropriate floor loads.
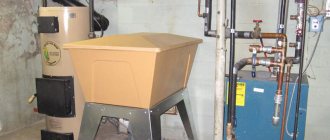
The firebox should not be located in the following rooms: 1. Where there is no combustion air supply. 2. Where flammable and explosive substances and mixtures are processed, stored or produced. 3. Rooms where air is sucked out (fume hoods, ventilation and heating equipment, dehumidifiers, etc.). The fireplace insert must be installed on a base with adequate load-bearing capacity. The cassette must be located on a foundation slab and not on an unstable or moving surface. The distance from the fireplace insert to the floor can be adjusted by turning the adjustable legs. Use adjustable legs to balance the height up to 10 cm. The firebox must be horizontally balanced.
Required materials and tools
The set of tools in this case looks much more modest:
- Building level;
- Water level;
- Plumb line, tape measure and pencil;
- Two different spatulas;
- Hammer;
- Rubber hammer;
- Screwdriver.
Additional materials are not included in the finished fireplace kit, so you will have to go to the hardware store with the following list:
- Self-tapping screws with a set of wide washers;
- Plastic dowels for self-tapping screws;
- Heat-resistant mastic and sealant;
- Foil-coated 50 mm thermal insulation boards;
- Profiles for drywall;
- Several sheets of drywall;
- Two grilles for ventilation windows.
Gas outlet options
Smoke removal depends on the fireplace insert in combination with the flue storage system. The following versions exist: Fireplace insert with cast dome. Recommended for connection to an air storage system with an internal diameter of 180 mm. Fireplace inserts with heat exchanger. Recommended for direct connection to pipes with an internal diameter of 200 mm. Fireplace insert with 45° heat exchanger. Recommended for direct connection to pipes with an internal diameter of 200 mm. Fireplace insert with a heat exchanger with a vertical outlet. Recommended for connection to a storage air duct system or for direct connection to a chimney. Fireplace insert for connecting accumulative rings. Recommended for connection to storage rings with an outer diameter of 440 mm. Fireplace insert with cast iron smoke collector. Recommended for direct connection to pipes with an internal diameter of 200 mm. The fireplace insert is right-handed. Recommended for lateral connections with pipes with an internal diameter of 200 mm. The fireplace insert is left-handed. Recommended for lateral connections with pipes with an internal diameter of 200 mm.
Preparation of tools and materials
To make your own fireplace, you need the following set of tools:
- Master OK;
- Mason's hammer or rubber mallet;
- Notched and regular spatula;
- Buckets for mixing the solution;
- Hammer;
- Screwdriver;
- Construction mixer or drill with an appropriate attachment;
- Building level;
- Water level;
- Plumb;
- Roulette;
- Pencil or marker;
- Bulgarian;
- Device for cutting tiles.
The list of required materials is as follows:
- Red stove brick brand M-200;
- Facing brick;
- Steel corners with a section of 50x50 mm;
- Steel strips measuring 50x5 mm;
- Self-tapping screws with wide washers;
- Plastic dowels for self-tapping screws;
- Heat-resistant masonry mixture;
- Heat-resistant mastic;
- M500 grade cement and sand;
- Thermal insulating foil material in the form of plates;
- Minirite slab (required for installing a fireplace in a wooden building);
- Ceramic tiles or porcelain stoneware;
- UD and CD profiles for drywall;
- Drywall sheets;
- Set of decorative grilles for ventilation windows;
- Heat-resistant sealant.
Chimney connection
Before connecting the firebox to the chimney, check the size and condition of the chimney (according to directives and standards). The correct operation of the chimney must be checked by a certified technician. When calculating the chimney, it is necessary to include the parameters of the fireplace insert. It is necessary to make sure that when adding firewood (the firebox is open), the firebox consumes a safe amount of air, as during normal operation (the firebox is closed). The chimney duct should not be smaller in diameter than specified by the manufacturer. More than one heat source cannot be connected to one pipe. Therefore, the calculation must be made according to the instructions for the firebox. The parts used for connection must be purchased together with the manufacturer's kit. The steel pipe (chimney) intended to connect the fireplace insert to the chimney must contain the CE mark (Minimum thickness of the casing walls 2 mm, for stainless steel 1 mm). If the chimney draft is too high during operation of the fireplace insert, it is recommended to install a damper. In this case, make sure: that the valve does not close automatically, the valve has simple and clear controls in the closed and open positions, the valve has holes in the clear section of at least 3% of the total cross-sectional size.
Properties of sweetener
Isomalt is a new generation carbohydrate that is low in calories. Used as confectionery sugar for making desserts and sweets. Isomalt, obtained from sucrose, has high-quality glazing characteristics and protects the product from clumping and caking.
The substance is a white crystallized powder. It has a sweet taste and is easily soluble in liquid. Isomalt is an odorless product. It is safe for the human body, since the source of production is one hundred percent natural. Isomalt is obtained from sucrose, which is extracted from starch, cane, honey and sugar beets.
It is commercially available in the form of powder, homogeneous granules or grains of different sizes.
The benefits of the sweetener include the following features:
- provides uniform energy supply to the body;
- activates intestinal function;
- does not cause caries;
- probiotic effect normalizes the number of beneficial microorganisms in the intestines;
- has a beneficial effect on the body, creating a feeling of fullness in the stomach.
Due to its low calorie content, the sweetener belongs to the dietary group, which is important for a healthy diet. It is indispensable for diabetes, as a result of which diabetics can eat confectionery and baked goods using Isomalt without harm to their health
Properties of sweetener:
- low-calorie - 100 g Isomalt contains 147 kcal less than sugar;
- low glycemic index, making it possible for diabetics to use the sweetener;
- providing the body with additional energy;
- activation of intestinal function;
- protecting the body from sudden surges in blood sugar.
Isomalt is safe and harmless to the body, helps to reveal even the most delicate flavors of dishes, is pleasant to the taste, and differs little from sugar. The dosage of sweetener recommended by doctors (in its pure form) is 30 g/day.
Combustion air supply
Fireplace inserts should only be used in rooms with a sufficient supply of combustion air. Air exhaust equipment (such as vents, steam, etc.) that operates the fireplace insert in the same room can affect the air flow to the fireplace. Make sure that the room has the specified pressure difference in the room (should not be less than 20 Pa). For smooth operation, the air supply must flow to the bottom of the firebox. It is recommended to use the shortest route for air supply and deviate from the direction only if absolutely necessary. Use diagrams (see professional rules for specialists - TROL) and determine the cross-section of air supply lines
Heat exchange
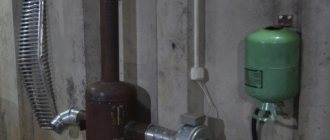
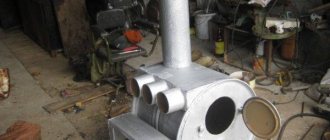
The principle of operation of the fireplace is simple. The spread of heat in the room is carried out due to radiant energy from the fire and heating structural elements, which creates a slight movement of convection currents.
The impressive size of the chimney prevents carbon dioxide from entering the room. The draft is quite large, the required speed of air movement in the pipe is at least 0.25 m/s.
The heat transfer of a classic fireplace is small - 20%, the rest comes out through the pipe.
You can increase the intensity of heat transfer in several ways:
- additional installation of side and rear walls of the structure;
- using metal as lining of the walls of the firebox;
- equipping the portal with a fireproof door that completely covers the firebox (for metal products).
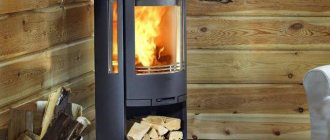
On sale you can find a wide variety of ready-made fireboxes made of fire-resistant steel. Professionals recommend giving preference to cast iron models: they are protected from deformation at high temperatures. But the main guideline for finished products is the compliance of the model characteristics specified in the data sheet with the conditions of your particular premises.
Limiting the open fire area also affects the heating intensity.
- two walls of the portal on the sides - the power is only enough for small rooms; To increase radiation, the side internal walls are shaped like a trapezoid with an extension towards the room.
- one side panel - such shapes contribute to increased extraction of air from the room into the pipe, but heat radiation spreads over a larger radius;
- the flame is open on all sides (Alpine or Swiss fireplaces) - ineffective for heating, although heat can radiate in all directions.
Manufacturers of combustible biomaterials and pellets have also achieved a slowdown in the combustion process due to the composition of the feedstock. They claim that their products increase heating efficiency to the level of a Dutch oven or Swedish oven.
Heat transfer can also be increased by increasing the area of the chimney: its surface heats up and can also serve as a heat source. For this, a recuperator is used - a ribbed insert into the chimney made of stainless steel. Its length ranges from 0.5 to 1 m. The cross-section of such a pipe must coincide with the diameter of the chimney.
Installing a fireplace insert
When assembling the firebox, comply with all rules and regulations regarding national and European standards. During the work, pay special attention to the provisions regarding fire safety, options for using materials and the size of ventilation ducts. When assembling a fireplace, it is important to provide access to clean the firebox and chimney. The diagram shows the individual security elements and structural elements in standard and protected walls. 1. Walls 2. Insulation layer (chimney) 3. Chimney connection 4. Insulation layer (back wall) 5. Convection zone 6. Grilles for convection air supply 7. Concrete slab min. 10 cm 8. Ceiling 9. Insulation layer (floor) 10. Air supply to the fireplace 11. Fireplace box 12. Insulation layer (ceiling) 13. Grids for extracting air convection 14. Protective floor made of fireproof material 15. Insulation layer 16. Fireplace lining 17. Radiation zone 18. Flammable material 19. Ventilated protection of combustible material 20. Wall protection 21. Fire protection of the smoke duct passage 22. Firewall made of mineral material 23. Furniture made of combustible materials - at least 5 cm from the firebox lining
Requirements
Smoke channel gravity value
Modern designs must meet the following criteria:
- Durable construction and long service life. The design of chimneys for a fireplace must withstand various temperature changes and the formation of condensation. Resist under the influence of aggressive acids, and, most importantly, comply with all fire safety standards and regulations.
- Aerodynamics. The installed structure must ensure unimpeded flow of combustion products. For example, a round cross-section can quickly and easily remove all flue gases from the firebox. Rectangular structures are not as efficient; in them, combustion products encounter resistance, thereby reducing the exhaust speed.
- Easy maintenance.
- Resistant to erosion and corrosion. To achieve this indicator, when installing a chimney for brick fireplaces, it is necessary to select the right materials.
Convection zone
If heated air is not used, there must be a gap of at least 6 cm between the firebox and the insulation layer (4, 15) for the rear and side areas. The convection zone must be isolated from all walls, with the exception of the walls that form the heat exchanger. The walls, floor and ceiling of the convection zone must be clean and abrasion-resistant. All convection pipes must be made of non-combustible materials. When laying the corrugation for supplying hot air: the corrugation must be securely connected to the hot air flange on the inlet grid. Operation of the air grid (hypocaust): heated air circulates in a closed space. Heat from the convective zone is transferred into the room through heat exchange zones. The heat load in the hypocaust convection zone is higher than that of conventional ventilation grilles.
Sequential installation of a fireplace
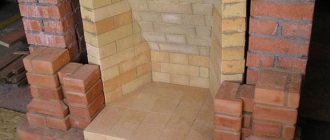
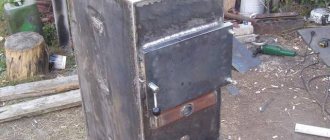
1. Stage one. Here we are talking about preparing the foundation, which is different from the foundation of a house. We dig a hole that is 15 cm wider and 60 cm deeper than the intended foundation of the fireplace. Next, we fill in 20 cm of crushed stone, and the next step is pouring concrete. The foundation must be able to withstand the load of the future fireplace; here it is important to correctly calculate the depth of the pit.
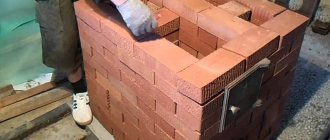
2. Stage two. Before installing the fireplace, you need to perform a few more steps. First, prepare a mixture of clay and water, with which bricks or blocks will be laid. It is done 3 days before work. When choosing a brick, preference should be given to materials that are intact and even in both shape and color.
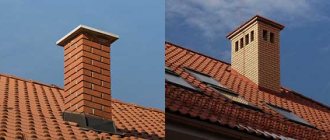
When laying the first row, you need to use cement, since it holds all the others and must be strong. And then a standard solution of clay, sand and water is used. Before laying a brick, immerse it in water and wait until air bubbles stop appearing and coming out. Remember that you need to ensure the symmetry of the work being performed so that the walls do not move in different directions. In the place where the pipe and roof meet, we again use cement. The outlet pipe, or rather the hole, is insulated using iron blanks. After work, the walls are wiped to remove excess solution. The floor around the fireplace is also covered with iron or tiles.
3. Stage three. The work has been completed. The fireplace has been laid, now it is painted, whitewashed or lined with stone to add brightness and make it look presentable.
Diameter
In order to calculate all the parameters, it is now necessary to decide on the material that will be used in the construction process. It is most convenient to carry out the calculation on paper, creating a sketch of the future structure; it is necessary to take into account some nuances:
- The diameter of the chimney for a fireplace must have a certain relationship with the firebox. Calculating this value has its own subtleties. For example, when calculating the diameter of a pipe that connects to an open firebox structure, a proportion of 1:10 is used. This method is only correct for a cylindrical type of chimney.
- The calculation of the cross-section for a square type device contains proportions of 1:15. But the diameter should be smaller than the size of the blower. If the resulting heat transfer is less than 300 cal/hour, the cross-section should not be less than 140 x 140.
- In order to determine the optimal diameter of the fireplace chimney, you can take as a basis state standards, which stipulate the permissible cross-section under certain conditions.
- In addition, the height and diameter are calculated in accordance with the area of the room.
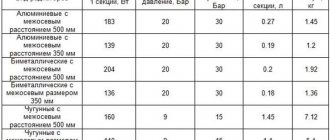
Standard dimensions of internal diameters and cross-sectional areas of brick chimneys
It would be a good idea to show your calculation to specialists and analyze it together. In addition, a suitable calculation scheme can be posted on the Internet.
It must be remembered that the calculation of these parameters must be done correctly; the efficiency of the heating device depends on this.