A brick stove is a time-tested way to warm up a room during the cold season and keep it warm. It is suitable both for heating a home for permanent residence, and for a summer cottage, which is visited once or twice a month. The structure of the hob and oven allows you to combine the functions of heating and a heat source for cooking in the oven. Although today more and more remote settlements are being supplied with gas, the problem of general availability of blue fuel is still acute. Even in the Moscow region, many gardening partnerships and detached estates and farms are located far from gas mains.
Building a brick stove with your own hands means solving the heating problem in the house using a well-proven method at the lowest cost. There are also situations when even the presence of gas on the site still does not make a brick stove a useless anachronism. This means a bathhouse. Unlike a Finnish sauna, which can be electric, a Russian bath must have a stove, and a brick stove is the traditional option, which is only recognized by convinced, consistent adherents of the art of bathing. Therefore, building a brick stove with your own hands will be useful on the farm, regardless of the conditions.
Laying a stove is not an easy task, but it is doable
In addition, there are fewer and fewer true master stove makers over time. Entrusting the installation of a stove to an untested specialist means risking not only finances, but also subsequent comfort and even fire safety. Isn't it better, in conditions of shortage, to temporarily retrain as a stove maker yourself? At the very least, you will only have yourself to blame for the mistakes you make.
Laying the foundation
Before folding the stove, you need to prepare a solid base.
The structure is quite heavy, so placing it directly on floors, even those covered with cement screed, is unacceptable. The foundation of the stove is a separate structure, not in contact with the base of the building. If you are building a brick heater close to the walls or building a corner fireplace, you need to make a retreat of at least 150 mm so that there is a minimum clearance of 10 cm between the foundations. If the floors in the house are screeded, then it is recommended to follow the following step-by-step instructions for installing a stove foundation:
- Dismantle the screed section and dig a pit protruding beyond the dimensions of the stove by 50 mm in each direction. The depth depends on the thickness of the upper layer of subsidence soil.
- Pour a sand cushion 100 mm high and compact it. Fill the hole to the top with rubble stone or broken brick, then fill it with liquid cement mortar.
- After hardening, lay a waterproofing layer of roofing felt and install formwork protruding above the screed, as shown in the drawing.
- Prepare the concrete and pour the foundation slab. For strength, you can lay reinforcement mesh there.
After 3 weeks (the time for the concrete mixture to completely harden), place a sheet of roofing steel on the finished base, and on top - felt impregnated with clay mortar or basalt cardboard. After this, you can begin to lay the body of the furnace.
Scheme of the base structure for wooden floors
To properly lay the foundation of a stove under wooden floors, use the same algorithm, only instead of a concrete slab, lay out the walls of red brick (used) up to the level of the floor covering. Fill the void inside with rubble or crushed stone and concrete on top. Next is a sheet of metal, felt soaked in clay and a solid first row of stove masonry. You can get more information on the topic by watching the video on the topic:
Brick laying process
To obtain even rows, stretch the thread from one edge to the other; you can also control the brick row with a long level. Clay or special stove mortar is placed using a trowel, although some experienced stove makers carry out a similar operation simply with their hands. The mortar is taken with the right hand, a wet brick is held in the left hand, and the area prepared for the brick is smeared with the mortar. The brick itself is also completely covered with mortar, except for the top “bed”. The mortar is also applied to the edge of the adjacent brick, and the inserted brick is pressed into the masonry with the right hand. Excess mortar can be trimmed with a trowel. (See also: What is the temperature in the oven)
Which one to build?
First, let's see what kind of stove it is possible to build outdoors, taking into account the fact that it will not be heated intensively and irregularly, but will be exposed to climatic influences, freeze in winter, and it will be difficult to provide it with a high chimney. But the danger from the spread of carbon monoxide from an outdoor stove is reduced to the minimum possible, although it is not completely eliminated, especially in a gazebo, under a canopy and in calm weather. Don't forget about this: there is no stove that can be heated at random without fear of fumes. You can get burned just sitting by the fire.
Keeping these circumstances in mind, the choice of outdoor stove design is not so wide. The simplest garden stove is the well-known rough or rough stove. She can look terrifying, pos. 1 in Fig., but it can be heated with any fuel and it works properly, almost regardless of the quality of the materials used and the work: when building a rough structure, you can use broken simple red working bricks or stones from the surrounding area using ordinary cement-sand masonry mortar, i.e. .To. microcracks in the masonry have almost no effect on the technical performance of this stove. See, for example, the video below of how a 5-year-old child built a rough stove, which his family successfully uses and which can also be used for smoking. Which, by the way, not every oven allows, see below.
Video: a simple stove, a rough one, a design accessible to a child
An outdoor oven at a weekend cottage is often a barbecue roaster, pos. 2. Although, as we will see later, in fact this is not a barbecue at all. Such a stove takes about the same amount or less bricks as a rough one (about 200 pcs.), and you can use red working brick in the same way, but masonry mortar, due to the, so to speak, subtlety of the structure, is already needed for the stove for the street (see .further, about technology and materials).
Based on the brazier, the so-called. Finnish outdoor brick oven, which is a hearth, brazier or barbecue attached to a rough stove, pos. 3. In fact, the only Finnish thing about such a stove is that the Finns were the first to think of producing them in the form of a set - construction instructions with detailed instructions and procedures, dry mixture for preparing masonry mortar, embedded parts, fittings. Now domestic kits for building an outdoor brick oven are sold in the Russian Federation. Sometimes the set also includes bricks; if necessary, hemmed/trimmed and numbered. A kit for an outdoor Finnish stove is inexpensive, and even a completely inexperienced person can build a stove from it, which is why the Finnish outdoor stoves from the kit are very popular, see for example. track. video clip.
Video: Finnish outdoor stove
https://youtube.com/watch?v=1qCvXhB7jSk
Even less common in areas is an outdoor fireplace, pos. 5. The reason is limited functionality: you can admire the flames and cook something as if on a simple fireplace, although the material and labor intensity of an outdoor fireplace is quite high. A Russian stove is built on the street (item 6) even less often. The culinary qualities of products and dishes from a Russian oven are well known, but a small Russian oven requires 2500 bricks, a large one - 3500, the design is very complex and it is not easy to protect it from bad weather. For the same reasons, Neapolitan (item 7) and Sicilian ovens for pizza and pastries are not very common in private households; In addition, these are quite highly specialized devices.
Procurement of materials and components
The main building material from which a do-it-yourself stove is built is red ceramic brick. It must be of high quality and must be solid; stones with voids inside are not used in the stove business, except perhaps for the construction of outdoor grills and barbecues.
To assemble a small-sized Dutch oven, you need to prepare the following materials and fittings:
- red burnt brick – minimum 390 pcs.;
- grate size 25 x 25 cm;
- loading door 25 x 21 cm;
- small cleaning and blower doors 14 x 14 cm;
- metal flap 13 x 13 cm.
List of components and building materials for the hob:
- solid ceramic brick – 190 pcs.;
- grate 25 x 5 cm;
- two-burner cast iron stove measuring 53 x 18 cm with disks;
- fuel chamber door 25 x 21 cm;
- metal tank - boiler with dimensions 35 x 45 x 15 cm;
- oven 32 x 27 x 40 cm;
- cleaning doors 13 x 14 cm – 2 pcs.;
- chimney valve;
- steel corner 30 x 30 x 4 mm – 4 m.
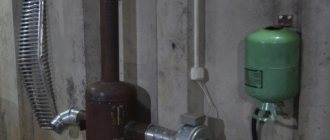
To save money, you can take on the manufacture of a tank for heating water yourself - simply weld it from metal 3, or better yet, 4 mm thick. There is another option: instead of a tank, place a coil inside the furnace, welded with your own hands from a steel pipe with a diameter of 25-32 mm. But we must remember that in such a water circuit it is necessary to organize constant circulation using a pump, otherwise the metal will quickly burn out.
To build a Swedish heating and cooking stove, you will need the same set of materials as for a stove. Just take a larger corner - 50 x 50 mm, buy a steel strip 40 x 4 mm and prepare fireproof (fireclay) bricks for laying the firebox. To install fittings, find soft steel wire with a diameter of up to 2 mm.
Rules and nuances of operation
In order for the operation of the furnace to be truly economically profitable, it is necessary to maintain it in impeccable condition.
Recommendations for using the oven
A small crack in the masonry, up to 2 mm, will contribute to heat loss from the heating system. Approximately 10% of the heat will be lost due to the entry of air masses.
The firewood used should not be wet. It is recommended to pre-dry them naturally and prepare them long before flooding the oven. Damp firewood will play a negative role, since it will cause condensation to accumulate on the brick walls, the action of which will contribute to the destruction of the material.
The firewood does not need to be stacked tightly together; there should be a gap of at least 10 mm between them, and 2 cm should remain free from the top of the stove. The ideal option would be to fill the firebox to 2/3 of the total volume of the chamber.
Some more recommendations:
Fire Requirements Scheme
- If the vent is open during heating, up to 20% of the heat will enter the pipe and the heating will not work effectively.
- When the combustion door is open, about half of the heat will be lost.
- For uniform heating, it is recommended to select logs of the same size, approximately 10 cm thick.
- To make the fire burn better, it is recommended to use wood chips or a splinter, and the use of flammable liquids for these purposes is prohibited.
- The view should be closed, then the heat will not go directly into the chimney, and the heating will be at the same level.
To ensure traction, you should focus on the color of the fire. If the color is yellow, then the combustion mode is optimal; if it is white, then there is a lot of air in the flame and most of the heat goes into the chimney. If the fire is red, then this is due to a lack of oxygen.
A technically competent solution for the operation and care of the stove will ensure long-term and reliable operation.
Features of a brick kiln
As a rule, the masonry of almost any brick oven is built from a natural and environmentally friendly material, this is clay, which can withstand very high temperatures and retain heat for a long time.
At the same time, during heating, the brick does not emit any harmful or hazardous compounds to human health. Clay bricks have high thermal conductivity, resistance to high temperature loads, and are also resistant to open flames.
It should be noted that an ordinary standard brick kiln has several important elements that must be erected in stages according to a special scheme:
- foundation;
- firebox or combustion chamber;
- grate;
- ash chamber;
- chimney.
Of course, a brick oven has a number of specific advantages, including:
- rapid heating of the oven;
- Can use different types of fuel;
- minimal operating costs;
- the warmth of the walls does not allow you to get burned if you touch the surface of the stove with your hand;
- The oven heats up quite quickly;
- the stove can perform a decorative function;
- does not require constant cleaning; it is enough to clean the vent once a week;
However, at the same time, a stove of this type also has several important disadvantages, among which are:
- if you operate the stove incorrectly, it can lead to carbon monoxide poisoning, which is very dangerous;
- the furnace has significant technical dimensions;
So, first of all, you need to decide on the installation location of the furnace structure; this is a very important criterion. The fact is that the heating of the room, as well as the practical and rational use of space in the room, depends on the location of the stove.
At the same time, the location of the stove must be indicated in a special drawing of a brick stove with your own hands.
As a rule, most homeowners give their preference to installing a Russian stove, which is one of the most practical and reliable stoves among other types.
Types of fireplace stoves with a chimney: drawing and diagram
Several basic plans for fireplace stoves are common, which are located indoors, for example, in a private house.
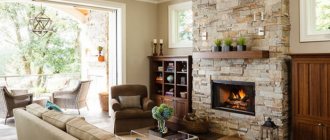
Photo 1. A red brick heating stove-fireplace is installed in a spacious room of a wooden house.
The first option is a stove with a large stove bench, which is a rather large building not suitable for small houses.
However, this design has a number of advantages:
Can perform the function of heating the room. If the system of smoke channels in such a stove is made taking into account the need to heat several rooms, then the rooms located along the chimney itself can also be heated from the chimney.
Photo 2. Drawing of a simple heating brick stove-fireplace with order and dimensions in millimeters.
- In the case of building a structure with chambers for cooking, the stove can replace a stove or, in case of problems with gas supply, act as the main means for preparing various dishes.
- If necessary, a bed built as an extension to the stove can be used as an additional heated sleeping area.
- Creating two fireboxes in this design allows you to heat only that part that is needed at a particular moment in time, and the use of both fireboxes increases the heat transfer of the building.
The diagram of such a structure looks like this:
two blowers with doors located under the fireboxes - one under the fireplace, the other under the stove;
Photo 3. Diagram of a multifunctional brick stove-fireplace with a hob and a second firebox. The location of the smoke channels is shown on the left.
- smoke channels for each firebox, which, if desired, can be combined into one chimney;
- the firebox of the stove and the fireplace itself, which, if necessary, can be placed on opposite sides of the structure and, thus, will be located in different parts of the house;
- a chimney that can go through several rooms.
Important! The large dimensions of the structure arise due to the creation of a full-fledged bed
Wall heating stove made of brick
This version of the stove is a fairly compact design designed for heating, as well as for creating comfort. It takes up much less space in the room, but it is problematic to use it for cooking.
The key feature of such a device is both the fireplace and the stove itself.
They are combined into a structure that can, if necessary, be heated and play the role of a heating device for two rooms at once, to the adjacent walls of which it is connected.
A drawing of such a design looks like this:
- a vent under the furnace firebox with a system of smoke channels to remove excess gaseous combustion products;
- firebox with grate and ash pan;
- fireplace insert with a portal and a system of smoke channels for discharging smoke into the chimney;
- chimney in the form of a single pipe.
Reference! There is no hob in this design, which makes it impossible to cook on it. It is better to combine the stove ducts from each firebox into one chimney, which will not worsen the draft, but will save on material.
A variation of this design can be a fireplace stove, which has a square at its base. The device is used to zone rooms if such a design task is assigned to it.
What is the difference between a multifunctional heating stove?
This type of heating structure is a complex structure that meets several tasks at once:
- heating the room (can be used both as an independent heating device and in combination with existing gas units);
- cooking, subject to the installation of appropriate devices in such a structure;
- decorative task when using a fireplace.
In terms of its dimensions, the design differs in that it can be either very large (for example, in the case when a bed is attached to it) or relatively compact (if a limited number of cooking utensils are used).
Its diagram looks like this:
- blower for stove and fireplace inserts;
- under the fireplace you can place a niche for drying firewood;
- a system of smoke channels from each cooking device (if they are heated independently);
- chimney outlet (there may be one for all heated parts of the stove, sometimes an independent element is designed for each part).
Attention! When placing such a structure in a house, it is best to place its fireplace part in the living room or bedroom, and the firebox and cooking equipment in the kitchen
What does simple mean?
It is further understood that a simple oven, which can be quickly made with your own hands, should satisfy the requirement. requirements:
- A person building such a stove does not need to have a deep understanding of the stove business. Ideally, he doesn't need to understand anything about it at all;
- The stove must operate on low-quality waste fuel with a thermal efficiency (this is analogous to the efficiency of heat engines) of at least 35-40%;
- A brick kiln should not require long-term drying after construction and “accelerating” fireboxes to reach the rated thermal power;
- It should consist of no more than 115-120 bricks, so that all the necessary materials can be brought at one time in the trunk of a car or on a trailer to it;
- Stove fittings (doors, hobs, burners) should be the most common (so that you can use used ones) and/or cheap;
- The masonry of a brick kiln should not contain complex joints, sawn (cut with a grinder) bricks, transitions from red brick to fireclay and steel mortgages.
Calculation of basic parameters
Before choosing a working design for a heating device, it is necessary to make a preliminary calculation according to the parameters of a particular room. The most accurate method is to determine the dimensions based on the heat output of the furnace. In order not to go into complex calculations, for well-insulated houses they use a simplified calculation scheme proposed by I.V. Kuznetsov. This method uses the average thermal power removed from one square meter of the surface of the unit (TMEP). For a conventional firebox, take the value 0.5 kW/sq. m, and if intensive heating is necessary, which occurs during severe cold weather - up to 0.76 kW/sq. m.
When determining the thermal power of a furnace, only those surfaces that participate in heat exchange processes are taken into account. For example, in “Dutch” systems, sections of walls located near the floor, below the horizontal sections of the gas duct, are not excluded from the calculations.
In principle, these values are enough to select a suitable project from those that can be found in the public domain. If the available options are not suitable for any reason, then you will need to calculate the parameters of the main elements of the furnace and design your own design.
Drawings and diagrams of brick kilns
Bath stove Russian stove
Stove-fireplace
Swedish oven Classic "Dutch"
Bell furnace
Firebox
The dimensions of the firebox are determined based on the maximum volume of the fuel fill. In this case, the amount of combustible materials is calculated using their calorific value and specific gravity, focusing on the required power. The volume of the firebox should be 2–3 times larger than the obtained value, which will allow the stove to be reheated at extremely low temperatures. When calculating the size of the combustion chamber, it is necessary to take into account that the maximum filling should not exceed 2/3 of the volume of the combustion chamber. In addition, the dimensions of the firebox and all its components must be adjusted to the size of the bricks used for laying the stove. In your calculations, you can use special tables designed taking into account the need to heat rooms of various sizes.
Calculation table for the main elements of a brick kiln
Ash pan
The height of the ash pan depends on the type of fuel used. For low-ash combustible materials such as coal or peat briquettes, this value is taken equal to 1/3 of the height of the firebox. If the stove is heated with wood or pellets, then the height of the ash chamber must be reduced to 1/5.
Chimney
When calculating the chimney, it should be taken into account that the place of its installation must comply with SNiP
Unlike gas heating equipment, wood stoves do not require much draft, so the best shape for the smoke channel would be a rectangle. When calculating the chimney, it is taken into account that the cross-section of the blower should not exceed the area of its flue, and all values are adjusted to the dimensions of a standard brick. Since accurate design requires operating with a lot of data and parameters, it is best to use one of the special programs. However, for the most common cases (no kinks in the smoke channel, vertical stroke, rectangular cross-section, height from 4 to 12 m), you can use average values for furnaces with a power of up to 14 kW:
- Less than 3.5 kW - 140x140 mm.
- 5 – 5.2 kW – 140x200 mm.
- From 5.2 to 7.2 kW - 140x270 mm.
- From 7.2 to 10.5 kW - 200x200 kW.
- 5 – 14 kW – 200x270 mm.
Recommended sizes are minimum. And yet there is no need to excessively increase the cross-section of the smoke channel, since cold air will descend into the stove through a chimney that is too wide. Counterflow, or “swish” in the language of professional stove-makers, threatens not only a deterioration in performance, but also more serious problems.
To calculate the amount of material required, it is best to use special tables. Below is one of them.
Calculation of the number of bricks
You should not worry if the chimney calculated “offhand” occasionally starts to smoke. If necessary, it can be extended with a piece of asbestos-cement pipe 0.5–1 m long, or several more rows of bricks can be laid. Often such events are carried out when the aerodynamics of the terrain have changed. For example, after trees grow or taller buildings are erected in the neighborhood.
Preparing the mortar for laying the stove
The mortar for a home brick stove is a clay-sand mixture. The sand must be sifted through a sieve so that its cell sizes do not exceed 1.5 mm. At this time, the clay should be soaked in water for 2-3 days. It would be a good idea to pass the finished solution through a sieve (3x3 mm). Each stove maker chooses the proportions for himself.
Having mixed sand and clay, you need to add water and begin to mix the resulting mixture until a thickness similar to rich sour cream is formed. A high-quality mortar should be placed on the brick in a clot and spread in a layer of 4-5 cm (recommended joint thickness).
How to lay bricks for a fireplace: video
A fireplace or other type of stove can be installed in almost any home. The main thing is to choose the appropriate form and function of the structure that matches the capabilities of your apartment or house in terms of safety precautions and dimensions.
If we are talking about installing a brick fireplace or stove with your own hands, then you cannot do without masonry. Now we will tell you how to do this and what is needed for this, then you can watch the attached video on the topic of laying bricks for the stove.
Laying a stove is a very labor-intensive job that requires care and responsibility. You can use different materials for masonry, but the most suitable one is brick. Brick stoves are safe and can harmoniously complement any interior.
If you are laying bricks for a stove for the first time, it is better to draw up a step-by-step work plan , which includes the progress of work and design drawings. Ready-made diagrams can be easily found on the Internet.
If you choose brick for laying a stove, then take into account the following tips and instructions:
- It is best to use solid clay bricks;
- if there are none, fireproof bricks or stones will do;
- the front part of the stove must be laid out from the highest quality bricks, which are ideal in size and color and have right angles;
- mortar for laying stoves and fireplaces should be made on the basis of cement, sand and clay.
To prepare such a solution, mix cement with dry sand, and only then add clay. The mixture should have a uniform consistency and no lumps. Before preparing the solution, the sand should be sifted through a fine sieve, while the clay should be completely cleared of all kinds of impurities by soaking in water.
DIY corner fireplace construction
One of the most common modifications is a corner fireplace, which is not only attractive in appearance, but also significantly saves space.
A very original design of this design is when the combustion hole is located symmetrically to the angular axis of the walls in the room. This type of fireplace can be placed either next to an internal or external wall. But when designing it and laying the foundation, you should take into account the location of the pipe. If the stove is located next to an internal wall, then the fireplace chimney should be built slightly higher than the ridges of the roof of the house.
When laying a corner fireplace, be sure to use the order. If you don’t know, ordering is a special arrangement of each of the bricks needed for masonry. Thanks to the ordering, you will be able to calculate the required amount of material and rationally use the available bricks.
Who can study
Almost anyone who feels the need to receive professional training in a specialty that will allow them not only to open their own business, but also to realize their creative potential can come to the stove-making courses.
Interview with the furnace master
The courses can be attended by either a person experiencing financial problems and seeking to improve the current situation, or a school graduate looking for his calling in life. Age is not of fundamental importance, but it is desirable to have sufficiently good physical health, hard work, and endurance. This is due to the specific nature of the stove maker’s activity, which involves lifting heavy objects and working in different, often uncomfortable, positions.
Laying a foundation for a fireplace with your own hands
A properly laid foundation is the key to successful and long-term operation of the entire structure in the future.
Remember that the foundation of the main room is not suitable for a stove or fireplace, and you need to lay a separate one. This is part of the correct technology for building stoves and fireplaces with your own hands. This work is difficult, but quite rewarding.
The foundation laying algorithm will be as follows:
- prepare a pit 10 cm larger than the future furnace with a depth of about 50 cm;
- Sprinkle the bottom of the pit with a crushed stone layer;
- we build the formwork: its height should be 5 cm below the floor level;
- place rubble stones in it and fill it with cement mortar, the preparation of which will require sand and cement in proportions of three to one, respectively;
- level the foundation and cover with polyethylene film;
- leave the structure to shrink for about a week.
Useful video on the topic
Scheme for creating a small heating and cooking stove:
Construction of a furnace equipped with a drying chamber according to Proskurin’s drawings:
Laying a stove does not tolerate fuss and haste. It is necessary to think through and carefully carry out each stage of work in order to obtain the desired result. It's better to start with a small design, as described above. Having gained experience, you can move on to building more complex ovens: with an oven, drying chamber, arched openings, etc.
Do you have experience building a stove with a stove? Please tell readers about the technical nuances of arranging the foundation and laying the solid fuel unit. Comment on the post, participate in discussions and add photos of your homemade products. The feedback block is located below.
Preparation for work
For laying a stove with a stove, different types of brick are used. Usually they take red solid one for external masonry and fireclay - to make the internal lining of the firebox, as well as the smoke well.
The foundation is poured with concrete mortar. To prepare it you will need cement of at least M400, preferably M500. The sand can be river or from a quarry, but it must first be sifted to prevent the ingress of impurities. Clean water should also be used. For the solution, you should also take granite crushed stone about 30 mm.
The foundation is backfilled using rubble granite, a suitable fraction is approximately 300 mm. In addition, you will need to prepare a solution of red clay and sand.
Instead of clay, you can purchase clay powder; the instructions for using it are indicated on the package. All components must be of good quality; the integrity and service life of the future stove depends on this. To seal the joints, you need to prepare a high-temperature sealant.
The work is carried out using ordinary construction tools.
You may need:
- containers for mixing the solution;
- Master OK;
- Bulgarian;
- plumb line;
- level;
- roulette;
- rule;
- mallet;
- furnace hammer;
- other devices for processing and laying bricks.
To make a high-quality solution, it is better to use a hammer drill or drill with the appropriate characteristics, as well as an attachment designed for these purposes. A shovel and a sieve will come in handy.
Additional tips for choosing material
Brick comparison chart
You should buy brown clay materials for stove masonry. They successfully withstand sudden temperature changes, and if the stove has not been used for a long time, the masonry will not crack.
You should not choose silicate, cast or pressed bricks - their structure will not withstand the load.
Fireclay brick is most suitable for laying a furnace, as it can withstand temperatures up to 1350C. It can also be used to construct the entire structure, or you can use it to lay out only the inner mile.
The use of brick grade ShA 8 yellow with specks or ShA from 22 to 45 is an excellent solution for laying a stove, but not for rooms with high humidity levels, since its operation is only possible at 60% humidity.
In rooms such as a bathhouse, it is best to use the following types of bricks:
- ceramic;
- refractory;
- clinker.
Taking into account all of the above, you can achieve an impeccable result.
Choosing the optimal location for the furnace
The operating principle of the heating device will help with this.
The location depends on where the chimney can be erected and removed, and a safe area for operation can be created. If a person wants to build a structure in a specific place, then before starting work it is necessary to take into account fire breaks. Only after this can you make brick stoves for your home.
The following recommendations will help you determine the exact location:
- air flows must penetrate unhindered in order to create the correct convection system (for example, to warm several rooms);
- when choosing a location for installation, you should take into account the connection of the stove to the smoke exhaust system;
- the presence of free space when opening the doors of the combustion chamber, if there is not enough of it, difficulties will arise in cleaning and kindling;
- any structure must be built taking into account fire breaks, from heating flammable parts (the standards indicate a safe distance).
Simple recommendations will help in performing the work and creating the right device.
How to properly build a brick oven: instructions for the progress of work
To build a stove with your own hands, prepare a clay solution in advance. 30-40 minutes before starting masonry, you need to soak several bricks in water (the porous material will take moisture away from the mortar, and the masonry will not be strong). Bricks must be constantly added to a container of water as they are used.
The first row is laid out first without mortar, guided by the order and determining how the material will lie. Then all the parts are removed from the foundation, beds of mortar are applied to it and work begins.
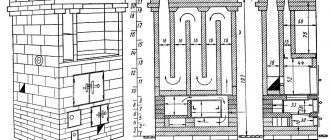
Furnace layout diagrams
The lower tier of the oven is made solid. There are no notches on it. In different orders, 1-2 rows of bricks are laid out. Once completed, the surface of the tier should be completely horizontal and the corners vertical. When laying the first levels, it is necessary to monitor these indicators using a level and plumb line. In the future, these tools will also be required, but the laying can already be carried out along the cord.
The doors must be secured immediately when starting work on this tier. To ensure that the frame is firmly held in the masonry, wire is threaded into the holes at its corners, twisted 2-3 turns, and the remaining ends (at least 15 cm) are placed in a layer of mortar between the bricks.
The order of each level has its own number. If grates or ceilings are installed on this tier, there is a narrowing of the hole, this is reflected in the drawing. Looking at the diagram, even a novice master will be able to correctly assemble the stove and its heating system, and repair brick stoves with his own hands.
Briefly about the installation of the oven and heat exchange register
The oven in most home ovens is placed just below the chimney exit from the firebox. In some cases, an additional gap is left between the wall of the firebox and the metal cabinet. Hot gases will flow evenly around the oven on 4 sides. In this case, a door is made under it to remove ash and soot. After passing the perimeter of the oven, the 2 chimney channels unite and go into the heater revolutions.
When installing a heat exchange register (if the furnace device contains a water heating boiler), pipes or other structures are placed in the firebox, above it or around 2 walls. If the pipes pass inside the firebox, between them and the stove, the walls of the firebox leave a gap to compensate for the expansion of the metal (5-15 mm). The installed unit should not interfere with the circulation of gases inside the furnace or interfere with loading fuel. If there is no ready-made scheme, all these parameters must be carefully calculated in advance.
Step-by-step instruction
It is not difficult to assemble a heating stove with your own hands; just read the instructions.
Further sequence of actions:
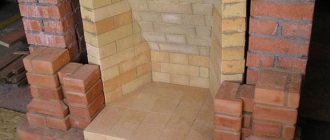
Two examples of brick oven laying
- After the third row has been laid, the blower door should be placed in the oven.
- To keep everything level, a level is used, and an asbestos cord is used to close the gap.
- Then they begin laying out the main part intended for heating. For this purpose, fireclay or stove bricks are used.
- Before laying a brick stove, the ceramic material is cleaned of dust and dirt and moistened with clean water.
- Fireclay bricks should not be wetted.
- Laying out the mortar can be done manually, since it is difficult to achieve a mortar thickness of 3 mm using a trowel.
- The furnace laying must be verified. Tapping and separate editing are not allowed.
- If you can’t do this the first time, you can repeat everything, having first cleared the brick from the mortar.
- After completing several rows of masonry, a grate is installed in the grooves of the fireclay bricks to separate the ash chamber.
- The working combustion door is installed in the furnace in the same way as the blower.
- The body of the furnace is laid out with brickwork.
- If the cast iron slab should be below the level of the bricks, then the last row of masonry should be moved outward.
Before carrying out work, you should consult a specialist.
Procedure for creating a brick oven
The algorithm of actions for equipping a brick kiln can be as follows:
Upon completion of the careful arrangement of the first row of the furnace. A door designed for the blower should be installed. It is strictly forbidden to install this door with ordinary wire. The correct option would be to use special metal plates that are suitable in size. Then you can start laying the second row, where there are no significant difficulties. The third row of the stove is arranged similar to the second
Do not forget that to obtain the desired shape of the blower, it is allowed to trim the brick on both sides, but it is extremely important to remember that the height of the door must fully correspond to the height of the row of bricks. You need to start laying the fourth row of bricks on the left side. First of all, you need to equip a door designed to remove ash, otherwise the system will not be able to operate at full capacity. The installation process follows the standard system, but it is important to close the ash door
Above the hole for ash removal, it is necessary to make a special square-shaped hole, which can be achieved by laying the bricks in a certain order. When laying bricks for the fifth row, the ash pan hole needs to be narrowed, but otherwise the installation method corresponds to laying the fourth row
The installation process follows the standard system, but it is important to close the ash door. Above the hole for ash removal, it is necessary to make a special square-shaped hole, which can be achieved by laying the bricks in a certain order. When laying bricks for the fifth row, the ash pan hole needs to be narrowed, but otherwise the installation method corresponds to laying the fourth row
When making arrangements for the sixth row of the furnace, it is necessary to use refractory bricks, which are usually shown as hatched in various diagrams, thereby greatly simplifying the installation process and eliminating the possibility of incorrect laying. It is recommended to chop off a brick in the area in front of the grate, which will increase the productivity of the furnace and simplify the placement of fuel. In this case, the fifth row will serve as a support for the grille. If it is not possible to get refractory bricks, you can always use a regular one, but it should be noted that the technical characteristics of a brick that can withstand high temperatures significantly exceed those of a regular one. In the space between the sixth row and the grate, you will definitely need to leave a gap 10 - 15 cm wide, which will subsequently need to be filled with sand. This part will serve as a compensator for the expansion of the metal grate during operation of the furnace.
The previously obtained U-shaped furnace channel should be blocked so that as a result three new channels are formed. This stage involves installing a door for the firebox, which will rest on the sixth row. Laying the eighth and ninth rows of a Swedish-type oven is carried out in the same way as the seventh
It is important to note the fact that the level of the ninth row must necessarily coincide with the level of the firebox door. The bricks covering the partition of the firebox chamber and the left channel on both sides will need to be cut off, as this will ensure a smooth transition of exhaust gases from the firebox to the channel (for more details: “Swedish stove: ordering it yourself according to the correct pattern”). The tenth row should also be based on refractory bricks
Among the features of this stage is the need for exclusively vertical laying, which can be achieved by using a building level. This must be done so that the flooring for cooking can be laid on this surface, as required by the ordering scheme.
Repair work
Repair depends on the complexity of the breakdown. A thorough inspection is carried out first. Operational problems are often associated with soot contamination. It is important to check and clean your chimney. If long streaks of smoke appear above the firebox, this is a sign of poor draft. The reason may be improper laying. Part of the structure must be disassembled and reassembled.
If the brick is not destroyed, this is a sign of burning raw wood. Incorrect fuel destroys the chamber and ash pan. Only dry logs are used for kindling. In summer, it is recommended to periodically check the condition of the structure. Inspection is necessary when the structure is not in use for a long time. Metal elements (latches, doors) are periodically checked for strength. If necessary, strengthen with mortar.
Stages of construction of the furnace structure
After determining the location of the furnace, it is necessary to make a high-quality and reliable foundation on which the rest of the furnace will be built in the future.
Therefore, the foundation is the basis of almost every furnace, and the durability and reliability of the furnace design largely depends on the foundation.
After erecting the foundation, it is necessary to begin constructing the ash pit; this is a special chamber that supplies air to the combustion chamber, and also an accumulation of burnt fuel is formed in this chamber. Therefore, it is periodically necessary to clean this chamber from soot and ash.
The size of the firebox must be taken into account based on the size of the stove structure itself. Next, you need to make an ash pan; this is a special chamber where all the ash accumulates, which must be periodically removed. Its installation height largely depends on what fuel the stove will operate on.
The final stage in the construction of any stove will be the chimney, which is designed to remove carbon monoxide and smoke from the stove. During its manufacture, it is necessary to install a special partition, the so-called valve, which must be opened when the stove is burning, and closed after it goes out.
This is how you make a brick oven using wood with your own hands. Upon completion of the construction of the structure, it must be left for several days to dry completely.
The process of constructing the structure itself is of no small importance. The fact is that the stove must be built in stages; after each row of brick laying, it is necessary to measure all the necessary parameters with a level, and if necessary, eliminate inaccuracies.
All work must be done slowly, carefully and carefully. A brick stove for a bathhouse is built with your own hands in almost the same way; the operating principle is almost the same, but there are minor differences.
The difference is that the sauna stove must be additionally equipped with a special place for storing stones, as well as a container for heating the hearth.
Training opportunity
The order of laying a heating stove
You can search for educational institutions where they teach the profession of a stove maker on your own. Now in many cities short-term courses are organized where the basics of the profession are taught.
It is necessary to take into account that organizations providing training receive accreditation from the Ministry of Justice, as well as the Ministry of Education and Science. In addition, they must have a license from the Ministry of Emergency Situations. Course graduates receive standard certificates that confirm their qualifications.
For example, in Moscow, educational services for training stove makers are offered by the following organizations:
- Russian Technical School;
- Russian Academy of Crafts and others.
The country's vocational education system, after reorganizations, continues to teach blue-collar jobs. In particular, they study to become a stove-maker at the Kostroma Vocational Lyceum No. 6.
Tandoor or Russian oven
Tandoor is an ancient construction of a dome-shaped adobe hearth. Distributed in different regions: from Central Asia and Northern China to Africa and Latin America. It combines high heat capacity with fuel efficiency, because in the historical homeland of these stoves there has never been an excess of firewood.
Ancient tandoor
A distinctive feature of the tandoor is its single-chamber design with a high round arch. The operating temperature in the firebox is higher than in a Russian stove. Therefore, the thermal regime during cooking is more intense, which affects the range of dishes. The cuisine is famous for its wealth of recipes based on simmering: porridges, grain dishes, various soups and decoctions.
Contents of the course being studied
If you decide to master the furnace business while taking courses, you must complete the proposed levels of training:
- elementary;
- base;
- in-depth.
Russian Academy of Crafts [ads-mob-1][ads-pc-1]
Stove maker courses
For example, the Russian Academy of Crafts allocates 72 hours to master each one. The entry level is focused on a detailed acquaintance with the activities of a master stove maker with training in the basics of the profession. Upon completion, the course participant will be able to consciously determine whether he needs further study or whether the choice of specialization was a mistake. As they continue their training to become a stove-maker, they will begin to comprehend the intricacies of the profession, and the benchmark in course preparation will shift towards increasing the number of practical hours. Other training centers may have their own standards.
The content of the course being studied in different organizations providing course services practically does not differ, since the skills of a stove maker have certain specifics. All study hours reflected in the program are divided into a theoretical block and a practical one.
General requirements and safety
Small Firebrick Stove
Let's start with the basics that will be useful to any novice stove maker. It will not be possible to understand everything at once, since laying a stove is a very complex and responsible process.
It is much more difficult to build than a brick wall. Therefore, today we will look at the simplest option that even a beginner can implement.
So let's start with terminology. It will be useful for you to understand the material that we will present below. Without knowing the names of the structural elements, even an experienced builder will not understand the information correctly.
Schematic structure of a brick kiln
| Part of the stove, photo | Description |
| Foundation | There is nothing complicated here - this is a solid foundation on which the entire structure will stand. It is made in the form of a monolithic concrete slab of the required size and shape. |
| The furnace walls provide a framework that supports the internal structure of the furnace. Their outer side transfers heat into the rooms, and it does not do this at once, but accumulates and then gradually cools down. |
| Firebox, firebox | This is a combustion chamber in which combustion products and flue gases are formed, which transfer thermal energy to the walls of the furnace. The upper part of the firebox is called the arch, and the lower part is called the bottom. |
| Grate made of steel reinforcement | The grate is a metal grate installed inside the firebox, through which ash spills down and air rises to maintain combustion in the furnace. |
| Ash pan | The chamber under the firebox, into which the passage from the grate leads, is called a blower or ash pan. Through it, air is sucked into the furnace from the room and ash is removed. A cleaning or hatch leads into the ash pan - this part is made of metal and has holes for air to penetrate inside. The system is equipped with a shutter to prevent spillage of hot ash. |
| Smoke channels | Smoke circulations are passages through which hot gases pass through the furnace, heating its outer surfaces. Through them, smoke is discharged through the chimney outside the room. Everything is clear with the chimney. |
| Cover | Upper surface of the oven. It can be made simply of brick, or have a metal or ceramic hob. |
| This is the name of the cavity inside the furnace, which is not connected by direct passages to gas exchange paths. |
Also in the oven there is:
- Damper - a damper that blocks the smoke channel;
- Doors for firebox and blower;
- Trenches - beams that replace the foundation slab, can be made of different materials.
Types of household stoves
Depending on the main function, there are three types of brick stoves:
- for heating;
- for cooking food;
- combined option.
The latter is intended both for heating the home and for preparing food. To organize stove heating at home, an impressive chimney system with numerous channels is installed. It must retain as much heat as possible from the combustion of fuel and smoke gases in order to warm the air inside the house.
If you need a stove for cooking, you can make do with a regular vertical chimney, but install a hob above the firebox. You can also make an oven underneath it. To create a combined version of such a stove, both a hob and a chimney that retains heat are used.
Depending on the type of device, choose its location. The heating stove should not be placed close to the outer wall, otherwise some of the thermal energy will simply evaporate outside. It is better to place it in the center of the room so that the air in different parts of the house warms up evenly.
A traditional brick wood stove, if desired, can be equipped with quite modern elements to expand its functionality
It is better to think about this point when designing a house. A heating stove can become an object that divides a large room into several separate zones. Each of them will be warm.
The hob is treated completely differently. In a closed kitchen, it is best to place it close to two adjacent external walls. This will allow excess heat energy to be transferred outside so that the room does not overheat during cooking.
Cooking stoves are also installed separately, in the open air. This is a popular element of the recreation area. Nearby there may be a grill, barbecue, cauldron and other cooking utensils. On a cool evening, the warmth from such a stove will pleasantly warm your vacationing guests.
A combination stove, like a cooking stove, is placed near two walls, but it is better if they are internal. Then the heat will not go outside, but into the house, and the kitchen will be moderately warm. The chimney is made massive, as for heating, but it is shifted towards the living rooms. As a result, thermal energy is distributed fairly evenly throughout the house.
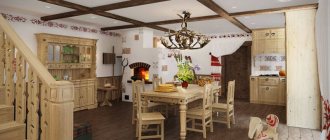
Interior design for a small kitchen
A small kitchen requires good design. Functionality is what matters here. A good way to enhance the interior of a small cooking room is to connect it to the living room. Kitchen design should start with the layout. For a small kitchen you should choose furniture that has several functions. The peninsula will do a great job arranging a room. It has been proven to be an excellent solution for small areas. Allows you to make the most of a small room's surface while taking up little space, so you can conveniently prepare meals and eat them together. In turn, the space under the peninsula will be useful for storing kitchen knickknacks and installing an outlet.