Before covering the stove, decide on the type of tile. First of all, pay attention to the following characteristics:
- Fire resistance. The coating is subject to constant contact with high temperatures.
- Thermal conductivity. The tile should let through, but at the same time retain heat.
- Strength. Accidental impacts affect the integrity of the coating. In addition, the low-strength material cracks at the first heating.
- Decorative. Pay attention not only to the colors and patterns, but also to the size of the elements.
- Porous structure. Due to this, the tiles adhere firmly to the surface of the oven and do not lag behind during temperature changes.
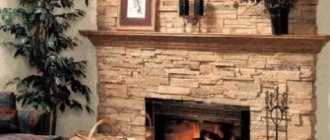
Facing tiles should not only be beautiful, but also practical
Calculation of the number of tiles
To do this you need to know a few things:
- the total area of all oven surfaces on which the tiles will be laid;
- the dimensions of possible areas with a narrow decorative layer of ceramics;
- dimensions of ceramic tiles.
To calculate the area, you will need to subtract the dimensions of the blower doors, combustion chamber, and gaps between finishing parts. For furnace cladding, it is recommended to make gaps of up to 10 mm.
If you plan to make a narrow finishing belt, make barriers and other decorations, the area of such a layer is taken into account in the calculation. Now knowing the dimensions of the tiles, we can easily calculate the number of tiles of the main layer and decorative belt.
We divide the total surface area by the area of 1 tile and get the number of parts required to complete the work. If the doors on the firebox and ash pan are small, they can not be subtracted from the total area. For reserve, it is recommended to increase the number of tiles by 20% of the calculated value.
Some useful tips
After grouting, you can make a neat seam with a concave surface. To do this, you will need an even stick or tube of suitable thickness. It needs to be pressed against the still soft mixture, pressing it between the tiles.
It is very convenient to use strips of drywall as a template for seams. Its thickness is 10 mm. This will allow you to lay the tile with a constant gap by simply pressing the side of the tile against the strip. Once the binding is completed, the templates can be easily removed.
An element that accidentally falls off after finishing must be cleaned of glue and its remains removed from the wall. Lubricate the entire underside of the tile with clay mortar and install the part in place. Press the glued fragment tightly, aligning it with the adjacent ones. They also carry out partial repairs of the coating during operation, rubbing the tile seams.
Do-it-yourself stove repair will be successful only if the tile laying technology is followed. It is better not to skimp on materials; porcelain tiles or clinker suitable for stoves and fireplaces are expensive, but they also last a very long time.
Tile requirements
To get acquainted, we will analyze the main types of tiles and the criteria for their selection. It is recommended to use several types of finishing materials for lining heating units and fireplaces:
- "Majolica". Such tiles can be found on old stoves. Ceramics covered with a layer of special heat-resistant enamel - the high price does not make it popular among the population;
- Terracotta tiles are a simple version of majolica. It is made from clay, due to its properties it is not subject to deformation from high temperatures, and is resistant to cracking and mechanical damage. It is successfully used as a finishing for stoves in garden houses with seasonal heating and long breaks in work. This finish will protect the stove from dampness and cracking.
- Clinker tiles are an alternative to refractory bricks. The composition includes several types of clay with the addition of fireclay and various dyes. The finished mixture is pressed under high pressure, then fired;
- The use of porcelain stoneware increases the service life of the stove finish. It is made from different types of clay with the addition of granite, marble and binding additives. The thermal properties of the material make it possible to reliably protect the stove surfaces and give them a beautiful appearance.
Any tile must meet several requirements, which we must pay attention to when choosing finishing materials:
- Surfaces must be smooth, without cracks or chips.
- Individual parts of the series must be painted the same color. If even the color tone is different, it is not recommended to buy such products. It could be a defect or a fake.
- Each part must be geometrically smooth, maintaining right angles. To check, place several tiles on the surface and join them together. If there are the slightest gaps or the slab does not adhere to the surface, it may be a mismatch or a fake.
- We make sure to check the seller’s quality certificate for the product, which should indicate the environmental safety class and other performance characteristics.
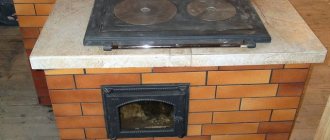
Tiles
This material is specially designed for lining stoves. It features excellent performance and stunning appearance. But this is not only a stylish decor, but also a way to retain heat for as long as possible. It has a box-like structure with a recess on the reverse side - the so-called rump.
Related article: Ideas for crafts from autumn flowers (56 photos)
Tile cladding will provide visual appeal and effective functionality.
How to lay tiles on the stove:
- A serpyanka mesh is fixed to the surface and plastered with a thin layer.
- Self-tapping screws are screwed into the seams between the bricks.
- Glue is applied to the stove and to the back of the tiller, along its contour.
- The tile is fixed to the surface, then screwed to a self-tapping screw using wire. All tiles are laid in this way.
- The distance between elements reaches 1 cm.
- Fire-resistant chamotte is poured inside the pump; it retains heat and increases the useful effect with less consumption of heating materials.
What glue should I use to glue tiles to the stove?
Having chosen a tile, you need to select a composition to securely fix it on the walls. To answer the question: how to glue tiles to the stove, we follow several recommendations:
- it is better to purchase a ready-made composition so as not to perform complex calculations on the amount of materials;
- we select glue produced for lining fireplaces or stoves;
- It is recommended to use heat-resistant mastic “Standard” with a heating temperature level of 10,000. We take into account the material consumption of 1.5 kg per 1 m2;
- glue “Plitonit – SupenrKamin” is produced using a dry mixture, which we dilute before work;
- Atlas-Plus hardens within a few hours. Consumption rate 2 kg per 1 m2;
- “Fixator” adhesive is recommended for use when lining garden house stoves. It can withstand high temperatures during furnace operation and cold during long breaks.
Grouting joints
After completing the furnace lining, the joints are grouted. The ceramics must be completely dry. You must allow at least 24 hours for this. The average drying time is 24–72 hours. A spatula is used to apply the grout. You can tint the mixtures with colors, in which case the seam can become both less noticeable and more contrasting.
The technique for performing the work is quite simple:
- adding water to the dry grout mixture;
- rubbing into the gaps using a rubber spatula;
- cleaning the surface with a sponge or damp cloth;
- re-cleaning the tiles from the remaining film after the composition has completely dried.
Stages of tiling the stove
After finishing the stove, at least 3-4 weeks should pass. This period is necessary for complete drying of all types of solutions that were used for cladding. After this period, the heating device can be tested. As soon as the oven heats up, it needs to be cooled down again. After this, the system is ready for use.
Materials and tools
In order to glue tiles to the stove, we will prepare the required materials and tools according to the list:
- tiles or other type of material with a reserve;
- mounting mesh or just chain-link;
- hammers with rubber and metal strikers;
- hammer drill with chisel;
- ready-made glue that can withstand high temperatures;
- device for cutting tiles;
- spatulas;
- building level;
- devices for protecting the corners of the furnace;
- special primer;
- ready-made or home-made parts for setting equal gaps between the cladding;
- heat-resistant grouting.
Preparing the furnace for cladding
At this stage, you will need to perform a number of auxiliary works:
- We clean the surfaces of the oven from the mortar and layer of plaster. We cut the seams between the bricks to a depth of 10 mm, for better fixation of the tiles on the surfaces. If you used a solution of clay and sand, you can put a metal brush on the grinder, but there will be a lot of dust;
- Removing traces of paint. If the surface is completely painted, you can make shallow cuts with a chisel or grinder;
- We attach the mounting grid to all planes.
Porcelain tiles
This material is increasingly used in oven linings. It has excellent heat resistance and unique characteristics. Porcelain tiles are used to decorate not only the outer surface, but also the interior of the oven. In addition, he is not afraid of temperature changes, evaporation, cold and shock.
Porcelain tiles are wear-resistant, so they practically do not wear out over time.
How to cover a stove with porcelain tiles:
- Apply glue to the surface with a notched trowel.
- The fragment is installed and compacted with a mallet.
- Several rows are laid in this way and allowed to dry.
- Work continues. At the end, the cut tiles are glued.
Methods for cutting tiles
In order to cover the stove, the tiles have to be adjusted to size. There are several tools you can use for this job:
- To cut simple, thin tiles, you will need a simple glass cutter. We trim the layer of glaze and then break the tile, laying it on a flat surface;
- electric jigsaw. This tool can cut any types of materials and shapes of parts. But the file leaves chips, even gluing tape to the front surface does not help;
- grinder with diamond blade. This tool can make smooth, straight cuts on any type of tile. To do this, mark the cutting line and lay the part on a flat surface. First, we do not deepen the disk, remove the layer of glaze along the entire line and only then cut off the part;
- tile cutter It is used by professional tilers; if it is possible to rent it, this will be the best tool option. The cuts are smooth, the front part does not crumble. Simply lay the tiles along the line, run the cutting tool and you can lay the tiles in place;
- for larger cutting sizes, after cutting with a glass cutter, you can gradually chip off pieces of tile using sharp tongs or wire cutters.
Spot bonding of ceramics
Popular brands of tile sealants
Point fastening of ceramic tiles is carried out using sealant. Red silicone sealant is perfect for this purpose and does the job perfectly. This installation method significantly saves the technician’s time and effort.
The spot method of finishing a stove has some disadvantages. Thus, the heat transfer of the furnace is significantly reduced. This happens because the finish does not adhere tightly to the base.
To carry out installation, apply sealant to the 4 corners of the tile on the back side of the sample. It is necessary to make an indent from the corners, which will be 2 or 3 centimeters. The area of each attachment point is quite large: approximately 3–4 square meters. see the gap between the tiles is 3 millimeters. Fixing crosses will help to obtain an aesthetic result: the seams between the tiles will be smooth and neat.
How to cover a stove with tiles?
Do-it-yourself tiling of the stove is carried out according to a certain scheme in several stages:
- We begin to lay the rows from the bottom. To prevent slipping and provide protection during operation, we attach a special perforated corner to the bottom along the markings. We fasten the corners to dowels with self-tapping screws. The pitch between the mounting holes is 200-250 mm. We cover all corners of the oven with the same parts. This will level all surfaces, protect corners from chipping and securely fasten the tiles.
- Prepare the glue. We dilute the dry mixtures and be sure to let the solution sit for 10-15 minutes.
- We apply the finished glue to the wall, filling the surface for laying a maximum of 7-8 tiles in a row. The thickness of the layer depends on the consumption rate indicated on the packaging. From the corner we begin laying out the ceramic parts. The first row is the basis for the entire finishing structure, so we lay out each tile level, bringing its position to the ideal. We insert special crosses into the gaps. Their thickness may vary depending on the type of ceramic. For simple tiles, it is enough to lay crosses up to 5 mm thick. We remove the protruding glue, the seam should not be filled, we will fill it with a special grout.
- If an incorrect position of a part is detected, it can be repositioned within 15-20 minutes. Place crosses on the bottom row on 2 sides and begin to make the 2nd and next rows. We check the installation of each part using a level. All seams must be even. After laying 4-5 rows, we take a break for 2-3 hours for the glue to harden and fix the lower rows.
- We bring the rows to the top row and determine the size of the tiles to be cut to size. Now we apply the solution to the wall for each part separately. To cover all the irregularities, we fix the corner with self-tapping screws. Having laid the top row on all sides of the stove, we check that there is no adhesive on the front surfaces and in the seams. Leave the oven for 3 days until the glue completely hardens.
Stages of work
Final works
At this stage of work:
- We remove all the crosses from the grooves;
- We put 2-3 kg of firewood into the firebox and dry the surfaces before completing the work. We carry out this operation at least 3 times, allowing the oven to cool completely after each stage;
- Prepare a solution of heat-resistant grout or use mastic. If necessary, you can add a color pigment to the composition to shade or highlight the main color of the tile. We fill the seams using a small rubber spatula. Immediately remove excess solution using a dampened cloth. If a heat-resistant sealant is used, fill the seams using a mounting gun;
- We treat the seams with a special water-repellent composition based on silicon;
- Let the grout harden a little, and after 2-3 hours we finally clean the front surfaces of the oven.
By carefully and slowly doing the work, you can improve your old brick oven or metal unit screens during the day. The work is not difficult, but responsible. The main thing is not to be afraid and do it. By redoing defective areas, we gain invaluable experience.