Most domestic holiday villages do not yet have the opportunity to connect to centralized communications. In terms of infrastructure, it’s good if there are asphalt roads and power lines. In such conditions, building a brick stove for a wood-burning cottage will help solve an important problem: it will provide thermal energy for heating rooms and for cooking.
We have selected for you diagrams and orders of the simplest stove structures, the laying of which can be handled by a novice master. With our help, home craftsmen will easily master the basics of the difficult, but extremely interesting activity of a stove maker. An impeccably constructed structure will delight both the owner and household members.
In addition to a detailed description of the technology for laying brick stoves, we provide valuable recommendations on the selection of materials for the construction of units. The article meticulously describes significant subtleties and the smallest nuances. To help independent stove makers, diagrams of stove structures, operational instructions, photos and video tutorials are included.
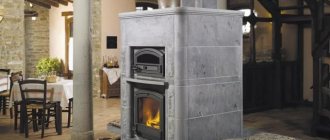
Why are brick ovens popular?
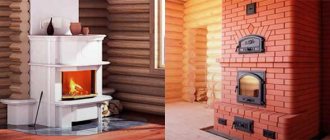
Brick stoves are found in private homes and country cottages. Despite the fact that there are more modern and technologically advanced ways to heat rooms of any size, it is possible to achieve comfort and a stylish interior only with such a design. Do-it-yourself brick veneer looks good in cottages.
The popularity of such heating elements lies in several factors.
- Thoughtful design. This helps retain heat much longer than with cast iron or steel varieties. One stack of firewood is enough for a full day of heating. Solid fuel is added to metal stoves every 5-6 hours.
- Economical. Combustion of fuel produces high heat transfer. Excess heat warms up the masonry, which in turn warms the rooms.
- Environmental friendliness. During the combustion of wood, carbon dioxide and a water base are released. These substances do not harm the environment.
- Soft thermal radiation. External parts do not heat up to maximum limits.
- Optimal humidity level. When bricks are heated, moisture evaporates from the pores, and when cooled, it is absorbed again. Thanks to this, the humidity levels in the room are 40-60%.
A hob is often installed on the surface of the stove. This allows you to prepare dishes with a special flavor.
Finishing
After the work with the brick is completed, you can inspect the brickwork again and open the seams additionally. Typically, DIY garden stoves are not plastered or lined with stone. If desired, this can be done if the design idea requires it or when a modern building is very different from the surrounding environment of the old dacha. Next to a small whitewashed house, a plastered stove decorated with paintings or tiles will look more harmonious. A stove in the depths of the garden, lined with natural stone, will look original, but if it stands on a lightweight foundation, this should not be done.
Calculation of basic parameters
Before starting construction work, it is necessary to calculate what power stove is needed for installation in a particular house. Dimensions are determined based on the heat transfer capabilities of the furnace. For well-insulated buildings, the calculation algorithm of I.V. Kuznetsov is suitable. It involves the use of average thermal power, which can be obtained from 1 m2 of oven surface.
For most fireboxes, the typical indicator is 0.5 kW/m2, and for intensive operation during a significant cold snap - 0.76 kW/m2.
When determining the thermal power of a brick kiln, only those surfaces that participate in the heat exchange process are taken into account.
It is not recommended to choose massive rough bars for small rooms. This is due to the fact that they will take too long to warm up, and half of the heat will escape through the chimney. It is recommended to place it at the intersection of living rooms so that they warm up evenly.
Drawings and diagrams of brick kilns
Based on the proposed drawings, you can design and make a brick stove with your own hands.
- Russian stove
- "Swede"
- "Dutch"
- Bath stove
The given diagrams are some of the most popular design solutions. You can construct such rough bricks with your own hands in a private home without outside help.
Firebox
The optimal dimensions of the firebox can be determined based on the maximum volume of the fuel fill. The amount of combustible materials is calculated taking into account the calorific value and their specific gravity. In order for the stove to operate at the required power, the volume of the firebox must be 2-3 times greater than the obtained value.
With the correct volume of the combustion chamber, you can fire the stove at extremely low temperatures outside the window. The size of the combustion chamber must correspond to the parameters of the bricks from which the stove will be built.
The maximum volume of solid fuel should not exceed 2/3 of the furnace.
Ash pan
The height of the ash pan is calculated taking into account the type of fuel that will be used to heat the room.
Low-ash varieties - coal, peat briquette. For this type of fuel, the height of the ash pan should be about 1/3 of the height of the firebox. Solid wood fuel – pallets, firewood. In this case, the height of the ash pan is reduced to 1/5.
Arrangement of an ash pit in the furnace is mandatory. Combustion products will enter this chamber and will not spread over the entire internal surface. Cleaning your oven before the cold season will be easy.
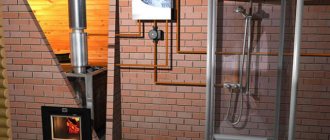
Chimney
The chimney is an essential part of the heating system, since fuel combustion products exit through it. Gas boilers require good draft, so the pipe is installed in a round shape. For a stove operating with solid fuel, a rectangular version will be sufficient.
When calculating the dimensions of the chimney, it is taken into account that the cross-section of the blower should be smaller than the area of the flue. The parameters of standard brick used as the main building material are also taken into account.
It is not recommended to significantly increase the cross-sectional indicators: cold air will penetrate through the wide pipe. This will degrade performance and lead to dangerous situations.
Chimneys that are too narrow can produce a lot of smoke. This leads to carbon monoxide poisoning and the possibility of fire. The problem can be prevented by building up an asbestos cement pipe or laying another row of bricks.
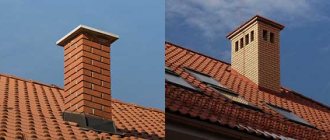
The chimney should not touch the wooden parts of the ceiling. During construction, you need to ensure that the distance from the chimney cut to the nearby ceiling beams is the same. The chimney should be 1.5 m from the roof ridge and rise above it by 0.5 m.
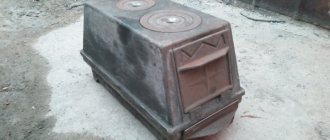
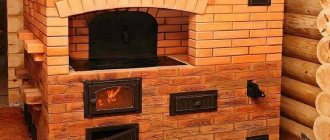
Brick kitchen slabs
Based on their design, kitchen stoves can be divided into simple, medium and complex.
A simple kitchen stove has a combustion and blower doors, a grate and a smoke valve. It is the simplest of all household stoves.
Kitchen stoves of average complexity have, in addition to the above-mentioned stove appliances, an oven, and complex ones also have a hot water box. Ovens are made of black steel with a thickness of at least 1 mm, and hot water boxes are made of galvanized steel. The casing of the water heating box is made of black steel with a thickness of at least 1 mm. The thicker the steel, the more durable the devices.
Stove with two-burner stove and oven
In a simple cookstove, hot flue gases from the firebox are directed under the cast iron stove and then discharged through an opening under the chimney into the chimney.
In other kitchen stoves, hot flue gases are directed under the cast-iron stove and then, descending, heat the walls of the oven or one wall of the water-heating box, and then are discharged into the pipe, while heating the bottom wall of the oven, the bottom and the other wall of the water-heating box.
The above-mentioned kitchen stoves do not have a cooking chamber, therefore, during cooking, steam and odor are released into the room, which negatively affects the microclimate of the room. This article provides drawings of sections and ordering of a kitchen stove of an improved design, which has a cooking chamber connected to a pipe using a ventilation duct closed by a ventilation valve.
Preparatory activities
Before starting construction, it is necessary to go through the preparatory stage. It is worth taking it seriously - the more scrupulous the approach, the better the result. Making a brick stove with your own hands from scratch is a very real task.
Preparation for construction occurs in several stages.
- Buy building materials.
- Determine the location of the building in a residential building.
- Pouring the foundation.
- Prepare a solution for working with bricks.
These are the basic preparation steps before building a brick kiln.
Required materials and tools
To make a brick stove with your own hands, you need to select high-quality materials. To build the structure you need to take:
brick. Individual quantity calculations are carried out for each project; doors: for the blower and firebox; clay for mortar; lattice; soot cleaner; flap; grates; valve; cast iron hob.
It is forbidden to use sand-lime bricks to build a furnace - even the double variety is not suitable.
Refractory bricks are optimal for furnaces; ceramic bricks are rarely used.
The basis for the solution will be clay. Red is suitable for red brick, fireclay - for fireclay. There are also special mixtures for sale for the construction of stoves; to work with the solution, it is enough to prepare it as written in the instructions.
To build a furnace, take the following tools:
- putty knife;
- Master OK;
- tape measure;
- plumb line;
- mop broom;
- level for construction;
- knitting wire;
- containers for preparing cement and clay mortar;
- grinder;
- metal strips and corners;
- bushhammer.
The foundation under the structure must be strong and reliable. To do this, you need to prepare a stable foundation. The following materials and tools will be useful:
- sand;
- crushed stone;
- reinforcing mesh;
- cement;
- boards and nails;
- waterproofing material.
If external wall finishing work is planned, then you need to buy material for this.
Features of choosing a place to install a heating device
Usually the location of the furnace is designated even before the construction of the house in the project. This is necessary in order to install heating equipment in a place from where warm air currents will be evenly distributed throughout the rooms. The foundation for the stove must be separate from the general foundation of the house. The distance between their walls must be at least 150 mm.
Failure to comply with the rules regarding foundation construction will lead to deformation of nearby walls.
A properly installed stove should heat several rooms located across the wall at once. If there are several rooms in the house, it is worth installing the grub at the crossroads of the walls. Since the foundations must be separate, it is better to make the internal walls light.
There are cases when the stove is installed next to the front door. This is how a thermal curtain is made to protect rooms from the penetration of cold air masses.
It is better not to place the edges of the stove close to the walls of the house. This is due to the fact that it is necessary to ensure full access to the rough. Owners are advised to regularly inspect heating equipment to comply with safety regulations. If the stove is part of the wall of a residential building, then a layer of heat insulation is laid between it and the end part of the partition.
If the stove is installed in a built room, then it is necessary to ensure that the chimney is not located too close to the beams. The distance is more than 15 cm, taking into account the thermal insulation gasket.
The area in front of the firebox is covered with fireproof material. Typically, metal sheets or ceramic tiles are chosen.
Construction of the foundation
In order for the stove to operate safely and efficiently, the foundation must be properly equipped. It must be separate from the common house.
Before starting to construct and lay the foundation, you should pay attention to the fact that the distance of the chimney from the roof slab should be more than 15 cm. Markings are applied where the grout will be located.
If the house has wooden floors, they are cut out at the location of the stove. 15 cm retreat from the outer edge. A pit is dug in the resulting hole. Its depth depends on the climatic conditions of the region and the degree of soil freezing, usually 0.7 - 0.8 m is sufficient.
15 cm of sand is gradually poured into the bottom of the hole. It needs to be watered to compact it. Crushed stone is poured on top in a layer of up to 15 cm. It is compacted tightly and evenly. Wooden pegs are driven into the corners of the resulting pit, and cladding boards are attached to them. The walls are covered with a polyethylene wall to prevent cement mortar from seeping into it.
A reinforcing mesh is installed 5-10 cm from the floor. It is placed on metal rods or broken bricks nailed to the bottom.
Concrete is prepared to pour the foundation. To do this, mix cement (M-400), sand and crushed stone in a ratio of 1:3:4. Pour in a small amount of water: the consistency should be medium fluid. If you overdo it, the base will turn out to be fragile and will begin to quickly collapse under the load of rough material.
The prepared mixture is filled into the formwork and leveled using the rule. After a few hours, when the composition “sets”, it needs to be covered with film. The prepared site for the structure is left for several weeks until the solution dries.
The upper base of the stove should be located 15-20 cm below floor level.
Preparation of the solution
For laying stoves in a private home, clay and sand mortars are used. Kaolin and fireclay marl are suitable for fireclay. For ceramic bricks, use ground gray and blue Cambrian clay with fire-resistant characteristics.
For 100 bricks you will need about 40 kg of clay.
Before preparing the solution, the clay is checked for fat content. This is necessary in order to determine in what proportion it should be mixed with sand.
To test, 1 kg of clay powder is filled with water to the top edge and left for 24 hours. If marl is used in construction, it only needs to stand for 2 hours. After souring, the clay is diluted with water; the consistency should resemble thick dough.
The resulting wet clay is divided into 5 equal parts. Sand is added to each in different percentages: 10%, 30%, 50%, 70%, 100%. After this, the resulting composition is dried for 4 hours. From each mass, roll small sausages (diameter - 1.5 cm, length - 30 cm), roll them into a circle.
- If there are no cracks in the mortar, it is suitable for any construction.
- There is a dry crust and minimal damage - it can be used.
- The cracks are about 1 mm deep - suitable only for low-power heating equipment.
- If there are kinks or deep damage, the solution must not be used.
The solution can be prepared using an identical algorithm.
- Pour the required amount of clay with water for a day.
- Knead it to the consistency of dough, sift through a 3x3 mm sieve - this will remove lumps.
- Add sand in the proportion that testing has shown to be optimal.
- Pour in water and stir until the consistency resembles thick sour cream.
If the fat content is not enough, you need to add sand or clay. It is checked with a trowel - the trowel is soaked in the solution and the result is assessed. With a normal ratio of components, 1-2 mm of the composition will stick, no more and no less.
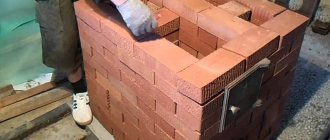
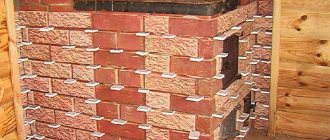
Features of stove masonry
In order for a stove in the country, laid with your own hands, to serve for a long time, each row should be checked for right angles and horizontal surface. The laying sequence is visible in the order drawing.
The cast iron doors of the blower and combustion chamber are secured using steel wire, which is embedded in the masonry. The cuts are made with a grinder. As a last resort, you can do it the old fashioned way - with a mason's hammer, but in this case there may be a lot of waste for scrap. The area for the grate should be slightly larger than the size of the grate itself. Then, when heated, the metal will not move the brick.
We lay out a stove for a country house with our own hands
The solution is applied to the wet brick. Experienced stove makers do this not with a trowel, but with their hands. A good solution spreads as easily as soft butter spreads on bread.
Important Note
If during laying the brick sank lower than necessary, it should be removed, the mortar cleaned and laid on a fresh one.
Otherwise, the new stove at the dacha will smoke heavily and leak soot. Unlike cement mortar, bricks cannot be moved in clay mortar! When building a stove for your dacha, try to make the inner walls as smooth as possible. Then soot will not linger on them, and it will be easier and less likely to need to be cleaned. The outside of the country stove should also be neat and beautiful. External seams should be carefully embroidered with a needle or finger. There should also be no gaps in the places where arches and horizontal partitions are formed. It is better to lay such rows slowly, one per day, so that the lower rows have time to set, and the upper rows do not creep.
How to properly build a brick oven. Instructions for the progress of work
Before starting work, you should familiarize yourself with the procedure for the selected type of oven. Visual diagrams will tell you in what order to lay the bricks.
After choosing the type of rough stone and its arrangement, you can proceed to instructions on how to build a brick stove in your house. This step-by-step guide is suitable for those who would like to get oven equipment with a hob.
- Rows of bricks are laid in a continuous row on cement-sand mortar up to floor level. The masonry must be adjusted precisely by level and plumb so that it is level and strong. The stability of the structure depends on this.
- After the first row has been laid, they begin to install the blower chamber.
- Before laying the second row of bricks, install the door for the blower. There are special loops in its corners; steel wire is threaded through them and laid into the seams of the masonry. To prevent it from moving or turning over, it is supported with bricks (but not treated with mortar; this is a temporary measure).
- The second row is laid as shown in the order. A ash pit is formed.
- Next, fireclay is used, indicated in the diagrams in yellow. After laying, a grate is installed above the ash pit.
- On the fourth row of bricks, they begin to lay out two channels to clean the rough from accumulated soot. Each chamber is equipped with a separate door.
- A grate is placed in the fifth row. It can be correctly laid in the special recesses that are in the bricks of the bottom row. All subsequent rows must be laid with fireproof bricks.
- The grate will fit correctly only if it is laid accurately. Each row must be checked with a level.
- Before laying the sixth row, the combustion door is installed. It is temporarily fixed with a column of bricks, which is laid on the grate. To prevent it from falling out, you can support the part with a metal or wooden strip.
- From the seventh row, the creation of gas ducts begins. To do this, the vertical walls are laid with bricks installed on the edge.
- Before laying the ninth row, a quarter is knocked out of the brick. It is laid in such a way that it fixes the firebox door. The wire from it is laid in the same row of masonry, which helps to finally secure it.
- If a hob is being made for working with cauldrons or other utensils, it is laid in the 11th row. Bricks are laid on the upper opening, the front part is decorated with a steel corner. The sealant is basalt cardboard or asbestos cord.
- Rows 12-16 are a chamber above a cast iron stove. Before you begin to cover the cooking niche, you need to lay steel strips. They will be the basis for laying the 17th row.
- The front part of the 17th row needs to be additionally decorated with a metal corner.
- The 18th and 19th rows are laid out completely, three vertical heat exchangers are installed.
- 20th row of masonry - placement of horizontal channels and doors for regular cleaning of the stove from carbon deposits and soot. From this moment the construction of the drying chamber begins, if provided.
- 22nd row – door overlap.
- From the 23rd row they begin to work with a horizontal flue. At this stage, it is ensured that only the holes in the vertical channels are open. Metal strips are laid over the drying chamber.
- The 24th row of bricks is laid.
- In row 25-28, another door for the cleaning channel is installed. At this point, you can block the stove niche.
- Valves are installed on the two remaining vertical gas ducts. First the frames are installed, then the partitions.
- Rows 31-35 become a transition area to the chimney.
- In the area of the 36-38th row, fluff is made.
This completes the installation of the brick stove with your own hands. Next you need to move on to constructing the chimney. It is laid out from the first row of the rough and finished where indicated in the order. In the example given, this is the 26th row. If necessary, the chimney is made higher.
In the third row of the chimney you need to install a special door. It is necessary in order to clean it from combustion products. On the 27th they install a central damper. Starting from the 31st row, the cross-section begins to gradually decrease so that the pipe can be taken outside.
In the place where the pipe from the furnace will pass through the ceiling, you need to lay a layer of non-combustible material. Expanded clay and mineral insulation are usually used.
Furnace arrangement options
These are the main popular options. It is worth carefully reviewing the diagrams before starting construction work - they show step by step how and in what sequence materials should be placed.
- The order of the Swedish oven.
- Dutch order.
- Order of the Russian stove.
- Ordering a sauna stove.
- Ordering of the Kuznetsov furnace.
Briefly about the installation of the oven and heat exchange register
Some designs provide for the installation of an oven. It needs to be mounted in a place where it would be washed by the maximum amount of heat flow. The optimal zone is the transition from the firebox to the heat exchanger. Metal corners are placed on the side walls of the horizontal flue. At the points where the oven touches the wall, asbestos cord or basalt cardboard is laid as a seal.
The heat exchange register is placed in the hottest zone of the stove. It can be located at the beginning of the flue, in the rear part of the firebox or under the hood (for non-revolving options).
Assembling a brick stove for a private home is not a difficult task. If you have the necessary tools, diagrams and quality materials, you can make a productive and durable roughener for regular use.
Recommended types of building materials
The range of suitable refractory raw materials is small. Let's look at the two main types in more detail.
Brick
The optimal solution is fireclay or refractory brick. Withstands temperatures up to +10000 C. Such a stove will not need finishing.
Red solid or ceramic bricks are suitable for cladding. The second one costs much more, but will also last longer. Preference should be given to brands M-250, M-500.
Even at the stage of drawing up a design diagram, you should take into account the dimensions of the brick. They produce 2 types:
- 230x114x65 cm;
- 250x120x65 cm.
This point should be reflected in the project. For example, to build a Russian stove you will need to purchase from 2200 to 3500 pieces. In addition, the solution consumption depends on the quality of the material.
To save money, you can use used bricks, but they should be thoroughly cleaned before laying.
Aerated concrete
Cheaper stove material with a high level of thermal conductivity, resistant to temperature changes, and environmentally friendly. Convenient to process and cut. Several times lighter than ceramic bricks
Its significant drawback is fragility. Upon impact, it will crack or split. It is hygroscopic, so when it freezes it can begin to crumble.
For an aerated concrete stove, it is recommended to erect a canopy and additionally line it.
Materials and tools
First, prepare the necessary tools:
- shovel;
- bucket for solution;
- vertical and horizontal level;
- pliers;
- trowel;
- pickaxe;
- hammer, including a rubber one.
We prepare reinforcement and formwork if we do the concreting of the foundation ourselves.
We purchase enough fireproof and fireclay bricks to cover the entire structure. Construction materials must:
- be resistant to temperature changes;
- not be subject to corrosion and other external influences;
- to be whole;
- be certified.
Then we check the availability of the necessary metal equipment:
- pipes;
- gratings;
- staples;
- gate valve;
- door;
- corners.
Their number must correspond to the furnace design.
We prepare a mortar for masonry, which will include:
- clay;
- sand;
- alabaster;
- cement, etc.
Consult with the builders first and choose the most appropriate solution option. Experts recommend cement-sand grade M250 and higher.
7181adadd41f890dd9ae31eefbcc49e8.jpe
Project selection
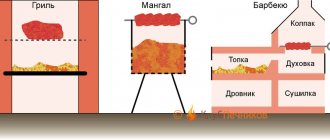
If you love fried meat, then the oven should include barbecue and grill elements. For smoked meats, you can install a smokehouse. The Russian outdoor stove includes a hob, which will provide the owners with healthy boiled, steamed or stewed dishes. And the availability of space for a cauldron - exquisite oriental: pilaf, shulem, shurpa, etc. Each type of stove has its own patterns and subtleties of masonry.
In addition to functionality, you need to think about the overall appearance, which will harmoniously combine with the entire site and the house.
Photo 2. An example of a brick structure project with a Russian stove, sink and cauldron. There is a comfortable warm place to sit on the side.
Possible problems
During construction, several mistakes can be made.
Connection of foundations - due to different loads, differences in subsidence are possible, which is why the furnace may warp in the future.
If you take river sand instead of quarry sand, the masonry mortar will not be strong enough due to the smoothness of the sand grains and their poor adhesion.
Hewn and cut bricks collapse faster, so when laying it you should try to install it with the cut side inside the seam.
When laying a chimney, it is necessary to use a special plug so that the mortar does not remain on the internal walls, and the surface of the masonry is cleaned of mortar every 4-5 rows.
If you do not make a cleaning hole in those places where the chimney changes direction, soot will accumulate in it. When installing dampers and doors, we must not forget about the property of metal to expand - masonry cannot be done without a small gap.
These and other mistakes can be avoided if you consult with an experienced craftsman before starting work.
Choosing the optimal location
The location of the stove for a garden house must be approached with the utmost seriousness, since not only effective heat transfer, but also your safety from fire depends on it. Of course, ideally in the old days, and even now, the place where the stove will stand was planned before the construction of the house began.
Here are the basic requirements for determining a place for the stove:
- The room where you plan to install a wood-burning stove must be at least 16 sq.m.
- The stove must be installed on a reliable foundation, which means there should be no floor beams under it. The chimney should exit in a place where there are no ceilings.
- Construction near the outer wall is not advisable, because precious heat will be given to the street. Therefore, it is better to locate it in the center of the house; the chimney will exit in the area of the ridge, and the height of the pipe will be smaller. For wooden houses, central placement is recommended for fire safety reasons.
Now let's talk about the features of choosing a place for the stove. The best option to ensure good heat transfer is to place the stove so that all walls can come into contact with the air inside the home. The rooms should not be large, then you cannot do without additional heat sources.
Therefore, ideally, it should be placed in the opening of the partition between the rooms, and the firebox would go out in the kitchen or hallway area. On the one hand, the kitchen also becomes warm with the ability to cook, and on the other hand, the living spaces are freed from garbage.
When installing a multifunctional stove in large rooms, it should again be placed in the center of the room. The stove turns into a place of concentration of comfort that gives a home. It turns out something similar to a studio apartment, with an open layout, where the stove becomes a space divider.
Recommendations for choosing purchased structures
The key indicator in purchasing a ready-made kitchen stove is the type of fuel on which it will operate.
The factory-produced summer stove has several design options.
- If you have gas nearby, you should consider purchasing a gas stove with oven. Its heating temperature is adjustable. The device is ready for use at any time and does not require the cost of searching for fuel.
- A cheaper solution would be to buy an electric stove. Easy to use and convenient to transport.
- In the absence of communications, an excellent wood-burning option is a solid fuel stove. Suitable for the most remote summer cottages.
- Universal stoves allow you to use several types of fuel, which significantly saves time on cooking.
It is worth noting that factory models have a number of advantages in operation:
- a large selection of finished products of various sizes and colors; metal alloys and refractory mixtures are used as materials;
- the device’s operating scheme reduces the risk of fire and smoke leakage to a minimum;
- designs are light in weight.
- quick assembly and installation.
However, a DIY project for a closed or open summer kitchen with a stove will allow you to take into account the characteristics of the site, the wishes of the owner and save money. In addition, step-by-step construction instructions have now been developed for furnaces of varying complexity.
Budget options could be:
- Russian stove for a cauldron;
- two-burner stove with oven;
- barbecue oven with grill.
It is important to remember that when creating a furnace, you need to accurately draw up a drawing in order to take into account the nuances of construction, the amount of material required and the amount of work