Heating to high temperatures is a necessary component of many technologies that are used in home creativity, commercial activities and industrial production. Factory heating devices are highly efficient and, accordingly, have a price that not everyone can afford. A do-it-yourself muffle furnace for hardening metal can be assembled at minimal cost with excellent performance characteristics. To achieve the desired result, you should familiarize yourself with the device, operating principle and possible options for assembling a 1000 degree oven with your own hands.
What is a muffle furnace?
Muffle furnaces are used for a variety of purposes:
- for remelting metals;
- firing of ceramic products;
- for leveling deformed surfaces of various materials;
- evaporation of moisture from the substance;
- fast and efficient drying of various products.
Depending on the type of oven, you can heat an object to a temperature of 100 to 2000 degrees. Muffle furnaces are most often powered by gas or electricity. But it is possible to design a device that will function from the process of burning wood or flammable substances.
The muffle is made of heat-resistant materials that do not allow combustion products to pass to the substance placed in them. In the muffle, processing can take place not only in the air. There are muffle furnaces that heat the material in a vacuum. Gases such as hydrogen, argon, helium or nitrogen can also be used instead of air. The sealing of the chamber creates a uniform effect of heat on the object. The muffle takes a long time to heat up, and it also requires a lot of energy.
Areas of application
The layout used must allow the required amount of material to be placed for processing.
It is worth dividing all furnaces into types of application for working with the material:
- hardening of metal and Kremlin products;
- firing and bringing the material to a certain structure, imparting strength;
- tempering, imparting plasticity to the material to make the corresponding products;
- blacksmithing, for splitting metal for subsequent processing and creating more acceptable sizes and workpieces;
- laboratory studies to study the effect of temperature treatment on metals and alloys of various formulas.
This division allows you to determine the types of temperature conditions and the total volume of the furnace, creating all the necessary design solutions and formulas for independent design of a muffle furnace.
Creating a muffle furnace body
You can create the muffle furnace body yourself or use blanks. As a workpiece, you can use an old oven, an electric or direct heating oven, a refrigerator, or a washing machine. It is also worth considering that it is necessary to remove all plastic parts, since they are not adapted to high temperatures.
You can create the case yourself. Sheet metal is suitable for this. You should choose a material whose thickness is more than two millimeters. A rectangular box should be made from it using a welding machine.
Sheet metal is suitable for creating the body
If you want to construct a cylindrical muffle furnace, you should bend the metal into a radius and weld the seam.
To protect the metal from corrosion, it is advisable to cover the stove with special fire-resistant paint. A special thermal insulation layer will improve the properties of the oven. It serves to reduce heat loss, thereby increasing the heat in the chamber. For the thermal insulation layer, you can use basalt wool, as well as perlite.
Disadvantages of homemade design
Each device is not without certain shortcomings, and a homemade device also multiplies them. Given the set goal, you can sacrifice some requirements for the sake of fulfilling others. However, everyone should know the list of negative consequences.
A homemade design is deprived of all guarantees, including safety guarantees. Evaporation of metal from the heater coil can lead to it being contained in the form of impurities in the composition of the precious metal being processed. Homemade thermal insulation will not provide full concentration of heat in the firebox, so the body of a homemade stove is very hot and requires careful handling. By the way, this is also a disadvantage of some factory models. Failure to properly monitor and regulate temperature may result in the oven not being able to perform a particular heat treatment task. https://www.youtube.com/watch?v=ABWK3hD9f1E
Ready-made factory-made ovens are designed to perform a fairly narrow range of tasks, but this is more an indicator of professionalism than a disadvantage. The main parameters and scope of application of a particular device are indicated in its passport.
The leaders in the production of compact and stationary muffle furnaces are such companies as TSMP Ltd (England), SNOL-TERM (Russia), CZYLOK (Poland), Daihan (South Korea). The presented list reflects the top list of companies for evaluating suppliers of high-temperature equipment to the Russian market.
Making a muffle
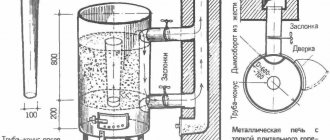
To construct a muffle furnace yourself, you should first make a fireproof chamber. Not every material is suitable for these purposes. A special chamber can be made from fireclay bricks. It is perfect for both rectangular and cylindrical ovens. True, it is quite difficult to lay bricks in the shape of a cylinder. To do this, you need to cut out identical trapezoids using a grinder. For a small stove you will need about 7 bricks.
Afterwards, you should connect them together with wire, and also check that they fit tightly. Unevenness can also be corrected using a grinder. Next, you should lay out the bricks in a row and make several grooves for the wire, which in the future will be the heating element. It is important to make the grooves in such a way that the wire does not touch anywhere. To do this, it is worth placing recesses on one of the bricks at an angle. The grooves should be 7-8 millimeters wide, the distance between them should be at least 2 centimeters.
The bricks are connected using heat-resistant glue. You can also use a mixture of clay, fireclay brick powder and quartz sand.
Ordinary clay is also suitable for making a muffle, since a homemade furnace will not work with extreme temperatures. Clay needs pre-treatment. Construct a small rectangle from cardboard or a sheet of plywood, which will coincide in size with the intended muffle chamber. Be sure to calculate by size whether this chamber will fit freely into the furnace body.
The model of the chamber should be covered on the outside with clay several centimeters thick. The clay must dry within 5 days. Afterwards, the obligatory step is firing the clay structure. It is best to burn the material in a coal furnace, since a temperature of at least 700 degrees is required. If all conditions are met, the result will be a fairly strong and fire-resistant chamber.
Method one. Making a chamber stove from a refrigerator or washing machine
For such a design you will need only three main elements:
- metal body (suitable for a washing machine or refrigerator);
- heating coils;
- chamber made of fireclay material.
When everything necessary for work is ready, we proceed directly to the manufacturing process.
- First, it strengthens the bottom of the metal case. We use a steel corner for this purpose (as an option, it can be replaced with an ordinary pipe with a diameter of 1.5 centimeters). We weld pieces of corners/pipes into the corners of the bottom - they will serve as support legs for us.
- In addition, we need to similarly strengthen the top of the frame, the door, and at least one of the sides (the one to which the door hinges will subsequently be welded).
- We lay a 1-centimeter layer of basalt wool on the bottom of the body (a similar layer must be laid on the inner walls). To avoid deformation of the insulation under the weight of the chamber, we lay several pieces of metal corner or rectangular pipe. At the end of these procedures, we cover the insulation with a sheet of metal.
- After this, we decide on the fireproof material that we will use in the manufacture of the chamber. Ideally, these should be fibrous fireclay slabs, which can either be cut on site after purchase or ordered in the required sizes. Our DIY clay kiln requires six of these slabs.
- We bind the bricks using mortar, which corresponds to the marking of the material. There is also a cheaper option - ordinary fireclay clay or fireclay masonry mixture.
- Now we begin the laying itself. We adjust the bricks as tightly as possible relative to each other, making the seams between them no larger than 0.5 centimeters. If necessary, we cut individual bricks to the required dimensions.
- We start laying from the bottom of the box. Dissolve the mixture with water and mix thoroughly. Before installing each brick, we moisten it with water, otherwise the mixture will dry too quickly.
- We begin to raise the walls. We place sheet metal and insulation in the gap between the body and the brick layer. If the brick is laid flat, then we can not use insulation.
- The upper part will take more time: the bricks along the edges need to be laid with a slight upward slope, and trapezoidal blocks must be laid between them.
- We weld the hinges and adjust the door. We must ensure that the gap between the brick layer of the body and the door is minimal.
- After the masonry has dried, we begin the next stage of work. On the surface of the bricks we must make grooves into which the heating coil will be laid. We use a spiral of nichrome wire 0.1 centimeters in diameter; the diameter of the coil will be about 0.5-0.7 centimeters. The grooves should be the same depth/thickness.
- When heated, the wire can expand, and the spirals, in turn, “climb out” of the grooves. Therefore they should be recorded. The image below shows the main ways to install spirals:
There is another way - to build a chamber from heat-resistant brick, since this material is sold everywhere and is used for laying stoves and fireplaces. For the chamber of such a furnace, it is recommended to use lightweight bricks marked “ShL” (for example, “ShL-0.5”).
This mixture is sold in the same place where bricks or fireplaces are sold. To fix the brick on a metal surface, add a little cement to the mixture (about 30 percent of the total volume).
Note! To create the outer layer, we prepare the solution separately - with the addition of cement.
The door is also lined with fireclay bricks. We make a quarter around the perimeter in such a way that a protrusion eventually appears (we will place it in the stove window).
- using small pieces of wire;
- through a groove located at an angle;
- by means of a groove having a protrusion;
- using an MKR tube.
Note! A very important point: the turns should not contact each other!
- We make 2 circuits from the spirals so that the temperature can be adjusted using a switch (the same as in an electric stove).
- We mount a ceramic plate on top (for example, from a burner) and fix the ends of the spiral with bolts.
- We will equip our kiln for firing clay with our own hands with the switch shown below, in which there will be three contacts on one side and two on the other.
- We mount the switch in such a way that its pin goes out, i.e., onto the front panel. We connect all the wires, on the side where there are only two contacts, we connect zero and phase.
- We connect the cables leading from the plate to the other three contacts. Typically, one of the cables should close a pair of contacts on the edge of the plate.
- As a result, we should get the following: at the first “speed”, the spiral circuits will be connected in a certain sequence, since in this case the temperature will be the lowest.
- This, in principle, ends the furnace manufacturing process. At the end, we need to thoroughly dry the structure, for which we place it in open sunlight or next to a heating radiator for at least 1-2 months. After this period, we need to perform final drying by running the device for 3-4 hours at the minimum “speed”. When steam is no longer billowing from the structure, the device can be turned off - it is completely dry. We can proceed directly to firing!
We bring the ends of the spirals upward.
If the “speed” is second, then only 1 circuit will be connected due to the fact that the temperature will be higher. It is characteristic that this should be the circuit that is drawn from below, so that the elements located in the lower part are also heated.
Finally, at the third “speed” the circuits are connected simultaneously - here the temperature will be maximum.
A few words about how to connect this kiln for firing clay with your own hands. For this purpose, it is recommended to use a reinforced socket - the kind to which an electric stove is connected. As an option, we run a large cable from the shield.
Note! In addition to all this, it is also recommended to install an automatic switch.
And remember: when using such a design - with open spirals - you should be especially careful! Every, even the most insignificant mistake can lead to the most unpleasant consequences. If you are not particularly knowledgeable about electricity, then hire a professional to do the work. Never touch energized heating coils.
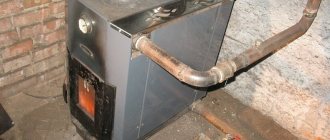
How to make a pyrolysis boiler yourself
Previously, we talked about how to make a good pyrolysis boiler with your own hands, in addition to this article, we advise you to read this information, see all the details here
How to make a heating element?
Wire is used as a heating element. You can use nichrome or fechral. Nichrome wire can withstand up to 1100 degrees. But nichrome can burn from the slightest contact with air. Fechral can withstand temperatures up to 1300 degrees, and the wire does not deteriorate from the air. The minimum wire size that needs to be used is 1 millimeter. Depending on the type of muffle chamber, the methods of attaching the heating element are different.
A ceramic muffle is wrapped with wire
The heating element is fixed to the casing using clay, the distance between each turn should be about 2 millimeters. The bonding layer should also be dried for several days and fired in a coal oven.
It is necessary to install a heating coil in the fireclay muffle. You can make it yourself from nichrome or fechral wire. To do this, you need to wind the wire evenly around a cylindrical object. A pencil, thin metal rod or welding electrode will do. The diameter of the spiral should be 6 mm.
It is imperative to ensure that the turns do not touch each other, otherwise a short circuit will occur. The spiral must be placed in special recesses made in fireclay bricks. Be sure to secure the coils. This can be done using wire or making putty. You can use clay for putty. Holes are drilled in the body through which the ends of the wire must be brought out. To connect the spiral to the network you need to use a cable.
What should the ventilation be like?
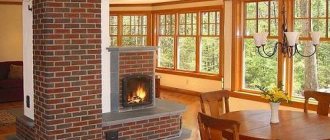
In reality, manufacturing, or rather the process of firing ceramics itself, is not so beneficial to health. And then many can conclude that the stove has no place in the house at all. There should be a special closet for her. Many people think even longer that they pollute the air a lot and so on and so forth. But compared to other indicators of pollution, the emissions from such a stove are simply nothing to the air.
But for those who dared and brought the stove into the house. What kind of ventilation should there be so as not to cause harm. So, the room must be well ventilated, since the firing time is many hours and during this time there is a constant release of substances that are harmful to health. Ventilation options for a room with a stove for firing ceramics:
- several open windows will help make air move and remove all odors and harmful particles immediately from the window;
- a special design of the ventilation system (a hole with a fan in the wall itself, through which air from the street will be taken into the room and emissions from the stove will be removed);
- Downdraft system and Updraft are special ventilation systems that craftsmen have thought out specifically for rooms where kiln firing takes place.
Here are many ways to help your hands not give up your favorite activity, and your health not to suffer from the harmful release of substances during firing.
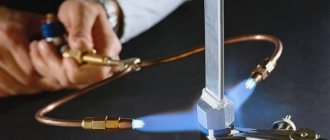
Heating the muffle with gas
A homemade muffle furnace can operate not only from electricity, but also under the influence of a gas burner. You can purchase such a heating element or make it yourself.
To create a gas burner, you need a metal pipe 10-15 centimeters long. The diameter of the pipe should not exceed a few centimeters. First, you should make a through hole near the edge for connecting the gas tube. It is also necessary to make several one-sided holes perpendicular to it. They are necessary to ignite the device.
For a gas burner you will need a metal pipe 10-15 centimeters long
The gas tube is made of copper, its diameter does not exceed 0.8 centimeters. Threads are required at both ends of the tube. In the middle of the device you need to make a small blind hole for the gas to escape. One hole must be closed with a plug, and a gas cylinder must be connected to the other. When combining elements of the device, be sure to install a valve between the hose and the burner, as it will protect the structure from fire.
Useful video
Watch the video, which shows how to start making a muffle furnace: what materials and tools are required, what needs to be done first, and what actions are not recommended.
1ba8d3678997cd1220be3ef58cf59f99.jpe ce84308707c136bdb783c4f4656f6cf0.jpeMaking the lid
- Cut a circle out of steel, identical in diameter to the already fully assembled structure.
- Place fireclay bricks on top of the glue - it will provide sufficient sealing.
Weld handles on the sides to make it convenient to lift and remove the lid, and a latch for closing.
Cover the edges with fireproof silicone; before doing this, be sure to degrease the surface (even White Spirit will do).
Let us remind you that when the oven is operating, it must be closed. Excessive air ingress will lead to rapid wear of nichrome.
Features of the muffle furnace assembly
The muffle furnace must be assembled correctly for it to last for a long time. There are a few basic tips to follow:
- It is definitely worth strengthening the outer part of the structure with metal inserts, since the muffle chamber is quite heavy.
- The camera should fit snugly against the insulation of the main body.
- If you made the case yourself, you need to make the door from a double sheet of metal, and also be sure to place a layer of insulation on it.
- When using an old oven as a base, you can neglect the insulation layer, since it is already provided for in the design of the oven.
- For safe operation of the muffle furnace, it is necessary to connect the heating element to a 20-25 A machine.
A do-it-yourself muffle furnace is significantly inferior in heating temperature to industrial devices. It is impossible to melt metal in it, and it is also difficult to work with glass. But a self-made unit will be quite enough to fire a ceramic product at home. The main thing is not to neglect the installation of protective elements against voltage surges or gas leaks.
Types and conditions of processing of raw materials
The main methods of processing materials in a homemade chamber are:
- Firing ceramics
- Hardening of metal products
- Melting of non-ferrous metals
Firing ceramics
The process of obtaining finished ceramic products involves firing blanks from raw clay and then covering them with glaze. At home, a do-it-yourself muffle furnace can fire several pieces of dishes and other crafts at once
In heat treatment, it is important to maintain an even heating regime for the chamber. Theoretically, it is impossible to indicate the exact time frame for processing a material at a certain temperature - this is achieved practically
Clay materials placed in a home muffle furnace for firing are divided into 3 groups:
Porcelain
The dried clay is subjected to heat treatment in two stages. Primary firing is carried out in the range from 800 0 C to 1000 0 C. The clay gains strength and becomes porous. Then it is dipped into a container with glaze. Repeated firing is carried out at different temperatures, depending on the purpose:
- natural porcelain - 1400 0 C
- dining room - 1350 0 C
- plumbing parts - 1250 0 C
Faience
The use of refractory raw materials during firing practically does not form a liquid phase. To mature the shard of the product, it is processed at a temperature of 1200 - 1250 0 C. Repeated heat treatment with the applied glaze is carried out at a temperature of 900 - 1000 0 C. If it is necessary to apply painting, then for the third time they return to the primary level of the temperature regime.
Majolica
Red refractory clays are used. Heat treatment requires precise adherence to the heating regime. When heated to 950 0 C, loose, fragile products are obtained. When heated to 1050 0 C, the raw material is sintered into an unusable, dense glassy mass. To accurately maintain a heating level of 1000 0 C, it is necessary to build a thermocouple into the chamber with the oven connected to a digital display.
The repeated processing of glazed materials is carried out at a temperature of 900 - 950 degrees.
Hardening of cutting metal products
Hardening the cutting surfaces of steel tools by heat treatment is called metal hardening. Hardening of metal products has been done by people since ancient times. The essence of the process is to roast the metal until a change in the structure of the crystal lattice is obtained (polymorphic transformation).
The metal is brought to a red-hot state in a heating chamber at a temperature of 750–850 0 C. It should be noted that some grades of steel are hardened under higher heating conditions, ranging from 1250 to 1300 degrees. Then the hardening furnace is emptied of hot products, which are then subjected to rapid cooling in an oil environment or in water. In this way, the hardness of the metal is increased.
This process is important for hardening the cutting surfaces of steel tools (knives, drills, chisels, milling cutters, etc.). Quenching (tempering) is best done in an oil environment. When hot metal is released into water, its surface is covered with a mass of steam bubbles, which slows down the process.
As a rule, finished tools or workpieces made of stainless steel are subjected to hardening. These products usually do not require a large volume quenching chamber, so a fuse muffle furnace is best suited for this purpose. A description of the creation of such a design will be given below.
Melting of non-ferrous metals
A muffle furnace is convenient to use for melting non-ferrous metals, but this does not apply to tin and lead. Their melting point is so low that it is enough to use a gas burner on a household stove.
In order to melt metals such as copper, bronze and brass, you will need a heating container. A liquid mass of metal is obtained in a crucible, which is then poured into special molds. Home craftsmen create various decorative elements for lamps, furniture, figurines and many other crafts.
Melting temperature of non-ferrous metals:
- copper - 1080 0
- bronze (depending on brand) - from 930 0 to 1140 0
- brass ranging from 880 to 950 degrees
Automation with temperature-time tasks
There are three types of automation for hardening furnaces. The cost of organizing furnace control increases along with the comfort of use. The simplest option is a simple thermostat with a thermocouple as a temperature sensor. This device will simply maintain the set temperature with a hysteresis of about 30–50 °C. The holding time is controlled manually, as is the moment the temperature point is reached.
More advanced automation is being developed specifically for electric ovens. Thermal controllers of the Autonics TCN4 type have a proportional power control function, providing adjustable hysteresis up to 1 °C. The device is also equipped with additional functions, such as an alarm when the set temperature is reached. If desired, the alarm channel can be used to activate a time delay relay installed in series with the thermostat.
The most advanced in this regard are automation devices for Profile-M type furnaces. They differ not only in built-in power relays, but also in the possibility of more flexible configuration. Such controllers have a preset timer, and also have the ability to configure heat treatment with a complex temperature profile, sequentially setting the duration of time periods during which a certain temperature should be maintained.
rmnt.ru