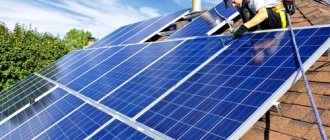
Siding is one of the most popular facing materials. It is inexpensive, looks beautiful, protects the house from frost, and the walls from moisture. In addition, covering a house with siding and insulation is very simple. If you have minimal construction and repair experience and a set of home tools, you can handle the job yourself. We'll figure out what to do now.
Panel installation
There is nothing complicated about decorating a house with siding yourself. This is simple sequential work. You just need to successfully complete each step according to the instructions.
First step. Proceed to install the starting strip of siding. To do this, find the lowest point of the wall of your house, step back 40 mm upward from it and draw a horizontal line at this level along all the walls of the building.
Place the starting strip of siding with the edge on this marking line and nail the strip to the wall with machine nails.
If the length of one starting strip is not enough, fill the second one with an indentation of about 0.5 cm from the first.
Second step. Nail special corner finishing elements to the wall joints. Fix with nails, driving them in increments of about 20-30 cm.
Third step. Install special J-rails around doors and windows.
Fourth step. Proceed to the main stage of covering the walls with siding. To do this, take the panel, insert it into the previously fixed starting strip with the bottom edge, and nail the top edge to the sheathing.
The panel should not reach the corner of the house by a few millimeters in order to be able to expand and contract.
Fasten the next rows according to the same scheme: hook the lower edge of the new row to the protrusions of the previously laid panels, nail the upper edge to the sheathing.
Facade finishing, siding
The panels can be fastened using a special connecting profile or simply overlapped. If you prefer the second option, fix the panels with an overlap of about 20-30 mm. In this case, the installation of the cladding must be planned in such a way that the joints are placed staggered - they cannot be arranged on top of each other.
You can easily determine the number of nails required to fix one panel, as well as the spacing of fasteners during the installation process. The siding has factory-made holes for nails, use them as a guide. Drive the nail strictly in the middle of the hole so that the panels can move normally during temperature deformations.
Photo of installing siding on top of insulation
Drive the last nail at a distance of no more than 80-100 mm from the edge of the siding panel. If there is no suitable mounting hole at this distance, make one yourself.
Siding is perfect for finishing walls and facades. A rich variety of textures, sizes and colors will allow you to choose a finish that fits perfectly into the landscape. Follow the recommendations received, and you can create a durable and beautiful design for your own home with your own hands.
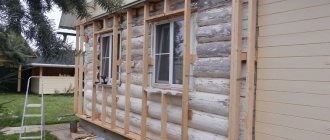
Preparation
- First of all, it is necessary to remove unnecessary parts from the walls that will interfere with the installation of the sheathing;
- Dismantle the trim on doors and windows, remove awnings, lamps, and ebbs. If necessary, you need to remove the window sills, as shown in the photo. You should pay special attention to this so that no unforeseen problems arise during the work;
- The surface of the brick wall needs to be leveled, the old plaster must be removed;
- Fill all the cracks with tow or silicone paste;
- Treat the surface with a moisture protective agent, and then apply a primer.
Lathing
To carry out high-quality installation of siding on the walls of a brick, frame or wooden house with your own hands, you need to create a frame, and there are good reasons for this:
- You can make imperfections in the walls outside the building invisible.
- It is possible to install insulation and waterproofing, which will help save on heating residential premises.
- A ventilated facade appears, eliminating condensation and moisture.
The lathing is assembled from wooden material or a metal corner, which is preferred in the case of protruding parts, although it costs more and is more difficult to install. Metal lathing does not swell from moisture, does not deform, does not rot, which allows it to serve for a very long time. When starting to install the frame on the walls of a wooden house with your own hands, do not forget to treat them with antiseptics, as required by technology.
The choice of fastening elements with which the frame will be installed directly depends on the material of the sheathing. The technological gap between the wall and the sheathing strips can be 15 cm, and it depends on what kind of insulation will be installed. If additionally only waterproofing is installed, only a couple of centimeters may be enough, while the insulation will cover more space (up to 15 cm).
The step between the elements of the vertical sheathing is usually 50 cm, and the installation of the frame itself is carried out under strict level control using guides.
Sheathing a house with metal siding with insulation: key features
Metal siding is rarely used for cladding residential buildings, but if you choose it, the facade will have to be insulated. After all, metal will speed up the cooling of the house in winter and heating in summer.
The choice of insulation is not affected by what kind of siding is used - polymer or metal. The procedure for covering a house with siding and insulation will also remain unchanged:
- surface preparation,
- installation of sheathing,
- installation of insulation,
- siding installation.
We will not dwell in detail on each of the stages. Let us only note that the sheathing for metal siding can be metal or wood, but not plastic. Metal panels are heavier than plastic ones. Therefore, the installation process may seem more complicated. And to work you need equipment for cutting metal.
Summary
Siding installation is not difficult. The order of work is universal. But there are a number of nuances that you need to know and take into account. For example, in the technology of siding a wooden house without insulation, it is advisable to include the installation of a waterproofing membrane, which will release moisture from the house, but prevent the penetration of water from the outside, which will extend the life of the walls.
Before starting installation, read the official instructions of the manufacturer of panels, insulation, hydro- and vapor barrier films. Different brands may have their own nuances. And if they are not fulfilled, the product will be voided from warranty. If something happens to the façade, it will be your own fault and you will have to fix it yourself.
Don't want to deal with all this? Leave the job to professional installers who have been trained and actually know what to do. Then you are guaranteed to get a beautiful, warm facade for more than a dozen years.
The procedure for insulating walls
For installation of siding with simultaneous insulation, lathing made of wooden blocks and metal profiles are suitable. Wooden lathing is most often used. Metal ones are used mainly at the request of the owner, mainly for cladding brick houses.
Using wooden sheathing
Using wooden sheathing
First step. Prepare the house for finishing work. If you are not working with a new building, but with an already built and used house, remove various elements such as trim, window shutters, drainpipes and anything else that will interfere with installation.
Second step. Get rid of any kind of defects and damage on the wall surface. Modern silicone sealants will help you with this.
Third step. Proceed with the installation of horizontal sheathing slats. Select the spacing of the bars so that it is approximately 1-1.5 cm less than the width of the insulation boards.
Fourth step. Place the insulation boards in the sheathing cells. Mineral wool and more modern insulation based on it are optimal for thermal insulation. Lay the slabs as tightly as possible without gaps at the joints.
Place insulation boards in the sheathing cells
Place insulation boards in the sheathing cells
Fifth step. Lay waterproofing material over the insulation. The best option is a special diffusion membrane. Such material will simultaneously protect the insulation from moisture and provide the necessary ventilation of the space.
Sixth step. Proceed to secure the vertical sheathing slats. Place vertical racks with a mandatory level check. Eliminate unevenness using special pads.
For vertical sheathing, boards 2.5 cm thick are suitable. You will attach your siding to them. Before installation, the boards also need to be soaked with an antiseptic.
Using metal sheathing
Using metal sheathing
Metal sheathing is usually used for siding on brick houses.
First step. Get rid of all elements that may interfere with installation. The principle of operation is the same as in the case of wooden sheathing.
Second step. Clean the wall surface thoroughly. Continue cleaning the walls until nothing stops falling off the sides.
Third step. Run your palm along the wall. If there is a mark left on the skin, prime and plaster the wall. The surface of the walls should be slightly rough. This will ensure the highest quality adhesion of the insulation to the walls.
Fourth step. Attach hangers to the walls for installing galvanized profiles.
Fifth step. Cover the walls with insulation. In this case, it is more convenient to use foam boards. They can be mounted without lathing. To fix the boards, use glue specially designed for this purpose.
Sixth step. Fix the metal sheathing elements to the hangers. Siding panels will be attached to them in the future.
Thus, you need to choose the appropriate lathing option, lay the insulation and only after that proceed with the installation of the cladding.
The process of insulating a house
After installing the frame, the house is insulated. Polystyrene foam is usually used as insulation. Mineral wool and extruded polystyrene are also suitable. It is important that the material is environmentally friendly.
Mineral wool in the form of slabs is highly moisture resistant, which is why it is used in places with high humidity. Installation of foam plastic must be done on a perfectly flat surface, otherwise the slabs will break and cold air will leak through them.
The material should be laid from the window and door openings, after which it is necessary to form a starting strip from which further installation will be carried out. It is better to do it at the very bottom strictly horizontally. This will ensure even and high-quality thermal insulation.
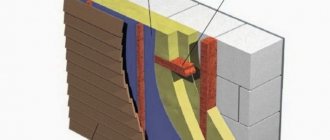
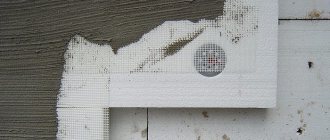
The insulation is attached to the wall using glue or dowels. All cracks should be sealed using polyurethane foam, special tape or adhesive tape. This will prevent cold bridges from forming.
Don't forget about waterproofing. It prevents moisture from entering the room. It is attached on top of the thermal insulation. After which the sheathing is installed. It is she who creates intervals for ventilation.
DIY insulation and siding installation
External insulation of the facade is carried out in strict sequence:
- They begin work by dismantling all elements (platbands, shutters, gutters) from the walls, cleaning their surface from protrusions, loose plaster and dirt. The same applies to a wooden house;
- A layer of vapor barrier is attached to a clean surface with your own hands using a construction stapler. The membrane is placed with the rough side facing the wall;
- the vertical lathing made of wooden material is fixed at the same distance, which is a couple of centimeters less than the width of the insulation (for dense placement). Nails or self-tapping screws intended for woodwork are chosen as fastening elements;
- the insulation is fixed (pressed between the slats), which can be further strengthened with your own hands using dowels with a wide head;
- the insulation is covered with an overlapping waterproofing film, and its edges are folded inward;
- on the sheathing strips (50/30 mm), a wooden frame is installed perpendicularly, on which the decorative cladding will be installed;
- decorative finishing (in our case, siding) is installed on the outside of the house. Then you can install the finishing elements and communications (drainpipes).
If you carry out all the installation procedures correctly, without skipping a single step, then you will get a beautiful and reliable decoration of the external walls of the house for insulation, created by yourself.
Siding is a popular finishing material based on polyvinyl chloride. It is used primarily for finishing facades and walls of various buildings, including private houses. It has many advantages, including the ability to fasten panels while simultaneously performing thermal insulation work on the surfaces being finished. In this case, all the necessary activities can be done with your own hands.
DIY siding with insulation
Contents of step-by-step instructions:
Corner profiles
Before you attach the siding, you will need to install the corner strips. They can be for external and internal corners. The first ones are mounted in this order:
- Marking the location of the edges of the spotlights.
- Attaching the guide to the corner of the building. There should be a gap of 3 mm between the profile and the soffit (roof). The lower border of the profile is located 6 mm below the border of the starting profile. The plank is secured with self-tapping screws in the upper part.
- Check verticality using a building level or plumb line. Adjust the location if necessary. Fastening the bottom and middle with self-tapping screws. Fasteners do not need to be provided too often.
Installation of a corner profile
If it is necessary to join the profile in height, the joining place is located at the same level in all corners of the building. The joining is done with an overlap. The part with holes for fastening the top panel is cut so that there is a gap of 9 mm between it and the same part of the bottom panel. Instead of a corner profile, when installing siding on a wooden house, you are allowed to use two starter ones.
Step-by-step instructions for installing profiles for internal corners look almost the same. But in this case, other strips are used.
Options for interior corner solutions
Types and characteristics
The term “siding” refers to ordinary panels intended for cladding the facades of buildings and auxiliary home structures. In addition to their decorative purpose, the panels are often part of a multi-layer wall covering, installed for the purpose of waterproofing, reducing noise entering the premises, and improving the operational characteristics of the building.
At first, siding was made of wood; nowadays, the variety of types of such external cladding is quite large.
Natural wood remains extremely popular to this day. Of course, modern wood panels are significantly different from the boards that were used before.
The wood used for the production of natural siding, as a rule, is coniferous, and certainly goes through a cycle of special preparation, including disinfectant impregnations and heat treatment. This makes the raw material resistant to external influences and increases its resistance to fire and rotting.
Despite the processing of wood, it remains the most environmentally friendly material for the exterior cladding of buildings. No other type of material can compare with it in terms of thermal insulation properties.
Almost all types of modern cladding have a locking part with grooves, allowing the installation of panels with almost no gaps that require sealing.
Metal cladding of houses is not very popular. It is more often used for finishing public buildings, commercial and social buildings, industrial enterprises, offices and other similar buildings.
Most often, galvanized steel is used to produce such panels. The most expensive types are made from aluminum and zinc. The advantages of metal cladding are its reliability (with high-quality anti-corrosion treatment), ease of installation, non-flammability, mechanical strength (however, if the material is inattentively transported or due to a pinpoint impact, it may well become deformed).
Plastic siding is the most popular. More than half of the sales volume of all facade panels comes from this group. Most often, the base substance in them is polyvinyl chloride (PVC), a polymer characterized by excellent performance properties.
Siding installation is so simple and intuitive that anyone, even an inexperienced builder, can handle it.
The best insulation materials
Those home owners who ignore the issue of insulating the external walls of a building are deeply wrong.
No matter how you try, there will certainly remain voids between the wall and the cladding. They will not add heat to the house, but they will collect dampness and create conditions for the appearance of mold, moss, fungi, and insect nests, the proximity of which can be not only unpleasant, but also dangerous.
In addition, damp walls will inevitably collapse. And the dew point will be in the thickness of the wall, which means that temperature fluctuations will contribute to the freezing of the material, rapidly destroying the building. The insulation will move the point outward, into the thickness of the thermal insulation material. Condensed moisture will be discharged outside through the ventilation gap.
Any home should be insulated, even country houses where you live only in the summer. This will ensure the safety of the building and freshness in the house in the heat. After all, thermal insulation protects against heat no worse than against frost.
Wind protection
When laying insulation between the panels and the wall surface, you need to take care of the windproof material. It will not only be a good protector of thermal insulation, but will also protect the insulation from atmospheric moisture. It is better to purchase windproof material with diffuse properties. According to the technology, hydro-steam insulating film will be able to increase the service life of the insulation and will prevent the appearance of dampness inside the room.
Distinctive qualities of cladding
Plastic slats can easily withstand high temperatures (up to +50 C) and are fire resistant. They are not afraid of moisture and are not infected by pathogens, are not damaged by moderate mechanical stress, do not attract insects and are environmentally friendly.
Plastic slats are fire-resistant, water-resistant, environmentally friendly, and easy to install.
This decoration on the outside of the house looks attractive and can transform even dilapidated buildings, as it allows you to hide all the imperfections of the facade. Siding is easy to install, but still, its installation requires certain skills. Siding perfectly masks pipes, curved walls and plaster errors.
Modern slats come in a variety of colors, which allow you to show your design skills and create an interesting decorative solution. You can choose drainpipes, storm drains, extensions and various related elements to match the cladding.
When choosing a decorative panel material, you should know that there are several types of it on the construction market:
Necessary tool for the job
Before starting work, you should calculate the amount of material needed, as well as stock up on a set of tools. For installation you will need corners, main and connecting strips and panels.
Important! Panels should be purchased with a reserve, as they may be from different batches and differ in color.
You will also need metal scissors, a grinder and a building level.
What siding to use for cladding
The modern market offers a huge selection of panels in a wide variety of colors and textures. Siding can successfully imitate wood, brick and stone surfaces.
What siding to use for cladding
The standard thickness of the facing panel is 1 mm. Width and length indicators are not subject to standardization and depend on the preferences of a particular manufacturer. The most common cladding panels are about 3-4 m long and about 20-25 cm wide. A large dimensional grid will allow you to choose the panels that will be most convenient to use for cladding your home.
Residential buildings are usually finished using vinyl or any other base siding. When choosing a specific option, all other things being equal, give preference to vinyl panels.
When choosing vinyl siding, be sure to pay attention to the appearance of the elements - the coloring of the panels must be strictly uniform
Expensive siding usually has the same color on both sides. For more budget-friendly materials, the inside is often a little lighter than the outside.
It is not recommended to use panels with a glossy finish. Such material will become very hot in the sun, to the point of deformation. Therefore, the best choice is siding with a matte finish.
Check that all panels are the same thickness. The parameters of their nail holes should also be identical.
Before purchasing a material, check its ductility. To do this, you can bend the thin part of the panel near the nail hole. If the edge breaks, you should refuse to purchase such panels. If the material bends, but remains intact, you can safely use such siding for cladding with insulation.
Siding a brick house with insulation: several important nuances
Photo 12. Covering a brick house with siding and insulation
Vinyl and acrylic siding expands at high temperatures and contracts at low temperatures. Therefore, during installation we do not tighten the panels. We undertighten the screws by 1-2 mm. Between the panels and profiles we leave a gap of up to 5-6 mm in winter and 2-3 mm in summer.
It is important. If in the summer there is nowhere for the panels to expand, they will warp. If the gap is larger in winter, the siding will narrow and fall out of the strips.
Between the panels and profiles we leave a gap of up to 5-6 mm in winter and 2-3 mm in summer. Why is it important? If the panels have nowhere to expand in the summer, they may warp. If the gap is larger in winter, the siding will narrow and fall out of the strips.
For façade cladding we use only galvanized self-tapping screws. Otherwise, they will rust and leave red stains on the siding.
We screw the screws at right angles to the panel, into the center of the perforation.
To install siding, you will need additional materials: starting and finishing strips, j-trim, connecting, near-window and other strips. Their exact list and quantity depend on the size and configuration of the house. You can calculate it yourself using an online program or order a calculation from the seller. Many of them do this calculation for free.
We mount the pediment
We sheathe the pediment around the perimeter. All fasteners, except the top one, are installed in the center of the holes. We install the upper fastening element at the top of the hole. It can be sheathed either with profiles for arranging internal corners or with a starting profile.
Pediment framing
The installation procedure is similar to fastening wall panels. We trim the edges of the elements and connect them to the locks of the receiving profiles. We remember the 6 mm indentation when installing in warm weather and 9 mm when doing work in winter.
We fasten the last element of the gable cladding directly through the panel material - this can only be done here.
Trimming edges
The cladding is complete.
Marking units
When selecting heating components, the standard unit of measurement is taken into account to determine the value and marking. The basic value that indicates the dimension is defined as a whole number or an inch. It is easy to convert inches into standard millimeters from the ratio: 1 inch equals 25.4 mm.
The size of the pipe is calculated using several indicators - the possible speed of fluid flow and some pressure loss over a one-meter section of the pipeline. Calculating the diameter based on pressure drop is economically feasible and consists of determining the balance sheet value between operating and major maintenance costs.
The larger the diameter, the higher the cost indicators, and in order to pump a certain amount of water where there is a narrowed diameter, much more energy will be required to operate the electric pump.
Criteria for selecting quality products
If you decide to use this particular option, then it is important to select a solution from the entire range on the market that will meet several important requirements:
Quality First of all, you need to carefully inspect the surface; it must be done very carefully, without any flaws or defects caused by low-quality equipment. Ask the seller for documentation that confirms the product’s compliance with all standards and regulations established in our country Physical parameters A very important indicator is the thickness of the panels, it should be at least 1.1 mm, since if this value is less, the planks will be very flimsy , in a few years the surface will begin to ripple. It should be noted that options whose price is very low most often have low strength and a thickness of 0.9 mm or less, which is very small. Manufacturing material
There can be two types, the first of them is vinyl, this material is distinguished by its affordable cost and quite attractive appearance, but its frost resistance is low, and at low temperatures the coating becomes brittle.
Acrylic panels are more durable and more attractive in appearance, but their cost is noticeably higher than that of the first option
As for installation, the instructions for carrying out the work are the same for both types
Coloring It is no secret that colors may differ from one manufacturer to another; it is important for you to choose a solution that will harmoniously fit into the surrounding space and will fit well with other objects on the site
Golden oak wood siding is one of the most popular due to its very pleasant shade and beautiful structure.
Application of the extractor
An extractor can be a solution to the problem. The tool is a kind of screwdriver, the tip of which contains a reverse thread. On the opposite side of the device there is a perpendicular crossbar with which you can perform rotations.
First, you need to make a notch on the head of the fastener using a punch and a hammer. The mark must be strictly in the center. Using a metal drill, make a small hole in the head.
Next, you need to use the extractor itself. The tip of the tool should be inserted into the prepared notch and hit on its back side with a hammer. It is necessary to tap the extractor until it is firmly fixed in the fastener head. Then you need to turn the device several times. Once the reverse thread of the extractor is firmly rooted in the structure of the material, you can begin to remove the screw.
Types of facing material
Types of siding for cladding a house:
Wooden - is the least common due to its high price and difficulty in maintaining. Wood siding is the most environmentally friendly, but it must be constantly treated with antifungal agents, painted, and damaged panels replaced. Often, lining for interior work is made from wood, the fastening of which we wrote about here.
Iron - not used for renovation of residential premises. Most often, metal siding is used for warehouses and garages.
Basement is the newest type of all. If you look at the photos of the houses, they look like brick or stone masonry. Installation of basement siding will immediately make any home stand out from the rest.
Vinyl siding for finishing. The advantages of vinyl components: long service life (about 50 years), corrosion resistance, basic maintenance and the ability to attach to any surface. Covering a balcony with this type of siding will improve even an old “Stalin” building.
Today we will look at the principles of wall cladding with vinyl material.
Equipment
Additional elements
Here are the parts included in the cladding kit:
- Narrow long panels are the main element from which the cladding is assembled.
- The corner is external, usually 3 m long.
- The corner is internal, has the same length.
- The starting plank, into the protrusion of which the lowest cladding panel is placed. Installed above the plinth and above window/door openings. Typically 3.8 m long.
- J-section plank. This part covers the ends of the panels if the cladding is open. For example, if the siding is not installed along the entire perimeter, or there is an extension adjacent to the house, which it was decided to leave unfinished. In addition, the J-plank is used as a frame for gable trim, and if desired, it can also be used as a finishing strip.
- Planks with T-shaped and H-shaped sections. They are used to design joints between siding panels - mainly when extending them along the length. The length of one part is 3 m.
- Near-window slats. They are used in cases where windows and doors are recessed into the wall. Length - 3 m.
- Platbands. They are used for finishing openings, the filling of which - a window or a door - is located in the plane of the outer surface of the wall.
- Window tides. Before purchasing, you should make sure that you have not already installed them: these parts are usually supplied complete with metal-plastic windows.
- Drain plate. An additional accessory designed for installation above a window.
- Wind board.
In addition to the above, you will need soffits - perforated panels that line the space under the eaves of the roof. Thanks to perforation, ventilation of the ventilated gap under the roof is ensured.
Advantages
When analyzing the advantages and disadvantages, we will talk about vinyl and metal materials, since this is what is meant when they talk about cladding a house with siding.
- It is resistant to sunlight, ultraviolet radiation, gusts of wind and other natural phenomena that it will encounter during operation.
- This material protects the walls of the building from negative influences. If it was installed on old structures, it can prevent their further destruction. But to do this, before covering the old surface must be treated with a primer.
- It is characterized by easy installation and replacement of individual elements if the need arises.
- Siding can retain its original appearance for many years. It does not need to be additionally painted or treated with protective agents. The only thing that will be necessary is to wash it. Drops of rain, wind with dust particles do not make it cleaner. To ensure that it always pleases you with its appearance, wash it at least once a year.
What should you consider?
During installation, it must be taken into account that in snowy areas and for slippery roofing coverings, the installation of snow retention systems is mandatory.
When planning drainage systems with frequent icing in winter, it is recommended to use electric heating for drainage gutters, which reduces the risk of damage to them. For stormwater systems made of plastic, gutters and funnels are additionally glued together with special adhesives, which ensures the strength of the system under any climatic conditions.
It is advisable to install nets or caps over the gutters and drain funnels to protect the system from debris, branches or leaves getting inside the pipes.