A few simple rules
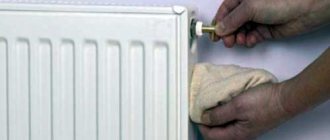
In what cases can we talk about the correct connection of batteries? When they work effectively. It's very easy to check. Place your hand on their surface, and you will immediately determine whether the radiator is heating up or not, and whether it is heating up enough. This can be done after completion of installation work, when the system is pressure tested. But there is one nuance in this moment.
Professionals touch not only the top or sides of radiator sections. They check all sections in a row, touching their lower parts. After all, according to the laws of physics, warm water rises to the top, so this part heats up the fastest. Then they check the uniformity of heating not only of sections of one radiator, but also of all radiators separately. This is very important, because one branch may fall out of the system.
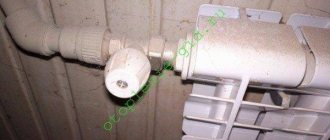
To ensure uniform heat distribution across all batteries, specialists use thermostats or taps. They are installed directly on the heating device. Cranes are most often used due to their simple and reliable design. And they last longer. Experienced plumbers try to install them in such a way that they perform double duty:
The diameter of the pipes was changed, thereby regulating the flow of coolant, and therefore the temperature inside the radiators. Allowed the removal of air pockets. Of course, Mayevsky cranes are usually used for this, since they are more efficient. However, conventional flow-through taps last 3-4 times longer.
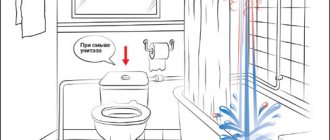
Air locks are most often the reason why batteries or entire branches of the system do not work. To quickly get rid of them, it is necessary to shut off the working branches, thereby directing the entire coolant flow to the faulty lines. Then you should open the taps on each radiator in turn, through which the air is squeezed out.
Attention! In heating systems with forced circulation of hot water, it is easier to remove air pockets.
Heating system design
First, you need to decide which radiators will be used and how they will be connected: this will allow you to carry out the necessary preparatory work indoors in advance.
As a rule, the heating system consists of the following elements:
All of the above components are freely available at points of sale of plumbing equipment.
Installation of radiators includes the following operations:
- Selection of the optimal installation location.
- Organization of a pipeline network.
- Connection of batteries to pipes.
- Conducting testing.
- If the test is successful, full operation is allowed to begin.
Connection errors
The most common connection mistake is the reverse circuit. The correct scheme is that the coolant is supplied to the upper inlet pipe, and the outlet comes from the lower pipe. If the piping is done the other way around, then the heating power drops by 2 times, which has been proven by research.
Of course, a professional plumber would never allow this to happen. An error is possible when connecting independently. This is why experts do not recommend that non-professionals engage in this process.
The second most important reason is the removal of air pockets. Everything here has to do with the slope of the pipes. The hot water supply pipe should be directed to the expansion tank, from where air can be removed spontaneously. But the slope of the return pipe should be directed towards the heating boiler. In this case, it is necessary to install a drain valve at the end of the return line, with the help of which it will be possible to remove the coolant from the heating system.
By the way, many people are interested in how the connection diagram for bimetallic radiators differs from other heating devices? Nothing. It makes no difference what material the devices are made of - the connection principle itself is important.
Place of radiators in the heating system
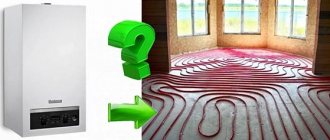
The use of radiators in heating residential premises plays an important role today. Due to design factors, most residential buildings, especially apartments in multi-storey buildings, cannot be equipped with in-floor heating, which requires a significant thickness of interfloor slabs. Therefore, the main job of heating interior living spaces is performed by wall-mounted radiators, often called radiators.
Radiators transfer thermal energy from the coolant to the surrounding space. The intensity of heat transfer depends on the temperature of the coolant, the thermal conductivity of the radiator material and the heat transfer area. The design of modern radiator models has a number of technical improvements that make it possible to connect them in heating circuits of almost any wiring diagram.
On a note:
Old-style cast iron batteries only had pipes for supplying and exiting coolant, while modern models are additionally equipped with built-in air vents to eliminate air pockets.
The new design of the batteries has radically simplified the operation of the heating system and increased its efficiency - if there are air pockets in the heating devices, it is enough to open the drain valve and bleed the air.
Bimetallic water heating radiator with fins that increase the heat transfer area
Thanks to modern models of heating batteries, it has become possible to choose the optimal connection diagram and install heating devices as rationally and efficiently as possible. But the operational efficiency and durability of the water heating circuit depends on the quality of the piping - a condition necessary when using polypropylene pipes, despite the numerous advantages of this material.
Important!
The connection of polypropylene pipes to a metal riser is made using special adapters, one end of which, the metal end, has a threaded connection, and the second end, the polymer end, has a polypropylene pipe connected by hot welding. When embedding a heating radiator into a circuit made of polypropylene pipes, it is necessary to use connecting fittings, adapters and couplings made of similar material.
Polypropylene pipes have a high coefficient of thermal expansion, therefore, when installing the heating circuit, gaps should be left between the ends of the pipeline sections and the wall so that during linear elongation from the influence of hot coolant, the pipe span does not rest against the wall at its ends and is not deformed. It should be taken into account that the longer the pipeline span, the greater the length it will lengthen.
Reinforcing polypropylene pipes with aluminum or fiberglass reduces linear expansion, but does not solve the problem completely, therefore, in sections of significant length, it is necessary to provide U-shaped or, if the location allows, spiral expansion joints.
Heating uniformity
In one heating radiator, different sections heat up differently and unevenly. However, the temperature difference between the upper and lower parts is normally barely noticeable. If you are not an expert in installing a heating system, then it will be difficult to determine whether the batteries are working correctly.
If you compare two heating devices - cast iron and aluminum, you should remember that cast iron products have lower heat transfer than aluminum ones. Accordingly, they will heat up more evenly. But in aluminum appliances, the top heats up faster than the bottom. But that doesn't mean they don't work correctly. It just takes a little time for the coolant to completely fill the radiator. And only after this can the quality of his work be determined.
There is another reason why devices may not work correctly. This is dirt that accumulates in the lower part over several years of use. This is why it is recommended to rinse and clean old batteries before installation. Moreover, cast iron products are best washed. Often they are simply disassembled, washed, new cuffs are installed and reassembled. The “new” connection of the cast iron radiator guarantees high quality of its operation.
Main characteristics
In a private house, unlike high-rise buildings, an autonomous heating mechanism is installed, that is, a system that does not depend in any way on a conventional boiler room. For this reason, the coolant temperature, as well as the network pressure, will be completely different.
When you choose heating batteries to be installed in a private home, you should take into account a number of factors:
- In buildings of this type, the pressure on the coolant, tanks and radiator pipes will be significantly less. In fact, radiator batteries will not experience such loads, which is why you can choose any model, even with thin walls.
- In buildings of this type, the length of pipes from the heat source to the radiator is short when compared with multi-story buildings. For this reason, heat losses are practically zero, and the coolant will heat up more strongly. That is, in a private home you should install models that will withstand such temperatures.
- You need quite a bit of liquid to fill such a heating system. If desired, you can add ethyl alcohol and antifreeze to it. This way you can make protection for radiators and pipes if the boiler does not turn on for a long time.
- Even the slightest possibility of so-called water hammer occurrence is excluded. True, in private houses a problem may arise, expressed in the freezing of water in the pipes. This will cause the batteries to simply burst if a person forgot to drain the water from there before leaving.
Advantages of cast iron batteries
For some reason, when it is necessary to replace old cast iron radiators, most consumers look for an alternative made from other types of metal. This happens for the simple reason that they do not know what modern models of cast iron batteries look like. They not only have a smooth, beautiful surface that looks stylish in almost any interior, but also new technical parameters that are significantly better than their Soviet counterparts.
Installing new generation cast iron heating radiators allows you to save money, both on products and their connection. They do not have to be adjusted to fit the existing heating system or purchase additional adapters. With all this, they have a number of advantages over old cast iron batteries:
- The weight of the new models has become two times less. If earlier the radiator section weighed about 8 kg, now it is 3.5-4 kg.
- Since their outer surface is no longer “ribbed”, but has acquired a smooth, even surface, the heat transfer of the new devices has become higher. In old models it was 110 W, and in new ones it was about 130-140 W.
- Their resistance to the quality of the coolant remains the same, and since the channels are quite wide, they will have to be cleaned much less often than the same bimetallic or aluminum sections.
- Knowing how to properly connect a cast iron battery, you can forget about the cold in your apartment for the next 20-30 years. This is exactly the warranty period that manufacturers give for their products, although the average service life is 50-60 years.
- The working pressure in new cast iron radiators is still 9-12 atmospheres (working) with a test pressure of 15 atmospheres. They are ideal for apartment buildings no higher than 6 floors.
With all their new advantages, these devices have the same disadvantages as the old “accordions”. First of all, this is their fragility. They cannot be hit, much less dropped, but connecting cast iron heating radiators of a new generation allows you to do this, if not individually, then at least without a team of builders. This did not work out with the old samples, given that the weight of one section was 7-8 kg, and there could be 12 or more of them in the battery.
Since the price of new cast iron structures is low, the heat transfer rates are higher, and the appearance is more stylish, you should pay attention to them, especially since their outdated analogues have served people well for decades.
Painting. Recommendations from professionals
It is better to choose a special heat-resistant paint. Acrylic is more often used, which has a less pungent odor. Before applying paint, you need to prepare the surface:
- Remove dirt and paint residues using a remover. If the paint stays even, you can apply a new coat over it.
- Sand the surface with sandpaper. It is more convenient to use a special attachment on a drill or a metal brush.
- Degrease the surface with ordinary acetone or solvent.
- Apply a coat of primer suitable for the paint being used. Wait until dry.
- Apply paint. For the inner surface, take a special curved brush. You need to start from above. Paint the inside first.
- For best results, paint in two thin layers. Each of them must dry out. This will make the paint last longer.
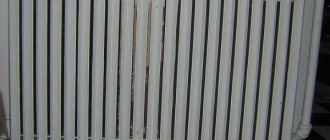
Painting cast iron radiators
Compliance with installation standards
Even knowing how to install a cast iron battery, you should remember why you need to adhere to the standards approved by SNiP. Maybe someone will consider this unnecessary, and will be wrong, since any deviations from the parameters are not just a violation of safety rules, but also a decrease in the efficiency of the system itself.
General rules for installing radiators include:
- The position of the device relative to the vertical axis of the window. The middle of the battery should coincide with it. The permissible deviation should not exceed 2 cm.
- The battery must have such a number of sections that when assembled it occupies 75% of the width of the window opening.
- SNiP indicates how to secure a cast iron battery to the wall. So the distance between it and the floor according to the standards is 60 mm, under the window sill 50 mm, and from the wall - 25 mm.
Since the distance between the radiator and the wall is so small, before connecting cast iron batteries, it is worth attaching a heat-reflecting film or metal plate to it. Such an easy procedure will significantly increase the heat transfer of the radiator, since the heat will not go into the wall, but will be reflected into the room.
When the location has been chosen and all calculations have been made, you can begin installing cast iron heating radiators with your own hands. To do this you will need tools and the necessary fasteners.
Handy tools
To install cast iron batteries, you will need the following tools:
- Building level.
- Screwdriver.
- Drill for making holes in the wall.
- Roulette.
- Sealant, sealing tape.
- Pencil.
- Long and short key for connecting battery sections.
Tools for installing a radiator
Additionally, it is better to purchase a torque wrench. It will help to optimally tighten the parts at the joints. If this is done poorly, they may not withstand the pressure of the heating system. This will cause a leak. And if you tighten it too much, the thread may break. This will also lead to an emergency.
Torque wrench
Fastening methods and number of elements
Attaching cast iron radiators to the wall is the first stage of installation, the quality of which determines the further connection and quality of operation of the entire system. Although newer cast iron batteries weigh half as much as their older counterparts, weak brackets or improper fastening can cause a serious accident over time. Therefore, you should perform this part of the work very carefully, using one of two installation methods:
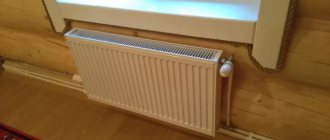
- Wall mount for cast iron batteries is the most common. As a rule, they are mounted under windows not because it is prettier or easier, but to prevent the glass from fogging up. Warm air rising from the structure creates a kind of curtain that prevents cold currents emanating from the window from entering the room. The main types of fasteners with this fastening method are:
- Brackets are made of cast iron, which are made in the same way as radiators, by casting.
- Steel fasteners located on a strip of the same metal.
- Steel pin fasteners up to 30 cm long. They are suitable for particularly heavy structures.
- The most convenient are adjustable steel clamps. They allow you to select the optimal position for the battery and change it if necessary.
Demir Dokum Retro 600
Main characteristics:
- cast iron radiator, floor-mounted, sectional;
- designed for a maximum pressure of 9 atm;
- operating coolant temperature - 110 °C;
- height - 768 mm, width - 498 mm, depth - 250 mm, height of legs - 107 mm.
Model description
Radiators of this series are distinguished by the fact that the surface of each section is covered with cast iron, made in the palace style of the late 18th century. To connect to the system, control and shut-off valves (taps, plugs, valves) are also used, also in retro style.
The products are used for connection to a water or steam heating system and can heat large areas. The original elegant appearance will not only decorate the interior, but will become its highlight, giving the room charm and a finished look.
Specifications
Technical indicators are as follows:
- volume - 18.3 l;
- weight - 76.4 kg;
- heated area - 14.4 m²;
- heat output - 1440 W;
- crimping pressure - 12 atm.
Main advantages
The manufacturing company Demir has long won the love of Russian consumers with the quality of its products. The radiators produced have properties that allow them to be used in both autonomous and centralized heating systems. In addition, they have other positive qualities.
Great design
Radiators are available in an elegant gray cast iron color or coated with a high-quality primer, which allows you to paint them in any color, artificially age them, make the surface glossy or matte. Ornate patterns of cast iron decorate the device, and together with retro-style valves and taps, they turn it into a work of design art.
Material quality and design features
In the manufacture of devices, high-quality cast iron is used; it is practically not subject to corrosion, is resistant to mechanical stress, is not afraid of aggressive environments, and has a high heat capacity. The latter property allows you to avoid sudden changes in temperature in the room when the heating temperature of the coolant decreases.
A design feature of the device is the increased diameter of the internal passage holes. Therefore, Demir Dokum Retro 600 radiators are not afraid of water hammer, blockages due to poor-quality coolant, or clogging of holes as a result of scale deposits.
Connection sequence
The most crucial moment in installing batteries is connecting them to the heating circuit and then checking them. In order for all work to be carried out efficiently, you must follow the installation sequence of the cast iron radiator.
- The heating circuit is first turned off, the supply of coolant to the apartment is stopped, and then drained from the pipes using a circulation pump.
- The battery is hung on brackets and its horizontal and vertical position is checked with a building level.
- The plugs are unscrewed from the device.
- In the event that the side connection diagram for cast iron heating radiators is “introduced” into a single-pipe circuit, then you must first install and connect a bypass with a valve. If the system is two-pipe, then flow pipes with taps are used.
Before installing cast iron batteries, it is recommended to check the assembly quality of the sections and adjust each nipple. After this, the sections are brought together, and the structure is subjected to crimp testing to check the quality of the connections. If there is no leak, then you can proceed directly to connecting the battery to the circuit.
- At the last stage, the Mayevsky tap is installed on cast iron radiators.
After connecting all the heating elements, a test check of the quality of work is carried out. It will show how securely the system is installed. To do this, water is introduced into it under pressure. If there are no leaks or strange noises or knocks, then all elements of the circuit are connected correctly.
The heating appliance market is striking in its diversity. But the familiar cast iron radiators are still popular due to their many advantages. They are durable, corrosion resistant, easy to use and very durable. But even the most reliable device may one day require replacement. You can solve the question of how to hang a heating radiator on brackets yourself. The main thing is to have experience, the necessary materials and take into account some installation nuances.
Modern cast iron radiators are an example of style
The procedure for carrying out installation work
Installation of brackets for a cast iron battery
First you need to determine the required number of brackets. It depends on the area of the heating device. For 1 sq.m. The heating surface needs 1 bracket. Calculate the surface area of the radiator depending on the number of sections of the device and mark the wall for installing brackets. After marking, check the calculations again, drill holes, insert dowels into them and screw in the fasteners.
Installing a heating radiator
The heating circuit must be closed and the water must be completely removed. The remaining coolant can be pumped out with a pump. The battery is hung on supports, and a bypass is connected for a one-pipe system. Next, the radiator is connected to the system using threaded connectors. All joints must be sealed. Any sealing materials are suitable for this; tow is usually used. If you know how to use a welding machine, take the opportunity to weld the joints of the pipes and the pipeline.
After installing the device, pressure testing is required. This procedure is performed by professionals with the appropriate equipment. If you have a device, do everything yourself; if not, then buying an expensive device for the one-time installation of one or several radiators is not advisable. After installation is complete, check the operation of the system.
Theoretically, there is nothing complicated in installing cast iron heating radiators, but in practice, not everything is as easy as we would like. If you do not have the necessary experience or an assistant who has already performed similar work, it is still better to hire a team of plumbers. Of course, paying for their work will significantly increase the cost of the heating system as a whole, but you will save time, effort and nerves. The final decision is yours.
Features of selection and installation
Before starting work, you need to decide on the installation location. The heating device is placed in the area where the most significant heat losses are observed. As a rule, this is a place near the windows. Heat losses are not excluded, even if you have modern energy-saving double-glazed windows installed. There is no need to even talk about ordinary wooden frames.
If there is no heating device under the window, then the cold air falling along the wall “spreads” across the floor. Attaching cast iron radiators to the wall in this location will change the situation. Rising warm air will prevent the spread of cold currents.
Another area of heat loss is the area near the front door. But this is more often faced by owners of private houses and apartments on the ground floor. In this situation, the heating device is hung as close as possible to the entrance. When choosing a location in accordance with the layout, do not forget about sufficient space for the pipeline.
For the most effective protection, the radiator should account for at least 70% of the width of the window opening. When choosing the appropriate option, keep in mind that a small device will not provide the required comfort. A battery selected correctly in size will avoid cold areas on the sides of the window, condensation and dampness.
When looking at models for installing cast iron batteries, consider the climate of your area. Purchasing a device with high heat transfer will be justified only for very cold regions. For residents of the middle zone, batteries with average performance are sufficient; for residents of southern latitudes, low devices with a minimum number of sections are suitable.
Rice. 1 – connecting sections to each other
Installation of cast iron heating radiators must be carried out according to certain rules of location in relation to the floor, window sill and walls:
- For installation, it is necessary to determine the middle of the window opening. Then from this point you need to set aside the distance on the right and left to the fasteners.
- To simplify the assembly process and at the same time avoid the formation of cold zones, place it at a distance of 8 - 14 cm from the floor.
- There should be at least 10 - 12 cm between the window sill and the battery, so as not to disrupt convection and not reduce thermal power.
- There must be a gap of at least 3 - 5 cm between the wall and the device.
Preparatory work
In order to correctly select the necessary parts and calculate their quantity, you should know the type of wiring of the heating system - one- or two-pipe. In a single-pipe system, the heated coolant rises through the riser, and the heating devices are connected to the downward line. In a two-pipe system, the coolant moves from the heater to the heating devices and back. One line is designed to supply hot water, the second - to return the cooled coolant to the boiler. There are two ways to connect system elements - horizontal and vertical.
All connection details should be clarified before work begins. Before installation, you need to drain the water from the system, dismantle the old heating devices, and remove the fasteners on which they were held. The supply of hot coolant to the system must be stopped until the work is completed.
Assembly of cast iron heating radiators
First of all, you need to group the sections. To do this you will need radiator keys. The device is mounted on a workbench; radiator keys must be inserted into the lower and upper holes so that they rest against the internal protrusions. Both nipples need to be deployed simultaneously to avoid skewing of the sections, so the manipulation is performed with an assistant. The nipples should be lubricated with drying oil and gaskets should be placed on them. The keys are rotated in the direction opposite to the thread. If it is left, then they turn to the right, and if it is right, they turn to the left. You need to screw in 1-2 thread strokes.
Hydraulic tests of the finished structure are carried out on a special stand, where a pressure of 4-8 kgf/cm2 is created using a press. The performance of the device is checked using a pressure gauge. If its performance begins to decline, it means that either defective sections are connected, or the work was performed poorly. In the first case, the elements are replaced, in the second, the nipples are tightened. If minor damage occurs, it can be repaired with epoxy glue. If the connections are not made correctly and the joints are leaking, the gaskets should be changed.
Painting the radiator after assembly
After testing, the heating device is painted and dried. To obtain a durable and even coating, it is necessary to apply two thin layers of paint. As a result, radiators must meet the following requirements:
- Heat-resistant coating of the device body. It must withstand temperatures of 80 degrees without softening or releasing harmful substances into the atmosphere.
- The painting must be of sufficient quality to protect the radiator from corrosion as much as possible.
- The selected composition should not change color.
Experts recommend using alkyd enamels as a coating, because... after drying, they are harmless and do not poison the air during operation. Option - acrylic compositions. They do not crack, do not change color and are resistant to heat. Both types of compositions have their advantages: alkyd enamels are cheaper, acrylic-based paints are more durable. You can also use water-dispersion paints, which have a manufacturer’s mark stating that they can be used for painting heating appliances.
How to correctly determine the location of the radiator
Heating devices are usually located under windows at a height of at least 6 cm from the floor and 5-10 cm from the bottom of the window sill. The distance to the wall should be at least 3-5 cm. The system pipes are placed at a slight slope, which is made in the direction of movement of the coolant. If there is no slope or distortions appear when installing a cast iron radiator, air will accumulate in the batteries, which will have to be removed manually. An “airy” radiator will not be able to warm up properly and give off heat. The center of the device should coincide with the center of the window opening plus or minus 2 cm.