Home » Automation and controls » Wireless thermostat for a gas boiler: description, principle of operation, main types and connection
Heating a home is a vital part of it. Effective management of this system helps not only to save money on heating, but also to extend the life of the building itself and heating equipment. In addition, it is always more pleasant to be in a room with a comfortable temperature. The thermostat of a gas boiler copes with these tasks, and a wireless thermostat makes it easier to control the operation of the boiler in the house. Let's figure out what this device is, how necessary it is and how to use it.
…
- 1 What is a thermostat
- 2 Types of thermostats 2.1 By connection method
- 2.2 By functionality
What is a thermostat
The device is a small device that is connected to a gas boiler using terminals and wires. If we are talking about a wireless device, data exchange occurs via radio waves. The wireless kit consists of two units, one of which is installed indoors. It has a temperature sensor and an interface through which the desired temperature is set. It is equipped with an LCD display and a keyboard. The second is attached to the boiler with terminals. The blocks are interconnected by a radio channel.
Based on this design, it becomes clear why a thermostat is needed: regulating the temperature in the room through the function of turning the gas boiler on and off when the set temperature is reached.
For comparison: when a double-circuit gas boiler is installed in a house, the system is guided by the temperature of the water that circulates through it. As soon as it drops below the set level, the boiler switches on heating. Therefore, if weather conditions change, you need to manually reset the boiler settings. During the season one has to resort to such manipulations more than once. This mode is inconvenient because the boiler often starts only for short periods of time, usually for a couple of minutes every 5-10 minutes. But the circulation pump of the system works constantly. Accordingly, there is a large excess consumption of electricity. For example, a 24 kW double-circuit boiler consumes about 60-90 W/hour, that is, approximately 43-65 kW per month. In addition to high energy consumption, there is high depreciation of the gas boiler itself.
Attention! The main advantage of a heating system with a room thermostat is that it turns on the boiler depending on the room temperature. A system without a thermostat turns it on when the water in it cools.
If there is a thermostat in the room, regulating the temperature in the room is easier, faster and more economical. The operating principle of the room thermostat allows you to set the desired temperature parameters right in the room and not have to run around to reprogram the boiler every time you need to change the temperature.
Smart heating Beok BOT-X306 CCT-10-X: Wi-Fi control of boiler and heated floor
Today we will talk about heating. But it’s not really about heating, but rather about saving heating bills and at the same time about comfort. After all, you will agree that you can not have heating, but it will not be comfortable, or you can throw money down the drain, but it will be hot. A kit from the BEOK company, which is known for its heating automation systems, underfloor heating controllers and other thermostats, will help us find a balance. For more than 3 years I have successfully worked with a combination of a boiler control panel and a remote panel with programming capabilities and a temperature sensor. But there is one minus in it: I could not remotely control the boiler, view its condition, set the temperature, or do simple automation of control depending on sensors.
Content
- Packaging and equipment
- Servo
- Thermostat
- Settings
- Setting up automatic operating mode
- Mobile app
- Connection and installation
- Video review
- Where can I buy
- conclusions
Packaging and equipment
I chose a wireless kit with the ability to connect to a smart home system. When choosing, look carefully, as the control panels will differ. Thermal heads also differ - normally closed or normally open.
Let's first take a closer look at the control unit itself for the boiler, thermal heads and other pumps. The manufacturer has two types of them, at the time of shooting the review. Namely, with a wireless connection to the control controller and, accordingly, with a wired one. I chose wireless, since the controller itself will be located on the second floor, beyond the reach of the boiler. It comes in a cardboard box like this with a small brand sticker on the top.
Inside there is the control unit itself and instructions in English.
I advise you to at least skim through the instructions, it became clear to me that one control unit can work with eight thermostats.
But these instructions are not entirely complete; there is even more information regarding the operation of the control unit on the seller’s page.
In addition, do not rush to throw away the cellophane bag; check it first. Since it contains 8 barcodes with unique numbers. And they are needed just to connect external thermostats to our control unit, and, in fact, for each head of a warm floor, we can set our own external thermostat.
The control unit itself is quite large. In the upper part there are 8 LEDs responsible for information about the circuits of the underfloor heating thermal heads, then a control lamp for the underfloor heating pump and a control lamp for the operation of the boiler. In the lower left corner is the manufacturer's logo. The dimensions of the control unit are 240*110*42 millimeters.
In the back there are holes for fastening, as well as “windows” for exiting wires. All of them are “closed” for now; if necessary, you just need to break them out along the already defined contour.
The left side is clean, and on the right there is another “window” for connecting power or a boiler.
There are two screws at the bottom, unscrewing which you can remove the front cover.
The control board is fixed on the back cover; this method allows us to easily connect heads, pumps and other thermostats without removing the control unit itself from its place.
I recommend sticking stickers with serial numbers on the inside of the lid so that you don’t have to look for them at the right time. But in general, even if you lose or forget about the stickers, the control unit has its own unique number, and for additional units for pairing we simply add two numbers at the end 11/22/33 and so on until 88.
All this was done with such a purpose that a house may have more than one boiler and a heated floor circuit, and if we talk about a small enterprise, then even more so. Since the control unit and the thermostat communicate at a frequency of 433 MHz, for pairing the manufacturer came up with the idea of issuing unique serial numbers to the control unit, so that any buyer could independently and without any problems connect the number of thermostats he needs to one or more units.
There shouldn't be any connection difficulties; everything is laid out quite clearly on the board. Power connection on the left side to the orange terminal block. There is a fuse above it.
Each of the 8 servo drive connection circuits is equipped with its own electromagnetic relay HUI KE HK4F-DC12V-SHC. Rated winding voltage 12VDC. The maximum load on the contacts with an active load is up to 3 amperes. Plus, each group has its own LED indicator.
To control the operation of the water pump, its own group of contacts is installed and the electromagnetic relay is also more powerful, already rated at 10 amperes. OMRON G5LA-14 VDC.
To turn on the boiler, either a normally closed or normally open dry contact is used. In my case, to start the boiler it is necessary to close the contacts, which means I will connect it to the normally open contacts on the board - designated NO. When it is time to turn on the boiler, the relay behind this group will close the contact and the boiler will start working. Next is a small antenna for working with external wireless thermostats, a button for self-testing the operation of thermal heads, and a terminal block for connecting the ground. The board is assembled quite well, I don’t see any traces of crooked soldering, unwashed flux or “snot”. We won’t close it, we still have to install it. The power of the main unit in “idle” mode is 0.3 Watt
Servo
Let's now move on to the servo drive to close one of the heated floor circuits. The seller has normally closed and normally open ones. Normally open is the servo drive that, if no voltage is applied to it, will remain in the open state. A normally closed one will be closed, but as soon as voltage is applied, it will open. I chose normally open ones, so that even in the event of failure of any component of this system, I would get an open floor heating circuit.
The kit consists of the servo drive itself and a plastic adapter ring. On one side there is a small thread, and on the second there is a place for mounting the drive.
The drive itself is non-separable, powered by 220 volts, power 2 watts. On the front, under the manufacturer's logo, there is a small button for removing the drive from the adapter. As you can see, when you press it, the “clamps”-ears on the sides diverge.
Inside there is a small pimptik, which simply presses on the valve stem of the heated floor circuit, thereby opening or closing it. The cable length is 0.5 meters, the ends of the cable are already crimped.
Thermostat
In this set, thermostats come in two types: wireless with WiFi for control from a smartphone, and simply wireless. The difference is not so significant that you cannot control the heating in your home remotely using a smartphone. This review is about a wireless controller with Wi-Fi. Supplied in a small cardboard box with a brand sticker in the top corner.
The general configuration looks like this.
The kit includes two screws for fastening, but I couldn’t find where to screw them in.
1 meter USB to USB-Type C power cable
The instruction manual, which I strongly do not recommend losing, so that later you can at least remember how and what to program.
The thermostat consists of two parts, a stand with a contact group and the thermostat itself. At the back of the stand there is a USB Type-C port for connecting power.
There are anti-slip spacers at the bottom of the stand.
I frankly don’t understand why it was necessary to make such a massive stand for a relatively small thermostat.
By unscrewing the screws on the front of the stand, separate the stand into two parts. As I thought, the USB Type-C port is simply connected to two contacts on the mating part of the pad. So, if you wish, you can safely make the connection without this pad, just apply a voltage of 5 volts to the two outer contacts of the thermostat.
The thermostat itself is a small rectangular box with touch control buttons and a display.
At the bottom there is a temperature sensor, thanks to which you can adjust the operation of the entire boiler.
All other edges are completely smooth.
The back part hints at the versatility of thermostats, since here we see a closed niche for batteries, places for mounting on the wall, but there are no hints of screws to disassemble this device. To open the back cover, just press the latches a little and separate the two parts.
Instead of a battery responsible for preserving the settings, there is a small capacitor with a capacity of 0.33 farads, so I do not recommend leaving the thermostat for a long time without power. There is space at the top to install two batteries, but their voltage is not enough to power our thermostat, 3V versus the required 5V.
The antenna for pairing with the control unit is located on the right side, and the “smart control module” is on the left. At the same time, it was soldered so that the markings are not visible at all.
The main brain of the thermostat is a Microchip PIC16F1947 microcontroller with a clock frequency of 32 MHz, 1 KB of RAM and 28 KB of permanent memory. Unfortunately, I won’t be able to get any other information about the components; I wasn’t able to disconnect the board from the display
Let's connect our thermostat to power via the stand, and we see that the consumption is only 0.08 Watt (when the backlight is on). I'm frankly surprised why this device wasn't made with batteries, even 3 of them. But in general, if you disconnect the power, no settings are reset, everything is fine.
The thermostat dimensions are 95.6*21*104 millimeters.
The main place is allocated for the display, to the right there are touch control buttons.
Below is a thermostat on/off button. Above it is a button for selecting operating modes. There is a cyclic switching between manual mode, automatic mode, temporary manual mode - long pressing this button allows you to set the operating time of this period. The clock button allows you to set the time and day of the week. The up and down buttons allow you to change different values. When you press any of the buttons, the display backlight turns on briefly. There is no backlighting of the buttons.
In the top row of the display we see the child lock button icon, followed by the frost protection icon. After it is an icon for connecting the thermostat to the control unit. If this icon is constantly on, then everything is ok, there is a connection with the unit, if it blinks, then either the thermostat is sending a command to the control unit or there is simply no connection. The next icon is similar to the previous one, but already indicates a connection to a Wi-Fi network. Blinking slowly - there is no connection, setting mode with the application on the smartphone is blinking quickly. Three curved stripes, similar to steam, are precisely the icon indicating that the boiler is now working and the room is being heated. On the right side are icons of control modes, automatic, manual or temporary manual.
In the central part of the display there are temperature indicators, next to the house icon is the current temperature in the room, and to the right is the temperature set by the mode. Accordingly, I focus on the selected operating mode; if the temperature in the room is lower than the set one, the thermostat will send a signal to the boiler to turn it on, and vice versa, it will turn it off if the temperature is equal to or higher.
The current day of the week is displayed just below, since work schedules depend not only on time, but also on the day of the week, more on that later. To the right is the icon of the current programmable period. If you leave only two periods of work 1 (day) and 6 (night), then the icons will change themselves to the icon of the sun and moon, the remaining periods are a house with a period number. At the very bottom of the display, stripes display a time scale on which you can see the current time and period of work range.
Settings
Let's go to the additional settings of our thermostat, to do this, turn off the thermostat with the off button, then hold down the clock button and turn on the thermostat.
The first parameter for setting DIF is hysteresis; the lower the number, the more often the thermostat will send a signal to turn on the boiler and the more accurately the system will operate. Range from 0.5 to 4.5 degrees Celsius, default 2.
The next item is switched by double arrows, SVH and SVL are the upper and lower temperature limits, by default - from 5 to 35 degrees.
Menu ADJ – allows you to adjust the readings of the built-in thermostat temperature sensor within the range from minus -5 degrees to +5 degrees. I didn’t notice such a need; I was in the same room with two different thermometers - the temperature was the same everywhere. Default is 0.
Fre parameter is responsible for enabling the anti-freeze mode. This means that even if the thermostat is turned off with a button, then when the temperature drops below +5 degrees, the thermostat will command the boiler to turn on the heating. 0 – disabled, 1 – enabled.
PON menu – allows you to save the thermostat state (on/off) after turning off the power. 0 - does not save, 1 - remembers. Default is 1.
LOC menu is responsible for locking the keyboard from children's hands, 00 – all buttons work, 01 all buttons except the power button are locked, 02 – all buttons are completely locked.
SNP menu – setting up the sequence of control units. 00 is the main thermostat that controls the boiler and pump from 0 to 12. Default is 00.
Menu FAC – reset to factory settings, for this select 00.
If the automatic connection of the thermostat and the control unit did not occur, and also to connect the second and subsequent thermostats to the control unit, they need to be given the serial number of the thermostat, these are exactly the barcodes that were included with the control unit. To do this, in the SNP menu settings, set the value from 01, press the button down and turn on the power to the thermostat. A menu for selecting numbers from 0 to 99 appears. Having selected the first two digits of the barcode, go to the second pair, clicking on the two arrows, again set a pair of digits that corresponds to the 3-4 digits of our barcode. We repeat until the CHK parameter - if you entered everything correctly, then the displayed number, in my case 56, will match the last pair on the barcode. If we need the thermostat to control only the thermal head, we go to the VAC parameter - where we indicate 01, if the thermostat controls the entire boiler, and, if necessary, we broadcast a new thermostat to our thermal head by setting its number starting from 02.
Setting up automatic operating mode
In manual mode, everything is clear, you set the desired temperature and the thermostat will constantly maintain it, turning the boiler on or off when the temperature is higher than the set temperature, or lower, respectively. To select manual mode, click on the button with two arrows and select the hand icon. Next, use the down and up arrows to set the desired temperature.
But this is not our option, since this thermostat was purchased in order to save on heating, and for this we will need an automatic operating mode. Select it with the button with two arrows. After selection, an active “Auto” icon will appear, and a strip with time and black rectangles will appear at the bottom of the display. These rectangles show when you are at home and when you are not, and the boiler needs to work only if the temperature drops below the set one. That is, eating at home means we get a comfortable temperature; if no one is at home, why waste resources.
By default, the schedule and temperature in periods are like this.
To set the weekly work timer, hold down the button with two arrows until the display shows LOOP. But I will say for those who have a Wi-Fi version, it’s easier to do everything from your phone.
First of all, we select for what period we will do automation, from Monday to Friday, click on the button with the arrows, select working Saturday, and you can also select the whole week, the display will show 1234567.
I will set it up for the whole week, but here everyone can build their own schedule. Click again on the “two arrows”; the sun icon appears at the bottom and set the temperature and time of dawn, or when we wake up. By default, at 6 am the temperature should already be 20 degrees. The start time of the period changes after pressing the clock button. I'll set it to 21 degrees, but you should understand that the logic here is a little different. Having set the temperature, let's say 21 degrees at 6 am, then if at 6 am the temperature is below 21, the boiler will turn on and heat until the temperature in the room with the thermostat is 21. But there is one more condition, this is the next period , the transition to which occurs by pressing the “two arrows” button, where we see another period, namely at 8 am we leave home. The temperature can drop to +15, but if it drops below, the boiler will turn on and maintain it in this range. By clicking on the “two arrows” we once again find ourselves in the third range, namely, coming home for lunch at 11–30, at which point you can set a different temperature, not 15 degrees. Period 4 is again leaving home after having lunch, and here again you can set the temperature support from 5 to 35 degrees. The 5th period at 17-00 sets the temperature at 22 degrees Celsius, so that when you come home at the usual 18-19 hours, the house or apartment will already have time to warm up. The last, sixth period is the period of sleep - the moon icon, starts at 22-00, setting the temperature to 15 degrees, that is, from 17 to 22 the house will heat up, and then it will simply cool down a little.
In fact, the logic of work for a working person is simple: start heating at 6 so that it is warm in the morning, and when the person comes home so that it is also warm and heat the house until 22 (or the time you choose), and at night you don’t have to heat it. But, I will say again that any time and any temperature can be changed to suit your schedule and needs. For example, I have a day/night tariff, so it is beneficial for me to start the boiler only at night to heat the house to maximum, and to “heat it” during the day if the temperature drops below the limit. I will show you this night tariff setting later in the mobile application. It makes setting everything up much easier.
Mobile app
The presence of Wi-Fi and its own smartphone application sets this kit apart from others on the market. What if I add more. The fact that it is very easily integrated into the Home Assistant smart home system and allows you not only to keep a temperature graph, but also to build automation based on the readings of any sensors, the kit becomes more and more interesting. I'll tell you about this in the next videos.
For now, let’s focus on the “native” mobile application, which is called “Beok Home”. Download and install it. Now we put our thermostat into pairing mode; to do this, turn off the thermostat and press the up button for 10-15 seconds. The thermostat will turn on and the Wi-Fi indicator will blink quickly.
After that, in the application, click “Configuration”, where we indicate our Wi-Fi network and password for it. Click “Establish connection”. After 1-2 minutes, the indicator on the panel will stop blinking, and a notification about a successful search will appear on the smartphone screen. We return to the previous menu. And click on the update icon in the upper right corner.
Now my thermostat has been found, click on it to add it to the control list. Now in the main application window we see our thermostat, room temperature, set temperature, Wi-Fi signal strength and a button to turn off the thermostat. By analogy, you can add several more thermostats here, even for each room.
Going to the main menu for controlling the thermostat, in the upper part we see the name of the thermostat, useful if you have more than 1 joke for underfloor heating in different rooms. Below is a temperature ring, and the current temperature in the room is marked on it, in my case 23.5 degrees Celsius. By moving the slider counterclockwise, we set the manual operating mode; you can set the minimum temperature from 5 degrees. If we move it clockwise, we will set the temperature to +35 degrees, and if it goes beyond the current temperature in the room, a fire icon will appear, which means that the boiler has turned on and is working. When changing the parameters of the set temperature from a smartphone, the parameters on the thermostat also change very quickly.
Below in the application there are icons with a clock - namely, synchronization of the time and day of the week of the thermostat with a smartphone. You don’t need to click on the icons, but rather hold your finger on them a little. Strange logic, but that's how it works. In the middle there is a child lock on the thermostat buttons. To the right is to turn on or off the anti-freeze function. In the lower menu, you can press the off button to turn off the thermostat. The middle button is responsible for selecting the manual/automatic operating mode.
The icon with a key and the name “Senior” is just a curved transition to the thermostat settings menu.
The first option is to set the buttons to lock, never lock, lock everything except power, lock everything. Next, set the maximum and minimum temperature in the room from 5 to 99 degrees Celsius. When the maximum temperature changes to 99 degrees, you can move the slider to heat up to 99 degrees, and it will immediately be transferred to the thermostat. I see no point in changing these parameters.
Here you can adjust the readings of the sensor in the thermostat if you think that they differ from the reference ones in your room by adding or decreasing up to 5 degrees Celsius. Step 0.5. degrees Celsius. As you can see, by adding +5 degrees, our thermostat began to show that the temperature in the office was already completely different.
In the temp control (rdif) menu, this hysteresis setting is from 0.5 to 4.5 degrees; I recommend setting the minimum value to 0.5 degrees for home use. It's a pity that it can't be even less.
You can also turn the anti-freeze function on or off. Off by default. After switching on, an icon with a snowflake will appear on the thermostat display. And the last menu item is whether or not to remember the state after turning off the device, I recommend enabling this option.
Let's move on to the settings for the automatic operation of our thermostat. To do this, on the main screen, click on the timeline. At the top, we select which days our parameters will apply to; they can be separate for weekends and weekdays. You can select either to make all days work and apply your own schedule for them, or by separately selecting Saturday and Sunday or Sunday separately.
If we take a working day, then we have 6 different periods with which we can set our start time and temperature for the duration of this period. With the weekend, we increasingly insert the time when we wake up and a comfortable temperature; at night we can set it cooler.
But what should you do if someone is always at home, you don’t really want to freeze it, but turn it on only at night, since you have an electric boiler at home and a nightly electricity tariff. Everything is simple, even very simple. We select a schedule of all working days. My tariff is from 23-00 to 7-00, so at 7-00 it is advisable to turn off the boiler. We translate period 1 to 06-50 and set the temperature to, say, 20 degrees. Now, for a more visual display of periods on the timeline, we set periods 2, 3 and 4 at a time of 06-51.52 and 53 minutes, respectively. We will also set the temperature to 20 degrees. In fact, now during the day we can simply change the temperature of the 4th period and maintain it until the next 5th period. And let the fifth period begin at 23-00, with a temperature of 23. But at night, let the maximum temperature be 23.5 degrees and the period begin at 23-01. Just at night the electric boiler will start working, the warm floor will serve as a kind of heat accumulator, which will last for the whole day until the evening. And if it suddenly becomes cooler than 20 degrees, the boiler will turn on again and raise the temperature to this value we set.
By switching the operating mode to automatic, we can already visually see when the boiler will work for heating and when it will maintain the daytime temperature. If necessary, you can always switch to manual mode simply by sliding your finger in the direction of increasing the set temperature.
Connection and installation
In general, there is nothing difficult about connecting. The thermostat connects to the unit within 20 seconds. After changing the temperature, also +- 10 seconds and the boiler control unit has already started working. First of all, he opens the servo drive of the heated floor head, and only then starts the boiler and supplies voltage to the circulation pump. But since we have one thermostat, we control the entire boiler and one thermal head. For a separate regulated floor heating circuit, we will need an additional thermostat, you can already buy it without Wi-Fi control, it will be cheaper. And the servo drive can even be installed to input a heated floor. Then, if on the first floor the temperature is already higher, say 22, and on the second the radiators have not yet been heated, the heated floor, at the command of the additional second thermostat, will close the supply of the heated floor, and the radiators will continue to work until the room reaches 23 degrees.
There are quite a lot of application schemes, ideally to have your own thermostat for each heated floor circuit, but if you wish, you can hang 2-3 servos on one block in the control unit and at the same time save on extra thermostats.
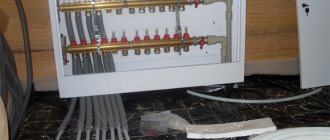
We find a place in the boiler to connect an external thermostat; be sure to specify in the instructions which contacts are used. For me these are normally open contacts. We bring out the 220 volt power cable; we can also take the power from the boiler power supply. We connect our heated floor circulation pump and thermal head to the blocks and attach the control unit either to self-tapping screws or to good double-sided tape.
Video review
Where can I buy
Set for boiler and heated floor BEOK BOT-X306 CCT-10-X - LINK
BEOK smart kit for boiler control with WiFi - LINK
My telegram channel @Lubops
conclusions
If you want to control the heated floor and the boiler separately, then immediately order two thermostats, one with Wi-Fi, the other can be simple, then you can hang the heated floor circuits, and the main thermostat will control the entire boiler. We will talk about this control in the following reviews, since my second thermostat is still on the way, at first it was decided to automate the entire boiler and with the ability to control it via Wi-Fi. What this kit did perfectly well. Thank you for your attention, I hope the review was useful to you.
Types of thermostats
There are several types of thermostats for regulating central heating temperatures.
…
By connection method
The thermostat can be installed in the room or directly next to the boiler. In the latter case we are talking about a central thermostat. The new generation of thermostats mainly has a wireless connection to the boiler, while the old ones are connected to it by wires.
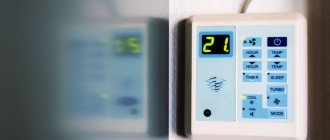
On a note! The recommended room temperature is 20 °C, at night it can be a degree higher. But in a children's room and where elderly people or people with disabilities live, it is worth setting it to 22 °C.
The central thermostat turns the heating on and off throughout the house, and the room thermostat allows you to change the heating mode at any time, set a special mode for weekends, day and night, or when the owners are away. If the house has one boiler with a radiator, one room thermostat is sufficient.
By functionality
Based on the type of functions, wireless thermostats for gas boilers can be divided into three main types:
- simple ones , which have only one function - maintaining a preset temperature in the room;
- programmers or programmable ones , which already have a number of useful functions: you can set the operation of the heating system for a week, differentiate the temperature by time of day, etc.;
- with hydrostat function. Such devices have a built-in hydrostat, which allows you to control not only the temperature, but also the level of humidity in the premises, and also adjust it to the required parameters.
Attention! Before you buy such a device, you need to calculate its required power. To do this, you need to know the total heated area and the approximate temperature level that needs to be maintained. This way you will save money by not buying a device that is too powerful, and you will also be able to prevent breakdowns by changing the wiring in advance if it turns out that it cannot withstand such a load.
We control heating via voice commands
Ideally, the user should not interfere with the operation of the Smart Home system, as it adjusts automatically and responds to the occupants of the home. However, in practice, things hardly work without manual access, and therefore the smartphone in most cases acts as an ideal remote control. But it would be better to say - he performed. This is because voice assistants, for example, Amazon Alexa (Amazon Echo/Echo Dot) or Google Assistant (Google Home/Google Home Mini), now make all this much easier and more convenient. It is enough to say the command “Alexa, adjust the heating to 21 degrees” or “Ok Google, turn on the lights in the living room,” and the corresponding action will be performed immediately. At first it sounds more like fun, but anyone who has once used voice control for a long time does not want to give it up.
Smart home control unit - Amazon Echo
Beyond voice control, there's one obvious added benefit: smart speakers from Amazon and Google allow you to connect different products from different manufacturers. So, it no longer matters which components you use - all devices will respond the same to your voice commands, as long as they support voice control at all.
The principle of operation of a wireless thermostat for a gas boiler
The operation of the device is as follows. It is necessary to set the desired temperature on it. As soon as the air in the room cools down a degree lower, a signal is sent from the thermostat to the gas boiler to turn on. The system comes into operation and warms up the rooms. When the temperature is set one degree higher than the set one, the thermostat sends a signal to turn off. And then both the boiler itself and the pump turn off.
Let's take a look at what reviews say about the operation of wireless thermostats for gas boilers. Significant energy savings and reduced boiler depreciation. Its switching on and off is reduced tenfold, and energy is saved by turning off the pump when the boiler is idle.
Also, if weather and other conditions change, there is no need to reset the temperature on the boiler. It just doesn't turn on if it's already warm, and turns on when the temperature starts to drop.
…
On a note! Boilers without a thermostat show excessive energy consumption by 25-30%. This is due to the fact that an increase in temperature above the established norm, even by one degree, entails a large excess consumption of fuel.
In addition to saving fuel consumption, there is an energy saving of approximately 30-40 kW per month. Not to mention less wear and tear on the equipment itself. Everything suggests that installing a wireless temperature controller for your boiler is a worthwhile investment.
Thermostats for radiators with Smart Home functionality
The royal class is Smart Home: such radiator thermostats can be controlled and adjusted remotely. In addition, it becomes possible to combine regulators with other system devices. For example, a contact sensor on a window linked to a thermostat will ensure that the heating automatically turns off as soon as you open the window. Some Smart-Home systems can recognize the user's approach via a smartphone and automatically launch certain programs when the owner returns home.
Thus, Smart Home systems are the most intelligent solutions presented here. A typical starter kit, as a rule, starts at a price of 10,000 rubles and, in addition to the main control unit for access to the system, contains one or two thermostats for radiators, as well as window and/or door opening sensors and a motion sensor or radio-controlled socket. In addition to the high cost, such solutions have another drawback: currently there are a huge number of different systems that compete for customer favor. Well-known manufacturers include Devolo, eQ3 (eg Homematic IP), as well as Bosch, Gigaset and many others. Startups can also be added here. Even Google has the Nest Smart Home line and Apple, through HomeKit, offers a corresponding platform. Although the controls of these systems differ from each other in detail, in general all of the named manufacturers offer systems that are very friendly to novice users and compatible with a smartphone. Thus, any beginner in this matter should be able to handle them.
Each of these systems, of course, has its own advantages and disadvantages, which attract attention, for example, by the volume of functionality. Generally speaking, we recommend that you choose solutions that are as flexible as possible, offer the widest range of products, and support multiple types of wireless communications.
Thermostat SALUS xT500 - wireless programmable electronic thermostat with touch control complete with an actuator
pros
- Full integration into the Smart Home system
- Internet control
- Numerous combinations possible with window sensors and switches
Minuses
- High price
How to properly install a thermostat for a gas heating boiler: connection diagram
It is necessary to install a room-type device in the most frequently visited room. As a rule, this is a bedroom or living room. It is important that this is a living room, and not a kitchen, corridor or bathroom. If there are few people in the house, then the coldest room is chosen.
Attention! Before installing a thermostat, take care of insulating the premises. Otherwise, no savings will be achieved due to high heat losses.
When purchasing a wireless electronic thermostat for a gas boiler, you must remember that it requires a constant flow of air. Therefore, it should not be placed behind furniture or covered with curtains. It must also be placed at a safe distance from electrical and heating appliances that interfere with radio waves. Touch switches and neighbors' boilers, which are located through the wall, also pose a danger. Also not suitable are places where the sun's rays fall or there are drafts or air flows from the air conditioner. If there are valves with thermal heads on the heating radiators in the room, there is no point in installing the device here either.
The device is placed at a distance of one and a half meters above the floor. Considering that warm air rises and cold air falls, at this distance the air has an average temperature in the room. This rule must be followed even if floor heating is installed. The device is attached to the internal wall of the building, since the external ones are too cold, even if thermal insulation is installed on them.
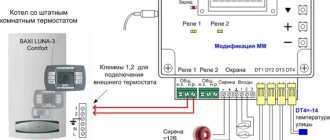
The connection diagram for the thermostat to the boiler is indicated in the instructions for the device, but it is worth identifying the key installation requirements. Before starting work, you should always turn off the power supply to the house to protect yourself.
Select the installation location in accordance with the recommendations described above. Connect phase and zero to it, then mount the thermostat. Now you need to connect the phase, neutral and ground of the device with the corresponding contacts of the gas boiler. If the device uses standard markings, the contacts are designated N, L and PE respectively. After connecting them, the connection of the thermostat to the boiler is completed.
How to connect a thermostat to a gas boiler - watch the video instructions
Advantages of using wireless thermostats for gas heating boilers
The main difference between a wireless thermostat for gas boilers is the built-in radio module, which communicates with the controller of the water heating installation. Accordingly, there is no need for wiring, which saves time, effort and money.
Attention! It is advisable that the thermostat be from the same manufacturer as the boiler. This will not only make it easier to install and debug the device, but also guarantee device compatibility. Sometimes there are problems with the latter. Moreover, this complexity is typical not only for wireless, but also for wired devices. Therefore, always consult a specialist before purchasing.
Wireless thermostats for gas heating boilers are sometimes available with a GSM module. Such devices can transmit text information to the phone. Boilers made in South Korea and Europe have built-in Wi-Fi modules that allow you to control the heating system via the Internet, regulating the temperature in the house from a distance.
Depending on these additional features, the price of the device varies. But if you take a simple thermostat, its cost will be low. At the same time, even an inexpensive unit allows you to significantly save on electricity, fuel, and use heating system equipment carefully.
For more information about setting different temperature conditions in a room using a thermostat, watch the video
Smart Entry Level: Bluetooth Controller
Visually and functionally, many radiator thermostats with a Bluetooth module do not differ from classic programmable controllers, but the setup here is, of course, more comfortable: the smart controller is controlled simply through an application. Thus, you can quickly set up different heating “phases” - and even replacing the batteries will not have any effect on the operation of such a regulator, since all parameters will be saved in the application, that is, on your smartphone.
Another advantage of such devices is the ability to quickly change the temperature manually or change settings through your phone without having to run to the thermostat. Of course, such regulators are a little more expensive than classic ones. For example, the same eQ-3 with a Bluetooth module costs twice as much as its “stupid” brother. However, these thermostats are still cheaper than a complete Smart Home kit.
pros
- Relatively inexpensive
- Can be controlled via smartphone
Minuses
- Bluetooth has limited range
- There is no possibility of control via the Internet
- Often there is no compatibility with Smart Home systems