A device such as a thermal head for a heating radiator is designed to regulate the heating temperature. With its help, you can use coolant more efficiently and save money.
Guaranteed effect from use - the right choice. To do this, you need to have as much information as possible about these devices.
From this article you will learn about the existing types of thermal heads, their design, operating principle and rules for installing them on radiators. We will also present the main criteria influencing the choice and briefly consider the best manufacturers of such equipment.
When is a thermal head needed and when is it not needed?
Thermal head is a device with an air temperature sensor that is installed on the radiator.
It allows you to save on heating, and significant amounts. The thermal head allows you to turn off the radiator when the room is already warm enough - and the desired temperature can be set directly on its body. The principle of its operation is quite simple: the thermostatic insert compares the set temperature on the thermal head with the actual temperature in the room, and pushes the rod in the desired direction. The rod, in turn, slightly opens or closes the flow through the thermostatic valve on the radiator supply, regulating its thermal power.
Currently, there are a large number of thermal heads on the market with a variety of connections (threaded, clip-on), with varying adjustment accuracy. They can be made of plastic of different colors, chrome-plated, or in a designer case.
There are even digital thermal heads with a screen! The cost of thermal heads ranges from 500 to 4000 rubles, while it allows you to save up to 30% on monthly heating payments. Moreover, they allow you to set different temperatures in different rooms - after all, all people feel “comfort” differently. It would seem that you can install them always and everywhere... but no.
There are situations when thermal heads are not needed. For example, in the case where you plan to heat a large and open space with a large number of radiators, you can get by with one wall thermostat. This is the only thermostat in the heating system that will compare the actual air temperature with the required one and regulate the operation of the heating system. In this case, it will not shut off the supply to one or more radiators, but will control the boiler.
Features of the thermal head structure
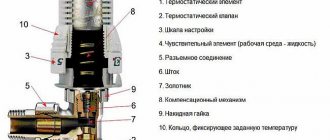
The most popular thermal head consists of a body, a bellows, a locking element, a pusher, a rod (closing cone), a return spring, sealing and fastening elements.
The amount of coolant flowing into the radiator is controlled by the valve device. Most products are equipped with this element.
The plastic body is made by hot stamping. It can be either transparent or colored - from white to black. The bellows is made of brass or galvanized steel. In most models, the thermal head housing for installation on radiators and the thermostatic valve are compatible.
The bellows filler, such as gas condensate, has the fastest response to temperature fluctuations.
Two stainless steel springs help open and close the rod. One of them returns the rod to its original position after the valve closes, and the second - after it opens
There is a locking element at the very top of the body. It is necessary to fix the settings. If the settings have not been changed for a long period or the moving elements of the device are inactive, they may become stuck.
To combat this phenomenon, experts recommend removing thermal heads from the valves as soon as the heating season ends. When thermostatic valves are designed for a pressure of 4 atm or more, the likelihood of sticking is significantly reduced.
There is such a thing as “gestesis” of the head. The smaller it is, the faster the device responds to temperature changes.
Types of heads by design
Thermostatic devices are distinguished by type of design. They are selected depending on the characteristics of the pipeline of a particular heating system and the method of installation to the radiator.
It is also necessary to take into account the peculiarities of the head installation. This node was always located horizontally. In this position the device will be more effective. The head will be better washed by air currents.
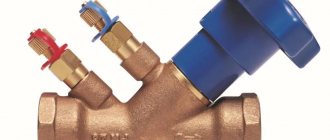
There are devices on sale that stand alone without radiator valves or together with them. The Danfoss thermostatic valve, for example, has exactly this arrangement. But the company produces completely different systems. Instead of a scale, this product has a special diagram on it, according to which you can make precise adjustments.
But the use of such equipment is not always advisable. In this case, instead of automatic solutions, you can use other types of valves. The difference here is that the adjustment is carried out not automatically, but in manual mode. Adjustable valves and thermal heads are installed on the supply line. It is recommended to install simpler fittings at the return outlet from the battery.
Thermostatic head operating principle
- As the temperature rises, the volume of the bellows increases (mainly due to gas expansion or partial evaporation of the working fluid).
- An increase in the volume of the bellows leads to the fact that the spring fixing the rod is released, and the valve gradually closes the gap in the pipe.
- This continues until equilibrium is established inside the device, or until the radiator valve under the thermal head is completely closed, i.e. the rod will not go to its lowest position.
Models with remote elements work according to a similar scheme. The only difference is that either special programmable devices (climate control systems) or remote sensors (liquid, gas or electronic) react to temperature changes. Only after this the information reaches the thermal valve mechanism and activates the rod.
How does the system work?
The sensor device can be schematically represented as a regular valve or tap with a thermal head for a radiator. In contact with the hot liquid is a thermostatic valve, which in its simplest form is a spring with a piston. The elastic element is connected to the working volume, which contains a gaseous substance that is sensitive to temperature.
The pressing force is regulated by the rotary scale knob, so the required temperature in the room is set. Depending on it, a piston moves, blocking the flow of liquid. The device is mounted with union nuts, this allows you to change the element if parts of its design fail. They provide additional fluid supply through ball valves in case of breakdown of the automatic control system.
Heating radiator connection diagrams
Lateral connection of radiators is the most common with regard to the heating system in a city apartment. To correctly connect the batteries according to this scheme in a private house, the pipes are routed from the side along the wall and connected to the two battery pipes at the top and bottom. A pipe that supplies coolant is usually connected to the upper branch pipe, and a return circuit is connected to the lower branch pipe. They often do the opposite, but in this case the heat transfer efficiency of the device decreases by 7%.
Diagonal connection of batteries is considered the most effective. To connect the batteries according to this scheme, perform the following steps: first, connect the coolant supply to the upper pipe, and the return pipe to the lower pipe, which is located on the other side of the device. Thus, the coolant inside the battery begins to move diagonally, hence the name of the circuit. Its effectiveness depends on how evenly the water is distributed inside the radiator. Very rarely, several battery sections may remain cold. This happens if the pressure or throughput is too weak.
The lower connection of the radiator can be found not only in single-pipe circuits. This is also used in two-pipe systems, but only in private buildings with one or two floors. This scheme for connecting heating radiators is considered insufficiently effective. According to experts, such wiring helps reduce heat transfer from heating radiators by 20-30%. In this case, the installation of a circulation pump will be required, which leads to an increase in the cost of all processes, and additional costs will also be required for the electricity consumed during operation of such a pump. To calculate the required power of radiators, you will need a large number of different coefficients.
Advantages of modern thermostats
The models of thermostats that are currently produced are not only easy to use, but also have an aesthetic appearance suitable for the interior of almost any room.
It is worth noting that the installation of these devices is simple not only in new heating systems, but also in existing ones. In addition, according to experts, they have a fairly long service life, during which virtually no preventative or maintenance is required. After installing thermostats, there is no need to regulate the temperature by opening windows or doors.
Thermostat for radiator
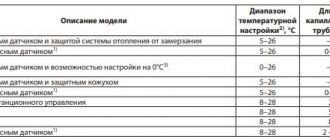
The temperature range for normal operation of this device is 5–27 °C, you can choose the required temperature yourself and it will be maintained in the room with an accuracy of 1 °C. In addition, a thermostat installed on the radiator allows you to prevent excessive heating of the air in the room due to direct sunlight, electrical appliances or the accumulation of a large number of people.
Thermostats can not only create thermal comfort in the room, but also ensure uniform distribution of coolant throughout the entire heating system. If the device is installed on the boiler, absolutely all radiators will have the same temperature, even those that are located at the maximum distance from it.
It is worth noting that when installing a thermostat, it is best to start with those rooms in which sharp temperature fluctuations are observed, for example, a kitchen, rooms located on the sunny side, or a living room in which a large number of people can gather at the same time.
Quite often, thermostats are used in autonomous heating systems, since their installation reduces fuel costs by 25%. This, in turn, reduces the amount of harmful waste resulting from its combustion and reduces the cost of heating.
The advantages of using thermostats in a heating system are quite significant; their use can be particularly effective in private homes and cottages, because in this case, the installation of these devices pays off due to fuel savings literally in a year.
The installation of thermostats in private homes should begin with the upper floors, since there is usually a significant difference between the temperature on the lower floors and the temperature in the upper rooms.
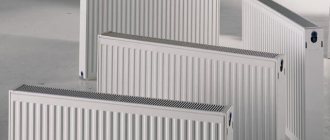
High economic efficiency can be ensured by panel radiators that have a significant response rate to the opening and closing of the thermostat valves.
When choosing a thermostat, you should pay attention to the presence of a certificate of quality and compliance; high-quality devices always have such documents. The service life of such products reaches 20 years
Correct installation
Thermostats can be installed both at the input of the heating battery and at the output, the main thing is to choose the right installation location. There are several recommendations for this.
Recommended installation height, which is specified in the technical specifications of the device. The main technical characteristics are developed at the factory, through testing and calibration, which are carried out at a certain height. This height corresponds to the upper radiator manifold. Typically this corresponds to a height of about 0.8 meters. At this height it is convenient to carry out all manipulations with this device.
Installation diagrams for heat regulators for radiators
When connecting batteries at the bottom (saddle), when the pipes are located only at the bottom, you need to look for appropriate thermostats. As an option, you can install a thermostat with a remote temperature sensor or reconfigure the thermostat, which is not so simple and is unlikely to be possible without specialists.
The installation technology is no different from the installation technology of conventional shut-off valves, but taking into account the direction of movement of the coolant.
When installing thermostats on radiators in apartment buildings, you should take into account the fact that all apartments are connected to the system. If you do not install a bypass, in the form of a pipe that connects the upper and lower pipes, then the thermostat will regulate the temperature of all apartments connected to the riser.
If you have a similar wiring (there may not be a pipe on the right), a bypass is required. The thermostat should be installed immediately behind the radiator
It is quite natural that no one needs this: neither the neighbors, nor the owner of the apartment. Moreover, such a connection can result in a considerable fine if the relevant services find out.
Kinds
According to the method of transmitting the signal to the thermal element, it can come from the coolant, indoor air. The valve of different types can be almost identical. They will differ in the thermal head. Today, all existing varieties can be divided into 2 types: mechanical and electronic. Devices have their own characteristics, which affect their performance characteristics.
The devices differ not only in the type of material, but also in the installation method. They can be of angular or straight (pass-through) type, depending on the type of connection. For example, if the main is connected to the side, a direct type valve is installed. The corner method is used when connecting from below. The valve option is chosen to be the one that fits best into the system.
The choice between them depends on the preferences of the buyer and his financial capabilities. Products can be designed for a specific type of thermoelement. To understand the differences between thermostats, you need to briefly note their main nuances.
Mechanical
Mechanical thermostats are easy to use, precise and consistent in use. They do not need a network connection. Manual products are different from their electronic counterparts. They work on the principle of a regular faucet: the regulator is turned in the desired direction, allowing the required amount of coolant to flow through. The devices are cheap, but not the most convenient, since to change the heat transfer you need to manually turn the valve each time.
If you install them instead of ball valves, you can use any of them to adjust. The devices are technologically advanced and do not require preventive maintenance. However, often there are no markings at the inlet and outlet of radiators of this design to adjust the heating temperature. Almost always you have to set it experimentally.
Before installing such structures, it is necessary to adjust them, as well as install hydraulic resistance. Smooth adjustment is carried out due to the throttle mechanism, which is located inside the device. This can be done on one of the valves (inlet or return). The operation of a mechanical thermostat depends on the hot and cold points inside the room, as well as the direction of air movement in the room. Another disadvantage is the fact that they react to the operation of household appliances with their own thermal circuits (for example, refrigerators, electric heaters, and hot water pipes).
Electronic
Such modifications are more complex in design compared to manual analogues. With their help you can make your heating system flexible. They not only allow for temperature control of an individual radiator, but also provide control of the main components of the system, including the pump and mixers. Depending on the model, programmable devices are equipped with different types of sensors.
The electronic mechanism can measure the ambient temperature of a specific space (the place where it is installed). Using the software, the received data is analyzed and a decision is made to reduce or increase the temperature. Such a mechanism can be analog or digital. The digital version has 2 modifications: its logic can be open or closed.
The difference between the categories is that products with closed logic are not able to change the functioning algorithm. They remember the level of the initially set temperature and maintain it. Analogs of open logic are able to independently select the desired control program. However, they are rarely used in domestic conditions, since it will be difficult for the average buyer to initially program them, selecting the desired options from the many built-in functions.
Smart thermal head-thermostat SH3 Zigbee eTRV: saving on heating
I think many people have asked themselves the question of how to save on heating, how to make heating or light bills even lower. This is where the smart thermal head thermostat SH3 Zigbee eTRV comes to the rescue, which will not only reduce the cost of heating, but will also allow you to make the temperature in the room comfortable for you. A huge plus of this thermostat for a battery or heated floor is that it essentially does not need a smart home system. The thermal head can operate completely autonomously without a Zigbee gateway or Internet at home. All operating modes can be configured directly using the control menu of the SH3 Zigbee eTRV smart thermal head. 3 in 1 device – Thermostat, thermal head and room temperature sensor. Included with the thermostat are adapters for connecting to various types of batteries. But since we have a smart home, we will connect the thermal head via a ZigBee gateway and control the heating/temperature in the room using a mobile phone. This is where the third, hidden parameter of the SH3 Zigbee eTRV smart thermostat opens: it displays the current temperature in the room on the smartphone screen.
Thermal head SH3 Zigbee eTRV CHECK THE PRICE
Another option Thermal head ZigBee Moes CHECK THE PRICE
Equipment and appearance
On the packaging, the manufacturer immediately highlighted the main aspects of the head’s operation and product capabilities.
I recommend it in the instructions. Take a look to understand how to connect, and most importantly, configure the operating modes of the thermal head.
The kit includes three types of adapters, a bolt with a nut for fixing, a rod extension and two plastic “stars”, the purpose of which I do not know.
RA and RAV adapters.
RAVL adapter.
The thermal head has a fairly large display, setting and control buttons.
In the “rear” part there is a knob for selecting temperature and changing settings.
The temperature is regulated by this rod, which is automatically unscrewed or tightened by the “brains” of the thermal head, recessing or releasing the valve on your battery.
The left and right sides have beveled edges.
The device does not need an additional temperature sensor to operate; it is already built into the thermal head, the “ventilation” cutouts of which are located on the back cover.
The device is powered by two AA batteries, which are hidden under the cover.
Connection and setup
Before connecting for the first time, you must set the correct date and time on the device. This will allow you to use automation scripts directly from the head, even without using a mobile application.
After this, the head should automatically determine the length of the rod on the battery. Therefore, if you run the initial setup on the table, the head will display error F4. All types of errors can be found in the instructions.
My faucet on the battery looks like this. For this I will use a RAW type adapter. Don't forget to tighten it with the screw and nut included in the kit.
After that, starting the initialization again.
That’s it, the head is ready for work, and the “default” automation schedule and temperature have already been set.
At the top of the display there are hours marked at which the temperature will be comfortable; if “empty”, the head will operate in economy mode. Next to it is the selected mode (in my case automatically) and the set temperature. Below is the day of the week and the remaining battery charge. Below the screen are buttons for menu, selection and manual selection of the operating mode.
The head can operate in 3 modes. And don’t worry about the temperature sensor built into the thermal head; it doesn’t heat up from the battery and is quite accurate, even in comparison with the sensor in the center of the room.
The first mode is automatic, essentially working like a regular thermostat with weekly programming. Convenient if you have a night heating tariff, or, on the contrary, you want to fall asleep in a cooler room, and during the day it would be warmer. In my case, I use full heating of the room from 23-00 to 24 degrees, and then maintaining the temperature at 21 degrees throughout the day until 23-00.
The next mode is manual mode. Switches using the 1st “menu” button. In it we simply set the desired temperature with a “twist”, and we can also choose a comfortable temperature in the economical or comfortable operating mode. The third button, with the corresponding icon, can quickly switch between them.
The third mode is vacation mode. Why spend your money on heating if you are not at home. We select the vacation mode using the menu button, use the twist wheel to set how many days we will be on vacation, and confirm with the central button. Next, we set the year, month, date and time when we planned to be away from home, after which we set the temperature we need. During these days the room will remain at the temperature you set.
Offline configuration options
As I said above, the head can be a completely autonomous device and work even without the Internet and a ZigBee gateway. For this, it has a settings mode. To do this, first of all, let’s go to the settings and set the device’s operating parameters “for ourselves.” To do this, hold down the “Menu” button for 5 seconds.
POS menu – displays the degree of valve opening as a percentage; the lower the value, the less open the valve on the battery is.
In the dAt , we can correct the time and date if you made a mistake the first time you turned it on.
Menu dSt – allows us to indicate to the device that it needs to switch to summer or winter time. This is disabled by default.
Aer menu is a function for detecting an open window. When the temperature in the room drops by more than 5 degrees C in 5 minutes, the thermal head will automatically detect that a window or door is open and close the valve on the radiators so that you do not heat the street. In this setting you can specify the minimum temperature in the room and the duration of ventilation in minutes. If you set the duration to 0 minutes, this function will be disabled.
Menu tOF – temperature sensor calibration. If your battery is installed under a curtain, table, etc., then naturally the temperature there will be higher than in the middle of the room. To do this, we can calibrate the sensor to the “average” room temperature. For example, the sensor on the head displays 20.3 degrees, and in the room it is only 18.1, then we’ll set the value to -2.2 using the knob. Maximum +-5.5 degrees.
Setting up the automatic operating mode of the thermal head
Menu Pr0 – allows us to configure the automatic operating mode of the thermal head “for ourselves”. In fact, in manual mode, even without connecting to the TYUA gateway, lack of Internet and complete autonomy, we can make our thermal head work by day of the week and time. Very convenient, even if you don’t want to bother with a smart home, ZigBee gateways and other mobile applications. First, select a mode by day or group of days. For example, weekends - weekdays, on all days or for each day we will set the temperature and mode switching parameters separately. I choose all the days. Next, we set the time from which the economy mode will begin. Since my electricity tariff decreases from 23-00 to 07-00, I will set it to 07-00. Time gradation is a multiple of 15 minutes. By default, the economical one is set to 17 degrees, I think, and in general, if there is no one at home, you are at work, then why heat it? We set it with a twist and confirm with the button in the center. Next, we set a comfortable temperature; for me, let this value be 23.5 degrees. We confirm and set the start time of this temperature. In my case it is from 23-00. You can set the time you come home from work, or in advance, so as not to sit in a cold house. Next, we will be offered 8 additional time intervals for setting the temperature. Or, after entering the economical temperature, select 24-00 and then the program will remember the parameters and complete the cycle. We make sure that everything is set correctly, exit the settings by holding the “menu” button.
As you can see, at the top of the display a straight line is displayed from 07-00 to 23-00 when the comfort mode will be active, and from 07-00 the economy mode will be in effect.
Additional features and settings
1 – if you suddenly returned from vacation or work early, and at home it’s +17, according to the thermostat operating mode. To quickly heat the room, you need to press the central key in any of the modes, wait 20-30 seconds and the thermostat will open the valve to the batteries for 15 minutes (900 seconds, counted on the display) to 80% of the maximum. To quickly heat up the room. After 15 minutes, the device will return to its previous status. You can cancel quick heating, again, by briefly pressing the center button.
2 – default setting of comfortable and economical temperature. Hold down the mode switching button for 5 seconds and set the temperature value for each mode.
3 – setting the “summer” mode. To do this, you need to switch to manual mode and turn the temperature regulator to OFF. The valve on the battery will be fully open. To disable the mode, in any of the modes you need to set the temperature with a “twist”.
4 – setting the frost protection mode. This function will be convenient when building a house, or in an apartment where no one lives, so as not to break the pipes. We turn off the device, as in summer mode, and now if the temperature in the room drops to 0 degrees, the thermal head will automatically open the battery valve and keep it open until the temperature reaches +5 degrees.
5 – protection from children who like to twirl various knobs =). Hold down the menu/mode button and simultaneously select the operating mode until LOC appears on the display. That's it, the device does not respond to button presses or temperature controls. To cancel, briefly press the same combination of buttons.
In addition, the device does not allow our valve on the battery to become sour. If the valve has not been activated during the week (let’s say the summer/winter mode is turned on, or the temperature in the room is higher than the thermal head settings), then at 00-00 every Saturday, the thermal head will automatically open and close the valve on the battery.
Menu rES - reset all settings to factory values.
Mobile app
To connect the device, we need a ZigBee gateway, wireless or wired (whichever is more reliable). After installing and/or opening the Smart Life or Tyua Smart application, we launch an automatic search for devices, and after 20-30 seconds the head is already found.
In the main menu we can change the operating mode, and we also see the set and current temperature, battery voltage. A little lower you can lock the device from children and use the slider to set the desired temperature. At the very bottom there are buttons for selecting a work scenario and entering settings. Selected mode
When using accelerated heating, a time counter will also be displayed, and the information is also duplicated on the head screen.
The settings completely duplicate the settings that we saw on the thermal head itself. setting automatic mode by week, setting vacation mode.
The “default” temperature for vacation, comfort and economy modes is also set there. All temperature settings were “transferred” from the head memory.
Open window and head temperature sensor calibration settings.
For myself, I decided to set this operating mode, since I have electric heating and a two-zone meter installed, it’s better for me to heat at night. From 23 to 24 we heat up as quickly as possible to 27 degrees Celsius (of course, the room simply won’t have time to heat up to this temperature, but the valve on the radiator will be 100% fully open). Then at night we maintain 23 degrees Celsius, and from 7 am we maintain 20 degrees. If at home everyone is at work from 9 to 18, you can set an intermediate value, say +16, and start warming up from 17-00. There are tons of options. Also, in smart scenarios, you can create various conditions, from opening a window to a motion or lighting sensor.
Video review
Conclusion
A huge plus of this thermostat for a battery or heated floor is that it essentially does not need a smart home system. The thermal head can operate completely autonomously without a Zigbee gateway or Internet at home. All operating modes can be configured directly using the control menu of the SH3 Zigbee eTRV smart thermal head. 3 in 1 device – Thermostat, thermal head and room temperature sensor. Included with the thermostat are adapters for connecting to various types of batteries. You can connect a thermal head via a ZigBee gateway and control the heating/temperature in the room using a mobile phone. This is where the third, hidden parameter of the SH3 Zigbee eTRV smart thermostat opens: it displays the current temperature in the room on the smartphone screen. The SH3 Zigbee eTRV thermostat is easily connected via the Smart Life or tuya smart app. And with the help of simple manipulations, it will be possible to connect to the Home Home Assistant smart home system via zigbee2mqtt home assistant.
How to choose
Based on the characteristics of the heating system, as well as the conditions of its installation, various combinations of valves and thermal heads can be used to control the temperature.
So, for example, for use in single-pipe systems it is worth using valves with a higher throughput.
The same applies to those two-pipe systems in which water circulation is carried out by gravity, that is, naturally, without forced mechanisms. In cases where a two-pipe system is used where there is a circulation pump, it is recommended to choose those types of valves where it is possible to adjust the throughput.
After selecting the valve, you need to select the thermal head.
The most common options that can be purchased today are:
- having an internal thermoelement;
- electronic (which can be programmed);
- having an external temperature sensor;
- anti-vandal;
- having an external regulator.
Most often, classic thermostats with an internal sensor version are installed in cases where their axis will be in a horizontal position.
Please note: the thermostat cannot be installed vertically, as the heat emanating from the housing piping will greatly affect the bellows, causing the entire device to function incorrectly.
In addition to vertical installation options, there are also other reasons to purchase a remote version of the sensor:
- if heating radiators with a temperature regulator located on them will be located behind the curtains;
- when there is any other heat source next to the installed thermal head;
- if the location of the battery is under a large window sill.
Very often, in rooms where interior requirements are increased, batteries are covered with decorative screens. Due to this, the internal thermostat will only register the temperature that is inside this casing. In this case, access to the thermal head adjustments will be blocked. Therefore, in such cases, it is recommended to opt for a remote controller with a temperature sensor.
It’s worth knowing: if you haven’t purchased heating radiators yet, you can buy Kermi models with built-in temperature sensors.
If we talk about electronic thermostats with a display, then they come in several types; the first have a built-in control unit, and the second have a removable control unit. The latter have the peculiarity of being able to be disconnected from the thermal head, while it will continue to operate in the same mode. The purpose of such models is to regulate the temperature in different modes at different times of the day. This makes it possible to reduce the heat level during the day, and at night, when everyone in the house is sleeping, to raise it to the desired level. Due to this, it is possible to significantly save energy.
If there are small children in the family who always want to touch and twirl everything, it is recommended to install anti-vandal thermostats. This will protect the device settings from unauthorized intervention. The same situation applies to options installed in various public buildings, from kindergartens to hospitals.
Remote temperature sensor
The use of a remote sensor is necessary in several other cases:
- Heating radiators with thermostats are covered with thick curtains.
- An additional source of thermal energy is located in the immediate vicinity.
- The battery is located under a large window sill.
Sometimes heating radiators are covered with decorative screens. This situation is observed in rooms with increased requirements for the interior. In this case, the thermostat located inside registers only the temperature behind the decorative cladding. In addition, access to the thermal head is difficult. To solve the problem, install a thermal head for a heating radiator with a remote sensor.
As for programmable devices, they are equipped with displays for visual control and are also divided into two types. Some of them are equipped with a built-in control unit, while others have this element removable. The second option has some advantage: the disconnected control unit continues to operate in the same mode
At the same time, it is important to control how the thermal head on the heating radiator works
Such models allow you to adjust the temperature individually for a specific situation. For example, during the day you can reduce the temperature values, and at night - increase them. The resulting savings are quite significant.
Current devices are ideal for homes where there are small children who touch and twirl everything
Therefore, it is important to know and understand how to install a thermostatic head on a radiator
Temperature regulators of this type do not allow the settings to be reset if handled carelessly. This option is also used in public buildings, including kindergartens and hospitals.
This option is also used in public buildings, including kindergartens and hospitals.
What are the criteria for choosing a thermal head?
Thermostatic devices are produced by many manufacturers.
To make the right choice, you need to be guided by the following criteria:
Thermal valve to which the head will be attached
Since the connection can be clip or threaded, you need to pay attention to this point. If the manufacturer is the same, there will be no problems.
View of the threaded connection on the head itself
It can be in the form of a nut with curtains or simply round. In the first case, during installation you need an additional tool to crimp the connection. In the second, everything is much simpler.
The presence of a “skirt”. The head looks better with it, because... it covers the work area.
Material of manufacture. The cheapest are thermal heads in a plastic case. Expensive models have a metal body.
Quality of plastic. Some manufacturers, in order to reduce the cost of their products, use the cheapest type of plastic. The strength of the structure suffers from this, and over time the plastic turns yellow and loses its aesthetic appearance.
Work item type. The choice will have to be made between liquid, gas, electronic and paraffin.
Smooth rotation. The handle should rotate smoothly. This is a sign of good quality. Any cracking, squeaking or jamming indicates a not entirely high-quality product.
Graduation and scale length. For most models it is in the range of +5 – +30 °C. If the graduation scale is located around the entire perimeter of the head, it can quickly wear out.
Availability of anti-vandal casing. It protects against unauthorized access to settings.
Design. Since thermal heads are mainly located in plain sight, their appearance and color scheme are important.
It is not necessary to purchase a ready-made kit consisting of a thermal valve and a thermal head. These devices can be purchased separately.
The gas-filled bellows is not too sensitive to external heat sources. This is a definite plus, but its cost is much higher than that of a liquid bellows
A thermal head equipped with automation benefits a lot, but it is not always effective. There is no point in mounting it on cast iron radiators. This material is very heat-intensive, and since the mass of the battery is large, it has great inertia. Only a manual type of head can work correctly here.
Brief overview of popular brands
The right decision when purchasing a thermal head would be to focus on reputable manufacturers. An unfamiliar trademark with an unknown history is a big risk of wasting money.
You can safely purchase products from manufacturers such as Dunfoss, Oventrop, Caleffi, Salus and other well-known companies.
Place #1 - Danfoss
The Danfoss concern has been producing thermal heads for over 60 years. This is a Danish manufacturer; under its license, products are also produced in Russia.
The range of equipment for automation of heating systems at the Danfos concern is rich and meets advanced technologies. You can control the operation and configure the thermal heads remotely using a smartphone.
The most frequently asked question is the RTS Everis thermal head. This is a bellows product filled with liquid. By direct fixation it interfaces with proprietary thermal valves. Others require an adapter.
Test of existing types of brand thermal heads in the following video:
Place #2 - Oventrop brand
Oventrop thermal heads from the Uni line are in great demand among consumers. They are equipped with a liquid bellows. They are connected to the thermal valve using a union nut. The temperature can be set between +7 - +28 °C.
There is a possibility of complete closure. The heads are designed for a maximum temperature in the system of +100 - +120 °C - these are the characteristics indicated by the manufacturer in the accompanying documentation.
Oventrop Uni heads are compatible with other sanitary products from this company. They can be connected without an adapter to other devices with a built-in valve and appropriate threads
They are installed on thermostatic valves with a suitable connection. On the heads of many series there is a special mark for people with low vision and a vandal-proof casing.
Place #3 - Thermo company
Consumers highly appreciated the products of the Swiss company Thermo, in particular the Royal Thermo RTE 50.30 model. It has a wide adjustment range - from +6 to +28 °C, and a low hysteresis value - 0.55 degrees. There is also a zero position.
For correct operation, the coolant must have a temperature no higher than 100 °C. The connection to the valve is a union nut.
Thermo thermal heads are distinguished by their reliability and build quality. Offers include models with a remote sensor
Place #4 - manufacturer Caleffi
The Italian manufacturer Caleffi supplies a wide range of radiator thermal heads. The Caleffi 210000 model is programmable. It is equipped with a digital LCD temperature indicator. In addition to the temperature value, it shows the time, date, and the set daily program.
When purchasing equipment for heating systems, be sure to ask the seller for accompanying documents, a warranty from the manufacturer and instructions for the product
When programming for a week, you can set 3 temperature levels: “Comfort”, “Economy”, “Anti-freeze”. This head is installed in tandem with Keleffi valves.
Place #5 - Salus company
The German company Salus also enjoys a well-deserved reputation. For example, the Salus PH 60 model is an electronic head with non-volatile memory and the ability to set the temperature for a week. Temperature range - +5 - +40 °C.
Power is supplied from 2 AA elements. The display has the function of backlighting and displaying temperature parameters, as well as the charge level of the elements.
A new development - a wireless mini thermal head powered by batteries. You can control the device via a computer or smartphone by first downloading the Smart Home application.
Technical innovations never cease to delight users - wireless thermal heads allow the owner to create a comfortable indoor microclimate, while being at the other end of the city or another country. And all this becomes possible if you integrate the device into the heating system of a smart home or download a proprietary application.
Rules for installing the control valve
As mentioned above, the greatest efficiency is achieved when the thermal tap is installed horizontally on the radiator.
The thermal head is installed according to special rules, according to which adjustment is necessary only for powerful radiators. Therefore, you should not equip every battery located in a residential area with this device. The greatest efficiency can be achieved if you install the thermostat on the most powerful heating element available in the room.
It is not recommended to install a valve with a thermal head for a radiator on cast iron radiators; this will not give the desired effect. The reason for this is the inertia of cast iron batteries, resulting in a large adjustment delay. Consequently, installing a thermal head in this case makes no sense.
The best option is to install the valve on the supply pipe while connecting the battery to the system. Otherwise, it is necessary to insert the device into the finished system. For this purpose, individual elements of the heating circuit are dismantled and the pipes are cut, first turning off the tap. It is quite problematic to make insertions into metal pipes, so you need to study the instructions on how to install a thermal head on a heating radiator.
After completing the installation of the thermostat, you need to fix the thermal head. This process is not particularly difficult and is as follows:
- There are corresponding marks on the body of both elements that must be aligned.
- To fix the thermal head, you need to lightly press the device.
- A dull click will indicate the correct position and installation.
Anti-vandal thermostats are more difficult to install. In this case, to solve the problem of how to install a thermal head on a radiator, you need a 2 mm hex key.
The work proceeds in the following order:
- Using dowels, the plate is secured to the wall.
- The device body is fixed to the plate.
- The capillary tube is fixed to the wall using clamps.
- Install the valve with the thermal head for radiators, aligning the marks, and press it against the main body.
- Tighten the fixing bolt using a hex key.
With the help of thermostats, you can not only regulate the temperature, but also limit pins on the back wall. The devices allow you to set the minimum and maximum values. In this case, the wheel will no longer turn beyond the established limits.
Selecting the optimal thermostatic head for a radiator is not particularly difficult. The main condition is that the option must correspond to the heating system, regardless of whether it is at the design stage or already presented in assembled form. In addition, you should take into account the installation features of each type of thermostat. According to experts with many years of experience, programmable devices allow you to get maximum benefits and savings.
Purpose and principle of operation of thermal heads
Temperature control in heated rooms is carried out in stages. The first stage of adjustment is setting the required coolant temperature on the boiler. In the case of centralized heating, this stage is absent - the coolant enters the devices at the temperature of the supplier organization according to the temperature (seasonal) schedule.
But temperature control (refers to a qualitative control method) on the boiler cannot provide the necessary conditions in rooms of various purposes and volumes. Even according to the requirements of SNiP, the air temperature in individual residential premises varies from 16 to 25C.
To solve this problem, quantitative regulation is carried out on heating radiators - a change in the volume flow of coolant through the device per unit time. In accordance with the mass flow of water, a certain amount of heat is released into the room through the device.
Quantitative adjustment is carried out in 3 ways:
- Manual valve adjustment;
- Manual adjustment with ball valves;
- Semi-automatic (automatic) regulation by thermostatic valves with thermal heads.
Manual adjustment of coolant flow has low accuracy (especially when using ball valves) and requires constant manipulation of shut-off valves when the air or coolant temperature changes. This process is automated using thermal heads installed on thermostatic valves.
The operating principle of thermal heads is implemented using the thermophysical properties of materials to expand and contract when the ambient temperature changes.
The container with the substance is built into the body of the thermal head; when it expands, it puts pressure on the valve actuator and it covers the flow area, reducing the coolant flow and, accordingly, the amount of heat transferred. When cooled, the container with the substance contracts and a spring-loaded valve opens the passage for water.
Device and principle of operation
The devices offered on the market have the same design. They also function according to the same principle. Main nodes:
- valve;
- thermal head with rod and bellows.
The last of the elements is removable. You can connect different thermal heads to one valve. The device of the electronic analogue is somewhat more complicated: the design includes a microprocessor responsible for regulating the temperature in the room. The operating principle of the thermostat is based on changing the cross-section of the valve lumen. To normalize the indoor microclimate, you need to reduce the volume of coolant that enters the radiator from the pipe.
The thermal valve is connected to the head via a union nut and a rod. The last of the elements moves inside the structure under the influence of the load exerted by the medium in the bellows (gas, liquid). When heated, the substance expands. The pressure inside the head increases. As a result, the rod lowers, partially or completely blocking the gap in the valve.
When the air in the room cools, the thermostat settings are changed manually or automatically. If a device equipped with a bellows is installed, the stem returns to its original position after the characteristics of the working environment change. Electronic devices interact with the thermostat. This element is often built into the design of the thermostat. There is another option: install a thermostat on the radiator.
The market also offers simpler thermostats - mechanical ones. They are equipped with valves and taps. Such devices are distinguished by their primitive design. They contain a valve, valve. There is no bellows inside the structure. All actions to adjust the parameters of the coolant and the environment are performed by a person: if necessary, the valve partially blocks the gap inside the valve, which leads to a decrease in the volume of the coolant. When the air in the room cools down, it is necessary to return the device to its original position.