More and more families are thinking about moving permanently to their own private house with a plot of land. And what can warm you up and restore your vigor after working in the garden, if not a heater like a stove. Since ancient times, the Russian hut has been heated by these sources of warmth and comfort, be it a huge, half-yazha-sized Russian stove with a stove bench (or a rough one) or a small “Dutch oven”.
Of course, they are being improved, new technologies and materials are being used. The ancient mud stove is a thing of the distant past, but even now the stove is a symbol of the hearth.
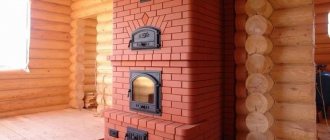
Currently, depending on the preferences of the owners, they install stoves and fireplaces of various types and try to decorate them in accordance with their taste.
This gives the entire appearance of the premises a special zest, unique flavor and comfort. People have long tried to decorate the stove. Or paint it with patterns on the plaster or, in rich houses, decorate it with tiles.
This tradition has not died out even today. Even in a small country house, they try to give the stove a presentable appearance.
- 2 Sandstone and shell rock
- 3 Beauty majolica
- 4 The oldest type of ceramics
- 5 Clinker tiles
- 6 Porcelain tiles
- 7 Tiles - man-made beauty
- 8 Do it yourself
- 9 How else can you decorate the stove?
Finishing materials
To decorate a brick oven, they mainly use different types of tiles, but you can paint the plaster with bright colors, considering it as the most budget option.
It is necessary to understand what types of finishing materials there are for this:
- natural stone (sandstone, shell rock, serpentine);
- bright painted majolica;
- ancient unglazed terracotta
- heat-resistant clinker tiles;
- the latest novelty is porcelain stoneware;
- exquisite tiles.
All these facing materials for stoves meet the necessary characteristics:
- sufficient thickness (6-9 mm);
- withstand high temperatures;
- increased strength under mechanical stress;
- the structure is quite low-porosity.
If when tiling a sauna or stoves in a bathhouse, only heat retention is important, then when decorating a home stove, you need to think about the design of the entire room.
You can find out more about the types of brick kilns by following this link:
Methods for whitewashing a stove
After preparing the surface, the question arises of how and with what you can whitewash the stove in the country. Traditional options that come from time immemorial are lime or chalk.
Lime is good because it is harmless to humans and resistant to high temperatures. Lime whitewashing of the stove is non-toxic and can be used even in rooms with high humidity and in a bathhouse.
Lime powder must be diluted with saline solution to the state of liquid sour cream. Salt will make the coating strong and not prone to cracking.
Lime for whitewashing must be diluted to the state of sour cream.
A liter of diluted lime is enough to paint 2 square meters. m area. If drops get on the floor, they can be easily washed off, the main thing is to do it quickly, before the lime is eaten away.
Do-it-yourself whitewashing with chalk allows you to get a bright white beautiful color. The disadvantage of the coating is that upon contact with the surface, white marks remain on the clothing.
It is recommended to dilute it not with water, but with milk. To make the coating stronger and not “whitewash”, you can add wood glue.
The powder is sifted and diluted in milk, mixed, and additional components are added. The mixture with lime is heated, without allowing it to boil, until all components are completely dissolved. The resulting solution must be filtered and only then proceed to coloring.
To whitewash the stove, you can use a roller or a wide brush. There is no need to heat it before bleaching - it should be cold.
First, the surface is moistened with water and the first layer is applied. To paint a wall without streaks, it is applied horizontally. Without waiting for the first layer to dry completely, apply the second, but horizontally. The whitewash should be left until completely dry, and only then proceed to applying a design or ornament to the stove.
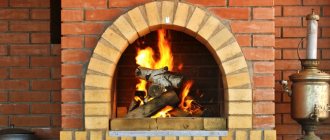
Beauty majolica
The tiles, painted with bright fiery colors and covered with a durable layer of glaze, came from the Mediterranean.
Ancient Roman traders brought it from Mallorca. The area was famous for its tin-lead painting on ceramic tiles and pottery.
Glazing serves as another layer that retains heat inside the finishing material, so majolica was in demand as an excellent type of cladding.
Only wealthy people could decorate their stoves with such beauty.
Rules for installing facing elements on a stove wall
According to the technology, it is better to start gluing tiles on vertical surfaces from the bottom, and it is necessary to lay out the first row and allow the adhesive mixture to harden. This will allow you to set guides along which you can navigate when installing the next rows. Therefore, when installing the first row of facing elements, you need to be especially careful. The tile installation process is carried out in the following order:
A sufficient layer of adhesive is applied to the underside of the tile with a regular spatula.
The facing element is pressed against the base surface, first with the lower part, and then with the upper, after which it is installed in the desired position with light blows.
When installing each tile, it is imperative to check the correctness of its spatial location with a small level.
As you fill the row with facing elements, you need to periodically make sure that you have not deviated from the specified parameters, using a longer level for this.
After the adhesive mixture of the first row has hardened, you can begin further installation of tiles, filling the next rows. The procedure for performing this task is the same as for the first row.
But now a long level will also be needed to check the vertical plane of the plane being created, which is advisable to do during the installation of each of its next elements.
A stove wall usually has certain places in its structure that should not be covered with a tiled covering, for example, firebox and ash doors, well windows for removing accumulated soot, and so on. In order to beautifully decorate such areas when installing tiles on the wall of the stove, it is necessary to change the format of the ceramic tiles, which means removing any of its fragments and, quite often, the figured ones. Tile is a rather fragile material, so if the cut line is not straight, but has any angles or turns, then you should use a grinder to form a non-standard element, after which it is mounted on the wall in the prepared space.
It is also often necessary to cut tiles when completing a row, since it is rare that there will be an even amount of tiles on the wall. Therefore, you need to measure the width of the missing piece with a tape measure, taking into account the size of the seam.
After this, you need to make an insert of the required size, separating the excess part from the whole tile using a tile cutter.
The finished part should be installed in its place using the same adhesive.
As can be seen in the photographs presented above, in order to achieve as much symmetry as possible when installing elements of the tiled covering, it is important to use limiting crosses, which are inserted into the seams between the tiles, two on each side.
This will ensure uniform spacing between the installed elements and keep them in this position until the installation mixture hardens. When the surface of the stove wall is completely covered with tiles, you will need to wait a day or two so that the hydration of the cement included in the installation mixture occurs to a sufficient extent, when you no longer need to be afraid that the stability of the elements of the tile covering will be disrupted.
The oldest type of ceramics
Terracotta is a special type of clay with a porous structure. In fact, it is the same majolica, but not glazed. It is considered the most ancient type of cladding. It has high strength and bright color.
Pressed clay of a certain grade is first pressed and then fired in special kilns. It turns out to be an excellent decor for cladding.
Terracotta was used in construction for roofing, various types of cladding, and to decorate stoves and hearths.
Clinker tiles
A European material created for cladding fireplaces and stoves as opposed to decorative brick in houses in Holland, Norway and a number of other Northern European countries.
Usually several types of clay are pressed, with the addition of certain parts of fireclay, various dyes, and fired. The result is a tile with a pleasant shade of beige, from milky to bright orange.
This is a material 9-12 mm thick, with a microporous structure, capable of retaining heat well.
Porcelain tiles
Its creation dates back to the 80s of the last century.
Porcelain stoneware is intended not only for finishing stoves, but is also widely used in construction. To produce it, several types of special clay are required with the addition of quartz sand, various types of natural dyes and a fine fraction of marble or granite.
The whole mass is well kneaded and pressed at fairly high temperatures under pressure. The result is a durable product that is not afraid of strong impacts and high temperatures, and retains heat well.
This is a monolithic material that can be given any color during manufacturing.
Thanks to modern technologies, porcelain stoneware can be made in the form of majolica, terracotta or tiles. The cost of such material is not high in comparison with the original ones.
Painting
Initially, beautiful Russian stoves were white, as if symbolizing the purity of the thoughts of the owners of the house. But in the modern world, stoves have not been installed in every home for a long time, so the meaning has gradually been forgotten. Many people find a simple white stove uninteresting, so they often make unusual paintings of stoves.
In order to paint a stove with your own hands, you do not need to be a great artist. Now it’s enough to choose the right stencil. You can find it in the store - a stencil for painting walls. Another option to make a stencil of a design for the stove is to find any image and print it on thick paper. The stencil is fixed to the surface of the oven using adhesive tape (or, if the stencil is “purchased”, it already has a self-adhesive base). It is then transferred to the surface using a colored pencil.
You can apply painting to the surface of the stove using a stencil.
If this is your first time dealing with such work, it is better to choose a simple design for a Russian stove. National patterns may be the best option: they will look harmonious on the stove, and also consist of individual simple elements that can be easily mastered.
You can color the pattern using whitewash, to which a coloring agent is added. It can be simple gouache, but it is better to purchase acrylic paints, which can withstand high temperatures much better.
The drawing itself is applied using ordinary artistic brushes of different sizes. After the drawing on the Russian stove is ready, it is not recommended to heat it for at least two days so that the paint can dry.
Photo gallery
Tile - man-made beauty
This is a beauty created from different types of clay.
The manufacturing technology came from ancient Babylon and has survived to this day. The tile is a box shape, thanks to which heat retention increases significantly.
This is a piece and expensive finishing material. In past centuries, only very wealthy people could cover a stove with tiles.
Beautiful boxes, each with an individual design, were incredibly expensive, but were in great demand.
Nowadays, tiles are also popular.
Do it yourself
In order to cover a brick stove with tiles with your own hands, you need to carry out preparatory work and prepare the tools needed for the job:
- rack level and plumb line;
- construction trowel and spatula;
- paint brush (it’s better to take a wide one);
- special tile cutter;
- a hammer or mallet with a rubber top;
- a brush with metal bristles;
- convenient container for the solution;
- fireproof heat-resistant adhesive.
This article will help you deal with the repair of a brick stove:
Decorating a stove with tiles is not an easy process, so professionals are invited for such work, but laying tiles can be done by an owner with good hands.
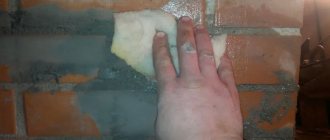
- To begin with, the stove is cleaned of the mortar remaining after laying. This is best done with a wire brush and rubbing with a damp rag or sponge.
- Cover and secure a special metal mesh over the entire surface (mesh size no more than 20mm). Self-tapping screws or nails are used as fasteners.
- The structure with the mesh is plastered with mortar, leveled and allowed to dry. At the end of drying, when the solution no longer cracks, the oven is heated well.
- They begin to glue the tiles. Masters recommend starting from the corners and bottom rows. To make the rows even, use a level and crosses.
- The simplest and most enjoyable stage is grouting the joints and applying a heat-resistant compound. Before grouting the seams, allow the entire structure to dry for about three days. After this, you can remove all construction debris and wash the tiles.
Cladding with metal sheets
Galvanized steel and aluminum sheets are used for cladding.
The decision to cover the stove with metal sheets is used not only for decoration purposes, but also as a way to reduce the consumption of masonry material. In the second case, a box is made, inside which a quarter-stone body is folded. The gaps are filled with shungesite sand, which has a high heat capacity. This design heats up quickly and is practically impervious to external factors. The work uses blued, galvanized steel, copper and aluminum.
Advantages of using metal:
- affordable price;
- representative appearance;
- short terms of arrangement;
- ease of assembly;
- ease of cleaning and maintenance;
- possibility of dismantling and improvement.
Disadvantages of technology:
- the likelihood of overheating when the lining comes into contact with the door;
- susceptibility to corrosion by the creosote produced by the stove;
- inability to eliminate mechanical damage - dents, holes, deep scratches.
The stove can be finished completely or partially; the use of ribbed slabs increases the heat transfer of the hearth.
To decorate the stove in the house in an interesting and unusual way, several types of material are often used. This approach is used not only for aesthetic, but also for purely practical purposes. You can decorate the base and sunbed with cheaper tiles, line the firebox level with tiles, and put a stone on top. There are many options, the main thing is to maintain harmony and follow the instructions for using the finish.