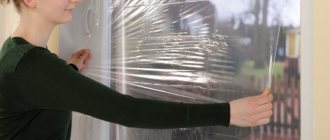
Heat losses through windows account for up to 30-40% of the total heat consumption in the house. When choosing ways to save on heating, experts are increasingly paying attention to energy-saving films for windows. Their operating principle is based on blocking infrared radiation (IR, up to 60%) and ultraviolet radiation.
Heat distribution when using heat-saving film in winter and summer
Advantages and disadvantages of heat-saving material
The use of thermal film has many positive qualities, among which it is worth noting:
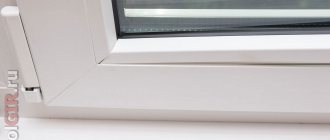
- Strengthening. Heat-saving material increases the strength of glass up to 8 kg/cm². When broken, the glass does not crumble into fragments, but remains glued to the film.
- Saving. After gluing the film onto a single-chamber double-glazed window, its energy efficiency becomes comparable to a two-chamber design.
- Protection of interior items from fading.
- Almost 100% UV blocking.
- Blocking IR radiation within 30-99%.
- Depending on the type of material, one-way light transmittance.
Thermal film protects well from sunlight and retains heat.
However, thermal film also has disadvantages. The most basic is the almost complete reflection of ultraviolet rays, which negatively affects indoor plants. Therefore, if you use heat-saving film, then provide your plants with additional lighting with photo lamps that provide the radiation spectrum required for their normal growth and development.
The second drawback is the lack of effectiveness in spring and autumn. At a time when centralized heating has not yet been started, the thermal insulation coating will prevent the penetration of heat from the sun's rays into the room.
The film also has the unpleasant property of reflecting radio waves, which can affect the quality of signal reception going to a mobile phone or television receiver. This is due to the fact that metal spraying is used in the production of thermal insulation film.
Advantages and disadvantages
The solution has a number of advantages:
- minimal thickness, high light transmittance;
- possibility of gluing wooden and plastic double-glazed windows;
- ease and efficiency of installation, no need for specific knowledge and tools;
- affordable price;
- fire safety;
- environmental friendliness.
The only significant drawback is considered to be susceptibility to deformation under intense mechanical stress. The service life of the product is 1-2 years.
Do-it-yourself insulation of windows with thermal film
Before installing the “Third Glass” film on a plastic window, you should prepare tools such as a stationery knife, scissors and a household hair dryer. These simple tools are available in almost every home. It is easier to install with two people, but you can do the job alone. For detailed video instructions on installing heat-saving film in an apartment, see the end of the article on the website.
Do-it-yourself insulation of plastic windows with thermal film
Instructions for thermal film “Third Glass”
Start insulating roof windows with a small window opening. The surface of the frame should be treated with a degreasing compound and dried. Next, double-sided tape, included in the kit, is attached around the perimeter of the glass unit; The film in the package is folded in half; it should be separated and cut out. Cutting is done in accordance with the size of the window, taking into account the fastening of the thermal film with tape. Check the dimensions of the film by applying it to the window opening being processed; Remove the protective strip from the tape and carefully glue the film to the double-sided tape
Do not pay attention to possible folds, the main thing is that the film is securely attached around the entire perimeter of the frame with double-sided tape; Blow the film with hot air using a construction or household hair dryer; under the influence of temperature, the material will shrink. As a result, the heat-saving film will stretch and become perfectly smooth over the entire area.
Stages of installing heat-saving film on a window
Insulation of plastic windows with heat-saving film
An important advantage of this material is that it increases the strength of the glass unit - the glass will not scatter in different directions into small pieces, which will reduce injuries. The film can be used to insulate wooden and plastic frames; the effect of the material can be compared to installing a double-glazed window. The film reduces the heat transfer of energy from a warm room to a cold one near a double-glazed window.
We will give some more important recommendations based on reviews. When insulating windows for the winter, it is better to install thermal film in October-November. It is recommended to remove it in May, as daylight hours increase. If the film accidentally breaks during installation, do not be upset - the tear can be quickly repaired using ordinary tape.
Price
The cost of the material is influenced by several factors, the most important one was mentioned above. The rest are:
- Manufacturer of heat-saving film - German and Polish versions are often more expensive than domestic ones;
- Canvas size - larger materials are cheaper (in terms of size-price ratio).
Countries producing heat-saving films for windows:
- South Korea;
- China;
- Türkiye;
- Ukraine;
- Russia;
- Germany;
- Poland;
- Other.
Most often, the following brands can be embedded in online stores:
- Thermo Tap;
- NANOFILM;
- USB (Ultra SolarBlock);
- ESB technologies (Russia);
- Heat technologies (Poland).
The screenshot below from one online store shows prices for energy-saving (more expensive) window films.
There are, of course, cheaper options. For example, film from the Polish brand “Heat Technologies” can be purchased at a price of 500 rubles per set. There are two types of sets: 1.1 by 6 meters and 2 by 3 meters. The average price per square in this case will be 85 rubles. As a bonus, the set contains a 20 meter roll of tape.
The cost of insulating one window with film
A window measuring 1400 by 1300 mm will require approximately 1.82 squares of film and 5.4 meters of tape. Thus, the cost of thermal insulation with Polish film will be 150 rubles per window.
Categories of heat-saving film
It is not recommended to purchase cheap thermal insulation coating that will crack or peel off when exposed to the sun.
It is worth paying attention to strong and durable materials. High-quality thermal protective film for windows is divided into three categories:
Self-adhesive. It resembles the film that is glued to the screens of phones and tablets. It's not that easy to stick on. This work can be done efficiently by specialists or those who have extensive experience.
Usually this material comes with a backing, the edge of which is carefully removed and the coating begins to be applied to the window. Gradually moving the backing away, glue the entire canvas
This work is difficult to do on your own; there is a high probability of material distortion. Heat shrink. Attached to the window frame using double-sided tape. An air gap is formed between the window and the material, which is a good heat insulator. The attached film at first looks like a wrinkled plastic bag. To smooth it out, you need to direct hot air from a hair dryer onto it. Under the influence of heat, the coating smoothes out and takes on a normal appearance. Film for soap solution. Externally, it resembles car tinting and forms a durable thermal insulation layer. Anyone can apply this canvas. It is advisable to use soap without aromatic additives (laundry soap, baby soap).
See also: insulating windows using thermal film.
How to install thermal film correctly?
Thermal film for window insulation is attached by performing the following simple steps:
- We glue the double-sided transparent tape that was included with the film onto the previously prepared frame;
- Upon delivery, the material arrives folded in two layers, so it is necessary to separate them;
- Cut the film, taking into account the need to apply about 20 millimeters to the tape, check whether you have measured correctly;
- Remove the protective paper strip from the tape glued to the frame;
- Attach the film to the tape, not yet paying attention to the small wrinkles that appear (it is better to do this step together);
- Since the film is heat-shrinkable, in order for it to level out and become smooth, we blow it with warm air from the center to the frame; for this purpose we will need a hairdryer;
Guide to insulation with paraffin and sealant
To eliminate small gaps, you can buy silicone sealant. You need to wash the windows in advance and wait until they are completely dry. Such insulation must not be performed at air temperatures below +5 degrees.
To eliminate small gaps, you can buy silicone sealant
The sealant is very convenient and easy to apply using a construction gun specially designed for this purpose. It is better to remove excess material immediately before it dries. In the future, to remove any leaking sealant, it will be enough to wipe the surface with a cloth slightly moistened with gasoline. You can simply carefully pick it off the glass using a knife.
One of the options for insulating a wooden window
Small cracks can also be sealed with paraffin. To do this, take several paraffin candles or buy ready-made material right away. The paraffin needs to be melted, taken into a syringe of suitable volume and carefully filled with it into each existing crack.
Large defects can be repaired with an ordinary clothesline. Any other lace will do. The rope is tightly pushed into the gap, after which it is filled with paraffin.
Such insulation will last at least 2-3 years. For the rest, focus on the condition of the thermal insulation and add new paraffin if necessary.
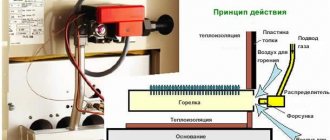
How film works
The basis for the production of the film is the polymer polyethylene terephthalate (PET), the thickness of which, depending on the manufacturer and operating conditions of the heat-saving film, can vary from 80 to 200 microns. Due to the high ductility of the heat-saving film, it can, to some extent, increase the strength of window glass, especially when glued directly to its surface. But the biggest advantage is that accidentally broken window glass will not shatter into small pieces. They will remain tightly “glued” to the film in the window frame.
But protecting window glass, of course, is not the main purpose of using heat-saving film.
Thanks to a microscopic layer of rare earth metals deposited on its surface by plasma evaporation and subsequent deposition of metal vapor in an argon environment, a layer is formed that, without interfering with the penetration of rays of the visible spectrum through the film, changes, due to refraction, the transparency of the film for rays of the UV and IR parts of the spectrum Sun. These rays are not visible to the human eye. But IR (infrared) rays are responsible for heat transfer; their film, when refracted, reflects into the room, and it is due to this that its “heat-saving” effect is manifested. But it reflects the rays of the UV (ultraviolet) part of the spectrum, which make up a significant segment of the sun’s light, preventing them from penetrating into the room.
The sun's UV rays have a strong ionizing effect. Being vital for the body in small doses, they contribute to the production of D vitamins in the human body, normal photosynthesis of indoor plants and purification of indoor air from pathogens.
When is it advisable to use film?
Most manufacturers recommend sticking heat-saving film on the windows of an apartment or balcony only during the cold period - from October to March. It is during this period that protection against heat loss through windows takes effect. The rays of the Sun, trying to penetrate into the room through the windows, carry practically no heat with them in winter, so the reflection of the UV part of the Sun’s light does not cause discomfort, since the films are absolutely transparent and do not give a tinted effect. But the IR (infrared) rays emanating from heating devices, trying to leave the room, are, on the contrary, reflected into the room. This is where the heat-saving properties of the film manifest themselves. Another important factor in which the heat-saving effect is most fully manifested is the technology of applying heat-saving film to glass.
What are cold bridges
Cold can penetrate into a living space not only through glass, but also in other ways - through elements that are in one way or another in contact with the environment. Areas where windows are in contact with the outer surface of the walls, as well as leaky panel seams in multi-story buildings, significantly reduce the thermal resource of the room, which means that not only the windows themselves, but also each of these areas must be insulated.
Replacing windows even with the most modern double-glazed windows without additional insulation of the above parts will increase the heat resource of the room by only 15-20%. If you take a comprehensive approach to insulating a room, the heat resource can be increased by 45% or more.
Where to buy energy-saving film?
Buying such a film now is not particularly difficult, since it can easily be found in almost every construction and hardware store.
In addition, when purchasing plastic windows in recent years, manufacturers initially began to install films on their products.
Sometimes film is sold in subway passages, but in such cases there is a high chance of purchasing a low-quality fake.
Source: ru-remont.com/okna/plenki/energosberegayushhaya-plenka.html
Negative aspects of using film that you need to know about
Since the film almost completely reflects UV rays, indoor plants, whose growth directly depends on the Sun, begin to suffer because of this. To prevent the plants from dying, they have to be additionally illuminated with photo lamps. That is, this problem is solvable. However, where is the energy saving? The photo lamp must be turned on at least 12 hours a day to ensure normal plant growth and compensate for lost sunlight. Even the most economical lamps will not save you.
What happens to the heat energy if the film is used in spring and autumn, when the heating is already turned off? Since the film does not allow natural solar heat from the street to penetrate, dampness will settle in the apartment and it will be cold.
Few people know about another property of film - they reflect radio waves. That is, radio signals that go to an indoor antenna or mobile phone will be reflected by the coating of the film. And, vice versa: the signal from the mobile phone will be reflected back into the room. Conclusion: cellular communication in buildings where the film is pasted will be very poor.
You should not use film for greenhouses and greenhouses, because plants need the full spectrum of sunlight.
There is no point in gluing the film if the apartment has modern windows with high-quality thick double-glazed windows. But when restoring old windows, it, on the contrary, will serve as a good help. You also need to take into account the fact that the film needs to be changed annually.
Negative properties of film
In addition to the positive ones, the film also has negative properties.
The most serious of these is the almost complete reflection of the sun's UV rays. Indoor plants growing on a windowsill or balcony suffer the most from this negative property of the film; they begin to wither and die. Therefore, if you use heat-saving film on windows in winter, be sure to provide 12-hour illumination with phyto-lamps for the plants located on your windowsills, which provide the correct radiation spectrum necessary for normal plant growth and allow you to compensate for the lack of natural light from the Sun. True, in this case, there can be no talk of any “energy saving” in your apartment. Even very economical phytolamps on LEDs, with daily illumination of plants for 12 hours, will completely “absorb” your savings on heating the room.
The second negative effect of heat-saving film applied to the windows of an apartment or balcony is its complete ineffectiveness in the spring and autumn. When the heating in the apartment is not yet turned on, or is already turned off, the film prevents the penetration of the sun's heat from the street. It becomes cold and damp on the balcony and in the apartment, especially in spring.
Another disadvantage of heat-saving films is their ability to reflect radio waves. The radio signal coming to your television antenna or mobile phone will be reflected by the metal coating of the film, and the signal coming from your mobile device will also be reflected inside the apartment.
Therefore, cellular communication in houses where heat-dispersing film is glued to the windows is, as a rule, very poor.
Benefits of using film on windows
When using film on windows there are the following advantages:
- By using a coating on the glass for insulation, you do not interfere with the natural circulation of air through the wooden frame.
- Significantly increases strength and prevents the risk of glass shattering when broken.
- Small sound insulation, perfectly prevents sounds from falling raindrops.
- Installation is very simple and any beginner who has never even tried this process before can handle it.
- There is no need for specialized tools and materials for installation or maintenance.
- It is possible to use a film with an external mirror surface, while the appearance from the inside remains unchanged.
- Complete protection against fogging and the formation of any type of condensation on the glass surface.
- Windows become less dirty, since any dust and stains do not remain on the surface.
- Due to its composition, even severe frosts are not able to freeze pieces of ice on the surface of this coating.
- Very high wear resistance and durability. As a rule, such a film can last much longer than the window itself. Even in case of damage, the surface can be easily repaired using the simplest stationery transparent tape.
- Low level of interference with electromagnetic radiation.
- Film performance is not lost even after prolonged use or if damaged. If a scratch or hole is repaired with tape, the properties of the film remain unchanged.
We make gluing
The entire installation process must be carried out very carefully and not rushed. In this matter, it is better to spend an extra half hour than to get a low-quality end result in the form of an unacceptable appearance or completely damaged material.
Work should be carried out with rubber gloves, and the glass should be at normal room temperature. The film has two sides, front and inner, they must be accurately separated in advance so as not to be confused during installation.
Let's start the installation:
- You should wash the window thoroughly and wait until it dries completely.
- The fittings and all handles are removable so as not to get caught during gluing.
- In order not to make mistakes when adjusting, make a small margin of about two centimeters to trim off the excess and adjust the film to the ideal size.
- The film for insulation is rolled out and cut to the resulting dimensions with scissors; here it is better to measure everything several times so as not to make a mistake, since the film must be glued in one solid sheet.
- Now you need to moisten the glass with a soap solution, and degrease the frame using regular medical alcohol.
- Double-sided tape is glued around the perimeter of the window.
- Then the film must be attached to this tape. When installed correctly, it should be completely invisible.
- Air bubbles are removed using a soft rubber or plastic spatula, and for better smoothing, the surface is heated with a hairdryer.
- It is best to secure the edges of the film with glazing beads. They can be removed before gluing or after, as is more convenient for you.
- The holding double-sided tape can be completely removed. We return the fittings and handles to their place.
- At the very end, remove the protective layer and the window will be completely ready.
Low-emission energy-saving film
When installing energy-saving film on a window, the room becomes much warmer. It prevents wave radiation from cooling the interior through the glass and thus retains up to 42% of additional heat.
In the spring-summer period, a window on which a heat-saving film is installed does not allow the room to overheat. This coating on the glass blocks the penetrating thermal rays of the sun. These qualities of the film make the window a real heat insulator throughout the year.
This effect is achieved due to the physical properties of refraction of sunlight. Thermal reflective films are produced using special technology only by manufacturers from the USA (4 are produced in the world).
Low-emission films have a main characteristic - emission coefficient, i.e. the ability to re-emit energy. The lower the value of this coefficient, the more effectively it retains heat in the room.
According to our measurements, not a single film, except Ecolux70, provides a noticeable heat-saving effect on double-glazed windows. A slight effect is visible with a thermal imager only on single glass.
Only 3 films in the world give an effect on a double-glazed window: Ecolux70 from SolarGard, Enerlogic from LLumar and Thinsulate from 3M.
Energy-saving film is an effective heat insulator in winter and summer.
Why does it blow from a plastic window?
Determining the reason for the blowing of a plastic window begins with whether it is new or old. In the first case, the problem can be safely attributed to poor quality installation of the product, which means that the installers will have to solve it.
In this case: poor-quality installation seam of plastic windows
Often, plastic windows are installed by companies whose workers do not have sufficient qualifications. Mistakes are also possible when trying to install windows yourself. That is why it is not recommended to save on specialists when replacing PVC windows with new ones. But if you are faced with a problem with improper installation or an obvious manufacturing defect, warranty repairs should cover all additional costs.
In the second case, the appearance of a draft is associated with the characteristics and duration of operation of the window. Among the reasons are:
- “Warpness” of the window frame and depressurization of joints due to shrinkage of the newly built house;
- Wear of window components - seals, sash pressing mechanisms, etc. after a long period of use;
- Untimely or absent maintenance of PVC windows.
Some of the problems can be fixed yourself, which will save both time and money. Others are best left to specialists. Namely:
- if replacement of fittings is necessary (“original” parts can often be ordered only through the installer);
- when performing external high-rise work (for windows located above the second floor);
- when insulating a window in winter (specialists will be able to do this quickly and without significant heat loss in the room).
With your own hands you can insulate the window from the inside or along the contour, replace the sealing material, and insulate the window sill.
Let's get started with window insulation
By eliminating all external cracks, we reduced heat loss, but not significantly. By placing your palm on the window frame, you can make sure that there are no drafts. In order for the insulation to be carried out efficiently, you need to pull out the glass and eliminate all the cracks. Before you insulate your windows, you should stock up on a few tools. We will need a flathead screwdriver and a spatula. Sequence of work:
- use a screwdriver to pry up the wooden glazing beads and carefully remove them;
- remove the glass from the window frame;
- Use a spatula to clean the frame from dust and old paint;
- Using a syringe, apply sealant over the entire surface where the glass is inserted;
- install the glass in its place;
- we nail the glazing beads.
The first thing you need to do when disassembling a window is to remove the glazing beads. However, this does not always work out. The beads are thin and often break. We advise you to stock up on some glazing beads before starting repairs. You can always install new ones instead of broken or damaged parts.
The glazing beads are difficult to pry off. They fit tightly to the frame. Therefore, before starting work, it is worth sharpening the screwdriver with a file. This can also be done on a sharpening stone. A sharp screwdriver will easily separate the wooden elements of the window frame.
You need to remove the glazing beads very carefully. First, the glazing beads should be “torn off” or “lifted” along the perimeter of the frame, only then removed. The glazing beads are also removed in a certain sequence. First, remove the bottom bead, then the side ones, and at the very end the top one, which will hold the glass. By following this sequence, there will be less chance of breaking the fragile glass.
When removing glass, it is better to wear cloth gloves. Sometimes the edges of the glass have sharp edges. Gloves will protect your hands from cuts.
Types of heat-saving films
Experts distinguish types of energy-saving film based on product manufacturing technology:
- with application of rare earth metals or noble alloys to the base;
- with ceramic surface coating of polyester.
According to the installation method, thermal films are divided into:
- Wet glued. The energy-saving film is applied after preliminary preparation and degreasing of the surface by pre-wetting the glass with detergents, soap solution or colorless shampoo.
- Dry glued. Installed on a previously prepared surface, in places of contact with the surface of the frame, double-sided tape is glued to it, after which the surface of the film is treated with a hairdryer, due to which the effect of heat shrinkage is achieved.
The second method of insulating windows with film has become very popular due to the ease of installation while ensuring absolute tightness of the connection and the absence of areas with an accumulation of air bubbles after treatment.
What is thermal film and how it works
The technology for the production of heat-insulating material is based on the physical characteristics of sunlight, consisting of UV and IR rays. Thermal film is a complex structure consisting of several layers of polyethylene terephthalate, the thickness of which reaches 80-200 microns. Each layer has a thin metal coating applied using a plasma discharge method in an argon atmosphere. Silver, gold, as well as nickel and chromium alloys can be used for coating.
Thanks to a special application technology, the metallized layer does not interfere with the entry of visible spectrum rays into the room and changes the light transmittance of the film due to their refraction. Infrared rays carry out heat transfer, and the thermal insulation material, by refracting, reflects them inside the house or apartment, resulting in a heat-saving effect. The material reflects UV rays, which make up a significant range of the spectrum of sunlight, preventing them from penetrating into the room.
The high ductility of the thermal insulation film glued to the surface of window glass significantly increases its strength. In addition, if it is broken, it will not crumble into small fragments, but will remain on the film. However, the protective properties are rather a side effect, since it is designed to save energy.
To know means to compare
Looking ahead, we can say that there are film canvases at a price of 30 rubles per square meter and 1000 rubles and even more. What is the difference?
Warm air leaves the apartment due to thermal conductivity. Every object has one, for example, the window frame and the glass itself. On one side the frame is heated by the battery, on the other it is cooled by the street. The frame strives to equalize the temperature and if it’s cold outside, it cools down.
There is a second method of heat transfer - radiation. Infrared solar rays also serve as carriers of thermal energy in the cold season too.
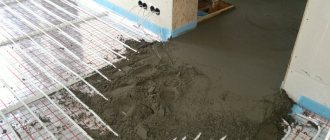
Mineral wool insulation technology
For external insulation of window openings with mineral wool you will need:
- mineral wool,
- plaster,
- adhesive solution,
- reinforcing mesh,
- perforated corners,
- dowels,
- putty knife.
The insulation process should be carried out according to the following scheme:
- Measure the width of the slopes and cut pieces of reinforcing mesh with an overlap of 10 cm.
- Place the mesh on the slopes with an adhesive solution.
- Place a layer of mineral wool on top, having previously coated the surface with glue. Its width should be 1–2 cm greater than the slope.
- To avoid the formation of air space, the slabs should be applied as tightly as possible to the surface of the slope.
- Trim the remaining strips of cotton wool protruding beyond the edge of the slope.
- After complete drying, apply glue to the edges of the insulation and wrap it with the remains of the reinforcing mesh.
- Install perforated corners around the perimeter.
- Wait until it dries completely and apply glue to the screed again using a spatula. The adhesive solution in this case should be slightly thinner than the original one.
- Apply primer and then paint the window façade.
Mineral wool insulation scheme
On the inside, mineral wool is used in combination with PVC slopes or sandwich panels.
What to do if the film is inflated or minor damage appears?
The insulation can “play” for two reasons: to inflate - if the sealing work is poorly done, to sag - if the film was glued in a room with sufficiently large temperature fluctuations.
In the first case, the film will have to be removed, the flaws removed, and pasted again. In the second case, you need to wait until the heating is turned on and the room is warmed up, and then use a hairdryer to fix the problem.
If damage occurs, there is no need to completely change the film, since this problem can easily be fixed with tape.
How to mount film
It depends on what kind of film you are using - heat-shrinkable, self-adhesive or soap-based. In any case, you will need an assistant. The film can be sold in sheets folded in half or in rolls.
The first preparatory stage is washing and drying the window.
After which a layer of soap solution is applied to it from a household sprayer. To prepare it, you can use children's shampoo not colored with pigments or colorless dishwashing liquid. After that, a film cut to the size of the glass is applied to the generously moistened glass of the window. Be sure to first use the top edge, and use a soft rubber roller or a rubber scraper for washing windows to remove excess soap solution from under the film. First, from top to bottom - in the middle of the glass, and then - from the glued middle of the film to the sides. If possible, avoid the formation of large air bubbles. The film will not stick in these places. Small wrinkles and liquid bubbles will disappear on their own as the film dries and the film will completely straighten out.
Self-adhesive films are also applied in a similar way. Only the base protecting the adhesive layer is not removed from the entire film at once, but a narrow strip is peeled off from the upper edge of the film. It takes two people to work. Having glued the top edge, the person at the top smoothes the glued film with a soft cloth, and the person at the bottom gradually removes the protective layer, pulling it towards himself. The main thing is not to rush.
Installation of shrink film is also best done by two people. Double-sided tape is glued along the perimeter of the window frame, a blank 2 cm larger than the glass is cut out of the film and glued to the tape along the entire perimeter. Top first, while an assistant must pull the bottom edge of the film by the corners, preventing premature gluing of the film. The resulting wrinkles and folds are not scary.
After gluing, the film is blown with hot air from a hairdryer, and it straightens and stretches itself. Shrink film is especially effective on the balcony, where it acts as a second or third glass.
Insulation with adhesive tape
The insulation technology is not very complicated. First of all, it is necessary to follow the sequence of work.
Plastic windows
Insulation is carried out in the following sequence:
- pre-removed old insulation is used, firstly, to purchase similar material, and secondly, to pre-cut the old material to size.
- gluing begins from the top of the window. As you progress, the protective layer is removed in small sections, and the tape is pressed tightly.
More details in our video:
Important! 1. The pasted tape should not have many tears.
2. In the corners the tape is not cut, but wrapped.
Wooden windows
For these windows, in addition to adhesive tape, thin foam rubber is often used. The work is performed in the following sequence:
- strips of foam rubber are cut along the window opening;
- cut foam rubber is placed between the frames;
- The tape is cut to the size of the window;
- The tape is applied with a sticky layer to the foam rubber and smoothed with a napkin.
This insulation will last up to three years. But it’s better to do it as shown in the video:
Do-it-yourself window insulation
There is nothing complicated in the process of finishing a window with film - not only a qualified specialist, but also the owner of the house can handle this task. No special skills or tools are needed, but some rules must be followed.
Required materials and tools:
- film;
- special colorless double-sided tape;
- roulette;
- long ruler;
- pencil or marker;
- construction knife or scissors;
- cotton gloves;
- regular hair dryer;
Step by step guide:
Initially, you need to make sure that there are no cracks in the window frame. In plastic windows this unpleasant nuance practically does not occur, but in wooden windows it may be present.
Wooden windows contain frames in their design, which entails the presence of many joints through which cold air can pass through. For high-quality sealing of seams and other cracks, transparent sealant or silicone is used.
You can proceed with further actions only after they have completely dried:
- The inside of the window frame needs to be washed. To do this, you can use household chemicals or soap solution.
- Afterwards, the frame is treated with degreasers (preferably ethyl alcohol 96%).
- Double-sided tape is glued along the edge of the frame (along the perimeter).
- Next, the film unfolds on a large table. If it is folded in half, it needs to be stratified. To do this, it is advisable to blow on the joints. Holding the two edges, it gradually separates.
- It is necessary to measure the horizontal and vertical dimensions of the glass unit in advance with a tape measure.
- The recorded indicators are transferred to film, with a tolerance of 1.5-2 cm for attaching it to tape.
- You can cut the material with a knife or scissors, because it is very pliable to cut.
- The protective paper layer is removed from the adhesive tape attached to the frame.
- First, the cut out area must be leaned against the upper horizontal plane of the tape and pressed carefully.
- Next, you need to pull it a little and press the edges of the film against the vertical strips of tape.
- In the lower part, the fastening process is identical to the previous ones. Thus, the film is fixed in the desired position and is ready to serve for a long time.
Recommendations in progress:
- Before completely sealing the window with film, you must thoroughly wash the glass.
- To ensure that no traces (fingerprints or other contaminants) remain on the canvas, work must be carried out with cotton gloves.
- If folds appear on the surface of the material during the process, this can be corrected using a regular hair dryer. To do this, it is necessary to spray the film with a stream of hot air escaping from it - which causes shrinkage.
- During the process of gluing the film, it is not recommended to stretch it too much, because the surface may burst. And it is almost impossible to repair it, unless you stick a strip of tape, but over time the defect will become noticeable.
- If the window is large enough, it is better to carry out the work together.
- Do not allow the film to sag or touch the glass - this will not provide good heat conservation.
What is needed to install thermal film?
To attach the thermal film, there is no need for the services of specialists; anyone can cope with this task. You should start by choosing a company and purchasing this material.
The standard kit, regardless of the manufacturer, includes the thermal film itself, as well as double-sided tape for attaching it.
Many suppliers also recommend purchasing tape with a desiccant applied to it. In addition, you will need a hair dryer, a stationery knife and scissors.
Product characteristics
Glass transmits about 35% of the heat from the room, so it is necessary to seal it. Externally, the protective film resembles culinary polyethylene, but it is made of polyester. The high-molecular structure allows the sun's rays to pass through and at the same time does not release heat from the room. The thin material becomes additional glass and functions as a large thermos.
Thanks to the transparent surface, the product is almost invisible on the window. There is no glare on it, since the film does not have a specular reflection. The maximum thickness of the material is 0.14 mm, while it can withstand tension. It does not react to chemical detergents, so they can be used to clean dirt.
The film does not attract dust and does not allow ultraviolet and infrared rays into the room, which can harm the health of humans and pets. The material is environmentally friendly and does not cause allergic reactions. The product has a small mass, and during heat treatment it shrinks.
Features of using polyurethane foam as insulation
To seal cracks and reduce heat loss, you can use ordinary polyurethane foam. It is extremely easy to use and allows you to obtain the highest quality thermal insulation
You just need to show maximum attention and accuracy during work in order to seal all existing cracks. After the foam has dried, its excess should be cut off with a sharp knife, and the insulation itself should be hidden with something
Polyurethane foam
To mask such thermal insulation, you can use homemade putty. To prepare it, you need to take part of the chalk and 2 times the amount of building plaster. Mix the ingredients, dilute the mixture with water to a semi-liquid state and spread on the foam. Of course, it will not be possible to completely hide traces of insulation, but at least the polyurethane foam will not be so conspicuous.
Thus, to independently insulate windows for the winter, you can use a wide variety of materials. Choose the most suitable and convenient option for you and get started. Good luck with your work and have a warm winter!
Good luck with your work and have a warm winter!
How to keep warm
In winter, most of the heat is lost through the windows. There are two ways to transfer thermal energy:
- Convection;
- IR radiation.
Convection cannot be avoided; the thermal conductivity of the window can be reduced. For this purpose, there are double-glazed windows. The more chambers and glasses, the less heat loss due to convection.
More than 99% of infrared radiation passes through glass. Due to it, the room cools down in winter. The amount of heat loss through windows is 25-40%. Of these, IR radiation accounts for 15-30%.
If you have an infrared heater installed, then a considerable part of its heat can escape through the double-glazed windows. Read more about the operating principle and types of infrared heaters in this publication.