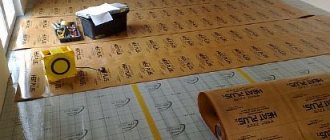
In private housing construction, the combination of “warm floor” with laminate is popular. At the same time, previously, electric cables (electric “warm floor”) and infrared films were mainly used for heating.
However, expensive electricity hinders the widespread use of such heating systems. And until recently, economical water-based “warm floors” were incompatible with laminate panels due to their low moisture resistance, the release of harmful substances when heated above 27oC, and the destruction of locking joints during sudden temperature changes.
Manufacturers of lamellas took into account the problem areas of their products and offered laminate flooring for “warm floors” made from water heating. This article is about how to make a “warm floor” with water heating under laminate with your own hands, comfortable, beautiful and durable.
Is water heated flooring compatible with laminate?
Until recently, professional builders refused to lay laminate flooring on a water-heated floor. There are several reasons for this:
- low thermal conductivity of the floor covering: the lamellas in combination with the substrate are a good heat insulator. As a result, heat was trapped below. This reduced the heating efficiency;
- Water heating does not have the ability to achieve strict temperature control, as a result of which the coolant can heat up to 35-40oC. This leads to two problems at once:
- deformation of the floor covering;
- the appearance of harmful fumes of formaldehyde resin in the room (emission begins at a temperature of 28-30oC).
- The slightest leak of coolant, however imperceptible, leads to swelling of the panels. Probably every home craftsman knows that moisture is the worst enemy of laminate flooring.
As a result of a series of experiments, the manufacturers of this flooring were able to achieve compatibility between water-heated floors and laminate flooring.
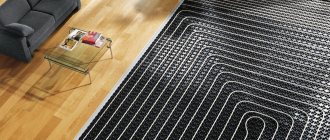
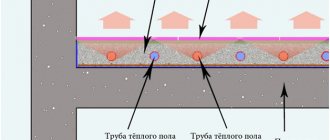
Scheme of a water-heated floor with laminate flooring.
Conclusion
There is nothing difficult in choosing a laminate for a heated floor. Look for appropriate labeling on packages of material and in operating instructions.
Even a layman can install laminate flooring on a heated floor.
Remember that laminate cannot be heated above 27 degrees. Therefore, a warm floor is only an auxiliary source of heat, but not the main one.
Strict adherence to all the tips described in the article guarantees a high-quality, durable and cozy floor on which you will want to lie down, and not just walk!
Which laminate to choose for water-heated floors
For a long time, the “warm floor” and the floor covering made of lamellas walked in parallel courses, without intersecting. Laminate manufacturers did not want to lose a significant market segment. As a result, floor coverings compatible with “warm floors” appeared on sale. It has completely different technical and operational characteristics, suitable for the operating conditions of underfloor heating systems. To navigate them, we advise you to look at the article “Which laminate to choose for a warm floor?”, which explains in detail which laminate is suitable for a “warm water floor”.
For those who have little time and desire to follow the link provided, we will list in a concentrated form the basic requirements for lamellas with a liquid coolant in a cement screed.
Thickness. The optimal thickness of the laminate for underfloor heating is 8 mm with a density of at least 900 kg/m3. This allows you to get a durable board with good thermal conductivity. Increasing density affects the price. She's taller. But both the strength and heat conductivity of the floor covering increase.
For information: there is no density information on the packaging. Sometimes the weight of one lamella or the entire package is written. Finding out the density figure yourself is not difficult: the volume of one panel is found by multiplying the thickness, width and length. Then the weight of one laminated board is determined. After this, the weight in kg is divided by the volume in m3.
Thermal conductivity. Information on thermal conductivity can be found on the insert. According to the European standard EN4725, the thermal resistance of laminate flooring for hydronic underfloor heating must not exceed 0.10 m2 x °K/W. On products of foreign manufacturers it is indicated by the inscription “thermal resistence”.
Strength. Laminate is available in different densities. Consequently, it has different service life, which is reflected by the “strength class” indicator. Indicated by two numbers. The first shows what rooms it is intended for:
- 2 - for residential;
- 3 - commercial.
The second is how durable laminated boards are. Under a warm floor you need a laminate of class 32-33.
Moisture resistance. When choosing lamellas you need to be careful. After all, there is a floor covering for infrared and electric floors, and there is one specifically for water ones. The inscriptions will help you figure it out. For water heating, the liner must have the inscription H2O or Warm Wasser. Black and brown pictograms with stylized pipes do not provide information about the type of “warm floor” that needs to be taken into account.
Environmental Safety. As the temperature rises, formaldehyde begins to release harmful fumes. In laminate flooring, chemical reactions in the resin are slowed down thanks to special additives. You can find out about their presence using pictograms (see photo). The designation E0 (NA) shows that up to +30oC there will be no harmful emissions. E1 claims that the emission of harmful substances is within sanitary standards.
The release of formaldehyde is within normal limits.
No formaldehyde.
The influence of high temperatures. Laminate does not like sudden changes in room temperature. And a “warm floor,” especially with water heating, can heat the floor covering up to +40oC. The ability of the lamellas to withstand overheating is indicated by the Latin letter B and the number 1.
Wear resistance. The last controlled indicator for water floor heating is wear resistance. Characterized by abrasion class. May be within AC1-AC5. The best option is AC4.
Wear resistance classes.
View of the castle. Until recently, experts did not pay attention to the type of laminate joint. Experience has shown that Click locks are better able to withstand sudden temperature changes.
Type of material. Under a warm floor, you can use a classic laminate made of fiberboard (in the English spelling HDF), vinyl, quartz vinyl and SPC laminate. There is a categorical ban on cork - it does not allow heat to pass through.
Determining thermal insulation properties
The technical characteristics of the laminate indicate a very important figure - the coefficient of thermal resistance. Pay attention to her! The higher this number, the higher the thermal insulation properties of the material. According to European EN standards, the total value of this coefficient for the final laminated coating over a heated floor should not exceed 0.15 m²*K/W. In this case, it is necessary to take into account the resistance of both the laminate and the substrate used. Let's say you purchased a laminate with a coefficient value of 0.051 m²*K/W, and a substrate with a coefficient value of 0.049 m²*K/W. Summing these two figures, you get a total calculated value of 0.1 m²*K/W, which is fully consistent with accepted European standards.
The resistance coefficient is directly dependent on the thickness and density of the laminate. That is, for a warm floor you need to choose a material with a lower density and a small thickness (recommended 8-10 mm). Even if the thermal resistance coefficient is slightly exceeded, the risk of overheating of both the lower surface of the laminate and the heated floor system significantly increases. Accordingly, this is fraught with damage to the floor covering and failure of the heated floor.
Which substrate is best to use?
The importance of the underlay when installing laminate flooring is described in detail here. But there is a special requirement for a laminate substrate under a warm water floor: the heat transfer resistance coefficient must be in the range of 0.04-0.06 m2*K/W. Only a substrate made of extruded polystyrene with mandatory perforation meets these parameters. Other types of underlying material (coniferous, cork) will not transmit heat upward. Or rather, they will, but poorly.
Perforated underlay for “warm floors”.
Required substrate thickness
The thickness of the substrate can be in the range of 1.5-3.0 mm. At the same time, the owners need to decide when choosing. Thinner material makes it possible to most effectively use the advantages of a water-heated floor, but it affects the durability of the floor covering if there are differences in height on the screed surface of 1 to 2 mm - the service life of the floor is significantly reduced. As the thickness of the substrate increases, the opposite happens: the durability of the laminate increases, and the transfer of heat from the coolant to the room worsens.
From the above, another conclusion follows: the surface of the screed should be smooth, close to ideal. Height differences of more than 2 mm are excluded. In principle, they can be covered with a thicker substrate, which is what is done when installing a simple floor. But then it will not be the room that will be heated, but the screed, due to the low thermal conductivity of the underlying layer. In addition, a thicker backing reduces the service life of the locking joints.
Panel connection types
The principle of laying slabs is almost the same for concrete and floor surfaces. Connection methods can be: glue and lock. The first option is not applicable in this case, since rigidly fixed panels are deformed when heated, so only interlocking “floating” installation is allowed.
- Click locks. Snap-on products ensuring high reliability of the connection. The planks are connected at an angle of 45° and then snapped into place. At the same time, a characteristic sound is heard, thanks to which the connection got its name. Even when heated, there are no gaps or deformations. The requirements for the quality of the base are moderate.
- “Lock” locks (drive-in). Tongue and groove connection. A perfectly level base is required. Any deformation may cause the connection to break, leading to the formation of gaps.
Compliance with the rules for choosing a substrate and laminate, the technology for laying them when doing DIY work and subsequent operation ensures the installation of a decoratively attractive and durable floor covering.
Materials and tools
To create a “warm floor” cake, from the ceiling to the floor covering, you need to buy the following materials:
- a set of water heated floors for laminate (boiler, collectors, electric pumps);
- pipes along with special fasteners;
- fittings for polypropylene or coupling-press for metal-plastic;
- roll waterproofing or mastic (only for concrete floors);
- insulation;
- damper tape;
- reinforcing metal mesh;
- metal profile for beacons;
- cement M300;
- sifted river sand;
- fiberglass fiber;
- plasticizers for cement-sand mortar;
- underlay for laminate;
- slats or wedges;
- laminate.
Tools you will need:
For preparatory work:
- perforator;
- level;
- hydraulic level;
- roulette;
- construction cord;
- trowel.
For laying pipes:
- grinder or hacksaw;
- wrench or adjustable wrench;
- soldering machine (needed for joining cross-linked polyethylene).
For the screed:
- concrete mixer (rented);
- bucket;
- rule;
- grinder (rent).
To lay laminate:
- jigsaw or hand saw for cutting laminated boards;
- mount;
- a block or a special metal bracket for padding the lamellas;
- wooden or cast rubber mallet;
- square;
- marker or construction pencil.
Pipe length calculation
The total length of the pipes is calculated by adding the length of each circuit. In turn, the number of circuits depends on the diameter of the pipe. Thus, through a 16-millimeter pipe, a pump of any power can pump water over a distance of 80-100 m (depending on the material of the pipes).
When this indicator is exceeded, a “locked loop” effect occurs - the movement of liquid stops due to the resistance of the pipe walls. Therefore, in large rooms, several circuits are installed. To simplify calculations, the pipe length for each room is determined, and then the number of circuits is determined. The calculation is carried out according to the formula:
L = S/P*1.05+(K*2) , where:
- L—pipe length in m;
- S—room area in m2;
- P - laying step in m (optimal - 0.2 m);
- K is the distance to the collector in m.
For information: a factor of 1.05 is used for the margin for radii and connections.
The value obtained after calculation is divided by the maximum possible length of the circuit for each type of pipe and rounded up. The calculation can be carried out in a simplified manner: multiply the area of the room by 5 - according to SNiP, there should be 5 m of pipes per 1 m2 of floor.
Installation procedure
Installation of laminated panels is carried out on a ready-made screed or flooring system.
- If the building design allows the installation of a water heating system in a concrete screed, then this option is usually chosen.
- In houses with wooden floors, the slabs have to be laid on a stacked structure, since they may not be able to withstand the weight of the concrete screed.
Attention! For both installation options, the base surface must be completely flat.
The process of installing screed on a heated floor system.
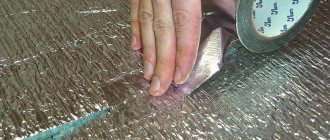
Before starting installation work, the concrete screed is treated with a primer to compact the top layer and remove dust. In this case, waterproofing measures are not required; the substrate is laid directly on the concrete. The substrate without the foil layer is laid on the walls with an overlap of 50 mm. The joints are taped with non-metallic tape.
Laminated panels are mounted on a substrate with a gap between them and the wall of 10 mm. It is recommended to start work from the far left corner of the room. To bandage the seams, the slabs are laid offset in rows. So, if in the first row a whole panel is first installed, then in the second row it is shortened by 30-40 cm.
After completing the work with the screed, the substrate under the laminate is laid directly on the concrete, then you can begin laying the laminate.
How to choose pipes for water heated floors
The efficiency of a liquid heating system largely depends on the choice of pipes. They must have:
- appropriate purpose;
- only two connections: at the input and output. Joining scraps inside the screed is not recommended - it minimizes the risk of leaks;
- optimal diameter for a given room;
- service life of at least 50 years;
- high-quality fastening and related materials;
- time-tested operating experience, which is typical of well-known brands.
Material
During operation, pipes are affected by two factors:
- the pressure of the screed when it expands when heated;
- corrosion processes under the influence of coolant.
This sharply narrows the range of pipe types recommended for water-heated floors. Can be used:
- polypropylene. The only drawback is the lack of flexibility, which makes installation difficult indoors. They are inexpensive. The connection is made using a welding machine, which is more reliable than fittings.
Polypropylene pipe.
- cross-linked polyethylene. Among the advantages: reasonable price and the absence of dirt on the inner walls - it does not accumulate. Disadvantages: strength and flexibility are lower than those of metal-plastic;
Pipe made of cross-linked polyethylene grades PE-X (left) PE-RT (right).
- metal-plastic. Connects using fittings. Installation is complex and expensive, which is compensated by high strength, flexibility and lack of waste during the assembly process.
Metal-plastic pipe.
Some experts advise using pipes made of copper and stainless steel. The experience of the USA, where copper has almost completely replaced other types of pipes from utilities, shows that inside the screed of copper pipes, cracks 2-3 cm long appear at the curves.
When installing heating without a screed, such problems are not observed. However, the cost of such materials is prohibitive. There are no positive or negative reviews on stainless steel pipes yet. Therefore, you should not take risks and buy polypropylene or metal-plastic.
Diameter
For heated floors, you can use pipes of different diameters: 16*2 mm, 18*2 mm, 20*2 mm and 25*2 mm. Let us immediately note that all contours must be made with pipes of the same geometry. Each of them has its own pros and cons. Thus, for small-diameter pipes, the amount of coolant per 1 linear meter is less, and therefore less fuel is needed for heating.
But large pipes have higher heat transfer. Overall, strengths and weaknesses are balanced. The only nuance that influences the choice is the turning radius. In small rooms, a pipe with a diameter of 20 mm cannot be laid in increments of 10-15 cm, which in most cases cannot be avoided. Therefore, 16 mm water pipelines are used in private houses and cottages.
Mistakes when installing heated floors without screed
Let's look at the main mistakes that can be made when installing heated floors.
- Measurements are not taken - they believe that it is not necessary to take measurements of the structure before and after installation. But during the measurements taken make it possible to identify and eliminate violations, otherwise they can lead to serious problems in the operation of the system.
- Haste during installation - all parts should be carefully secured so that you do not have to disassemble the structure later.
- Deep placement of temperature sensors - this should not be done, as they often break and require replacement.
- A strong desire to save money - the service life and functioning of the system is affected by the quality of the material; the better it is, the more expensive it is. Therefore, it is wiser to use high-quality products than to spend money later and waste time on repairing the system.
Anyone can make a warm floor on a polystyrene or wooden base. This design is not only an excellent solution for heating a room, but also a good option for sound insulation.
Technology for installing water-heated floors under laminate
The technology for installing a heated floor involves two stages of work: preparing the base and laying pipes with pouring screed.
Preparatory work
The step-by-step algorithm for preparing a floor for water heating includes the following operations:
- Using a tape measure, the possibility of installing a water-heated floor in the room is checked. To do this, measure the height of the ceiling from the concrete or wooden floor. From the resulting figure, 14 cm is subtracted for the floor pie and 220 cm for the height of the doors. There should be at least 10 cm left. If they are not there, you should forget about this heating option;
- the ceiling is repaired: cracks, chips, sinkholes are repaired, and damaged areas of plaster at the joints of panels are also restored. You can see how to do the work correctly here;
- The location in the house where the collector will be located is determined. A niche is cut out (cut down) for it;
- a collector is installed;
- the base of the floor is protected from moisture from below - waterproofing work is carried out. Detailed instructions can be found in the articles:
- “Waterproofing a floor in a wooden house”;
- "Waterproofing the floor before the screed."
- To prevent heat loss through the ceiling, the base of the floor is insulated. You can lay a simple heat insulator (foam plastic, extruded polystyrene foam, polyurethane foam boards, basalt mats) or lay it with bosses for pipe routing. You can see how to choose insulation and install it correctly on our website. The following articles are devoted to the problem:
- “Which insulation is better to choose for the floor?”;
- “Floor insulation with mineral wool.”
Attention: when laying a heat-insulating layer of extruded polystyrene foam slabs, they must be additionally secured to the ceiling with disc-shaped dowels - they float when the screed is poured.
Important: almost all sites that post materials about installing a water-heated floor mention the need to use foil insulation or aluminum foil. This is a publicity stunt aimed at increasing the cost of work. After all, the ability of foil to reflect heat rays in an opaque environment - in a screed - is completely lost. In addition, the alkaline environment of the CPR will completely “eat” the foil during the hydration process.
- damper tape 6-12 mm thick is glued to the wall;
A damper tape is attached to the wall.
- A metal reinforcing mesh is laid on top of the insulation. Wire thickness - 2-5 mm, cell size 50x50 mm.
Installation of heating pipes
Before starting the installation of the heating itself, you need to decide on two parameters: how to lay the pipes in the circuit and the distance (pitch) between them.
Methods for laying the contour
There are several ways to lay out a contour. And each of them has its own strengths and weaknesses.
Snake. The simple snake installation option is a plus. The downside is a significant temperature difference at the inlet and outlet of the coolant: the liquid cools down as it passes through the pipe, which is natural. Therefore, there is a significant temperature difference in different parts of the room.
Snake pipe laying.
"Snail". Here everything is the opposite: it is difficult to lay, but the floor temperature is almost the same everywhere (there are differences, but they are leveled out by the body of the screed). In practice, in 90% of cases this is the method used.
Snail styling.
Double snake. An even more complex way of laying out pipes. But the heating of the floor is uniform over the entire area.
Pipe laying methods.
Combined. Near the walls the installation is carried out with a snake, in the middle of the room with a snail. The method is complex, but it allows the coil with the pipe to be used as efficiently as possible (the least amount of unused residue) and ensures a comfortable heating mode.
Laying step
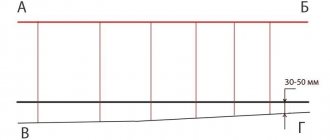
The laying step is another important parameter when installing a “warm floor” with liquid coolant. It can be from 100 to 250 mm. When laying in a snake pattern on a steep radius, pipes may break. Therefore, the pitch there is different - 150-250 mm. Experience shows:
- near the outer walls, pipes should be laid apart from each other at a distance of 100-150 mm. In this case, there should be 5-6 rows of coolant in the zone;
- in the center of the room you can use a step of 200-250 mm;
- in bathrooms and corridors - 150 mm.
Pipe laying
When laying with a simple snake, work begins from the outer wall - the coolant is hotter. The first row is laid at a distance of 150 mm from the outer wall. Pitch, for pipes with a diameter of 16 mm - 150 mm. Other diameters - 200 mm. The length of the pipe in the circuit should not exceed 80-100 m.
When laying “snail”, the distance between the pipes near the walls is 10 cm, on the remaining area - 20 cm. Each row is secured with special brackets, if the insulation does not have special bosses for fixing the pipes.
Staples for fastening pipes.
After laying out, the ends of the pipes are attached to the collector. It is important here not to confuse the entrance and exit, especially when laying with a snake. The tightness of all connections is checked - the boiler is started, hot liquid is driven through the pipes.
The process of installing a water-heated floor is completed by pouring the screed. There are many nuances and secrets here, and therefore we advise you to view the work “Screed for a warm water floor.” In the same work you can read in detail about laying water heating pipes on a wooden floor base.
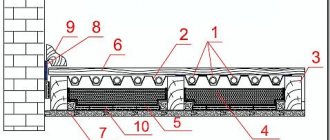
Briefly about the method. Two laying systems are used:
- polystyrene boards with bosses;
- wooden modules or slats.
Installation on bosses is simple and convenient: the slabs are laid on the insulation, and pipes are recessed into the grooves between the protrusions (bosses). The cost of the work is lower than when pouring a screed, but there is a drawback: when the heating is temporarily turned off, the room quickly cools down, which does not happen with a screed - it accumulates heat and then slowly releases it into the room. It's like a brick stove - you heat it once and it's warm for almost a day.
Laying pipes between bosses.
Modules are available for sale. But you can do without them by using strips 20 mm thick (for 16*2 pipes) and 130 mm wide (for a pitch of 150 mm). The work is completed by laying plywood, fiberboard, gypsum fiber board or OSB sheets on the bosses or strips - they serve as the basis for the floor covering.
Preparation for laying laminated panels
After installing the heated floor pipes into the screed, the heating of the system is turned on, which is stopped on the day of delivery of the laminated panels. Laminate does not tolerate sudden temperature fluctuations, so before laying it, it is left for three days in the room in which installation will take place.
After completion of installation work, the temperature in the room should be maintained at approximately the same level for three days (at least). With the beginning of the heating season, the temperature of the underfloor heating is increased gradually - from 15-18°C by about 3°C per day, until the optimal temperature regime is reached. Finish heating, gradually reducing the temperature to 15-18°C.
The nuances of further laying laminate
Laying laminate flooring on a warm water floor is carried out using classical technology:
- a waterproofing film is laid over the screed or flooring, overlapping and extending onto the walls;
- a substrate is attached on top of the film;
- The final floor covering is installed - laminate.
Finally. Warm water floors are used mainly in private houses and cottages (for apartments you need to obtain many permits and it is not a fact that in the end they will be allowed). This allows for very convenient and comfortable heating of the building. The ability to lay laminate floors on top of coolant pipes has expanded these possibilities. You can do all the work yourself, saving a lot of money.
Special markings
For finishing that is intended for installation on a heating system, special markings are used. The icons are different. We list all their modifications.
- Drawing showing a heating element. It is stylized in the form of the letters U or S.
- Vertical arrows pointing upward, symbolizing rising heated air.
- H2O, the chemical formula of water, indicates compatibility with hydronic heating.
The possibility of use over a heated floor is indicated by the inscriptions located on the packaging: “Underfloor heating” or “Warmwasser”. Near the marking, the manufacturer must indicate the type of heating system compatible with the finish and the operating temperature range.
Instagram maisterniapidlogi
Instagram maisterniapidlogi
- Floor
What material is better to make the floor in the hallway from: 6 possible options
Load class
The grade of a laminate indicates its ability to withstand wear and tear. The material can have 21-23 and 31-33 classes. Manufacturers advise using material with the first three classes for home use, and the other three for commercial premises. Of course, it will be better for home owners if laminate boards of classes 31-33 are installed.
Load classes
A nuance - the higher the class, the greater the density of the material, and the less heat it transmits. Considering this feature, each owner must decide for himself what is more important - savings on heating or the long “life” of the floor.
Laminate of a certain class is selected depending on the type of living area of the house. The kitchen, for example, is a place where the whole family often gathers, and where factors that can damage the surface of the coating constantly appear. Here, the best option is to lay a coating of 32-33 classes. To increase heating efficiency, pipes should be filled with sand-cement mortar. To protect the material from water, the joints are filled with sealant.
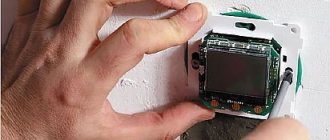
Class 23, 31 are suitable for a bathroom. Here you need to use an “aqua laminate” and a regulation sensor, which will ensure smooth heating and will not allow the main element to heat up to a temperature exceeding 29 degrees Celsius. This sensor should be used in any room.
Class 21 building materials are used for the bedroom. It is appropriate to lay material with a matte surface (it has a sound-absorbing and antistatic effect). Material with such a surface is also installed in the hallway and children's room. For these rooms, it is preferable to lay laminate flooring of 31-33 classes.