When choosing a warm floor for your home, you will most likely come across a control sensor. The heated floor control panel will allow you to save electricity and also regulate the floor temperature, preventing overheating and cold, which will significantly increase the level of comfort in your apartment.
There are many options for such sensors on the market with different functionality, so it can be difficult to settle on just one option. In this article we will help you understand this issue.
Thermostats for electric floors
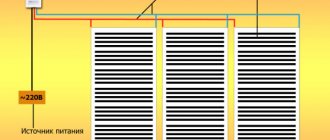
The heated floor is controlled by an electric unit, on which you can configure the operation of the heating elements. Typically, you can turn the heat on and off, adjust the temperature, and set how often the thermocouples turn on and off.
In total, there are several types of electric floor control panels, which differ in the location and method of attachment, appearance, method of interaction with a person and the number of connected sensors.
Let's divide them according to the principle of their operation:
- An electronic-mechanical regulator
is the easiest way to control a warm electric floor. The range of functions of such a device is quite meager: heating control and turning off the electric floor. Control is done manually using a wheel, like on an iron, connected to a regulator that maintains a constant floor temperature. Due to its simplicity, such a “remote control” is one of the best solutions, because its price is quite low, and breakdowns occur rarely and are easily fixed. - The digital control panel
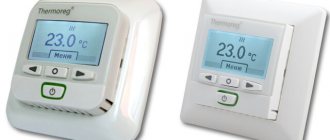
works the same as the previous version, but differs in the control method: the user sets the desired temperature not with a wheel, but with buttons or a sensor. The control unit for heated floors is also equipped with electrical sensors that measure the temperature of the floor and air in the apartment, after which they transmit the collected information to thermostats. - A programmable thermostat
is the most modern development on the heating equipment market. This regulator is equipped with several temperature sensors that transmit information to the controller, which is capable of maintaining different temperatures in individual rooms or areas organized by different heating circuits. The most modern programmable thermostats can be controlled via the Internet, for example, you can leave the house, turning off the heating, and when you return, turn it on again from your smartphone so that the floor warms up before you arrive.
When choosing an option for yourself, you should give preference to a digital control panel, because adjusting the temperature from it is quite convenient and its price is also not high, compared to a programmable thermostat, the functions of which not everyone needs. Digital panels have various design solutions, so they can fit into any apartment, for example, as in the photo.
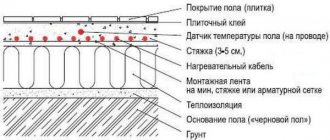
Installation diagram
Water heated floors today are a common system for heating a home; different schemes are used for its arrangement.
Installation of underfloor heating with the installation of a three-way thermostatic valve is suitable for mixed heating systems. Radiator (water temperature 80 degrees) and underfloor heating (the liquid should not heat above 50 degrees).
The question arises - how to cool the water from 80 to 50 degrees. This is what the three-way thermostatic valve is designed for. It is attached to the supply pipe, and a circulation pump is connected behind it.
The working process is as follows:
- waste cooled coolant is supplied from the return pipe;
- in the mixing chamber it is mixed with the hot liquid to a predetermined level;
- then the water flows into the branches of the floor.
The disadvantage of this method is the inability to dose the waste water mixture, and this leads to the entry of overheated or underheated coolant into the main line. Plus - easy installation and low price of equipment.
There are two installation schemes for a water heating floor with a three-way thermostatic valve; they differ in the direction of flow:
T-shaped (symmetrical) - heated and cold coolant is supplied from the sides, water is mixed in the center of the valve body, and comes out in the middle.
L-shaped or asymmetrical - the heated liquid enters from the side, and the cooled liquid from below. Mixed water comes out from the side, opposite the hot one.
Both valves are compact and widely used in warm hydrofloors.
Selecting a thermostat
To choose the right thermostat for your apartment, you must pay attention to your own wishes, as well as to ensure that the parameters of the sensors and heating elements suit each other.
What you should pay attention to:
- The most important thing is to match the power of the floor and the sensor. If the sensor does not provide enough power to the floor, then you will not be able to heat it to the desired temperature. To avoid this, first of all, pay attention to the indicators when purchasing. However, sometimes you have to install several sensors at once on a heated floor in one room, for example, you can connect the programmers to one network and create a power of 3 kW. In large rooms it happens that even a power of 3 kW is not enough, so in this case you will have to connect several regulators separately.
- The type of installation is also an important aspect. If you are ready to cut a hole in the wall, then a built-in controller that is embedded in the wall is suitable for you, and if you do not want to spoil the walls, then simply install a box with a thermostat. All other settings, such as connection to heating elements, are specified in the instructions that come with the sensor.
- Functionality is something that everyone decides for themselves. As mentioned above, control units with little functionality are often used, but if you want to control the floor remotely and program it for a long period of time, for example, a week, then it would be better to purchase a more expensive option - a programmer.
- Appearance is the final factor, which is determined by the style of the room. In the store you can find many different solutions, differing in color, shape, etc., however, most often, control panels look like small sockets.
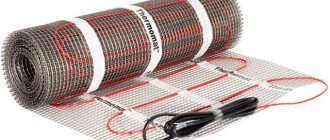
It is worth noting that you can do without a thermostat at all, but for this you will have to use a special self-regulating heating cable, otherwise your floor will quickly become unusable without a temperature sensor (read: “How to choose and install a temperature sensor for a heated floor”).
Signs of a faulty refrigerator temperature sensor
The following ghosts indicate problems with the sensor.
The refrigerator works and does not turn off
In this case, the functionality of the thermostat is checked without removing it. To do this you need:
- Unplug the plug from the socket.
- Empty the chambers of food.
- Set the knob to the maximum cold position or start the fast freezing mode, if available.
- Place a thermometer on the middle shelf of the refrigerator (not the freezer!), preferably one that can measure sub-zero temperatures.
- Turn on the refrigerator with empty compartments.
- After a couple of hours, remove the thermometer. It should show 6 - 7C. If the readings are different, the thermostat will need to be replaced.
So that the check does not take a lot of time, you need to get to the thermal relay and move the plate located near the pin on which the handle is placed. If there are no clicks when it moves or it does not move, the thermostat is changing.
Refrigerator won't turn on
The cause of this malfunction may be not only the thermal relay, but also a burnt-out compressor motor or a breakdown of the start-protection relay. But before calling a technician, you should check that the thermostat is working properly. To do this, you need to remove the casing, having first disconnected the unit from the power supply, and understand the wires.
In older models, only a couple of wires fit to the thermal relay terminals. They are removed and connected to each other with a piece of wire or even a paper clip, bending it appropriately.
The wires were connected to each other and the compressor started working. This means the thermostat is faulty. And if the compressor does not start when it closes, it means the start-protection relay is faulty or the engine has burned out. Therefore, it is impossible to do without a master.
In modern units, 4 multi-colored wires are connected to the thermostat:
the wire from the compressor motor is orange, red or black;
- from the fork - brown;
- from the signal light - white, yellow or green;
- the ground wire is yellow with a green stripe.
You need to close the first 3 wires, and then as indicated above.
Professionals consider it more reliable to check with a multimeter, which can be done by a home craftsman. The thermostat will have to be removed. If the multimeter analog switch is set to the position of measuring low resistances, and the arrow with the probes closed is set to “0” with the wheel on the left side. On a digital device, the switch is set to “200”.
In order for the test to be carried out in conditions as close as possible to the workers, the end of the bellows tube is placed in water with ice for a couple of minutes. Then measure the resistance between the terminals. If the needle on an analog multimeter goes off scale, but “1” is displayed on a digital one, the thermostat is sent to the landfill.
The appearance of ice on the walls of the refrigerator
This phenomenon is also observed with other malfunctions, but the check should begin with the thermostat. To do this, you need to perform the actions indicated for a unit that does not turn off. When the thermometer readings are 5 - 7 C, the temperature setting knob is turned to the left until the compressor stops.
If the compressor stops, the thermostat is working properly. Otherwise it is changed. When turned off, the unit is left to work for 5 - 6 hours with empty shelves. At this time, the time between starting and stopping the unit is measured. During normal operation, the duration of the intervals is about 40 minutes. At lower values, turning the knob to the right adds cold. If this does not help, change the thermostat.
Thermostat location
Where to place the thermostat is an independent decision, but it is worth mentioning some rules for installing the thermostat:
- You can choose the height of the controller yourself, because it absolutely does not affect the operation of the sensor. Most often, the regulator is installed near the floor or next to switches.
- The strictest rule is the prohibition on installing the regulator in wet rooms, for example, in the bathroom. If you have installed a heated floor in the bathroom, then it is recommended to take the control unit out into the corridor, running the cables to the heating elements through the wall.
- The rules for connecting to the network are individual for each model, but they are all similar. Each model has several terminals for connecting heating elements, power and sensors. There are models with a power cable already connected, in which case its length will be from two to three meters, which is quite enough to connect to the junction box.
All additional installation rules are usually described in the instructions, so it is a must-read; in addition, you can read in it about how to use heated floors.
Types and possible functions of thermostats
There are many types of such devices. It is customary to classify them according to several characteristics, but the most understandable is the classification according to the principle of action. According to it, the following types of devices can be distinguished:
Mechanical thermostats for heated floors
They are considered the easiest to manage and affordable. All settings are set and changed manually. The main disadvantage of this type of device is the inaccuracy of temperature indicators, which may differ from real ones by 3-5°C.
Electronic thermostats for heated floors
The cost of such devices is higher, but they have greater functionality. In such devices, you can set the floor temperature to decrease or increase at a certain time of the day. If the temperature outside the window has changed, then there is no need to adjust the indicators. Control can be carried out using a remote control.
Main problems and their solutions
Analyzing user reviews, we can conclude that control panels have two main failures:
- The most common breakdown is the incorrect functioning of the control unit or its complete failure. You can diagnose it yourself using a tester: apply current to the receiving terminal and measure it at the other terminal, which supplies energy to the heating element. If there is no current, this means that the sensor should be sent for repair, because you cannot fix this breakdown on your own.
- The second common failure is the failure or incorrect operation of the temperature sensor. To make sure it is faulty, use a multimeter and measure the resistance of the sensor. Normal values are indicated in the instructions (usually 5-45 kOhm). If the indicators do not match, then the temperature sensors should be replaced with new ones.
Conclusion
In conclusion, it is worth saying that a heated floor control sensor is an irreplaceable thing. The control unit not only helps to adjust the floor heating, but also saves electricity. Programmable control panels save the most money, but their price is significantly higher than models of other classes.
Large savings (up to 30%) occur due to the fact that, when choosing the desired floor temperature, you do not direct excess voltage to the heating elements, and, accordingly, do not waste excess energy.
A floor thermostat is used to properly control a modern heating system, which must constantly maintain a comfortable temperature in the house. The work is carried out using an element called a remote temperature sensor, which ensures convenient control of floor and air heating.
Review Reviews
If you believe real reviews from buyers of heaters from, these devices have many useful qualities. They fully meet the expectations of owners due to their high quality and efficiency.
The main advantages include a fairly budget price. Thanks to this characteristic, TeplEco branded heaters can be purchased by representatives of almost all social strata. Another positive feature that consumers highlight is its light weight. The heater is quite easy to transport from place to place; one person can handle it.
The high level of customer service is also noted, which is provided by both employees of official representative offices and the TeplEko online store. Consultants are always ready to help if the buyer for some reason does not understand why the device does not work, answering all questions in an online consultation or by calling the hotline. If the heater breaks down and is still under warranty, the period of which is stated in the warranty card, then anyone can contact the company’s service center without any problems. Specialists will diagnose the device and, if necessary, make repairs free of charge.
But in order not to be refused service, it is important not to attempt to repair the heater yourself during the entire warranty period. Otherwise, the device will not be accepted for repair.
Negative comments regarding devices are quite rare. Most often, they are associated with individual shortcomings of the units (defects or defects) or caused by users’ failure to follow operating instructions.
For information on installing TeplEco heaters in a country house, see the following video.
Types of thermostats for heated floors
When installing heated floors, the thermostat should be selected depending on the size of the heated area and the preferred power.
Mechanical thermostat
The easiest devices to control are mechanical thermostats. They have a convenient control panel, which is often in the form of a rotary dial with a printed temperature scale.
Mechanical thermostats do not consume electricity to operate, so their use seems more profitable. Some devices have a timer with which you can set the desired start time for heating.
The room temperature is determined using a built-in bimetallic temperature sensor. Its work is based on the properties of gases or bimetallic elements: when the ambient temperature changes, they will change shape or volume. When the air temperature reaches the set temperature, the circuit opens or closes. Such regulators have an on/off hysteresis so that when the temperature set point is reached, the thermostat does not click back and forth.
Electronic thermostat
Electronic thermostats without programming capabilities have gained no less popularity than mechanical ones. Thanks to them, it is possible to control the heat in rooms with an accuracy of 0.5°C. This device is equipped with a convenient display that displays data on the floor temperature, both current and set.
If the system is turned on, this is indicated by a special sign appearing on the thermostat screen. The display also displays technical messages; if faults are detected in the floor heating system, the corresponding symbols are displayed. Control is carried out using keys located on the outside of the panel.
The heating elements are powered from the same source as mechanical thermostats. Using electronic devices, you can change the cycles of heating on and off, which saves resources and money to pay for them. The devices can operate until the homeowners turn them off.
Programmable thermostat
If the area to be heated is large enough, the ability to save energy is important. This problem can be easily solved using a thermostat with programming, which is used both when using film for film heated floors and with cable systems.
The operating principle of a programmable type thermostat is almost no different from the circuit used in simple devices. The main difference is the addition of the ability to configure operating modes by day. Temperature maintenance intervals can be set for any day of the week. This makes it possible to reduce energy costs by up to 70%.
For the operation of the device, periods are assigned when it is necessary to maintain heating at maximum power, or time is set for shutdowns. Process regulation occurs automatically. You can make settings for weekdays and weekends separately. The established cycle will be repeated until the owners change the settings.
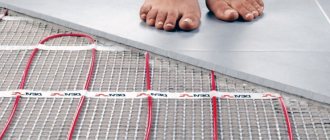
Thermostat for electric heated floors
Thermostats are equipped with a convenient sensor, which makes it possible to maintain the desired temperature by periodically turning the circuit on and off. When the temperature increases, the thermostat triggers a relay. An infrared floor thermostat, powered from the mains, works on a similar principle.
Most often, when assembling a heating system, a suitable thermostat is included in the kit. If the system is not equipped with such a device, you can buy it. Such devices are produced as standard - they are suitable for most commercially available systems.
All thermostats are equipped with external and internal temperature sensors. The internal one is designed to measure the temperature of the floors, the external one helps to control the heating of the air in the room.
The temperature sensor is a regular resistance thermometer. The operating principle of such sensors is based on the dependence of the resistance of the sensor on the temperature of the ambient air in which it is located. For example, for a Pt100 type temperature sensor at a temperature of 0 °C its resistance will be 100 Ohms, similarly for a 50M sensor, only 50 Ohms. As the temperature increases, the resistance will increase.
Then the thermostat converts this measured resistance into degrees and, based on the set setting for regulation, performs the necessary actions, turning on or off the voltage to the heated floor.
Important! The type of temperature sensor must match the selected thermostat for the heated floor. Otherwise, the sensor resistance value will not be correct and the regulation will not be correct.
When choosing a thermostat, you need to take into account what the maximum power value of the floor is. If you neglect this criterion, the power will not be enough and a sharp drop in temperature will occur. If necessary, devices can be connected as a single network to provide power exceeding 3 kW. Installation is carried out at different ends of the room separately.
Removing the refrigerator temperature sensor
If the refrigerator does not turn on at all, it will be impossible to carry out the diagnostics described above. The probable cause of the breakdown is an electrical failure of this element.
But a problem can also be a compressor malfunction, for example, a burnt out motor winding. To determine whether the thermostat needs to be replaced, it will have to be removed from the refrigerator for examination.
Typically, the thermostat is located next to the control knob, which is used to set the air temperature in the refrigerator compartment. Double-chamber models are equipped with a set of two such handles
First you need to unplug the refrigerator. Now you should find the place where it is located, as described earlier. Usually you need to remove the adjustment knob, remove the fasteners and remove the protective elements.
Then you need to carefully inspect the device, paying close attention to the wires through which the power is supplied.
All of them have different color markings depending on their purpose. Typically, a yellow wire with a green stripe is used for grounding. This cable should be left alone, but all the others should be disconnected and shorted together.
Now the refrigerator is plugged in again. If the device still does not turn on, the thermostat is probably working properly, but there are serious problems with the compressor.
If the refrigerator does not turn on at all, the cause may be not only a malfunction of the thermostat, but also a breakdown of the compressor, for example, a burnt-out motor winding
If the engine starts working, we can clearly conclude that the relay needs to be replaced. Before starting work, it doesn’t hurt to arm yourself with a smartphone or camera in order to consistently record all operations.
When installing a new thermostat, these pictures can be very helpful, especially for beginners.
You need to clearly remember which cable core was used for what purpose. Typically, a black, orange or red wire is used to connect the thermal relay to the electric motor.
A brown wire leads to zero, a yellow-green wire provides grounding, and a pure yellow, white or green wire is connected to an indicator light.
To connect the thermal relay, wires with different color markings are used; you need to remember the purpose of each wire so as not to get confused during reassembly
Sometimes removing a damaged regulator can be difficult, especially when it is placed outdoors. For example, in some Atlant refrigerator models you have to completely remove the chamber door from its hinges.
To do this, you need to remove the trim that is installed above the top hinge and unscrew the bolts hidden under it.
Before removing the adjustment knob, you also have to remove the plugs and unscrew the fasteners. All these operations must be done carefully.
It is better to store fasteners and linings in a small container so that they do not get lost. The thermostat itself is usually screwed to the bracket; it must be carefully removed, unfastened and removed.
If the thermostat is located inside the refrigerator compartment, it is usually hidden under a plastic casing, where a lamp for illumination can also be mounted
A new thermostat is installed in its place, following the reverse assembly order. Sometimes the breakdown of the thermostat is associated with a malfunction of the so-called capillary tube or bellows. If you replace only this element, the relay can be left.
To perform this procedure, you will have to remove the thermal relay, following the method described above. The bellows must be disconnected from the evaporator and carefully removed from the device body.
Now a new capillary tube is installed, connected to the evaporator, and the relay is mounted in its original place, and the disconnected wires are connected.
How to choose a thermostat for a heated floor
Without a correctly selected temperature controller, full operation of the heating structure is impossible. With fully equipped heating systems, you can save both electrical energy and money. The thermostat for a heated floor performs simple tasks - it turns the heating on or off at a pre-selected time. The function can also be carried out in accordance with the readings of the device.
When choosing a control device for integration into the heating system, you need to take into account the power - it must correspond to the same indicator for the heating structure. Not only the comfort in the room, but also the safety of the floor covering depends on which thermostat is installed and how it works.
Among the models of thermostats, the following groups are distinguished:
- Devices that make it possible to save money when working - they help reduce energy consumption if the homeowners are away for some time. During this period, the heating power is slightly reduced.
- Devices with the ability to program the floor heating temperature sensor. Using this function allows you to set the period when the room will be heated at the required intensity. The command given by the timer is transmitted to the control device, after which it will maintain the set temperature at the desired level.
- Intelligent, capable of programming operating modes, where economical and heating are alternately used. When using such a device, the command from it at the right time goes directly to the heating element. The time is determined depending on the user's preset settings or changes in the atmosphere outside.
- Devices that include a built-in limit sensor. It helps protect both the floor covering and the heating element from overheating. The use of such a device is especially beneficial if the floor has laminate flooring that cannot withstand large temperature changes.
The temperature control device is selected based on the area of the room. So, for a small room, a simple device is enough, the operation of which does not provide for programming capabilities. For large areas, it is necessary to look for more complex devices that provide programming capabilities. For such purposes, thermostats with special sensors that are installed inside the floor can be used.
Adjustment devices can be overhead or built-in - information about this is contained in the instructions attached to the product. When choosing, you need to take into account the type of control, evaluate the ease of installation, configuration and use for existing conditions.
Refrigerator temperature sensor location
The location of the regulator depends on the refrigerator model. Information about its structure and location is contained in the operating instructions for the household appliance. It is usually located next to the temperature control knob. In old household appliances, the thermostat is installed inside the chamber, under the light bulb, and covered with a protective housing. To remove the part, remove the handle by pulling it towards you. Then unscrew the screws and dismantle the housing.
In modern models, the thermostat is located outside, usually above the door. If it needs to be removed, first also remove the adjustment knob. Then unscrew the bolts and remove the panel with the light bulb, after which the regulator is removed.
Setting up thermostats
Different models of thermostats can operate in automatic or manual mode. Programmable electronic devices allow you to organize a mode for the days of the week or time of day that users need. When installing thermostats, advanced adjustments or calibrations may be performed. One of the temperature sensors can be turned off if necessary.
The manufacturer indicates the actions that must be performed during adjustment, as well as the installation location of the sensors, in the instruction manual. You can lock the device to prevent anyone (such as children) from accidentally changing the settings.
In our climate, heating a home with warm floors is becoming increasingly popular. This system must have a thermostat for a water heated floor, since such a heating system is very demanding on the degree of heating.
Regardless of whether heating using a water floor is the main or auxiliary method of maintaining acceptable temperature conditions in the room, it is subject to specific requirements.
The fact is that it must have a limited maximum temperature. In any room there is always dust and it is located, in accordance with the laws of physics, on the floor. It has been established that when the surface of a heated floor is heated, convection currents of heated air are formed.
If the heating exceeds 30 degrees Celsius, then air currents raise dust, and we have to breathe it. This circumstance does not have a favorable effect on the general condition of the human body, as a result of which thermostats began to be used to maintain the desired temperature.
To control the temperature regime, a thermostat for the water floor is connected, which belongs to the control devices.
Setting the time and date
First, set the time: To do this, press the “book” and “up” buttons simultaneously and hold for 5 seconds. We go to the menu, everything is intuitive here: - setting the clock “up” “down” switching “book”. Also at the bottom you need to put the desired day of the week, there is a gradation from 1 to 7, where 1 is Monday, 7 is Sunday. After setting, press the “power” button.
Device and principle of operation
The comfort of staying indoors largely depends on the heating system used. The temperature of the water heated floor is controlled using special devices - thermostats.
Many designs of such systems are used, but in most cases they use only a few fundamentally different adjustment methods.
Watch video - setup process
But, before considering the operating principle and design of thermostats, you need to understand the object of regulation.
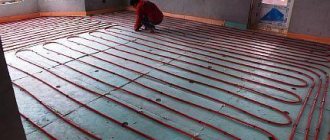
What is heating wiring
Heating a room with a water floor can be done in various ways. One of them is the use of heat from heated water, which acts as a coolant. The transmission is carried out through pipes. Previously, steel pipes were mainly used for heating; now they have been replaced by modern ones made of plastic materials.
The heating circuit can be located along the walls in the form of radiators, or it can be located under the surface of the floor, heating it and the air in the room.
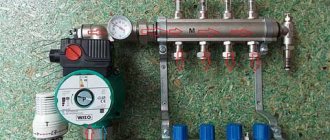
Hot water or antifreeze is heated in the boiler, after which, using a circulation pump, it is supplied to the heating circuit of the water floor.
Passing through its pipes, the coolant transfers heat into the enclosed surrounding space, heating the surface. The cooled liquid is returned to the boiler system. Depending on the temperature of the “return” in the mixing unit, it is heated or cooled by mixing in colder water from the tank.
And this is where a thermostat is installed, reacting to the amount of heating of the return flow and giving a command to perform one or another action.
In circuits with heated floors, which are connected by a separate circuit, a thermostat is installed for each of them, since they all have their own thermal regime. And the radiator heating circuits heat up to a temperature almost twice as high as for a warm floor.
How does the principle of temperature control work?
The main elements of heating control are servos, temperature sensors and thermostats. This composition of the equipment allows the temperature of the water heated floor to be adjusted steplessly in continuous automatic mode. This happens as follows:
- If a signal about insufficient temperature is received from the temperature sensor, the servo drive opens the valve and more hot water enters the heating circuit.
- When the coolant overheats, the cooled water mixing valve opens, reducing the degree of heating in the circuit.
- However, manual adjustment is also possible by setting the tap to a certain position. But this method requires constant visual monitoring, since the factors on which the heating mode depends change repeatedly during the day. Despite the relative cheapness of such devices, they are very inconvenient to use, since each condition in the room requires intervention in the heating operation.
Adjustment options
Watch video - adjusting the power of the temperature sensor unit
Thermostats in the heating system can regulate the following parameters:
- The degree of heating of the floor covering. In this case, the heating sensor is installed in close proximity to it. Such a heated floor device is best suited for small rooms and low-power heating circuits that are used only as auxiliary ones, in particular for heated floors.
- Room air temperature - with this control scheme, sensors are used that are mounted directly in the thermostat housing. Correct operation of such a device can only be achieved if all the requirements for insulation of the heated building are met. Otherwise, it is difficult to achieve efficient heating operation - significant energy losses are inevitable. A properly built home with an extensive heating system and thermostat can provide up to 30% resource savings.
- Combined control systems, in which water heated floor temperature sensors are installed both in the heated room and on the mixing unit system. The parameters are adjusted to ensure the most comfortable temperature in the house. Such equipment with a thermostat is used in large rooms. Both sensors or one of them can be used for control.
Child lock
The last thing I would like to note is the blocking from “moving children”. If you have configured the thermostat as needed, you can “lock” it, just press the “up” and “down” keys simultaneously for five seconds, a lock icon will appear (unlock in the same way).
Guys, that's all. These are the basic settings, sorry if it’s not very clear. For this, I also created a video version, I simply “chewed” the information there, so let’s take a look.
Types of thermostats
Watch the video - review of sensors for water floors
To create these devices, various principles and design solutions are used. Let's look at them.
- A mechanical thermostat for water heated floors is the simplest, most reliable and durable device. The air heating is adjusted using a rotary handle; the temperature scale is applied to a durable plastic case.
Some manufacturers install an open-closed valve on the thermostat. The disadvantage of this device is the need for constant monitoring - it only works in manual adjustment mode.
Some manufacturers allow serious inaccuracies in the calibration of the temperature scale, so it is necessary to additionally check the device using an accurate calibrated thermometer.
- For a touch-sensitive floor heating remote temperature controller, control and adjustments are performed from the corresponding panel or remote control. These models provide more accurate and reliable heating control, but in some cases these indicators depend on the manufacturer. You should not consider the price of the device as the main selection parameter; in some cases this approach is not justified.
- Electronic thermostats are not much different in functionality from touch devices, but they have a more convenient display.
- Programmable thermostats are convenient because they allow you to independently create heating control programs.
Such a device allows settings for a day, a week, as well as the ability to operate in automatic mode with support for an economical mode when people are away from the house. This allows you to save up to a third of your costs on energy resources.
Such devices allow you to automatically maintain the temperature in individual circuits of a complexly branched heating system with water heated floors. The disadvantages of the device include the high cost and complexity of adjustments. Before commissioning, you need to carefully study the instructions for connection, installation and settings; errors lead to failure of a complex, expensive system.
- Radio-controlled sensors can be considered exclusive due to their high cost. When using them, there are no low-voltage control circuits, since adjustments are made via a radio signal. Each device is equipped with a radio transmitter and a radio receiver for signals that control the operation of the servos. Such devices may be appropriate in luxury cottages to regulate the temperature of a warm water floor if the owners do not want to have bundles of control circuit wires.
Possible faults
During operation, the user may encounter typical thermostat malfunctions. The most common failure is considered to be a refusal to turn on - the control indicator does not light up or the entire screen does not light up. In this case, you need to check the power connection. The diagram is indicated on the end of the thermostat. Voltage must be present at the corresponding terminals - phase and zero. If it is not there, then the problem is not in the underfloor heating system itself, but in the wires or in the distribution panel.
Checking for faults
If, even though there is an uninterruptible power supply, the display and indication still do not light up, then most likely the thermostat has failed. You need to send it to a service center for diagnostics and repair.
There is another option - the regulator lights up, all the buttons are turned on, but the device does not enter operating mode. In this case, you can set the underfloor heating temperature to a higher temperature so that it heats up above the current room temperature.
Thus, connecting a thermostat for a heated floor is not particularly difficult. Questions may arise with connecting the wires, but this is easily resolved since the connection diagram is indicated on the device body. If you strictly follow the instructions from the manufacturer and the advice of professionals, you can easily connect the thermostat and enjoy the adjustable operation of a water or electric heated floor.
Average score of ratings is more than 0
Share link
Comments There are no comments yet, but you could be the first...
How to regulate the temperature in the house - 3 ways and determining the optimal mode
The main task of maintaining temperature conditions is to create comfortable living conditions, subject to optimal use of resources. This can be achieved in several ways.
The first of them is to set the optimal degree of heating of the coolant in the underfloor heating circuits. The second is the complete cessation of its entry into it.
The easiest way is to use pipes with a maximum operating temperature of 90-95 degrees for the heating circuit. This allows you to install a circular pump with a thermostat in the system, as well as a reverse valve.
The installation location of the pump is the return pipe, and the temperature of the coolant in this place is no more than 70-80 degrees Celsius. If the heating of the coolant reaches critical values, the thermostat turns off the pump and the heating goes into standby mode.
As the floor cools, the circulation pump turns on again, supplying a new dose of hot water into the circuit pipeline. Practice shows that this method is the most effective and reliable for stable heating operation with heated floors.
The second method of adjusting the degree of heating involves the inclusion of a three-way valve or mixing valve in the system. With this approach, chilled water from the return to the hot supply is mixed through a three-way valve. That is, the maximum temperature of hot water from the boiler is reduced by adding cooled water.
If a 3-way valve is used, adjustment can be made manually or via a servo drive. The mixing valve regulates the temperature of the coolant according to a pre-entered control value.
The third way to regulate the heating of the coolant in a home heating system is to use a mixing unit. Such a device can be made from the following components:
- 3-way valve;
- circulation pump;
- bypass jumper;
- thermometer;
- thermostatic head;
- maximum temperature control relay.
Considering the composition of the components used, the unit for adjusting the degree of heating in the heating system turns out to be quite expensive.
But the temperature change in it occurs very quickly, because it is produced by mixing water from the return pipe into the main coolant flow. In this case, the combustion intensity in the boiler automatically decreases.
In accordance with the established regulations, the fuel consumption mode is always optimal. The number of nodes in the combined system can be any, and each will work autonomously in accordance with the established settings.
Thus, it is possible to maintain a higher air temperature, for example, in a children's room and at the same time a lower one in the bedroom of adult members of the family. Such a unit is especially effective for controlling the temperature in the installation of water floors.
To use this method of adjustment there is only one requirement - the entire heating circuit must be arranged in accordance with European requirements. The temperature of hot water from the boiler should not exceed 67 degrees.
And now we will consider the method of adjusting the thermal and hydraulic conditions using a thermostat. It is installed in a room, and adjustment is made by setting this device to the desired temperature for that particular point. Heating is controlled by a servo drive on a specific circuit.
Watch the video
Such a device works successfully in conjunction with a homemade manifold, a three-way valve and a mixing unit. Its popularity is due to the ease of adjusting the heating mode and the relative cheapness of the device.
Basic elements of a refrigerator temperature sensor
In household refrigerators, thermostats of various designs are used, but their individual elements perform very specific functions that are the same for all designs.
The abrupt contact opening unit protects the thermostat contacts from burning when opened. In the above schematic diagram of the thermostat, for the purpose of simplicity, the movable contact is placed on the power lever, which is directly acted upon by the bellows and the main spring. With this arrangement of the moving contact, severe burning of the contacts and their rapid failure are inevitable. This is explained by the fact that the rupture of the electrical circuit when the contacts are opened will occur slowly in accordance with the movement of the lever, which, in turn, is determined by the slow change in temperature and, accordingly, freon vapor pressure in the heat-sensitive system.
In addition, with such an arrangement of the moving contact, a slight turn of the power lever will immediately open or close the contacts, i.e. break the chain frequently. The abrupt contact opening unit eliminates these shortcomings. In this case, the moving contact is located on another lever (plate), connected to the power lever by a special reversible spring. When the power lever is rotated to certain positions, the lever with the contact will remain motionless, and then the flip spring will sharply change its position and the contacts will sharply open (or close).
The temperature change unit is a device that changes the tension of the main spring. In some thermostats, the spring tension is changed by rotating a screw, which moves a nut that rests on the end of the spring; in others, by rotating a roller with a profile cam pressed onto it, acting on the spring. The screw (roller) is rotated with a handle that has a pointer for setting it to a certain position on the instrument scale.
A temperature-sensitive system is a sensor that responds to changes in temperature in a controlled object and acts on the contact system of the device.
The final part of the tube, sensitive to temperature changes, may differ slightly for different thermostats, which depends mainly on the level of the liquid phase of freon in it. With a small inner diameter of the tube or a relatively large amount of freon in the tube, when the level of its liquid phase exceeds 80...100 mm, it is difficult to ensure a tight fit of the tube to the evaporator wall at such a length. In these cases, the end of the tube is curled into a spiral, bent into an elbow, or a can with an internal diameter larger than that of the tube is soldered.
The differential adjustment unit is used to regulate the differential value. The thermostat differential is the difference between the opening and closing temperatures of the contacts (at a certain tension of the main spring). The smaller the differential value of the device, the more within narrow limits the set temperature will be maintained. In thermostats of household refrigerators, this unit is used only for factory installation of the device. In many designs it is missing.
The differential is changed using a screw, which, being a limiter for the movement of the power lever, brings closer or removes the moment when the flip spring throws the lever with a moving contact.
The semi-automatic evaporator defrosting unit creates convenience when removing snow cover. The unit is used in individual designs of thermostats. The principle of its operation and design depend on the method of removing snow cover adopted in a particular refrigerator.
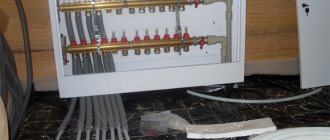
Connection diagram for thermostat for water heated floors
In an apartment building in the city, installing heated floors is an almost impossible task. The fact is that the low-temperature heating circuit of the floor can only be included in the return pipe and often leads to a critical decrease in temperature in the general heating network.
This becomes the reason for refusal to approve changes in the design of heating systems. This issue is much easier to resolve for individual developers, who are complete owners of their own heating system.
Watch the video - functions and differences of thermostats for screed circuits
In them, the hot coolant from the boiler enters the collector and from there is distributed throughout the rooms by separate pipes. Having given off heat in the radiators, the coolant again enters the collector, completing the full cycle.
The control equipment in such devices is installed directly on the collector. It controls servos that receive a signal to operate from thermostats.
A temperature control method is also used using a signal from a sensor located directly in the room where the temperature is controlled.
This method is certainly more accurate, but it is associated with greater costs when installing low-voltage control systems. This will require a large amount of wall gating, because such wires will have to be pulled from each heated room.
And some of them have two, when a combined heating circuit with a radiator part and a heated floor system is installed in the room. When installing a thermostat on the manifold, this is no longer necessary, and the end result is the same.
The pipeline for a water heated floor is quite complex in design, and errors in design and installation are costly. Therefore, it is better to entrust such work to experienced specialists.
Before connecting the water heated floor thermostat, you need to decide on its location in the heating system.
Expert advice
Installation of heated floors is a complex procedure that depends on several factors.
To get a reliable and durable system, experts recommend adhering to the following tips:
- Regardless of what kind of floor you are installing, you should avoid placing coolant under furniture and other structures vulnerable to heat. Select the correct piping or electrical cable layout.
- Be sure to calculate the power of the boiler or electrical network. This is necessary to select the technical characteristics of the heated floor.
- Use only high-quality materials. In most cases, pipes and cables are hidden under a layer of screed, so they cannot be repaired quickly. This is especially true for the pipeline, which can leak.
Connecting underfloor heating is a complex task that requires preliminary calculations and the use of special equipment. Therefore, it is better to trust it to a team of installers who guarantee long-term and reliable operation of the entire system.
For detailed instructions on installing heated floors, see the following video.
Features of the thermostat E 51.716
- The front panel of the E 51.716 thermostat contains an LCD display, control buttons and an air sensor.
- The thermostat is designed to maintain floor temperature within the range from +5 °C to +90 °C.
- The thermostat can operate in three modes: manual, programmable and comfortable. The thermostat can be programmed for every day and week using six time intervals.
- The thermostat has an independent power supply to save settings. After turning off and on the power supply, the thermostat will automatically switch to the heated floor heating operating mode, which was previously set by the user.
- To determine the temperature, an external temperature sensor (10 kOhm) is used, which is placed directly in the heated floor. The length of the temperature sensor wire is 3 meters.
- The thermostat E 51.716 is designed for standard concealed installation in a wall box with a diameter of 65 mm.
- The product is certified. Warranty period 3 years.
Operating modes of thermostat E 51.716
Manual mode
The thermostat constantly maintains the user-specified temperature throughout the day. All software settings are disabled.
Program mode
Work according to a given program. It is possible to program 6 time intervals with different temperatures during the day for each day of the week.
Comfort mode
The temperature can be temporarily changed for the current mode. The comfortable temperature returns to the original value in the next event, the thermostat continues to operate according to the previously set program.
- Awakening, event 1.
- Leaving home before lunch, event 2.
- Return for lunch, event 3.
- Leaving home after lunch, event 4.
- Returning home in the evening, event 5.
- Dream, event 6.
Note! When selecting the comfortable heating mode (based on the floor temperature sensor), it is recommended to set the temperature to 28-32°C for comfortable heating and 20-24°C in energy saving mode. In this case, it is necessary to increase the temperature 60-120 minutes before the onset of the event, and lower it 30-60 minutes before the onset of the next event. The settings are adjusted by the user through experience.
Mechanical temperature sensor
A mechanical thermostat does not have an electronic display or other components. Installing a mechanical thermostat requires a little knowledge and time, since the STP is connected to the sensor by connecting electrical wires.
A mechanical thermostat consists of a switch and a rotating temperature control axis. A switch allows you to turn off the energy supply to the heated floor without resetting the settings.
The thermoregulation mode occurs due to a metal plate made of two metals, connecting two wires to each other in a state of rest (cold plate). When heated, the plate bends, stopping the flow of current from one contact to another, thereby cooling the system.
The advantages of a mechanical thermostat include:
- Affordable price;
- Ease of use;
- Working in a room with low temperature;
- Strength, safety;
- Tolerates sudden temperature changes well;
- Long service life;
- It turns on automatically if the electricity is turned off and then back on.
Despite their simple design, mechanical thermostats are popular due to their safety, reliability and ease of use.
Technical characteristics of thermostat E 51.716
220 V, 50 Hz
| Voltage | |
| Maximum switching current | 16 A |
| Maximum power | 3520 W |
| Temperature range | +5 °С … +60 °С |
| Temperature range maximum | +5 °C … +90 °C |
| Temperature control step | 0.5 °C … 10 °C (factory setting 1 °C) |
| Thermostat power consumption | 2 W |
| Installation temperature | -5 °С … +50 °С |
| Housing protection level | IP 20 |
| Housing material | High quality self-extinguishing plastic polymer |
| Floor sensor | NTC, 3 m |
| Air sensor | NTC built-in |
| dimensions | 86 x 90 x 46 mm |
| Manufacturer country | China |