There are many ways to make a heated floor in an apartment or private house, but using a heating cable is the simplest and most inexpensive option, which is why it is in great demand.
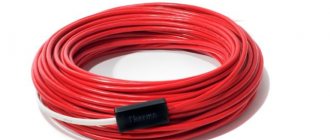
Electric cable heated floor
A heating cable is a copper wire through which an electric current passes. To increase performance characteristics, it is placed in a special fiber winding and heat-resistant polyvinylethylene. Thanks to this design, the safety of its use is ensured. An electric current passing through a wire releases thermal energy, due to which the surface is heated.
Heating cable device
Electrical cables for concrete screed have different power: from 15 to 40 W/m, they can heat up to 90°C. The conductor – the core – is galvanized steel or copper. Any wire is designed for a traditional electrical network with a voltage of 220 V.
What types of heating cable are there?
There are two criteria for classifying heating cables under screed:
- By the number of conductors: single-core; Single-core resistive cable diagram
- two-wire; Twin cable
- resistive; Resistive heating cable
A single-core resistive wire for a concrete screed has the simplest structure and is characterized by low cost.
Resistive heating cable
A resistive type electrical wire for a heated floor has one or two cores, which are placed in an insulating sheath, and couplings are installed at both ends, with the help of which the connection to the electrical network occurs. If a single-core cable is used, a closed circuit must be ensured. This means that the cable should be placed on the floor so that both ends fit into the installation box.
Resistive cable T2BLUE Raychem
If a two-core wire is used, then the presence of a second conductor ensures that the current circuit is closed, so only one end is placed in the box, and a plug is mounted on the other.
A two-core cable has a more complex structure:
Two-core heating cable for underfloor heating
- both cores are placed in insulating material, for example silicone rubber;
- two wires are combined with fiberglass;
- a tinned copper conductor is used for grounding;
- Aluminum foil protects the core from local overheating;
- the entire structure is placed in an outer shell made of polyvinyl chloride.
A single-core cable has one significant advantage - price, while a two-core cable costs 20% more. The two-core cable is simply placed under the screed - you can use any convenient method, without the need to return the other end to the box.
Single-core and two-core cable
When connected to an electrical outlet, a resistive wire constantly generates heat - this is its main drawback. Because if the thermal energy is blocked from the output, it will cause the wire to overheat and a short circuit will occur. You cannot lay such wires in places where you plan to place furniture.
Results
It takes a lot of time to make cable heated floors. Most of it is spent on “setting” the concrete screed solution. Another disadvantage is the fairly large thickness of the material pie: at least 5-6cm. The advantages include the low cost of a linear meter of cable, but to the total cost you must also add the costs of making screeds, insulation, fastening tapes, etc. As a result, the cost is much higher. Therefore, before making a decision, it is worth familiarizing yourself with other possibilities for arranging an electric heated floor. If you want to lay cable flooring under tiles, then look at other materials on electric mats or infrared film floors. Take a closer look at carbon rod mats. They, like carbon films, emit heat in the infrared range. These materials get along well with ceramic tiles and are easier to install. When comparing these options, the cost of heating should be compared per square meter, not per linear meter.
The advantages of film and rod heaters include the fact that they emit heat in the infrared range. And this range is better perceived by the human body, since we also emit heat in the same range. Therefore, when heating with infrared heated floors, the comfortable temperature is 2-3°C lower than with thermal radiation. This results in lower energy costs. To the advantages of an IR rod floor, you can add its ability to self-regulate (IR films do not have this ability), that is, it is not afraid of overheating and itself reduces its temperature in the right places. So, as always, to the question “What is better”? there is no clear answer.
Self-regulating cable
A shielded or self-regulating cable for underfloor heating is a matrix, inside of which two conductors are placed, and between them there is a layer of polymer, which releases the necessary thermal energy. The special feature of this cable is that it regulates heating due to the resistance of the polymer. As the temperature increases, the resistance also increases, which leads to a decrease in current strength and, as a result, the amount of heat generated decreases.
Self-regulating heating cable braid
Thanks to this structure, the self-regulating cable is also quite economical, so over time it will justify the investment in its purchase.
Screened wire composition:
Shielded Heating Cable Design
- carbon conductor;
- polymer;
- insulation;
- reinforcing braid;
- external insulation made of PVC.
Despite the ability to control overheating, it is also not recommended to lay such a cable under furniture, since this will increase electricity consumption but will not provide the necessary effect - heating the cabinet is pointless.
The nuances of choosing high-quality sand concrete and cement in bags and the features of pouring screed
To the stage of pouring the screed so-called. Some developers do not treat the “wet type” responsibly enough, making mistakes when choosing a ready-made sand concrete mixture M300 or violating the proportions when preparing the solution themselves. For example, they use a lot of water to give the mixture greater mobility and increase its life time during the laying process, which leads to a decrease in the strength of the screed and an increase in the likelihood of cracks.
Maria A
I want to make my own mixture for pouring sand concrete screed. Questions: how to choose the components of the mixture and what additives are best to use?
Another common question from portal users is: what is better - using ready-made sand concrete or preparing your own mixture from high-quality cement in bags.
Anna Ruzhitskaya
In terms of convenience, reliability and stability of the result, it is better to use ready-made dry mixtures (sand concrete). For these mixtures, the maximum sand grain size is regulated, i.e. In production, seeded sand is used, the cement-sand proportions are strictly maintained, and the crack resistance parameters of the hardened mortar are checked.
Please note that mixtures from trusted manufacturers undergo thorough quality control at all stages of production and meet all GOST requirements. The mixture, precisely measured by weight, is delivered to the site in reliable packaging - 40 kg bags.
To install a screed on a warm floor, it is better to use a “wet” screed.
A semi-dry screed differs from a wet screed in that it uses a small amount of water necessary to mix the cement-sand mixture.
Therefore, it is difficult to distribute and compact the semi-dry screed efficiently, taking into account the installed underfloor heating system - mounting tape and thermal cable. When the density of the cement stone decreases, due to the formation of air cavities, the heating efficiency decreases, because The thermal conductivity of the screed decreases.
When preparing sand concrete for screed yourself, special attention should be paid to the quality of the ingredients. The sand should be coarse, sifted, without clay and other harmful impurities (shells, plant remains, contamination with petroleum products, etc.). When choosing the proportions of the mixture, you should remember that sand can have different humidity levels, which affects the required amount of mixing water.
When working with ready-made dry mixtures, pay attention to the availability of information with recommendations on basic recipes and exact proportions for preparing the main types of solutions. This simplifies the work of builders.
The quality characteristics of sand concrete and screed can be improved by using plasticizers and fiberglass.
Heating mats
Methods for cutting and bending a heating mat
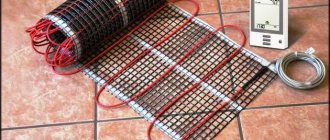
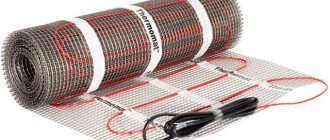
To simplify the installation of a heated floor using a heating cable, special mats have been developed. They consist of a mesh base on which heating elements are fixed.
The main advantage of this design is that you don’t have to make a concrete screed, but you can immediately lay the finishing layer on top (most often tiles are used).
Installation of mats is very convenient because it is easy to change direction and can be laid in any order, bypassing the furniture locations. Most often, a resistive two-core cable is placed in the mats.
Laying the heating mat
[ads-mob-1][ads-pc-1]
Rules for laying cables. Carrying out calculations
In order to correctly plan and calculate your cable “warm floor”, you need to know the basic “postulates” regarding its correct installation.
Thermal insulation
Let's start with the fact that a layer of thermal insulation under the heating system is mandatory. Even if there is a heated room underneath the ceiling. Otherwise, the generated heat will be wasted “in vain” on unnecessary heating of the massive ceiling and the main walls on which it rests. In any case, the ceiling (especially the base on the ground) will be colder than the heating cable, that is, it will “pull” heat onto itself, despite its enormous heat capacity. Heat losses, and therefore electricity costs, will become unacceptably high.
What should the thermal insulation layer be like? Actually, a professional thermal engineering calculation is required. But you can also use their values, derived “in the laboratory” and tested practically.
Below is a diagram showing the dependence of the amount of heat loss (Y-axis) on the thickness of the insulation in millimeters (X-axis). The diagram was compiled based on the results of calculations for a room with an optimal level of thermal insulation of walls, windows, and ceilings (with poor insulation, starting a “warm floor” is a generally pointless task). Extruded polystyrene foam boards (EPS, XPS) with an average thermal conductivity coefficient of approximately 0.033 W/(m×℃) are considered as insulation.
Dependence of the amount of heat loss of a “warm floor” on the thickness of the lower insulating layer
What do we see?
If the insulation is completely neglected, then even in conditions of complete thermal insulation of the room, up to a third of the heat generated by the cable (about 32%) is simply lost.
With increasing thickness, heat loss rapidly decreases. But completely reducing them to zero is unattainable. An interesting feature is that with an EPPS thickness of 30 mm, losses reach 12-13% (almost three times), and then their decline becomes not so “rapid” at all. So, with a thickness of 40 mm, the loss is about 8÷9%. With further increase in thickness, this trend only increases. That is, we can say that a layer of 30÷35, maximum 40 mm will be optimal, and with a further increase in thickness, practically no gain can be expected.
Where is the cable laid? Its length and laying pitch.
Installation of a “warm floor” must be preceded by drawing up an accurate scaled cable layout diagram. What criteria are taken into account?
A similar diagram should be drawn up for each room where the “warm floor” will be installed.
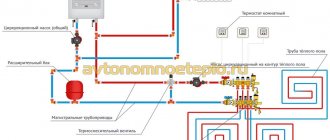
- The installation location of the thermostat (item 1) must be designated so that it is not covered by any pieces of furniture, curtains, etc. Usually it is placed at the level of sockets, one of the devices of the block being created. It is to this point that the power cable corresponding to the power of the “warm floor” should be connected.
- The location of the temperature sensor (item 2) is immediately determined and must be marked on the diagram. The sensor should be placed at a distance of approximately 500÷600 mm from the wall, and always in the middle of the loop of the laid heating cable.
- The diagram should also indicate the location of the couplings - switching and end couplings (positions 3 and 4). Their number and location depend on which cable is used, single- or double-core.
- The drawing indicates the boundaries of the area where the cable will be laid. The fact is that, as already mentioned, it is not placed under stationary pieces of furniture and household appliances (item 5). The distance from the walls (N) is at least 50 mm, and from heating devices or other heat sources - at least 100 mm.
- Using the outlined boundaries, you should then immediately determine the surface area on which the cable will be laid out - we will need this value soon. By the way, it is considered quite normal for the area of the “warm floor” to be about 75% of the total area of the room.
- To apply a “drawing” of the cable layout to the diagram, you need to know the pitch size (in our drawing – D) between adjacent turns, and this cannot be determined in any way without the exact length. And both of these values are “tied” to the required specific heating power.
And this power, in turn, depends on the operating conditions of the heated floor and on the characteristics of the base on which it is mounted (on the ground or, say, above a heated room). You can use the following values:
| Features of the premises and planned operation of the heating system | “Warm floor” is planned to serve as the main source of heat in the room | “Warm floor” will work together with heating, it is created only to increase the level of comfort |
| Floor on the ground or above an unheated room | 180 W/m² | 130 W/m² |
| The floor above the heated room | 150 W/m² | 110 W/m² |
- Further, each manufactured heating cable must have a specific power in the list of characteristics - watts per linear meter of length. For example, 15 W/linear m.
- Having the area and specific power values for the floor and the cable, it is easy to calculate the minimum required length. Well, knowing the length, calculate the laying step.
We will not “torment” the reader with formulas - we will simply offer a calculator that will quickly and accurately calculate both of these quantities.
Let us only add that if, according to calculations, the laying pitch is greater than 300 mm, then it would be better to slightly increase the cable length in order to reduce the pitch. Otherwise, a “zebra effect” may occur, that is, alternating warm and cold stripes on the floor.
Calculator for calculating the length of the heating cable and its laying pitch
Go to calculations
After the calculations, you can finish drawing up the diagram - and you can begin to implement it.
The most common brands of heating cables and their characteristics
The Russian market includes both domestic and imported manufacturers of electrical cables for heated floors under screed.
| Brand | Section length, m | Power, W/m | Maximum operating temperature, оС | Service life, years |
| Single core cable | ||||
| National comfort, NK-250 | 17 | 15 | 90 | 15 |
| Teplolux | 10 | 14 | 90 | 25 |
| Neoclima | 5 | 15,2 | 100 | 35 |
| Twin cable | ||||
| Ceilhit | 8,1 | 18 | 100 | 25 |
| Teplolux Elite | 15 | 27 | 90 | 30 |
| Raychem T2 | 14 | 20 | 100 | 35 |
| Self-regulating cable | ||||
| Optiheat 15/30 | 15 | 30 | 100 | 40 |
| Devi-pipeguard 25 | 25 | 30 | 85 | 30 |
| Heating mat | ||||
| NeoClima | 0.65 m2 | 105 | 80 | 25 |
| Electrolux EEFM | 2 m2 | 150 | 80 | 35 |
| National comfort | 0.5 m2 | 130 | 90 | 25 |
Why you should trust professionals
Upon closer examination, even a person without experience in performing such work can connect a warm floor to the heating system of a small bathhouse or garage (with due attention to the theoretical part, developing the project and performing the necessary calculations). But at the same time, you need to be prepared for the fact that you will need to devote a lot of time to studying the operating features of the entire system, the selected equipment, taking into account the specifics of a particular brand.
At each stage, as a rule, a lot of questions arise: what kind of automation to order, to make a heated floor from a self-regulating cable or a resistive one, how to calculate the cost of 1 m2, how to reduce it in order to prevent a decrease in the reliability and efficiency of the entire system as a whole. In addition, during the work it is difficult to avoid difficulties and errors due to ignorance of the intricacies of the technology, features of the configuration, and the design of the devices used.
At the same time, professional turnkey installation allows you to get:
- favorable prices
for supplied equipment and materials from the best manufacturers (we purchase them in large wholesale, so we can offer truly favorable conditions for cooperation); - saving time and money
due to the availability of a full set of tools, auxiliary equipment, materials from our specialists, a sufficiently large stock of equipment; - guarantee of the quality of the work performed
(we bear financial responsibility for each project, regardless of whether we are talking about installing a heated concrete floor under tiles in the bathroom of a private house or in a large entertainment center).
The project implementation price and warranty period are determined in the contract and do not change during the work process. For more detailed information on any questions you may have, call us.
Rules for installing heated floors with electric wire
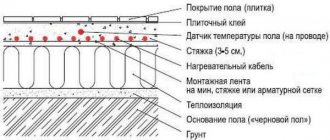
For an electric heated floor, it is necessary to ensure a perfectly flat surface of the rough base, since there may be air in the voids, which will lead to burnout of the resistive element. A thin screed of 3 to 5 cm is recommended for the subfloor.
Electrical cable installation diagram on the floor
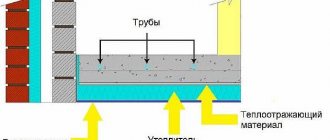
Next comes thermal insulation. The thickness of the material should be at least 2 cm, but if this is an apartment on the ground floor, it is better to choose a thicker one. When choosing a material, you should pay attention to heat resistance - it must withstand heating up to 100°C. It is better not to use foil-coated material - foil will quickly deteriorate under the influence of constantly high temperatures. An alternative is a metallic coating - it will reflect heat and direct it upward.
Self-installation of electric heated floors
Both roll insulation and slabs are used. One condition is that there should be no gaps between the canvases. If heated floors are installed in the bathroom or kitchen, waterproofing materials should be used. They will prevent the penetration of unwanted moisture.
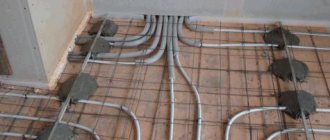
Most often, thick polyethylene film is used. The next stage is the installation of heating elements. It can be carried out on a special mounting tape, which has fasteners for the cable. It can be replaced with reinforcing mesh, the cells of which do not exceed 1.5 cm.
Stages of installing underfloor heating with electric wire
The next stage is the screed. You can use any materials that can withstand high temperatures. This is either a concrete composition with the addition of polymers, or ready-made dry mixtures for heated floors. Before pouring the screed, it is necessary to check the functionality of the heating system. The test takes place using a tester that measures the maximum resistance. Deviations within 10% from the data specified in the wire passport are allowed.
Installing the Thermostat
To save energy and more efficient operation of the heated floor, you should use a thermostat. It must be installed before laying the heating elements. It is mounted in a convenient place, at least 30 cm away from the floor. You need to make a niche in the wall to install the box and draw a groove to the base of the floor, in which the corrugation or pipe is placed. The corrugation should pass another 0.5–1 m along the base of the floor; connecting wires from the heating elements are placed in it.
A good place to mount the thermostat
The ends of the cable must be led to the thermostat in such a way that the couplings remain in the screed.
Connecting the cable to the thermostat
After laying all sections, the supply conductors at the very end of the mat should be plugged and insulated. It all depends on your cable.
For example, if you have a two-core one, which at the beginning has one cold end and an end coupling, then the conductors in it are connected to each other at the very end.
And if there is a single-core heating mat that has two cold ends on each side, then both of these ends must be brought in and connected to the thermostat.
The third option is independent sections connected from power wires laid along the edges of the mesh. Here you need to insulate each end separately with a thermotube, without connecting them to each other.
Next, proceed to connect the cold end of the heating mat to the thermostat. To do this, take a copper power cable KGVVng. Measure and lay it in the next room to the place where the thermostat is installed.
Then connect it to the power wires. To do this, strip the wires, put on heat shrink and connect the ends using a connecting sleeve.
After crimping, slide the heat shrink and heat it with a hair dryer.
It is recommended that the cold end connection sleeve be placed in close proximity to the end coupling. That is, the place where the heating cable ends.
If any problems arise, and they most often occur at the joints, you will only need to open one tile and will not have to dismantle a couple of square meters at different ends of the room.
The service life of the heating cable itself is more than 50 years, so all accidents and problems arise precisely at these sleeve connection points.
The other side of the cable, which comes out of the installation box, is stripped, and the stranded cores are crimped with NShVI lugs. At the same time, in order not to confuse the wires, it is better to mark them.
- phase conductor - Ltp
- zero core (blue) - Ntp
Cabling
There are several cable routing options:
- snail;
- snake;
- double or triple snake. Options for laying heating cables
The snail layout is less popular, especially if resistive elements are used. The pitch between turns is selected independently, depending on the required power per 1 m2. The minimum permissible distance is 5 cm, the maximum is 30 cm.
How can you calculate the required amount of wire per 1 m2?
Heating cable power calculation table
- First, you should decide whether it will be the main heating in the room or auxiliary. If the main thing is, then you need to provide a power of 150 W or more, and when the heated floor is only an additional system, 110 W is enough.
- Secondly, the degree of floor insulation is taken into account - if this is a ground floor apartment, then you need to provide 140–150 W, even with additional heating. More powerful elements should be installed on the balcony or loggia - up to 180 W.
- Thirdly, the definition of the heated area is approximately 70% of the floor, taking into account the location of the furniture (the wire is not laid under it).
Now you can calculate the cable length. For example, the coverage area is 10 m2, it is necessary to organize a power of 140 W per 1 m2. There is a heating cable for underfloor heating with a power of 16 W. We calculate the maximum consumption: 140 * 10 = 1400 W. We determine the length of the cable: 1400/16 = 87.5 m. Now you need to select the number of bays or sections that will come as close as possible to this value, since shortening the heating cable for a heated floor is very problematic.
Nuances of arranging cable floor heating
If any heating wire is damaged, the system loses its functionality. For this reason, heated floors constructed using cables are laid in a screed. At the same time, its thickness is selected so that the high load from the cement layer does not damage the wiring located under it.
In addition, a screed that is too thick in this case will greatly reduce the efficiency of the heating system, making it inertial. A thicker layer can cause a lot of trouble, since the floor will not heat up even when the power is set to maximum.
In the electrical cable laying diagram for heated floors, it is always necessary to provide for the placement of a thermostat and a floor surface temperature sensor. You can do without these devices by directly connecting the cables to the power source. But then the heat supply system will not work for long.
This is especially true for resistive cables. Therefore, when installing a wired underfloor heating system, you first need to install a thermostat.
First of all, it is necessary to measure the resistance and insulation of the wire. Since each bay is accompanied by a passport, which indicates the technical characteristics of the cable for heated floors, it is necessary to compare the indicators obtained during the measurements with the data in the document. If the deviations do not exceed 10%, then installation work can continue.
How to shorten the cable?
The question of how to shorten a heating cable may arise when the wrong footage has been calculated and there is nowhere to put the excess (you must remember the minimum permissible distance between turns is 5 cm). The wire is sold in coils that have several sections. Couplings are installed at the ends of the cable in the section. A certain resistance is created within each section. If you cut the wire yourself, the balance will be upset: the resistance will decrease, the current will increase.
Heating cable information diagram
As a result of this, the cable will simply burn out, so you should use up the entire footage for coverage. But if such a need arises, then it is better to entrust the pruning to a professional. It will determine how much resistance is lost and install a current-limiting resistor to compensate. [ads-pc-2][ads-mob-2]
Thermal sensors
In order for warm cable electric floors to fully function, the thermostat must constantly receive information not only about the air temperature, but also about the degree of heating of the floors themselves. For this purpose, temperature sensors are used: internal and external. Internal sensors are placed between the turns of the heating cable and serve to monitor the floor. External ones are usually located inside the thermostat; they monitor the air temperature in the room.
Heated floor temperature sensor
When cable underfloor heating is installed as an additional heating system, it is usually limited to installing internal sensors. And if it is the main or even the only equipment for heating the room, then the ambient temperature becomes an equally important indicator. Then there is a need for an external sensor.
If you are installing a cable heated floor under laminate, wooden parquet or other material that is sensitive to overheating, then a double control system is required. In this case, you cannot do without both types of temperature sensors.