Heating a modern private home depends on many factors. This includes choosing a heating boiler, the presence of underfloor heating systems, and choosing a radiator connection diagram. But the most important factor influencing the energy efficiency of the system is the installation of various heating pipes in a private house, the choice of diameter and installation method.
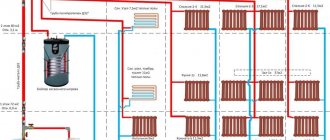
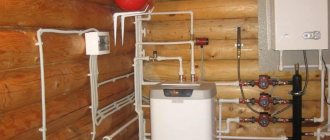
An example of the arrangement of a modern boiler room, in this case using a copper pipe
Residential heating options
The well-known and most common way to heat your own house or apartment is to make a water system. Operating principle: the coolant is heated by a boiler or other source, then transferred through pipes to heating devices - radiators, heated floors (abbreviated as TP) or baseboard heaters.
Note. Water heating is used in 99% of apartment buildings and administrative buildings. There are 2 methods of supplying coolant - from a centralized city network or from an individual boiler house serving a specific building.
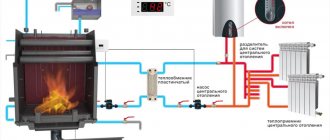
A heat exchanger placed inside the stove heats the water, directed by the pump to the batteries.
Now we list alternative heating options:
- Stove. A metal potbelly stove is installed or a full-fledged brick oven is built. If desired, a water circuit is built into the firebox or smoke channels of the stove (shown in the photo above).
- Purely electric - convectors, infrared and oil heaters, spiral fan heaters. A more modern method is to install underfloor heating using resistive cables or polymer film. The latter is called infrared, carbon.
- Air. The heat source warms up the filtered street air, which is forced into the rooms by a powerful fan. A simpler and cheaper option is to install gas convectors in residential premises.
- Combined - wood stove + electric heaters of any type.
Scheme for heating a bathroom with electric heated floors
To move on, you need to decide which type of heating is better - more profitable, more efficient, more convenient. We definitely recommend choosing a water system. Causes:
- to heat water, you can use any energy source or combine several types of fuel by installing 2-3 boilers;
- if there are high requirements for interior design, the piping is installed in a hidden way, instead of batteries, baseboard heaters or TP circuits are used;
- the ability to organize hot water supply (DHW) - install a double-circuit boiler or an indirect heating boiler (depending on the amount of water consumed);
- Alternative energy sources can be connected to the system - solar collectors, heat pump;
- if necessary, heating in a private house is made completely autonomous - pipes are laid according to a gravity (gravity) scheme, plus a boiler unit is installed that does not require connection to the electrical network;
- The system lends itself well to adjustment, automation and remote control via cellular communications or the Internet.
The only drawback of water networks is the cost of installation, equipment and shut-off and control valves. The purchase and connection of electric heaters will be cheaper, but restrictions in terms of fuel choice will lead to increased operating costs.
Construction of a brick kiln is an expensive and labor-intensive undertaking. An affordable iron potbelly stove will heat 2-3 adjacent rooms, so it is only suitable for a summer house or a change house.
Installing full-fledged air heating in a country cottage will cost even more than building a stove. It is necessary to purchase a ventilation unit with a recuperator, which plays the role of a blower, purifier and air heater. Then organize supply and exhaust - run air ducts to all rooms. An expert will talk about the pitfalls of air heating in the video:
Main mistakes
All stages of organizing heat supply must be carried out with the utmost care.
Soldering of polypropylene joints must be carried out at the recommended temperature, which guarantees that joints with the required characteristics are obtained. Failure to comply with these conditions may result in the need for a complete rework of the system.
Choosing an energy carrier
The main selection criterion is the cost of energy, depending on the country and region of residence. If in the Russian Federation the undoubted leader is natural gas, then in the rest of the states of the former USSR the picture is different - firewood, briquettes and coal take the first place. Don't forget about electricity supplied at half the nightly rate.
When choosing the right type of fuel, it is worth considering five factors (in addition to price):
- efficiency (efficiency) of heating equipment using this energy carrier;
- ease of use;
- how often the units will have to be serviced, prices for calling a technician;
- storage requirements.
Below is a comparative table showing the prices of various energy sources and how much a kilowatt of heat produced in real conditions costs. Building area – 100 m², region – Moscow region.
Note. The calculation results and prices are given as of February 15, 2018. Over time, the data becomes irrelevant, but the difference in the cost of 1 kW remains.
Based on the numbers given in the table, it is much easier to find a suitable option (or several). Just make an adjustment for the cost of energy in your region. Based on other selection criteria, we will give 4 tips:
- It is most convenient to use gas and electric heating equipment. There is no need to store anything, constantly maintain and bother with cleaning water heating devices.
- Burning coal and wood is the most economical way to heat. Saving money will have to be paid for with labor - sawing, carrying, loading the firebox, cleaning the chimney. It is more comfortable to burn briquettes and pellets, but the price of the boiler installation and the fuel itself increases. Plus you will need storage for storage.
- Diesel fuel or liquefied gas is the best solution for providing autonomous and at the same time comfortable heating when other energy sources are not available. The downside is the decent cost of fuel and installation of the fuel tank.
- A proven option is the combination of 2-3 energy carriers. A common example: solid fuel + electricity at night tariff.
Which fuel is best to use in specific conditions is described in detail in a separate material. We also recommend watching the video and listening to useful expert advice:
Schemes of water heating systems
We are moving on to the next step - developing a project for the future system, according to which we will purchase materials, fittings and thermal power equipment. The task is to choose the appropriate type of wiring, apply pipes to the layout of a private house, and arrange heating appliances.
Reservation. It is assumed that a place has already been allocated for installation of the heat generator - a furnace room, an extension, a kitchen or a corridor. We outlined the regulatory requirements for the placement of boilers in detail in another publication.
To deliver heated water to appliances and transfer heat to the air in rooms, the following schemes are used:
- single-pipe - horizontal “Leningrad” or riser system;
- two-pipe - dead-end, collector, associated ring (otherwise - Tichelman loop);
- water circuits for underfloor heating - heated floors (HF).
The first 2 types of wiring work in conjunction with radiators or other heating devices. The coolant movement is ensured in two ways:
- Forced, using an electric pump installed on the main pipeline or directly in the boiler.
- Natural circulation of water through the pipes (gravity flow) due to the difference in temperature and mass of the coolant between the supply and return lines. Cold liquid is heavier, so it tends to push hot liquid upward.
A gravity riser system with an overhead coolant distribution is suitable for a two-story house.
In the first case, the system does not communicate with the atmosphere and operates with an excess pressure of 0.6...3 Bar, depending on the degree of heating and the initial pressure in the network. The resulting excess expanding water is absorbed by a closed tank with a rubber membrane inside.
The gravity circuit is in contact with the atmosphere through an expansion tank located at the highest point of the system. In this way, airing is prevented - the bubbles formed in the pipes and batteries rise and go into the open tank. Effective air removal is facilitated by slopes of horizontal sections.
Let us consider each option separately and for clarity, we will give examples of typical schemes.
Single-pipe wiring - pros and cons
The supply and return of coolant in this system is organized through a single looped pipe. Accordingly, each radiator is connected to the main line using both connections. In the Leningrad scheme, this collector is laid horizontally, while the riser is laid vertically.
On the left is the connection of the radiator to the vertical riser, on the right - according to the Leningrad horizontal scheme
Negative aspects of single-pipe coolant distribution:
- due to the addition of cooled water, the temperature of the main line decreases by 1-2 °C after each battery;
- in order to ensure the required coolant flow in heating devices, the diameter of the main pipeline must be at least 25 mm throughout its entire length;
- when the number of radiators is more than 5 pieces, the cross-section of the collector increases to 32 mm;
- the last batteries receive cooled coolant, so they heat worse, the problem is solved by increasing the number of sections or increasing the size of the panels by 10%;
- “thanks to” the increased diameter of the line and the expansion of radiators, the costs of materials increase.
Note. The disadvantages of the Leningradka are listed here; with vertical wiring, the disadvantages are not so critical. There the problem is different - the risers that penetrate the ceilings are not easy to wall up inside the walls, the pipes stick out in plain sight. More details here: description of single-pipe heating networks.
Classic "Leningradka" closed type with a gas boiler
Positive points:
- Simplified installation - one pipe is easier to install than two.
- The Leningrad heating system for a private house, assembled from polypropylene pipes, is the most budget option. But if you use metal-plastic or cross-linked polyethylene, this advantage is offset by the price of the fittings.
- Single-pipe vertical risers are the best solution when installing a gravity system in a two-story house.
Taking into account the peculiarities of single-pipe schemes and the lack of installation experience of most homeowners, we recommend assembling the “Leningradka” in small country houses or residential buildings. If you want to save money, use polypropylene plus inexpensive steel radiators.
Methods for two-pipe battery connection
The main difference between these systems and single-pipe systems is the separate supply of coolant to the devices - hot water comes to the batteries through one line and returns through another. When installing heating, 3 types of schemes are used:
- Classic deadlock (shoulder). The coolant is supplied to the battery group, then moves back through the return pipeline. If necessary, the system is divided into several dead-end branches, and hydraulic equilibrium is established between them due to balancing.
Two-pipe dead-end wiring with 4 branches for a two-story cottage - Ring distribution with a parallel flow of forward and reverse water. The two-pipe loop is assembled in such a way that the coolant leaving the radiator does not change the direction of movement. The first heater on the supply line is the last on the return line and vice versa.
In a two-story building, 2 Tichelman loops are laid out, connected to a common riser - The collector circuit provides for individual connection of each battery to a common distribution comb, powered from the boiler.
Each floor will need its own distribution manifold
Important point. The main advantage of two-pipe networks is the supply of water at the same temperature to all radiators. Hence the other advantages - distribution pipes of smaller diameter (15-20 mm), normal battery sizes and no restrictions on the number of devices.
A novice developer installing heating with his own hands for the first time is recommended to choose the first option - shoulder wiring. It is simple and reliable, and the most affordable. A preliminary design for a one-story house is developed as follows:
- Mark the windows on the building plan and place radiators near these openings. If there is no glazing, the device is placed near the coldest outer wall.
- Place a heater on the drawing - a boiler, a furnace with a water heating circuit, a heat pump.
- Run along the outer walls from the boiler pipe to the radiators. To avoid crossing the doorway, divide the net into 2 arms of approximately the same length.
- If there is a second floor, make 1-2 additional branches laid upstairs. It is better to lift the second floor branch directly from the boiler room.
An example of a heating project for a one-story building with an area of 100 square meters.
Pipe diameters for a building of 100...200 m² (closed system): from the boiler - DN20, arms (branches) - DN15, connections to the heaters - DN10. The indicated sections are taken from practice; there is no need to calculate water flow and hydraulics. The exception is houses of complex configuration, large number of floors and area.
Reference. The designation “Du” indicates the diameter of the internal passage in millimeters (rounded). For example, the diameter of a plastic pipe 26 x 2 mm is 20 mm.
It is convenient to make a collector system during the construction process - the connections to the batteries are hidden in the floors. The Tichelman loop helps out in a situation where you need to “plant” 10...20 radiators on 1 line. On our resource there is a separate material devoted to the consideration of two-pipe wiring methods.
About underfloor heating circuits
The advantages of water heating over other heating methods are obvious:
- uniform heating of the room, starting from the lower zone;
- efficiency - due to lower water temperature (35...55 degrees versus 60...80 °C on batteries);
- aesthetics - heaters and pipelines are not visible;
- convenient regulation using automation - distribution manifold servo drives and room temperature sensors.
Along with the impressive advantages, we note the main disadvantage of TP - the high costs of purchasing materials and installation. The circuits will require a decent amount of quality pipe (metal-plastic, copper, cross-linked polyethylene), a manifold with flow meters and a mixing unit. Add the layout of the hinges and the installation of a cement floor screed - a considerable number will come out.
Advice on reducing the cost of construction. In a country house or apartment up to 150 m², you can save on the purchase of a manifold and mixing unit - make a TP comb yourself from the tees, and install RTL thermal heads to limit the temperature of the coolant.
Minor disadvantages of floor contours:
- Inertia. When heated, the concrete monolith absorbs a lot of heat, which continues to be released after the heating is turned off. And vice versa, “overclocking” cooled TP takes 4...6 hours.
- If a pipe breaks inside the screed, repair is very difficult. It’s unlikely to do without calling the experts, because you need to find the defect, open the monolith and properly fix the leak.
- A power supply failure in an apartment building is a real problem. You will have to repair your own home plus your neighbor’s flooded one (from the bottom floor).
An example of a TP layout on the first floor of a house.
The comb is located in the center of the building, large rooms are divided into 2 water circuits. The inertia of warm water floors is “overcome” with the help of traditional radiators that quickly respond to changes in the temperature of the boiler water. For ease of adjustment, 2 systems are installed - TP and batteries, which is not cheap. How to independently arrange heating heating circuits, read our other guide.
Equipment, components and materials
The next step after developing the scheme is the selection of all heating elements:
- heat generator;
- radiators, underfloor heating collector;
- pipes;
- expansion tank, circulation pump, fittings and heater piping parts.
Clarification. Wall-mounted gas boilers and some floor-standing models are equipped with a pump and expansion tank located inside the unit. If you plan to purchase such a device, still make sure that the tank volume is sufficient for your system.
Let’s immediately make a reservation that we will consider a hot water boiler as a heating unit. You will not be able to install an air or geothermal heat pump without the help of specialists, and connecting the water circuit of the stove is carried out in the same way as connecting a solid fuel heat generator.
How to calculate the capacity of the expansion tank, choose the right pump and fittings:
- The useful volume of the tank must be at least 10% of the total amount of coolant circulating in the heating network. The water jacket of the boiler is also considered.
- If the building area does not exceed 150 m², then circulation will be provided by a pump with 25/40 or 32/40. The first number is the diameter of the threaded connection, the second is the developed pressure. The 25/40 unit is equipped with a 1” pipe thread and is capable of delivering a pressure of 0.4 Bar.
The most common model of pumping unit 25/40 from the Grundfos brand - For a large cottage and floor circuits, it is better to select a pump according to the algorithm.
- Shut-off ball valves are installed in front of the heat generator, expansion tank, pumping unit and on the make-up pipe. Additional equipment - a buffer tank, an indirect heating tank, a solar system - must also be cut off by taps.
- Each heating radiator is equipped with a thermostatic valve at the inlet and a balancing valve at the outlet. In the unregulated version, a ball valve is installed on the battery supply pipe.
The final list of components is compiled after selecting the main elements - a thermal power plant, batteries and a pump with a tank. Accordingly, we will next consider the issue...
How to choose a heating unit
Factors influencing the choice of a boiler (or several water heating devices):
- energy carrier used;
- heat generator power;
- dependence on external energy sources;
- price;
- functionality, ease of use.
Note. The heater selection criteria are arranged in order of priority. It is important for the user that the unit consumes cheap fuel and produces enough heat. Price plays a secondary role; comfort and functionality come in third place.
All household boilers are usually divided into groups according to the type of fuel (energy carrier) burned:
- gas;
- electrical;
- solid fuel;
- liquid fuel, consuming diesel fuel and waste oil;
- universal, operating on 2-3 types of energy carriers.
Each of the listed groups is divided into varieties according to the operating principle, installation method and other criteria. We will review existing boilers and give a number of useful recommendations.
Types of gas boilers
To organize heating in private homes, 3 types of units using natural gas are sold:
- Atmospheric. The combustion chamber is open, combustion air is taken from the boiler room. The operating efficiency is in the range of 86...88%.
- Supercharged (aka turbocharged). Air is forced into the closed firebox by a fan controlled by an electronic circuit. Boiler efficiency is 90...93%.
- Condensation. Structurally similar to turbocharged heaters, but the heat exchanger and burner are designed in such a way that in a certain mode the boiler uses the latent heat of combustion of the fuel. Efficiency – 95%.
Reference. All heat generators are capable of burning 2 types of fuel - natural gas and liquefied propane-butane mixture (LPG). To switch to LPG, the fuel jets are replaced and the automation is adjusted.
Boilers are manufactured in wall, floor and parapet versions. The first group is ready-made mini-boiler rooms, equipped with their own expansion tank and pump. The second type is high-power units, or those that do not depend on electricity. Parapet models are placed near the outer wall, the chimney goes directly to the street.
Among the large assortment of gas water heaters, it is not easy to make the right choice. Our recommendations are:
- If you are on a limited budget, purchase an atmospheric wall-mounted boiler. But remember - open-chamber heaters require a traditional chimney.
- To work together with the gravity system, you will need a non-volatile floor-mounted atmospheric unit.
Floor-mounted non-volatile heater equipped with a single-stage burner, mechanical automatic safety system EuroSIT and a cast iron heat exchanger - It is better to install a forced-air heat generator in an apartment or cottage without a ready-made chimney. Organize the removal of combustion products through a coaxial pipe laid through the outer wall.
- To supply hot water to 1-2 consumers, buy a dual-circuit model. If the consumption in the DHW network is high, you will need an indirect heating boiler connected to a conventional single-circuit heater.
- Read the detailed description of all gas heaters presented in a separate article.
A condensing boiler is the most economical among gas-using devices. The disadvantage of the unit is the complexity, high price of the equipment and its repair.
Electric hot water installations
A feature of electric boilers of any type is their high efficiency, reaching 99%. The second positive point is the low installation costs and purchase of the heaters themselves. The units should be used as auxiliary heat sources, operating at night at half the light tariff.
There are 3 types of electric boilers (all are available in wall-mounted versions):
- With traditional tubular heaters - heating elements. Modern devices are equipped with an expansion tank and a circulation pump.
- Electrode. Heating of the coolant occurs due to a chemical reaction resulting from the passage of current through the water layer between the 2 electrodes.
- Induction. Here the coolant is heated by the steel core of a sealed coil, which creates eddy currents in it.
Sectional view of a heat generator with tubular heaters (TEH)
To install electric heating, it is better to take a classic heating element boiler that does not require serious piping. The device is reliable and easy to repair - you can always replace a burnt heating element yourself. An induction heat generator is expensive and cannot be repaired in the event of a breakdown, and an electrode heat generator is highly dependent on the salt content in the coolant.
Advice. Don't listen to salespeople who call induction boilers energy-saving. All electrical installations heat water equally efficiently - losses do not exceed 2%, the rest of the energy is converted into heat.
Classification of solid fuel boilers
For heating country cottages, 3 types of solid fuel units are used:
- direct combustion - atmospheric and turbocharged;
- pyrolysis;
- automatic pellet and coal.
There are many myths about the efficiency of TT boilers. Manufacturers of pyrolysis heat generators claim an efficiency of 85-86%, pellet heat generators - up to 90%. In reality, the figures are much more modest: traditional wood-burning units - 75%, pyrolysis units - 75%, boilers using pellets and coal chips - up to 86%.
Construction of a direct combustion boiler with a fire tube heat exchanger
Reference. In addition to the listed types of heaters, there are long-burning TT boilers with an increased size of the firebox. How to distinguish such installations from classic wood-burning heat generators, read the corresponding publication.
Recommendations for choosing a solid fuel boiler:
- A steel direct combustion apparatus equipped with a chain draft regulator is perfect for burning wood, coal and briquettes. Turbocharged examples are automated and burn wood better, but rely on electricity.
- Pay attention to the volume of the firebox of a traditional boiler - the duration of combustion depends on this indicator.
- Automated pellet units are a good solution for lovers of comfortable heating. You don’t have to chop and carry wood, remove coal dust, just clean the firebox and burner weekly.
- Do not mess with pyrolysis TT boilers, they are a priori more expensive than conventional ones, demanding on the quality of fuel, and in addition they consume electricity.
- Avoid models with water-filled grates if you plan to burn with coal. The temperature difference forms a hard crust on the surface of the grate, which is not easy to knock off.
Grate of a TT boiler made of pipes filled with coolant
When choosing a heat generator, remember the old saying “the miser pays twice.” It is better to take a high-quality classic device with a cast-iron heat exchanger than a cheap “pellet generator” with electronics of unknown origin.
Diesel and combined models
This heating equipment is used much less frequently than gas, wood and electric boilers. Diesel fuel is more expensive than other energy sources, and waste oil is a specific fuel that is clearly unsuitable for the average homeowner. Accordingly, such heating devices are operated only in certain conditions when access to other resources is limited.
Multi-fuel boilers from different manufacturers combine 2-3 energy sources, for example, wood + electricity, gas + coal. Advantage: you buy one heat generator and get two. Disadvantage: the unit cannot boast of high efficiency and functionality. The most popular option is shown in the photo - a TT boiler, equipped with a heating element unit for electrically heating water after the flame in the firebox has died out.
Electric wood heater from the Russian company Teplodar
Heat generator power calculation
To select a boiler based on performance, you should find out the load on the heating system of the house. That is, calculate the heat losses of the building. We propose to calculate this indicator in a simplified way:
- If a living room is separated from the street by one wall with 1 window opening, then 0.1 kW of heat is consumed to heat a square meter of area.
- A room with two external walls (corner) and 1 window – 0.12 kW/m².
- The same, with 2 light openings - 0.13 kW/m².
An important nuance. The calculation is performed for each room separately, then the results are summed up.
The algorithm is suitable for buildings with floor heights up to 3 meters. If the ceilings are higher, heat consumption is calculated based on the volume of the room. Accordingly, in a room with 1 fence and a window, the volume value is 35 W/m³, in a corner room – 40 W/m³, in a corner room with two openings – 45 W/m³.
Having determined the need for thermal energy at home, we select the power of the boiler installation according to the instructions:
- The performance of a unit operating only for heating is taken with a margin of 20%. That is, we multiply the found amount of heat by a factor of 1.2.
- The heat generator providing hot water supply must be taken with a reserve of 50% (coefficient 1.5).
- For TT boilers, the increasing coefficients are 1.5 and 2, respectively.
If you live in an area with a mild southern climate, then the coefficients should not be used. Conversely, residents of the northern regions should increase the initial heat loss figure by 1.5-2 times.
Calculation of heat losses by volume of residential premises
Reasons for using a screed
Heating pipes can be laid indoors using open or closed methods. A closed method is often used, when the pipes are hidden in a screed and filled with concrete. Such actions are carried out for the following reasons:
- aesthetic appearance. Pipes hidden in the screed make the room more neat and spacious;
- there is no risk of burns, since the air temperature in the heating device is high, there is a risk of injury;
- the service life of pipes increases. Since no damage occurs during operation;
- communications do not accumulate dust in the room;
- the room retains heat for a long period;
In the event of a breakdown, it is necessary to chisel the wall to get to the damage site. The work is complex and requires financial investment.
Types of heating batteries
Water heating devices are divided into types based on the material they are made of:
- steel;
- aluminum;
- cast iron;
- bimetallic.
Construction of stamped steel heaters
Reference. The name “aluminum radiators” is conditional. In fact, batteries are made from an alloy of aluminum and silicon - silumin.
Steel radiators are available in the form of flat panels and individual sections connected by threaded nipples. Batteries made of cast iron, silumin, bimetal - sectional. The latter type of devices is also made of an alloy, but a frame made of iron pipes is inserted inside, withstanding high pressure and protecting the aluminum walls from corrosion.
Connecting a sectional battery with nipples
How to choose heating radiators:
- Select the type of batteries for a private home at your discretion; any will do - cast iron, iron, aluminum. Focus on your own budget, appearance, quality of products.
- In an apartment in a high-rise building with central heating, do not take steel panel radiators and cast iron “accordions” of the old MS-140 model. They are designed for a working pressure of 9-10 bar, and in the heating network there can be 12.
- When laying hidden pipelines under floors, use batteries with bottom connections.
- The number of sections or size of a panel radiator is based on heat transfer indicators, using a simplified method.
Bimetallic radiator - a steel core made of pipes is embedded in the silumin housing
Zoning
Thanks to the thoughtful distribution of thermal energy, you can not only create a comfortable atmosphere in your home, but also significantly save money.
List of recommended temperatures for different rooms:
- Average level of comfortable temperature: + 20-24 degrees.
- It is advisable to increase the temperature level in the bedroom slightly to + 22-25 degrees.
- The bathroom, toilet, living room and other rooms where apartment residents visit most often should be heated within the range of + 21 to + 24 degrees.
- In the dining room, kitchen and office, the temperature is reduced to +18-22 degrees.
- The hallway, garage and passage rooms should be heated within + 12 degrees.
Pipes for connecting radiators and heated floors
For homeowners without installation experience, we recommend the following options:
- If you want to save on materials, take reinforced polypropylene pipes (PP-R) with fittings. In addition, buy an inexpensive Chinese soldering iron - it will definitely be enough to assemble 1 system.
- Without special tools, you can install heating pipes from metal-plastic pipes on compression fittings, tightened with open-end wrenches. The disadvantage is the high cost of parts.
- The best solution is to assemble the system from cross-linked polyethylene or metal-plastic with press fittings. You will have to rent special pliers.
The structure of the polypropylene pipe - to prevent thermal elongation, aluminum reinforcement is laid between the layers of plastic
Important note. Polypropylene is not suitable for installing heated floors due to the thick walls and joints that fall inside the screed. Use metal-plastic or polyethylene PE-X, PE-RT.
Polypropylene pipelines are welded according to technology, the main thing is to accurately maintain the heating time. It is strictly not recommended to wall PP-R joints in floors and walls to avoid the consequences of leakage.
Beginners should not use copper, stainless or galvanized pipes. High-quality installation will require certain skills - welding, proper cutting, crimping. Metal is reliable, but inferior to plastic in price.
On the left in the photo are pipes made of metal-plastic, on the right - cross-linked polyethylene
Steel
Welding equipment is used to connect steel pipes; for products made of stainless or galvanized steel, a threaded connection is used. The assembly of heating systems from steel consumables must be carried out by specialists who have the appropriate qualifications. The low demand for metal pipes is explained by the rather high cost and difficult installation.
Boiler installation instructions
Strict requirements are put forward only for the installation of gas-powered heaters. But we recommend following these rules when installing any heat generators:
- Equipment with a power of up to 60 kW can be placed in a kitchen with ceilings of 2.5 m (minimum). More powerful units are moved to a technical room - internal, attached or free-standing.
- The requirement for furnace ventilation is threefold air exchange, that is, the amount of supply and exhaust air is equal to three volumes of the room in 1 hour. The kitchen window is equipped with a window.
- When placing a floor-standing boiler, observe the minimum technological passages - 1.25 m in front, 60 cm on the side, 250 mm in the back from the nearest building structure, as shown in the photo.
- The distances from the wall-mounted heat generator to the walls or cabinets are 20 cm on the side, 45 cm on the top, 300 mm on the bottom. Before hanging, a protective sheet of roofing steel is laid on the wooden wall.
- The height of the chimney is 5 m, calculated from the grate or gas burner, not from the ground. The head of the pipe should not fall into the wind support zone of the roof.
- The maximum number of turns of the chimney is 3, the distance from the chimney to combustible structures is 0.5 m.
Clarification. Double-walled sandwich-type chimneys can be placed at a distance of 38 cm from wooden walls and ceilings.
The heat generator piping depends on the fuel consumed. High efficiency boilers - gas, diesel - are connected to the system directly through shut-off valves. Floor-standing versions are additionally equipped with an external expansion tank and pump.
Typical wiring diagram for a double-circuit wall-mounted heat generator
Solid fuel units must be protected from cold return flow and condensation; accordingly, a small boiler circuit with a three-way mixing valve is provided. Please note: the pump is always installed inside the circuit, on the supply or return line - it makes no difference. Detailed wiring diagrams are shown in the instructions for connecting TT boilers.
Important! In a closed system operating under pressure, there is always a safety group - a pressure gauge, an automatic air vent and a safety valve. The installation point is the supply pipe at the boiler outlet. To prevent dirt and sand from getting inside the heat exchanger, a filter - a mud filter - is placed on the return line in front of the heater.
Tips for installing a home heating system
The heating installation begins with the installation of radiators in pre-prepared places under windows or on corner external walls. The devices are hung on special hooks attached to the structure itself or the plasterboard finish. The unused lower outlet of the radiator is closed with a plug, and a Mayevsky valve is screwed in from above.
The pipeline network is installed according to the assembly technology of certain plastic pipes. To protect you from mistakes, here are some general recommendations:
- When installing polypropylene, take into account the thermal elongation of pipes. When turning, the knee should not rest against the wall, otherwise, after starting the heating, the line will bend like a saber.
- It is better to lay the wiring in an open way (excluding collector circuits). Try not to hide the joints behind the sheathing or embed them in the screed; use them to secure pipes.
- Mains and connections located inside the cement screed must be protected with a layer of thermal insulation.
- If for any reason a loop has formed in the pipeline, facing upward, install an automatic air vent on it.
- It is advisable to install horizontal sections with a slight slope (1-2 mm per linear meter) for better emptying and removal of air bubbles. Gravity flow schemes provide for slopes from 3 to 10 mm per 1 m.p.
- Place the membrane expansion tank on the return line near the boiler. Provide a valve to shut off the container in the event of a malfunction.
Installation trick. Do not fill the TP screed until you fill the circuits with water and warm up the system. The goal is to increase the pressure in plastic pipes and force them to lengthen, that is, to put them into operating mode. Then the material will not bend under the weight of the monolith and will not float up if the solution turns out to be liquid.
Detailed description of each method
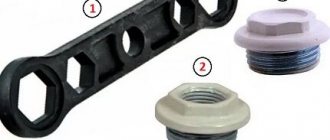
Threaded
They can be done in several ways, the most common being squeezing.
The following tools will help you do this job:
- Pipe wrench.
- Coupling with internal thread.
- Seals for sealing. Maybe: hemp rope, FUM tape or sealant.
- Lock-nut.
Two pipes have external threads. We apply sealant to them. One has a longer thread length than the other. Where there are more turns the nut is screwed on until the end. Then the clutch. Then we screw it onto the second part, twisting it with the first one. When the coupling stops screwing, support it with a lock nut
Tighten with keys, carefully, so that the coupling does not burst
Flanges
For a flange joint you will need:
- two flanges;
- paronite gasket;
- bolts, washers, nuts;
- keys;
- manual arc welding;
- level.
The flanges need to be welded. Avoid displacement; they must be in the same plane.
We catch using a horizontal level. We screw two bolts into the upper holes. We put the part on the edge of the tube so that the bolts are at the top. We put a level on them and catch the position of the bubble between the strips in the middle. When caught, we make a tack by welding at the top point. The horizontal plane is ready.
We rearrange the level to a vertical position, leaning it against the flange mirror. We catch the level by slightly adjusting the lower end of the flange that is not yet stuck. Having established the vertical, we installed the second tack. And then two more, resulting in four even sections.
Then the welder welds the flange on both sides. Manipulations are carried out similarly with the second pipe.
Bonding
This method is used very rarely in metal parts. The process itself does not require any special skill from a person, but it takes a lot of time.
This job requires:
- glue. BF-2 or 88N or EDP;
- brush.
Before gluing the parts, first apply the first layer on their surface and allow to dry. This layer will be the bonding layer. Each glue has a drying time written in its instructions. Then a second layer is applied and the parts are placed under the press for a day or even more. It all depends on the glue.
Then clean the seam from any glue leaks.
Crimp connectors for steel pipes
Welding
The welding process is used in almost all metal pipe joints.
In order to obtain a seam, the following welding methods are used:
Gas welding is used to obtain permanent connections in small diameter pipes with minimal thickness.
The gas welding station consists of:
- oxygen cylinder;
- acetylene;
- rubber hoses;
- burners.
Resistance welding is rarely used. This method has proven itself more effective in working with plastic pipes.
The most popular method of producing permanent joints is electric arc welding, divided into:
- manual
- semi-automatic in protective gas environment
When constructing pipelines, connections are made only by welding
An important part is preparing the joint for welding
The pipe must be connected to another:
- no fractures or displacements;
- the joint must be cleaned;
- make a chamfer;
- set the gap to 1-3 mm.
Required welding equipment:
- electrodes;
- power source (transformer or rectifier);
- cable;
- Personal protective equipment for welders: overalls, mittens, brushes.
Soldering of polyethylene pipes end-to-end and using an electrofusion coupling
Trumpet
This type of connection is widely used in cast iron pipes for the oil and gas industry, housing and communal services. One of the simplest options for permanent joints.
The main process of obtaining a joint is to seal the gap between the socket and the surface of the conical pipe. Cement material is used for this.
To seal the socket, grade 300-400 cement is used, which is thoroughly mixed with water in a ratio of nine parts cement to one part water. The socket is filled with cement mortar using a scoop and embossed until the latter begins to bounce off the cement.
Pressing
This method of obtaining a permanent weld has become necessary for small-diameter connections made of non-ferrous metals. Conventional electric arc welding is not capable of welding such metals due to its technical parameters, so in this case they found a different approach.
To join such thin-walled non-ferrous metal pipes, press fittings with crimp sleeves are used. They perform crimping on the inside of the pipe, and external seals ensure the joint is sealed.