Here you will learn:
- Eight ways to increase efficiency
- Integrated approach and technical solutions
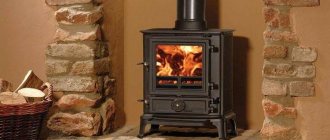
Traditional potbelly stoves are not characterized by the highest efficiency. Up to 30-40% of the heat they generate flies into the chimney. Simple technical devices will allow you to increase the efficiency of a potbelly stove. In this review, we'll look at eight ways to increase the efficiency of these furnaces. They differ in level of complexity, but all work is done with your own hands using auxiliary tools. Let's go through these methods in more detail.
Improving the stove to increase efficiency
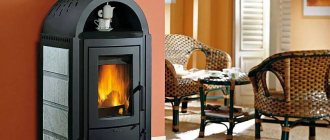
Suitable for heating a garage
To increase the performance of a potbelly stove, the chimney pipe can be built not at the back, as is traditionally done, but at the front directly above the combustion chamber. In this case, the walls of the stove will first heat up, increasing the heat output. And if the stove itself and the pipe are lined with bricks, the cooling time will increase significantly, which will lead to fuel savings. In addition, if the dimensions of the structure allow, you can make the internal walls in the combustion chamber itself from fireclay bricks, that is, line the furnace.
Another method of increasing the heat capacity of a stove-stove is to install additional fins. To do this, strips of thick metal located perpendicular to the walls are welded to the outside of the side walls of the furnace. At the same time, the heated area increases, which warms up the surrounding air faster. If you place a container of water on the stove, this will also help retain heat for a long time after the fire stops.
A furnace with welded fins can be protected with a special casing made of metal or heat-resistant materials. This will reduce the risk of getting burned when firing the stove.
Another way to increase the efficiency of a potbelly stove is to weld large-diameter hollow metal pipes to it. Their ends at the top of the stove will be directed in opposite directions according to the principle of Buleryan stoves.
Increasing heat capacity
The heat capacity of a potbelly stove can be increased both by increasing its weight and dimensions and by using additional heated materials. In any case, it is necessary to make design changes to the heating system. One option may be to use smoke circulation inside the oven. This can be done by installing sheets of heat-resistant metal in the firebox, thereby providing additional paths for the movement of gases. At the same time, they are burned, heating the furnace to a higher temperature. But at the same time, the temperature of the exiting smoke also increases. With a short chimney, the heat is simply released into the atmosphere.
To use this heat, a heat-storing container is installed on the exhaust pipe of the potbelly stove, which can be made either from an old gas cylinder or from a large-diameter pipe. The container is filled with large stones that retain heat well. At the same time, it is loaded to approximately 2/3 of the volume. The stones are placed on the grate. Hot gases flowing through the battery heat them up and, giving off heat, go outside.
The stones are heated to a temperature of about 400 °C. After the fuel burns out in the stove, the damper on the chimney is closed and the room is heated using the heat accumulated by the stones. In this case, the stove is in a cold state. Using such a battery allows you not only to save fuel, but also to receive heat after the stove stops working.
The battery, which increases the efficiency of the furnace, can be made of brick and installed on metal supports above its surface. But such a design cannot be used with a round stove.
The calorie content of fuel depends on its type and quality. Replacing fuel with a higher-calorie fuel is expensive and requires additional storage space. As a rule, garages are heated with waste material that is easy to find. Now, knowing how to increase the efficiency of a potbelly stove, you can begin work. It should be noted that the best results are obtained with the integrated use of methods that increase the heating efficiency of the furnace.
Ways to increase efficiency
Potbelly stoves are made in various shapes and sizes. But they have one drawback in common - low efficiency. More than half of the thermal energy, in the literal sense of the word, flies out into the chimney. The irrational use of heat has led to the fact that the owners of these heating devices began to think about possible changes in the design of the furnace to increase its efficiency. The solution to this problem could be a partial modernization of the potbelly stove. There was no single concept for solving this issue, and each stove owner began to solve the problem independently, by trial and error.
Increasing the efficiency of a potbelly stove means receiving additional heat from the heating device while maintaining a constant amount of burned fuel. This can be achieved in several ways:
- changing the heat transfer surface,
- increase in heat removal;
- using more high-calorie fuel;
- increasing the heat capacity of the furnace.
The potbelly stove gives off heat to the surrounding space not only with its body, but also with its metal chimney. You can increase the heat transfer surface of the device by revising its dimensions upward. This option is possible when creating a stove with your own hands. Having already made a potbelly stove, you can do it in another way. Usually a corner is welded to a chimney made of a metal pipe. Position it with its apex facing the element along its entire length. The angle is installed around the pipe. Thus, the area of the heat transfer surface can be increased by 3-4 times, depending on the size of the corner.
Another option for increasing the heat transfer surface is to make a chimney running inside a large area. For this purpose, a chimney with turns is made. They are performed in the form of smooth transitions. It is undesirable to create turns at right angles, as the potbelly stove may start to smoke. The last section of the chimney is installed vertically. A pocket is made on it with a hatch for cleaning soot.
If it is impossible to lengthen the pipe, its design is changed. Cylinders made of pipes with a diameter of 300-400 mm are welded onto the pipe coming out of the furnace body. They are connected to each other by pipe sections with a diameter no less than that of the smoke pipe. They are welded out of alignment to increase the smoke path.
We assemble and install equipment
There are two options for creating this heating system:
- The coil is installed in the stove during the construction stage of the latter.
- The heat exchanger is built into an already erected furnace structure.
Using a radiator as a heat exchanger
The latter method is more labor-intensive because it involves dismantling the brickwork of the stove. In addition, the fuel part will be reduced after installing the coil.
Complete the heating circuit. The highest point of the line must be equipped with a storage tank, it is mandatory to install a safety and air valve, as well as a safety unit with a pressure gauge. Where the radiators enter and exit the furnace, connect the valves.
To prevent the water in the coil from boiling, its thickness must be at least 40 millimeters. The walls of the heat exchanger must be at least 5 millimeters. If the stove is heated with coal, then this figure increases. Otherwise, the walls of the coil may burn out. The exchanger should not fit tightly to the wall of the fuel part of the stove. There should be a space of at least 2 centimeters between them. This is necessary due to thermal expansion of the heat exchanger
Pay great attention to the fire safety of the system. If the stove has wooden partitions, then there must be an air space between them, because if the wooden structures overheat, a fire may occur
This is why wood is not the best facing material for a stove. To do this, it is better to choose materials with fire-resistant qualities.
Pipe coils
Coil option for heating and cooking stoves
The photo above shows a diagram of one of the coil options. This is what stoves designed for both heating and cooking are equipped with, because it is easy to build a cooking surface over it.
A profile pipe used instead of the upper and lower U-shaped pipes in such a coil will greatly simplify the process of creating it. Rectangular profiles can replace vertical pipes if necessary.
To make a steel heat exchanger, the thickness of the steel must be at least 5 millimeters. The use of a 6x4 centimeter profile and 5 centimeter pipes is necessary for the inlet and outlet of liquid. Depending on the length of the fuel part of your stove, the size of the heat exchanger is selected.
If you are going to insert a steel heat exchanger into a stove that is equipped with a hob, then experts advise making the design so that the gas flows around the top shelf of the coil. This gas then escaped into the smoke circuit, which is located in front of the coil.
Sheet steel heat exchanger
Using sheet steel, you can build an exchanger in the form of a book.
To do this, the walls of the heat exchanger are connected using pipes or a profile. Here in the register there is no top shelf. To improve circulation, connecting pipes are added at the top of the register. The inlet and outlet are made at the back or side of the heat exchanger. The hob is installed above the register.
Installation process
Installation of the water circuit
The exchanger is installed in the same way as any other heating system. There is only one nuance - this is the location of the “return”. It is located above.
In the first case, the pipes are installed with the maximum possible slope.
Natural circulation
Where the pipes exit the stove, a “acceleration manifold” is installed. To make it, direct the pipe in a vertical direction to a height of 100–150 centimeters, and then down to the radiators at an angle.
Forced circulation
It forms the pressure of the coil. True, experts do not recommend using only this type of circulation. If there are power outages or the pump breaks down, the water will stop circulating and the coolant may boil.
https://www.youtube.com/watch?v=d0WSmS_Tc5c
The latter type combines the first two, i.e. it is equipped with both sloped pipes and a pump, where the latter is connected to the system via a parallel line. This is beneficial because the circulation will be carried out using a pump, and if the power goes out or the pump breaks down, the water begins to circulate naturally.
Why is there bad draft in the furnace?
Poor or weak traction most often causes reverse traction as a consequence. The reasons may be completely different from each other. As for the main one, these are the mistakes that people made when designing the heating system. In this case, there is a possibility of improper use of building materials. Let us also consider in more detail the possible sources of the problem and what to do in such cases:
The defect may be hidden in the chimney design. The proportions between height and firebox are sometimes calculated incorrectly. And because of a low pipe, for example, the pulling often happens worse. However, if the parameter for this component was greater, then reverse thrust would not have formed.
REFERENCE
That’s why it’s so important to consider the universal size – about five meters
- Don't forget about the diameter ratio. A narrow value makes it difficult to remove combustion products.
- In addition, if the product is square in shape, then most likely the movement of smoke will not be as free as it would be with rounded corners.
- Natural conditions also significantly influence the presence of weak traction. In rainy climates, high humidity or strong winds, the level tends to decrease.
- If there are various damages or scratches or irregularities on the pipe, then there is a high probability of obstacles to attraction with a good coefficient.
- Stove care. There are often cases when the user forgets about cleaning, thereby accumulating dirt - collapsed building materials.
- The reason is very similar to the previous one. Only this time the clog is soot.
- The ventilation process has been disrupted. Because of this, there is a shortage or no supply of air mass at all.
Option two, allowing you to use the heat of the chimney
In the chimney, the air heats up to a very high temperature, since the brick warms up quite well during the firing process. The longer the stove is heated, the less heat the brick takes and the more the gases escaping through the pipe heat up.
At the same time, this also reduces the efficiency. To increase it, you need to use high temperature, heating the gases that flow through the chimney.
To increase efficiency, it is enough to integrate a steel pipe into the chimney.
For this you can use both round and square pipes. Their diameter can vary from two hundred to three hundred millimeters. When placing the pipe, care must be taken to tilt it towards the stove.
Several pipes can be built into the chimney. This depends on the size of the oven. Having arranged the chimney in this way, you will notice that the room heats up much faster, since the metal has high thermal conductivity and allows the heat of the chimney, which previously went outside, to be transferred into the room.
A well-heated pipe heats the air that circulates in the room, and does not create a vacuum, but rather enhances the movement of warm air. As a result, the room heats up faster, fuel is saved, and the efficiency of the stove increases significantly. However, such reconstruction must be carried out at the masonry stage.
These two methods have already been tested in practice and proven to be effective. Experts recommend not limiting yourself to one of them, but boldly implementing both in order to feel the difference both in fuel economy and in heating the house before using and after improving the stove.
Warm brick
A potbelly stove using wood, coal and other types of fuel can significantly increase its efficiency. To do this, it is enough to build a screen of baked clay bricks around it with your own hands. If you look carefully at the drawings of such a mini-building, you will see that the bricks are laid at a short distance from the walls of the stove (about 10-15 cm), and, if desired, around the chimney.
Brick screen for potbelly stove
Bricks require a foundation. Do you want the masonry to last a long time? Then fill the base one at a time to form a monolith. It is better to take concrete as the material for the foundation, which should be reinforced with steel reinforcement yourself. It is advisable to place the reinforcement layer at a distance of approximately 5 cm from the surface of the concrete pad.
Ventilation holes are made at the bottom and top of the brickwork, which will ensure air movement (heated masses will go up, cold air flows will come from below). Ventilation also prolongs the life of the metal walls of the potbelly stove, delaying the moment of their burning due to cooling by circulating air.
Bricks laid around the stove accumulate heat and then release it for a long time, warming the air in the room even after the stove goes out. In addition, brickwork additionally protects objects surrounding the stove from fire.
If desired, you can completely lay out the stove from brick. Such a structure is advantageous in that it will last for many years without additional effort on the part of the owner. However, there are also certain disadvantages. The disadvantages of this option include the following:
- the process of laying out such a stove is quite labor-intensive and is suitable only for those people who have experience in masonry with their own hands;
- a brick stove is quite expensive, as it requires the use of fireproof materials, including fireclay bricks and special clay for mortar.
In order to get a small potbelly stove with wood, it is enough to lay out a cone measuring 2 by 2.5 bricks, 9 bricks high. In the combustion chamber, rows 2-4 are laid out of fireclay bricks. An ordinary fired clay brick is suitable for a chimney, into which you must remember to insert a stainless steel sleeve.
Whatever the method of making a miniature stove or potbelly fireplace with your own hands, whether you make them according to a drawing or by eye, the main thing is that at the end you get an effective heating device, and in an expanded configuration also a hob for cooking. Look around for suitable materials (barrels, sheet iron, etc.) and go ahead to your own homemade stove or even a potbelly stove!
How to increase the heat output of a furnace
So, how to increase the efficiency of such a stove?
There are several simple ways. The most basic one is to put a brick screen around the stove. The bricks don’t even need to be held together with clay; just lay them on top of each other. You can fold such a screen near the side walls, or you can fold it at both side and rear walls. The brick will heat up while the fire is burning, and when it becomes small or goes out, it will give off heat. You won't have to add fuel often. One of the features of a potbelly stove is that the stove is light and mobile. With such a screen, it will not lose its mobility, because the bricks can be disassembled at any time, the stove can be rearranged and the screen can be folded in a new place. https://youtube.com/watch?v=SNKEQmQMxl4
There is another method with a screen, which also increases heat transfer. In this case, a sheet metal screen is mounted at some distance from the side and/or rear wall of the stove. The sheets can be secured using long bolts. In this case, the effect of convection is added.
There is another simple way to increase heat transfer. This time the stove's chimney is being modernized. Typically, such stoves have a straight chimney. It is removed through the roof of the room in which the stove is installed. If you add several bends to the pipe, then the heat transfer will increase, although not by much. In this case, the pipe will resemble the letter S.
If you want it to be much warmer, then you need to take 2 tanks from old-style washing machines. The tanks are welded together, and a chimney is passed through them. Thus, above the potbelly stove, which is heated with wood, there is also a stove of the same size, heated by hot smoke. Heat transfer almost doubles.
Another method is to weld additional ribs onto the stove and chimney, for example, from metal angles. In this case, the chimney must be made of thick metal. Such fins significantly increase the heated surface area. An increase in area leads to faster heating of the surrounding air. The room becomes warmer. In addition, thick metal retains heat even when the fire in the firebox is no longer burning.
But still, it will not be possible to endlessly increase the efficiency of this heating device. And if you want to have a full-fledged stove in the room, you will have to build it out of brick according to all the rules, so that the stove retains heat for a long time, for example, all night. For example, there is no need to increase the efficiency of a Russian stove; it already retains heat for a very long time. True, in order to fold it correctly, you will have to call a stove specialist.
What is a potbelly stove
For those who have never seen such stoves, we need to tell you what a potbelly stove is. This is a metal firebox with a straight chimney and a hole into which firewood is placed. These fireboxes are often made from any metal object of suitable volume or welded from scrap metal. A potbelly stove can be round, for example, made from an old metal barrel, or square or rectangular from iron boxes. The stove is placed on metal legs or simply on bricks. The pipe is routed through the roof. The good thing about a potbelly stove is that it is cheap, and you can heat it with any waste.
The operation of such a stove is based on constant combustion. Thin metal heats up quickly and transfers heat to the room. Everything would be fine, but you have to constantly maintain the fire in the firebox, because when the flame becomes smaller, the stove begins to cool down. It cools down quickly, and the room becomes cold again. But craftsmen learned to get out of the situation by modernizing the stove with their own hands. Having such a stove and slightly modernizing it, you can get a very cheap heating device that will retain heat even after the fire goes out. And when burning, the converted potbelly stove will produce much more heat than before.
Factory production
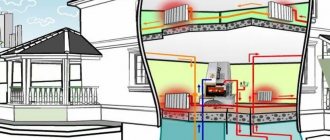
It must be said that it is not for nothing that individual heating boilers and long-burning stoves are called mini-boiler houses - they really represent an entire heating system that can provide precious heat in winter to rooms with a fairly large area. The most common today are autonomous stoves using combined solid fuels (wood, coal, pellets - fuel granules), which are not without reason considered the most inexpensive and convenient type of heating for domestic use. An alternative to them is the so-called electric heating - compact and fully automated electric boilers for individual heating. If gas and electricity seem to you an unprofitable way to heat your own home, then in this case, as an alternative, heating equipment manufacturers will offer a wide selection of liquid and solid fuel, as well as long-burning condensing boilers. Combined heating systems for the home, which can operate on different types of fuel, are also very popular.
All individual heating sources can be divided into single-circuit and double-circuit. The difference between them is that the first type of heating equipment is intended exclusively for heating residential and non-residential premises, while the second - double-circuit boilers - are also used for hot water supply (this is the most popular type of heating device among owners of country houses, which allows solve two problems at once).
| Equipment: cast-iron fire door with heat-resistant glass, cast-iron blower door with a system for adjusting combustion modes, cast-iron hob, firebox lined with easily replaceable high-quality fireclay, ceramic side inserts. | |
| Fire door Vesuvius 205 made of cast iron. Height 820 mm. Width 600 mm. Depth 550 mm. Chimney diameter 115 mm. Weight 180 kg. Cast iron hob. Cast iron grate. Ceramic finish. | |
| Possibility of connecting an electric fan, which provides “turbojet” heating of the room. Tooth chipper made of stainless steel 2mm thick. | |
| The furnace finish is soapstone, heated volume is 230 m³, power PK-01(205) 12 kW (200 m3), water circuit, the furnace is made of high-quality structural steel, cast iron hob has a service life of more than 10 years. | |
| General characteristics: steel stove, cast iron, stove finish sandstone, heated volume 220 m³, power 12 kW, burning time of one load of firewood up to 5 hours, service life of at least 10 years. |
How to make a homemade potbelly stove?
- The first type of potbelly stove
- The second type of stove-stove
- The third type of stove-stove
- Step-by-step construction of a potbelly stove
The stove, popularly known as a “potbelly stove,” is a barrel- or box-shaped metal structure equipped with a pipe and a door. As a rule, the chimney was led directly into the window of the room. The “potbelly stove” literally saved people in the cold season, if the house did not have a large Russian stove or there was simply not enough wood for heating.
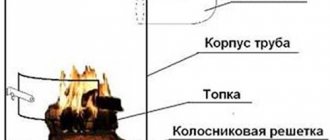
Sawdust stove diagram.
This stove got its name because of its high efficiency; she could heat a room in a short time by burning several birch branches.
Until now, homemade potbelly stoves with a similar design are successfully used for heating garages, temporary buildings and small country houses.
In addition, urban apartment dwellers should also resort to such simple equipment if the heating is turned off in winter.
Potbelly stoves impress with the simplicity of their design and high efficiency. Today there are several different types of baby stoves, let's look at some of them.
A few highlights
The screen can be harmoniously combined with the interior
First, you need to choose the most effective cladding method, which hides all the pipes and taps as much as possible, matches the style of the interior of the room and has a neat appearance. In order for the structure to last for a long time, the following points should be taken into account:
- reliability, strength and durability of the heating system (if there is any doubt at this point, it is better to construct a collapsible casing);
- the meter, faucet, machine and other heat or pressure regulators must be freely accessible;
- The architecture and geometry of the system will affect the shape of camouflage shields and screens; it may be necessary to design a box.
Chimney for potbelly stove
Material for making a chimney
Before you start making a chimney pipe that will be installed on a potbelly stove, you need to decide on the material that will be used.
Taking into account the fact that a potbelly stove is a portable stove, we immediately refuse brick chimneys. In this case, we have few options: either asbestos-cement or metal pipes. Most heating experts still recommend using metal chimneys: they are lighter and easier to manufacture
We'll talk about them in more detail.
Most heating experts still recommend using metal chimneys: they are both lighter and easier to manufacture. We will talk about them in more detail.
Cast iron stove with steel chimney
Making a metal chimney for a potbelly stove
So, we have decided on the material - we will make a chimney from a metal (stainless steel) pipe. However, it is not enough to simply insert the chimney pipe into the corresponding hole in the potbelly stove - the chimney must be correctly mounted and optimally located.
Potbelly stove on the street
As a rule, a simple chimney for a potbelly stove installed indoors consists of two parts - internal and external. These parts are connected in the attic or at the level of the under-roof space.
This “double-knee” design makes it relatively easy to replace the lower burnt-out segment of the chimney without dismantling the entire system.
By the way, you can not buy steel pipes, but bend them from a steel sheet, but this will require certain skills from you. On the other hand, then you can make a pipe for a stove-stove of exactly the diameter that you need.
Pipe installation
To install a chimney of standard dimensions, we will need the following materials:
- Elbow 100x1200mm (1 pc.)
- Elbow 160x1200 mm (2 pcs.)
- Butt elbow 160x100 mm (3 pcs.)
- Tee 160 mm with plug
- Mushroom 200 mm
Also, depending on the characteristics of the room in which the potbelly stove with our chimney will be installed, you may need a passage glass, a rain canopy, thermal insulation, etc.
Also, to seal the joints between pipes, we may need an asbestos cord or a special sealant.
After all the materials are ready, we begin assembling the pipe for the potbelly stove:
- We fix the first section of the pipe on the chimney opening or the furnace pipe.
- We extend the pipe bends until they overlap.
Chimney hole
- We make a hole in the floor slab with a diameter of at least 160 mm for the chimney outlet. We remove the thermal insulation along the edges of the hole to prevent it from igniting.
- We insert a passage glass into the hole, and then pass the potbelly stove pipe through it.
- We connect the pipe to the external chimney.
- To ensure optimal operation of the chimney, we provide thermal insulation to the outer part of the chimney by wrapping it with thermal insulation and coating it with bitumen.
Chimney outlet through a window
We strengthen the fungus on top of the chimney, which protects the pipe from precipitation and small debris getting inside.
Pipe care
In order for the chimney (and with it the potbelly stove itself) to work properly, it must be looked after:
- At least once a year we check the outer surface of the pipe for defects - burnouts, rust, cracks.
- Likewise, the pipe needs to be cleaned annually. To do this, you can either use special chemical compounds that are burned in the firebox along with firewood, or simply burn several aspen logs in a potbelly stove. Aspen gives a very high temperature, which perfectly burns soot.
- It is unlikely that it will be possible to use mechanical cleaning means (brush, weight, etc.), because the chimney of a potbelly stove is not very durable.
Manufacturing and arranging both the stove itself and the pipe for the potbelly stove is a difficult task only at first glance. Of course, you will have to work hard and carefully study the proposed instructions - but it is still quite possible to do this without resorting to the help of specialists. So go for it!
Potbelly stoves - proven and simple designs
Potbelly stoves were a hit of the 20s of the last century. At that time, these stoves competed with brick stoves and were installed everywhere, even in apartments. Later, with the advent of centralized heating, they lost their relevance, but are used in garages, dachas, and for heating utility or outbuildings.
Sheet metal
Potbelly stoves from a cylinder, barrel or pipe
The most suitable material for making a potbelly stove for a garage is propane cylinders or a pipe with a thick wall. Barrels are also suitable, but you need to look for ones that are not very large in volume and have a thick wall. In any option, the minimum wall thickness is 2-3 mm, the optimal is 5 mm. Such a stove will serve for many years.
By design they are vertical and horizontal. It is more convenient to burn horizontally with firewood - longer logs will fit. It’s easier to make one extended upward, but the firebox is small in size, so you’ll have to cut the wood finely.
A potbelly stove for a garage can be made from a cylinder or pipe with a thick wall
Vertical
First, how to make a vertical stove for a garage from a cylinder or pipe. Divide the selected segment into two unequal parts. Below is a smaller one for collecting ash, above is the main one for storing firewood. The following is the order of work:
- Cut out the doors. Small at the bottom, solid at the top. We use the cut pieces as doors, so we don’t throw them away.
- We weld the grates in the chosen place. Usually this is steel reinforcement cut into pieces of the required length with a thickness of 12-16 mm. The reinforcement installation step is about 2 cm.
- Weld the bottom if there is none.
- We cut out a hole in the lid for the chimney, weld a strip of metal about 7-10 cm high. It is better to make the outer diameter of the resulting pipe fit standard chimneys. Then there will be no problems with the installation of the chimney.
- We weld the lid with the welded pipe into place.
- Using welding, we attach the locks and hinges to the cut-out door pieces and install it all in place. As a rule, potbelly stoves are not airtight, so there is no need to make seals. But if desired, you can weld a strip of metal 1.5-2 cm wide around the perimeter of the doors. Its protruding part will cover a small gap around the perimeter.
Overall, that's it. All that remains is to assemble the chimney and you can test a new stove for the garage.
Horizontal
If the housing is located horizontally, the ash box is usually welded from below. It can be welded to the required dimensions from sheet steel or a piece of channel of a suitable size can be used. Holes are made in the part of the body that will be directed downwards. It’s better to cut something like grate bars.
How to make a potbelly stove for a garage from a gas cylinder
Then in the upper part of the body we make a pipe for the chimney. To do this, you can weld a cut piece from a pipe of a suitable diameter. After the piece of pipe is installed and the seam is checked, the metal inside the ring is cut out.
Next you can make the legs. The best fit is pieces of a corner, to which small pieces of metal are attached from below so that they stand stable.
The next step is installing the doors. You can cut a piece of metal onto the ash pan, attach hinges and a lock. There are no special problems here. The gaps around the edges do not interfere - combustion air will flow through them.
There will be no difficulties if you are making a door from metal - welding the hinges is not a problem. Only here, in order to be able to at least slightly regulate the combustion, the door needs to be made a little larger - so that the perimeter of the opening is closed.
How to install stove casting on a metal stove
It is problematic to install furnace casting. Suddenly someone wants to have not a steel door, but a cast iron one. Then you need to weld a frame from a steel corner, attach the casting to it with bolts, and weld this entire structure to the body.
From two barrels
Anyone who has used a potbelly stove knows that very hard radiation comes from its body. Often the walls become heated to a red glow. Then it is impossible to be near her. The problem is solved with an interesting design: two barrels of different diameters, inserted one into the other. The gaps between the walls are filled with pebbles, clay mixed with sand (calcined over a fire, then filled in only after it has cooled). The inner barrel acts as a firebox, and the outer one is just the body.
This stove will take longer to heat up. It will not immediately begin to give off heat, but it will be more comfortable in the garage and after the fuel burns out, it will warm the room for another couple of hours - releasing the heat accumulated in the bookmark.
https://youtube.com/watch?v=PEWZxL2ebXE
Design and principle of operation
What is the difference between the Loginov Potbelly stove and other metal stoves? The point is the L-shaped blower. The ash pan door is replaced with pipes welded perpendicularly. The edge of the horizontal pipe is tightly welded, and the edge of the vertical pipe has a thread for a plug. There are holes made on the thread - by screwing the plug you can reduce the air flow, thereby regulating the combustion process.
Loginov's original potbelly stove
It is important to make a plug with a slight play, so that expansion of the metal when heated will not cause problems. A screen is welded to the sides and back on the stiffeners to increase efficiency
Without such screens, it is extremely uncomfortable to be near the stove - the temperature is too high and can cause burns. The firebox door is also threaded. A 200mm pipe serves as the firebox opening, and a plug with a handle 220mm in diameter is screwed onto this pipe.
You can see more details about Loginov’s potbelly stove in this video:
Modification
N. Pyankov’s model is distinguished by the presence of an additional combustion chamber. Unlike more complex designs of slow combustion stoves, the Pyankov potbelly stove is manufactured even faster, the model proposed by Loginov. It is enough to weld steel sheets 140-160 mm long to the back and front walls of the furnace at different distances from the top. The distance between the sheets should be 80mm. The grate is installed 80mm from the bottom. Pyankov moved Loginov’s firebox door to the top of the stove and began using it as a hob.
It will not be difficult for a good master to evaluate all the advantages and disadvantages of the two drawings. If desired, you can make a new model of a potbelly stove using only these two developments, changing the rectangular shape to a round one.
An example of a homemade design (in this photo there is a modernized Pyankov stove), but there is practically no difference in the manufacturing process.
Device assembly process
https://youtube.com/watch?v=J8iA78F9Df8
- The potbelly stove will be made from a can. The container must be thoroughly cleaned of dirt and corrosion.
- In the body of the future heating apparatus, you need to make holes for the ash pan and loading of firewood or coal. This can be done using a chisel and hammer.
- You need to attach the door hinges to the body, and then install the doors into the holes made.
- At the bottom of the container you need to make a hole for the smoke exhaust. It is recommended to install a chimney with a 10 cm diameter.
- The next step is to install the grate. You can purchase it at a specialty store or make it yourself. To do this you will need steel wire. It needs to be bent several times and placed inside the heating tank. Before this, you need to weld supports on the inner walls so that the grille does not fall through. The supports can be made from steel rod.
- Then you need to attach the chimney to the hole made in the bottom using a welding machine.
- The potbelly stove is installed in the place intended for it. As noted above, it is not necessary to make a foundation. It is enough to install a brick support or lay a metal sheet, the thickness of which is at least one centimeter.
- A special screen should be laid out of brick around the device. This is necessary to increase the heat transfer of the stove. During operation of the potbelly stove, the brick will also heat up and give off additional heat, even after the wood or coal has completely burned.
The third type of stove-stove
Now let’s figure out how to construct a homemade potbelly stove with a square body with thin walls and an adjustable draft. The main advantage of a square-shaped potbelly stove is its larger surface area of interaction with air, that is, greater efficiency compared to a stove based on a pipe.
The most optimal dimensions for a homemade stove will be a structure height of 800 mm and a base of 450 × 450 mm. A potbelly stove of this size will not take up much space and can easily accept almost any piece of wood.
Chimney installation diagram.
You should also determine what thickness of metal will serve as the material for the stove. Here, as in everything, a golden mean should be observed: very thick walls (about 1 cm) take too long to warm up, thin-walled metal sheets swell after heating, and the stove will become shapeless.
For these purposes, choose an average wall thickness - approximately 0.3-0.5 cm. Then the potbelly stove will retain its original appearance and will perfectly warm the room.
Types of homemade long-burning stoves
For heating small rooms, brick or metal stoves (potbelly stoves) can be used, capable of operating on both solid and liquid fuels.
Long-burning brick stoves are rarely built, since not everyone is able to lay them out with their own hands, taking into account the special requirements for the material and design of the chimney.
After all, an incorrectly made chimney pipe will result in continuous problems with insufficient draft and smoke in the room. In addition, purchasing fireclay bricks and the same powder for mortar will require a lot of money. And the brick oven itself takes up a lot of space, which is completely unacceptable for premises such as a garage, small country house or greenhouse.
Metal stoves, called potbelly stoves, can use free fuel in the form of waste oil, which does not require further disposal and brings tangible benefits.
What are the advantages of bourgeois?
First of all, such long-burning devices are characterized by low profitability. After all, for their production, as a rule, used containers are used. They can be purchased completely free of charge or for a minimal cost. The same can be said about the price of fuel.
Besides:
- You can make a potbelly stove with your own hands if you find successful and understandable drawings of its design.
- Despite the small size of the stove, it has sufficient efficiency.
- There is no need to build a strong foundation for it.
- You don't need to fill out a bunch of permits.
- Easy maintenance and free installation.
- A potbelly stove, in addition to its heating function, can serve as a cooking stove.
Fire door
But despite all the advantages of such do-it-yourself stoves, they have such disadvantages as rapid burning of fuel, as well as rapid cooling due to the inability to accumulate heat. All these shortcomings can be eliminated if improved types of furnaces are used and heat-storing structures are built.
Advantages and disadvantages
The list of advantages of using a wood stove for heating private houses and summer cottages includes:
- saving money on the construction of a massive foundation, since the devices weigh little and have compact dimensions;
- regulation of the combustion process;
- high efficiency (up to 80 - 85%);
- attractive appearance, due to which they fit harmoniously into any home decor;
- multifunctionality - they can not only heat the room, but also heat water and be used for baking and preparing various dishes;
- Possibility of installation in any room with a chimney;
- durability (service life of devices is at least 50 years);
- relatively low cost;
- high efficiency, since the stove can operate for a long time on one load of firewood.
The disadvantages include:
- the need for regular chimney cleaning;
- high requirements for wood moisture content;
- difficulty in setting oven modes.
How to make a potbelly stove from steel
Potbelly stove of convection type.
If you need to heat a house in the country and cook food, you should definitely know how to weld a potbelly stove yourself from sheet steel. This design will not require a lot of fuel. This is achieved through the installation of partitions in the firebox, reliable fastening of the doors and the ability to adjust the air flow. To make such a device with your own hands, you will need to prepare the following elements:
- sheet metal 4 mm thick or more;
- metal 8-12 mm thick, from which the partitions will be made;
- lattice;
- chimney pipe;
- corners from which the legs will be constructed;
- welding device.
Sequence of manufacturing actions
From the steel sheet, the first thing you need to do is cut out elements for the body and several partitions that will be mounted in the upper part of the firebox. They will be able to create a labyrinth for the smoke, which will increase the efficiency of the stove. In the upper part you can make a recess for the chimney structure. The recommended recess diameter is 100 mm. Next, you will need to make a recess for the hob with a diameter of 140 mm.
Potbelly stove made of sheet steel.
Using a welding device, you need to attach the side elements to the bottom of the structure. You will need to attach thick strips of metal to the side walls. As a result, it will be possible to attach the grate. This can be a sheet of metal with recesses with a diameter of about 20 mm. The lattice can be made of reinforcing bars. At the next stage, you need to attach supporting elements from a metal strip to the side walls. After this, the partitions are installed.
Doors for the firebox and ash pan should be cut out of metal. They can be installed on ordinary hinges. However, a more reliable option is to use curtains made of steel pipes and rods. They can be secured to wedge latches. The elements are cut out of a stainless steel sheet and then secured with bolts. In order to be able to adjust the intensity of fuel combustion, a recess must be made on the door that closes the ash pan for mounting the damper.
A sleeve 200 mm high must be attached to the recess for the chimney structure, on which the pipe will be mounted. A damper in the tube will help retain heat. For it you will need to cut a circle from a metal sheet. One extreme part of the steel rod needs to be bent. After this, you will need to make several parallel holes in the tube. Next, the rod is mounted, after which a round damper is welded to it.
Diagram of a brick fence for a potbelly stove.
The chimney pipe should be installed at an angle of 45°. If it passes through a recess in the wall, the part must be wrapped in fiberglass in this place, and then secured with a cement mixture.
To prevent burns from touching a hot stove, you will need to build a steel protection screen on several sides and place it at a distance of 50 mm. If there is a desire to increase the thermal efficiency coefficient, the structure can be covered with brick. After the firebox is finished, the brick will continue to heat the house for some time. The laying should be done at a distance of 12 cm from the metal body.
A pillow of air can act as a heat protector.
To implement it, holes for ventilation must be made in the masonry at the top and bottom.
Calculation of basic parameters (with drawings and dimensions)
High efficiency of a potbelly stove can only be achieved if all the main design parameters are correctly calculated.
Pipe
In this case, the diameter of this element is very important. The throughput of the chimney should be less than the productivity of the furnace firebox, which is the main distinguishing feature of a potbelly stove. This will allow warm air not to immediately leave the stove, but to linger in it and heat the surrounding air.
It is very important to make an accurate calculation for it. The diameter should be 2.7 times the volume of the firebox. In this case, the diameter is determined in millimeters, and the volume of the firebox in liters
For example, the volume of the combustion chamber is 40 liters, which means the chimney diameter should be about 106 mm
In this case, the diameter is determined in millimeters, and the volume of the firebox in liters. For example, the volume of the combustion chamber is 40 liters, which means that the chimney diameter should be about 106 mm.
If the potbelly stove provides for the installation of grates, then the height of the firebox is calculated without taking into account the volume of this part, that is, from the top of the grate.
Screen
It is very important to force the hot gases not to cool, but to burn out completely. In addition, the fuel must burn through partial pyrolysis, which requires extremely high temperatures. A metal screen located on three sides of the stove will help to achieve a similar effect.
It should be placed at a distance of 50–70 mm from the stove walls, due to which most of the heat will return to the stove. This air movement will give the necessary high temperature and protect against fire.
A metal screen located on three sides of the stove will help to achieve a similar effect. It should be placed at a distance of 50–70 mm from the stove walls, due to which most of the heat will return to the stove. This air movement will give the necessary high temperature and protect against fire.
The screen of a potbelly stove made of red brick is capable of accumulating heat
Litter
It definitely has to be there. There are two reasons for this:
- some of the heat is radiated downwards;
- the floor on which the stove stands gets hot, which means there is a risk of fire.
The litter solves these two problems at once. As such, you can use a metal sheet with a projection of 350 mm (ideally 600 mm) beyond the contour of the furnace itself. There are also more modern materials that do an excellent job of this task, for example, a sheet of asbestos or kaolin cardboard, at least 6 mm thick.
You can use an asbestos sheet for bedding under a potbelly stove.
Chimney
Despite all the calculations, gases sometimes escape into the chimney not completely burned out. Therefore, it must be done in a special way. The chimney consists of:
- the vertical part (1–1.2 m), which is recommended to be wrapped in thermal insulation material;
- hog (slightly inclined part or completely horizontal), 2.5–4.5 m long, which should be 1.2 m from the ceiling, which is not protected with heat-resistant materials (1.5 m from the wooden surface), from the floor - by 2.2 m.
The chimney must be vented to the street
Photo gallery: diagrams of a potbelly stove for a garage
The diagram must indicate all the exact measurements. The chimney must be led out onto the street. The potbelly stove can be round or square. The volume of the firebox depends on the presence of grates. The layout of the potbelly stove depends on the material used.
How to increase draft in a potbelly stove using a chimney
The design of a high-efficiency potbelly stove chimney should have the following features:
- The chimney should be made high enough. So, the optimal distance from the furnace itself to the top of the pipe is about 5-6 m.
- There should be no horizontal or inclined sections of less than 45 degrees in the pipe shape, or their number should be kept to a minimum.
An increase in the efficiency of a potbelly stove will also be facilitated by the creation of thermal insulation on the pipe, which will significantly reduce the damage from the formation of condensation.
- When establishing the cross-section of the chimney, you need to choose the optimal size. If at the time of establishing the efficiency of the potbelly stove there is already a too narrow chimney, you can put a deflector on top, which will protect the structure from precipitation and increase draft.
- The height of the pipe should also be affected by the level of the ridge. If the chimney is lower than it, you need to extend the pipe.
↓ Be sure to study the recommended material on the topic ↓
How to make an economical stove-stove with your own hands with increased heat transfer
Tip: The draft force in the stove is determined by the color of the flame: if there is not enough air, it is red with dark stripes, if there is too much air, it is bright white, and the chimney often makes a hum. If the color of the flame is golden-orange, then the potbelly stove’s draft is normal.
About stone ovens
Stone stoves do not lose their popularity to this day, despite the huge selection of modern models. This is due to the reliability of the design, high heat transfer and operation.
Most often, stone stoves are installed in houses that are built in areas remote from centralized heating.
Alternative fuel sources, such as coal and wood, cost much less than electricity or gas. A stone wood stove helps create a special atmosphere in the house.
In such houses you feel more comfortable, and food cooked in the oven has a mind-blowing aroma and taste. The modern design of stoves turns an ordinary structure into a real work of art.
The main stages of making a potbelly stove
1. All the details are marked on a sheet of metal: 6 steel rectangles for the walls of the oven, 1 rectangle for creating a smoke reflector, plates for the grate and latch for the door. 2. Cut
sheet metal can be found at any metal depot. The guillotine, unlike the grinder, allows you to cut (chop) it more accurately. In this case, there will be no need to do straightening (alignment of sheets).3. The furnace body is made in the form of a rectangle. Their sides are joined together at an angle of 90° and welded together.
4. To avoid mistakes, the furnace box is first only tacked by welding in several places, and only then, after checking its horizontal and vertical positions, its seams are welded.
Important! All connections in the body are thoroughly welded; To check the seams for leaks, you can coat the joints with chalk or kerosene. 5
Welding seams are cleaned with a wire brush.6. The internal space of the potbelly stove is divided into three parts: the firebox, the smoke circulation chamber and the ash pan. To separate the firebox from the ash pan, a grate is laid between them, on which the fuel will be placed. To do this, at a height of 10-15 cm from the bottom of the stove, 5x5 cm corners are welded on the sides and on the back of the box. On which the grill will be located
5. Welding seams are cleaned with a wire brush.6. The internal space of the potbelly stove is divided into three parts: the firebox, the smoke circulation chamber and the ash pan. To separate the firebox from the ash pan, a grate is laid between them, on which the fuel will be placed. To do this, at a height of 10-15 cm from the bottom of the stove, 5x5 cm corners
. on which the grille will be located.
Advice.
It is better to make the grate from 2-3 detachable parts. Otherwise, when replacing a burnt grate, it will be difficult to remove it from the firebox.
7. The grate is welded from thick steel rods or strips 30 mm wide. They are attached to 2 stiffeners - rods with a diameter of 20 mm. Since the grates burn out over time, it is better to make such a grate removable.
Manufacturing of grate
8. At a distance of 15 cm from the top of the box, two strong rods are welded, on which one or two removable reflectors
– thick-walled sheets of metal that will delay the flow of hot gases and send them for afterburning. However, they should not completely block the oven. To allow hot smoke to enter the chimney, an indent of about 8 cm is made from the front (for the first sheet) and back of the stove.
Diagram of the passage of gases in a simple potbelly stove and stove with an installed reflector
9. Next, the upper part of the box is welded, and then a hole for the pipe
.
Pipe hole
10. The front part of the stove with holes cut in it for the firebox doors and ash pan is welded last. 11. The size of the firebox door must be sufficient to allow fuel to be added and grates to be changed without effort. The hole for the ash pan is made a little smaller. 12. The hinges are welded first to the door, and then to the body of the potbelly stove. They can be bought ready-made or welded from two tubes of different diameters. Door handles can be made from a strip of metal or rod.
Important! When attaching the doors, you should fit them to the body as tightly as possible; To do this, they are straightened (leveled) and cleaned with an emery wheel. Wedge latches closing the doors are adjusted to the body as tightly as possible
13. You can cook food or heat water on such a stove. To do this, a hole of the required diameter is cut in the upper part of the box. Stove burner
.
which will be inserted into this hole can be purchased at any hardware store.14. For ease of use, the structure is installed on legs
or a welded stand made of pipes.15.
The chimney pipe is connected to the stove using a sleeve
.
16. For inserting a gate valve
. to regulate the smoke output, two holes are drilled in the pipe. A metal rod is inserted into the holes and bent at 90°. A metal “penny” is attached to it in the center of the pipe - a gate, the diameter of which should be slightly less than the diameter of the pipe itself by 3-4 mm.
Gate valve for adjusting smoke output
Preparation of the solution
Let's start by preparing the solution. For masonry work we use a special ready-made mixture. Sold in construction stores. It is a yellow-gray powder in 25 kg bags. All that remains is to dilute it with water in the correct ratio and mix. Detailed instructions are always indicated on the packaging; you need to follow them step by step. This solution is the best choice. It has only one drawback - its high price.
You can prepare the mortar for masonry yourself. For this we need clay and sand. First, let's determine the quality of the available clay and the content of impurities in it. We follow the following instructions:
- Roll the clay into a rope. Thickness - 10-15 mm, length - 150-200 cm.
- Take a rolling pin with a diameter of 50 mm and wrap a rope around it.
- The tourniquet should stretch smoothly and break, stretching by about 15-20%.
Expert opinion Pavel Kruglov Stove maker with 25 years of experience
If the rope stretches more, the clay is “fat”; if it breaks earlier, the clay is “skinny.” In the first option, the solution will shrink greatly under the influence of temperature, in the second it will crumble.
The next step is to prepare the sand. First, sift it through a fine sieve. The cell should not exceed 1.5x1.5 mm. Next we follow the instructions:
- using a handle and burlap, we arrange some kind of net;
- pour sand into it and begin to rinse it under running water;
- Rinse until the draining water runs clear.
Thus, we have rid the sand of impurities.
We do the same with clay. Now it should be soaked. To do this, pour the clay into a previously prepared container. Pour water so that the entire surface of the clay is covered. After 24 hours, mix thoroughly. We repeat the process until the clay has a consistency similar to toothpaste.
There is no universal proportion for a solution. Everything is installed by trial and error, depending on the characteristics of the materials used. The main thing is that the solution is convenient to work with.
To increase strength, experts recommend adding a little cement or salt.
Expert opinion Pavel Kruglov Stove maker with 25 years of experience
Here is a basic recipe for masonry mortar:
Take 2 parts of clay. Add one piece of sand to it. Using a construction mixer, mix until smooth and thick. We will need approximately 40 liters of solution.
Requirements for the construction of potbelly stoves
An economical, long-burning wood-burning stove must meet certain requirements and design rules:
- It is mandatory that such a structure is equipped with a smoke exhaust pipe, and the room is equipped with a supply and exhaust ventilation system.
- Considering that the design of a potbelly stove will heat up to very high temperatures when heated, it is necessary to comply with fire safety requirements when installing it indoors.
The stove should be located away from flammable structures of walls, ceilings and floors, and also have a fence to prevent fire and the risk of burns during its operation. A potbelly stove surrounded by a wall made of heat-resistant brick not only becomes safe during operation, but also creates additional heating areas.
Types of metal furnaces
But let's not immediately write off this model, which faithfully served the baths for many years. Today, modern Kulibins offer an improved potbelly stove, which is classified as a long-burning stove.
What has changed inside the structure itself?
- Firstly, its combustion chamber was divided into two parts by a horizontal partition. Firewood is burned in the lower one, and flue gases are burned in the upper one. They pass through a channel left on the side in the form of a gap between the partition and the vertical wall of the device.
- Secondly, the firewood is stacked tightly together so that it burns with less oxygen.
- Thirdly, special channels are installed through which fresh air enters the second combustion chamber.
And yet these metal stoves are not the most economical. And their efficiency is not very high. That's why we offer other types of products.
However, there are two very important warnings:
- A metal sauna stove must be made of sheet iron with a minimum thickness of 4 mm. You can also make it from a pipe.
- It must be covered with bricks. This will increase the safety of the structure and create conditions for uniform heat distribution throughout the room.
Attention! One of the biggest advantages of homemade metal stoves is that there is no need to build a large and durable base. There are many base options
For example, a concrete screed lined with ceramic tiles, fire-resistant brick or a piece of metal sheet.
Types of structures
Metal stove for a bath
How are they different from each other? In the first case, this is a simple model, the body of which is lined with refractory bricks on the outside and inside. Of course, this is an expensive option, so many people use ordinary red brick for cladding. By the way, the bricks are attached to the walls of the unit and to each other with a special wire. A grate is installed inside the middle of the oven, on which stones are placed.
The second option is simpler. To do this, the stove is trimmed around the entire perimeter with a metal grate so that there is a fairly impressive gap between the walls of the appliance and the grate. Stones are poured into it.
Fuel types
There are only three groups of products in this category:
- Electric ovens. They are supplied with a metal casing and heating element. The requirement is good insulation of terminals and connection points.
- Gas. In addition to the body, they contain a burner that supplies fuel to the firebox. Experts recommend installing a security unit in the form of a simple automatic control system. For example, a thermostat, a temperature sensor and a flame sensor. The latter is especially important - it will control the gas supply. When the flame dies out, it will give a command to the valve, which will shut off the gas pipe line.
- Wood-burning. These are the simplest designs that do not use energy supply networks. By the way, these include potbelly stoves.
Ensuring heat removal
It is possible to increase heat removal by creating devices that promote natural and forced convection. To ensure natural air circulation, screens are made with a guide device that allows you to create a powerful convection flow and distribute it throughout the room. The guide apparatus is made in the form of curved strips of metal, welded to the screen and directing warm air not only upwards, but also to the sides. The prepared device is attached to the oven.
The heat removal device can also be made from scraps of water supply and profile pipes. The distance from the floor to the bottom edge of the elements must be at least 15-20 cm. The pipes are welded to the stove body and covered with a screen on the sides to protect against accidental contact. A traditional potbelly stove heats the air around it by 0.5-1.0 m, and the use of such a design allows you to increase not only the radius, but also the rate of temperature rise in the room. When the body of the heating device is heated above 60 °C, a stable convection draft appears in the device, the power of which increases as the temperature of the furnace increases.
Heat removal can be increased by using fans to blow over the heat transfer surface. Both household and old car fans are used. Devices with variable rotation speeds have proven themselves especially well. They allow you to regulate the temperature and heating time of the room in various oven operating modes.
For more efficient blowing of the furnace elements, special casings are installed that allow cold air to be directed to the hottest areas of the heating device, while it can be taken from various places in the room. A potbelly stove with pipes welded into the firebox for heating air has proven itself well. A multi-speed car fan installed on a common discharge manifold allows you to effectively heat the room.
How to increase the heat output of a furnace
So, how to increase the efficiency of such a stove? There are several simple ways. The most basic one is to put a brick screen around the stove. The bricks don’t even need to be held together with clay; just lay them on top of each other. You can fold such a screen near the side walls, or you can fold it at both side and rear walls. The brick will heat up while the fire is burning, and when it becomes small or goes out, it will give off heat. You won't have to add fuel often. One of the features of a potbelly stove is that the stove is light and mobile. With such a screen, it will not lose its mobility, because the bricks can be disassembled at any time, the stove can be rearranged and the screen can be folded in a new place.
https://youtube.com/watch?v=SNKEQmQMxl4
There is another method with a screen, which also increases heat transfer. In this case, a sheet metal screen is mounted at some distance from the side and/or rear wall of the stove. The sheets can be secured using long bolts. In this case, the effect of convection is added.
There is another simple way to increase heat transfer. This time the stove's chimney is being modernized. Typically, such stoves have a straight chimney. It is removed through the roof of the room in which the stove is installed. If you add several bends to the pipe, then the heat transfer will increase, although not by much. In this case, the pipe will resemble the letter S.
If you want it to be much warmer, then you need to take 2 tanks from old-style washing machines. The tanks are welded together, and a chimney is passed through them. Thus, above the potbelly stove, which is heated with wood, there is also a stove of the same size, heated by hot smoke. Heat transfer almost doubles.
Another method is to weld additional ribs onto the stove and chimney, for example, from metal angles. In this case, the chimney must be made of thick metal. Such fins significantly increase the heated surface area. An increase in area leads to faster heating of the surrounding air. The room becomes warmer. In addition, thick metal retains heat even when the fire in the firebox is no longer burning.
But still, it will not be possible to endlessly increase the efficiency of this heating device. And if you want to have a full-fledged stove in the room, you will have to build it out of brick according to all the rules, so that the stove retains heat for a long time, for example, all night. For example, there is no need to increase the efficiency of a Russian stove; it already retains heat for a very long time. True, in order to fold it correctly, you will have to call a stove specialist.
Asbestos chimney size
When selecting asbestos chimney pipes, you need to be guided by the following considerations:
- The use of this material is only possible for gas boilers and pyrolysis heating units, which are characterized by a low flue gas temperature. It should be taken into account that the smoke of pyrolysis furnaces is oversaturated with products that contribute to the formation of condensation, and therefore soot.
- The diameter of the asbestos chimney pipe should not be less than the outlet pipe of the heating unit.
- The total length of the chimney must be at least 5 meters, while the excess above the roof ridge must be at least 0.5 meters.
- Significantly exceeding this indicator will also lead to undesirable consequences due to a decrease in the speed of gas movement in the pipe.
This will increase the amount of condensate formed. The effectiveness of a chimney made of any material depends on its correct installation on the roof of the house
The best stove for heating a wood-burning brick house with your own hands
The neatly folded structure becomes the highlight of the interior. However, laying brick heaters is a long-forgotten craft, and there are very few experienced stove makers. The lack of competent specialists forces owners of private houses to build heating stoves themselves. To decide on the best one, you need to choose from existing designs:
- Straight-through. The most primitive design of a stove in which flue gases go into the chimney along the shortest path. The efficiency of this design is low, and fuel consumption is increased.
- Duct. This is an improved duct stove. In it, flue gases, before entering the chimney, move through wells formed by masonry. The stove has a developed heat exchange surface; it accumulates heat better. The more channels it has, the higher the efficiency. But an increase in the number of wells leads to a deterioration in draft and complicates the cleaning of the furnace from soot.
- Bell bells. A combined design that combines elements of direct-flow and channel furnaces. Hot flue gases are held in a heat exchange chamber, where they transfer heat to the brick walls. The cooled smoke settles down, from where it exits into the chimney through the vent. Bell-type stoves provide uniform heating of the room due to their design. They are easy to clean: soot can be easily removed, as it accumulates in one place.
Before starting construction of the furnace, a number of preparatory measures should be completed. First of all, the foundation is poured. A monolithic concrete base is made when laying a structure of 500 bricks or more. A lightweight stove can withstand the existing ceiling, but the issue is considered individually.
The location of the heater is selected taking into account what will be located on top. In particular, the approximate position of the chimney is assessed. The latter should not come into contact with the ceiling beams. Also, the gap between the chimney and all supporting structures should be approximately proportionate. The edge of the pipe is placed above the roof at a height of 0.5 to 1.5 m.
Step-by-step instructions for assembling a potbelly stove with your own hands
The first stage is the preparation of the drawing and necessary materials. As for the drawing, it should reveal the design features and subtleties of all elements in as much detail as possible.
For experienced craftsmen, this stage can be skipped, but for those who are just starting the journey of constructing potbelly stoves, it is recommended to assemble a model from cardboard. Modeling, in this case, will cost much less than miscalculations immediately embodied in metal.
The next step is the selection of tools and materials. Here it is recommended to use ready-made components and housings produced industrially as much as possible. This way you can not only reduce the cost of work, but also find new, more effective technical solutions. Another piece of advice regarding this stage is proper organization of the workplace. When working with sheet metal, it is recommended to assemble a jig from wood so that the structures to be welded can be easily installed in the desired position.
During assembly, you need to remember that all connections must be as precise and strong as possible, especially for the body and supports of the potbelly stove. And of course, after assembly, it is necessary to make a test firebox to check the functionality of the assembled structure.
Grid with stones
Modernizing a potbelly stove with a mesh with stones is quite one of the most common improvements. Almost everyone had a bath and steamed in the steam room. There you saw a set of stones that warm the air in the steam room.
The principle of this modernization method is similar. It is necessary to line the potbelly stove with stones, which continue to retain heat for a long time. It is worth remembering that you should not use galvanized material for manufacturing, since when heated, toxic fumes are released into the air.
Materials and tools
For this event we will need:
- a set of good stones (you can use high-quality clay bricks), preferably of medium size, similar to those you came across in the steam room.
- dense metal net, you can use a chain-link net.
- if you plan to do it like an adult, then you will need fittings and a welding machine.
Instructions
Making this improvement is simple:
- It is necessary to make a frame of metal mesh (or reinforcement) near the stove, which will not block access to the technological openings of the potbelly stove.
Design example
- After creating this frame, it is necessary to fill the cavities between the stove and the frame as tightly as possible with prepared stones.
You can also fill the cavities between the stones with clean clay, which will also help retain heat.
Precautionary measures
It is strictly forbidden to use flammable materials and metals with low melting points to create this improvement. Also, this structure should ensure free maintenance of the potbelly stove, not block access to the firebox, to the ash pan, and not interfere with the removal and replacement of outlet pipes.
Furnace models and manufacturers
Before you buy an inexpensive wood-burning stove for your home, you should get acquainted with the features of products from well-known manufacturers. In this case, it will be easier to navigate the assortment offered in the store, the advantages and disadvantages of individual models.
Buleryan
A stove with a similar design was first developed in Canada. It is characterized by simplicity of design and high performance characteristics.
The cylindrical firebox is made of steel having a thickness of 5 – 6 mm. The combustion door is located on the front side. Hollow pipes having a round or rectangular cross-section are welded to the body. After heating the firebox, the air in the pipes heats up, providing an active convection process.
The grate is located inside the chamber at the bottom of the cylinder. There is a partition in the upper part, dividing the firebox into two parts. The first is intended for storing firewood, the second is for afterburning pyrolysis gas. The chimney is located on the side opposite the door and goes inside the combustion chamber. This ensures that the combustion products formed in the depths of the main chamber return to the front wall, and then rise to the top and enter the chimney.
Buleryan - time-tested quality
Butakov furnaces
The patented model has demonstrated good results in harsh climatic conditions. Several models are produced under this trademark, with different technical characteristics:
| Model | power, kWt | Weight, kg | Volume of internal space, cubes |
| Student | 9 | 70 | 150 |
| Engineer | 15 | 113 | 250 |
| Assistant professor | 25 | 164 | 500 |
| Professor | 40 | 235 | 1000 |
| Academician | 55 | 300 | 1200 |
Butakova - reliability and durability
Breneran
Russian analogue of the Canadian model, manufactured using European technology. Available in several models:
| Model | power, kWt | Heated area, squares | Weight, kg |
| AOT-6 | 6 | 40 | 56 |
| AOT-11 | 11 | 80 | 105 |
| AOT-14 | 14 | 160 | 145 |
| AOT-16 | 27 | 240 | 205 |
| AOT-19 | 35 | 400 | 260 |
Continuous ovens can be equipped with glass doors. Connection to a water circuit is acceptable. However, unlike its foreign counterpart, such equipment has insufficient sealing of the smoke fitting, which can cause condensation to enter the room.
Breneran - Russian analogue of Buleryan
Teplodar
Products of a famous Russian manufacturer. It features high efficiency thanks to a carefully thought-out design. Compact size and light weight. You can choose a long-burning stove for a garage or home with suitable characteristics.
Teplodar Matrix-200 is relevant for rooms with an area of up to 200 square meters. Siberia provides quick heating of the room. T series models will be the best choice for the garage. For the kitchen it is better to purchase a vertical heating and cooking stove-fireplace
Teplodar Matrix-200 is a good choice
Vesuvius
Russian development. Such long-burning wood-burning stoves for a bathhouse, cottage or country house can be the best solution. Often used to heat outbuildings. The choice of model is influenced by the purpose of the room for which it is purchased. They provide uniform heating thanks to a special design: pipes are welded into the firebox through which heated air passes.
Vesuvius for uniform heating of the house
Termofor
Domestic development for any home. Several models are produced under this trademark:
- Germa;
- Cinderella;
- Indigirka;
- Normal;
- Fire-battery.
The stoves can be used to heat various rooms with an internal volume of 50-250 m³. Their power varies from 4 to 13 kW.
Termofor in brown color
Ermak
Heating equipment that is small in size and has a classic design. The reliable casing protects from harmful infrared rays. This is the optimal solution for a small country house.
Operating principle of the Ermak stove
Why increase efficiency?
The compact dimensions of the stove mean that the surface that heats up during operation is small. Not much heat flows outside and the room quickly cools down. Sometimes it seems that the return from the potbelly stove is weak.
To help it increase efficiency, several tasks are solved:
- the duration of combustion and smoldering increases;
- a sufficiently high combustion temperature is ensured;
- a high level of traction is achieved.
Standard potbelly stove efficiency
Large rocket stove with bench
The main advantage of the rocket modification over the Russian stove is its compactness. Even when equipped with a bed, it will please you with its small size. By making it out of brick, you will have at your disposal an effective source of heat with a comfortable bed - household members will fight for the right to occupy this warm place.
The presented procedure allows you to assemble a brick oven without the use of metal. Only the doors will be made of iron. Subsequently, the bricks can be coated with clay, which will make the stove more rounded.
The first row forms the base of our rocket stove. It consists of 62 bricks laid according to the pattern shown in the figure. The second row forms channels for heating the bed - they run along its entire length. Cast iron doors are also installed here, secured with metal wire - it is held between the rows. The number of bricks used is 44 pcs. The same amount will be required for the third row, which completely follows the contour of the second. The fourth row completely covers the channels that heat the bed. But here a vertical smoke channel and a firebox are already beginning to form - the row includes 59 bricks.
Another 60 is needed for the fifth row. The bench has already been formed, all that remains is to finish off the chimney channel and build the hob. The sixth row, which includes 17 bricks, is responsible for this. Another 18 are needed for the seventh row, 14 for the eighth.
The ninth and tenth row will require 14 bricks, the eleventh - 13.
Row No. 12 is our key row - the chimney pipe will begin from here. Also from here begins a hole through which the air rising to the hob will fall down to the stove bench - 11 bricks are required (this is the top of the riser). In row No. 13 this process is completed, 10 bricks are spent on it. Now we lay an asbestos pad, which is covered with a piece of thick sheet steel - this will be the hob.
Rows No. 14 and No. 15 require 5 bricks each; they cover the chimney channel and form a low wall between the hob and the stove bench.
A metal surface is mounted at the back of the rocket stove, under which a small compartment is formed - here you can dry firewood.