Calculation of the number of tiles
To do this you need to know a few things:
- the total area of all oven surfaces on which the tiles will be laid;
- the dimensions of possible areas with a narrow decorative layer of ceramics;
- dimensions of ceramic tiles.
To calculate the area, you will need to subtract the dimensions of the blower doors, combustion chamber, and gaps between finishing parts. For furnace cladding, it is recommended to make gaps of up to 10 mm.
If you plan to make a narrow finishing belt, make barriers and other decorations, the area of such a layer is taken into account in the calculation. Now knowing the dimensions of the tiles, we can easily calculate the number of tiles of the main layer and decorative belt.
We divide the total surface area by the area of 1 tile and get the number of parts required to complete the work. If the doors on the firebox and ash pan are small, they can not be subtracted from the total area. For reserve, it is recommended to increase the number of tiles by 20% of the calculated value.
Some useful tips
You can decorate the stove more aesthetically and neatly using several techniques.
Making a grout joint with a concave surface. This can be easily done using a straight stick, which is pressed against the grout while it is still soft.
If you follow all the rules, you will get a high-quality stove lining
Strips of drywall sheet can be used as a template for forming seams. Its thickness is 10 mm. This ensures that the gap between the tiles will be of a constant size. Once work is completed, these templates can be easily removed.
An element that accidentally falls off after finishing can be returned to its place. To do this, you need to remove the glue and install it in place, having previously lubricated it with a clay solution.
Almost every craftsman can tile a new stove or appliance whose finish needs updating. To complete the work you will need a minimum of tools and some experience in construction work. The amount of time spent and the appearance of the stove depend on what material and method of fastening is chosen.
Tile requirements
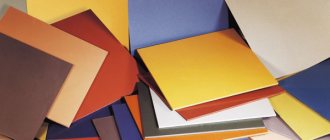
To get acquainted, we will analyze the main types of tiles and the criteria for their selection. It is recommended to use several types of finishing materials for lining heating units and fireplaces:
- "Majolica". Such tiles can be found on old stoves. Ceramics covered with a layer of special heat-resistant enamel - the high price does not make it popular among the population;
- Terracotta tiles are a simple version of majolica. It is made from clay, due to its properties it is not subject to deformation from high temperatures, and is resistant to cracking and mechanical damage. It is successfully used as a finishing for stoves in garden houses with seasonal heating and long breaks in work. This finish will protect the stove from dampness and cracking.
- Clinker tiles are an alternative to refractory bricks. The composition includes several types of clay with the addition of fireclay and various dyes. The finished mixture is pressed under high pressure, then fired;
- The use of porcelain stoneware increases the service life of the stove finish. It is made from different types of clay with the addition of granite, marble and binding additives. The thermal properties of the material make it possible to reliably protect the stove surfaces and give them a beautiful appearance.
Any tile must meet several requirements, which we must pay attention to when choosing finishing materials:
- Surfaces must be smooth, without cracks or chips.
- Individual parts of the series must be painted the same color. If even the color tone is different, it is not recommended to buy such products. It could be a defect or a fake.
- Each part must be geometrically smooth, maintaining right angles. To check, place several tiles on the surface and join them together. If there are the slightest gaps or the slab does not adhere to the surface, it may be a mismatch or a fake.
- We make sure to check the seller’s quality certificate for the product, which should indicate the environmental safety class and other performance characteristics.
Why is cladding needed?
Here are the reasons why you should consider finishing your stove:
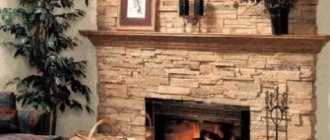
- Aesthetic. The stove is a fairly large structure, and therefore it always takes up significant space in the interior. In a technical room, for example, in a workshop, bare brick walls can still be left, but in a residential building they must be refined.
Even a bulky stove can become an interior decoration if it is tiled
- Hygienic. It is clear that it is easier to remove dirt from a surface, the smoother it is. This issue is especially relevant for stoves: they often have to be washed from soot and dirt that is carried in with fuel - coal and firewood. It would be difficult to tidy up rough brick, but smooth glazed tiles are a different matter.
- Safety. With some probability, microcracks may appear in the seams of the brickwork, through which smoke will leak into the room. The tile shell will act as a protective barrier to prevent carbon monoxide poisoning of residents.
- Technical. In the case of a metal stove, the tile serves as a softener of infrared radiation, which, due to the high heating temperature of the metal walls, is initially quite hard. This is especially true for sauna stoves, next to which users are naked.
What glue should I use to glue tiles to the stove?
Having chosen a tile, you need to select a composition to securely fix it on the walls. To answer the question: how to glue tiles to the stove, we follow several recommendations:
- it is better to purchase a ready-made composition so as not to perform complex calculations on the amount of materials;
- we select glue produced for lining fireplaces or stoves;
- It is recommended to use heat-resistant mastic “Standard” with a heating temperature level of 10,000. We take into account the material consumption of 1.5 kg per 1 m2;
- glue “Plitonit – SupenrKamin” is produced using a dry mixture, which we dilute before work;
- Atlas-Plus hardens within a few hours. Consumption rate 2 kg per 1 m2;
- “Fixator” adhesive is recommended for use when lining garden house stoves. It can withstand high temperatures during furnace operation and cold during long breaks.
Grouting joints
After completing the furnace lining, the joints are grouted. The ceramics must be completely dry. You must allow at least 24 hours for this. The average drying time is 24–72 hours. A spatula is used to apply the grout. You can tint the mixtures with colors, in which case the seam can become both less noticeable and more contrasting.
The technique for performing the work is quite simple:
- adding water to the dry grout mixture;
- rubbing into the gaps using a rubber spatula;
- cleaning the surface with a sponge or damp cloth;
- re-cleaning the tiles from the remaining film after the composition has completely dried.
Stages of tiling a stove
After completing the finishing of the stove, at least 3-4 weeks should pass. This period is necessary for complete drying of all types of solutions that were used for cladding. After this period, the heating device can be tested. As soon as the oven heats up, it needs to be cooled down again. After this, the system is ready for use.
Materials and tools
In order to glue tiles to the stove, we will prepare the required materials and tools according to the list:
- tiles or other type of material with a reserve;
- mounting mesh or just chain-link;
- hammers with rubber and metal strikers;
- hammer drill with chisel;
- ready-made glue that can withstand high temperatures;
- device for cutting tiles;
- spatulas;
- building level;
- devices for protecting the corners of the furnace;
- special primer;
- ready-made or home-made parts for setting equal gaps between the cladding;
- heat-resistant grouting.
Difficulties in finishing the stove
To avoid fatal mistakes, the master must understand the features of the heat generator cladding process. Let us note three important circumstances:
- during operation, the furnace heats up to high temperatures;
- periods of heating alternate with periods of cooling, that is, significant temperature changes occur;
- The efficiency of the furnace and its efficiency are linked to the thermal conductivity and heat capacity of the walls.
Taking into account all that has been said, the following requirements must be made to the tiles and adhesive:
- They must withstand as many so-called thermal cycles (TCs) as possible. This term refers to a single heating of the furnace and its subsequent cooling.
- Materials must maintain performance at high temperatures and not emit harmful volatile substances.
- The impact on the thermal characteristics of the furnace should be minimal: its heat capacity, efficiency, nature and duration of heat transfer should remain optimal.
- The lighter the cladding, the better.
- The temperature coefficient of expansion (TCE) of the materials should be as close as possible to the same parameter of the brick from which the furnace body is made. If this condition is met, the internal stresses in the furnace body and lining during heating and cooling will be minimal.
Knowing this, it will be easier to compare different types of tiles used for facing work.
Preparing the furnace for cladding
At this stage, you will need to perform a number of auxiliary works:
- We clean the surfaces of the oven from the mortar and layer of plaster. We cut the seams between the bricks to a depth of 10 mm, for better fixation of the tiles on the surfaces. If you used a solution of clay and sand, you can put a metal brush on the grinder, but there will be a lot of dust;
- Removing traces of paint. If the surface is completely painted, you can make shallow cuts with a chisel or grinder;
- We attach the mounting grid to all planes.
Types of tiles and their advantages
Lining the stove with decorative material has a number of advantages. For example, this will increase the heat transfer of the heating device several times. In addition, the attractive design of the stove will give the room its own unique flair.
But before you start working, you need to choose a material that will have the following qualities:
- resistance to high temperatures;
- strength;
- rigidity;
- heat capacity;
- environmental friendliness.
Having made the right choice, you don’t have to worry about the material losing its former color. Ceramic tiles, which have all of the above qualities, are quite easy to maintain and install.
The following types of material intended for facing work are on sale:
- clinker tiles for the stove, which contain clay, fireclay, various melting agents and dyes;
- porcelain stoneware with a monolithic structure;
- majolica , which is a pressed tile coated with a special glaze;
- terracotta is the same majolica, but without glaze.
The thermal conductivity and strength properties of a material depend entirely on its thickness. The most popular tiles are in the shape of a square, the sides of which are 12 cm.
You should not use tiles for these purposes, since they tend to crack when exposed to high temperatures.
Methods for cutting tiles
In order to cover the stove, the tiles have to be adjusted to size. There are several tools you can use for this job:
- To cut simple, thin tiles, you will need a simple glass cutter. We trim the layer of glaze and then break the tile, laying it on a flat surface;
- electric jigsaw. This tool can cut any types of materials and shapes of parts. But the file leaves chips, even gluing tape to the front surface does not help;
- grinder with diamond blade. This tool can make smooth, straight cuts on any type of tile. To do this, mark the cutting line and lay the part on a flat surface. First, we do not deepen the disk, remove the layer of glaze along the entire line and only then cut off the part;
- tile cutter It is used by professional tilers; if it is possible to rent it, this will be the best tool option. The cuts are smooth, the front part does not crumble. Simply lay the tiles along the line, run the cutting tool and you can lay the tiles in place;
- for larger cutting sizes, after cutting with a glass cutter, you can gradually chip off pieces of tile using sharp tongs or wire cutters.
Cladding a brick oven with tiles using a special adhesive composition
Before moving on to the description of the process of installing tiles on the walls of the furnace, a few minutes of attention should be paid to adhesive compositions suitable for this purpose. In addition, the rather complex process of cutting ceramic tiles requires lighting, since incorrect actions are quite capable of ruining the entire work.
What kind of glue is needed for tiling the stove?
The adhesive composition used for laying tiles on the walls of a brick kiln must have special characteristics, as it will be exposed to high temperatures.
As an example: packaging of a special dry construction mixture - heat-resistant adhesive for lining stoves
Some tilers prefer to make up the adhesive solution according to their own recipes. For example, one of them is quite simple. The mixture is made up of Portland cement, PVA glue and a small amount of salt. However, the difficulty in creating such glue options lies precisely in the correct selection of proportions. Therefore, if there is no accumulated experience in this matter, then it is best to use a ready-made dry composition, sold in hardware stores in paper packaging. All the necessary ingredients have already been added to this glue, and all that remains is to add the required amount of water and mix until it becomes a homogeneous plastic mass.
Experienced tilers also add a little salt to the finished adhesive composition, as it accumulates moisture, not allowing it to completely evaporate quickly from the solution, maintaining the plasticity of the mixture.
Ceramic tile cutting
Ceramic tiles have a very high hardness, so they are not easy to cut, especially in cases where it is necessary to cut out complex shapes. In order not to spoil the material already during cladding, it is recommended to study in advance information about the technology of correct cutting so that you get a smooth edge without protrusions and burrs. Better yet, practice on some unnecessary fragments to get better at it.
The simplest and most convenient option for cutting in a straight line is to use a special tile cutter
It is recommended to cut ceramic tiles using a special manual machine called a tile cutter. A glass cutter for thick glass may work, and often the optimal solution for this process is a grinder with a stone disc mounted on it.
The grinder allows you to cut out corner pieces of tiles if necessary.
Terracotta tiles, which are often used for lining stoves, are usually cut only with a grinding machine.
If the work will be done with a tile cutter, then it needs to be prepared:
- First, the reliability of the roller cutter is checked. It should rotate well around the axis, but not move from side to side. If such a problem is identified, the wheel must be firmly secured with a bolt.
- A few drops of machine oil are dripped onto the guide frame and cutting roller.
- It is imperative to check how sharp the cutting edge of the roller is - perhaps the cutter needs to be replaced. This becomes necessary from time to time, especially if the tile cutter has previously been used intensively.
- A properly adjusted tile cutter can cut tiles 4÷8 mm thick.
The cutting procedure itself is carried out in the following order:
- The first step is to take measurements from the area where the tiles are to be installed.
- Then, the tiles themselves are marked taking into account the width of the seams. The lines on the tile are drawn using a marker.
- Before cutting, the tile must be securely fixed in the tile cutter, so that the cut line marked on it is under the cutting edge of the cutter roller, along the line of its translational movement
- The next step is to apply pressure with a roller along the marking line. The marked groove will determine the fault line, cutting the front surface of the tile.
- Then a special lever with claws is lowered, which will divide the tile in two.
When using a grinding machine for cutting, for the safety of the master and the formation of a neat cut edge, it is recommended to firmly hold or secure the tile on a flat horizontal surface with an overhang of the part to be cut.
In addition to the above tools, a manual tile cutter is also used for cutting tiles, which also has the function of nippers. The principle of operation is similar: a groove is drawn with a roller, and then, when the handles are compressed, the paws break the tile in two. However, you need to remember that thick, for example, floor tiles, cannot be cut with this tool. In addition, the likelihood of possible failures is much higher than when working with a desktop tile cutter.
Prices for tile adhesive
tile adhesive
The simplest manual tile cutter, which, however, may not cope with high-quality cutting of thick ceramic tiles
When using a regular glass cutter to cut ceramic tiles, you will have to make additional efforts to deepen the fault line and separate the tiles into two parts.
Therefore, for quick and accurate work, it is recommended to use a tile cutter, which is safe and easy to use. If the farm doesn’t have one, then you should try to rent it - many hardware stores offer a similar service.
Covering the stove with tiles fixed with glue
Now that the preparatory work has been done, and you know which glue is best to use, as well as how to cut the tiles to the desired size, you can proceed directly to the finishing work.
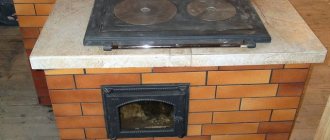
According to the master’s plan, the stove is finished using a combined technology - plastering and cladding with terracotta tiles are used
In this case, a combined finishing option is presented, when terracotta ceramic tiles are combined with a plastered and painted surface.
| Illustration | Brief description of the operation performed |
| In order for the tile laying to go smoothly, it is necessary to perfectly align the horizontal of its first row. This cannot be done by eye, since even small deviations in the lower part of the cladding will turn into significant visible distortions of the masonry located above. Therefore, you first need to determine the bottom line along which the alignment will be carried out. In any case, the building level will come to the rescue. If a line needs to be marked on the long side of a structure, the easiest way to do this is with a paint cord. On the narrow side of the oven, a ruler or rule may be sufficient. Typically, such a line is marked along the upper edge of the bottom row of tiles. | |
| It would be safer to attach a special perforated aluminum L-shaped profile along the bottom edge of the first row, which will serve as a stand for the tiles and will definitely prevent them from deviating from the markings or sliding down. The corner is fixed to the furnace wall with dowels installed in increments of 200÷250 mm. The size of the corner depends on the thickness of the tile - it should not protrude above the finished surface. If the tiles are laid from the floor, and the corner is fixed at the junction of two surfaces, then its size will not matter - the main thing is that it is level. Instead of an aluminum corner, a flat wooden strip can be used, which can be simply dismantled after the glue has dried in the masonry. | |
| Next, you can start laying. Cladding is usually done from the corner of the building. If the tile set includes corner elements, then there will be no problems with placing the corners, since they will be completely protected from damage, and possible irregularities will be hidden. First, corner elements are laid at both corners of the structure, and only after they are secured, tiles are installed to fill the space between them. If necessary, one or two of them are trimmed. Each row laid horizontally must be checked with a building level. | |
| If the kit does not include corner tiles, then in order for the corner of the stove to be neat, another perforated corner profile with a rounded protruding edge is attached to it. This element is also secured to the corner of the stove with dowels, which are installed at a distance of 250÷350 mm from each other. They often do without them, so as not to damage the corners of the brick - the perforated “wings” of the profile are simply recessed into the applied mortar. One of the options for such a profile is shown in the illustration. | |
| To ensure that the horizontal and vertical seams between the rows of tiles are the same, various devices are used. You can use special crosses or, as in this case, pieces of broken unnecessary tiles installed between the masonry elements. The main thing is that they are all the same thickness. | |
| The adhesive, mixed using a mixer, can be applied to the surface of the stove using a notched trowel, or to the tile itself. When installing the tiles on the wall, press them well and immediately insert plastic crosses or other calibration devices into the seams. Do not forget that the glued tiles can be leveled and adjusted only within 10-12 minutes, while the mixture has not yet set. The adhesive mortar that has protruded into the masonry joints must be removed immediately, without waiting for it to dry, since these gaps between the tiles must be filled with a more plastic grout mortar. The calibration elements are removed only after the glue has set and the tile can no longer be accidentally moved. | |
| If you plan to clad the walls with solid masonry, then after installing 5-6 rows, it is recommended to take a break for several hours so that the glue sets well and the lower rows become a reliable support for the upper ones. After maintaining such a technological pause, you can complete the lining of the furnace with tiles. But they start filling the seams only a day after laying the last row. | |
| If a combined design option is chosen for the furnace walls, then after gluing the tiles, after just one or two hours you can start transforming the plastered surface. | |
| The first step is to cover all non-tiled surfaces with putty. This process is carried out using spatulas - narrow and wide. The putty is applied in a thin layer, and its function is to make the surfaces smooth, thereby preparing them for painting. | |
| For this stage of work, heat-resistant putty for stoves and fireplaces is used, which is most often sold ready-made in plastic buckets. | |
| Having covered all plastered surfaces with putty, you need to leave the oven for one or two days for all layers of preliminary finishing to dry completely. | |
| Further, if terracotta tiles were used for finishing, it is recommended to varnish them, giving them a brighter color. | |
| A clear stone varnish is used for this process. | |
| The next step is to paint the rest of the surface, covered with putty. For this purpose, brushes of different widths are used. Painting must be done carefully, without touching the plane of the tile. It may be worth considering temporary protection of ceramic tiles from accidental contamination - using masking tape, old newspapers, etc. | |
| Radiator enamel, designed for increased heating and temperature changes, is suitable for painting. If desired, you can add color to the white paint and varnish composition, giving a shade that will harmonize well with the glued tiles. | |
| Next, move on to filling the seams. The grout composition is matched to the color of the tiles or painted surfaces. The joints can be filled with grout using a construction syringe, or it can be pushed into the cavities between the tiles using a rubber spatula. The first option will allow this process to be completed faster, and the filling will be neat and will not touch the tile surfaces. You can make something like a syringe yourself - put the grouting compound in a thick plastic bag, then carefully trim one corner. If small mistakes cannot be completely avoided, then it will be easier to remove the solution from the previously varnished surface of the tile. Any mixture that gets on the tiles is wiped off with a damp, but not wet, sponge. | |
| To fill the joints, a heat-resistant wide-joint mixture for fireplaces and stoves is used, which is mixed immediately before starting work. The final evenness of the seams is given with a special tool - narrow jointing. | |
| After completing this stage of work, the finishing of the stove can be considered complete. |
Another example of covering a stove with terracotta tiles is in the video below:
Video - Cladding stoves with ceramic tiles "Terracotta"
How to cover a stove with tiles?
Do-it-yourself tiling of the stove is carried out according to a certain scheme in several stages:
- We begin to lay the rows from the bottom. To prevent slipping and provide protection during operation, we attach a special perforated corner to the bottom along the markings. We fasten the corners to dowels with self-tapping screws. The pitch between the mounting holes is 200-250 mm. We cover all corners of the oven with the same parts. This will level all surfaces, protect corners from chipping and securely fasten the tiles.
- Prepare the glue. We dilute the dry mixtures and be sure to let the solution sit for 10-15 minutes.
- We apply the finished glue to the wall, filling the surface for laying a maximum of 7-8 tiles in a row. The thickness of the layer depends on the consumption rate indicated on the packaging. From the corner we begin laying out the ceramic parts. The first row is the basis for the entire finishing structure, so we lay out each tile level, bringing its position to the ideal. We insert special crosses into the gaps. Their thickness may vary depending on the type of ceramic. For simple tiles, it is enough to lay crosses up to 5 mm thick. We remove the protruding glue, the seam should not be filled, we will fill it with a special grout.
- If an incorrect position of a part is detected, it can be repositioned within 15-20 minutes. Place crosses on the bottom row on 2 sides and begin to make the 2nd and next rows. We check the installation of each part using a level. All seams must be even. After laying 4-5 rows, we take a break for 2-3 hours for the glue to harden and fix the lower rows.
- We bring the rows to the top row and determine the size of the tiles to be cut to size. Now we apply the solution to the wall for each part separately. To cover all the irregularities, we fix the corner with self-tapping screws. Having laid the top row on all sides of the stove, we check that there is no adhesive on the front surfaces and in the seams. Leave the oven for 3 days until the glue completely hardens.
Stages of work
Fastening tiles without glue
Another interesting option that you can do with your own hands, even without experience in tiling, is to cover the stove with tiles without glue. The fastening is done using homemade galvanized corners. This is complex and painstaking work, but the costs will be minimal.
Example of finished cladding
The main advantage of this method is that if one ceramic tile breaks, it can be replaced in a couple of minutes with your own hands by unscrewing the corner and pulling it out from the defective row. The downside is that a 3 mm horizontal frame will be visible on each tile and the heat transfer will be slightly reduced due to the air gap.
You will need:
- Any ceramic tile, in this example the size is 10x10 cm. It is sold in 30*20 cm modules, so you will need to separate them with your own hands.
- Galvanized sheet, thickness 0.5 mm.
- Aluminum corner 20*20, thickness 2 mm.
- Aluminum strip 20 mm, usually sold in 3 meters.
The simplest ceramic tiles 10x10 cm are used.
Making corners for fastening
The longest and most difficult job is to make the corners with your own hands. They will be J-shaped to hold the tiles in place at the top and bottom, like a frame.
- We cut the galvanization into strips of 44 mm. You will need to make a corner from these blanks.
- To bend them, we make a simple device from a block with a 6 mm metal plate screwed on. It is screwed on with a small protrusion (3 mm).
- The dimensions of the corner are shown in the diagram. We set the workpiece on the fixture according to size and clamp it with clamps.
- Using a wooden mallet, bend the corner.
- We adjust the plate to the dimensions of the next bend and bend the corner again. Due to the presence of a protrusion on the device, a 3 mm bend goes under it.
Dimensions and location of corners
Give the plate the desired shape using a mallet
Fastening tiles
- Along the perimeter of the stove, a frame is made of aluminum corners. They will serve as the basis for attaching horizontal aluminum strips.
- In addition, intermediate aluminum vertical plates are attached to the corners.
- Homemade corners are attached to the plates using 6*3.2 mm tear rivets. To do this, you will first need to drill holes. One corner will look in one direction, the second - in the other.
- The space between the rows is made according to the width of the ceramic tiles, but taking into account a couple of mm of margin so that they can be easily inserted and pulled out.
- When all the corners are installed, the ceramic tiles are inserted from the side into the resulting frame. The end is then closed with a corner.
Inserting ceramic tiles into the frame
Final works
At this stage of work:
- We remove all the crosses from the grooves;
- We put 2-3 kg of firewood into the firebox and dry the surfaces before completing the work. We carry out this operation at least 3 times, allowing the oven to cool completely after each stage;
- Prepare a solution of heat-resistant grout or use mastic. If necessary, you can add a color pigment to the composition to shade or highlight the main color of the tile. We fill the seams using a small rubber spatula. Immediately remove excess solution using a dampened cloth. If a heat-resistant sealant is used, fill the seams using a mounting gun;
- We treat the seams with a special water-repellent composition based on silicon;
- Let the grout harden a little, and after 2-3 hours we finally clean the front surfaces of the oven.
By carefully and slowly doing the work, you can improve your old brick oven or metal unit screens during the day. The work is not difficult, but responsible. The main thing is not to be afraid and do it. By redoing defective areas, we gain invaluable experience.
Features of finishing of metal stoves
Metal walls have significant elasticity and plasticity, so the process of facing them may seem quite simple at first glance. But the picture is spoiled by the high TCR of steel and the temperature it reaches during furnace operation. Based on this, the most preferable method of lining a metal furnace is painting with heat-resistant enamel - today such compositions are on sale in a wide variety.
Before applying the enamel, the metal walls are degreased. Primer treatment is not used, since this material does not have heat resistance.
A metal stove can be painted with heat-resistant enamel
If you still want to cover the stove with tiles, the latter can be secured with clamps. They will play the role of a movable ligament that will prevent the cladding from peeling off due to temperature changes.
Tip 5 How to lay ceramic tiles on walls
Ceramic tiles are a decorative element that is very often used for wall cladding in the bathroom or kitchen. The process of laying this material is quite complex and has its own characteristics. Having studied them, you can easily make high-quality wall cladding yourself and at the same time save money.
- - ceramic tile;
- - plastic crosses for separating tiles;
- - wooden slats;
- - putty;
- - painting strip;
- - primer;
- - wooden ruler;
- - a simple pencil;
- - Master OK;
- - glue;
- - grout for seams;
- - dry rag;
- - damp sponge.
First of all, thoroughly prepare the wall on which you plan to lay the tiles. Clean it of old coating, as well as dust and dirt. After this, check if the walls
. To do this, attach a special rail to them vertically. If the surface deviates from it by even 5 mm, be sure to start leveling.
This can be done using putty. Using a special paint strip, apply a two-centimeter layer of it to the wall and wait until it dries. Repeat the procedure if necessary. To ensure better adhesion of the glue to the surface, it is recommended to prime the wall.
To make installation easier, mark the wall
.
Make a ruler from a two-meter wooden strip. To do this, lay out all the tiles in rows on the floor and insert crosses between them. Place the ruler so that its edge matches the edge of the first tile. Mark each tile with a simple pencil on a ruler. Measure the width of the wall
and find its center point.
Place the ruler horizontally so that one of the marks coincides with this point. This will make it possible to determine how many whole tiles will fit on the wall. If you notice that the last tile of each row only fits halfway or less, move the center point a little. Move the ruler one division and then put a new mark in the middle of the division. Turn the ruler upside down and draw a line.
After this, mark the horizontal lines. Nail wooden slats to the wall to act as guides. Place the ruler on the vertical line so that it touches the floor and make a mark along the top division. After that, move it towards the ceiling and you will see that the marked point does not coincide with the division. Measure the distance between them and divide it by 2. This will be the size of the cut tile, ideally it should be at least half the size of the tile.
Hold the ruler parallel to the floor and move it until the division lines up with the dot. Mark the edge of the ruler and draw a horizontal line through the mark. Nail the first wooden strip along it, and the second - parallel to the vertical line. When the markings are done, proceed to laying the tiles.
Start from the bottom corner formed by the slats. Using a trowel, apply a small amount of glue to a small area. Smooth it out, and then make horizontal grooves with the jagged side. Take the first tile and place it against the corner, pressing it firmly against the battens and the wall. Make sure that when you press the glue does not extend too far beyond the edges. Lay the rest of the tiles in the same way. separating it among themselves with plastic crosses.
Wait until the glue dries thoroughly, remove the crosses and start grouting the joints. It is applied diagonally and rubbed into the seams between the tiles. Once the grout has dried, use a dry cloth to clean the tiles. If traces of grout remain here and there, use a damp sponge and then wipe the tiles dry.
how to properly lay tiles on a wall
Porcelain tiles
This material is increasingly used in oven linings. It has excellent heat resistance and unique characteristics. Porcelain tiles are used to decorate not only the outer surface, but also the interior of the oven. In addition, he is not afraid of temperature changes, evaporation, cold and shock.
How to cover a stove with porcelain tiles:
- Apply glue to the surface with a notched trowel.
- The fragment is installed and compacted with a mallet.
- Several rows are laid in this way and allowed to dry.
- Work continues. At the end, the cut tiles are glued.
Using hot melt adhesive when laying tiles
Ceramic tile laying diagram.
Next, apply hot glue to the entire surface. If you don't have hot glue, use sand-cement mortar. To prepare the solution, use cement (one part) and sand (one third). There should be no impurities in the sand. Use river material. If you are working rough with hot glue, try to prime the seams in advance. Of course, don't forget to apply plaster.
Once you have processed the surface, attach a wooden strip to the wall. Place the upper edge of the slats above the floor, the distance should be equal to the width of the tile. Using this method, you can lay the tiles evenly.
It is necessary to lay the tiles on the rough from the 2nd row, which is located at the very bottom. The laying is carried out upwards and to the sides. Spread it out evenly. Using a flat spatula, apply hot melt adhesive. Using a notched trowel, smooth out the glue applied to the surface. Using spacer crosses, you can even out the gaps between the tiles. Remove the sacrum from the material before grouting.
Once you have laid all the tiles on the rough, remove the lath and add the last row. If necessary, trim the material.
Smooth the seams with a rubber spatula after the hot-melt adhesive has dried. That's all. Now you know how to lay tiles on rough.
Preparing the walls
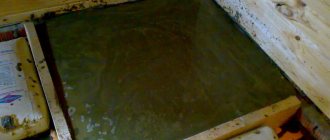
Before the actual finishing of the stove with tiles in a private house begins, there is a stage of preparing the surface of the walls. This seemingly insignificant stage cannot be neglected. The quality of the preparation determines how well the glue and the tile itself are fixed and how long it will all last. First, the stove is cleaned of the old layer of plaster. If this is not done, it may begin to peel off, if it hasn’t already, which means the tiles will begin to fall off. In a wet state, it is removed better, so it is first sprayed with water from a spray bottle several times.
And the layer itself is separated with a spatula. Once you have completely gotten rid of the old layer, you can proceed to the next stage. The surface is again abundantly wetted. Go over it with a wire brush to remove any remaining particles. The seams need to be deepened. You can do this with a grinding machine, but only if you have extensive experience working with the tool. You can miscalculate and make the recess too deep, but it should not exceed 8 mm in depth. A more labor-intensive, but surefire way to do the job is with a chisel.
If the stove is new, then you need to wait for complete shrinkage before starting lining. This will take about six months. After the seams are deepened, the surface is primed. The solution must penetrate deeply. Do not waste time and effort on this; the primer provides additional protection and improves adhesion.
The surface can absorb all the water from it, which will lead to subsequent cracking. The surface must be flat, otherwise the tiles will stand crooked. You can check this parameter using a plumb line and level. If the differences are more than 1 cm, then they must be eliminated. First, beacons are installed on the clay solution. The mixture is applied in a layer of 1 cm; if the depth of the depression is greater, then it will have to be applied in several layers, gradually. It is simple to prepare the solution: the clay is poured into water and mixed until smooth. The finished mixture is applied with a trowel and leveled with a rule. Metal corners are used to strengthen the corners.
After the entire wall is leveled, the reinforcing mesh is laid while the layer is still wet and pressed into the solution. Then the solution needs time to dry and after that the final layer is applied. After drying, the wall is primed again and left until completely dry.
Tile modification of tiles for various products
It is also part of the terracotta family of materials. But due to its properties, it is considered a more environmentally friendly option, which is due to its composition. But its shape is very complex and therefore requires the accompanying presence of many additional materials. It is one of the moisture-resistant products.
It is important to realize that heat-resistant tiles for stoves are suitable for baths and other rooms that generate more moisture. The tile minimizes the heating of the tile, so you can touch it without fear of getting a burn or unpleasant sensations of high temperature.