A leak in a heating battery is quite a big problem for home owners. This situation most often occurs at the most inopportune moment - during the heating season. But even this problem can be quickly solved if you take into account a few simple but effective recommendations from experts. To achieve the desired result, you must determine exactly where the battery is dripping, as well as prepare all the necessary tools and devices.
Detection of a fistula in a cast iron product
Factors that cause radiator damage
In order not to have to figure out ahead of time how to properly fix a leak in a cast iron heating battery, you need to understand that structural damage is most often caused by temperature changes in the system and water hammer. Despite the fact that such radiators have increased resistance to various negative factors, they can also fail. Large changes in the temperature of water or other filled coolant negatively affect the condition of the batteries.
If liquid hotter than 100C circulates in the system, gaskets and sealants may eventually be damaged. When water boils, the pressure in the central system can rise several times. This situation does not exclude damage to entire sections. In some cases, the radiator may even burst.
When a previously working battery leaks, the main reason may be due to improper installation of the equipment. This problem can arise just 1-2 years after installation. If cast iron products were chosen to complete the system, then the risk of manufacturing defects cannot be excluded. That is why it is better not to save on heating equipment, so that in the end you do not have to overpay for unscheduled repair work.
Destruction by rust
Taking water from batteries is prohibited and is harmful to health.
Details Created 06/06/2017
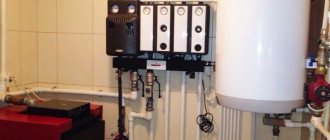
We do not have a centralized hot water supply as such, because we have an open heat supply system, that is, there is no separate boiler in the boiler room and a separate pipeline for hot water. An open hot water supply (heat supply) system is understood as a technologically connected complex of engineering structures , intended for heat supply and hot water supply, carried out by selecting hot water from the heating network. Once again I would like to remind users of heat supply services that, according to clause 35 of the Government of the Russian Federation of May 6, 2011 No. 354 “On the provision of utility services to owners and users of premises in apartment buildings in homes and residential buildings, “the use of hot water from the heating system is strictly prohibited.” Resource-supplying organizations suffer losses due to unauthorized water collection, because constant replenishment of boilers with cold water and additional fuel consumption for heating the coolant are required. According to this resolution, the Consumer does not have the right to: b) drain the coolant from the heating system without the permission of the contractor; c) arbitrarily dismantle or turn off the heating elements provided for in the design and (or) technical documentation for an apartment building or residential building, arbitrarily increase the heating surfaces of heating devices installed in a residential building above the parameters provided for in the design and (or) technical documentation for an apartment building or residential building house; d) unauthorizedly break the seals on metering devices and at the places where they are connected (attached), dismantle metering devices and carry out unauthorized interference in the operation of these metering devices; e) regulate indoor equipment used for the consumption of communal heating services; f) unauthorizedly connect consumer equipment to in-house engineering systems or to centralized networks of engineering support directly or bypassing metering devices, make changes to in-house engineering systems.
Therefore, the State Housing Inspectorate of the Republic of Khakassia recommends that owners of premises in apartment buildings not equipped with centralized hot water supply dismantle the water taps on heating appliances and install electric water heaters. If, during an inspection by housing inspectors, the presence of additional equipment for draining water from the heating system is detected, consumers face administrative liability for illegal reconstruction of residential premises under Article 7.21 of the Code of Administrative Offenses of the Russian Federation in the form of a fine of up to 1,500 rubles. And one more important point is that hot water supply must meet the sanitary and epidemiological requirements for the quality of drinking water. DHW in an open system cannot meet these requirements, since the coolant in the heating system is process water. This is confirmed by the results of an analysis of water from the heating system conducted by an accredited testing laboratory center on May 5 of this year. Here are some characteristics of battery water:
| Parameters (characteristics) | Actual figures | Standard indicators |
| Common coliform bacteria | 15 | Not allowed |
| Thermotolerant coliform bacteria | 15 | Not allowed |
| Iron | 0,95 | No more than 0.3 |
| Chroma | 75,2 | No more than 20 |
| Turbidity | 19,26 | No more than 1.5 |
Based on the above, in order to avoid unauthorized withdrawal of water from the heating system and prevent harm to the health of citizens, a special dye will be added to the heating system, which can spoil the appearance of the laundry if it is washed with such water.
Labor safety engineer of Tashtypenergo LLC Yu. V. Bocharov
Most common faults
If the homeowner decides to independently figure out how to quickly eliminate the resulting leak, then it is necessary to familiarize yourself with what types of defects of this kind exist:
- Violation of previously created pipe tightness.
- Cracks in the casing of tubular, sectional and panel radiators.
- Formation of a leak in the area where the structure is connected with the pipeline.
- Violation of the tightness of the seam that serves as the connecting element of the sections of the device.
Even the most minor breakdown inevitably leads to a leak in the heating unit. This is a clear sign that the system is out of order. Even an untrained person can detect such a problem. More serious problems can only be identified by a qualified specialist who has at his disposal a special device for measuring pressure in pipes. This approach is especially relevant if the characteristic sound of a leak is heard, but the damaged compartment cannot be found.
The most problematic area
Ball valve repair
New-fashioned ball valves are somewhat more complex than traditional valve models. So, what should you do if the ball valve is leaking? Most often, the problem is that dirt has gotten inside the housing and interferes with the operation of the mixer.
When repairing a ball valve, you must carefully remove the valve. To do this, first remove the decorative plug, under which there is a fixing screw. In short, the faucet needs to be disassembled, cleaned and reassembled
They do it like this:
In short, the faucet needs to be disassembled, cleaned and reassembled. They do it like this:
Use a screwdriver to unscrew the screw that secures the lever. Carefully remove the lever from the tap. Use a screwdriver to unscrew the threaded screw. Remove the mixer dome and plastic seal. Inspect the seal gasket and remove accumulated deposits. If the seal is worn out, you need to purchase and install a new part. Remove and inspect the ball. If it is damaged, it will also have to be replaced with a new one. Using a thin screwdriver, carefully pry off the seals that secure the ball.
If they are even slightly worn, they will also need to be replaced. After replacement, lubricate the seals with the composition recommended by the manufacturer. Carefully reassemble the mixer in reverse order.
All procedures when cleaning a ball mixer must be carried out carefully, since its parts are easily damaged. If all steps are completed correctly, leaks will stop.
In the same way, problems with temperature control in mixers of this type are eliminated.
Sometimes you just need to change the faucet cartridge. This procedure is described in detail in the video:
Damage to a piece of material that does not have a thread
You can qualitatively eliminate a leak in an operating heating radiator on your own. This is an excellent option for those situations when there is no time to wait for representatives of the housing and communal services organization, and a welding machine is also unavailable. Many deformations occur due to poor-quality welds and corrosion damage.
There are several available ways to restore the system:
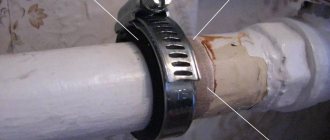
- At a plumbing store, you need to buy a factory-made clamp, which is designed to combat leaks. The disassembled product is placed on the pipe so that the durable rubber gasket is located opposite the leak. At the final stage, the clamp is tightened with bolts.
- The problem can be solved with the most common aluminum clamp, which is designed to tighten hoses on fittings. First, a thick rubber gasket is applied to the current areas. The structure is clamped with a regular screwdriver. This option is distinguished by its accessibility and simplicity.
- If you don’t have time to visit stores, but you urgently need to solve the problem and eliminate the leak, then you can safely use thick copper or annealed steel wire. The product is folded in half and the gasket is pulled to the location of the detected leak in order to twist it with pliers.
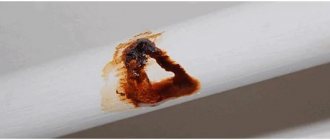
Attention! If the user does not know how to cover up the formed hole, and paint streaks are clearly visible at the leak site, then the structure is first cleaned with a knife. The performer of such painstaking repair manipulations should be prepared for the fact that after the completed manipulations, the liquid pressure will increase slightly.
An accessible way to unscrew the plug
Repair of heating radiators: bimetallic sections, their replacement, soldering cracks and washing
Any repair without the involvement of specialists is a troublesome and unpleasant task, requiring both financial expenses and time investment.
Repairing bimetallic radiators with your own hands can be done quickly and without problems if three conditions are met: adhere to the sequence of actions, have the necessary tools for this, and be able to independently determine the cause of the breakdown.
Knowing how to disassemble bimetallic radiators, the rest of the work will be easy to do. They can be soldered, cracks sealed and washed, like other sectional structures, for example, made of cast iron, steel or aluminum.
Bimetal battery design
The uniqueness of this type of heaters lies in their design. Combining two types of metals in one design is an opportunity to take the best from each of them, while replacing their weaknesses.
On sale are:
- Combination of stainless steel core with aluminum casing. In this case, these metals complement each other in the following:
- Steel has a thermal conductivity of only 47 W, which is quite a bit for high-quality heating of a room. Aluminum has a heat output of 190 W. Heated by the core, the casing effectively transfers heat to the room.
- Aluminum is “afraid” of water, namely high acidity, as it causes corrosion. Stainless steel is so named because it is not afraid of any coolant. The installation of steel collectors inside the aluminum body protected it from interaction with water. Thanks to this, the service life of bimetallic radiators is 20-25 years, while for models consisting exclusively of aluminum, it rarely exceeds 10 years.
- The strength of steel allows batteries of this type to withstand any water hammer, which gives consumers the opportunity to install them in houses with a centralized and unstable heating system.
Thus, the combination of two such different metals created a strong and reliable structure, although its heat transfer is slightly lower than that of its aluminum counterparts.
- The combination of a copper core with an aluminum top is a real breakthrough, since these metals cannot even be kept close together, but together they create a device with the highest heat output. The separation of copper and aluminum ensures their durability and the strength of the entire structure.
- Semi-bimetallic radiators are equipped only with vertical steel collectors, while the horizontal ones are made of aluminum. They are cheaper, but less durable, although their strength and heat transfer are high.
This is how a bimetallic heating radiator works. If such a reliable design fails, it means that errors were made during its installation.
Main causes of malfunction
Before you begin repairing the radiator, you should understand the cause of the malfunction. As practice shows, there are several main reasons for the breakdown of a bimetallic battery:
- Incorrect model selected. If you do not correlate the performance of the heating system with the technical characteristics of the battery, it may turn out that they do not suit each other.
- Incorrect connection to the system. For example, if the pipes or adapters to them are copper, and the radiator body is aluminum, then the contact of these metals will provoke the formation of corrosion.
- Too dirty a coolant can damage even the most expensive and high-quality heating devices, leaving deposits in the form of suspensions and debris on their walls for many years. When bimetallic heating radiators do not warm up completely, the most common reason for this is their clogging.
- “Looseness” of nipples and gaskets is often caused not only by temperature changes, but also by water hammer. The former need to be periodically checked and tightened, and the latter need to be changed.
- When noise is heard in the batteries, the cause may be airiness, but when asked why bimetallic radiators click, it is better to answer the question from specialists. The reason may be caused by internal damage, which can only be determined by heating network workers using special equipment.
How to fix a leak from a locknut
There can be several reasons for this problem:
- As a result of mechanical impact, the tightness of the connection was broken. A common problem often occurs as a result of someone simply becoming naked on the pipe.
- The used plumbing linen burned out.
- The thinnest section was destroyed by corrosion.
If a person has not yet figured out the best way to seal a small leak, then it is best to adhere to the following scheme:
- The heater risers must be turned off and reset.
- Use an adjustable wrench or a gas wrench to unscrew the lock nut in order to be able to clear the threads of winding residues. After the manipulations have been completed, you should carefully inspect the structure.
- If the technician does not find any signs of fistulas, then you can rewind the locknut with flax and paint, sealant or drying oil. As an affordable alternative, you can use a polymer thread, which should be tightened with moderate force.
- At this stage, outside help will be needed, since when starting the risers it is necessary to monitor the damaged area.
- If the technician managed to repair the leaks in the battery the first time, then the repair work can be considered complete. You just need to bleed the air. If after rewinding the locknut the leak was not eliminated, then the fistula formed precisely in the thread.
- It is necessary to push the radiator cap and locknut all the way down the pipe. Now you need to carefully disconnect the wiring from the radiator. The existing thread should be driven with a die and an additional six threads should be cut. Be sure to clean the surface of paint first.
- All that remains is to cut the pipe to the problem area in order to run the thread with a die again. After this, connect the radiator.
- At the final stage, all that remains is to launch the system to fully heat the rooms.
Important! Experts recommend applying very little oil to the pipe, since in this case the die will go much easier and will not leave unwanted damage on the metal.
How to deal with battery leaks on your own
Is assembly required
If the radiators are supplied assembled, it is enough to install plugs and a Mayevsky tap. Most models have four holes located at the four corners of the body. They are used to connect heating lines. In this case, any scheme can be implemented.
Before installation of the system begins, it is necessary to close excess holes using special plugs or air vent valves. The batteries are supplied with adapters that must be screwed into the collectors of the product. In the future, various communications should be connected to these adapters.
Prefabricated models
Assembling batteries should begin by laying the entire product or its sections on a flat surface. Best on the floor. Before this stage, it is worth deciding how many sections will be installed. There are standards that allow you to determine the optimal amount.
The sections are connected using nipples having two external threads: right and left, as well as a turnkey lug. The nipples should be screwed into two blocks: at the top and at the bottom.
When assembling the radiator, be sure to use the gaskets supplied with the product.
It is necessary to ensure that the upper edges of the sections are correctly located - in the same plane. The tolerance is 3 mm.
Damage to the radiator plate
Heating of residential premises must be of high quality and reliable. But too thin, corrosion-resistant battery metal will eventually develop a leak that needs to be fixed quickly. If a spare plate is not at hand, then cold welding can be used. This material is a two-component epoxy adhesive with the addition of fine steel filings. All further actions must comply with the following scheme:
- When a heating device leaks, it is necessary to reset the risers. Damaged areas are cleaned of paint and rust. It is advisable to degrease with acetone or gasoline.
- Apply the glue evenly. Detailed instructions must be indicated by the manufacturers on the packaging. It is best to treat an area of at least 4 cm2.
- You need to wait enough time for the composition to harden. After 40-50 minutes, you can start the system and bleed off the accumulated air.
Damage to worn-out products
What to do if a leak has formed between two sections of the battery
This problem often occurs as a result of a decrease in the temperature of the charged coolant. If the user decides to seal a tiny defect, then there is no need to rush into performing this procedure until the next frost. The temperature of the battery will gradually rise, causing the naturally expanded sections to again compress the leaky gasket.
Comprehensive leak control includes several stages:
- The first step is to turn off the system and gradually disconnect the radiators from the supply lines.
- You need to measure the distance from the nearest end of the heating device to the leak in order to throw a thick steel rod into it, which is flattened at the end. The master needs to try to hook the problematic nipple. The technology for placing this part directly depends on the side from which the key was inserted.
- The nipple must be tightened along the thread until it stops. In this situation, additional efforts can be made.
- All that remains is to tighten the plugs furthest from the liner. The unit is connected to the riser, the air is vented and started up.
Attention! When disconnecting the liner, it is better to substitute a capacious basin, since a certain amount of water necessarily remains in the riser.
Formation of cracks between different sections of heating installations
Heating system adjustment
After filling the system, you need to go through all the radiators and bleed air through the Mayevsky taps: open the Mayevsky tap, first the air comes out, then the tap “spits” air with water... when only water flows, it means the radiator is filled with water, close the Mayevsky tap. And so on for all radiators.
Most likely, the pressure will drop after manipulating the radiators, so we re-charge the system to operating pressure. If there is a second floor, we bleed air from its radiators in the same way. And - we feed the system to operating pressure.
We bleed the air from the circulation pump. The pump has a screw; you need to loosen it with a wide slotted screwdriver. First, air will come out like from radiators, and then water will come out in a thin stream. After this, tighten the screw. Check the pressure and add coolant if necessary.
Let's start the pump.
Important! Before going any further, listen to see if the pump is working. It happens that it does not work because its rotor is soured
Turn off the pump and fix it by: 1) unscrewing the screw in the center of the pump motor; 2) inside, at the end of the rotor, there is a slot, insert a screwdriver into it and turn the rotor; 3) screw the screw into place. Let's turn on the pump again, it simply must now work.
For 10-15 minutes. Moreover, after 1...2 minutes of operation, we unscrew the screw on the pump again, if water flows, everything is in order. When you turn on the pump, you will hear air coming out of the air vents again, this is also normal. And the pressure will drop, and we will feed the system to the 1.5 atm we need.
While the pump is running, we go through all the Mayevsky taps and check the presence/absence of air in the radiators. And again we feed the system to the required pressure.
Now we believe (for now we only believe) that the system is completely filled with coolant (but we are not too delusional, air can leave the system for up to 3 weeks or even up to a month, especially if there is a water-heated floor; air will leave the warm floors itself through air vents on the manifolds).
The most effective methods for eliminating leaks in the battery
With the onset of the cold season, many apartment and house owners discover that a recently working radiator has begun to leak. In such a situation, you need to try to shut off the water supply as quickly as possible and drain all the coolant from the circuit. In emergency situations, the battery simply needs to be replaced. If the structure is collapsible, then the financial costs for restoration work will be minimal, since to fix the problem you can purchase only one new section or plate.
Important! Before a comprehensive replacement of equipment, you should try to take all measures to restore tightness and eliminate leaks. It is for these purposes that experts have provided several simple and affordable home repair options.
Universal hermetic seal
Leaks often occur in an aluminum radiator, which are directly related to various unfavorable operating parameters. To restore the integrity of the structure, a high-quality sealant can be used, which can be purchased at any hardware store. The product that manufacturers produce specifically for heating radiators, consisting of polymers or a special powder, has proven itself to be excellent.
Attention! Due to its specific composition, upon contact with air, the sealant simply polymerizes.
After complete hardening, the applied composition perfectly eliminates leaks, so you can avoid large financial investments in major repairs. If the homeowner has previously worked with sealants, he can quickly take emergency measures so that the system can continue to heat the house.
The use of rubber gaskets and conventional clamps
Before repairing bimetallic heating radiators, you should prepare some materials and equipment:
- Pliers.
- Aluminum clamps.
- Wire.
- Classic gasket made of durable rubber.
The repair technology includes a certain list of important stages. A gasket is placed in place of the leak and everything is secured with a clamp. If you don’t have the right tools at home, then a simple wire and a bicycle tube will do just fine. From this material you can carefully cut a piece of rubber of the appropriate size. You can secure the homemade gasket with strong wire. To achieve a good tie, you need to use pliers.
Advice from professionals
A few tips will help you carry out an effective repair:
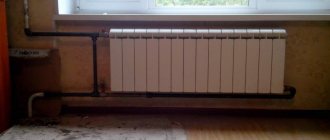
- After repair, the radiator will have to be painted. If it is hidden behind a decorative screen, it is advisable to choose dark paint. A cast iron battery will transfer heat better.
- The hanging brackets are positioned so that the gap between the radiator and the window sill is 10 cm, and the gap between the floor is 12-15 cm.
- To reflect heat, the wall behind the cast iron radiator is sealed with foil material.
Heating efficiency depends on the number of sections on each radiator. This requires competent calculations, which experienced specialists will help you perform.
Innovative moisture-resistant adhesive
In this case, the technician will not be able to rehabilitate the heating without draining the water. If liquid begins to drip at the junction between the metal sections, then to eliminate this damage you will need a cloth that must be soaked with glue that is resistant to high humidity and high temperatures. When the composition hardens, the leak will be reliably eliminated. For these purposes, it is better to buy universal epoxy glue.
The video provides interesting information about cold welding and its versatility:
Bandage based on plaster and cement
To figure out how to repair a damaged radiator, you can use this technology. To work you will need prepared alabaster, sharp scissors, a regular bandage, a container for water, and cement. In a vessel you need to prepare a solution of a thick consistency, into which you need to dip the pieces of bandage. One strip should be 35 cm long. Bandages thoroughly soaked in alabaster are applied to the detected leak area. To achieve maximum results, you need to apply several layers at once. This option is actively used by both beginners and professionals.
Application of universal welding
Thanks to this device, you can eliminate absolutely all traces of leakage. Welding allows you to eliminate leaks in any type of battery in just a few minutes. The master can purchase a high-quality installation in a specialized store.
Important! Classic welding copes well with all types of cracks and breakdowns, due to which you can quickly return the system to its previous tightness.
This option is in great demand, since the result of the manipulations performed is not afraid of the negative effects of moisture and high temperatures. Welding is one of the most reliable ways to eliminate leaks in a heating system. If a person has not previously encountered such a device, then it is better to entrust all manipulations to a specialist.
A variety of products for filling holes in cast iron products
Features of installation of various types
The material from which a particular heating element is made imposes certain requirements for its installation. While cast iron is not afraid of serious mechanical stress, others require special care.
Cast iron classic
Cast iron radiators are still relevant. The special characteristics of the material used in their manufacture make it possible to effectively heat a room of any size due to slow cooling.
To install such a heating element correctly, before connecting you should:
- disassemble the finished product into sections;
- Having pulled out all the nipples, assemble the product in the reverse order.
When performing installation work, it is worth taking into account the weight of the product and the composition of the material from which the house was built. The heating element can only be installed on brick and concrete walls. The battery is installed near a plasterboard wall on a floor stand.
Modern models
Such products are characterized by low weight and increased fragility. For them it is necessary to provide a Mayevsky crane.
During installation work, do not remove the packaging to prevent surface deformation.
Fixing a leak between two sections
The technician needs to perform additional sealing of the joints. Those areas that are located between the two sections are distinguished by their unique rectilinear shape and small area. Thanks to this, you can find a defect much faster and eliminate it efficiently. Experts recommend using a simple algorithm of actions:
- You should try to strengthen the guide screw using a classic car clamp.
- If desired, the master can make the fastening element himself. To work, you will need several plates made of durable steel (aluminum blanks). The hinges can be tightened using a classic bolt connection.
- Before using clamps, you should isolate problem areas using a rubber gasket. You can also use a piece of fabric that is impregnated with epoxy glue.
Attention! The winding between the batteries must be done as carefully as possible so as not to overtighten the connection. Particular care is also taken when fastening the clamps.
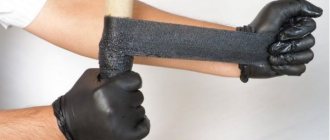
Temporary solution
So, if water runs in a thin stream from any place in your radiator, and you do not have the opportunity to stop the flow of coolant, then you can try to block the damaged area in such a way as to prevent further troubles. To do this, you will need something rubber: for example, an old rubber boot, an inner tube from a bicycle or car wheel, a household or medical glove - in general, anything as long as it is made of rubber.
The algorithm of actions is simple.
- Cut the rubber product into strips. The longer they are, the better. The width of each strip should be such that the leak can be completely covered.
- Now you need to wrap the damaged area with the resulting strips. Start the process near the place where the water is flowing, gradually moving towards it. The turns should overlap each other slightly. It is necessary to wind the rubber as tightly as possible - the tighter the fit of the strips, the more reliable the effect will be.
- After the winding is done, it needs to be fixed. To do this, make a tie using a fabric tourniquet - it must be placed over the leaking area. Instead of fabric, you can use strong wire, but it must be wound in the same way as rubber, in turns across the entire width of the original winding. A car clamp is also suitable - this is generally quite a useful thing that can be useful on the farm many times, so it is recommended to purchase more of them for the future. Another option for securing the patch is a strip of tin. It can be tightened over the rubber using bolts.
Of course, such a solution is only temporary. Ideally, after eliminating the leak in this way, it is still advisable to call the emergency service so as not to risk it. But in many cases, such a rubber patch helps you survive until the end of the heating season, and then you can safely do more general repairs or replace the battery.
You can make your life even easier if you purchase special plumbing clamps to eliminate such troubles. They are designed specifically for pipe repair. Such a clamp is a metal product with rubber attached to the inner wall. That is, in essence, this is the same patch described above, but its application is much more convenient - fixing the leak will take about a minute.
If this solution does not work, and the coolant still continues to leak from under the patch, then you still need to either call an emergency team, or, if possible, stop the heating system yourself and begin serious repairs. There are several ways to eliminate a leak. The simplest of them is gluing.
This is interesting: How to choose bathroom furniture
Combating defects that have formed at the junction of the riser and the pipe
Damage to the heating battery used may be caused by incorrect installation of the equipment. The first problems become noticeable to the user after the first start-up of the heating system. To connect the riser to the pipe, experts use threads or conventional welding. But poor-quality assembly, failure to comply with basic techniques, as well as the use of pipes of different diameters can provoke the occurrence of leaks, which is why unscheduled repairs are simply inevitable.
If a large mechanical pressure is applied to the created structure, this can provoke the formation of a fracture at the junction or distortion. This situation most often occurs when a person needs to get to the top of the window or due to careless play by children. The salvation in such a situation is the use of a clamp in strict combination with a rubber gasket.
Professional approach to repairs
Causes of leaks and other breakdowns of heating devices
If a fistula appears on the heating pipe or any defect in the heating device, first of all you need to understand the reasons for its occurrence and eliminate them so that the problem does not reappear in the future.
Various radiator malfunctions occur for the following reasons:
- If you choose the wrong type of unit for a given heating network, it quickly fails. When choosing a battery, take into account the diameter of the main pipeline, the temperature of the coolant, pressure and other system parameters.
- If the heating device is incorrectly connected to the mains, it will also quickly break down.
- Fistulas and leaks most often appear due to corrosion of the material. Corrosion processes are accelerated by oxygen entering the network, airing the system, using coolant with impurities, as well as frequent pressure surges.
- Plaque at the junction of sections and clogging of radiators and pipelines occurs due to the use of a thermal fluid of inadequate quality. In this case, all components of the network must be washed and cleaned.
- If the threaded nipples fail, the extent of the failure will be significant. To protect these elements from damage, change the gaskets regularly.
- Clicks and noises in radiators and pipes do not necessarily occur due to breakdowns. However, in any case, it is better to seek advice from specialists to eliminate the possibility of breakdown.
- Low heat transfer and incorrect battery operation occur due to the appearance of air pockets. They occur after network repairs, replacement of heating devices, due to low pressure in the circuit or leaks.
Fighting cracks of different diameters
Elimination of such defects has its own characteristics. The most suitable option is to use traditional welding. But this option is quite labor-intensive, and also implies the presence of appropriate equipment and minimal skills. As an excellent alternative, you can use special glue. First, the technician needs to prepare the problem area of the battery. The process itself is based on cleaning the surface and degreasing it.
The prepared cold weld fragment is pressed against the crack formed with a certain force. This material stands out for its quality and reliability, since it polymerizes within a few minutes. It takes 35-45 minutes for the formed seam to harden. The very next day, the restored battery can be put into operation, but after the end of the heating season, such a device will need to be replaced, since such welding falls into the category of temporary repair work.
Rewinding the cork for better sealing
Restoring the integrity of pipes
If the structure is already leaking, then you simply cannot do without a plaster-cement dressing. The repair of heating equipment itself includes several main stages:
- Cement is diluted in a pre-prepared container to a consistency that is convenient to use.
- A classic medical bandage is cut into pieces 35-40 cm long.
- The prepared strips are thoroughly soaked in the prepared cement mortar.
- The fastening blanks are carefully wound onto the formed crack in several layers so that maximum joint strength can be achieved.
If the user does not have the opportunity to turn off the tap on his own, then the first dressing must be treated with an alabaster solution. All subsequent layers can be based on classic cement.
Welding all cracks and large holes on the battery
Effective prevention measures
Every property owner can detect a leaking pipe, regardless of the operating characteristics of the heating system. But all of the above methods of dealing with defects are relevant exclusively in the winter season, when it is necessary to take any measures as quickly as possible to restore the structure. But at the end of the heating season, it is imperative to organize professional scheduled maintenance of batteries and pipes.
The radiators are carefully dismantled and disassembled into separate sections, trying to remove all the old sealant from all threaded connections. In some cases, it may be necessary to replace old nipples. Experts definitely recommend preparing new intersectional rubber sealing gaskets. If the repairman also finds fistulas, then they must be welded in order to subsequently be able to return the already restored radiator to its place.
If the house has not previously undergone a comprehensive replacement of all components of the designed heating system, then the resulting risk of a leak increases exponentially. This is caused by natural wear and tear of communications. Experts always recommend having classic thick rubber gaskets and various clamps in your home arsenal. For emergency repairs, you will need cold welding to be able to immediately shut off the flow of moisture. In practice, it has been proven that specialized glue is capable of eliminating any leaks that form in heating devices.
Important! There is a huge range of sealants on sale that will help even an inexperienced craftsman improve the tightness of the structure. The final choice depends on the allocated budget and the actual condition of the equipment.
After all the manipulations have been done, you can install the battery in the circuit and fill the system with water to check the integrity of all connections. This stage must be performed with the boiler operating, since under the influence of pressure the circulating coolant is able to identify all weak points in the pipes. If no defects were found within 24 hours, then the problem can be considered resolved.
More interesting and educational information on this topic is presented in the video:
Average score of ratings is more than 0
Share link
Comments There are no comments yet, but you could be the first...
Scheduled Maintenance
All of the above methods are mostly used in winter, when something urgently needs to be done. During the warm period of the year, you can carry out scheduled maintenance of risers and batteries so that leaks do not occur in winter. The battery is completely removed from its place and unrolled into sections. All threaded connections are cleaned of old sealant. If necessary, nipples are replaced with new ones. Intersectional gaskets are also completely replaceable. The detected fistulas are welded or sealed, and the battery is installed in its place. In the video below you can see other ways to eliminate leaks.