Answer
What to do if you notice rust on a reliable old cast-iron battery that has been tested for years?
Is it worth changing it or is there a chance that the battery will still serve? And if this is a new cast iron battery, what should you do in this case?
Let's figure out what causes rust on a cast iron radiator.
So, one of the main qualities of cast iron is its corrosion resistance. During operation of the radiator, its surface becomes covered with so-called dry rust and corrosion practically does not proceed further. For this reason, cast iron radiators are very durable - it takes a lot of time for the thick wall of the radiator (which is exactly what a quality product should have) to rot through.
Has rust appeared on a cast iron battery?
This means the battery is simply damaged. It could be a small crack that is leaking a little. Or a shell formed during casting. In this place, the battery wall turned out to be thinner, and, accordingly, it succumbed to corrosion more quickly.
Of course, a small leak in the battery can be repaired by cold welding. By the way, there are “masters” who advise doing exactly this. They even sell special anti-rust paint for batteries. But if you simply cover up and paint over the rust, the consequences of such a “repair” can be very sad. After all, if in the middle of the heating season the battery breaks, it will not seem like much to either you or your neighbors. Not to mention the fact that you will be left in the cold without heating.
Therefore, if you notice rust on the battery or on the connection of sections, then there is only one way out - replacing the radiator.
Focus on quality
And to avoid the excruciating pain of wasted money, choose high-quality radiators from well-known manufacturers. For example, cast iron radiator Аdarad Оttoman 475 or radiator Аdarad Nostalgia 800/180. After all, a stingy person, as you know, pays twice: the first time when he buys cheap Chinese radiators, and the second time when, after a year or two, he replaces them with new ones, having previously flooded his neighbors.
In addition to all the advantages inherent in cast iron radiators, these batteries also have an excellent appearance. These radiators are guaranteed to last you at least 50 years. No rust and no leaks.
Construction and Dacha in clear language
Nothing lasts forever, and over time everything falls into disrepair.
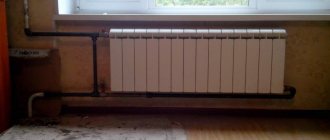
If you have high humidity in your apartment, then the heating radiator can “give” you not only a bad look and peeling paint, but also rust on it as a bonus. As a way out, of course, you can change the battery and buy a new one, but this is expensive and where is the guarantee that the new one will not become just as rusty in a couple of months?
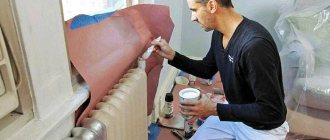
It’s better not to buy a new (and expensive) radiator, but to remove the rust and paint it yourself, and it will look as good as new again.
The battery is leaking - what to do?
Almost every house and apartment has cast iron radiators, thanks to which it is always warm and cozy in cold weather. The service life is several decades, this is so long that almost everyone takes their work for granted, without thinking at all about the fact that they need to care for the battery.
Of course, when an incident occurs in the form of a leak, everyone begins to cut off the telephone numbers of the housing office and private repairmen. If this happened on a weekend, everything is somewhat more complicated. The average apartment resident has no idea what or how to do if a cast iron battery starts to leak.
Please note that if employees of the management company or heating network, during a scheduled inspection, will be able to identify and fix the breakdown in time, but this must be done on time and in advance.
A breakdown causes a lot of trouble if it happens in winter and there is already water in the system . Below we will tell you how to provide first aid to a battery and not leave your family without warmth and comfort, without flooding your neighbors.
Centralized battery cleaning
Washing cast iron batteries with your own hands is a good thing, it doesn’t cost anything, but it requires a lot of effort, considering how much they weigh and time. If you involve heating network workers in this procedure and get the go-ahead from your neighbors, you can get results much more efficiently than fiddling with the radiators in the bathtub yourself.
To do this, you need to submit an application to the management company and pay for the cost of the service. This procedure is carried out exclusively in high-rise buildings, and it does not require dismantling elements of the heating network.
- Water is supplied under strong pressure into the system at certain intervals, which fills it with air bubbles.
- Rushing through pipes and radiators, the bubbles knock down rust, scale and debris in the channels on their way, carrying it all out.
- Repeated rinsing with air-filled water until it is clean and clear will ensure a good cleaning.
This is the most effective way to clean cast iron batteries without removing them from the wall, but it takes time and money.
Although this method seems to be the easiest for busy people who are willing to pay for such a service, organizational issues and waiting for permission may take some time.
What does the battery consist of?
If we are talking about old-type radiators, then in appearance they resemble accordions, while modern models are flat, due to which they heat up more evenly. Cast iron is a very strong material, but even it is not eternal, it has a limit of stability.
So the service life varies from 20 to 30 years, depending on operating conditions. If maintenance is carried out in a timely manner, the service life increases several times and the battery will last almost a hundred years.
Unfortunately, problems often arise in the places where the sections are fastened to each other; they wobble due to water or crack due to age. This is where the leak begins, which is best localized as soon as possible.
Placing a basin or saucepan under a dripping radiator is not a solution, as the crack tends to grow, so that one day a flood may occur! If we are talking about the winter period, then there is generally boiling water in the pipes, which poses a serious danger to the life and health of people.
Battery cleaning steps
The first cleaning is carried out with hot water without the use of chemicals and biological agents. This stage allows you to further save detergents and speed up their action.
The radiator needs to be filled with water and shaken vigorously, as a result of which the dirt lags behind the walls and drains together with the waste liquid. The action must be repeated until clean water flows out of the battery. The radiator sections are heavy, shaking them alone is very difficult; before carrying out work, you need to enlist the help of 1-2 people.
The battery, washed with water, should be filled with detergent. To prevent the cleaning solution from leaking out, it is necessary to place plugs on all openings of the section. Depending on the product chosen, it is left for 1.5–2 hours so that the cleaning substance has time to react with the plaque and dissolve it. At this time, it is necessary to tap the outside of the battery with a wooden hammer or shake the contents periodically to help remove scale. Then you need to open the plugs, drain the solution and rinse the cavity with running water. Rinse until particles of softened plaque come out.
In cases of particularly severe blockage, you can disassemble the battery into sections and wash each part separately. This will make the process much easier.
Cleaned heat exchangers need to be dried and installed in their places. Replace old deformed fittings and intersection gaskets with new ones, attach air vents or Mayevsky taps to the ends of the battery if they are missing.
After all work is completed, it is advisable to fill the system with water and start it up. This will allow you to check the joints and flush the pipes. After a successful test, the system is ready for the new heating season.
What breaks most often
Although cast iron is a great conductor of heat, batteries have wide channels which minimize the risk of the battery clogging. In this case, it will heat the room worse. So why might the battery burst?
The radiator is too heavy , if the brackets are installed weakly or not deep enough (and it also happens that they are completely forgotten about and the battery hangs on the pipe), over time it sags under its own weight and tilts.
It would seem that this is not the case, but the slightest deviation is fraught with a decrease in the efficiency of the device. If no one paid attention to this and did not correct it, corrosion appears and leaks begin. Initially, corrosion damage appears as a small brown spot that gets larger.
Many people mistakenly believe that older radiators last much longer and work better, but there are also those who prefer newer models. Both will work properly if they are located no higher than the 6th floor.
Provided the water flow is stable and there are no water hammers, in this case the battery will heat and operate at least on the 10th or 20th floor. Otherwise, a leak may form at the joints . Any hardware store has a lot of sealants that will help correct the situation or prevent it altogether.
Remove rust from radiator
There are several ways to remove rust from the metal surface of a radiator.
The simplest is mechanical , that is, we take a battery, take metal brushes and sandpaper and clean off all the rust and the layer of previous paint.
(Of course, the method is very long and difficult, but the most effective). You can also use the sandblasting method.
But, sometimes there are cases when the mechanical method cannot be used when we use mechanical compounds:
- We prepare a solution (500 ml of water, 105 g of ammonium, 100 caustic soda, 400 g of 40% formaldehyde, then add another 500 ml of water), to this solution add 10% sulfuric or hydrochloric acid (100 to 3). The part you need, first of all, degrease (for example, with gasoline) and allow to dry, after which the rusty parts should be dipped in the resulting solution for 20-30 minutes, then rinsed thoroughly with hot water.
- Use tin chloride (dip rusty parts in it) then rinse and let dry.
- Fish oil (apply it to the problem area and leave it for several minutes).
- If there is little rust, you can moisten cotton wool with kerosene and use it to wipe off the rust.
- Clean off rust with machine oil and charcoal.
Home remedies (using what you have on hand):
- Vinegar + citric acid (1:1) and apply to areas, leave for a couple of hours.
- Baking soda (mix with water to form a thick paste) and apply to areas for 20 minutes, then wipe off with a wire brush (the procedure may be repeated).
- Coca-Cola (dip battery parts in Coca-Cola and leave for a while).
- Ketchup. Apply ketchup or tomato paste to the rust stain, leave for 10 minutes, then wipe dry.
- Foil (using it, you need to scrub off the rust from the radiator).
Radiator paint
The choice of paint is a very important aspect, because the final result will depend on the choice.
First of all, the paint should:
- Withstand high temperatures (at least 100°C);
- Be resistant to mechanical stress;
- Have protection from an aggressive environment;
- Don't be toxic.
The following types of paints are available for sale:
Acrylic enamels. They are made from organic solvents, so when the paint dries, they emit a characteristic solvent smell. When dry, the surface becomes glossy and shiny.
Advantages:
- High service life;
- Colors remain bright and do not fade;
- Dries quickly;
- Cracks and “wrinkles” do not appear on the surface;
- To clean the brushes, you only need water;
- Low price (compared to oil ones);
- Can be used in rooms with high humidity
Flaws:
- High difficulty in removing acrylic paint from the surface.
Alkyd paints. The coating is very resistant to high temperatures. There is a fairly large selection of this paint in different colors on the market and in specialized stores. But when dried and at high temperatures, this paint emits an unpleasant odor.
Advantages:
- Durable;
- Elastic;
- Dries quickly;
- Do not lose brightness;
- Do not crack or shrink when dry.
Flaws:
Water-dispersion paints . It is considered the best choice, since this type of paint does not have the standard unpleasant odor and also dries much faster.
But pay attention to the packaging; the packaging must be marked “for painting heating radiators and pipes.”
Advantages:
- Cheaper than acrylic paint.
Flaws:
- Less resistant to moisture and mechanical damage.
DIY repair
The inside of the cast iron is rough; if the radiator is foreign-made, then there are no roughnesses. Due to roughness, debris clings to the walls and settles inside.
If the battery is not cleaned, it will clog and simply burst from the high pressure of water.
If there is a leak at the joint, then a simple bandage and epoxy glue will help to cope with this, coat the joint with glue and soak the bandage with it, then wrap the joint tightly, wait until the glue sets and once again, sparing no glue, coat everything, then you can touch up the place no repairs were visible.
This is a temporary measure; after the heating season ends, it is worth replacing the section.
If a crack has formed , then a bandage and glue will not save the situation; you will need a clamp. It is better to use cold welding, a sealant that is very similar to window putty. Knead it thoroughly and cover the crack with it, after a few minutes everything will set and you can sleep peacefully for another heating season.
All other methods, unfortunately, are useless. Even after such independent repairs, after the end of the heating season, it is worth turning to a specialist for help.
Even the best cold welding is not a guarantee that the leak will not return after some time. Carry out technical inspections and minor repairs in a timely manner and let the radiator serve you faithfully.
Central heating allows you not to worry about the need to light the stove on time, as well as the fact that it is impossible to leave your home for a long time. But it also has its drawbacks. The main one is the invoice that comes every month. Another disadvantage is breakdowns that occur from time to time. This applies to both central highways and points within the house. When a problem occurs in the house, it is important to know what to do if the heating battery is leaking. The causes of the leak and how to eliminate it will be discussed in the article.
Cleaning radiators in private and apartment buildings
Radiators get clogged inside in any case: whether they are located in a private house or in an apartment building.
And how to properly rinse heating batteries? Things are much better with flushing batteries in an individual living space than if you do this work with one heating system for everyone. In your home, everything depends only on the owner of the home.
In an apartment building, this procedure can be done without the services of a plumber. But it is necessary that the condition be met - the risers should not be clogged, because there will be no effect. Flushing should be done before the heating season, when the risers are still without water. It is advisable before it starts, since then the utilities will have already purged them. After supplying water and using it, you will feel a difference in the degree of heating of your batteries.
A positive result is guaranteed when residents of apartments whose heating is connected to one riser agree to flush their radiators all together. In this case, the debris accumulated in the batteries will have no chance to remain in the system, and this will give the maximum effect from the procedure performed.
How to flush cast iron radiators?
In this section you will learn how to clean cast iron batteries. These products were in great demand in the past, and now, after many years, most of them are in place and in use. From this we can conclude that cast iron batteries are truly durable. The disadvantage is the formation of rust and scale inside.
Before cleaning the batteries:
- pre-drain water from the system;
- select the necessary plumbing tools;
- place a vessel under the radiator into which water can drip after it is disconnected from the system;
- dismantle the product by removing it from the pins.
The radiator itself can be washed in a cast-iron bath or outside. To do this, prepare a solution of a product that will remove scale and rust from the walls. The following substances can be used:
- means for flushing radiators in cars;
- vinegar essence;
- caustic soda;
- lemon acid;
- milk serum.
If you still decide to flush the bathroom, you should definitely protect the drain with a plug with a mesh. Before starting work, remove all plugs from the battery, and gradually pour boiling water from the kettle from all sides. The radiator is shaken if possible and the water is poured out. The waste water will already contain scale and rust particles. Next, pour in the active solution and wait 1-3 hours. After this time, the radiator is again shaken and tapped with a wooden hammer. The entire contents of the battery are drained again and water is added again. The procedure with water is repeated as many times as deemed necessary. If acid was used, you should try to wash off its remains so as not to provoke the appearance of rust again.
How to properly flush heating radiators made of aluminum?
How to wash aluminum radiators?
Of course, there is a difference in actions, but it is not big. The process of removing batteries is much easier in aluminum radiators, since they are more modern. Aluminum objects are not subject to corrosion, which means there is no need for tapping, which can also deform the products.
Similar actions are carried out with cast iron batteries, only with the specified nuances. When reinstalling, modern sealants are used, such as FUM tape.
Is it necessary to remove radiators when cleaning them?
And the last question that may arise from readers: how to wash heating radiators without removing them? If the work is carried out in an individual heating system, and it is of short duration, then water can be supplied and drained on the other side. Since hot water has a more pronounced activity, it should be poured in.
Despite the labor-intensive work, it extends the life of the heating system. With regular washing, the need to dismantle it may disappear, and the process will be carried out according to the above method.
You can see how to wash a cast iron radiator in the video:
https://youtube.com/watch?v=d9l4AN9O2Hs
Where is the leak
The entire system consists of heat-transfer devices and wiring, which is represented by pipes. There is also a central riser through which hot water is supplied to the home. Any of the modules can leak. The cause of the leak may be poor-quality assembly, as well as defective material from which the pipes or radiators are made. Knowing this, you can predict where a leak might appear. Among such places are:
- the junction of the outlet pipe with the riser;
- pipe seam;
- leakage between battery sections;
- leak at the pipe inlet to the radiator;
- the appearance of a fistula in the radiator section.
Each type of leak requires its own approach to elimination. In some cases, the same materials may be used.
Why does a cast iron battery clog?
What is the main reason for contamination of cast iron radiators?
The quality of water does not improve from year to year; over time, everything leads to the fact that many mechanical particles settle in heating systems.
Chemical flushing of heating pipes.
For example, a small piece of wire or similar metal elements circulate along with water through heating risers. Water is usually drained during the non-heating season, which leads to pockets of corrosion (rust) forming in the pipes.
Before finally turning on the heating, hot water is supplied under pressure; it breaks off particles of corrosion, which also remain in the pipes. And the water itself that is put into the pipes is often not the cleanest. This buildup of debris in cast iron systems causes rust waste circulating through the system to clog the water passage, causing the batteries to cool.
Over time, more and more debris accumulates in the batteries, which affects their heating properties. The riser itself may be hot, but the pipes may be warm. If you notice this, there is nothing left to do but clean the radiator.
First actions
Since the reasons why leaks occur, as well as the locations of leaks, are different, there is no one universal rule that would quickly solve the difficulties that have arisen and eliminate the leak. But there is a certain procedure that can be followed when a leak is detected:
- leak localization;
- blocking the water flow;
- maintenance or replacement of the problem area.
Is it possible to cold weld a battery?
Can
Is it
possible to seal the battery by cold welding
?
It’s possible
, but it’s better to call a technician after the end of the heating season to carry out major repairs and, if necessary, replace the radiator.
Interesting materials:
Antifreeze gets into the oil, what should I do? Antifreeze got into the engine, what should I do? A stone hit the windshield, what should I do? A stone hit the glass, what should I do? I got into an accident, what should I do with insurance? I got into an accident, what should I do? I got into an accident while car sharing, what should I do? I got into an accident, what should I do next? A cut on a suspended ceiling, what should I do? I cut the suspended ceiling, what should I do?
Knot near the riser
A leak at the branch point from the riser may occur due to a leaky connection. If it is welded, then the cause of the leak may be a corrosive effect, which intensifies when using the heating system, like zero when unwinding the meter. Another reason for such a leak is the negligence of the craftsman who performed the joint. Also, the problem of leakage may be due to low-quality material that was purchased to save money. Often, a leak appears when the pipes are under high stress, which occurs due to welding work or loads on them with heavy objects.
The simplest way to eliminate a leak in such a place is a metal clamp and a piece of rubber. If such a leak is not uncommon, then you can stock up on a sufficient number of rubber seals in advance to eliminate the leak. They can be cut from an old bicycle inner tube. The sizes can be very different, because you never know where you will have to use this method. The first step is to try to temporarily eliminate the leakage using improvised means. Next, two clamps are loosened and put on the pipe. The cut piece of rubber is placed at the leak site and clamps are placed on it. It is worth clamping them with a screwdriver until the leak stops.
If it becomes clear that in a certain place the pipe wall has become thinner than necessary due to corrosion, then you can use a plaster or cement clamp rather than a rubber clamp to eliminate the leak. This method is also suitable when the leak is due to a crack in the pipe. A small amount of cement and gypsum must be added to warm water. The substances are mixed until a homogeneous mass is formed, but it must have good fluidity. You will need a thick bandage. It must be well soaked in the prepared solution. It is advisable to cut it into pieces of 20 cm. The soaked bandage is wrapped around the damage where there is a leak; this must be done in several layers so that the leak completely disappears.
In some cases, the problem occurs due to a leak directly on the thread. There is no point in delaying the decision to eliminate the leak. It is advisable to take a radical method and cut off the burst part, weld the pipe and cut a new thread. But while waiting for the repair team, you can apply a tourniquet to the leak site. It is done according to the principle of the previous one, but before soaking it in the cement mixture, you need to moisten the bandage with water and sprinkle it with salt.
Products and biological products for plaque removal
Sometimes cleaning is done mechanically, by tapping the outer surface and rinsing with a stream of water under pressure, without the use of additional cleaning agents. This method is not always effective and can cause damage.
To facilitate the process, it is better to use flushing chemicals:
- Car radiator cleaning products: Hi-Gear, Liqui Moly, Lavr, Pingo. There are other manufacturers, but they are not so highly recommended. Before use, the selected substances must be diluted with water according to the instructions.
- Special compositions with a high degree of biological activity. They are used quite rarely in everyday life, since it is not easy to choose the right product for the elements of a system made from different materials. The professional series “Medex” and “Master Boiler Power” cleaners cope well with the task. They are completely safe for pipes and heat exchange devices made of various types of metals. The compositions of the Dosker Thermo series are most often used for cleaning polymer pipelines. The Metalin T reagent is safe for removing heavy lime deposits in steel heating systems.
A good effect is achieved by combining special preparations and the mechanical tapping method.
Radiator sections
Although old cast iron radiators are the best option for central heating, they are often the cause of leaks. One of them may be water leakage in the place where the fins connect to each other. It is not always clear where the hole appeared due to pressure. Often water completely covers the battery. To identify the area where there is a leak, you need to completely turn off the water with the taps and wait until the pressure drops through the hole or release it with the Mayevsky tap. When the water stops flowing, you need to wipe the batteries dry and try to determine where the leak occurred. If the cast iron battery has leaked at the junction of the sections, then using cold welding would be an excellent solution.
Usually this substance is two-component and is sold in small tubes. At its core, cold welding is an epoxy resin with metal powder additives. Before using it, it is necessary to clean and degrease the area where the leak is noticed. It is important to remove not only rust, but also paint from the leak site; it is better to make small indentations on each side so that the interaction area is large. The leak area can be cleaned using a knife sharpening stone. Cold welding usually indicates the method of its use, but some types are not suitable for use with water, because when exposed to it, polymerization is impossible.
Prevention of scale formation in radiators
Preventing plaque from appearing is easier than cleaning radiators. To understand the need for prevention, you should check the water used for the coolant for hardness. If this indicator is close to the upper limit of the norm or significantly exceeds it, then it is advisable to carry out a number of measures aimed at softening the water.
You can do this in several ways:
- Fill the system with rain water rather than running water. It is devoid of harmful salts that precipitate, as it is formed by evaporation.
- Do not heat the coolant above 65 ° C, as scale will form at higher temperatures.
- Install a polypropylene coarse filter and a polyphosphate softening cartridge.
The use of antifreeze, ethylene glycol, antifreeze and vodka is not recommended. The effectiveness of these drugs has not been proven, and considerable harm can occur. Many “anti-freeze” agents are toxic; their use voids the right to warranty repair of heating equipment in the event of a breakdown.
It is not difficult to flush the heating system yourself and carry out preventive work to prevent the formation of scale and rust. It is enough to be patient and follow simple recommendations for carrying out cleaning activities.
How to properly clean heating radiators
- How to flush a heating radiator at home
- Flushing heating systems in a private home
In homes, the heating system begins to lose its efficiency over time, which leads to poor heat loss and poor heating of the room. The reason for this phenomenon lies in the contamination of the battery.
High temperature water circulating in the heating system has a chemical effect on the inner surface of the radiators. This leads to scale formation. During long-term operation of pipelines, rust appears on their walls.
Thus, water circulates in the heating system with particles of scale, rust and other mechanical particles that clog the radiators and prevent high-quality heating of the room.
Battery input
One of the problem areas where leaks often occur is the junction of the battery with the pipe from the riser. Typically, the appearance of such a leak is not caused by damage to the area, but by a leaky seal on the thread. To eliminate such a leak in the heating battery, it is necessary to close the riser as quickly as possible. After this, the pressure in the battery is reduced using a Mayevsky tap or another method. Using an adjustable wrench, unscrew the nut or coupling that makes the connection. Next, the rust at the leak site is cleaned, and the old sealant in the form of flax fiber is removed.
In case of such leak repair work, it is advisable to acquire a new nut or coupling. If they have been used for a long time and have not been changed, then they can easily burst while eliminating the leak. When the threads on a pipe are damaged, you can use a die to fix them. Several turns of tow are wound around the joint and it is covered with Unipak paste. After these steps, the assembly is reassembled and the supply tap is gradually opened. This will allow you to timely determine whether the leak has been completely eliminated.
Washing with soda ash and whey
According to videos filmed by various experts, cleaning with soda ash is carried out as follows:
- Plugs (plugs) are placed on the two holes of the outer section.
- Soda ash is diluted in hot water. Half a standard pack for 6-10 liters is enough.
- They lift the heating radiator from the floor, placing it on the section with plugs. The section with two free holes should be at the top.
- Water with soda ash is poured through one hole. Air will escape through the other. Therefore, it does not need to be drowned out.
- Plug both holes and place the battery on the floor. The heating device must lie down.
- So that the soda ash can eat away any adhering dirt, rust, and possibly even old paint that has come in with the water, the radiator needs to be shaken. To do this, grab the top and raise/lower it several times. The bottom should not come off the floor. The same is repeated on the other side.
- Relax for 1 hour, watching a video on the Internet about the features of removing old paint from cast iron and applying new paint.
- Lightly tap along the entire perimeter with a wooden hammer. This is done so that the dirt is completely removed from the walls. At this time, the paint may come off. This means that it was poorly attached to the cast iron.
- Place the radiator on the nightstand so that one of the plugs is in the air.
- Place a bucket under the plug and unscrew the plug.
- After draining the water, the radiator should be flushed. To do this, unscrew the plug at the opposite end and insert the hose from the water supply. Open the tap. Water will flow into the radiator under pressure, thanks to which it will be possible to wash away dirt and completely clean the heating device.
To clean the radiator with serum, you need to follow all the steps described above. Just use whey instead of soda. This process, of course, can be seen in various videos.
Fistula in the rib of the battery
This type of leak can be considered one of the most unpleasant, since it requires significant effort to eliminate. But temporarily, you can use a simple method to eliminate such a leak. If the hole where the leak came from is small, then you will need to enlarge it a little. For these purposes, the water is completely shut off and the pressure in the batteries is reduced. After this, using a small drill, the hole is slightly drilled out. This is done in order to insert a peg into the hole from which water is leaking. It can be cut from a small wooden block. It will swell with water and plug the leak well.
Preparatory work for dismantling radiators
It is best to clean batteries outdoors. If conditions do not allow, then you can wash them at home, but in this case it is necessary to provide the room with good ventilation. Place a grate or tray on the bottom of the bathtub, and cover the side surfaces with a rag. This will protect the enamel coating from unwanted chips and scratches. The drain hole must be protected with a mesh from the penetration of scale particles and debris into the sewer. This procedure should not be carried out in an acrylic bathtub, since some drugs can hopelessly ruin it.
Scheduled Maintenance
All of the above methods are mostly used in winter, when something urgently needs to be done. During the warm period of the year, you can carry out scheduled maintenance of risers and batteries so that leaks do not occur in winter. The battery is completely removed from its place and unrolled into sections. All threaded connections are cleaned of old sealant. If necessary, nipples are replaced with new ones. Intersectional gaskets are also completely replaceable. The detected fistulas are welded or sealed, and the battery is installed in its place. In the video below you can see other ways to eliminate leaks.
How to flush a heating radiator at home
It must be emphasized that cleaning the batteries should be done at the end of the heating season.
Scheme of chemical flushing of the heating system.
To wash the heating battery yourself, you need to drain the water from the heating system and dismantle the radiator. Washing is carried out with mixtures of caustic soda, acetic acid, whey, and also using household chemicals.
Radiator cleaning is done at home in the bathroom. In order not to destroy the enamel of the bathtub, thick rags are lined on its bottom, and a mesh is placed in the drain hole so that large contaminants do not seep into the drain.
Flushing the cooling system.
Flushing the cooling system on a Priora car. The dude mixed 2 antifreezes and ended up with an “explosive mixture”...
Cleaning the cooling system from RUST.
This video shows how to clean the cooling system from rust.
after long-term operation of the motor on water.
All plugs must be removed from metal batteries, and hot water . After the first fill, the radiator must be shaken and the water and debris must be drained. Pour water a second time, but with the addition of a cleaning agent: soda ash or caustic soda, whey, vinegar. Vinegar essence with a concentration of 70% is used in the entire bottle for one radiator.
After pouring this solution, the plugs should be closed and the device should be left for at least 1 hour. After the time has passed, the battery must be shaken well and tapped with a wooden hammer so that the remaining rust and plaque are separated from its inner surface. The solution is drained and clean water is added again. Flushing with water is carried out so many times until clean water flows out of the battery. It is also important to thoroughly rinse the radiator cavity because residual lactic or acetic acid can cause the formation of rust.
Radiator cleaning diagram.
As a cleaning agent for a heating device, you can use a car radiator cleaner. To do this, pour hot water with the addition of this liquid. Only a few grams of radiator cleaner should be added, strictly following the instructions on the package.
After closing the holes, the battery should be turned over and shaken every 10 minutes. After two to three hours, the water with the chemical composition is drained and the radiator is washed with plenty of water.
As a cleaning agent, you can use cleaning compounds for sewer pipes, for example, “Mole”.
Types of leaks and their elimination
There are several classifications of heating pipe failures. Each of them is affected by different reasons and provides individual ways to eliminate the problem. Let's look at the main types of breakdowns associated with heating batteries:
Radiator section leaking due to a crack
Is your heating battery leaking? Such a leak occurs due to the constant load on the heating pipes: maintenance work, heating supply, hydraulic measures. All this creates a threat of destruction of the integrity of the pipe and subsequently leads to the appearance of cracks.
This problem can be easily eliminated using a welding machine, if you have one at hand. You can learn how to solder copper pipes or how to solder polypropylene pipes from our articles.
You need to wipe the battery very well so that the radiator is dry. Then use cold welding, clamping the accident site and holding this point until it is completely glued. After half an hour, the problem will be eliminated, and the heating pipes will become operational again.
Loss of tightness at the junction of the riser and radiator pipes
The reason is the incorrect factory assembly of the battery itself. For example, significant differences in the size of pipes when they are connected. Incorrect threads can also cause pipe failure and leakage. Also the cause is the deformations that occurred as a result of using the radiator.
Under no circumstances should you place any objects on the battery, sit down, or exert any other physical force. This also leads to a similar kind of breakdown.
To eliminate the accident, a clamp is needed. It is sold in hardware stores, so in case of an emergency it is better to buy it in advance and put it at home. If such a product is not available at home, you can use a bandage made of small wire and rubber. This auxiliary tool can be used as a tourniquet, which should be used to tighten the section of the battery where the leak has occurred.
Cement-plaster dressing to eliminate leakage of the heating radiator
Before fixing a leak in the heating battery, you need to prepare the required materials and tools:
- cement;
- alabaster (plaster);
- container with water;
- salt;
- medical bandage
To eliminate the leak, a bandage is applied to the damaged area.
The procedure after turning off the water is as follows:
- dilute cement in a container with water to the consistency of thick sour cream;
- cut the bandage into strips 25-30 centimeters long;
- thoroughly soak the bandage with the cement mixture;
- wrap strips around the damaged area.
The process is repeated until a durable bandage is obtained.
If it was not possible to turn off the water, then instead of cement you need to use alabaster, which dries much faster. Then a cement bandage is applied to the plaster cast.
If the heating battery leaks at the threaded connection, you can use salt:
- wet strips of cloth or bandage in water;
- roll the material thoroughly in salt;
- wrap the leak area.
The gap will close as a result of the salt dissolving in the water. A cement bandage is applied on top.
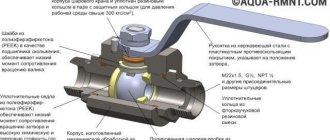
Ball valve repair
New-fashioned ball valves are somewhat more complex than traditional valve models. So, what should you do if the ball valve is leaking? Most often, the problem is that dirt has gotten inside the housing and interferes with the operation of the mixer.
When repairing a ball valve, you must carefully remove the valve. To do this, first remove the decorative plug, under which there is a fixing screw. In short, the faucet needs to be disassembled, cleaned and reassembled
In short, the faucet needs to be disassembled, cleaned and reassembled. They do it like this:
Use a screwdriver to unscrew the screw that secures the lever. Carefully remove the lever from the tap. Use a screwdriver to unscrew the threaded screw. Remove the mixer dome and plastic seal. Inspect the seal gasket and remove accumulated deposits. If the seal is worn out, you need to purchase and install a new part. Remove and inspect the ball. If it is damaged, it will also have to be replaced with a new one. Using a thin screwdriver, carefully pry off the seals that secure the ball.
If they are even slightly worn, they will also need to be replaced. After replacement, lubricate the seals with the composition recommended by the manufacturer. Carefully reassemble the mixer in reverse order.
All procedures when cleaning a ball mixer must be carried out carefully, since its parts are easily damaged. If all steps are completed correctly, leaks will stop.
In the same way, problems with temperature control in mixers of this type are eliminated.
Sometimes you just need to change the faucet cartridge. This procedure is described in detail in the video:
Sequence of work
Depending on how serious the breakdown is, the steps to fix it depend. So, if the leak is small, then you can do without disconnecting the battery from the circuit, and for repairs you will need:
- Place a container under the breakdown site in case of a breakthrough or an oilcloth with rags to collect water.
- The area of the rupture or crack must be cleaned down to the base using a cable or sandpaper. It is necessary not only to remove a layer of paint, but to expose the metal itself.
- Degrease the prepared area with some solvent.
- If special glue or epoxy resin is used to repair the damage, then strips of thick fabric or bandages will be required. Apply the product to them and wrap several layers around the tear site.
- If cold welding is used, fabric is not needed.
- A clamp is put on and screwed onto the area captured by the sealant, but it is important to ensure that its clamps are on the opposite side of the leak. For example, a crack has formed on the inside of the radiator, which means the clamps will be on the outside, and vice versa.
- If the breakdown is serious and hot water is gushing out of the battery, then you need to call an emergency team, and not try to stop the leak yourself without the necessary tools.
Even the highest quality repairs do not guarantee long service life of the device. Restored cast iron radiators will still have to be replaced, and the sooner this is done, the safer it will be in the apartment.
How to fix a leaking heating battery: a general guide to action
If a cast iron battery is leaking, the most likely cause of this phenomenon is wear and tear of the product. It is also necessary to take into account the materials from which the gaskets and main pipes were made, and the specifics of connecting the elements. Experts emphasize that primitively covering cracks with plaster is only a temporary measure; if you rely only on it, there is a high risk of worsening the problem.
Even if the leak is extremely small, you should not limit yourself to localizing it using a can or basin (although this should be the first step); if a significant pressure drop occurs in the network, a hole will form at the site of the crack, which is fraught with a full-fledged flood. Even small drops mean urgent elimination of the defect.
Leaks occur either due to loss of tightness of joints, or due to destruction of the material. Of particular danger are leaks that disappear from time to time - in such conditions, ordinary people hope for the material to stick, which can be a big mistake.
If the radiator is not suitable for repair, you need to drain the coolant from the system and replace the defective element. The main step here is to shut off the flow of water.