Cracks are often found on brick stoves, so SNIP standards provide for regular preventive inspections of heating devices in dachas and private homes. After identifying the damage, the owners are interested in the question of how to cover up the cracks in the stove. We understand the reasons for their appearance and learn to diagnose the extent of the danger. Having studied the issue, you will be able to choose the right plan of action, select the appropriate composition and correctly eliminate the defect.
How to preserve the beauty and functionality of the stove Source pristor.ru
Why do cracks appear in furnaces?
Most often, problems appear in brick fires. There are 4 main reasons for violating the integrity of the masonry:
- prolonged absence of heating in the house; if the stove stood in an unheated building during the winter, then cracks cannot be avoided - and not only in this structure, but also in the walls of the building;
- ignoring operating rules; a “fresh” stove must stand – the masonry mixture should set and the structure should dry well; heating a damp hearth will certainly lead to the appearance of cracks;
- uneven heating of furnace zones; the structure must be made in such a way that heat is distributed evenly throughout it; otherwise, the thermal contrast boundary line will become clearly visible - the masonry will crack in this area;
- difference in thermal expansion coefficients of masonry mixture and masonry; the furnace material and the solution must have approximately the same thermal expansion rates, otherwise the surface will be covered with a network of microcracks; This is not the biggest problem - cracks are not visible on a cold structure.
Figure 2. Formed cracks along masonry joints
These four reasons lead to troubles that can be relatively easily eliminated with putty. But there are more fundamental reasons:
- improper foundation design; if the latter, for example, does not correspond to the dimensions of the heat source, the stove monolith will be damaged; the oven will begin to crack even if the shrinkage of the base does not go according to plan;
- incorrect calculation of physical characteristics of materials; for example, without a reserve in thermal seams, the metal structure will “break.”
In these two cases, putty will not help. We'll have to move the oven. Therefore, the first step is to diagnose the structure. Once you are sure that the problem can be solved with little effort, you can proceed to the next steps.
Important! Before repairing, you need to make sure that restoration can be done. There is no point in sealing cracks if the cause is fundamental
How to cover up cracks?
You can cover the stove with a purchased mixture or a solution you prepare yourself. Further about the features of the options.
Sand-clay mixture
Putty made of clay and sand is the most accessible and inexpensive option. Scheme for preparing the mixture:
- you need to take clay and fill it with water in a ratio of 1:3; after this you need to leave the mixture for at least a day;
- The clay should be thoroughly mixed, adding liquid from time to time; after kneading, strain with a fine-mesh sieve and tincture again (several hours);
- after the next infusion, you need to drain the water and make sure that the mass has a creamy consistency;
- you need to mix clay and sand - first in equal proportions.
Readiness is determined using an object used to mix the solution. If too much clay sticks to it, add a little sand. As a result, the ratio of components can be from 1:1 to 1:2.5. The composition can be considered ready when a small amount of the viscous component remains on the stick.
This recipe is approximate as clays can vary greatly. It is best to rely not on a stick with stuck clay, but on the result of experiments. Experienced craftsmen make grout with different compositions. After this, several different types of cakes are dried in a place free from sun and wind. Those pieces that are not cracked are dropped from a meter height. “Surviving” flatbreads demonstrate the optimal ratio of components.
Features of stove repair with heat-resistant glue
- Designed specifically for stove repairs.
- You can even buy it ready-made.
- To prepare a dry glue consistency, you will need water.
- The finished version is suitable for small sizes of smearing. For specific repairs, it is better to buy dry glue.
- The composition of the glue consists of clay, sand, cement and various additives.
- Dries in half an hour.
How to cover up cracks and plaster a stove?
To prevent the stove from cracking, you need to take a competent approach to its construction and operation. But if cracks do appear, they need to be eliminated as quickly as possible. Regardless of the type of mixture, the structure should be prepared before restoration. The surface is cleaned of dirt and debris, and the cracks are deepened and widened. If there are bumps and sagging on the base, they are knocked down.
Remember! If the oven begins to crack due to insufficient shrinkage, you need to let it sit completely. Otherwise, after repairs, the structure will again become covered with cracks.
Before coating, the hearth must be heated. Due to the high temperature, the furnace materials will increase in volume. This will avoid repeated cracking immediately after post-restoration heating.
Selecting heat-resistant paint
Heat-resistant paint can be applied both to a metal or brick surface, and to the preparatory layer of putty or plaster. The use of paint protects the surface from corrosion and helps give the equipment an aesthetic appearance. The paint for the stove must have sufficient elasticity so as not to crack when heated and cooled, there should be no changes in color, burning, or fading due to high temperatures.
Important! Paints for stoves cannot be made based on oils, which release toxic substances when heated, so mixtures are made based on acrylic, epoxy, and silicone.
The consistency of the paint should be uniform and applied evenly. Sometimes spray guns and ready-made aerosols are used - in this case, the consistency of the composition is more liquid (for example, this is how heat-resistant enamel is applied).
How to eliminate cracks in a metal structure?
The main solution to the problems of cracks in metal stoves is obvious - welding is used. But if this option is not suitable, you can use special fire-resistant putties.
Recipes for preparing mixtures are presented in the tables.
Table 1. Ratio of water-based mixture components
Table 2. Ratio of components of a mixture based on natural drying oil
How to cover up cracks in a brick stove
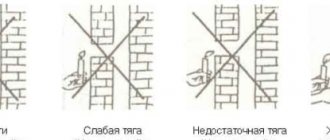
Before troubleshooting, you need to find out the extent of the damage:
- The top layer of the plaster mortar simply cracked, and a web of small cracks appeared. This only affects the appearance of the oven.
- There is a crack between the bricks or a cracked brick, but the stove does not smoke.
- A crack through which smoke and gas leaks, but it does not grow.
- A gap that gets bigger every day and a lot of smoke comes out through it.
If in the first two cases the problem is easy to deal with - just prepare a fresh solution for plaster, then in the third case - with a smoking stove - you need to carry out serious repair work. In the fourth case, contact specialists.
The owner must choose what to use to fill the cracks. There are several options:
- fireclay clay is environmentally friendly, moisture-resistant and resistant to elevated temperatures;
- clay and sand - the mixture does not collapse when the temperature rises, there is no need to buy it in a store, but prepare it yourself;
- grout - can withstand very high temperatures, is easy to prepare, but quite expensive;
- oven glue is a very heat-resistant and expensive material.
A mixture of clay and sand
The most inexpensive way to repair a furnace. Preparing the solution is also easy, you just need to know in what proportions to combine them. Necessary:
- Soak the clay in advance - fill 1 bucket of clay with 3 buckets of water for a day. It should have the consistency of soft plasticine.
- Dilute the resulting mass with more water to the consistency of sour cream. Stir and strain to obtain a homogeneous solution.
- Sift the sand to remove small stones and debris.
- Add it to the clay solution, approximately 1:1, until the required composition is obtained.
There is interesting information about obtaining a high-quality composition.
REFERENCE! You can dip the handle of a shovel into the resulting mixture; if there is clay stuck to it, then you need to add sand. Only after seeing small clumps of sand and clay solution on the handle can you begin to plaster the walls of the stove.
To improve thermal insulation, in rural areas, horse manure is added to the composition.
Using glue
Furnace glue can be purchased at the store. It consists of fireclay clay and cement with increased fire-resistant properties. The package contains instructions for its use, which must be strictly followed when preparing it. The solution is plastic and easily fills the resulting gap and crack.
Special grout
Grout can be bought at the store, but it is expensive. The package contains instructions for its use. The method for preparing the working solution is simple. It is enough to mix the powder with clean water at room temperature, a certain volume, until smooth. After 15 minutes the solution can be used. Grout consumption for a 10 mm crack is 1.5 kg per m2.
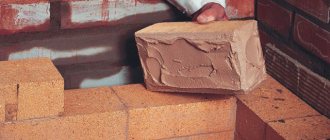
Application of fireclay clay
Fireclay clay (kaolin) can be purchased in stores; it is cheaper than grout, but also withstands higher temperatures and is effective. It is packaged in bags with detailed instructions for use. But it's not easy to work with it. Stages of preparing the working mixture:
- The clay is gradually filled with water, mixed thoroughly and infused for about three days.
- After this, the mixture is mixed with the addition of sand and, if necessary, water. The working solution should be as thick as sour cream.
In the store you can purchase a composition with instant mixing, without infusion. The price of this mixture is higher. When preparing the solution, you must use PVA glue.
IMPORTANT! Fireclay clay is recommended to be used if the stove is lined with fireclay bricks and based on its mortar, because there is the same percentage of expansion when heated. This ensures greater strength of the entire structure.
Rules for grouting
To properly coat the stove with clay, you must follow these step-by-step instructions:
- The surface, cleaned of plaster, is generously moistened with primer or water.
- Using a chisel, knock out the gaps between the bricks.
- The oven is warming up.
- Using a trowel, apply the clay mixture into the cracks and spread it over the entire surface in an even layer. If you don’t have a tool, you can do the smearing by hand. The mixture does not cause irritation or damage to the skin.
- When the surface is dry, another layer of the mixture is sprayed. Particular attention is paid to cracks - there should be a dense layer of mortar between the gaps.
- Using a damp wooden trowel, grout in a circular motion to remove any unevenness.
- The last step is plastering the stove.
The process of sealing with fire-resistant adhesive is carried out according to the same scheme, but includes an additional step. After filling the cracks with plastic material, the entire surface is treated with a hard type of glue so that the stove no longer smokes. It takes half an hour to dry, which can be spent on decorating. It is important to remember that the structure can be used after the solution has completely hardened.
Causes of cracks in the stove
When laying or plastering the stove and its use, cracks and even cracks may form. There are several reasons for their formation:
- Poorly prepared solution.
- Improper finishing.
- Uneven heating of the oven.
- Incorrect use.
- Incorrect foundation construction.
Repairing furnaces is not a complicated process, but it is responsible. It doesn't matter which solution was chosen. The main thing is to do everything slowly and carefully, then the stove will last a long time.
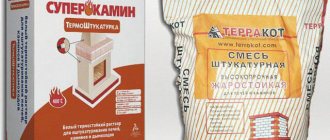
Repairing a stove is a very difficult process, and sometimes much more difficult than building small heating appliances, such as a standard stove with a heating shield. Indeed, before repairing, you need to understand the problem. And there can be many reasons for improper functioning: from improper use of the heating device to errors in construction (as a rule, everything comes out in a complex). This time. Regarding the mixtures used for repairs, in theory I will give 99.99% that a clay-sand mixture homemade by an amateur will fall out of the seams very soon (in practice 101%), since its correct preparation has many nuances and takes a considerable amount of time. Therefore, it is much easier to buy a special repair mixture that does not crack when it dries quickly in seams heated to maximum expansion, which should not be dried, but should be moistened abundantly when caulking (or, in Russian, filling) with the prepared solution. Let’s say “Plitonit - thermal repair” would be suitable, and “Terracotta” seems to have thrown something out on the market... Conclusion: an article to fill the site with content, in principle, with almost correct theoretical premises, but completely divorced from practice. For example, the author of this commentary only on general approaches to the repair of brick stoves at one time made a rather large brochure, but in my mind, a whole book should be written there so that an uninformed person would somehow understand the issue. Therefore, dear readers, if you have reached the end of this text, my advice to you is not to engage in DIY repairs of heating devices, contact specialists, I assure you, it will be cheaper.
Both traditional and brick ovens can crack over time. Even the highest quality oven is not immune to such a defect. Cracks can appear for various reasons, one of the most common being uneven heating. For the safety of the furnace, many craftsmen inquire in advance about how and what to coat the furnace so that it does not crack.
Many household members do not pay attention to the gaps that appear in the masonry or plaster of the stove, but the problem can lead to serious consequences. Even through small cracks, carbon monoxide enters the house, which is known to be very harmful to humans. Such defects can be prevented if you choose the right coating for the oven.
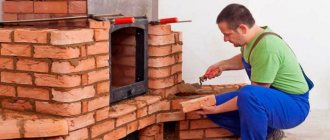
Sequence of work
The first time the cracks are plastered or covered is no earlier than six months after the stove has been installed. It is necessary to wait for the natural shrinkage and shrinkage of the materials, otherwise the restoration will have to be repeated. Having decided the question of how to coat the stove, it is important to do it correctly. The work consists of the following stages:
- Cracked seams are opened: they are deepened by removing the plaster. This will help fill a larger area with the solution and increase adhesion (quality of adhesion).
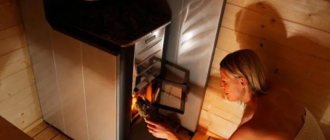
Firing the furnace Source blogspot.com
- The prepared surface is treated with a deep penetration primer (it can be replaced with water). Then the stove or fireplace is heated with a small pile of firewood. The flow is an important part of the technology; it dries the surfaces prepared for restoration.
- While the walls remain warm, a base is applied to the working surface: a liquid clay solution. The clay is applied with a paint brush and allowed to dry.
- A reinforcing fine-mesh mesh is laid on top, which is fixed with self-tapping screws. An alternative to mesh is old burlap. It is glued or fastened with nails in the joints between bricks.
- The selected mixture (factory or homemade) is applied in two steps. The thickness of each layer of plaster is 4-5 mm.
- After the plaster has dried, it is rubbed down, the walls are painted with a chalk composition or whitewashed with liquid lime.
Whitewashing a stove with lime Source ytimg.com
How to coat a stove
Cracks cannot simply be repaired with plaster or other material; all defects must be identified and restored correctly. You should not skimp on such work, as this can lead to even greater defects. The entire process of restoring the furnace lining includes the following steps:
- inspection and determination of the causes of defects;
- selection and mixing of the solution;
- applying grout and plaster.
In most cases, the actions will not take much time, and most importantly, they will not allow carbon dioxide and combustion products to accumulate in the room.
Damage diagnostics
Cracks that do not smoke can be covered up yourself.
Pay attention to the condition of the stove after the start of smoke or during a visual inspection of an unlit hearth. The number of defects is taken into account, their depth is checked with a knife blade or a thin metal ruler.
Cracks are diagnosed:
- minor damage that does not emit fumes - you can repair cracks on a brick stove yourself;
- large cracks from which smoke oozes - you need to call a specialist to determine the cause of the destruction of the stove walls.
Furnaces are whitened with lime and chalk; on such a surface the blackness from the release of carbon dioxide smoke is clearly visible. To do this, you do not need to use a gas analyzer; defects are immediately visible. Cracks are detected not only on visible stove surfaces in the room; it is important to find damage in the body of the brick chimney, which is located in the attic area.
Causes of crack formation
Defects in masonry and coating may appear on the stove due to the following features:
- Use of low-quality or cheap materials. If the putty or mortar was mixed incorrectly, it will sooner or later crack. When working with a furnace, you should not skimp on coating work.
- Failure to comply with finishing technology. When finishing a stove, it is very important to remember the intermediate steps, such as wetting the masonry and drying. Do not rush and apply the coating when the mixture has not yet dried.
- Incorrect drying. Some craftsmen use hair dryers or heat guns to speed up drying. This process is contraindicated in ovens, especially clay ones. The structure must dry naturally to ensure uniform hardening.
- Drawdown. If the furnace substrate or the first row of masonry was done incorrectly, it will sag. Such a defect is more difficult to eliminate; in extreme cases, complete or partial dismantling of the masonry may be required.
The most difficult defect to correct is subsidence. You should never skimp on your furnace foundation. A high-quality stove can survive even after a house is destroyed.
Often, combustion products accumulate in the house due to the following shortcomings:
- Chimney blockage. You can clean the smoke duct in different ways, but this must be done frequently.
- Clogging of the stove riser with brick chips. The brick gradually crumbles, which leads to clogging of the riser systems.
- Violation of internal masonry technology. In such a situation, you will have to completely redo the chimney.
- Hypothermia of the riser due to downtime. If the stove is left unlit for a long time, it may start smoking. To prevent this from happening, the first kindling is done gradually, heating the stove with paper and wood chips.
If you cannot independently determine the cause of smoke in your home, be sure to invite a professional to do this. An experienced stove fitter will not only help detect defects in the stove, but will also draw up an estimate for the work.
Plastering from cracks
You cannot plaster the stove over cracks. First you need to treat the defects using one of the methods described above, and then apply plaster. The composition can also protect the oven from improper heating and cracking.
During the process of restoring the furnace, the plaster is always removed where defects have formed. Decorative trim also needs to be removed.
Before any restoration, the masonry is generously moistened with water, this increases the adhesion of the composition to the working surface. If you skip this step, the solution may simply fly off.
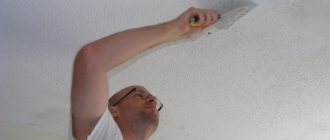
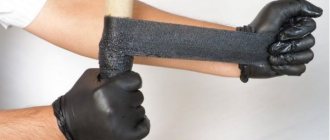
When working with cracks, it is most convenient to apply the putty with your fingers; this will allow you to feel the direction of the putty and its amount. For convenience, it is better to apply the composition with rubberized gloves.
After all defects have been treated, the oven is left to dry for 7-10 days. Only after this period has passed can the first fire be carried out.
Drying time
It is not recommended to heat the stove immediately after plastering the cracks.
It is not recommended to use the stove immediately after treatment, since heating will cause the plaster and putty to expand, so the surface will crack again. The heat-resistant ready-made solution dries within 3 – 4 hours, the exact time is indicated on the packaging. The clay composition will harden for about a day.
The first firebox includes a small amount of firewood, the amount is gradually increased with each addition. You cannot use a full load so as not to spoil the work.