A garage in which a passenger car is parked, valuable property is stored and many different works are carried out requires heating in the cold season. Doing this with gas and central water heating is quite expensive, so an alternative to such sources is being sought. This could be a potbelly stove made from wheel rims - a functional device that can work on almost all types of solid fuel, including household waste. It’s not difficult to make a stove from disks yourself; the savings on purchasing a factory-made heater will be significant.
What is good about a stove made from rims?
A stove made of wheels is capable of heating a room measuring 15-17 m2. It is used, despite the specifics of the selected materials, not only in the garage, but also to provide heat in other utility rooms and baths. The main advantage of the heating device is the availability and high quality of the material.
The discs are made of durable and thick steel, which ensures long service life. The quality of the wheels is in no way inferior to boiler steel in sheets and profiles.
In addition, a garage oven practically does not dry out the air, and metal does not emit harmful fumes at high temperatures. The environmental friendliness of the material is due to the fact that the discs are made of specialized steel that is resistant to corrosion.
Long burning stoves
Despite the disdainful attitude towards this type of heating devices as temporary solutions, an effective potbelly stove, built with your own hands, can use such innovative solutions as afterburning of exhaust gases or pyrolysis combustion.
As is known, these technical methods allow the most complete use of the heat released during fuel combustion. At the same time, the frequency of laying firewood decreases several times. There are long-burning designs with a water circuit used as heating boilers. Moreover, well-known world manufacturers produce such boilers in mass production (the Stropuva furnace is produced by more than 20 companies, or the Russian Tverdotop of the Medved concern). The well-known Russian “Bubafonya” by inventor Afanasy Bubyakin, who lives in Kolyma, is built on the same principle. This is a unique oven. A potbelly stove that hundreds of craftsmen built with their own hands.
Advantages and disadvantages
To heat the garage, the stove is made from Kamaz wheels - they are large in diameter
Before making a decision in favor of making a potbelly stove from disks with your own hands, you should objectively evaluate the positive and negative aspects of this structure.
Advantages:
- Low cost. Minor investments are required, since the main part is made from waste raw materials or inexpensively purchased material.
- Durability. In the production of wheels, special steel is used that is resistant to corrosion, friction and heating to extremely high temperatures.
- Compact and lightweight. The finished product can be easily moved around the premises, and, if necessary, taken to other sites, including on hikes.
- Easy to assemble. Even a novice repairman can make a stove from disks using a standard set of tools found in any garage.
- Heating efficiency. The heater quickly begins to produce intense heat, creating a warm and comfortable environment in a matter of minutes.
Metal cools quickly after heating
Flaws:
- Weak traction. It is necessary to significantly increase the height of the pipe, which means additional difficulties and costs.
- Rapid cooling after fuel burnout. The walls of the fireplace are thin; it heats the building only if it is constantly loaded with fuel.
- Intense heat from the walls. If you are careless, you can burn your hand.
- Low height of housing and loading opening. It is inconvenient to heat the fireplace, as well as to cook using the top surface for cooking.
Based on an analysis of the features of the device, the prospects for its use and one’s own skills, a decision is made on the feasibility of its manufacture.
Pipe or barrel stove
An old barrel or large-diameter pipe is a fairly common material that will serve as an excellent blank for a potbelly stove. Here's what to do:
- Cut two openings in the wall of the workpiece: the upper one is for loading fuel, the lower one is for cleaning the ash chamber.
- A strip is welded along the perimeter of the cut out fragments - these will be the doors. To each of them you need to weld a handle and a latch.
- From the inside, corner shelves should be welded to the walls of the housing approximately 100 mm below the upper opening, on which the grate will be laid.
- Now we make the grill itself - we weld several steel rods.
- If a pipe was used as a workpiece, you need to weld the lid and bottom to it. On the lid closer to the back you need to cut a hole for connecting to the chimney.
- The legs are welded to the bottom, then the hinges for the doors and hooks for the latches are welded to the body.
- We hang the doors.
Assembling a stove-stove from a pipe
The potbelly stove is ready, all that remains is to install it in place and connect it to the chimney.
In this version of the oven, as in the first, the surface of the lid can be used as a cooking surface (heating food or boiling water).
How to make a stove for a cauldron with your own hands from car rims - Home
Many craftsmen today make wood-burning stoves and boilers using thick-walled pipes. But sometimes such products become too expensive, while several old car discs may be on hand.
In this case, you can make a stove, which will be completely free. You just have to work hard on the design itself, using your own skill and ingenuity. Some masters even create “works of art” that deserve attention.
Such designs are attractive not only because of their performance, but also because of the thickness of the metal. It won't take long for the body to burn out, especially if you use a wheel from a truck.
The latter are used for the manufacture of sauna stoves, as they differ in overall dimensions and impressive metal thickness. For a sauna stove, which quite often operates under heavy loads, this factor cannot be called unimportant.
If you use the wheels of a commercial or passenger car, you can make a wood-burning heater for a garage or a small barbecue oven.
Preparing tools
If you decide to make a hearth for a cauldron or a regular stove using car wheels, then you need to take care of the availability of tools, among them the following should be highlighted:
- welding machine;
- electric drill;
- chisel;
- sledgehammer;
- disks;
- paint brush;
- ruler;
- grinder;
- hacksaw for metal;
- hammer;
- file;
- pliers;
- roulette
It is noteworthy that almost any of the disk-based models made will be portable, which is very convenient, because this design can be used in a bathhouse or on the street.
It is best to use stamped steel discs, the diameter of which varies from 40 to 50 cm. Their height can be 25 cm.
The hearth for a cauldron, like a sauna stove, cannot be made of aluminum disks, or those made from aluminum alloys.
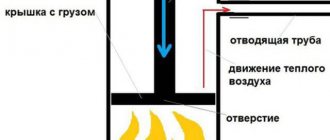
Waste oil furnace
In this chapter we will look at how to make a potbelly stove with your own hands. The body of this furnace consists of two tanks and a pipe installed between them. The tanks should be made of sheet steel 4 mm thick, the pipe should have the same wall thickness, and only a 6 mm thick sheet will be needed for the lid.
6e162aebc95ce3c564df48f7a0fbfc69.jpe
The diameter of the connecting pipe should be 100 mm or slightly less, the length is equal to 4 diameters, that is, 350 - 400 mm.
The oven is assembled like this:
- Perforation must be made over the entire surface of the connecting pipe: 6 rows of 8 holes with a diameter of 9 mm.
- In the upper part of the upper tank, slightly offset to the left of the center, you need to cut a hole to which the chimney will be connected.
- In the lower wall of the same tank, now offset to the right, a hole should also be cut - the connecting pipe will be welded to it.
- On the other hand, the lower reservoir is welded to the pipe, but the hole in it is made strictly in the center.
- A neck for filling fuel, equipped with a hinged lid, is welded into the same tank.
- The design is strengthened by connecting elements that fasten both tanks, while unloading the pipe.
- All that remains is to weld the legs to the bottom of the stove.
Stove in progress
Used oil is poured into the lower reservoir so that its level does not reach the lid by a few centimeters. The oven must be cold during refueling.
Next, you need to place a wick or rag rolled up from paper into the neck and set it on fire, and when the oil lights up, close the lid.
In an hour, such a potbelly stove can burn from 0.7 to 2 liters of fuel.
Why are car wheels suitable?
When planning to heat a garage unit, its owner often has to solve the problem of saving money. Factory products are too expensive, sheet steel is also not affordable. In such cases, the optimal solution is old wheels from trucks of the ZIL, KAMAZ and GAZ brands.
The advantages of this material:
- wide selection, including rims of the same size;
- the opportunity to purchase blanks for free or cheap at the price of scrap metal;
- use in the production of high-quality metal, characterized by strength and resistance to strong heat;
- The initially round shape ensures the tightness of the assembly and heat distribution.
An important factor in favor of this solution is the thickness of the disk walls. They are strong, resistant to burning and conduct heat well.
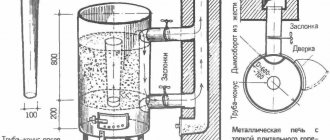
From a milk flask
Scheme of a potbelly stove from a flask
A metal can is an excellent household item, suitable for storing paints, motor oils, and fuel. The design of the flask is ideal for making a potbelly stove from it, but as a heating device it will not be as durable as we would like, its walls are not thick enough. We can confidently say that it will be enough for 2-3 seasons.
To make a potbelly stove yourself, you need to perform several operations.
First you need to mark and then cut out a hole for the chimney in the lower part of the can, almost at the very bottom. At the final stage of work, the pipe is tacked by welding. The chimney diameter is selected from 8 to 12 cm. The chimney is extended after the stove is manufactured and installed.
The can lid is a ready-made oven door with a good latch; all that remains is to drill a few blower holes, the diameter of which can be 15-18 mm. This is done at the bottom of the lid.
4 legs of equal length are made from a corner or pipe scraps, which are then symmetrically welded to the bottom of the can. You can lay a metal sheet in front of the door so that an accidentally falling ember does not fall on flammable material.
The handles of the flask are a convenient thing for carrying a potbelly stove from place to place; by grasping them you can easily shake out the ash accumulated in the stove. It is for this operation that it is better to make the chimney detachable.
Well, that's all, all that remains is to test the new stove.
Features, pros and cons of a homemade potbelly stove made from wheel rims
Nowadays it is not at all necessary to buy a home-made potbelly stove or make it yourself. You can buy it ready-made in the store. Moreover, some options look quite nice, and in the door area they have tempered glass, which allows you to turn such a stove into an impromptu fireplace and watch the flames. Yes, even ordinary potbelly stoves from the store, without glass, look quite good. But the question of quality remains open. You can buy the cheapest stove, but it will quickly burn out - a waste of money. And high-quality potbelly stoves will definitely not be sold for next to nothing.
Potbelly stove from the store
In addition, a good modern potbelly stove is made as safe as possible, which also increases its cost. Previously, the combustion intensity was regulated by opening the door, now - with special valves, which increased the level of safety when using the device. In addition, good store-bought stoves are much more economical in terms of fuel consumption than homemade ones. The chimney is also designed differently: now potbelly stoves have special smoke chambers or special systems, due to which the pipes rarely burn out. In smoke chambers, the smoke has time to cool slightly before being released into the environment.
We still suggest making a potbelly stove with your own hands, but one that will be reliable and durable. It won’t take long, but you will have much more confidence in such a stove than in a cheap store-bought version. So you will not only save money, but also be able to work in a warm garage for more than one season.
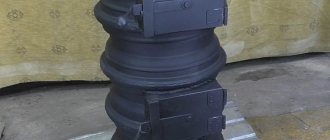
Potbelly stove made from wheel rims
For example, from wheel rims you can create a high-quality and durable potbelly stove. Its advantages:
- low cost - to create such a product you will not need to purchase any special materials;
- durability - car wheels are very thick and durable;
- heat resistance - the alloy that is used to create disks can easily withstand very high temperatures;
- high heating rate - such a potbelly stove quickly warms up to the required level and quickly warms up the room (efficiency reaches 85%);
- unlimited in size - to create a stove you can use 2-4 or more disks depending on your requirements.
This design, of course, also has disadvantages. To make such a potbelly stove, you need welding skills and a welding machine. In addition, the product retains the other disadvantages of any stove of this type: fire hazard, rapid cooling.
It is also important to consider some features. Thus, the distance between the lower part of the firebox and the grate to the first barrier to smoke (the upper part of the firebox) should not be less than 45-50 cm. If you have to heat the stove with raw wood, then it should be even greater - 65-80 cm. The need to withstand This distance is due to the fact that the smoke, coming out through the chimney too quickly, takes away the lion's share of the heat. The result is a decrease in efficiency. Also, because of this, a lot of carbon deposits and soot are formed inside the furnace, which also reduce the efficiency and increase the fire hazard of the furnace.
Scheme of a potbelly stove made from rims for a car
Low-quality fuel, garbage and waste are often used to fire a potbelly stove made from disks, and the optimal size of a stove for a garage is far from the largest. That is, in many cases it is simply impossible to make the combustion chamber high. In this case, it is easier to make a special grate structure assembled from thick steel or reinforcement. It is placed inside the oven, leaving a small gap of 5 mm to take into account the thermal expansion of the materials. Thanks to such a grate, you can solve the efficiency problem of a small stove.
On a note! If the oven is oriented horizontally, then grates are not installed in it.
Design Features
Using welding, you can build a practical stove from wheel rims.
A potbelly stove made from disks is structurally no different from its analogues made from steel sheets and gas cylinders. A special feature is the small height of the product. As a rule, it is cooked from two or three fragments, since an increase in the number of seams weakens the strength of the device. Because of this, pyrolysis gases do not have time to burn in the furnace, and when leaving the furnace they settle on the walls and pipes of the structure, forming flammable soot. This substance reduces the heat transfer of the fireplace and is fraught with fire, fire and even explosion.
To reduce the amount of soot, the grate is lowered as close to the bottom as possible, and the draft is increased by increasing the length of the chimney pipe. This approach makes cleaning the device easier and makes it completely safe.
How to assemble a potbelly stove body
So, you will need 4 disks, but three of them will need to be worked in a special way.
In the disk that will be below, you need to cut a hole and make a removable tray for removing the ashes
In the side of the disk you need to cut out a half ring with a grinder, as shown in the photo. This half ring will become the basis for the pallet
Measure the inside of the disk, make a template and cut a piece of thick sheet metal along it to create a circle that can then be welded to the half ring
To easily remove the tray, you need to attach a handle to it. Even an ordinary door or any other suitable metal bracket will do. It can be secured by welding or bolts, whichever is more convenient for you.
The second disk is installed on the lower one with the rim down, there is no need to redo anything, and ash will then spill into the tray through the ventilation holes
But in the third element, the rim needs to be cut so that the disk turns into a metal ring. Its task is simply to make the firebox higher so that fuel can be refueled
Three discs are installed in this sequence: first the one with the tray, then the usual one without changes with the holes down, and finally the ring
The final, fourth disk must be placed with the holes facing up, then all the small ventilation passages will need to be welded and only the axial one will be left, to which the exhaust pipe will be attached. The entire structure must be fastened by welding, making continuous seams. This is where you can practice with a welding machine.
The furnace body is ready, you just need to make a few additions.
What is needed to make a potbelly stove?
DIY stationary circular saw: manufacturing instructions
So, the most important material for making a stove is wheels.
PHOTO: YouTube.com For a small heating unit, the simplest small disks are quite suitable. The metal on them is especially durable; it will resist burning for a long time. Of course, if you take KamAZ wheels, it will be a large and almost eternal stove, but do you need one for your garage?
You will need to find 4 identical disks. In addition to them, you will need a piece of thick iron for the tray and door, a metal pipe for the hood and a square profile cut. From the tools, prepare a grinder and a welding machine.
By the way, if you still haven’t found the time to learn welding, then take advantage of these forced days off.
Why are rims ideal?
Stoves for cauldrons are made not only from disks. For production, you can use a metal barrel. But it is too thin, so a strong fire can simply burn through its walls.
Another option is to use a steel sheet, choosing the desired thickness. This design will be reliable, but will also come at a store price.
The best option remains car wheels, which you may have lying around somewhere in the garage. In addition to its low cost, such a stove for a cauldron has many other advantages:
- materials for production are always available;
- the car disk is made of durable steel of sufficient thickness, so the stove will last for many years;
- car rims are resistant to high temperatures and open fire;
- the steel from which the disc is made heats up quickly;
- since there are disks of different diameters, the structure can be made to the desired size;
- From car wheels you can make a stove not only for cooking, but also for heating small rooms or for lighting a bathhouse.
Another significant advantage is that a homemade stove can be made without experience. The only tools you will need are a welding machine and a grinder.
The advantage of a potbelly stove
small room, etc. extremely simple
A potbelly stove can be installed in any room where there is a possibility to bring a pipe outside. It takes up little space due to its compactness. Since the oven heats up quickly, it won't take long to reach the desired temperature. The simplicity of the design makes it easy to create it from various available materials. You can equip a hole in the stove for installing dishes and at the same time cook food on it and heat water.
The main disadvantage of a potbelly stove is that it cools down as quickly as it heats up. Therefore, to maintain the temperature, it has to be heated constantly. But it is possible to create conditions for long-term heat transfer by using a laid brick layer and creating a multi-stage firebox system.
A potbelly stove can be purchased ready-made in a store. However, you can cope with this work yourself, choosing the material taking into account its availability and its availability in personal supplies.
Step-by-step guide to making a stove
Inspired by the fact that you will independently make a necessary thing in the household, and having taken the necessary tools and materials, you can begin to make a stove for a cauldron.
We weld the disks together
It is worth noting that a design made of aluminum wheels will not work; you need to take two steel wheels.
First we make the upper part of the furnace. Turning the disc with the mounting pad up, use a grinder to cut a circle through the bolt holes and pull out the middle. As a result, you will get a stable surface on which to place the cauldron.
The second stage of work will be making the bottom of the stove. We turn the disk so that the mounting platform is at the bottom, and place the upper part of the stove on top, which we made in the previous step. Weld two disks together in a circle.
Assembled furnace from disks
In order for the stove to be lit, you need to cut a hole about 20 by 12 cm in the lower part. To make the structure durable, make a hole two centimeters higher from the bottom edge. The cut out part will serve as a good door for the combustion chamber.
To ensure stability of the structure, you need to weld three footrests to it, the length of which is about 20–30 cm. Steel corners can be used as a material.
To make the stove easy to carry, weld handles to the sides.
Use a metal plate to cover the hole in the disc hub at the bottom of the stove.
This is how in a few hours you will get an excellent oven made from car wheels, which is well suited for preparing your favorite dishes.
Process of creation
Constructing a furnace device from disks with your own hands begins with converting the disks into the necessary structural parts.
Such metamorphoses begin with a disk, which will be the upper compartment of the furnace being manufactured
It is positioned so that the fastening part is at the top. Next, a circular hole is cut using a grinder along the mounting holes and the cut out contents are removed. The dimensions of the circle are determined in relation to the existing cauldron, which will make it possible to achieve the stability of this specific dish. The hole must certainly be perfectly round, and therefore all flaws are corrected immediately.
The disk for the lower compartment of the furnace device is installed with the mounting platform facing down. Then the top one is placed on it, and their mating edges are carefully welded in a circle.
The result should be a welded structural blank
Let's move on to the combustion chamber system. To create it, a rectangular fragment is cut out at the base. Its approximate dimensions in centimeters are ~ 20x12 (for rims from passenger cars). When marking the location of the combustion chamber, it is necessary to make an indent of ~ 2 cm from the lower edge of the disk. Such a trick is guaranteed to provide not only high structural rigidity, but also facilitates the operation of the firebox.
The disk fragment cut out for the combustion chamber is preserved. In the future, it will serve as an excellent firebox door.
After completing the operation of forming the combustion chamber, you can choose two options for the stove under the cauldron from disks. One of them is extremely simple, but the second will require some additional steps.
Materials and equipment for work
When welding a furnace from car wheels, the following list of materials and tools is used:
- rims of a truck or car, 2-4 pieces;
- welding machine;
- welding mask;
- gloves;
- pipe with a diameter of 16 cm, length about 3 meters;
- chimney;
- metal sheets for creating air reflectors;
- metal legs in the amount of 7 pieces;
- hinges and handles to create a door;
- fuel container.
When creating a combination oven or other types of oven, additional materials may be required.
Which type to choose for yourself
Taking into account the above-mentioned features, it is necessary to correctly select the appropriate type of disk furnace. The need to independently construct a furnace from car rims occurs in the following cases:
- If you need to heat small non-residential premises, for example, a country house or a workshop. The use of high-quality rims will allow you to achieve maximum quality of the furnace, and will also significantly simplify production.
- If you need to equip the main “fire” part of the furnace structure without using expensive heat-resistant steel.
- If you are going to use the stove for cooking. In this case, you will have to make a stove for the cauldron from car wheels.
Most often, car wheels are used to create mobile (portable) outdoor and garden cooking stoves, as well as for arranging fire pits. The simplest version of a disk hearth stove involves the use of a large mass and side height, which significantly improves heat transfer rates and provides reliable protection from the effects of wind.
Doors, legs, exhaust pipe
You need to install three doors on the furnace body: the bottom one, through which air will flow and ash will be removed, and two upper ones.
For the ash pan, use a grinder to cut a rectangular hole directly in the lower disk. Along the perimeter of the hole, you need to fasten metal plates that will form a box. The door will be held on it. Important point: the door handle must be fixed in different positions to regulate air access to the firebox
Prepare 4 identical pieces of pipe for the legs of the potbelly stove. Weld them to the bottom of the stove at an equal distance and slightly inclined so that the stove stands very firmly
For the fireboxes, prepare two boxes with doors and handles with locks. The openings of the fireboxes will be located on the first from the top and the third disk. Make them on one side of the stove with an ash pan so you don’t have to run around the structure during maintenance.
Install the finished boxes onto the holes and weld them along the contour
In the top lid of the potbelly stove, you need to cut out a hole for the exhaust pipe with a grinder, having previously measured it along the contour. A piece of pipe is welded into the hole, and a metal corrugation is connected to it, which is taken outside the room
At this point, the assembly of the structure is completed. Now, if the aesthetic component is important to you, the stove needs to be brought into a condition worthy of use.
Stages of work
After the preparatory part, you can safely begin manufacturing the structure.
First stage
We take three disks and cut out the middle using a grinder. The process can take a long time because the discs have an uneven shape, making it difficult to reach the middle.
Second phase
The next step will be welding. We weld a square metal sheet to the lower wheel rim. It must extend beyond the walls of the disk so that burning coal or a spark from the furnace falls onto it. This is a guarantee of fire safety.
We weld the disks together in a circle. You need to be careful not to leave unwelded holes through which smoke from the potbelly stove will escape. We also weld all the holes for the valve for the camera.
Third stage
Next, we cut out the doors for the firebox and ash pan.
We recommend cutting a hole for the ash pan in the lowest disk, and for the firebox in the second one from the bottom. The metal pieces that remain can be used as doors. There is no hole for the ash pan, so that the draft goes well, you can open the doors of the ash pan or firebox. Installation of a chimney pipe. We weld the pipe into the center of the uppermost disk or onto a sheet of iron that can be welded to the upper disk. In the second case, your potbelly stove will be more fireproof and reliable.
Fourth stage
The last step is to install the stove on the base. Its height can be equal to the height of one brick, since the entire stove does not weigh very much. First you need to make a square formwork from bricks and fill it with cement mortar. After the solution has dried, you can safely install the potbelly stove.
To ensure that the stove lasts longer and the metal does not corrode, we recommend covering the potbelly stove with a special paint that can withstand constant high temperatures. It is especially important to paint the upper part of the structure: it is there that moisture constantly evaporates, so the metal becomes more vulnerable to losing its properties.
As a result, from the maintained materials you will get an excellent, reliable potbelly stove that will heat the room no worse than a new one.
Fire safety rules when installing homemade stoves
When creating a stove from car wheels, fire safety rules are a rather sensitive topic. The technology for the production of wheel disks initially did not include their use for other needs, especially as a homemade oven.
Disc stoves cannot be made using waste oil, since metal that is not rated for welding can burst, and boiling oil with highly toxic gases will flow through the crack. Since it is impossible to extinguish the furnaces during mining, you should wait until the oil burns out.
To avoid disastrous consequences, it is recommended to cook a stove made from car wheels only with solid fuel.
You can create a completely safe horizontal potbelly stove from disks by adhering to the following rules:
- The weld seam must be smooth and free of defects. Otherwise, smoke will escape through the cracks and fill the room. In addition, during operation there is a risk of failure of an improperly welded stove.
- To improve quality, it is strongly recommended to weld 2 parts at a time.
- After each seam, the welded parts must be given time to resolve residual internal stresses. It will take 3 minutes per kilogram of mass of elements being welded. It is recommended to begin further welding no earlier than when you can touch the metal with your bare hand 3-4 cm from the end of the seam.
- A day after installing the parts, the stove undergoes a test run to resolve residual stresses. This requires at least 3 hours of burning at full power with the air throttle open.
To ensure fire safety, it is necessary to close the oven door tightly, and also place flammable items away. When leaving the room, it is important to completely extinguish the stove and clean the chimney in a timely manner.
Trial fire
A self-made oven must sit for 24 hours so that residual stresses are completely resolved. Then it needs to be tested with a full load of fuel for three hours. The doors - at the firebox and the ash room - must be open.
Carrying out a trial fire
During the first test fire, the internal surfaces of the device are annealed. If minor defects are found on the welding seams - no more than two on one - they should be corrected a day after the stove has cooled. Then the test fire is repeated.
Small oven with grate for food
How to make a stove from disks for a sauna with your own hands
The most complex version of a potbelly stove made from disks with your own hands is considered to be a heating structure for a bathhouse. It is used to create a medium-sized sauna with heated, moist air. The sauna stove is based on a brick firebox.
The structure of the heating system is somewhat more complicated than that of a simple horizontal stove made of disks, but it is quite possible to do it yourself.
First, a brick firebox is laid. When calculating the dimensions of the masonry and foundation, they are based on the diameter of the wheels. As a rule, ordinary passenger car wheels are used, therefore the dimensions of the firebox are on average 625x625 mm. There should be a cast foundation underneath it.
Functionally, the firebox is divided into 2 parts, so you need to think through the laying in advance. Cold air from the locker room should come from below, and solid fuel materials should be thrown from above.
Drawing of a disk stove for a bathhouse.
After the firebox has been built, welding of the structure begins. It consists of 4 discs. At the bottom, struts and a reflector are installed for uniform and smooth air flow, as well as high-quality heating of the container.
The third disk is welded so that stones can be placed inside, and a metal pipe is installed in the center to remove smoke. The third and second disks are connected by legs to fix the structure. The smoke transmission pipe is attached to the bottom of the third wheel.
An air divider is installed in the second disk on top, which is necessary for heating the water. The divider is mounted on 2 metal legs. The upper disk is a reservoir for supplying warm water. A pipe of a convenient length is attached to it, and a faucet is also mounted.
There is a pipe in the center to remove smoke. The chimney is fixed to the supporting platform with struts. Under the support platform there is a sheet of galvanized iron.
This is a general scheme for welding a furnace from disks. Let's take a closer look at the nuances of creating individual parts of the structure.
Water container
The water tank is made of one wheel. To do this, it is necessary to weld the bottom and the top so that there is a hole in the center corresponding to the diameter of the pipe, the standard is 16 cm. It is also important to make an even and accurately executed seam, otherwise water will leak out of the container, and the reliability of the structure will be called into question.
After welding the container, you need to weld the pipe and check the quality of welding by filling it with water.
Arrangement of the heater and the upper part of the firebox
For complete and high-quality heating of water and stones, each intermediary disk must contain a divider or reflector. A heater is a container with a pipe in the center to remove smoke. It is necessary to completely weld the bottom, install the pipe and attach the container to the top of the firebox.
A pipe is attached to the third disk - the upper part of the firebox - using casings, and an air divider is installed inside to heat the tank.
Foundation and brickwork
The foundation of the stove should be monolithic and extend slightly beyond the boundaries of the firebox. The average foundation dimensions are 700x700 mm. The firebox is divided into 2 equal parts: at the floor level of the locker room, from where fresh air is supplied, and at the steam room level, where solid fuel materials are thrown in.
In both cases, metal doors are attached, and a combustion structure is installed between the levels.
Stove assembly
Scheme of the furnace in production.
Assembling the stove should begin with laying the firebox and welding the elements. First, the internal parts of the structure are installed - a divider and an air reflector, then the bottoms are welded to the structures for water and stones.
Then the smoke exhaust pipes are installed, after which the remaining elements are attached to each other. After complete assembly of the structure, it is necessary to carry out a mandatory test run of the furnace.
A properly welded stove will not allow smoke to pass through and will ensure uniform heating of the containers. High-quality masonry will ensure constant air circulation, which promotes rapid heating and long burning.
How to install?
Experienced experts recommend placing the potbelly stove approximately in the corners of the room, and leading the chimney pipe to the other side. Using this arrangement, you can achieve maximum heat transfer from the furnace. To prevent the heat from leaving along with the smoke, the pipe should be pulled at an angle of 30 degrees. You should also try to avoid straight sections of pipe located horizontally.
To place a potbelly stove in a garage, you need a supply ventilation system and good exhaust.
You should never place the stove close to the car. The potbelly stove should be at a distance of 1.5, or even 2 meters from it. Also, any flammable items and compositions must be moved from the potbelly stove to an approximately similar distance.
Brick walls should be installed on the sides and in front of the stove. This not only provides protection from accidental contact with a hot structure, but also ensures the accumulation of heat generated by the stove, which can significantly increase the efficiency level of the potbelly stove.
If the walls of the garage are made of wood, then there should be about 100 cm of free space between them and the stove itself. The wooden walls themselves must be covered with asbestos sheets, lined with bricks, or protected with some other fire-resistant means.
It is extremely important to place a sheet of iron up to two cm thick at the base of the potbelly stove or pour a concrete screed, which will help prevent the spread of fire if sparks, coals, etc. fall out of the stove
The potbelly stove should be used exclusively in rooms where good ventilation is provided. The main factor in fire is oxygen. Therefore, fresh air must enter the garage in good volumes, otherwise the fire simply will not ignite, and there will be a minimum of heat from such a stove. Sometimes it is enough for this purpose to leave a not very wide gap between the garage door and the ground. If there is no such gap, then you need to either make it yourself or make a supply ventilation system.
Under no circumstances should you leave flammable materials near the stove.
How to make a grill for a cauldron from car rims
Many of us love Central Asian cuisine, in particular pilaf. Classic pilaf is cooked in a huge bowl-shaped cast iron cauldron over an open fire.
For ease of cooking, you can build a small grill for a cauldron, which is already available.
There are a lot of ways to build such structures with your own hands, but in this article we will tell you in detail how to make a barbecue for a cauldron from disks that have served their time on the wheels of a car.
Design Features
Actually, the main advantage of an improvised barbecue made from a wheel rim is that the costs of its construction are kept to a minimum, and the final result is very worthy. Almost every summer resident has all the necessary materials and tools for production. The design is durable and easy to use.
For construction you will need car wheels that have already served. Since they are thrown away or scrapped, their cost is insignificant, so they can easily be found in your garage or at any service station. You will also need some metal profile to create the legs and a few pieces of metal for the central cap and handles.
Difficulties may arise only if you have never worked with a welding machine, but you can always invite a specialist to help you make a few welds.
Step-by-step algorithm
The first thing you need for construction is a pair of classic stamped car wheels made of durable metal. The sizes of the disks should be selected to suit your cauldron; option 13 may be suitable, or maybe 15, although a very large design is not needed.
Two stamped white discs
On one of the disks we mark a cutting line, exactly above the round holes, and cut off this circle using a welding machine.
The cut circle will work perfectly as a lid on which you can put pots or a kettle, so don’t rush to throw it away.
On the second disk, you need to weld the main central hole, which will require a small piece of thick metal.
Preparing the welding machine Carrying out welding work
Then the two disks are placed on top of each other and, using the same welding machine, they are connected into a single structure.
Circular welding process
This creates an impressive seam that firmly connects the two discs. To make it more presentable, you can modify it with a grinder, cutting off strongly protruding elements and grinding the edges.
In order for the structure to stand stably at the required level, you will need legs. The legs can be tightly welded to the grill if you are preparing a summer cottage, or you can make the structure detachable.
In the second case, the device will be mobile; it can be easily carried in the trunk of a car and, if necessary, assembled. Small pieces of a profile larger in cross-section than the legs themselves can act as fastenings for the legs.
These three parts should be welded to the grill on three sides (in this case, a tripod is made).
There is no need for precise calculations here; it is enough to roughly estimate equal distances and weld the necessary parts to the bottom of the grill made of disks at the same angle.
Leg clamps are welded
We also cut out the legs from metal, in particular we use a rectangular profile.
The legs themselves, cut from the profile
It is worth trying on the legs by inserting them into the prepared grooves. If they enter with difficulty, you should process the edges of the parts with a grinder, and then hammer them into the grooves with a hammer.
Note that many craftsmen advise making four supports, as they consider the tripod not a very stable structure.
Next, mark the door that will open directly into the firebox and cut it along the line.
At the next stage, you will have to use your imagination and engineering skills to create a decent hinge for the door. For example, you can make it from one bolt.
It is necessary to cut off the cap from it, then select two nuts that are screwed onto it. One nut should be welded to the door, and the second to the wall of the grill. By screwing the bolt onto the threads of both nuts, you get a convenient loop.
You can weld any piece of metal of suitable size as a handle.
You can make two loops using the same bolts, here all the work is done at the discretion of the master.
Loop manufacturing option
To make it easier to transport the grill, you should weld lugs to it on both sides, or at least on one side. Such improvised handles will allow you to comfortably carry the barbecue without fear of getting dirty with soot, soot or dirt.
For a more uniform smoke output, you can make four even cuts along the diameter of the disk. At this point, work with the hearth to form its shape is completed.
To remove paint from car rims, you should burn the resulting grill on all sides. For final processing, you can use a brush or sandpaper.
Removing paint using improvised means
Then, using heat-resistant paint, you need to paint the structure in a suitable color. Black looks very harmonious.
As you can see, making a grill for a cauldron is quite simple; there are no special tricks here. A simple and convenient design will allow you to install a cauldron and cook pilaf, and if desired, you can make a shish kebab on it using skewers of suitable length.
Manufacturing methods
Drawings and instructions for making your own mechanical wood splitter
Despite the simplicity of the design, to make a stove from disks you need to have skills in working with a welding machine, a grinder and some knowledge in the field of creating metal products.
Welding method
The most common way to create a metal picnic stove is welding. In order to make a quality product, you must follow the instructions:
- Using a grinder, you need to make a symmetrical cutout on one of the disks from the side of the mounting bolts. Its dimensions correspond to the diameter of the cauldron at a distance of 2/3 of the height. The countdown is from the top of the convex part of the bottom. Planting in the oven at this depth will ensure uniform heating of the entire volume of the container and removal from the heat without unnecessary effort.
- Next, you should prepare the discs for welding. To do this: remove paint residues, rust, clean the surfaces to be welded, and chamfer.
- After this, the stove structure is assembled on a flat surface in the following sequence:
- the lower disk is installed with the convex side down;
- a second one is attached to it on top, but with the convex side up;
- both elements must be secured by welding;
- the third disk is installed on the second with the cutout facing up. It should also be welded in several places;
- final welding of all joints is carried out;
- The slag is removed, the seams are inspected, and defects are eliminated. The seams are being cleaned. The seat under the cauldron is cleaned especially carefully;
- at a height of 200 mm from the bottom of the oven, the contours of the damper are marked with chalk. Its dimensions are 180 x 200 mm;
- The damper is made from the cut blank. Tubes are welded on the short side. Hinges are inserted into them, which are then mounted to the furnace casing. To hide the unevenness of the cut, eliminate inevitable gaps, add rigidity, and maintain the aesthetics of the appearance, you can weld a rod around the perimeter;
- the handle and latch are welded in place;
- On the side opposite the damper, a hole for the chimney is marked and cut in the upper disk. The chimney pipe is installed, fixed with welded points, then scalded in a circle.
We cut out a circle from the disk We carry out welding work We need to weld the disks on all sides You should get a seam like this We prepare the fittings for the legs Weld the clamps for the legs We install the legs Weld the handles We mark the location of the door We make and fasten the door hinges We remove the layer of paint We paint it black
Adjusting disks to size
With this method, the entire structure becomes detachable, there are no rigid connections. This can be achieved by spreading out the outer rim of one wheel and settling the other - the result will be a tight butt joint. The operation is carried out using a hammer. A technological hole is cut in the lower disk for loading fuel. With this manufacturing option, the performance of the furnace deteriorates: it will become “gluttonous”, and heat transfer will decrease. To fully maintain performance characteristics, the side hole does not need to be cut. Firewood will be loaded through the top cutout, but to do this you will have to remove the cauldron each time.
This furnace design is more technologically advanced. It is collapsible and less labor-intensive to implement. However, significant disadvantages are low efficiency, increased consumption of solid fuel, and poor traction.
A variation of the technique is the use of a combined method. This is a compromise option for creating a furnace, combining the main advantages of welding and the method of fitting disks. There is no need to weld them together, they are inserted one into the other. The butt joint is borrowed from the fitting method. Only the damper and handles are made by welding. For greater rigidity, it would not be superfluous to provide fasteners for fastening the sections together.
Take two car rims, Cut out the central part, Try on whether the elements fit, Make a sealed structure with a hammer, Cut out a hole for supplying firewood, and Done
Glossing and operating a potbelly stove
If you have a sandblaster, great! Clean the entire surface of old paint and rust.
It is better to cover the outer part of the potbelly stove with a special heat-resistant paint that can withstand temperatures up to 1000ºС. Certa and Kudo paints show good results; these brands have aerosol packaging for sale, which is very convenient
After the paint has dried, the potbelly stove is ready for use.
Nothing complicated: you lay the wood and set it on fire, and use the blower from below to regulate the combustion
The stove has two fireboxes, so you can use only the bottom or the top, for example, if you need to cook food, or both, if it is very cold
And it should be noted that the stove has a very decent appearance, one might even say vintage due to its special shape
So, practically from scrap metal you can make a very worthwhile thing for your dacha or garage. Of course, you will have to tinker for a day or two, depending on your skills, but you must agree, it’s worth it.
This, of course, is not the only option for a garage stove. To complement this topic, we offer you another master class on making a stove for a cauldron from the same disks:
Watch this video on YouTube
And we are waiting for your impressions of the author’s idea in the comments. If you have already done something similar and documented the process with photos, send us your pictures with a description, we will definitely publish the best materials!
From a gas cylinder
Potbelly stove from a gas cylinder
You need to start work with a drawing, but not on paper, but on the cylinder itself. The future firebox door and vent are marked with a marker. The door should be located in the center of the cylinder, and the blower should be in its lower part. The distance between them is maintained no more than 10 cm, and a closed line is drawn in the middle. Using a grinder, the cylinder is cut into two parts.
A grid is welded from 16mm reinforcement and welded to the lower half, after which both parts of the cylinder are joined again.
In the places intended for loops, cuts are made. Then the hinges are welded there and the door is cut out. The same operation is carried out with the blower.
All that remains is to install the chimney. To do this, the valve is cut off with a grinder, and a metal pipe is welded in its place, the diameter of which should be 80-90 mm. The chimney cuts into the garage hood system or is vented out through the wall.
Ready-made potbelly stove from a cylinder
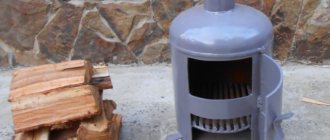
Potbelly stove for heating a garage made from rims
We bring to your attention the third version of a homemade stove made from car wheels.
In this case, to make a mini potbelly stove you will need three identical rims from a car.
The design of the “wheeled” stove is vertical, which is very convenient for small spaces. Its main purpose is to heat the workshop and garage.
Take the first car rim and cut out the middle of it. Then we attach it to the second disk (the base of the furnace) - it turns out to be a kind of blower. We weld a handle made of a metal strip to the valve.
We cut out a door in the first disk and secure it with hinges. We weld the two rims together, placing them on top of each other (as shown in the photo below).
After this, we weld the third car disk. We cut a hole in the center to weld a pipe for installing the chimney.
The master installed a radiator between the pipe and the chimney to better heat the room.
At the last stage, all that remains is to weld the legs from the profile pipe. To collect ash, place a metal container under the stove.
As a result, we have a compact stove for the garage, which will definitely come in handy in winter.
The welded structure will need to be painted with heat-resistant metal paint. See the author's video for details.
Another option
And finally, we want to share with you one more idea on how to make a stove from disks. Moreover, in this case we will use not 3 or 4, as in the previous versions, but as many as 5 rims.
First, the surface of the rims must be cleaned with a grinder. After this, we install them on top of each other, and it will be necessary to weld them together into a solid structure.
Next you will need a square corrugated pipe. We cut two pieces of the required size from it, then make a trim at 45 degrees, butt them together and weld them.
In the lower wheel rim, using a grinder, we cut out a square “window” of a suitable size so that the corrugated pipe can be inserted inside the potbelly stove.
Thus, one part of the profile will be inside the rims, the second - outside. We cut out a “window” in it, and then weld another piece of corrugated pipe (wood will be loaded through it).
The bottom of the potbelly stove is made of sheet metal. We cut out a circle of suitable diameter and weld it to the base of the first disk.
It is necessary to cut out a cover from the same sheet metal (it will be removable, so two handles need to be welded to it).
We weld an outlet from a round pipe to the first rim for installing a chimney. We clean the seams and paint the metal with heat-resistant paint.
As a result, we got a homemade potbelly stove made from car rims for the garage.
Among the advantages of this design, it is worth noting its low cost - all the parts can be easily found on ferrous metal, and they cost pennies. And many home craftsmen have most of the materials in stock, which further reduces the cost of the stove.
For more information on how to make a stove from disks yourself, see the author's video.
DIY FRIEND
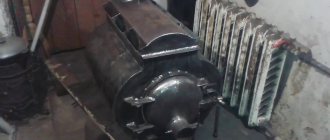
Dear friends, and dear visitors of the site “Homemade Friend”, from the presented material you will learn how to make a full-fledged heating stove for a garage or workshop yourself from 2 car wheels. Car enthusiasts know and understand how difficult it is sometimes to start a car and warm it up in winter , even if the car was in the garage. Also in winter, breakdowns occur quite often, and repairing in a cold garage is not very comfortable, you’ll get cold and chill faster))
For the above reason, it was decided to make a heating stove for the garage from car wheels with our own hands. There was just a couple of dead disks lying around in the workshop, and they went into action) The design is quite simple, namely, 2 disks are welded together, thereby forming a kind of cylinder, quite suitable in size for placing the combustion chamber and ash pan. A lid with a hole for the pipe is welded on top, the ash chamber is cooked separately.
Let's look at what exactly is needed to create a stove?
Materials
- car wheels 2 pcs
- sheet metal 4-5 mm
- pipe 80 mm
- black heat resistant paint
- bolt
- screw
Tools
- welding machine
- grinder (angle grinder)
- drill
- ruler
- roulette
- cutting torch
- hammer
- sandpaper
- brush
- chalk
Step-by-step instructions for making a stove from car wheels with your own hands.
And so, the first thing you should do is familiarize yourself with a small drawing, as they say “First theory, then practice”
HOMEMADE FRIENDNext you need to take 2 disks, the diameter depends on the size of the van you will need for the stove, generally GAZonovsky ones work well.
After that, a lid with a hole for installing a pipe is cut out of 4 mm metal and the sidewalls are made of thinner metal so that the oven is more or less even without sharp transitions.
Then the two disks are welded together, and the sidewalls and pipe are also welded.
The ash chamber was made separately.
For the convenience of collecting ash, the ash pan is equipped with a retractable metal drawer.
Doors for the firebox and ash pan with latches were also made. 4 holes are drilled in the lower part to form drafts inside the oven.
Installed directly on the stove. A limiter is welded onto the pipe.
We try to open the door) this is how the firebox looks inside.
Then the surface should be sanded using an angle grinder, and then painted with heat-resistant paint.
This is how we got a fairly inexpensive stove for heating a garage space in the winter. Due to the thick walls of the metal disk, heating and heat transfer occurs evenly. Now let’s watch the video and consolidate the material covered.
Thank you very much for your attention!
Tweet
8 Shared