In our country it is rare to meet a person who has a “cool” attitude towards the bathhouse. Therefore, when building a house or cottage, the bathhouse is often the first to be built on the site. Let's figure out how to build a sauna heater with your own hands. After all, many people prefer traditional stoves, although now an electric heater can also be purchased.
DIY sauna heater
Useful properties of steam
It is impossible to imagine a real Russian bathhouse without steam. Steam expands skin pores and removes harmful toxins from the body. The skin becomes more elastic and firm.
Heat dilates blood vessels, stimulating metabolism. The human brain is freed from mental and emotional stress, bringing the entire body into a peaceful state.
The heat of a steam room is an excellent cure for joint disease. It was not for nothing that our ancestors loved going to the bathhouse, mercilessly whipping themselves there with brooms, and to get steam, you would need a sauna heater. Let's figure out how to choose a heater for a bath or make it yourself. Most often, a traditional wood stove is used, although an electric one can be installed.
Rules for successful masonry
The efficient operation of the furnace largely depends on how well the masonry technology was followed. This is influenced by the quality of the bricks, the method of doing the work, the binding solution and the degree of moisture of the material. The result of proper masonry will be a solid structure. An unsatisfactory result is considered to be a structure made without bandaging the joints, separated by vertical lines of seams.
During the work, one important requirement must be met: it is necessary to prevent the gases formed during combustion from escaping to the outside. In addition, air entering the furnace structure is also not welcome.
Careful selection and adjustment of the material will help make the masonry beautiful and durable. It is important that the bricks are split and hewn. Before starting work, the cobblestones need to be soaked in water, lowered into a container for 10 seconds, then laid in a row on a layer of clay.
Craftsmen advise applying the mortar by hand, and using a trowel only when doing external masonry.
The brick laying process is as follows:
- take the block in one hand, grab the clay with the other and apply a thin layer to the brick;
- level the surface;
- place the product in a specific place;
- while pressing on the cobblestone, perform forward and backward movements;
- remove excess mortar on both sides of the masonry with your hands;
- with the next brick, repeat the above steps, in this case it is necessary to apply the solution also to the end of the block, with which it will be pressed against the first one.
Types of heaters
Heater stoves are precisely designed to produce steam. If there are people who think that a heater is just a stone stove, but this is not entirely true.
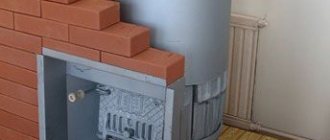
The name of the heater comes from the design of this stove. Essentially, a sauna heater is a container filled with stones. When the oven operates, they heat up, and steam is generated from the water that gets on them.
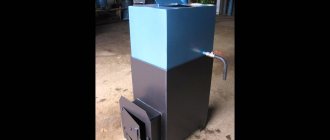
Usually, like all stoves, a sauna heater is made of brick. But, in principle, a sauna heater can also be made of metal. The advantage of ready-made metal structures is the speed of their installation. You just need to choose and buy a stove, and then install it in the required location of the bath.
Another important factor why many people prefer a metal heater is its relatively small dimensions and the absence of the need to build a foundation for the stove.
Necessary tool
To lay a stove, you will need the following set of tools:
- small trowel;
- hammer-pick;
- square 60×40 cm;
- plumb line;
- steel level 60–90 cm;
- grinder with cutting disc for stone;
- protective glasses.
Requirements for heater stoves
Sometimes, such an important device as a sauna heater is subject to increased and even contradictory requirements. Everyone wants a stone stove to take up as little space as possible in the bathhouse. Another wish is a low price, quick warm-up and economical fuel consumption.
First of all, you need to decide what fuel the stone sauna stove will use. An electric or wood-burning oven can be used. Wood-burning stoves for heating a house or cottage are not the most rational choice, but wood-burning stoves for a sauna are an excellent choice. First of all, wood stoves are an economical option. Secondly, a wood stove not only produces heat, but creates a specific aroma in the steam room.
But an electric sauna stove, although quite convenient, is not particularly economical. Therefore, an electric stove is installed if it is not possible to install a wood stove.
However, an electric stove also has advantages, since you will not need to worry about having a supply of firewood. In addition, the electric heater is compact and suitable for a small sauna. The most important advantage is that an electric stove does not require a chimney.
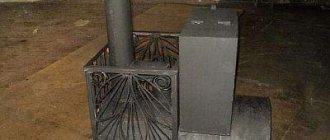
Metal heaters: advantages and disadvantages
What's better? Traditional brick heater or metal stove? It is impossible to answer this question unequivocally; you will need to look for the best option for a specific bathhouse built on the backyard of a house or cottage. But we will give you some tips to help you choose one or another oven option.
First of all, we will consider all the advantages and disadvantages of metal stoves.
Main advantages:
- Compact sizes.
- Quite light weight. As a rule, the weight of such stoves starts from 50 kg.
- Fast warm-up. You can use the heater after 1 hour.
- Multifunctionality.
- A wealth of varied designs
The disadvantages include:
- Uneven heat distribution.
- Fire hazard.
- Fast cooling.
- Stoves of this type are suitable for small rooms, no more than 25 m³, so if you plan to make a spacious bathhouse with a swimming pool on the site near your house or dacha, then it is better to choose a different stove option.
Brick heater
It is worth noting that many connoisseurs of the Russian bath believe that a stone stove for a bath is the best option. What are the advantages of a brick stove over its metal counterparts?
Main advantages:
- Soft and uniform heating of the steam room.
- Long-term heat retention.
- Ideal fire safety.
- Possibility of heating a large area, more than 25 m³.
- Easy to use.
- High reliability and durability.
Like any other, a brick stove is not without its drawbacks:
- Heavy weight.
- Requires installation of a foundation.
- Occupies a large area.
- Long warm-up, from 3 to 5 hours.
- Inconvenient to clean after use.
If you decide to install a brick heater in a bathhouse on the garden plot of your house or cottage, we will help you build it as profitable and convenient as possible.
Of course, a structure of this type requires the availability of appropriate construction skills. But if the master took part in the construction of a house or cottage, then a heater for a bathhouse can easily be made with his own hands.
Features of operation
After erecting a stove with a heater for an open or closed bath, it is necessary to dry it. Operating rules:
- It is forbidden to heat the stove with wood for seven days after laying.
- You can heat the stove only after a week. To quickly dry the masonry, it is recommended to perform 3-4 heatings every day for the next 7 days.
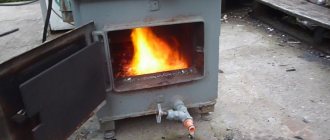
- Massive logs should not be used for the first fires. It is important to choose fuel that will burn quickly enough - wood chips, birch bark, straw, small dry branches.
Before starting the first kindling, it is necessary to check the draft. To do this, you need to bring a lit match or lighter to the blower. If the flame reaches towards the hole, there is a draft, you can start a fire.
You also need to pay attention to the stones used. It is better to use basalt, granite, andesite.
Requirements for stone backfill:
- stones should not emit harmful substances when heated;
- cobblestones must maintain their integrity under constant temperature changes;
- The stones must heat up quickly and transfer heat effectively.
The suitable size of stones is at least 10 cm in diameter.
No matter how correctly the stones for filling the heater are selected, with active use, after about a year they will begin to crack. Every 10–12 months you need to go through the entire backfill, throw out small fragments and replace damaged cobblestones with new ones.
The heater can be “built on top” of many standard brick and metal stoves. When assembling it yourself, it is important to make the structure such that it can accommodate the required amount of stone backfill, withstand its weight and exposure to high temperatures.
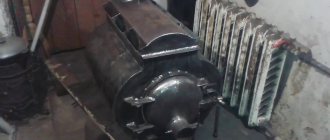
Water container
Before making a stove with your own hands, we advise you to decide on the size of the container for heating water. To do this, you should have an approximate idea of how many residents will live at home and whether you plan to invite guests to the bathhouse. The calculation is based on 8-10 liters of hot water per person.
Water heating container
It is better to use an open water container. Evaporation during operation will be small, but you will receive a number of advantages:
- Free access when filling out
Water heating container - Possibility of servicing the interior.
- When the oven operates, scale will form on the walls of the container. Open access will allow you to freely clean and dry the inner surface.
- In winter, this will completely remove remaining water, protecting it from freezing.
Water heating container
A boiler of the appropriate size, sold in specialized stores, is perfect for the container. If desired, the container can be welded individually.
Water heating container
Our advice: when making the bottom, use thickened steel.
Pros and cons of brick sauna stoves
In favor of a brick oven, it is worth highlighting the following:
- Environmentally friendly raw materials, which is safe for health.
- Long service life. It can last up to 100 years or more.
- Wear resistance and strength of the material.
- The ability to retain and release heat for a long time. The water in the tank, heated in the evening, will be warm until the morning.
- The steam produced is of good quality.
- Combustion products do not pass through the inner heater.
- The stove is capable of heating large rooms.
- Brick is a fireproof material.
Among the disadvantages, users note that:
- It will not be possible to build a structure quickly and without experience. Here you need to correctly draw up a drawing, carry out calculations, and understand the principles of brickwork.
- The oven is heavy. Therefore, a reliable foundation must be poured under it.
- The design takes a long time to heat up compared to its metal counterpart.
- Prolonged heating entails increased consumption of wood fuel.
- High cost of work (if ordered from a stove maker). Large amounts of money spent on purchasing materials.
Despite so many shortcomings, the advantages of the design are much more significant, which is why the demand for the construction of a brick oven with a water tank is only growing.
We are building a heater
Let's start building a brick stove with our own hands.
Foundation
Construction of a house begins with the construction of the foundation. The same applies when installing a stove in a bathhouse. Usually the weight of the furnace itself exceeds 500 kg ; the foundation must be appropriate. A large amount of water is used in the bath. An improperly constructed foundation will soon sag and may collapse due to freezing in winter.
We mark an area on the ground that corresponds to the size of our foundation, and go deeper into the ground by at least 0.5 m . The size of the foundation should be exactly half a brick larger than the size of the stove.
In this case, the foundation of the stove should not come into contact with the foundation of the bathhouse itself. The minimum distance between them must be at least 50 mm. Subsequently, fill the gap with dry sand.
Foundation solution
The bottom of the pit must be leveled and compacted. A rubble concrete or completely concrete foundation is perfect for the stove. If the soil is dry, brickwork with lime-cement, cement or lime mortar can be used for the foundation.
Solution proportions:
- Limestone - slaked lime 1 part, sifted sand 2 parts
- Cement - cement 1 part, sifted sand 3 parts
- Lime-cement - cement 1 part, slaked lime 6 parts, sifted sand depending on the fat content of the lime and the brand of cement
Pour the prepared solution into the dug pit and leave to dry for 5 days. After which we cover the surface with a layer of cement mortar and carefully level it using a building level and a lath.
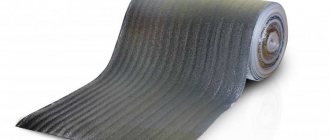
Waterproofing
Bricklaying
- After two weeks of drying, you can begin laying bricks. But first we waterproof the foundation. A regular roofing material will do for this. We cover the surface of the foundation evenly in two layers.
- To do this, we cut the roofing felt sheet to such a length that its edges protrude beyond the foundation by 50 mm . We lay a cut strip of similar length parallel to the first. In this case, one strip must overlap the other by at least 100 mm. This way we cover the entire foundation.
- The second layer is laid in the same way as the first, but with the stripes perpendicular to the bottom layer.
- Sometimes special mastic or molten bitumen is used to fasten strips of roofing felt. In our case, we don’t need to do any of this. The first layer of the heater consists of a continuous layer of bricks and perfectly fixes the waterproofing.
Masonry
Masonry bricks
For laying the stove, ordinary brick is used. The use of silicate, hollow and perforated bricks is not allowed; such bricks are suitable for constructing the walls of a house, but a different material is needed for the stove. For laying the firebox and lining, we advise you to use heat-resistant and refractory bricks (see Furnace lining).
Before laying, be sure to immerse the bricks in a container of water for 2-3 minutes. This will prevent dehydration of the masonry mortar and, as a result, its poor adhesion (all about mortars, see Masonry of fireplaces).
Masonry mortar
Proportions of mortar for laying a stove:
- Clay 1 part
- Sand 1 part. If the clay is very oily, you will need 2 parts of sand.
Laying seams
Particular attention should be paid to the seams. Unlike ordinary wall seams, the seams of a heater stove must be completely airtight. This will prevent the slightest ingress of carbon monoxide into the room.
The mortar is applied in a complete layer over the entire width of the brick. In this case, it is necessary to achieve a minimum thickness of the seam. For ordinary bricks, this distance should not be more than 5 mm , for heat-resistant bricks - no more than 3 mm .
Of course, it is very difficult to achieve such accuracy, especially if you have little experience in masonry. Let's use a little trick:
- Before starting work, we will make two guides. They can be made from a metal rod of the appropriate diameter. Two welding electrodes are suitable for this, if you first remove the insulation from them.
- Before laying the next brick, we lay guides on both sides of the previous layer. After we press the brick against the bars, we have a perfect seam. Now the guides can be easily pulled out.
- The guides must be laid in such a way that they are at the edges of the brick. The mortar from the next brick will perfectly fill the void created by them. Pay close attention to filling it out.
Masonry. Subtleties of dressing
Laying each row begins only when the previous row is completely completed. We recommend that you first adjust the bricks of each row “dry” and only after that lay them on the mortar. Using a construction square, we check the correctness of the angles.
When laying a stove-heater, strict adherence to the dressing of the brickwork is mandatory. Another important element is the use of heat-resistant bricks.
The use of heat-resistant and ordinary bricks in the same row is strictly prohibited. They have completely different expansion when heated. With such dressing, cracks in the seams and subsequent leakage of carbon monoxide are inevitable.
Installation of accessories
All stove fittings (dampers, hinges, water tank, grates, etc.) are installed immediately along with the masonry. Before installation, the door frames must be wrapped around the perimeter with asbestos cord. It will serve as a compensator for the expansion of metal due to heat and prevent the formation of cracks.
Smoke channels
Smoke ducts must be laid out especially carefully. Immediately remove excess mortar from internal joints. Subsequently, the fallen pieces will interfere with the normal operation of the entire oven.
Stove-heater with a rectangular container
Here is a diagram of a furnace with an open rectangular container:
Stage 1
Stage 2
Stage 3
Stage 4 Stage 5
Stage 6
Stage 7
Stage 8
Stage 9
Stage 10
Stage 11
Stage 12
Stage 13
Stage 14
Stage 15
Stage 16
Stage 17
Stage 18
Stage 19
Stage 20
Stage 21 Stage 22
Stage 23
Stage 24
Stage 25
Stone backfill
A do-it-yourself sauna heater involves the use of stone backfill. I would like to say something special about her. The stones must warm up well and then quickly give off heat, withstand high temperatures and not crack from water.
Stones of volcanic origin are well suited for this: andesite, granite, basalt.
If such stones are not found, siliceous non-volcanic rocks can be used. They are usually collected along the banks of rivers and lakes. They have been well hardened by water and sun over many years. The size of the stones must be at least 10 cm in diameter.
They should be laid out as follows. Larger samples are laid first, followed by smaller ones. A little trick: for greater effect, use small cast iron ingots mixed with stones.
Over time, the stones will begin to crack. Once a year, go through the backfill and get rid of small fragments. We advise you to always have a small supply of stones.
Broken porcelain or ceramic products can serve as a substitute for stones. They are usually small in size, so we recommend using them in the very top layer of backfill.
Laying a rubble concrete foundation
A heater stove for a bathhouse with your own hands can be built on a different type of foundation, which is created as follows:
- They dig a pit taking into account the amount of soil freezing. It needs to be made wider relative to the perimeter and depth by 10-15 centimeters. A rubble concrete foundation is laid provided that the walls of the pit do not crumble and groundwater does not seep through.
- Crushed stone 15 centimeters high is poured onto the bottom and compacted, making a horizontal platform.
- Next, they build a formwork that looks like a box without a bottom. The inside is covered with a waterproofing layer of roofing felt or hot bitumen is used, after which it is immersed in a pit.
- A layer of stones with a diameter of no more than 15 centimeters is placed at the bottom, and crushed stone is poured into the spaces between them.
- A solution of Portland cement and sand (in a ratio of 1:3) is poured on top, reminiscent of thick sour cream in composition.
Further actions depend on the selected option:
- The first row of stones is filled with solution and left for 24 hours. Do the same with the second layer of stones and wait a day. Continue in the same way until the desired level is reached.
- If the volume of the base is small, the filling is done at one time.
The level of the rubble concrete foundation is made 6-7 centimeters below the finished floor. The surface of the screed is checked with a level and covered with film. After about one week they begin laying.
Tips for those who are taking up baking for the first time
- Make a detailed drawing of the heater indicating all dimensions. Moreover, it is important to do this regardless of what you plan to make the stove from - metal or brick.
- A concrete or rubble concrete monolith foundation must be installed under a brick oven. A brick foundation using a lime or cement mixture is allowed only if the surrounding soils are dry.
- The foundation must protrude beyond the contour of the stove itself by at least 5 cm on each side.
- When the top of the foundation is level with the floor line, level it with a cement mixture, and then lay a layer of waterproofing, such as roofing felt, in two layers.
- Lay out the heater not in segments, but in rows, observing the order and dressing of the seams. Moreover, the thickness of the seams should not exceed 3 mm.
- It is not allowed to tie bricks of different types in adjacent rows.
- The grates are installed at a height of 1 brick.
- A wood firebox can have different sizes, but the optimal dimensions of its opening are considered to be the following: 25 cm in height, 35 cm in width and from 40 to 60 cm in length.
- The pipe in a sauna heater is usually made of a top-mounted type. Be sure to leave a gap of about 10 cm between the brick pipe and any wooden roofing elements. And where a metal or asbestos-cement pipe passes through the roof, cover the adjacent elements with felt soaked in clay mortar.
- The wooden floor is protected with asbestos cardboard and roofing steel sheets.
Also be sure to watch the video and photo materials on our website. This will help you get an idea of the masonry process and some of the nuances.
Possible mistakes
It is recommended to choose basalt stone for the heater.
The heater in the bathhouse will function for a long time and correctly if you follow certain recommendations when arranging it.
- For laying the body, it is better to use red clay bricks. Only fireclay is suitable for the firebox; replacement is not allowed.
- It is important to choose the correct consistency of clay mortar for masonry. If it is too dry and liquid, the masonry will crumble; if it is too greasy, the joints will be loose.
- Not every stone is suitable for a heater. Choose basalt, soapstone, and andesite.
- The stones are selected to be relatively flat in shape and placed in a vertical position. When placed horizontally, heat is distributed unevenly.
Test ignition is carried out after the masonry has completely dried, it lasts no more than 5 minutes. For 3 days, the procedure is repeated several times a day. Only after this do they begin to fully heat the steam room.
Water tank
The size of the container for heating the liquid is determined based on the maximum number of users of the sauna. If we consider that up to 10 liters should be enough for one person, then the volume of the container is calculated by multiplying this number by the expected number of users.
By choosing an open type tank, you definitely get the following advantages:
- ease of filling the container with water;
- free access to the oven;
- ease of cleaning the tank from scale;
- easy removal of liquid residues to prevent it from freezing without the need to kindle the bath in winter.
When using an open container, only a small amount of evaporation is allowed.
Preparation of the solution
Before laying fireclay bricks, prepare a composition of white fireclay fireclay. You can also buy a ready-made mixture designed to work with fireclay.
But such a solution is not suitable for laying a stove structure. The fact is that when heated to more than 700°C, it sinteres into a monolithic structure, which means it will quickly begin to crack and crumble.
When a brick heater is being built for a bathhouse, a solution is used for the external masonry, which includes quartz sand, preferably from a quarry, and clay in a ratio of 5 to 1. The sand is first sifted through a mesh with cells of 2–2.5 millimeters.
The clay must be extracted from a quarry at a depth of at least two meters. To ensure quality, you need to soak 200 grams of clay in water for a day. Then they roll it into a bun and leave it to dry under cover in the open air. After 2 days it must be dropped onto a stone slab from a height of 170 cm. In order for the clay to be of suitable quality, the bun must fall apart into several large pieces when it hits the surface.
Decorative finishing
A stove in a bathhouse is not only a source of heat, steam, and increased danger, it can also be a decoration for the room.
If you only care about the safety of the stove, then it is enough to paint it with modern paint to protect the metal from corrosion. The use of heat-resistant enamel based on silicone paints is no different from conventional enamels, but protects metal at temperatures up to +800 degrees. The metal is degreased and then paint is applied. After the first layer has dried, the next layer is applied. It is recommended to paint those metal elements that will be covered with brick and insulation.
The decoration of the stove in the bathhouse can perform a purely decorative function in the form of forged decorations and additional decorative elements of the stove itself. You can use heat-resistant paints of various colors with an antique effect. Decoration can also be used to eliminate the increased danger of a sauna stove.
The stove can be lined with red brick masonry (we have already considered this method), but the masonry on the sides can be decorative, in the form of a grid. On the firebox side, the stove can be covered with a screen made of forged elements or simply with a beautiful mesh fixed in the frame.
It can be covered with a beautiful casing, also covered with heat-resistant paint, in the color you like.
A stove lined with heat-resistant stone will look impressive; this will not only give a noble look to your product, but will also improve the quality of the stove itself.
The decorative decoration of your bathhouse stove depends only on your desire, taste and wallet size.
Other stove elements
The next stage of work is the construction of the firebox and ash pit. In this case, it is necessary to correctly calculate the dimensions of the firebox, taking into account various factors - fuel for the bath, the presence of a collector for heating water, and so on.
The ash pan, pan and ash pan are needed to collect remaining fuel; they also facilitate the flow of air into the firebox through the grate. To regulate the intensity of firewood combustion, you need a pan or valve. If the bath needs to be heated quickly, then the tray needs to be moved away and then put back in place.
A mandatory element of a heater for a brick bath is a chimney. It first crosses a tank of stones and then goes through a tank of water to be heated. It can be made using ceramic blocks or sandwich pipes and then insulated. The lower part of the structure up to the ceiling is made of steel; when passing through the ceiling pipe, a gate is installed to adjust the draft and improve the degree of combustion.
If the structure is made of a sandwich pipe, then it has two walls, between which there is thermal insulation. Pipes can be installed from the ceiling to the fungus on the roof. To insulate a brick chimney, you need to cover it with basalt mats and secure them with wire. A fungus or umbrella is placed on the structure itself to protect it from precipitation.
Is finishing necessary?
The stove-heater does not require any finishing. But the color of the brick can be further enhanced with a solution of hydrochloric or sulfuric acid, and the stove can also be tiled or plastered.
The layer of plaster is up to 15 mm; for this purpose, compositions based on sand and asbestos with the addition of clay, cement, lime and other elements in different proportions are chosen.
Before finishing, the stove must be heated, then the first layer is wetted and applied to its surface. When it sets, a second one is applied. The wall needs to be rubbed down so that it is perfectly smooth, and when finished it can be painted.
How to choose stones
One of the features of a heater stove is that you need to take special stones for it. Before this they must undergo a special examination. The most acceptable options are porphyrite, crimson quartzite and others.
Many people believe that it is best to choose sea stones for a heater, but in practice it has been proven that river stones withstand high temperatures better, while sea stones are quickly destroyed due to poor strength.
It is necessary not only to choose the right stone itself, but also to choose it correctly in shape and size. The best option would be medium-sized pebbles with a smooth structure. There should be a lot of stones, this directly affects the quality of steam emission and heating of the bath.
When the stove is ready, you should not rush to light it for the first time. If it is not dried well, the masonry may crack. Opening the doors facilitates rapid warm-up. Then the draft is checked - ideally, the stove should not smoke when lighting.
It is quite possible to make a stove-heater with your own hands from bricks, and for experienced people it is not so difficult. Compared to a ready-made solution, this will allow you to feel the real spirit of a Russian bath with its characteristic features.
Popular models and prices
Cast iron stoves are rarely installed due to their heavy weight.
The choice of stoves on the market is huge. However, for a bathhouse it is preferable to purchase models from domestic manufacturers, since their products are adapted to existing conditions.
- Harvia produces both regular floor-standing models, as well as wall-mounted and corner models. The main material is high-strength steel. The body is coated with special fire-resistant paint. Models cost from 14 thousand rubles.
- Helo - most models are made of stainless steel, which guarantees a long service life; a characteristic feature is a heat-resistant glass insert that allows you to observe the flame. The cost of electric heaters starts from 40 thousand rubles.
- "Termofor" - produces heaters for the Russian steam room mode. Offers a huge selection of models of different power and design. Heat-resistant chrome-plated steel is used for the firebox. Models cost from 23 to 45 thousand rubles.
- "Hephaestus" - offers cast iron models for baths with the highest efficiency - up to 90%. The stoves are very economical and provide light steam. Minimum cost from 50 thousand rubles.
Cast iron stoves are installed much less frequently. Despite the fact that this design retains heat for a long time, it is very heavy.