Izospan is an insulating film coating. The main purpose of the film is to ensure that the original thermal insulation characteristics are maintained throughout its entire service life. It is difficult to imagine a modern construction project without the use of various types of thermal insulation. Mineral wool, Penoplex, Izolon, Izover, various polystyrene foams and simply polystyrene foam - all these materials require their own protection.
Thermal insulation materials practically envelop our house, retain heat on frosty and rainy days, create comfort in the hot summer, preventing the penetration of heat flows. But how to protect the thermal insulation belt from negative atmospheric phenomena? Reliable protection from moisture, rain, damaging winds is designed to be provided by 100% polypropylene, with the proud name - Izospan .
To create a barrier at the stages of the construction process, to perform the function of protective insulation for thermal insulation, this is the true purpose that isospan vapor barrier successfully fulfills. Despite its apparent simplicity, the material differs by type.
We bring to your attention – Izospan instructions for use. Figure it out: which side to lay the isospan on. Consider the isospan technical characteristics, and the installation method.
Worthy competitors of isospan:
- Tyvek vapor barrier;
- Vapor barrier TechnoNIKOL;
- Vapor barrier Nanoizol;
- Vapor barrier Ondutis;
- Vapor barrier Yutafol.
Before moving on to a detailed review, it should be clarified that the films are presented by the manufacturer in a wide variety and have different purposes. Vapor barrier films and membranes are divided into absolutely vapor- and water-tight and partially permeable to moisture only in one direction. Some of the materials successfully complement thermal insulation, enhancing its characteristics.
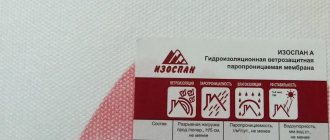
Vapor barrier isospan technical characteristics
- The material is waterproof;
- Elasticity is beyond praise; it is not difficult to get around the most difficult areas and bends;
- Resistance to ultraviolet radiation;
- Resistance to negative atmospheric phenomena;
- Does not emit harmful substances. Safe for human health. Does not harm the environment.
- Withstands temperature changes in the range from – 60 °C to + 80 °C
- Fireproof elements added in production determine the fire hazard group G4, which is confirmed by relevant certificates.
Izospan has various applications, taking into account the field of construction use. Isospan, a type of insulation unique in its structure, has individual technical characteristics and its own labeling.
Manufacturers classify their products by letter indices A, B, C, D, F, R. The combination of letter indices adds numerous variety, applications and installation of isospan. Each new designation assumes its own isospan application. This fact must be taken into account when building your home.
roof vapor barrier isospan
Installation features
Vapor barrier protection meets the declared characteristics only if installed correctly. This is possible if the coating is continuous. For sealing joints, fixing canvases and restoration, the manufacturer offers a number of additional materials:
- SL tape connects the edges and is vapor-tight;
SL tape Source stblizko.ru
Izospan A
The membrane, like a check valve, freely allows water vapor to pass through from the thermal insulation side. Does not interfere with the natural ventilation of the insulation. On the other hand, it reliably blocks the penetration of moisture from the external atmosphere, prevents the formation of condensation, and prevents the wind from destroying the structure of the insulation.
Due to the water resistance of the material on the outside, membranes are widely used in roofing structures and are widely used as protection for walls and ventilated facades of buildings and structures for any purpose.
The waterproofing property that the isospan membrane has long extends the service life of the thermal insulation. Even the best insulation is destroyed over time under the influence of wind; the use of Izospan A will be the ideal solution to protect the outside of the house.
In a nutshell, we will clarify which side to lay Izospan A . The question of which side of Izospan A should be laid is far from idle. As we noted, its operation is carried out on the principle of a check valve. Or, if you want: – let everyone out, don’t let anyone through. The membrane must be laid on the outside, on top of the insulation.
The smooth side, which is easily identified by touch, should “look” towards the street. The roll is cut into wide strips of suitable size, after which it is carefully spread over the area, overlapping with the next layer.
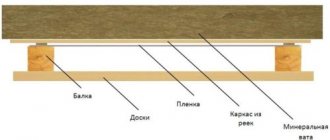
Roof vapor barrier
Water vapor barrier of the roof starts from the bottom. When laying isospan A membranes, contact with the thermal insulation material should be avoided. Touching the membrane significantly reduces its waterproofing properties.
Probably those who went camping with their grandfather’s canvas tent noticed that if during rain you run your finger along the “roof” from the inside, then literally after 10 minutes it will drip in that place. It is for this reason that laying Izospan A is allowed only with double lathing.
Isospan flooring is carried out outside the thermal insulation on a lathing made of slats. The use of a membrane increases the degree of insulation and extends the life of the entire structure.
It is extremely important to monitor the absence of possible swelling or sagging during work. Otherwise, you will become a constant listener to gusts of wind with the characteristic sounds of a membrane beating on the roof. Thin slats are enough to secure isospan A, leaving 2-3 centimeters of free space to the insulation.
Methods of using the membrane
Izospan is a synthetic film based on polypropylene. It absolutely does not absorb water and prevents moisture from entering the main layer of insulation, be it polystyrene foam or a material based on mineral or basalt wool. The ideal moisture and vapor barrier of isospan was appreciated by everyone involved in construction, as well as other advantages of the material:
- It prevents the penetration of air into the interior of the room through natural cracks and pores of the main building material, thus providing protection from drafts and cooling of the room.
- Protection of metal from rust formation.
- Protecting wood from rotting.
- Protection of the main insulation from moisture penetration and condensation formation, which significantly reduce the performance of the insulation.
On a note
Izospan is an absolutely environmentally friendly material that does not release harmful impurities into the surrounding air. It can be used in the construction of residential premises or insulation of children's areas.
Izospan B
As we found out, isospan A, firstly, protects from the wind, and secondly, it creates a powerful hydrobarrier for the insulation. There remains a danger in the form of condensation, wetting of the insulation - condensation, which, before passing through the membrane in the form of steam, saturates the thermal insulation with moisture.
Humidification by only 5% will reduce the thermal insulation performance by half. The further prospect is the penetration of condensation onto the metal tiles, with the subsequent transformation of the roof into a colander.
The anti-condensation surface in combination with the steam and waterproof effect will save you from such troubles. When carrying out installation work on arranging the roof, you must clearly understand that even the best insulation for the roof is gradually saturated with water vapor.
By creating a barrier to internal vapors, Izospan B will serve as a kind of vapor barrier. The material consists of two layers, a layer with a smooth structure is adjacent to the insulation during installation, the second fleecy side is designed to absorb condensation.
That is why the installation of the coating is always carried out with the fleecy side down, with a gap to the finishing materials, for ventilation and drying. Type B is laid with an overlap with an overlap of at least 10 centimeters on the insulation side and secured using a construction stapler or another method.
Briefly about the main thing
Products under the Izospan brand are made of polypropylene. The membrane can be represented by a different number of layers, including metallized lavsan.
Various types of Izospan films are used to protect structures from the effects of external or internal phenomena: wind, moisture, steam.
Laying of canvases is carried out in accordance with the instructions from the manufacturer. It is important to observe the direction of smooth and rough surfaces, the location of edges overlapping or butting, and sealing seams.
Izospan S
The structure of the material combines two layers: on one side there is a smooth surface, on the other there is a fleecy surface. The fleecy layer retains condensation followed by weathering. Izospan C creates a vapor barrier for the insulation, preventing the absorption of vapor from water particles formed inside the room.
The material is widely used in the construction of walls, installation of insulated, sloping roofs and interfloor ceilings. Steam-waterproofing using type C is installed in various cement screeds and in flat roof structures.
In a word, in structure and characteristics the material is very similar to type B. At the same time, it has an increased margin of safety and, therefore, the reliability of the super-dense panel is higher. Buying isospan C will cost the consumer about 50-60% more than type B.
Characteristics of isospan Type C:
- 100% polypropylene;
- Applicable temperature range -60 – +80 °C;
- Tensile load: longitudinal // transverse. N//5cm not less than 197/119
- Vapor-tight
- water resistance not less than: 1000 mm water column.
Application of isospan S:
- Sloping roof with an overlap of at least 15 cm
- Attic floor protection. A vapor barrier layer is spread on top of the insulation, smooth side down;
- Concrete floor. spread on a concrete surface, smooth side down;
- Wooden floors of horizontal design.
Laying the canvas on sloping roofs should be done from bottom to top. The material overlaps about 15 centimeters.
To avoid depressurization, overlapped joints are glued together with a special tape that is sticky on both sides, similar to double-sided tape.
The structure is secured with slats 5 cm thick. A gap of at least 5 centimeters is left between the roof tiles and the vapor barrier layer; it is necessary for natural ventilation.
Izospan C is spread on top of the insulation; for ventilation it is necessary to leave a gap of about 50 millimeters from the panel to the heat-insulating material. In the installation of a concrete floor, type C, an overlap is laid on the concrete surface, then a cement screed is laid on the canvas, and only after that the floor covering is installed.
Installation of attic floors
It is important to use the right materials for arranging attic floors, choosing them depending on the operating conditions and purpose of use:
- If it is necessary to protect the heat insulator in the ceiling between a heated room and an uninsulated attic from weathering and moisture, and to ensure the removal of vapors from it, AQ proff, AM or AS membranes are used. The sheets should be laid with the white side facing the heat insulator, close to each other, without gaps.
- A vapor barrier layer, which simultaneously protects against insulation particles entering the air, is installed on the side of the living room. Film grade B, RS, C or DM should be laid between the sub-ceiling and the finishing. The rough side should be facing down. It is advisable to provide a ventilation gap (40–50 mm) between the sub-ceiling and the vapor barrier.
The vapor barrier on the room side of the rough ceiling can be mounted from foil materials. The reflective layer should face down. A gap of 40–50 mm should be left between it and the finishing material.
All types of canvases are laid with an overlap of 15–20 cm, the joints and junctions are glued with mounting tapes appropriate to the material.
Description of materials Izospan allows you to understand the types of membranes and films, understand how to choose and how to install vapor and waterproofing.
Based on materials from the site: vseokrovle.com
Izospan D
High-strength, completely moisture-proof waterproofing material. Polypropylene sheet with one-sided laminated polypropylene coating. The versatility of the moisture-vapor-proof material implies widespread use in construction technologies for the construction of any type of structure.
Izospan D successfully withstands moderately strong mechanical loads, is resistant to tearing, withstands strong gusts of wind, and in winter copes with heavy snow loads. In comparison with other similar films, Izospan D has gained fame as the most durable and reliable option.
Izospan D Area of application
In any type of roof, as a barrier preventing the formation of under-roof condensation. Widely used in the installation of hydro- and vapor barriers during the construction of buildings and structures. Protection of wooden structures. The material largely resists negative atmospheric phenomena.
Izospan D is often used on construction sites as a temporary roof covering and installation of a protective wall in objects under construction. Such a roof or wall can last up to four months.
Type D is especially popular when constructing concrete floors that require a waterproofing layer to protect against earth moisture.
Heat-reflecting vapor-waterproofing materials
Among the Izospan materials, it is worth highlighting films on which an aluminum coating is applied using the spraying method. A feature of foil materials is the ability to reflect thermal radiation.
Evgeniy Filimonov
Ask a Question
Indoors, foil film is used to create a vapor-waterproofing barrier to protect the heat insulator, as well as to increase the energy efficiency of insulation. When installed outside the building, the foil material will protect the insulation from precipitation and weathering.
Roll size
Vapor barriers of various types are available in rolls. Standard roll sizes are 70 m2.
They can be visually presented in the form of a table:
| Brand | Length/m.p. | Width | m2 per roll |
| A | 43.75 | 1.6 m | 70 |
| AM | 43.75 | 1.6 m | 70 |
| IN | 43.75 | 1.6 m | 70 |
| WITH | 43.75 | 1.6 m | 70 |
| D | 43.75 | 1.6 m | 70 |
| R.S. | 43.75 | 1.6 m | 70 |
| FD | 43.75 | 1.6 m | 70 |
Vapor barrier for siding: when and why is it needed
When we are asked to calculate the cost of covering a house with siding, we are often asked the question: “Have you calculated the vapor barrier for the siding?”
At the same time, most often the customer does not understand what he is talking about. But this can be fixed.
From this article you will learn what a vapor barrier is, why it is needed and when it is necessary to do a vapor barrier under the siding.
What is vapor barrier
Vapor barrier is a non-woven material in the form of a film rolled into a roll.
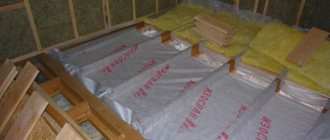
In this photo, the first floor of the house is covered with a vapor barrier before insulation (click to see all photos from this object)
The simplest and most inexpensive vapor barrier is polyethylene film.
But there are also more advanced types: membranes with limited one-way vapor transmission, etc.
The purpose of this article is not to describe all types of vapor barrier, but to help you figure out whether vapor barrier is needed when covering your house with siding, so I will not delve too deeply into the range of membranes and films.
Why do you need a vapor barrier in general and under siding in particular?
As the name suggests, a vapor barrier seals off steam, creating a barrier to its movement from a warmer room to a colder room (outside). If you allow steam (water in a gaseous state) to pass through the wall of your home, at some point , the state will change and the gas (steam) will turn into liquid (water).
The place where water vapor condenses and turns into liquid is called the dew point.
Typically, it is located somewhere inside the wall of your home.
If you do not allow the steam to “crawl” to the dew point, then it will never become moisture (liquid).
The location of the dew point depends on the difference in humidity and temperature between two rooms or between a room in your home and the street.
The warmer the house and colder it is outside, the closer the dew point moves to the outer surface of the wall.
Once you cut off the outward movement of vapor contained in the air inside your home, you protect it from becoming liquid (condensation) because it does not reach the dew point.
How condensation can damage your home
Residents of panel houses most likely encountered dampening of the walls inside the house during the cold period.
This humidification occurs because the dew point moves inside the house and the vapor turns to liquid right on the wall.
More often than not, we do not see the condensation process because the dew point is located inside the wall.
But if you decide to insulate the house with siding, then the dew point moves even further outward and will now be located inside the insulation (especially if the insulation is thicker than 50 mm).
In the case of expanded polystyrene (foam), this is not a problem, because it itself is a vapor barrier and does not conduct steam.
But if you insulate the house under the siding with mineral wool (mineral wool slabs), which have good vapor permeability, then condensation will form inside such a slab.
In other words, the insulation will get wet inside due to the temperature difference between the room and outside.
Wet insulation is bad insulation.
Increase the humidity of the insulation by just 5%, and its thermal insulation capacity becomes two times lower.
It’s easy to understand this way: insulation under siding 100 mm thick without a vapor barrier heats the same as 50 mm with a vapor barrier.
If you don’t do a vapor barrier, then you pay twice as much for insulation as you get.
By the way, we have an excellent article about mistakes when insulating. Click here: 5 mistakes when insulating a house under siding.
When is a vapor barrier under siding needed?
As follows from what was written above, a vapor barrier is needed if you are insulating a house under the siding when installing siding with insulation.
In this photo you see insulation mounted on a vapor barrier (click to see all photos from this object)
In any other case, there is no point in vapor barrier, and you need a material that is similar in appearance, but completely different: wind-waterproofing or, as it is also called, wind-hydroprotection.
If you are insulating a house under siding, then you will still need wind and hydro protection.
It will cover the insulation from the outside.
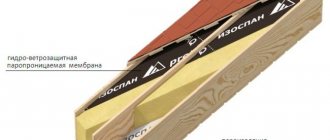
When a house is properly insulated with siding, the result is a multi-layer cake: siding, under it is windproofing, under it is insulation, under it is a vapor barrier attached to the wall of the house.
Procedure for insulating a house with siding
So, you have decided that the walls of your house need to be insulated.
In what order is this done:
Installing a vapor barrier on the wall of a house
First, we protect the insulation from steam, which will penetrate into it from inside the house.
To do this, we install a vapor barrier directly on the wall of the house, always overlapping:
In this photo you see a vapor barrier installed on a timber house before insulation with siding (see all photos from this object: click here)
By the way, we have an excellent article about siding houses made of timber. Click here: Siding a house made of timber.
Installation of insulation over vapor barrier
Next, we install the insulation, for which the vapor barrier under the siding was started.
Now we can be calm: the insulation is reliably protected from moisture penetrating in the form of steam from inside the house.
In STK Etalon, insulation is carried out without cold bridges, which is one of the many advantages of ordering siding installation from us.
In this photo, the insulation has already been installed on top of the vapor barrier, and is pressed down by the first layer of sheathing, but not yet covered with wind-waterproofing
Installation of wind and waterproofing (wind and moisture protection) on top of insulation
Now we protect the insulation from moisture, which can get into it from the outside and reduce its thermal insulation ability, for the sake of which we attached it to the wall.
We need to cover the insulation with wind-hydroprotection, also known as wind-waterproofing, or wind-moisture protection.
In the photo, the insulation is covered with wind-hydroprotection, which is fixed by a partially installed second layer of sheathing
Installation of siding over windproofing
All work on creating a warm “pie” is completed.
Now we cover it all with siding, and the house becomes warm and cozy, while its “subcutaneous fat” (insulation) is reliably protected from moisture on both sides.
See all photos from this object: click here
When is a vapor barrier under siding not needed?
one answer to this question: if the house is not insulated, then a vapor barrier is not needed (but wind and hydroprotection is needed).
The second answer: you won’t need a vapor barrier under the siding (or, more precisely, under the insulation) if it is already on the inside walls of your house.
If you have a frame house, then most likely there is already a vapor barrier in the wall.
If you have a log house or timber house covered with clapboard, then a vapor barrier can be laid under the clapboard. We need to look.
The third answer applies to houses made of SIP panels: there is foam (expanded polystyrene) inside the walls, and it is not permeable to steam.
The fourth case, when a vapor barrier under the siding is not needed, applies to houses with thick, warm walls, for example, aerated concrete houses.
As a rule, such houses are insulated with insulation no thicker than 50 mm, and the dew point in this case, anyway, remains inside the aerated concrete wall.
By the way, we have an excellent article about siding a house made of aerated concrete. Click here: Siding a house made of aerated concrete.
And finally, look at the magical transformation of houses after siding:
Ready to install siding yet?
Call in St. Petersburg 956-17-30 or click on the “ CALCULATE AN ESTIMATE ” button.
Was this article helpful? Share it with your friends on social networks! Click on your favorite social media button to the left of this article.
Source
Quality and range: everything to protect your home
In total, the Izospan line of insulating products has an assortment that is conventionally divided into 4 groups:
- windproof waterproofing vapor-permeable membranes;
- waterproof vapor barrier films;
- universal materials that work in several directions at once;
- heat-steam-waterproofing materials with additional energy-saving effects.
Here is an explanatory illustration of how exactly all these materials differ:
A roofing pie with films from Izospan looks like this:
Series A are windproof materials, and series B, C and D are hydro-vapor barrier membranes. If you are afraid of getting confused in abbreviations, remember a simple rule: the first letter means the insulation class, and the second means the modification.
If there is no second letter, then the material is classic, without additional frills:
Plus Izospan produces a special tape designed specifically for this product:
This manufacturer also produces special waterproofing materials for flat inversion roofs. The company itself always boasts that it creates all its products in automated production facilities.
And this is evidence that technical control is constantly being exercised over the quality of products. This cannot be achieved with any kind of handicraft production.
Advantages of film
This material is used directly for high-quality protection of various thermal insulation layers during the construction of buildings of various purposes and heights. The main qualities of the product are high strength, long service life, excellent reliability, simplest installation, absolute environmental friendliness, versatility, resistance to high temperatures.
The excellent versatility of the film makes it possible to use it for interior and exterior finishing work. But at the same time, you need to choose the right type of film for a specific job and also mount it correctly. Only in this case can we guarantee high performance and quality indicators of the material.
Izospan for outdoor work Source galich-dom.ru
Cost table
One of the advantages of the isospan vapor barrier is that it has a reasonable price and high quality products.
Using the example of a table of different brands of Izospan, you can see the price per square meter.
| Brand | price, rub. for 1 m2 |
| A | 19 |
| AS | 38 |
| A.M. | 26 |
| B | 14 |
| C | 20 |
| D | 18 |
| DM | 26 |
| R.S. | 18 |
| R.M. | 19 |
| FS | 20 |
| FB | 21 |
The Izospan trademark produces a universal product in the field of construction technologies. The variety of products makes it possible to select the film or membrane needed for specific work. At the same time, you can be sure that the product will correspond to high quality and its purpose. Water-repellent properties, resistance to fungi and mold, endurance over a wide temperature range, environmental friendliness, long service life - all this is not a complete list of the advantages of this vapor barrier. In addition, knowing the procedure for how to properly lay out Izospan, you can efficiently insulate any room, isolating it from the effects of adverse weather factors.
How not to step on a rake
Mostly people are satisfied with the quality of this product, but sometimes sharply negative reviews appear on the forums. As practice has shown, such people often bought a fake. In order to protect you from such a mistake, the photo below shows the reference points by which you can find the real “Izospan”.
How to recognize a counterfeit roll of isospan.