Many people are accustomed to thinking that the most affordable and economical type of fuel is natural gas. But it turned out that this product has a good alternative option - hydrogen. It is obtained by splitting water. The initial component for obtaining such fuel is obtained free of charge. A DIY hydrogen burner for a heating boiler will help you save a lot and not have to think about going to the store. There are special rules and methods for creating a technical installation designed to produce hydrogen.
How is hydrogen produced?
Information about the production of hydrogen is often given by chemistry teachers to children in secondary school. The method of its extraction from simple water in chemistry is called electrolysis. It is with the help of such a chemical reaction that it is possible to produce hydrogen.
The device, simple in design, looks like a separate container filled with liquid. Under the layer of water there are two plastic electrodes. Electric current is supplied to them. Due to the fact that water has the property of electrical conductivity, contact is built between the plates with minimal resistance.
The current passing through the created water resistance leads to the formation of a chemical reaction, as a result of which the required hydrogen is produced.
At this stage, everything seems very simple - all that remains is to collect the resulting hydrogen to use it as an energy source. But chemistry cannot exist without small details. It is important to remember that if hydrogen combines with oxygen, then at a certain concentration an explosive mixture occurs. This state of substances is considered critical, which limits a person’s ability to create powerful home-type stations.
How does hydrogen heating work?
This heating method was developed by one of the Italian companies. A hydrogen boiler operates without generating any harmful waste, which is why it is considered the most environmentally friendly and silent way to heat a home. The innovation of the development is that scientists managed to achieve the combustion of hydrogen at a relatively low temperature (about 300ᵒC), and this made it possible to produce similar heating boilers from traditional materials.
Hydrogen fuel cells for home
When operating, the boiler emits only harmless steam, and the only thing that requires costs is electricity. And if you combine this with solar panels (solar system), then these costs can be completely reduced to zero.
How does it all happen? Oxygen reacts with hydrogen and, as we remember from middle school chemistry lessons, forms water molecules. The reaction is provoked by catalysts, as a result, thermal energy is released, heating the water to approximately 40ᵒC - the ideal temperature for a “warm floor”.
Adjusting the boiler power allows you to achieve a certain temperature required for heating a room of a given area. It is also worth noting that such boilers are considered modular, since they consist of several channels independent of each other. In each of the channels there is the catalyst mentioned above, as a result, the coolant enters the heat exchanger, which has already reached the required value of 40ᵒC.
How does a hydrogen burner work?
To create hydrogen-powered generators with your own hands, the classic Brown installation scheme is most often used as a basis. An electrolyzer of this type has an average power and includes several groups of cells, each of which, in turn, has a group of plastic electrodes. The power of the created installation will depend on the total surface area of the plastic electrodes.
The cells are installed in a container that is qualitatively protected from external factors. On the body of the device there are special pipes for connecting the water line, hydrogen output, as well as a contact panel that acts as an electrical supply.
A self-created hydrogen burner according to Brown’s scheme, in addition to all of the above, includes a separate water seal and a check valve. With the help of such parts, complete protection of the device from the release of hydrogen is achieved. It is this scheme that many craftsmen use when creating a hydrogen installation for heating their home area.
Some good advice
Next, let's talk about other components of the hydrogen burner - the filter for the washing machine and the valve. Both are for protection. The valve will not allow ignited hydrogen to penetrate back into the structure and explode the gas accumulated under the lid of the electrolyzer (even if there is only a little of it there). If we do not install the valve, the container will be damaged and the alkali will leak out.
A filter will be required to make a water seal, which will act as a barrier preventing an explosion. Craftsmen who are familiar firsthand with the design of a homemade hydrogen burner call this valve a “bulbulator.” Indeed, it essentially only creates air bubbles in the water. For the burner itself we use the same transparent hose. That's it, the hydrogen burner is ready!
All that remains is to connect it to the input of the “warm floor” system, seal the connection and begin direct operation.
Hydrogen station for home use
How to make a hydrogen burner with your own hands? This question continues to be the most popular among owners of private houses who are trying to produce a reliable and high-quality heating source. The most common way to create such a device is the following option:
- pre-prepare a sealed container;
- plate or tubular electrodes are created;
- the design of the device is planned: the method of controlling it and equipping it with current;
- additional modules are prepared for connection to the device;
- special parts are purchased (fasteners, hoses, wiring).
Of course, the master will definitely need tools, including special devices, a frequency meter or an oscilloscope. Once all the tools and materials are prepared, the master can proceed to the creation of a hydrogen heating burner for home use.
What is required to make a burner?
Electrical diagram of a hydrogen burner.
Before starting work, it is recommended to prepare everything necessary for the manufacture of the device.
To make a hydrogen burner, you need to stock up on the following materials:
- sheet stainless steel;
- 2 bolts M6x150 with nuts and washers;
- a transparent tube, for example, such as in a water level;
- fittings with an outer diameter corresponding to the hose;
- sealed plastic container with a volume of 1.5 liters;
- small filter for purifying supply water;
- water check valve.
The choice of stainless steel must be approached responsibly. It is advisable to choose the brand of imported steel AISI 316L or the domestic equivalent - 03Х16Н15М3. However, if there is a small piece of stainless steel 50x50 cm 2 mm thick, then there is no need to purchase a whole sheet.
It is necessary to use stainless steel, since it does not corrode in water, unlike ordinary steel.
Additionally, hydrogen welding will be more effective if you use lye rather than plain water. The alkaline environment is aggressive, so using ordinary steel is unacceptable.
Device creation scheme
At the first stage of creating a hydrogen burner for heating a house, the master needs to make special cells designed to generate hydrogen. The fuel cell is distinguished by its completeness (slightly less than the length and width of the generator housing), so it will not take up too much space. The height of the block with electrodes inside reaches 2/3 the height of the main body, into which the main structural parts are installed.
The cell can be created from plexiglass or PCB (wall thickness varies from 5 to 7 millimeters). To do this, the textolite plate is cut into five equal parts. Next, they are formed into a rectangle and the borders are glued together with epoxy glue. The lower part of the resulting figure should remain open.
It is customary to create the body of the fuel cell of a hydrogen heater from such plates. But in this case, experts use a slightly different assembly method using screws.
On the outside of the finished rectangle, small holes are drilled for holding the electrode plates, as well as one small hole for the level sensor. For comfortable release of hydrogen, an additional hole with a width of 10 to 15 millimeters is required.
Electrode plates are inserted inside, the contact tails of which are passed through drilled holes on the top of the rectangle. Next, a water level sensor is built in at around 80 percent of the cell filling. All free holes in the textolite plate (except for the one from which hydrogen will come out) are filled with epoxy glue.
This is a device that is delightful in the simplicity of its idea, and can be assembled at home with a minimum of tools and skills used (of course, in the advanced version everything becomes more complicated due to bells and whistles).
The idea is very simple: we take electrodes, put them in the electrolyte, apply current, and collect hydrogen-oxygen at the output. Probably, anyone reading this text in childhood or later in life made a mini-electrolysis installation of the “entertaining physical chemistry” class: two pencils in a jar of salt or soda, a battery, wires, test tubes, and cheerfully set fire to hydrogen in a test tube. no images were found
So, this is the same thing, only two or three orders of magnitude more powerful. This crap produces a powerful, extremely hot flame simply from water and alkali. No gas cylinders, no gearboxes, gas stations and other dregs - just apply voltage. And if you inflate her a balloon and release it with a burning thread...
What is needed to obtain a more or less powerful gas flow? That's right, a large area of electrodes, and the volume of gas per second is directly proportional to it. I won’t go into calculations, especially since I haven’t done them myself, I’ll just tell you the optimal parameters. The total area of the electrodes for a noteworthy gas flow must be at least 1000 cm^2 (total of the anode and cathode), preferably from 2000 cm^2. The current density should be on the order of 0.08-0.15A/cm^2 (8-15A/dm^2): with a higher current, overheating of the electrolyte and boiling will occur - that is, foam, thousands of it; with less, we lose in gas evolution. The drop on one pair of electrodes for such a current is 2-3 volts, depending on the electrolyte concentration (I took 10%, this corresponds to approximately 2.2-2.3 volt drop). Under such circumstances, pumping two huge plates with hundreds of amperes of current at two volts does not seem to be a very reasonable solution. It is much better to connect several cells in series: then we can increase the operating voltage and electrode area many times over at the same current. And now all that remains is to figure out that one electrode plate can be the cathode of one cell on one side, and the anode of another on the other. In short, we simply assemble a Big Mac from plates alternating with ring-shaped gaskets. More plates means more voltage at the same current; the larger the area of each plate - more current at the same voltage. Increasing the number of plates increases the total voltage drop across them. The diagram shows everything clearly.
Now about the practical nuances of construction. First and most important: the material of the electrode plates. Since they will have to work in an aggressive environment (strong alkali, electrolytic reactions, temperature 50-80 degrees), there is only one choice available - stainless steel. But even here it’s not so simple, there are a lot of brands, and not all of them are suitable. By experimental (and also partly theoretical and partly comparative-analytical - study of descriptions of industrial electrolysis gas welding installations) a common and suitable steel was determined: 12Х18Н10Т.
Letters - additive metals (chrome, nickel, titanium); numbers - designations of their quantity (0.12% carbon, 18% chromium, 10% nickel, a little - up to 1.5% - titanium). It doesn’t matter, it’s a fairly fashionable and common steel and it’s not very difficult to find it in sheets with dimensions like 1000*2000 mm (I leave the method of cutting the sheet into plates to the discretion of those who want to replicate the device). Its analogue - AISI 321 - should also theoretically be suitable. I don't know, I haven't tried it. Titanium-free 08Х18Н10, for example, rusts and oxidizes, although it would seem to be completely suitable.
In each plate, it is necessary to make holes at the bottom and top at distances slightly less than the diameter of the gasket from each other (but not less than 0.5-1 cm from the edge of the gasket) - for gas exchange and for distributing the electrolyte among the cells. About a 5mm drill is enough.
Don't forget to solder the wires to the outer parts of the plates before assembly.
Alkali. NaOH or KOH is suitable, preferably pure, not technical. Start with a concentration of 10% by weight (in distilled water), then experiment. Higher concentration means higher current, but more foam.
Almost all of the rubber gaskets sold are already oil and alkali resistant. I used o-rings (o-rings) of about 130 mm in diameter. You need one less of them than plates.
Tension plates. You need something very weakly bendable and rigid. The ideal and classic construction is thick, two-centimeter plexiglass. In it you can make conclusions and threads for gas and additional. fuel tank. I didn't have plexiglass, I just soldered copper tubes into the last stainless plate, and used 27 mm plywood for the ties.
If all the above components - steel, gaskets, ties - are there, you can assemble them together, check with a small pressurization - the gaskets should not bulge and there should be no etching of air at all at a pressure of at least 0.5-0.6 atm, fill in alkali - and move on to external body kit.
First of all, you should make a water seal. The hydrogen-oxygen mixture, HHO, is an incredibly evil thing. It detonates easily and burns very quickly, without requiring any oxidizing agents (that is, oxygen).
If during operation a flame somehow slips into the hoses and reaches the electrolyzer, in the best case scenario, hot alkali mixed with pieces of gaskets will be scattered throughout the work area. But this is quite easy to avoid by installing a simple design, the essence of which is clear from the diagram. The flame does not have a chance to jump down the bubbles through a layer of water or other liquid, and thus the combustion will not penetrate into the device itself. The structure is a little less than entirely assembled from plumbing fixtures from a hardware store.
Next you should take care of the burner.
As a nozzle, the best we could find were thick all-metal needles (such as “Record” and the like) from Soviet reusable syringes. But since the idea of using the syringe itself as part of the burner is not the best, I simply tore off the nose of the syringe and soldered it to the nozzle on a full-fledged propane-oxygen burner. And then comes an important point. In view of the above-mentioned malice of HHO in terms of combustion in general and especially its combustion speed, all possible places in the burner should be tightly, tamping, clogged with tangled small-small copper wires.
I used several meters of MGTF (there lived about 0.07 or less), thoroughly mixed into a copper pulp, which clogged almost the entire “barrel” of the burner and most of its spout. This will almost certainly prevent the flame from leaking into the hoses even if it is turned off incorrectly (and most certainly, in the event of an accidental breakthrough, the water seal will protect it). I really don’t recommend neglecting the volume and quantity of this copper waste. And it should start from almost the burner nozzle itself. I won’t go into detail about little things like hoses, connections, pressure gauge connections, they are made from what’s at hand. Vinyl and silicone medical pipes have proven themselves well; they are easy to find in the right size that fits standard plumbing copper pipes of diameter.
Nutrition. As for power supply, everything is simple, how many volts and 8-15 amperes are needed. For now, I am using LATR and an OSM-0.63 (600 watt) transformer that steps down to 110 volts, after which there is a 50-amp diode bridge (with a reserve), a filter electrolyte and an ammeter to monitor the current. The voltage currently consumed is 68 volts, the current is 8-10A, respectively, the power is about 500-600 watts. If you expand the device to about 140 plates, direct network connection without a transformer will become possible, which will bring the device into a state of incredible coolness, and that’s what we plan to do as soon as I get the rubber gaskets - 110 more pieces.
In short, if everything is done, you can turn it on. It’s very lazy to describe possible problems that may appear; after all, this site does not have a set of “do it yourself for dummies” instructions. That's it in a nutshell. First, there may be foam. Foam means dirty electrolyte, dirt on the plates, or overflow/overheating. If there is dirt, wait 20-30 minutes on a low current until it disappears. If there is overflow/overheating, reduce the current or let it cool. If the electrolyte is dirty, we use another alkali and distilled or at least melt water. Next, it can spit out alkali along with the gas. The electrolyte level is too high, drain it or let it run until it goes down. The pressure does not hold when the burner is closed - it is poisoning somewhere. Need to check. If the device is leaking alkali between the plates, you need to find out exactly where, look, and replace the gasket or plate. Nothing should leak anywhere, neither gas nor liquid. The gas flow is too weak, the flame jumps into the burner or burns the needle-nozzle - reduce the diameter of the nozzle or increase the gas emission power. By the way, when warming up, the plates can sag and short-circuit with each other - this needs to be monitored and something should be placed between the corners.
I recommend checking for combustion not indoors (otherwise it will go crazy, excuse my French, and everything will be alkali). I dragged him outside, and when I was sure it was safe, I brought him back inside. If everything is done correctly, at the end of the needle either a pale yellow-pinkish or quite bright yellow (the latter means sodium that has sneaked into the vapor) flame will light up, several centimeters long, almost silent, very difficult to blow out. By experimenting with the power input, electrolyte concentration and needle-nozzle diameters, you can achieve quite interesting results. By the way, this flame burns under water. The glass of a light bulb burns through, while thicker glass heats it white-hot and boils. Thin iron boils, thicker iron heats red and white. Melts (but with difficulty) quartz glass. In the video you can see what and how it can do.
The simplest addition to this electrolysis burner is an enrichment agent. The hydrogen-oxygen flame itself is quite harsh and not very convenient for heating large parts, and it is also highly oxidizing. If you first drive HHO gas through a layer of gasoline, for example, it will be enriched with its vapors, which, when burned, will give additional power to the flame and make it enriched. The enriched flame has a characteristic dagger shape, greater power and size, and a characteristic hydrocarbon blue-white color. My enricher has the same design as a water seal (only gasoline is poured in instead of water), and therefore, since they stand together, you can smoothly adjust the degree of flame saturation. With an enriched flame, the true size of the jet is visible - about 30 centimeters (while with a quickly burning HHO, at most 5-7 cm are visible).
And a couple of external links on the topic to helpful resources. https://patlah.ru/etm/etm-04/svarka/gaz-svarka/gaz-elektroliz-svarka/gaz-elektroliz-svarka.htm https://igrushka.kz/slabo/ogovod.shtml
Share on social media networks
There are no tags.
Generator cells
Most often, when creating a hydrogen generator, cylindrical modules are used. The electrodes in this design are made according to a slightly different pattern.
The hole from which hydrogen comes out must be additionally equipped with a special fitting. It is fixed with a fastener or glued in. The finished hydrogen generation cell is built into the body of the heating device and sealed from the top (in this case, epoxy resin can also be used).
About the Meyer hydrogen cell
If you have made and tested the design described above, then you probably noticed from the burning of the flame at the end of the needle that the performance of the installation is extremely low. To get more detonating gas, you need to make a more serious device, called the Stanley Meyer cell in honor of the inventor.
The principle of operation of the cell is also based on electrolysis, only the anode and cathode are made in the form of tubes inserted into one another. Voltage is supplied from the pulse generator through two resonant coils, which reduces current consumption and increases the productivity of the hydrogen generator. The electronic circuit of the device is shown in the figure:
Note. The operation of the circuit is described in detail on the resource https://www.meanders.ru/meiers8.shtml.
To make a Meyer cell you will need:
- a cylindrical body made of plastic or plexiglass; craftsmen often use a water filter with a lid and pipes;
- stainless steel tubes with a diameter of 15 and 20 mm, a length of 97 mm;
- wires, insulators.
Stainless steel tubes are attached to a dielectric base, and wires connected to the generator are soldered to them. The cell consists of 9 or 11 tubes placed in a plastic or plexiglass case, as shown in the photo.
A ready-made plastic housing from a conventional water filter can be adapted for the Meyer cell
The elements are connected according to a scheme well known on the Internet, which includes an electronic unit, a Meyer cell and a water seal (technical name - bubbler). For safety reasons, the system is equipped with critical pressure and water level sensors. According to reviews from home craftsmen, such a hydrogen installation consumes a current of about 1 ampere at a voltage of 12 V and has sufficient performance, although exact figures are not available.
Schematic diagram of switching on the electrolyzer
Device body
The housing of a hydrogen generator for home use is quite simple. But it will not be possible to use such a design for high-power stations, since it simply will not withstand the applied load.
Before installing the finished cell inside, the housing should be well prepared. To do this you need:
- create a liquid supply in the lower part of the housing;
- make a top cover equipped with convenient and reliable fasteners;
- choose a good sealing material;
- install the electrical terminal block on the cover;
- equip the lid with a hydrogen collector.
How to make a hydrogen welding machine yourself?
Hydrogen welding is useful to any craftsman. The hydrogen cutter is not a cheap piece of equipment. In addition, commercially available machines are often unsuitable for soldering small parts, especially jewelry.
The way out of this situation is to make atomic-hydrogen welding yourself. All the parts necessary to create such a device can be easily purchased at any hardware store. So, let's look at how to do this at home.
Main capacity
Installation for welding with hydrogen.
The hydrogen welding machine operates as a result of the combustion of hydrogen, due to the dissociation of an aqueous alkali solution.
This process is carried out in a container for which a half-liter jar is perfect. It must be closed with a plastic cover with two holes made to remove contacts from the electrodes.
All terminals must be tightly sealed. Moment glue is suitable for these purposes.
Four-centimeter strips of stainless steel can be used as electrodes. For the best performance of a welding machine, the entire volume of liquid must be used.
To do this, the plates are drilled along the upper and lower edges and connected to each other with dielectric pins. Terminals are made on the resulting block: two negatives located at the edges, and a pole between them.
Each terminal is bent and fixed to the container with a bolt. The terminals from the power source will be attached to these bolts.
The container must be filled with a syringe with working fluid through the gas outlet fitting. The electrolyte is an 8-10% mixture of sodium hydroxide in distilled water. When the electrolyzer is operating, the temperature of the working liquid of the alkaline solution usually does not exceed 80 °C.
The second vessel acts as a hydrodispenser. In it, gases are saturated with vapors of flammable substances. Then the resulting mixture is sent to a third container filled with ordinary water. It acts as a shutter for the release of gases.
An ordinary medical needle can be used as a nozzle through which oxygen, hydrogen and flammable substances will come out.
Current source for atomic hydrogen welding
A regular 12 volt battery can be used as a power source. This option is perfect for working with metal of a fixed thickness.
Its disadvantage is the inability to control the burner flame strength, since its performance is determined by the production of hydrogen and oxygen, which depends on the current strength.
Choosing a charger for car batteries will be more preferable. To work with thin metal plates or jewelry, charging can be set to 3 volts.
Hydrogen welding can be powered with oxygen from a regular 220 V network, which allows you to use this device at home.
Exchange camera
Schematic diagram of a hydrogen welding apparatus.
To select hydrogen and oxygen supplied to the burner, another container is used - an exchange chamber.
You need to make 3 holes inside it:
- for refilling with working fluid;
- at the bottom there is a fitting for supplying working fluid to the main tank;
- fitting for supplying the gas mixture to the nozzle.
The design of the additional container must also be carefully sealed. Gases and liquids should not leak through the hydrogen seals of the hydrogen generator. This is also solved with the help of "Moment".
Making a burner
To make a burner, you can use a regular rubber hose. It is through this that hydrogen and oxygen will be transported from the exchange chamber to the nozzle. You can use a needle from a syringe or dropper as a nozzle. The latter will be a more preferable choice, since the walls of this needle are thicker.
The hose must be tightly secured to the exchange chamber fitting and the needle base. This is achieved using clamps. After completing all operations to assemble the device, you can begin testing it.
Electrolysis of the working fluid begins quickly. After just a few minutes, you can ignite the flame at the end of the nozzle. The flame is adjusted by changing the voltage on the device.
Final stage
At the end of the work, the master will be able to obtain a high-quality and reliable hydrogen generator for the heating system of a private home. Next, only the final touches remain:
- install the finished fuel cell into the main body of the device;
- connect the electrodes to the terminal block of the device cover;
- the fitting installed at the hydrogen outlet should be connected to the hydrogen manifold;
- The cover is placed on top of the device body and secured through a seal.
The hydrogen generator is now completely ready for operation. The owner of a private house can safely connect water and additional modules for comfortable heating of a private house.
Design and principle of operation of a hydrogen generator
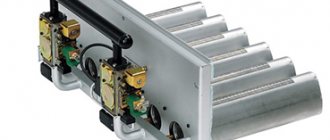
The factory hydrogen generator is an impressive unit
Using hydrogen as a fuel for heating a country house is beneficial not only because of its high calorific value, but also because no harmful substances are released during its combustion. As everyone remembers from a school chemistry course, when two hydrogen atoms (chemical formula H2 - Hidrogenium) are oxidized by one oxygen atom, a water molecule is formed. This produces three times more heat than the combustion of natural gas. We can say that hydrogen has no equal among other energy sources, since its reserves on Earth are inexhaustible - 2/3 of the world’s oceans consists of the chemical element H2, and in the entire Universe this gas, along with helium, is the main “building material”. There's just one problem - to get pure H2 you need to split water into its component parts, and this is not easy to do. Scientists have been looking for a way to extract hydrogen for many years and settled on electrolysis.
Laboratory electrolyzer operation diagram
This method of producing volatile gas involves placing two metal plates connected to a high voltage source in water at a short distance from each other. When power is applied, the high electrical potential literally tears the water molecule apart, releasing two hydrogen (HH) atoms and one oxygen (O) atom. The released gas was named after the physicist Yu. Brown. Its formula is HHO, and its calorific value is 121 MJ/kg. Brown's gas burns with an open flame and does not produce any harmful substances. The main advantage of this substance is that a regular boiler running on propane or methane is suitable for its use. Let us only note that hydrogen in combination with oxygen forms an explosive mixture, so additional precautions will be required.
Installation diagram for producing Brown's gas
The generator, designed to produce Brown's gas in large quantities, contains several cells, each of which contains many pairs of electrode plates. They are installed in a sealed container, which is equipped with a gas outlet, terminals for connecting power and a neck for filling water. In addition, the installation is equipped with a safety valve and a water seal. Thanks to them, the possibility of backfire spreading is eliminated. Hydrogen burns only at the exit of the burner, and does not ignite in all directions. A multiple increase in the usable area of the installation makes it possible to extract the flammable substance in quantities sufficient for various purposes, including heating residential premises. But doing this using a traditional electrolyzer will be unprofitable. Simply put, if the electricity spent on hydrogen production is directly used to heat a house, then it will be much more profitable than heating a boiler with hydrogen.
Stanley Meyer hydrogen fuel cell
The American scientist Stanley Meyer found a way out of this situation. His installation did not use powerful electrical potential, but currents of a certain frequency. The invention of the great physicist consisted in the fact that a water molecule swayed in time with changing electrical impulses and entered into resonance, which reached a force sufficient to split it into its constituent atoms. Such an effect required tens of times less current than when operating a conventional electrolysis machine.
Video: Stanley Meyer Fuel Cell
For his invention, which could free humanity from the bondage of oil magnates, Stanley Meyer was killed, and the works of his many years of research disappeared to God knows where. Nevertheless, some of the scientist’s notes have been preserved, on the basis of which inventors in many countries around the world are trying to build similar installations. And I must say, not without success.
Advantages of Brown's gas as an energy source
- Water, from which HHO is obtained, is one of the most common substances on our planet.
- When this type of fuel burns, it produces water vapor, which can be condensed back into liquid and reused as a raw material.
- During the combustion of detonating gas, no by-products are formed except water. We can say that there is no more environmentally friendly type of fuel than Brown's gas.
- When operating a hydrogen heating system, water vapor is released in an amount sufficient to maintain the humidity in the room at a comfortable level.
You may also be interested in material on how to build your own gas generator:
Application area
Today, an electrolyzer is as common a device as an acetylene generator or a plasma cutter. Initially, hydrogen generators were used by welders, since carrying a unit weighing only a few kilograms was much easier than moving huge oxygen and acetylene cylinders. At the same time, the high energy intensity of the units was not of decisive importance - everything was determined by convenience and practicality. In recent years, the use of Brown's gas has gone beyond the usual concepts of hydrogen as a fuel for gas welding machines. In the future, the possibilities of the technology are very wide, since the use of HHO has many advantages.
- Reducing fuel consumption in vehicles. Existing automotive hydrogen generators allow the use of HHO as an additive to traditional gasoline, diesel or gas. Due to more complete combustion of the fuel mixture, a 20–25% reduction in hydrocarbon consumption can be achieved.
- Fuel savings at thermal power plants using gas, coal or fuel oil.
- Reducing toxicity and increasing the efficiency of old boiler houses.
- Multiple reductions in the cost of heating residential buildings due to the complete or partial replacement of traditional fuels with Brown gas.
- Using portable HHO production units for domestic needs - cooking, obtaining warm water, etc.
- Development of fundamentally new, powerful and environmentally friendly power plants.
A hydrogen generator built using S. Meyer’s “Water Fuel Cell Technology” (that’s what his treatise was called) can be bought - many companies in the USA, China, Bulgaria and other countries are engaged in their production. We propose to make a hydrogen generator yourself.
Video: How to properly install hydrogen heating
Rules for using the device
A hydrogen jewelry burner for home must have additional built-in modules. Particularly important is the water supply module, which is combined with a water level sensor built into the hydrogen generator itself. The simplest models are a water pump and a control controller. The pump is controlled by the controller through a sensor signal depending on the amount of liquid in the fuel cell.
Auxiliary elements are very important for any heating design. Without automatic control and protection modules, using a hydrogen-based generator is prohibited and even dangerous.
Experts advise purchasing a special system that regulates the frequency of the supplied electrical current and voltage level. This is important for the normal functioning of the working electrodes inside the fuel cell. The module must also contain a voltage stabilizer and overcurrent protection.
The hydrogen manifold is a tube into which a special valve, pressure gauge and check valve are built. From the collector, hydrogen is supplied to the room through a special check valve.
The pressure gauge and hydrogen manifold are very important parts in a hydrogen generator, with the help of which the gas is evenly distributed throughout the room and the overall pressure level is controlled.
Any consumer should remember that hydrogen remains an explosive gas with a high combustion temperature. It is for this reason that it is prohibited to simply fill the heating device structure with hydrogen.
What is needed to make a fuel cell at home
When starting to manufacture a hydrogen fuel cell, it is imperative to study the theory of the process of formation of detonating gas. This will give an understanding of what is happening in the generator and will help in setting up and operating the equipment. In addition, you will have to stock up on the necessary materials, most of which will be easy to find in the retail chain. As for the drawings and instructions, we will try to cover these issues in full.
Hydrogen generator design: diagrams and drawings
A homemade installation for producing Brown's gas consists of a reactor with installed electrodes, a PWM generator to power them, a water seal and connecting wires and hoses. Currently, there are several electrolyzer designs using plates or tubes as electrodes. In addition, you can find on the Internet an installation of so-called dry electrolysis. Unlike the traditional design, in such a device the plates are not installed in a container with water, but the liquid is supplied into the gap between the flat electrodes. Refusal of the traditional scheme makes it possible to significantly reduce the dimensions of the fuel cell.
In your work, you can use drawings and diagrams of working electrolyzers, which can be adapted to your own conditions.
Selection of materials for the construction of a hydrogen generator
To manufacture a fuel cell, virtually no specific materials are required. The only thing that may be difficult is the electrodes. So, what do you need to prepare before starting work?
- If the design you choose is a “wet” type generator, then you will need a sealed water container, which will also serve as the reactor vessel. You can take any suitable container, the main requirement is sufficient strength and gas tightness. Of course, when using metal plates as electrodes, it is better to use a rectangular structure, for example, a carefully sealed case from an old-style car battery (black). If tubes are used to obtain HHO, then a capacious container from a household filter for water purification will also be suitable. The best option would be to make the generator housing from stainless steel, for example, grade 304 SSL.
Electrode assembly for a “wet” type hydrogen generator
When choosing a “dry” fuel cell, you will need a sheet of plexiglass or other transparent plastic up to 10 mm thick and sealing rings made of technical silicone.
Stainless steel tubes or plates. Of course, you can take ordinary “ferrous” metal, but during the operation of the electrolyzer, simple carbon iron quickly corrodes and the electrodes will have to be changed frequently. The use of high-carbon metal alloyed with chromium will enable the generator to operate for a long time. The craftsmen involved in the manufacture of fuel cells spent a long time selecting material for the electrodes and settled on 316 L stainless steel. By the way, if tubes from this alloy are used in the design, then their diameter must be selected in such a way that when installing one part in the other there was a gap of no more than 1 mm between them. For perfectionists, we give the exact dimensions: - outer tube diameter - 25.317 mm; — the diameter of the inner tube depends on the thickness of the outer one. In any case, it must provide a gap between these elements equal to 0.67 mm.
Its performance depends on how accurately the parameters of the hydrogen generator parts are selected.
Please note that polished tubes are not recommended. On the contrary, experts recommend treating the parts with sandpaper to obtain a matte surface. In the future, this will help increase the productivity of the installation.
Tools that will be required during the work process
Before you begin building a fuel cell, prepare the following tools:
- hacksaw for metal;
- drill with a set of drills;
- set of wrenches;
- flat and slotted screwdrivers;
- an angle grinder (“grinder”) with a mounted circle for cutting metal;
- multimeter and flow meter;
- ruler;
- marker.
In addition, if you build a PWM generator yourself, you will need an oscilloscope and a frequency meter to set it up. Within the framework of this article, we will not raise this issue, since the manufacture and configuration of a switching power supply is best considered by specialists on specialized forums.
How to determine the quality of an installation?
Creating a high-quality and safe heating installation for your home yourself is a difficult task that not everyone can cope with. For example, even when considering the metal from which the device pipes and electrode plates are made, one can already encounter a large number of difficulties.
The service life of the built-in electrodes directly depends on the type of metal and its basic properties. Of course, you can use the same stainless steel, but the operation of such parts will not be long. The temperature of the hydrogen burner should be around 5000 K.
Measurements are also of particular importance. All calculations should be carried out as accurately as possible, taking into account the required power, the quality of the incoming water and other criteria. If the size of the hole between the electrodes does not coincide with the calculations, then the hydrogen generator may not start at all.
Application of the method
Gas flame welding is carried out due to the combustion of a gaseous mixture. The most commonly used is acetylene welding. It is based on the oxidation of carbide in water.
If low temperatures are required, for example when working with small parts or thin metal, propane is used. It is fed from the cylinder into the mixing chamber and then into the burner.
Oxygen is supplied to the same chamber to support gas combustion. By adjusting the oxygen pressure, it is possible to achieve a combustion temperature of up to 3000 degrees, which allows not only welding, but also metal cutting.
The disadvantage of this technology is the need to use a gas cylinder. This places restrictions on the use of welding in many difficult conditions.
Unit for hydrogen welding.
The operating principle of hydrogen welding is based on the process of separating water into hydrogen and oxygen. As a result of the subsequent recombination of monatomic hydrogen into diatomic hydrogen, energy is released, which accelerates welding.
The welding area is protected from oxygen by hydrogen, which eliminates surface oxidation and ensures smooth seams.
Using hydrogen cylinders for rafting is dangerous. Leakage in confined spaces may cause suffocation or dizziness. It is also explosive.
The production of hydrogen necessary for the operation of the welding machine is carried out directly at the welding site in the electrolysis chamber. This eliminates these risks if the equipment is used correctly and safety precautions are followed.
Hydrogen welding is widely used in difficult conditions: tunnels, mines, sewers. It is impossible to use propylene-acetylene cylinders for such tasks due to the high risk of mixture leakage and explosion.
Electrolysis equipment does not have these disadvantages and is widely used in these areas.
Using hydrogen welding machines is quite simple. They do not require frequent recharging and quickly reach operating temperatures.
In addition, they can operate from a household network, which makes them very attractive for the average user. Especially considering that hydrogen welding can be done with your own hands using one of the many electrolyzer circuits for welding available on the Internet.