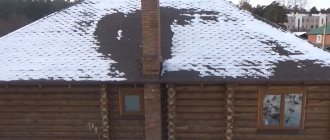
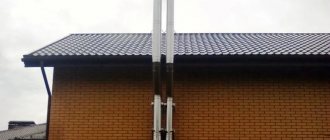
Modern man is a very heat-loving creature, and cannot exist in a house without heating. A heat generator with a chimney is the most complex and potentially dangerous engineering system. A chimney is a rather bulky and complex structure, and if the stove or fireplace is located near the outer wall of the house, then the most practical option is to install the chimney through the wall.
We welcome our regular reader and offer him information on how to make a chimney outside near the wall of the house with your own hands.
What is it and what is it for?
A chimney is a vertically located structure that has a cavity inside through which hot combustion products are discharged into the atmosphere. In fact, this is a box made of non-combustible material (brick, metal, ceramics, asbestos cement, concrete), which serves to remove flue gases upward from the combustion chamber (furnace) under the influence of draft.
A chimney is needed to remove waste combustion products outside the home. Smoke poses a significant danger to humans:
- Exhaust gases contain carbon dioxide and carbon monoxide, which are toxic to humans.
- Smoke contains oxides of sulfur, nitrogen and some other elements; when the oxides combine with water vapor, aggressive and harmful acids are formed.
- Smoke carries soot particles, which, without smoke removal, will settle into the room, on the ceiling, furniture, things and in the lungs of humans and animals.
- Smoke contains a lot of water vapor produced by the combustion of hydrocarbons - the steam will also condense on walls and windows and create high humidity, promoting the formation of fungi and mold.
- In addition, hot gases can cause a fire.
The health and even life of you and your household depends on how the device is properly executed and high-quality materials are selected.
Principle of operation
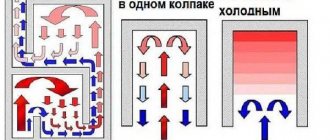
The principle of operation of a chimney is based on the tendency of hot combustion products to rise upward. Hot gases expand, their density decreases, and they tend to “float” into a higher layer of the atmosphere with the same density. When the waste combustion products rise in the furnace, a vacuum is formed and fresh air is sucked in. Thrust ensures a continuous supply of oxygen to the fuel.
Many factors influence cravings:
- Chimney height.
- Cross-sectional area of the internal channel.
- Insulation of the channel.
- The location of the head relative to the top of the roof (ridge).
- Sufficient air supply.
How the chimney works
The traditional brick chimney differs in design from modern chimneys, which are assembled from ready-made factory-made elements.
Any chimney has a vertical box, a head, valves, hatches for cleaning, and sometimes a foundation.
A typical brick chimney has the following parts:
- If necessary, a foundation.
- The neck is used to connect to the furnace firebox.
- Riser (box) with valves.
- When retrofitting, a stainless steel liner is often inserted into the brick frame.
- Slope.
- Otter - expansion of brick walls above the roof, covering the gap in the roof from precipitation and leaves; A galvanized steel molding is often attached to the otter.
- At the point of passage through the roof structure there is a neck.
- Headband.
- In recent decades, the top of the structure has been covered with a metal cap.
A chimney made of asbestos cement and steel consists of pipes, adapters for connecting to the firebox, a cap, insulation, and sometimes an outer lining made of galvanized sheet.
The most modern and promising types of chimneys are made from three-layer sandwich pipes and prefabricated ceramic ones. These types of pipelines are assembled from ready-made factory-made elements; a wide range of elements allows you to quickly install structures of any configuration.
The main parts of ceramic and sandwich pipes are straight and rotary elements (elbows), tees, elements with inspection hatches for cleaning, elements with a container for collecting condensate; transition elements for connecting the heating unit, cone, deflector.
Sandwich pipes consist of two layers of metal and insulation between them. Ceramic chimneys are assembled from an external expanded clay concrete frame, an internal prefabricated ceramic duct and a layer of insulation between them.
Modern chimneys are not installed without deflectors - they increase draft and protect the smoke channel from precipitation.
Types and designs of external chimneys
Structurally, chimneys installed outside the building near the wall are:
- Wall-mounted – mounted on the wall of a building.
- Root - installed on a separate foundation near the building.
According to the material of manufacture, chimneys are:
- Brick.
- Single-layer steel (including modular).
- From sandwich pipes.
- Asbestos-cement.
- Cement (used in industrial furnaces).
Self-construction of a beautiful, level free-standing brick pipe is difficult - the skills of a qualified mason are required. Asbestos-cement products are fragile, components for them are not produced (with hatches, tees, bends, modules for collecting condensate), they are destroyed under the influence of condensate and require insulation. Single-layer steel pipes require insulation - and it is impossible to independently insulate a monopipe as well as a sandwich or factory-made ceramics. The aesthetic qualities of steel or asbestos-cement structures with insulation also leave much to be desired.
What type of chimney can be routed through the wall?
Any chimney can be brought out through the wall. In practice, the choice of chimneys installed outside the building comes down to ceramic, sandwich and brick structures.
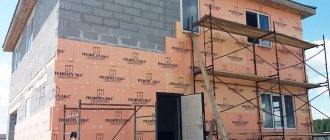
Passing a chimney through a wooden wall using modern passage units is also not very difficult.
Advantages and disadvantages of venting the chimney through the wall
Advantages:
- The most important advantage of venting the chimney through the wall to the street is the greater fire safety of the room with the heating unit and the building as a whole.
- An external chimney is safer in terms of smoke from the part of the pipe facing the wall, leakage of exhaust gases and poisoning of residents with carbon monoxide or carbon monoxide.
- Absence of holes in the roof, violation of the rafter system, or passage of structures in the ceiling. The passage of a chimney through a wooden ceiling always creates an additional fire hazard. The absence of holes in the plank sheathing of the roof and the absence of additional reinforcement of the rafters with timber makes the work easier and strengthens the roof.
- Saving space in the room, the bulky design inside the room does not always fit well into the interior - installing a chimney outside the building makes it possible to decorate a room with a stove or fireplace to your liking.
- When modernizing a building, installing an external chimney is much easier and faster than an internal one.
- Exterior structures are also much easier to repair and upgrade.
Flaws:
- A ceramic chimney requires a separate foundation.
- Sandwich pipes must be securely fastened, especially in the upper part - the structure, despite its low weight, has a fairly significant windage.
- In many cases, water from the roof slope pours onto the chimney when it rains, and in the place of the eaves it is necessary to install special flashings or install additional storm gutters.
- The chimney outlet through the wall must be very carefully insulated with non-combustible materials.
- Sometimes an external chimney disrupts the overall design of the building. And sometimes it gives it some color:
The service life of such a chimney
The service life of chimneys depends on the designs and materials from which they are made.
A ceramic chimney will last up to 40 years. Manufacturers declare 50 years or more, but no one has checked it yet. A brick one can last longer, but stainless steel liners will have to be replaced after 15-20 years. The service life of the liner primarily depends on the thickness and grade of steel. The thickness of the liner steel should not be less than 0.8-1.0 mm. Galvanization will not last long.
A good quality sandwich will last for 15-20 years or even more. The service life depends on the material and thickness of the inner liner - a good stainless steel inner liner with a thickness of 1 mm will last 20 years. Enameled liner made of carbon (“black”) steel – 15 years.
The service life of the liner depends on the type of heating unit (more precisely, on the type of fuel and the heating temperature of the exhaust gases). The shortest service life is for chimneys for fireplaces and coal boilers, which release very hot gases during intense combustion. The service life of chimneys from boilers and fireplaces using peat, briquettes and wood is slightly longer. Chimneys for pellet and gas boilers will last the longest.
Types of fireplaces for a wooden house
When choosing a stove for a wooden house, it is important to choose a model that is not only efficient, but also fireproof:
- The Russian stove takes up a lot of space, so it is ideal for a large house. In addition to reliable heating, it makes it possible to cook; all you need to do is install a hob and oven.
*
- A fireplace stove, as the name suggests, contains both a fireplace and a stove. This is a fairly safe and effective type of fireplace. Its design allows you to quickly and effectively warm up the room, which is very important in winter, especially if there are interruptions in gas or electricity supply. Such structures can be cast iron or steel.
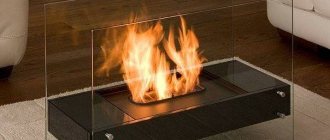
- The bio-fireplace is easy to install and operate and greatly enhances the interior of the home. Environmentally friendly bioethanol in liquid form is used as fuel.
- An electric fireplace is also easy to install, convenient to use, safe, but depends on the supply of electricity.
- A gas fireplace has good heat transfer, easy ignition and the absence of soot and soot, but requires a gas pipeline.
By location they can be:
- Frontal, installed along the walls;
- Corner, they fill the corner of the room and take up relatively little space;
- Island, installed away from the walls.
Do it yourself or order it?
You can only make a brick chimney yourself or a structure from an insulated single-layer steel pipe. But laying smooth and beautiful walls of a brick pipe is more difficult than laying just a brick wall, and you must have the skills of an experienced mason. Single-layer pipes will have to be insulated; the quality of self-insulation is much worse than that of ready-made factory-made pipes.
You can independently install a chimney made of ceramics and sandwich pipes. It is impossible to manufacture elements of such chimneys on your own, but the industry produces many modules that allow you to assemble a pipeline of any design.
The question of whether to install a pipe yourself or hire a team of professionals is quite complicated. Installing a chimney is quite a complex job, and it is worth thinking about and carefully assessing your capabilities: is it possible to take prefabricated scaffolding or scaffolding of the appropriate height, will you have assistants, do you have the skills to install building structures, how do you react to height.
Manufacturing
It just so happens that even with any degree of availability of different models of fireplaces in the store, we are interested in the question of how to make a metal fireplace with our own hands. Moreover, this interest is driven not only by the desire to save money. Here you can realize all your ideas about the location, shape and decoration of a living hearth. After all the work done, relax into a soft chair and listen to the crackling of firewood in the firebox with a feeling of satisfaction.
Before you start constructing a metal fireplace with your own hands, you need to familiarize yourself with a number of aspects that will not only help improve the efficiency of its operation, but are also necessary to ensure the required level of fire safety.
- The walls of the fireplace body become very hot when wood burns. By the way, this fact should be taken into account when choosing a room for installation. Under no circumstances should this be done in children's bedrooms. Closely located surfaces must be insulated on all sides, this applies to walls and floors.
- The chimney, which ensures the removal of combustion products, must be led through the roof to the street, therefore, despite the mobility of the fireplace, you should carefully consider its location.
A homemade fireplace can be made from any material: copper, iron, steel, cast iron. As a rule, iron fireplaces are cheaper in cost, but are inferior in performance to copper or cast iron ones. The thickness of the metal for the main firebox should be 3-5 mm. Having prepared the required number of sheets, as well as the corners for making the frame, you can begin to act.
To make it easier to start constructing a metal fireplace with your own hands, you need to prepare the necessary drawings, according to which the sheets will be cut and assembled. There are ready-made designs for different types of fireplaces, but you can use your own artistic skills. Moreover, there are no special requirements for the design, so modeling and drawings are made taking into account the required geometric shapes and sizes.
You need to start assembling with the fireplace stand. It performs a dual function: on the one hand, the stand insulates the firebox from the floor at a decent distance, and on the other, it provides access to cold air, which is necessary for combustion and is a coolant. The stand will be a rectangular frame that needs to be welded from corners and legs, providing an elevation of 15-20 cm above the floor. The resulting frame is sewn up with a sheet of iron.
The body is made of metal sheets in the shape of a parallelepiped. At the top there is a hole for the chimney. On the front side, hinges are welded to the wall and the door is installed. All these manipulations require skills in working with a welding machine. If the original appearance does not have aesthetics, then you should not forget about surface finishing, with which you can veil all the flaws.
The firebox must be divided into two parts, but not a blank wall is used as a partition, but a valve capable of adjusting the gap between the sections.
- One part will serve for direct combustion of wood.
- The second is used as a smoke collector before it enters the chimney.
Building regulations
Chimneys are designed and installed in accordance with SP 60.13330.2012 “SNiP 41-01-2003. Heating, ventilation and air conditioning.”
Chimneys must meet the following requirements:
- The height from the mouth to the grate must be at least 5 meters.
- The internal channel should not have narrowed areas.
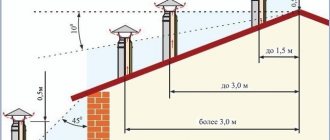
- The height above the flat roof is at least 0.5 m (preferably 1 m).
- Head height for pitched roof:
- At a distance of less than 1.5 m from the ridge (parapet) - no lower than 0.5 m from the ridge.
- If the distance to the ridge is from 1.5-3 m - not lower than the level of the ridge.
- If the distance to the ridge is more than 3 m, the height should not be below a line drawn from the ridge at an angle of 10° to the horizontal (down from the horizontal).
- When calculating, you should take into account not only the height of the ridge closest to the chimney, but also the height of the highest ridge of the building (or the highest part of the building).
- Pipes may have inclined sections at an angle of at least 30° to the vertical, with a horizontal pipe displacement of no more than 1 m. The cross-sectional area of inclined sections should not be less than the cross-sectional area of horizontal sections.
Fire safety requirements for chimneys
The distance between the outer surface of brick or any other chimneys (with insulation) and the structures of walls and roof slabs must be at least 130 mm. The distance from the structures to the wooden wall must be at least 260 mm.
If the chimney in the area of the roof overhang passes close to rafters, sheathing and other combustible materials, the passage must be insulated with non-combustible materials.
The chimney of solid fuel, wood and peat heating devices must necessarily have a mesh spark arrestor with a mesh size of no more than 5x5 mm if the roof is covered with flammable materials (bitumen tiles, roofing felt, ondulin) or leaves fall on it. When installing a chimney in a wooden house, be sure to install a spark arrester.
Traction and height
The height of the hog is the main parameter that determines the traction force.
Other factors affecting traction force:
- Sufficient insulation of the pipeline.
- Smoothness of the walls of the chimney channel.
- The thickness of the soot layer on the walls.
- The presence of a head or deflector (which does not interfere with the free exit of smoke).
- Air supply to the firebox.
- Closing the canal with valves, condensate or ice frozen at the mouth.
- Correctly selected internal cross-section.
How to choose a diameter
The diameter of the internal chimney channel must necessarily coincide with the diameter of the boiler outlet pipe (information from the heat generator’s passport).
In SP 7.13130.2013 “Heating, ventilation and air conditioning. Fire Safety Requirements" shows the cross-sectional dimensions of the internal channel depending on the power of the heat generator:
- Up to 3.6 kW – 140×140 mm (diameter not less than 158 mm).
- 3.5-5.2 kW – 140×200 mm (diameter not less than 189 mm).
- 5.2-7.0 kW – 140×270 mm (diameter not less than 219 mm).
Recommendations from professionals
To build a high-quality fireplace for heating rooms, you need to take into account certain features. The fire source must be installed in such a way as to minimize the likely risk of fire. There should be no flammable objects nearby; a fire extinguisher must be installed near the fireplace.
The following expert advice will help you build a fireplace correctly:
- The wall near the combustion chamber must be fireproof. Moreover, an additional layer of thermal insulation made of aluminum foil or other metal alloys is laid.
- The floor near the fireplace should be covered with non-combustible materials - metal, porcelain stoneware or stone. This will prevent fire caused by falling sparks.
- To protect the ceiling from elevated temperatures, partitions made of metal lathing and plasterboard are used.
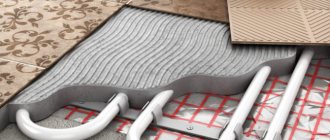
- For the installation of a smoke exhaust duct, it is recommended to use a two-layer material.
A fireplace cannot always heat a building completely, since the bulk of the thermal energy is lost through the chimney. In this case, the best design may be a fireplace stove, which makes it possible not only to heat the house, but also to cook food. To heat the house, you can connect a water heating circuit.
Rules and features of chimney installation
In real conditions, we usually purchase ready-made heating boilers that are made with sufficient quality and safety. The chimney is the most dangerous part of the heating system, because the health and even the life of household members depends on its operation. Therefore, it is necessary to strictly comply with all regulatory requirements for the installation of chimneys - this guarantees the safety of the house and your family.
If you plan to install a chimney yourself, then it is best to use a practical, lightweight and easy-to-install sandwich pipe made from ready-made, high-quality factory-made elements. Its only serious drawback is its high cost. But you can save money by carrying out the installation work yourself. Simple installation can guarantee you a device for the safe removal of flue gases from the heating unit.
The most important rules for installing chimneys:
- Correct selection of the internal diameter of sandwich pipes.
- Correct calculation of the chimney height.
- Compliance with standard distances from the pipe surface to walls and other structures.
- Sufficient insulation of the chimney duct.
- High-quality sealing.
- Reliable fastening to the wall.
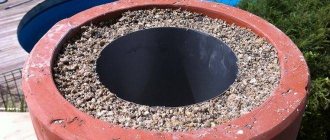
- Mandatory installation of a container to collect condensate.
- Assembling elements by condensate (or use recently introduced modules that are simultaneously assembled by smoke and condensate).
Insulation materials
For high-quality insulation, preference is given to materials with the following characteristics:
- Low thermal conductivity. This will allow you to maintain a certain temperature in the chimney;
- Environmental safety;
- Durability and resistance to external influences;
- Long service life.
Professional installation of a chimney will ensure high-quality operation of any heating unit, good ventilation, complete tightness and proper draft.
Do-it-yourself chimney installation
Installing chimneys with your own hands is quite possible if you comply with the requirements of the regulatory documentation set out above. Of course, this work is not for a beginner, but if you live in a private house, then, willy-nilly, you will have to learn repair and installation work.
Drawing and diagrams
Before starting installation and purchasing materials, it is necessary to draw a drawing or at least a diagram, carefully consider all the nuances and regulatory requirements for the arrangement of elements, and determine the quantity and composition of the necessary components.
Size calculation
The length of the pipe is calculated taking into account regulatory requirements and the height of the roof (see above), but it should not be less than 5 m. It should be borne in mind that the higher the chimney, the greater the thickness of the thermal insulation layer must be, otherwise the cooling of the exhaust gases will be lead to a decrease and even overturning of traction.
The diameter is taken in accordance with the heat generator's passport. If the diameter of the boiler outlet pipe is non-standard, then choose the nearest larger pipe diameter. When installing a homemade or brick pipe, the diameter must comply with the standards (see above).
Selecting a place to exit through the wall
There are different types of walls - front and side. The side wall is located on the side of the roof slopes and under the roof overhangs; water flows onto it from the roof (or gutters are located on it). There is a small overhang of the roof above the front; water from the roof does not fall on it.
The ideal option for a chimney exiting from sandwich pipes through a wall is through the front wall and in such a way that there are no windows, balconies or other obstacles that will have to go around vertically above. The option when the chimney is laid along the side wall is worse - you will have to carry the structures through the roof overhang and pile up a drainage system around it (water pouring onto the chimney from the roof slope reduces the life of the sandwich sleeve, especially galvanized ones, and can lead to wetting/freezing of the insulation, increasing thermal conductivity sandwich, decreased cravings; heating and even fire of the wall of the house). Any rounding of windows and other obstacles reduces traction in the hog. But sometimes you can step back from the wall, go around the roof overhang and not make a passage through the overhang structures:
This is not the best option for installing a sandwich.
Furnace piping
In rare cases, a room is heated by a stove due to convection currents. The very status of the device implies the most efficient use of released energy. Therefore, the heating system is supplied with a coolant, which can be water circulating through pipes or air moving under the influence of forced convection. Connecting the coolant channels to the furnace is called piping.
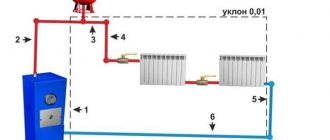
Some problems associated with the installation of a fireplace stove are concentrated in the incorrect installation of the main line. With water heating, circulation is provided by a pump or it is carried out due to natural convection. In the second case, it is important to maintain a certain slope of the line, since a reverse slope will lead to stagnation of liquid. In a closed heating system (case 1), the slope does not matter, but the system has strict requirements for tightness. Even a small amount of trapped air will stop circulation.
The water circuit with which the fireplace stove is equipped has an inlet and an outlet for connection to the main line. If they are not specifically marked, then you must remember that the hot water outlet is located below the cold water inlet.
Heating circuit connection diagram
Piping the air duct is not difficult, but laying the line under the panels or covering it with plasterboard is a labor-intensive process. A furnace that uses air as a coolant is equipped with a fan system that drives air through the main line. By adjusting the supply dampers, you can direct heat selectively to different rooms.
Good to know: Electric oven for making pizza at home
Step-by-step installation
The installation of pipes begins by marking the passage through the wall. A horizontal monopipe without insulation is always attached to the heat generator pipe - the temperature of the exhaust gases in this place is high, the insulation will simply sinter and deform the pipe. The length of the horizontal part should not exceed 1 m. Then the transition element is attached to the sandwich. During installation, the modules are simply inserted into one another. All joints of elements are tightened with special crimp clamps. Then they make a passage through the wall, install a tee (through which condensate flows freely into the container), attach an element with an inspection, an element with a container for collecting condensate, and a plug.
Hole device
Before bringing the chimney through the wall, drill a hole in the wall. For this purpose, powerful hammer drills with special nozzles of large diameters are used, which do not drill, but rather cut out a piece of the wall. You can cut a hole in wooden walls.
To prevent each installer from inventing components and elements for passing the chimney through the wall, the designers came up with a special passage unit. A special steel flange with a pipe or box inside the wall is installed on the wall - first the outer part, a pipe is passed through it, the distances are measured so that the pipe runs strictly horizontally and in the center of the pipe, the pipe is secured. Attach the outer flange and fill the space between the pipe and the wall with insulation. Then the inner flange is attached. The flange on the outside (and inside as well) is sealed around the perimeter with a heat-resistant sealant. Insulation with a sealant on the street side must also be waterproof - so that precipitation does not get into the gap and insulation, and does not cause the wall to soak and rot the wood.
The shape of the flange - round or square - is not of fundamental importance.
Wall mount
The chimney should be secured to the walls using standard clamps and brackets for fastening sandwich structures. The optimal distance between fasteners is at least 500 mm. The lower part of the pipe must be installed on a strong bracket mounted on the wall or on a stand.
If the chimney rises above the roof slope by more than 1 m, it is necessary to secure the structure with guy wires; if more than 1.5 m, it is necessary to provide additional fasteners - for example, a strong rod securely fixed to the wall. The pipe is attached to the rod using the same clamps. The sandwich pipe itself, assembled from thin steel modules, does not have the necessary rigidity and strength and can bend and even collapse in strong winds.
Sealing
The joints of the elements are sealed by applying a heat-resistant sealant to both mating surfaces. To seal joints, it is better to use silicate sealant - it can withstand temperatures up to 850°C and higher. To seal the flange and flashings, use silicone sealant that can withstand up to 250°C.
Frequent errors and problems during installation
The most serious mistakes when installing sandwich pipes are installation at a small distance from the wall, lack of insulation at the point where the sandwich pipe passes through the wall, and assembly of elements according to smoke. A chimney in the wall of a wooden house requires particularly careful insulation of the space between the pipe and the wall.
During installation, it is important to check that there is a sufficient amount of insulation at the pipe junction - loose insulation will lead to heating of the outer part of the pipe with all the dangerous consequences. The joints should not be located where the pipe passes through the wall and roof overhang.
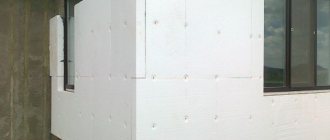
It is also important to securely and strictly vertically fasten the structure. Particular attention should be paid to the fastenings for the chimney to the wall if the wall surface is insulated with polystyrene foam or mineral wool - the dowels must be long enough and fit into the supporting structure (not into the plaster!) of the wall by at least 60 mm.
If the pipe passes through the side overhang of the roof, be sure to install a flashing so that precipitation from the slope does not fall on the sandwich (it can wet the insulation). On the front facade, it is also worth covering the place where the pipe passes through the protrusion of the roof covering with ebbs (although in this case the pipe often passes without touching the covering).
Direct path to fire.
Operating a fireplace in a wooden house
A fireplace is, first of all, a source of fire, so when using it it is important to minimize all possible fire risks.
Before use, make sure that there are no flammable objects such as curtains, books, etc. nearby.
Important! Houses equipped with fireplaces must have fire extinguishing equipment and fire extinguishers.
In addition, all residents of the house must have basic knowledge of the rules of behavior in case of fire and fire safety rules.
Expert advice
The chimney running outside the building should be collected using condensate. If you collect smoke, condensation can get inside the liner, wet the insulation - the pipe will be poorly insulated (the liquid conducts heat well), the outer liner will heat up, heat up the wall structures, which can lead to a fire. In addition, freezing of the liquid can lead to damage to the pipes, and the acid in the condensate can lead to faster burning of the stainless steel inner liner. At the same time, a small smoke leak in the open air is quite safe, but a large one is clearly visible and can be eliminated by additionally sealing the pipe joint with sealant.
Under no circumstances should you reduce the diameter of the chimney duct opening - this will lead to a decrease or stop of draft.
It is necessary to regularly (2 times a year) clean the chimney channel from soot, and the head from frozen condensate, ice and snow.
How to insulate
The sandwich pipe is already well insulated and does not require additional insulation. An exception is where the pipe passes through a wall or partition. For this purpose, different insulation materials are used, if possible fireproof. Glass wool with a low melting point cannot be used for chimneys; basalt wool cannot be used for coal boilers.
The place where the pipe passes through the wall (sometimes through the wooden structure of the roof overhang) must be insulated with basalt or ceramic wool, foamed vermiculite, or asbestos.
Do not think that asbestos is super harmful - the finished products do not generate dust or emit harmful substances, and the asbestos itself will be closed and isolated from the room with a flange.
Features of working with wooden walls
The peculiarity of wooden walls is their flammability. Therefore, installing a chimney in a wooden house is more difficult than in a stone one. When venting a chimney through a wooden wall, it is necessary to very strictly maintain the distance from the wall to the pipe (at least 260 mm) and perform high-quality thermal insulation of the passage through the wall. It is also important to pay attention to treating the walls with an antipyretic.
The installation of a chimney in a wooden house requires insulation of the wall surface near the outlet pipe of the heat generator and the first mounted monopipe. Insulation is carried out with non-combustible materials - plaster, tiles (porcelain stoneware), stone, fiber cement sheets, sheet metal with an asbestos sheet underneath.
Features of brick and concrete walls
Brick and concrete are resistant to fire - this is a big plus. But nevertheless, insulation in the place where the pipe passes is mandatory, the distance to the wall is at least 130 mm. The rules for installing chimneys were invented for the safety of people, and they should be followed in any case.
Facing
To give the fireplace a decent look and style, its firebox is lined with tiles or asbestos-based plaster.
When constructing fireplaces with a closed firebox, cladding is a necessary condition. For this, brick, tile, marble, wood and other materials are used.
Plastering the surface of fireplaces is often used.
This method is very common due to its accessibility and simplicity. Important!!! Plastering is carried out in two passes, the thickness of the final layer of plaster should not exceed 50 mm.
After drying, the plaster is covered with a layer of paint. Heat-resistant plasterboard or ceramic tiles are also used for cladding fireplaces.