Modern private houses are most often built taking into account the fact that even at the design stage they provide for the installation of a heated floor as the main or additional source of heating. In any case, the advantage of houses with heated floors is obvious - they are more comfortable and warm. It is important to understand that the underfloor heating system must first be calculated - this is especially true for the water system. The heated floor design allows you to foresee the power of the system, correctly arrange all the components, and calculate the amount of material. When developing a project, you will need to take into account many nuances: the area of the room and the estimated heat loss in it, the type of pipes, the material of the finishing coating and the method of installing the system itself, as well as much more, without which high-quality installation is impossible.
A properly designed underfloor heating project guarantees the durability and high-quality operation of the heating system
Where to begin
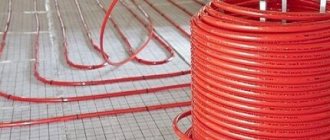
Among the variety of technologies for installing heated floors (electric, infrared and others), the water system is especially popular. It is durable and reliable, but without preliminary correct calculation there is a possibility of increased costs during installation and a decrease in the operational properties of the system.
Water heated floor
A water heating system project can be developed as one of the items in the design documentation for a house. You can also order it separately or do it yourself. Some companies specializing in the installation of water heated floors independently carry out a preliminary design of the system.
The project will be required even if you install a water heated floor yourself. This will allow you to purchase material and shaped elements in the required quantity, and perform the installation itself in a short time, without being distracted by calculations and alterations.
Layout and connection diagram in a private house
To draw up a project, you will need to have and record the following data:
- Floor plan of the building.
- Material of external walls and windows and doors.
- Desired indoor temperature.
- Information about where risers and outlets are located inside the building.
- Furniture arrangement plan.
Knowing the listed nuances of the room, they first perform a thermal calculation, and then begin to draw up an installation diagram.
Now there are several types of “warm floors” on the construction market. They differ in the type of coolant and operating efficiency. How to choose a heated floor? We'll tell you in our article.
Documentation
Before you begin installing the system, you must have a plan for the heating system and a list of necessary materials and equipment.
Warm floor plan
The plan structure includes the following data:
- About the location of heating devices.
- A diagram showing the location of the pipes, the distance between them, their diameter and the length of each straight section.
- Information about the required power of each radiator and their locations.
- Thermal calculation of a water heated floor system.
Conclusion:
Calculating and installing a warm water floor system yourself is a solvable task. It is recommended to start work at the very beginning of spring in order to have time to carry out all the work, test the system and correct possible errors during the warm period. In addition, it is easier to carry out concrete floor screed.
To make the work easier, it is recommended to purchase profile mats. It is much easier to install floor heating pipes on them, and in this case there is no need for reinforcing mesh - the pipes are securely fixed in the mat.
The main condition for successful work is the selection of quality materials.
Materials
During the design process of a water heated floor system, a list of materials is drawn up. Conventionally, they can be divided into components of the system itself and raw materials for creating the screed.
The main elements in a heating system with an additional heat source in the form of a heated floor
The components of a warm water floor are:
- A thermal boiler that heats the coolant in the absence of a central heating system.
- A pump built into the boiler or separately located for pumping water into the system.
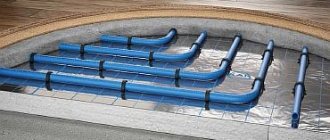
- Pipes for the movement of coolant.
- A collector is installed to distribute water through the pipes.
- The manifold is placed in a special cabinet, and you will also need to purchase splitters for distributing cold and hot, valves, fittings, and balls. It will also be necessary to provide for emergency drainage of water and removal of air from the pipes.
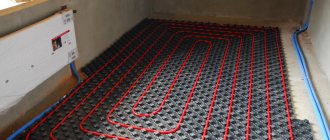
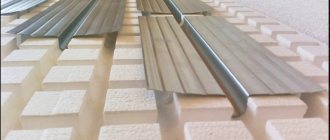
Pipe fastening methods
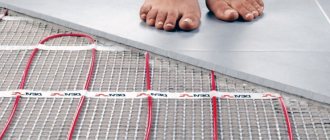
The list of materials depends on the method of installation of the system - wet (in a screed) or dry (using mats with bosses , for example).
The principle of connecting a heated floor
In the first case, a reflective layer and reinforced mesh are laid over the rough screed and the pipes are fixed. After this, a finishing screed is poured onto which the finishing floor covering will subsequently be laid.
Pipe laying can be done using mats with bosses and thermal plates that effectively reflect heat
In the second case, the pipes are fixed in a given position using special mats with bosses and thermoplates with a groove where the pipe is laid. This method is relevant for rooms with old or weak floors.
How to choose pipe length
One circuit (loop) can have a certain maximum length depending on the diameter of the pipe used. With a pipe diameter of 16 mm, the maximum circuit length is from 70 to 90 m; with a diameter of 17 mm, the circuit length varies from 90 to 100 m; if the pipe diameter is 20 mm, then one circuit can have a length of up to 120 m.
Calculation of the number of pipes taking into account the main criteria
The dependence of the loop length on the diameter is due to the fact that pipes of different diameters have different hydraulic resistance and thermal load. Less hydraulic resistance is observed in pipes with a larger diameter.
Calculation depending on the laying step
Note! In a small room, it is enough to mount one circuit that does not exceed the maximum permissible length values. But if the room is large, then it is better to install two circuits rather than exceed the recommended optimal pipe length.
It is also worth considering that in fact, when installing the system, it is necessary to use pipes of the diameter for which the calculation was made in the project. You can make calculations for pipes of different diameters and choose the appropriate option at this stage, and not later, choosing the appropriate material experimentally.
Calculation of contour lengths for various rooms
When laying several contours, it is necessary that their lengths coincide as much as possible. The length of the circuit is the length of the entire pipe, that is, it starts from the collector. It is clear that during the work it is not always possible to achieve the same length of the contours, but it is necessary to strive to ensure that the difference between the lengths does not exceed 10 m.
Recommendations from experts
The method of laying contours of the same length is influenced by the area of the room. Where it is smaller, when laying pipes between turns, a smaller step is provided. Alternatively, to heat a small room with minimal heat loss (hallway, bathroom), you can use the return pipe of an adjacent loop.
How to choose a pipe laying step
The distance between adjacent turns of pipes (pitch) is 15-30 cm. In this range, the values are multiples of 5, i.e. 15, 20, 25,30. For large rooms, such as gyms, the pitch can be 30 - 45 cm. Near a large window or external wall, the laying pitch is 10 cm. These areas are called edge zones.
Laying pipes in the edge zone (near the window)
The choice of pipe laying step is influenced by various factors: thermal load, purpose of the room, contour length, finished floor material and other nuances. Due to this:
- For edge zones, the optimal number of rows is 6, laying step: 10 -15 cm.
- For central zones: 20 – 30 cm.
- For bathrooms, the step is 10 - 15 cm, but you should be prepared for the fact that due to the need to bypass plumbing equipment, the step may not be the same.
- If the finishing coating has high thermal conductivity (tile or marble tiles, porcelain stoneware), then the distance between the turns is 20 cm.
Calculations of basic parameters for contours of different lengths
Note! In practice, it is not always possible to adhere to these recommendations. According to experienced craftsmen, the most optimal option is a step in the edge zone - 10 cm, in the center - 15 cm. These are the values at which the system will work.
How to choose pipe diameter
For residential premises, the area of which starts from 50 m², the best option would be pipes with a diameter of 16 mm. The height of the tie from the top point of the tube is 5 cm.
Pipe diameter characteristics
It is this diameter that makes it possible to comply with the conditions for laying pipes with a pitch of 15 - 20 cm. This applies even to houses with good thermal insulation, where the pipe laying pitch should not exceed 15 cm. For private houses, the specified parameters are optimal in terms of ease of installation, cost of materials and volume of coolant.
Performance properties of pipes for heated floors
Pipes with a diameter of 18 mm, due to their larger volume, lead to unnecessary costs, including related materials (fittings, etc.).
The advantages of pipes specially designed for underfloor heating are obvious
Accordingly, pipes with a diameter of 20 mm will require even more energy to heat the coolant. In addition, laying with a snake in increments of 15 cm is not realistic, due to the impossibility of bending a pipe of such diameter to the required radius. As a result, the laying step will be larger, there will be less heat in the room, and this with significantly increased coolant costs. Pipes of this diameter are used in public premises with a thick screed.
Properties affecting installation quality
Pipe material
Different pipe materials directly affect the correct operation of the system.
Table 1. Types of material
| Type of material | Positive traits | Flaws |
Copper | 1. The material conducts heat well. 2. Copper is highly resistant to corrosion. 3. The material has a long service life 4. Copper has a unique plasticity that allows pipes to be bent along a fairly small radius 5. The walls are characterized by high mechanical strength and high resistance to temperature changes. 6. An external polymer coating protects copper from negative external influences. | 1. Laying copper pipes requires skill in working with such material. 2. The need to use special equipment. 3. High cost of material. |
Stainless steel (corrugated pipes) | 1. Excellent flexibility. 2. Resistance to kink. 3. High mechanical resistance. 4. High resistance to temperature changes. 5. A wide range of high quality connecting elements that allow joining pipes in a long circuit. | High price. |
Polypropylene | 1. Easy installation. 2. Low cost. 3. Suitable for supplying coolant from the boiler to the collector. | 1. Low plasticity. 2. Short length. 3. When forming a contour, there are many welds, which are potential leakage points. 4. Low thermal conductivity. 5. High level of thermal expansion. |
Cross-linked polyethylene | 1. High strength of the material 2. Hermetic connection of circuits. 3. Possibility of creating a contour of any length. | Large bending radius. |
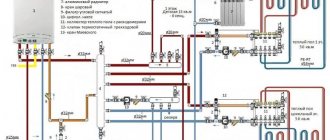
What should be the diameter of the pipes from the boiler to the collector?
The task is to connect one, two or more underfloor heating collectors.
Almost every underfloor heating collector has a 1-inch (25 mm) thread for connecting to the main line - it doesn’t matter whether it is internal or external.
There are manifolds with an inch and a quarter thread, but these are for large industrial or public institutions where a larger diameter pipe will be used, so you do NOT need to take such manifolds for a private home.
It makes no sense to initially narrow or “widen” the diameters of the main pipes (i.e., supplying coolant from the boiler), but it makes sense to take the same diameter as the collector inlet, i.e. 1 inch. For a polypropylene pipe, this is a diameter of 32 mm (this is the outer one, and the inner one is just 25 mm). For a metal-plastic pipe, this is a diameter of 26 mm. For copper – 28 mm. These are standard options for using pipes. But if there are doubts about the number of circuits, then you can increase the diameter of the main pipes by one size (40, 32 and 32 mm for polypropylene, metal-plastic and copper pipes, respectively; an adapter is required to go by 1 inch).
Pipes made of cross-linked polyethylene (PEX) have the same dimensions as metal-plastic pipes in terms of wall thickness and diameters.
What else will need to be taken into account in the process of designing a heated floor?
In the process of developing a project for a heated floor system, it is recommended to make a schematic drawing indicating the laying of pipes, main dimensions, distances and indentations, and furniture placement.
Collector group
You should also select the final coating material. To do this, you can read our article . In it we will consider the most suitable finishing coatings.
At the design stage, the type of coolant is determined: in 70% of cases water is used, since it is the most accessible and cheapest substance. Its only drawback is its reaction to temperature changes, which result in a change in the physical properties of water.
Floor pie with pipes in screed
Antifreeze based on ethylene glycol or propylene glycol with special additives that reduce the chemical and physical activity of liquids is often used as a coolant for underfloor heating. In any case, the type of coolant must be taken into account at the design stage, since its properties form the basis for hydraulic calculations.
Antifreeze as a coolant
You will also need to take into account the following nuances:
- One circuit is installed per room.
- To place the collector, choose the center of the house. If this is not possible, then to regulate the uniformity of coolant flow through circuits of different lengths, flow meters are used, which are installed on the collector.
- The number of circuits connected to one collector depends on their length. So, with a circuit length of 90 m or more, no more than 9 circuits can be connected to one collector, and with a circuit length of 60 - 80 m - up to 11 loops.
- If there are several collectors, each has its own pump.
- When choosing a mixing unit (mixing module), it is important to take into account the length of the circuit pipe.
- A more accurate calculation would be based not only on data on heat loss in the room, but also on information on heat influx from household equipment and equipment, from the ceiling, if a heated floor is also installed on the upper floor. This is relevant when calculating for a multi-storey building, which is built from the upper floors to the lower ones.
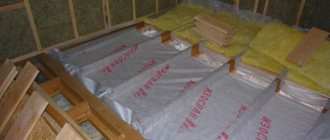
- For the first and ground floors, the insulation thickness is taken to be at least 5 cm, for higher floors - at least 3 cm. Insulation on the second floor is used to eliminate heat loss through the concrete base.
- If the pressure loss in the circuit exceeds 15 kPa, and the optimal value is 13 kPa, it is necessary to change the coolant flow towards a decrease. You can lay several smaller contours in the room.
- The minimum permissible coolant flow rate in one loop is 28-30 l/hour. If this value is higher, then the loops are combined. Low coolant flow leads to the fact that it cools down without passing the entire length of the circuit, which indicates the inoperability of the system. To fix the minimum value of coolant flow in each loop, use a flow meter (control valve) installed on the manifold.
Connecting pipes to the collector
Finish coating
It is laid on a dried concrete screed after the system has been fully tested for functionality. When choosing a material for a finishing coating, it is important to focus not only on taste, but on the labeling of the product - there should be a symbol on the packaging stating that the material can be combined with heating coatings.
If the room has a high level of humidity, it is optimal to choose any type of floor tiles. Ceramic has proven itself best.
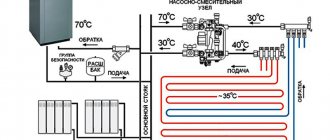
The role of a water floor as a main or additional source of heat
A warm floor in a room as a heating system can perform an additional or primary function. As an additional system, underfloor heating affects the comfort of the flooring surface. In this case, the main source of heat is traditional heating radiators. To maintain the coolant temperature, the thermostatic regulation principle is used.
Combined heating system
Controlling the heating level of the coolant allows you to compensate for heat losses in the room and protect it from temperature changes outside, when the water floor is the main source of heat. The warmer it is outside, the lower the coolant temperature should be and vice versa.
In fact, a heated floor is a low-temperature type of heating system and, theoretically, the required coolant temperature can be obtained by setting the boiler to minimum heating. However, a conventional boiler set to a low temperature range is characterized by a sharp decrease in efficiency and from the economic side such a system becomes unprofitable.
Mixing unit
In this regard, there are other ways. For example, the use of a modern heat generator that supplies coolant heated to +30 - 50 degrees. When such a boiler is equipped with a circulation pump, each circuit has a coolant of the same temperature, due to which the most economically efficient process of heating a house with a “warm floor” system is carried out.
Three way mixing valve
If the boiler is not equipped with a low-temperature operation function, then a three-way mixing valve can be used, and the required temperature can be obtained by equipping the mixing unit with a thermostat.
Note! When installing a combined floor covering, for example, wood and ceramic tiles, a separate circuit is laid under each material, since each material differs in thermal conductivity. The water in the circuits will have different temperatures to create uniform heating of the room with such a floor.
It is also worth considering that some types of finishing materials are not suitable for water floors and can be installed in tandem with film or cable electric heating systems.
Infrared film for heated floors
What affects the operation of a warm water floor?
How to ensure that a warm floor really is warm and creates a comfortable temperature for the floor covering. Often, due to the large length of the circuit, a high value of hydraulic resistance is observed.
For correct operation of the system in a house with several floors, a separate low-power pump is installed on each level or one high-power pump is connected to the collector.
Pump group
When choosing a pump, take into account the calculated data, coolant volume and pressure. However, it is worth remembering that to determine the level of hydraulic resistance, it is not enough to know the length of the pipe. You will need to take into account the diameter of the pipes, valves, splitters, laying pattern and main bends. More accurate calculations are obtained by using a special computer program into which the main indicators are entered.
As an alternative, it is possible to use standard equipment that has already known technical characteristics. By maneuvering its parameters, the hydraulics of the system are adjusted to the characteristics of the pump.
Manifold with installed pump
Heat distribution: features
Since the area of the rooms in the house varies, the circuits also have different lengths, so it is necessary to ensure the same hydraulic pressure in all areas of the system. It should be taken into account that the pump is a constant value.
Distribution of heat from different sources
Supplying the same volume of water to circuits of each length leads to the fact that the coolant in the longer one cools down faster and at the outlet its temperature will differ from the coolant with a shorter profile. As a result, the floor surface will warm up unevenly - somewhere there will be overheating, and somewhere, on the contrary, the coating will be cold.
The advantage of using heated floors
Due to the high hydraulic resistance, the coolant may not flow into a long circuit at all, since it will move into shorter circuits with less resistance. To prevent this from happening, the system is equipped with a distribution manifold, which allows maintaining a balance of supply and uniform heating of the coolant in each loop.
Using qualified assistance to draft a project
Many people underestimate such things due to lack of funds/desire/experience/time. Professionals offer each client:
- creating a plan taking into account all needs;
- implementation of invested resources by 100%;
- consideration of all prices, from small expenses to the total estimate;
- implementation of a turnkey underfloor heating project;
- quality results supported by experience/knowledge/scientific data/proven methods;
- guarantee of effective heating if all instructions are followed.
We recommend: How does radiant floor heating work?
All this seems unreal until you have to fully face it. But at the time of reading this article, a person has already appreciated some of the benefits of such information. In large cities, trusting unverified companies is very dangerous.
Which is why it’s better to play it safe once again to achieve your plans. Especially if it is your own comfort and safety.
- Related Posts
- How is a heated floor connected?
- How is carbon heated flooring installed?
- How to install electric heated floors under tiles?
- How to connect a warm floor?
- How to lay polystyrene foam for heated floors?
- How does the underfloor heating calculator work?
How to calculate the number of pipes
At the design stage, after all the calculations have been made, you can understand how many pipes in linear meters may be required. This will allow you to estimate the cost of the material.
Main stages of installation
So, with a room area of 12 m², the air temperature should correspond to + 20 degrees. The width of the edge sections along the walls with furniture should be 30 cm. If one wall has a length of 6 m, and the other two are 2 m, then the working area of the system can be calculated using the following formula: 12 – 0.3*(6+2+2) = 9 m².
Note! The laying pitch and diameter of the pipes depend on the level of heat loss. The smaller they are, the larger or smaller the pitch of the pipes.
When determining heat loss in a room, the glazing area, the characteristics of the insulation used in the enclosing structures, and the height of the room are taken into account. The resulting value varies from 20 to 300 W/m² depending on the thermal efficiency of the structures and double-glazed windows used, the thickness of the walls and the number of openings.
Warm floors are a serious cost item during renovation, so it is important to accurately calculate how much and what materials will be needed. To ease your labor costs, we have prepared special instructions telling you how to calculate a heated floor - water or electric. Online calculators included. And in the article “What is needed for a heated floor?” you will find a complete list of everything that may be needed during installation.
Popular pipe laying schemes and their features
The main layouts for laying pipes with coolant include “snake” and “spiral”, and other installation options based on them are also often used, for example, “snake” without edge zones.
Common installation methods
“Snake” is a convenient option that can be easily installed in a small room, however, heating of the pipes in this case occurs unevenly. Therefore, pipes are laid along the wall, characterized by large heat losses, which are located closer to the collector (at the beginning) and are better heated.
The pipe laying step according to this scheme should not be more than 30 cm, otherwise the floor covering will have an uneven temperature - heat will be felt above the pipes, and cold between them. The distance between the outer pipes is 20 cm or less.
“Snake” and “spiral” are the optimal ways to form a contour
Note! To ensure that when laying pipes according to the “snake” pattern, the heating of the floor surface is uniform, a second (reverse) snake is laid.
The “spiral” scheme is distinguished by a laying method in which the supply and return pipes are placed parallel to each other. Due to this, the issue of uneven heating of the floor is resolved, and the temperature above both pipes is approximately equal.
Laying options
The spiral type of installation is most relevant for large rooms, with the distance between pipes being 20 cm.
Calculation method
- We calculate the average coolant temperature using the formula
- We calculate the thermal resistance of materials above the pipes
- We calculate the thermal resistance of materials under the coil
- We calculate the angle between the surface of the flooring and the plane of maximum thermal resistance
- Set the pipeline laying step
- We calculate the maximum thermal resistance of the screed layers (above the coil)
- We calculate the ratio of heat flows above and below the pipeline
- We calculate the power of the heat flow directed upward
- We calculate the power of the heat flow directed downwards
- We calculate the total power of heat flows
- We calculate the heat flow per 1 m of water TP
- We calculate the maximum temperature of the TP
- We calculate the minimum temperature of the TP
- We calculate the average temperature indicator of the heated floor, which should be less than or equal to the standards defined by SP 60.13330.2012 clause 6.4.8
A similar technique is included in some programs for calculating heated floors, distributed on a paid basis.
Installation of heated floors: features
One of the design stages includes the creation of an installation diagram, which will subsequently need to be followed when performing work directly on site.
Floor pie with pipes inside the screed - optimal thickness
The installation diagram should reflect the following points:
- Plan for dividing the base surface into several sections. This stage cannot be ignored when pouring screed over a large area, since thermal expansion in this case leads to its destruction. Dividing into separate sections allows you to form expansion joints between them. In this case, one area should not exceed 40 m², and premises of L and U-shaped configurations are divided into sections regardless of their area.
The principle of laying on mats
- The installation diagram must contain a reference to the presence of expansion joints, which are filled with damper tape, elements made of extruded polystyrene foam or polyethylene foam. Inside the seam, the pipes are placed in a casing, for example a corrugation.
- The project indicates the way in which the pipes will be laid - this will allow you to purchase the necessary material in a certain quantity. They also reflect the method of screed construction - wet, semi-dry or dry.
- The temperature of the pipes is calculated - this will help determine the finishing flooring material, the manufacturer of which indicates the compatibility of the material with the “warm floor” system and its permissible heating. So, parquet can be heated up to 25 degrees - no more.
The principle of laying in a screed
Prices for heated floors Caleo
heated floors Caleo