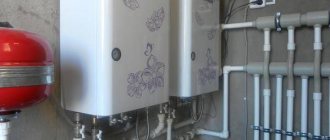
Gas boilers are often used to heat houses - convenient and quite economical appliances that run on blue fuel. The correct functioning of these devices is ensured by a number of devices that monitor the operating mode.
Timely adjustment of the gas boiler automation allows you to increase the efficiency of the heating device, as well as ensure reliability and safety in operation. And this, you see, is a rather important point for all users.
But how to make the adjustment and is it possible to do it on your own? Let's try to figure out these issues together. For this purpose, let’s take a closer look at the design and operating principle of the automation using the example of one of the most popular models.
We will also pay attention to the issues of setting up the equipment and the main problems that the user may encounter in the process of setting up and further operating the gas boiler.
Setting up boiler and pressure automation
The automation needs to be specially configured if it starts to operate randomly. This problem is also called clocking. The reason is often the high temperature of the coolant.
There is a backup method - remove the tap in front of the device. But you need to understand that when fuel does not burn completely, more harmful substances are released.
It is better to adjust the temperature of the gas boiler. To do this, you need to move the thermostat to a cool place, if possible, or reduce the temperature where it is. And also make more coolant. You can also replace the burner if the issue arises due to its high power.
The most common reasons for interpretation:
- The tension has changed.
- The wind extinguished the burner.
- Problems with pipe patency.
- The pressure dropped.
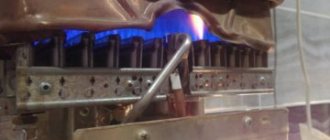
In order to improve the operation of a gas boiler, you can configure the automation as follows. Turn the knob to "Spark". The burner will light. Next, leave it on “Iskra” for another half a minute, then turn it to “Off.”
Boilers are manufactured with regulators that can be used to set the time in the program for a period of 24 hours or for a whole week. When the equipment heats up to tedious degrees, it turns off on its own.
To adjust the pressure in the gas boiler, use the automatic block. The boiler keeps the temperature at a level and shuts off the gas when danger arises.
Some models have a knob that you can turn and select one of seven modes. You need to select the first one, remove the cover and tighten the screw under the handle on the left side. It is better to turn the handle clockwise so that the feed is gradual.
You can also set the maximum. Set the knob to the seventh mode and tighten the screw at the bottom of the equipment. And now turn counterclockwise. As soon as the flame becomes less intense, the pressure will drop.
On the automatic unit, it is correct to understand the sides when setting up a gas boiler. Where the handle is, let it be on the side. Or, depending on how the boiler was installed, this may be the top. Be careful and check the screws.
The pressure needs to be reduced if:
- The flame lights up but quickly goes out.
- You hear a popping noise during ignition.
- The flames extend beyond the designated area.
- The fire is red or red-orange.
Typically, blood pressure becomes high during cold weather. Gas companies increase it to 280 mm. Install a pressure regulator or reduce the flow by lowering it manually.
To begin with, you need a reasonable choice of power
Attempts to optimize the operation of the heating system will be completely pointless if the rated power of the boiler is far from the required one. Moreover, it doesn’t matter which way.
- With a clear lack of power from the heating unit, with the onset of cold weather in some rooms, or even in the entire house at once, it will be clearly cool, to say the least. Moreover, it is impossible to eliminate this drawback with any settings - “you can’t jump over your head.” All that remains is to rely on additional electric heaters and plan to replace the boiler with a more powerful one in the foreseeable future.
- With an overly powerful boiler, it would seem that the owners have a trump card on their hands - a solid operational reserve! But this is only at first glance …
The problem is that thermal equipment is mainly designed and calculated for power close to the upper limit of the rating range. It is under such conditions that the boiler will show all the advantages inherent in it by the designers. A reduction in power is possible (this is what the range is indicated for), but this is inevitably accompanied by a decrease in efficiency.
Range of total (Q) and useful (P) boiler power. Please note that the minimum and not the maximum, but the nominal limits are shown. That is, the optimal mode with maximum efficiency is to operate the boiler at the highest power levels.
By the way, indicate the decrease in efficiency with a decrease in power in the passport or on the product nameplate. This information is usually only available in the service instructions.
For example, the instructions for the “Protherm Gepard 23 MTV” boiler directly state that with a rated power of 23.3 kW, the efficiency indicator (η) reaches 93.2%. And if the equipment operates at the lower end of the power range (8.5 kW), then the efficiency drops to 79.4%. That is, in reality, it turns out that when operating in low power mode there is a significant loss of performance - a considerable part (more than 20%!) of the expended energy simply burns out, without bringing any benefit to the consumer.
I don’t even want to think about the efficiency value if the real demand of the heating system is less than the lower limit of the power range... However, such “curiosities” do occur.
And to avoid them, it is necessary to purchase a boiler with power indicators that are adequate to the real needs of the existing or planned heating system. That is, to carry out preliminary calculations.
For such calculations, a ratio is often proposed: 100 W per square meter of heated area. However, this “algorithm” does not take into account the specific climate of the region of residence and the location of the building on the ground, nor the characteristics of the house itself and each of its premises. And therefore, a considerable mistake in one direction or another is likely.
Expert opinion: Afanasyev E.V.
Chief editor of the Stroyday.ru project. Engineer.
Therefore, let me offer you another solution to begin with - a special calculator for determining the required thermal power. It evaluates each room of the house, taking into account many criteria. The sum of all heated rooms will give a very accurate idea of the total thermal power of the system. In addition, the obtained value for the room will allow you to correctly select heat exchange devices for it - radiators, convectors, etc.
Below is an explanation of the calculation procedure.
Calculator for calculating the thermal power of a heating system
Go to calculations
Explanations for calculations
We repeat - the calculation is carried out for each of the premises of the house or apartment individually. The sum will give the total heating power requirement.
To simplify your task and save the results obtained for the future, you can, armed with a plan of your property, draw up a plate in which you can indicate, line by line, all heated premises. And then determine according to the plan and write down all the necessary data for each of the rooms. This will be, perhaps, the most difficult part of the calculations, since the calculator will take care of the rest.
On a copy of the plan, you can indicate the directions of the cardinal points (here the wide blue arrow shows the North) and, if information is available, the predominant direction of cold winter winds (“wind rose” for the winter).
An example of a sign is shown below - it is not tied to the plan taken solely as an example, just as a proposed design option. And now we will briefly go through the requested data.
| Name of the room, its area, ceiling height. Insulation of the floor, which is located above and below | The number of external walls, their orientation to the cardinal points and relative to the winter “wind rose”. Quality of wall insulation. | Number, type and size of windows | The presence of doors to the street or to an unheated room | Required thermal power |
| 1. Hallway. 3.18 m². Ceiling 2.8 m. Floor laid on the ground. Above is an insulated attic. | One, South. Average degree of insulation. Leeward side | No | One | 0.52 kW |
| 2. Hall. 6.2 m². Ceiling 2.9 m. Insulated floor on the ground. Above is an insulated attic | No | No | No | 0.62 kW |
| 3. Kitchen-dining room. 14.9 m². Ceiling 2.9 m. Well-insulated floor on the ground. Upstairs is an insulated attic. | Two. South, west. Average degree of insulation. Leeward side | Two, single-chamber double-glazed windows, 1200 × 900 mm | No | 2.22 kW |
| 4. Children's room. 18.3 m². Ceiling 2.8 m. Well-insulated floor on the ground. Above is an insulated attic | Two, North - West. Full insulation. Windward | Two, double-glazed windows, 1400 × 1000 mm | No | 2.6 kW |
| 5. Bedroom. 13.8 m². Ceiling 2.8 m. Well-insulated floor on the ground. Above is an insulated attic | Two, North, East. Full insulation. Windward side | Single, double-glazed window, 1400 × 1000 mm | No | 1.73 kW |
| 6. Living room. 18.0 m². Ceiling 2.8 m. Well-insulated floor. Above is an insulated attic | Two, East, South. Full insulation. Parallel to the wind direction | Four, double-glazed window, 1500 × 1200 mm | No | 2.59 kW |
| 7. Combined bathroom. 4.12 m². Ceiling 2.8 m. Well-insulated floor. Above is an insulated attic. | One, North. Full insulation. Windward side | One. Wooden frame with double glazing. 400 × 500 mm | No | 0.59 kW |
| TOTAL: | ||||
| Area 78.5 m² | 10.87 kW ≈ 11 kW |
So, for the calculations you will need to clarify and indicate the following data in the calculator for each of the premises:
- What temperature is typical for the region in the coldest decade of winter. It is clear that this indicator will be the same for calculating all rooms - it simply characterizes the climatic features of the area. So there is no point in putting it in the table - you can specify it during the first calculation, and then simply not change it.
Important - this should be a minimum, but normal temperature for your region.
- The area of the room and the height of the ceilings - there is nothing to explain here.
- The number of external walls, that is, the reverse side in contact with the street or a cold unheated room.
- The side of the world towards which the outer wall faces. The idea is that walls in the South or South-West can receive a “solar charge”, unlike their “antipodes” in the North and North-East, which never see the Sun.
- If the direction of the prevailing cold winds in winter is known, then this factor can also be taken into account. If there is no such inflation, leave it at default, but then the calculation will proceed as for the most unfavorable, quickly cooling windward side.
- When assessing the degree of wall insulation, one should proceed from the fact that the thermal insulation that is completed on the basis of thermal engineering calculations is considered complete. If there is no such confidence, then it is better to leave the medium level - this approximately corresponds to brickwork of two bricks (approximately 500 mm) or a log house with a wall thickness of at least 200 mm. Well, the walls of a residential building should not be uninsulated - you will simply go broke on heating!
- Next, you have to choose from the proposed lists the option of insulating the floor or adjacent to the rooms above and below.
- An entire block of fields is dedicated to windows. You have to indicate their quantity and quality - choose from the list of proposed options. In addition, the calculator asks for size. The glazing area is automatically calculated and compared with the area of the room, on the basis of which a correction factor is introduced into the calculation.
- Finally, the number of doors leading from the room to the street or to a cold (unheated) room is indicated. This is understandable: each opening of the door means an influx of a considerable volume of cold air, which requires a certain compensation.
After that, press the calculation button - and the result for a specific room is ready. There is no need to add anything to it - the operational reserve is already included in the fact that the calculation was carried out for the most unfavorable conditions.
The total value for all rooms of a house or apartment is a guideline for purchasing a heating boiler. For example, in the table above it turned out to be 10.87 kW. They select a model that, of course, has slightly more power, but best of all is the closest one in the direction of increase. That is, in this example, let’s say, choosing a boiler with a capacity of 11.6 kW would be appropriate.
* * * * * * *
What to do if, for some reason, a boiler with too much power has already been installed, and its replacement is not planned for the foreseeable future. Is it possible to optimize the operation of the heating system?
It turns out, yes, many modern models allow you to make adjustments, those that, if they do not bring the boiler to the optimal mode, will at least bring it to a level as close as possible to the nominal values.
Preparatory stage
You need to set up a single-circuit or double-circuit gas boiler after:
- Montage.
- Setting fire.
- Long break.
After the equipment is installed, it is necessary to test the sensors, fuse, and components. In this case, the initial connection is performed by employees of the company with which you have a maintenance contract.
Five steps for installing and setting up an Ariston gas boiler:
- Heat the boiler.
- Open the gate.
- Adjust the heat to maximum power.
- At the same time, turn the valve until the yellow flames are removed.
- Test all positions and automation.
The steps will also apply to equipment from other manufacturers.
Don’t forget that a floor-standing gas boiler not only needs to be adjusted, but also cleaned. Especially if you don’t use it for a while, insects appear in the chimney.
Inspect the pipe and fan and take care of them. Including removing carbon deposits, ice, and soot as a combustion product, otherwise there will be problems with ignition.
It doesn’t hurt to remove debris from the insulator where the wiring leading to the combustion chamber is located. Can be cleaned with a soft cloth. If there is already a lot of debris, a solvent will help. And before starting the boiler again, wait until the insulator dries.
After setting up a wall-mounted gas boiler, clean the heat exchanger from scale. If you notice that the equipment has become poorly heated, flush its circuit. Pour in hot water along with descaling agent. Finally, test how the flow sensor works. Fine? The boiler can be used.
Check before first start
If the equipment is new, then there is no need to check the deposits on combustion products; it is advisable to inspect the ventilation and remove excess debris from the chimney pipe. In these elements, I often noticed the accumulation of various insects, both small and large individuals, they can affect the productivity of the unit.
Open the chimney damper to the limit and check the draft. If you carry out the manipulations as carefully as possible, problems should not arise. But it is better to do all the work sequentially and devote the required amount of time to each moment, do all the work carefully and scrupulously, because safety directly depends on this.
How to adjust draft in a gas boiler?
After setting up a gas boiler from Bosch or another manufacturer, the draft may weaken. It is sometimes necessary to check it both in the equipment itself and in the pipe. Look through the window, clear the paths of soot. Weather can also affect traction.
The deflector helps improve traction. It artificially lowers blood pressure. Or you can buy a fan, weather vane.
The gate is installed when the thrust, on the contrary, is too strong. And then the chimney cools down, becoming covered with condensation from the inside. The pipe becomes clogged with soot or ice.
But you just need to remember to turn the draft regulator once every few days so that the equipment does not deteriorate, otherwise you won’t be able to change the position later.
If you are setting up a Navien or other gas boiler and choosing a damper, then take into account the length and height of the pipe. The diameter of the regulator must be smaller than the diameter of the pipe.
There are mechanical regulators. They are suitable for solid fuel equipment. But the craftsmen also use gas ones.
Instructions for setting up the damper for a gas boiler:
- Empty the boiler.
- Remove the coolant (if the heating cannot be turned off using taps).
- Place a gate valve in place of the plug.
- Return the coolant.
- Light the burners.
- Set the degrees.
If you cannot understand the degrees on the regulator, then look at the flywheel. In summer, you can choose to set it closer to average. And in winter it’s closer to high levels. And before choosing a temperature when setting up a Visman or other gas boiler, test all modes.
Install Thermostat
Installing a thermostat for a heating boiler means increasing the efficiency of gas equipment by approximately 20-30%, maximizing operating accuracy and simplifying maintenance. Today, standard thermostats for a heating system are represented by a special temperature-sensitive sensor, a setting unit, a control module, a mechanical valve or an electromagnetic relay. The choice of model is determined by:
- typical characteristics of the boiler;
- wiring diagram of the heating system used;
- availability of free space and sufficient functionality.
Using the manual control unit, you can set the desired temperature mode, so at the required parameters, a sensor is triggered, turning off the equipment or closing the shut-off valve in the heating pipeline system. A decrease in air temperature causes the equipment to turn on normally.
Modern modules with electronic control are designed to use not just one temperature indicator, but several at once, depending on the time of day or day of the week. An undeniable advantage of such units is the ability to install an additional outdoor temperature sensor linked to the operation of the thermostat.
Setting up the ignition device in a gas boiler
To set up the ignition device of a Baxi or other gas boiler, you will need a set of tools:
- Pliers.
- Screwdriver.
- Keys.
- Multimeter.
- Alcohol.
Procedure:
- Remove the terminals, short and tighten with pliers.
- Turn on the pilot burner.
- Find out the resistance using a multimeter.
- Not 1-2 Ohms? Get a new meter.
- Norm? Clean the sensor with cotton wool and alcohol.
- Put everything as it was. Check if the ignition device is working.
If these steps do not help set up the gas boiler, you need to contact the thermocouple breaker:
- Remove the terminals.
- Look at the resistance.
- Not 3 Ohms? Take the keys.
- Remove the nut on the breaker and pair.
- Unscrew the breaker (about half a circle).
- Take the insert where the contacts are and remove the breaker.
- Connect valve and pair.
- Make sure the ignition is in order.
If you can’t turn it on, it’s a problem with the pair.
And then you need to remove the fastening between the first burner and the pair, check the strength with a voltmeter. If the pair is working properly, then use alcohol to treat the contacts with the breaker.
How to supply gas when setting up a gas boiler:
- The flame lights up but quickly goes out.
- You hear a popping noise during ignition.
- The flames extend beyond the designated area.
- The fire is red or red-orange.
The fire can pass to the main burner if there is one on the pilot burner. The flame may not be supplied if the draft is weak or absent at all. When the system is automated, the user is better able to supply gas safely.
Other ways to optimize fuel consumption
Perhaps, if you are faced with high gas consumption, you do not need to reduce the boiler power. Measures should be taken to optimize the operation of the boiler.
The thermal energy created during the combustion of gas in a heating boiler is additionally consumed by the equipment in order to compensate for heat losses. Optimizing fuel costs will be especially relevant in winter, when the ambient temperature is sharply negative.
In order to reduce heating costs, it is necessary to provide an integrated approach to the issue of preparing premises, including insulation, replacement of windows and doors, and elimination of cold bridges. Among other things, it is mandatory to check the performance of all gas equipment in use and make adjustments to the mode of their normal operation.
Strapping scheme
A solid fuel unit is usually connected to a boiler that runs on a different type of fuel. This is usually an electrical unit.
An electric one is installed parallel to the solid fuel stove. This is the so-called auxiliary element. Its role is as follows: if, for example, the owners are not in the house for a long time, and the solid fuel boiler has run out of fuel, then the auxiliary element, in this case, the electric unit, automatically comes into working condition. It maintains positive temperatures. More on how it all works.
First, the coolant under pressure from the circulation pump is supplied to the boiler, passing through which it heats up. Next, the coolant enters the radiator, where movement follows the principle of natural circulation. Then it enters a special boiler, inside of which there is a coil that is immersed in water. The coolant, passing through the coil, heats it, as a result of which the water heats up. Thus, the residents of the house are provided with hot water.
After the boiler, the coolant again enters the radiators and underfloor heating coils. But before that, he must pass a special crane. If the temperature of the coolant corresponds to the established norm, then the tap opens and the coolant circulates through the floor coils, and if the temperature is higher than normal, the tap closes.
The optimal solution is a heat accumulator
Sometimes the tips listed may not work: the user is interested in a narrow temperature range, the temperature sensor is built-in, and the minimum boiler power exceeds the required by four times. It would seem that timing cannot be avoided. In this case, it is worth moving from fine adjustments to making design changes to the heating system.
The essence of the problem is the heating and cooling of the coolant too quickly. This is observed due to a combination of two or three factors:
- Spacious room
- Powerful boiler
- Not enough coolant
The first two cannot be fixed, but these are secondary problems. Low coolant content in the network is a key drawback causing clocking. It’s easy to get rid of it - just introduce new elements into the heating.
A heat accumulator is a sealed tank with water or other coolant with a volume of 100 liters or more. It is installed directly at the outlet of the heater, connecting it to the rest of the pipe system.
The result is the following process:
- When turned on, the boiler warms itself up.
- The battery stores heat over a significant period of time.
- The rest of the heating system warms up.
- The automation turns off the boiler.
- The battery distributes heat over a significant period of time, maintaining a constant temperature.
- The cycle repeats.
Of course, the battery increases inertia - therefore it is recommended to connect it parallel to the main pipe, with the possibility of excluding it from the system. Thus, the clocking problem is solved comprehensively and is unlikely to return again.
Changing the hot water temperature
In order to adjust the water supply to optimal levels, it is necessary to reduce the burner power. The procedure will be as follows:
- you need to open the mixer to switch the boiler to hot water supply mode;
- set the temperature to 55°C;
- go to the service menu in the same way as described for Proterm;
- select parameter d.53 and click Mode;
- then in the line you will see the maximum power.
If you immediately select the minimum value of 90, the temperature of the water from the tap will not be very comfortable. We set 80 and get a degree increase. Increase the values little by little until you are satisfied with the DHW supply.
Estimated cost
Different manufacturers have different prices and characteristics of automation devices.
Among domestic manufacturers, there are two companies that are quite popular in the market:
- Start. The automation of this company operates on an ATOS unit. Power reaches 40 kW. The cost of the unit is 6,000 rubles, and the cost of the temperature controller is 2,500 rubles.
- Virbel. The automation from this company costs a little less – 2,500 rubles.
Strange as it may sound, in our age of scientific and technological progress, solid fuel boilers still remain in demand and are even considered practically the most common heating devices. And if there is demand, then there will be offers - not only for the boilers themselves, but also for various devices designed to optimize their operation. One of such devices is automation for solid fuel boilers, which allows you to very effectively control the operation of the boiler, simplify its maintenance and operation. We will talk about how it works and on what principle it works in this article - in addition, together with the website stroisovety.org we will talk about how to independently automate the operation of a boiler that burns solid fuel.
Automation kit for solid fuel boilers photo
Insulation of the house
Proper insulation of premises reduces operating costs for gas heating while maintaining a given temperature regime. An important indicator of the economic feasibility of thermal insulation characteristics is the payback period of the insulation system used.
Thermal insulation of a house is a very broad concept that includes a set of works to improve the thermal insulation characteristics of any building surfaces, represented by walls, floors and ceilings. Various types of materials and technologies are used in thermal insulation measures.
Insulation of the house is carried out in stages, taking into account the material used to construct the walls, floor and ceiling, as well as the type of windows and doors installed. Proper implementation of thermal insulation ensures not only the comfort of year-round living, but also significant savings in gas consumption, which is especially important in the context of regularly rising tariffs.
Why is it beneficial to contact us?
The company's personnel have experience in equipping boiler rooms in residential buildings and industrial enterprises. We will select the appropriate solution for any task. High-quality equipment with proven equipment guarantees timely response of tracking devices to a dangerous signal and prevention of an emergency situation. We offer a range of services: selection of equipment, professional installation, commissioning, subsequent maintenance with performance monitoring. Automatic equipment is individually selected for each object. We guarantee that we will take into account maximum wishes. A range of services is offered at attractive prices. Experience allows us to find profitable solutions for each client. To view the proposed prices and discuss the terms of the contract, call us. Be sure that after concluding the contract, employees will soon cope with the task. Take advantage of the offer today to get the desired result at reasonable costs!
Defect or incorrect setting?
An unpleasant phenomenon is often viewed as a technical malfunction, but it is not. The temperature sensor is triggered by a change in temperature - the burner turns on - the boiler heats up. Everything works correctly and in accordance with the specified conditions. And the fact that the cycle irrationally uses the boiler resource is the problem of the user, not the underlying program.
Thus, clocking is not a defect, but the result of incorrectly adjusted temperature ranges or a poorly organized heating system. There are several most common reasons for the boiler to not operate correctly:
- Incorrectly installed thermometer.
- Small temperature ranges.
- Unregulated burner.
- Low heat capacity of the heating circuit.
It is these problems that are a frequent reason to call a specialist. Of course, you can do it on your own - just follow simple tips.