A beautiful roof is the calling card of any country house. In addition to the roofing, the chimney also attracts attention. A crumbling brick or improperly made chimney spoils the entire impression of the architecture of the cottage. The location of the chimney on the roof and its design are subject to certain requirements specified in building regulations. Violation of technical regulations on the correct design of chimney systems can lead to problems with the operation of heat generators (boilers and heating stoves) and a reduction in the service life of the chimney itself. And replacing or even repairing such a structure that runs through the entire house is almost a new overhaul. The article tells you how to avoid the most common mistakes when installing a chimney.
Features of the structural design of chimneys
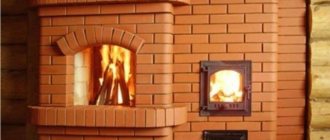
Installation of chimneys is required in houses where there is a Russian stove or fireplaces operating on solid fuel. If you want to have a real heating structure made of brick or stone, you need to choose the right location for its installation. In ancient times, people first laid out the stove, and only then built the walls.
In order not to provoke a fire hazard, you must adhere to a number of rules. Thus, it is impossible to place a large number of wooden ceiling elements above the stove, since there is a high air temperature there, which is fraught with big troubles, including the ignition of beams and ceilings.
The performance of the smoke exhaust structure depends on how straight the chimney is on the roof and its length. To ensure the required draft force, it is necessary that the air blows through the chimney at the location of the ridge or close to it.
Rapid cooling of gases appearing in the furnace shaft as a result of fuel combustion should not be allowed. Therefore, it is necessary to ensure not only the correct installation of the chimney on the roof, but also its high-quality insulation. If this is not done, condensation will constantly appear at the point of contact of warm air masses with cold ones - it will eventually saturate the chimney and begin to descend lower, destroying the structure and clogging it.
Jumpers
Functions
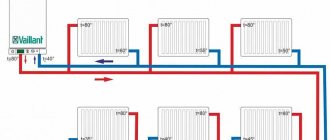
Regardless of which risers are connected by jumpers - heating or hot water supply - the jumpers perform one function - they ensure continuous circulation of water. Why it is needed in the heating system - I think there is no need to explain.
In hot water supply, connecting two or more risers with jumpers solves two problems at once:
- Provides almost instantaneous supply of hot water after opening the tap. In houses with dead-end DHW risers, water has to be drained for a long time to heat it;
- Ensures continuous operation of heated towel rails. In new buildings they are installed in the gap of the riser, and not in the hot water supply line.
The towel rail is a bend in the riser.
Installation
There are more than a few requirements for installing lintels in the attic:
- An air vent (Mayevsky tap or regular valve) is mounted at the top point of the jumper. It is needed to remove air plugs from risers;
- If there are brackets (bends in the vertical plane), the air vent is installed at the top point of each bracket;
- The lintel above the ceiling level is thermally insulated.
Selection of materials for the chimney
When constructing a stove, you need to purchase building materials correctly; this is the only way to ensure the smoke exhaust duct has optimal temperature conditions and a long service life. Materials must warm up quickly.
To build chimneys use:
- ceramics;
- metal;
- asbestos cement mortars.
Each of the listed materials has its own disadvantages - this does not allow us to call their choice ideal. Therefore, when purchasing this or that product, you should consider how suitable the product is for installing a chimney on the roof.
For example, metal structures look good, but only if an on-mount chimney is built. But making a basic model of a metal pipe will be very expensive.
When constructing the internal parts of chimneys, bricks or modules are used - materials that are fire-resistant and durable. For external sections of the structure, it is better to use asbestos-cement products.
Fighting joint leaks
To create the maximum possible tightness of the junction of the roofing material and the pipe at the points of contact, an internal apron is made using the lower strips.
Installation of a chimney passage through the roof.
To make an internal apron, you need the following tools:
- marker;
- long metal ruler;
- grinder with a disk 2 mm thick;
- pliers;
- hammer.
In order to do this, the plank is applied to the walls of the chimney pipe, making marks for the top of the plank. The next step is to punch a groove along the previously marked line.
Installation of the inner apron should start from the bottom wall. The edge of the apron is inserted into the groove, after which it is installed on the remaining walls. The overlap should be 15 cm. Then the edge of the film inserted into the groove is sealed. Having trimmed the lower strips, they are installed and then secured with self-tapping screws.
After installing the lower apron, you can begin installing the tie, which is a sheet of waterproofing material placed under the elements of the inner apron from below. The main function of a tie is to drain water.
After completing the installation of the tie and apron that protect the joints, the roofing material is laid. Then the outer apron is installed. To do this, use the upper abutment strips.
The installation of the apron on the outside is similar to the installation of the apron on the inside. The difference is the absence of a groove and the upper edge is fixed directly to the chimney wall.
Important: today the building materials market offers products that are designed specifically for chimneys with a round cross-section. They are roofing passages that consist of a base (flat steel sheet) and an apron cap. A circular chimney is installed inside the passage.
A circular chimney is installed inside the passage.
Variety of chimney schemes
When building a chimney, one of the existing schemes is used, according to which the choice of building materials is made. If you choose it correctly, you can significantly save money and time on work.
Pipe layouts depending on the type of structure are:
- hidden - they are installed in ventilation ducts located inside the walls of buildings;
- mounted - the chimney is connected to the outlet of the air ducts of stoves or fireplaces;
- external - pipes are installed on the facade or roof;
- radical - a vertical riser is mounted on its own foundation.
Before taking the pipe outside the building, first they arrange the internal hidden areas, and then begin to construct the external chimney. Root or mounted schemes involve the exit of chimney systems through the roof or attic.
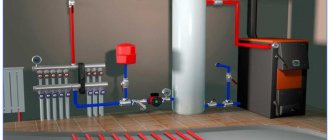
Heating bottling
Functions
What are the benefits of moving the heating supply bottling to the attic?
- Extremely simple start of the heating system. You just need to fill it, open both house valves in the elevator and bleed the air from the expansion tank in the attic. For comparison: in the case of bottom filling, you need to bleed the air in the jumper between each pair of risers;
- Uniform heating of all heating devices on each floor. The drop in coolant temperature as it moves from top to bottom is compensated by an increase in the size of the radiators.
Schematic diagram of a heating system with top filling.
The only inconvenience is that it is more difficult to reset and start a separate riser with your own hands: in the case of top filling, it must be turned off both in the basement and in the attic.
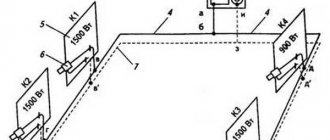
Installation
The filling is installed with a constant slope along its entire length. An expansion tank is placed at the top point, collecting air when the circuit starts. Each riser is equipped with:
- A valve that allows you to turn it off independently of the others;
- A plug. It will allow the riser to suck in air during discharge and prevent water from hanging in it.
Discharge of riser from bottling. Instead of a plug, a relief valve is installed - a ball valve.
In ventilated attics, both the bottling and the sections of risers located above the attic floor are thermally insulated. As a rule, glass wool or mineral wool, rags and knitting wire are used for this purpose. Thermal insulation reduces both non-target heat loss and the likelihood of circuit freezing during short-term circulation stops during winter cold.
Self-construction of chimneys
The technology for installing a smoke duct has much in common with the installation of a conventional air duct. The difference lies in the presence of more stringent requirements for the operation of the chimney. Therefore, the process of arranging pipes for furnaces requires accurate calculations, selection of building materials, fasteners, refractory putties and other things.
Modular pipe
In the case where the chimney is planned to be laid in the wall of the house, this nuance should be taken into account at the stage of wall construction, otherwise the hole will need to be punched using a jackhammer. It is possible to install a stove duct in an already equipped ventilation duct, but as a result, the fire safety of the smoke exhaust structure will significantly deteriorate.
To implement a hidden pipe scheme, you need to use the services of an experienced architect, since during the operation of the furnace, temperature deformations are possible - the dimensions of the channel increase from the influence of hot gas, thereby exposing the walls to destructive processes.
Chimney sections inside load-bearing structures can be constructed from multilayer blocks. They are placed over the entire surface of the wall, using a temperature-resistant adhesive for fixation. This material is able to level out thermal deformations, thanks to damper gaskets, and thereby ensure the integrity of the building.
The main advantage of this design is that there is no need to insulate the pipe on the roof of the house - the channel will go outside above the roof level inside the gable.
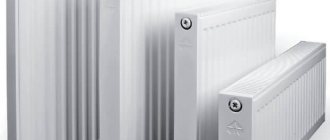
Mounted steel chimney
Installing steel chimneys does not require special skills or a lot of time, so they are often preferred by homeowners, and such structures are relatively inexpensive.
It should be taken into account that:
- Any metal pipe must consist of at least two parts and must be disassembled accordingly. After a few years, the first section burns out from high temperatures, not the entire structure will need to be replaced, but only a section of it.
- Where the chimney will be brought out through the roof and wall, fire-resistant insulation is laid, otherwise the building may catch fire.
- The section of the pipe located in an unheated room must be properly insulated so that cold air masses do not cool the gas and thereby affect the performance of the heating unit. As a result, condensate will not collect on the surface of the pipe and it will not rust.
- It is imperative to waterproof metal pipes using non-combustible materials.
Install the metal shell structure in stages:
- The first elbow is placed on the screen pipe or on the outlet of the furnace air duct.
- The second ring is brought out through the attic into the room and fixed on a fire-resistant spacer.
- Connect both knees.
- The third segment is led out into the attic through a through opening in the roof. The place where the pipe exits to the street is covered with a spherical casing.
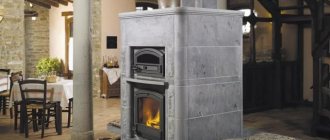
Root brick pipe
This type of brick stove chimney will last for many years. The main pipe is installed on a foundation, which is laid separately during the construction of the basement floor.
The installation technology of this chimney is more complex than that of a mounted metal structure. The fact is that the main pipe must withstand the longitudinal load from the weight of the entire unit, so it is laid out from baked bricks.
Features of the structure:
- To build a chimney channel, leave a hole the size of a brick or half a brick. To lay one layer, 4-6 bricks will be enough.
- The layers are laid out so that the bottom joining seam of the row is under the whole brick.
- Before the chimney pipe is brought out through the roof, a special module is made in the place where it passes through the ceiling to shift the axis of the section piercing the roof relative to the axis of the part of the chimney located in the room.
The design of this type is complex, and it is installed when there are no other options.
External chimney
A pipe mounted from metal or asbestos-cement modules is installed along the facade of the building, moving in the direction from bottom to top.
External structures have the following features:
- in the place where the pipe enters the building, a hole is made, through which a horizontal segment of the chimney is then brought out;
- the junction of the horizontal and vertical sections is designed in the form of a tee, one part of which is closed with a plug. This element is used when cleaning the chimney;
- the pipe is attached to the facade using detachable metal clamps. The lower part of the chimney is strengthened with a superstructure specially erected on a separate foundation.
Node of passage of a chimney through a flat roof
When installing a chimney on a flat roof, it is important to remember that its height above the roof surface must be 500 mm in accordance with SNiP standards. A round pipe, a rectangular chimney duct, or a brick chimney itself can be discharged through a concrete floor slab. The round pipe passage unit will be considered separately, and for other cases two basic installation principles are used
The round pipe passage unit will be considered separately, and for other cases two basic installation principles are used.
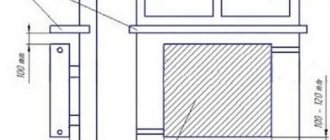
Features of arranging a passage through a pitched roof
How to fix a chimney on the roof? On the chimney pipe on the inside of the roof, it is necessary to mount a flange that is rigid enough to absorb the loads from the sheathing - the chimney outlet forces the dismantling of part of the purlins, and without installing the flange, the structure will remain suspended.
The flange is usually a steel sheet with stiffeners welded to it. The sheet thickness should be at least 2-3 mm. A non-flammable heat insulator – basalt cardboard – should be placed on the flange. This will prevent heat transfer from the chimney to the sheathing. If the chimney structure is not reliable enough to take on part of the load on the roof, a rafter structure or additional racks are installed around the perimeter of the opening so that the load is transferred to the attic floor.
Around the pipe, all layers of the roof must be cut into a gap that complies with the standards specified in SNiP (depending on the type of pipe and the degree of its heating). The resulting gap must be filled with a non-flammable heat insulator - basalt or glass wool, basalt cardboard.
The principle of sealing the junction of the roofing material to the chimney pipe depends on factors such as:
To ensure that the chimney exiting through the pitched roof is not damaged when snow melts, it is recommended to install snow guards higher up the slope. If the width of the chimney (across the slope) is over 800 mm, above it on the slope a special structure should be installed to divert the water flow.
Output through the roof of a pipe with a circular cross-section
It is very difficult to waterproof the junction of the roof to a round pipe without the use of special roofing penetrations. The construction market offers a wide selection of pipe assemblies, differing in diameter and material of manufacture.
A universal option is an aluminum flange equipped with a silicone or rubber corrugation. These elements are available in several standard sizes, so you can choose a penetration for a chimney pipe of any popular diameter. The working surface of the flange is covered with a material similar to the corrugation material and is equipped with grooves for filling with sealant. The top of the corrugation cone is cut to the required diameter, after which the penetration must be pulled onto the chimney. The flange must be coated with sealant and attached to the roof with self-tapping screws, which are included in the kit. If the roof covering is not made of metal, the flange is attached with dowels or long screws directly to the sheathing.
For roofs with different slopes, penetrations are offered in which the corrugation is located at different angles to the flange. You can purchase a detachable design, which is used if it is not possible to stretch the corrugation onto the pipe due to the presence of protruding parts or the large height of the installed chimney. This penetration is equipped with clamps, thanks to which the corrugation is tightly pressed around the pipe.
Fastening the chimney to the roof can be done using penetrations in which a hinged segment is used instead of corrugation. This is a universal option for roofs with any slope angle: the surfaces of the connecting elements are spherical in shape and can be fixed relative to each other at any angle.
Manufacturers of roofing materials often offer ready-made chimney penetrations with a flange pre-formed to match the appropriate roofing covering. This penetration is attached to the roof sheathing with the necessary overlap. To achieve matching diameters, the apron cone is cut off. Penetrations from roofing manufacturers have several standard angles of inclination. To seal the joint, a second conical apron is installed, overlapping with the first.
A few tips from the master
To perform a quality installation, you need to have knowledge of how to properly install a pipe on the roof and have the appropriate skills. Installing a chimney is associated with great risks, so you should not forget about safety measures when work is carried out on the roof of a house.
Here are some recommendations from experts:
- If the decision is made not to build a separate box for the chimney below, it is necessary to ensure a gap between the chimney structure and the combustible materials used for the walls.
- The section of the chimney that will be located outside must be made without joints. When this is not possible, the connection should be made above the point where the pipe exits the ceiling, without coming into contact with the sheathing and roofing. The joints are tightened with iron clamps, covered with asbestos material and secured.
- If you want to lay a brick chimney, you need to purchase special baked bricks, using clay or strong grades of cement for laying.
- If you are not sure that you will be able to build a brick chimney yourself, then it is better to purchase a ready-made structure. The homeowner will only have to study the information on how to secure the pipe to the roof. Today, there are insulated and protected chimney systems on sale that do not need to be coated with asbestos and treated with mastic.
- To improve the fire protection of a structure, you need to put a canopy on it to protect it from accidental sparks and precipitation.
Carrying out penetration depending on different types of roofing
The roof penetration will vary depending on the shape of the chimney and the material that covers the roof. Thus, to install a sandwich pipe, installation of a heat-insulating box is not required, since the insulation here is laid during manufacture. To penetrate the roof of a brick or ceramic chimney, it is necessary to construct a thermal insulation box to protect the building from fire.
Elastic penetration for round pipe
The simplest but most universal penetration exists for a sandwich pipe. It is a rubber or silicone pyramid that is put on the pipe and fixed to the roof. Moreover, the smoothness of the roof covering in this case does not matter much - the elastic insulating apron is equally hermetically attached to the ribbed surface of the profile, wavy tiles, and soft ondulin. Manufacturers offer ready-made flexible penetrations for sandwich chimneys of any cross-section.
Installation of elastic penetration is carried out as follows:
- A hole is cut in the roof for the pipe outlet so that at least 38 cm remains from the pipe wall to the combustible roofing materials.
- A galvanized metal sheet with a hole for the chimney is fixed to the inside of the roof. The distance from the outer wall of the pipe to the edge of the sheet hole is at least 14 cm.
- Remove the pipe and secure it in the desired position.
- The elastic penetration pyramid is cut to a level corresponding to the diameter of the pipe and put it on the pipe through the top.
- The protective apron of the penetration is applied to the chimney passage, having previously coated the edges with fire-resistant sealant.
- A metal mounting ring (flange) with holes is placed on top and secured with self-tapping screws.
For roofs with a steep slope angle, manufacturers produce special elastic penetrations, where the slope of the pyramid and apron is more pronounced.
Metal penetration for round pipe and smooth roof
A metal feedthrough for a round pipe can also be purchased ready-made. It is a metal cone, the upper hole of which corresponds to the diameter of the chimney pipe. When choosing a metal penetration, you need to know the angle of inclination of your roof.
Installation diagram for metal penetration:
- the hole in the roof and the inside of the protective structure are designed as for elastic penetration;
- a passage pipe is put on the chimney, the edges of the lower part are coated with fire-resistant sealant;
- secure the protection with self-tapping screws with rubber caps to seal the mounting holes.
Penetration for rectangular pipe
Exiting a brick chimney through the roof has its own characteristics. To complete the penetration you will need a grinder, a screwdriver, metal scissors and galvanized iron sheets or stainless steel.
The installation of the brick chimney penetration begins with the construction of a box for thermal insulation. Its size is calculated based on the cross-sectional size of the chimney plus 15 cm on each side. The material for the box must be non-flammable. Sheet iron or asbestos is used.
The space between the pipe and the walls of the box is filled with basalt wool. This material can withstand significant temperatures and has excellent thermal insulation properties. The lower part of the box is decorated with a metal sheet.
Street protection has a complex composite design. The roofing material for a brick pipe is not of great importance, since in any case it has to be removed when removing it. The drainage tie is installed on top of the roofing covering, regardless of its type.
The penetration-casing consists of the following elements:
- four (according to the number of sides) internal protective wall profiles;
- four external decorative elements;
- drainage tie.
If the protection is installed on top of a flat roofing material, then it is glued with a fire-resistant sealant. When installing under a corrugated pipe (profile, slate, tile), a wall profile is installed on the pipe, securing it into a pre-made groove on the pipe. The upper parts of the apron are placed under the roofing material, the lower parts are secured on top.
Possible installation errors and how to avoid them
Errors during chimney installation can lead to a fire in the ceiling, roof or wall.
It is important to maintain minimum distances between flammable objects and the chimney
Errors and remedies:
- A common mistake is saving space. Sandwich pipes, as long as they are in good condition, should not heat up. But over time, warm air may pass through the thermal insulation layer. In this case, nearby flammable materials may catch fire. The presence of sufficient space between the chimney and building materials eliminates this possibility.
- Another mistake is neglecting the tightness of the compared parts. It is recommended to cover all joints between the components of the chimney with a layer of sealant, otherwise combustion products may pass from the chimney into the environment. The joints between the pipes can additionally be tightened with special clamps.
- The third common mistake is comparing pipes only by the “smoke” or “condensate” type. Matching “by smoke” means that the socket of the overlying pipe fits onto the underlying pipe. In this case, smoke will not accumulate in the resulting pocket between the pipes, but condensation may drain there. Comparison “by condensate” means that the socket of the underlying pipe fits onto the overlying one. Condensation will not be able to drain into the resulting pocket, but smoke will accumulate there. In the first case, there will be a lot of condensation in the chimney, in the second - soot. In order to take advantage of both options in a sandwich pipe, it is enough to compare the inner cylinders “by condensate”, and the outer ones “by smoke”. Matching both cylinders in the same way can quickly clog the chimney.
- A serious mistake is to use general building insulation instead of thermal insulation. Many insulating materials are used in construction, but when arranging a chimney, it is necessary to choose materials with the best thermal insulation. This material is mineral wool. When installing external insulation, the use of basalt wool is allowed, but if the pipe warms up significantly from the outside, after a few hours the basalt wool will begin to heat up.
Soft surface
The soft surface has its drawback: it is flammable. Therefore, it is necessary to leave a gap of approximately 14-25 millimeters between the surface and the chimney.
Moisture insulation of such a surface proceeds in the same way as other surfaces, but it uses a valley carpet rather than a flexible tape.
How to route a chimney pipe through a roofing surface
Stages of installing a chimney pipe:
- Determining the location for the passage;
- Installation of the box;
- Drilling a hole for the chimney pipe;
- The roofing material is folded outward, the insulation inward. A pipe is inserted into the created hole;
- A moisture-proofing belt is placed on the pipe device;
- The box is filled with heat-resistant material;
- Sealant is applied to the joints.
Installing a chimney device through the roof requires a serious approach and compliance with installation rules, because... This determines whether leaks will appear and whether the chimney will collapse.
Ondulin surface
Ondulin is otherwise called “Euroslate”. According to its characteristics, it does not have reliability and durability. Therefore, it is necessary to cut a hole in the roofing surface and fill it with heat-resistant material, which, in turn, will prevent the penetration of moisture.
To waterproof the ondulin surface, install an apron or use a flexible tape - Onduflesh. This coating requires additional ventilation.
Masonry mortar
It contains clay, sand, water and cement. The liquid is taken in its pure form, without various inclusions, that is, it cannot be taken from reservoirs and artificial ponds. The clay used should also be as clean as possible, without foreign inclusions.
Differences in solutions depending on the masonry area
For each part of the chimney, it is advisable to use a specific cement mixture:
- the pipe under the roof is erected with cement-lime or lime mortar;
- For the part of the chimney above the roof, a cement-sand composition is used.
If you are making a brick chimney for a metal stove with your own hands, then you should know that the thickness of the mortar layer will depend on the sand fraction; the finer it is, the neater the seams will be.
Making the mixture
The mixture is prepared from sifted river sand and pure clay, mined from the depths of the earth at least 1.5 meters. It also needs to be sifted, and the sieve cells should not exceed 5 mm. Before mixing, the clay must be soaked in water and left for 48 hours.
After this preparation, the clay is mixed with sand in a ratio of 2 to 1, and then the whole thing is filled with water, maintaining a ratio of 1 to 4. In order for the batch to brew, it must be left for 12 hours, and then moved until a homogeneous mixture is obtained.
The cement-lime composition is prepared in almost the same way, only lime is also added to it, which is sifted through a sieve with 3 mm cells.
Full range of design and installation services
carries out a full range of work on the design, installation and commissioning of smoke removal routes of any level of complexity, length and design. The company’s installation department specialists will prepare a detailed technical work plan, taking into account all the nuances of the structure, its design and layout, as well as taking into account the personal needs and wishes of the customer. Drawing up a plan is possible both at the initial stages of construction and in finished buildings.
The project plan is drawn up with an accurate calculation of the cost of both all work and the required chimney elements, which is undoubtedly convenient for the customer. After approval of the project, a team of specialists arrives at the client’s site and promptly carries out high-quality installation of the smoke exhaust system, followed by commissioning. A big advantage is testing and a full check of the functionality of the heating and smoke exhaust system upon completion of the work. The client receives long-term guarantees of the quality of the constructed smoke removal system, installed in accordance with all fire and operational safety rules and regulations.
What can result from poor installation?
Often, the list of works of a stove maker or installer of a gas or electric heating boiler does not include work on installing a chimney. It is assumed that the passage of the chimney pipe through the roof is laid at the construction stage, or the homeowner will install the chimney on his own. The apparent simplicity of such work provokes owners to refuse to use professional roofers. They don’t think about what serious negative consequences a poor-quality chimney outlet to the roof can lead to. Frequently encountered problems:
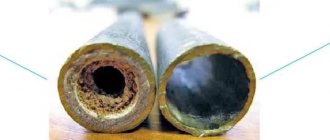
- through a poorly sealed pipe passage, dampness can enter the masonry, eventually destroying bricks and cement joints;
- increased humidity of the chimney pipe itself or the elements in contact with it provokes an increased spread of various microorganisms, mold, and mildew. The spores of some of them can pose a danger to human health and even human life. If traces of infection are visible on the pipe, it is not recommended to use it, and in special cases it is necessary to completely replace the entire smoke exhaust system;
- water seepage in places where the chimney passes through the roof elements leads to a reduction in the thermal insulation properties of the insulation by half. You need to understand that after such a layer dries, the insulation characteristics will no longer be able to return to their previous level;
- a poorly installed chimney affects the durability of the materials of the roofing elements and rafter system. Penetrating moisture accelerates the process of wood rotting, which will lead to the destruction of the power frame;
- large gaps near the passage of pipes lead to the cessation of normal circulation of warm and cold air in the room under the roof. This leads to additional energy losses, and hence to unnecessary heating costs;
- Poor-quality chimney lining significantly spoils the appearance of the entire building.
Not only chimneys from stoves, fireplaces and other solid fuel devices are raised above the roof. Exhaust pipes from gas heaters, as well as ventilation pipes, are also discharged there. When installing them, exactly the same methods are used as for chimneys.
Preparatory stage of work
To avoid any difficulties during the pipe installation process, you need to prepare the work site and tools in advance. A hole from corrugated sheeting is cut according to the following technology:
- After determining the configuration of the chimney, they plan where the exit to the roof will be located. Let us remind you that it is better to place the pipe vertically.
- The cross-sectional size of the chimney pipes is selected based on the recommendations of the heating device manufacturer. The thicker and higher the pipe, the better the smoke is removed from the stove.
It is important that all segments are of the same cross-section and fit each other, and are inserted without creating a gap.
- On a corrugated roof, mark the outline of the pipe using a permanent marker.
- Using a grinder with a thin metal cutter, cut out a hole, moving a couple of centimeters inward from the intended line. You should work with corrugated sheeting carefully and slowly so that the edge of the cut is smooth, without jagged edges that could cause injury during the pipe removal process.
- You need to make short cuts in the corners of the hole to bend the edges of the corrugated board upward.
- They cut out the same weight in the ceiling.
- A metal box is installed that will connect the pipe to the rafters. The chimney will pass through the hole inside the box; the distance between their walls should be at least 15 cm.
- The insulation, waterproofing film, and vapor barrier membrane are removed from the hole made in the roof. It is necessary that the hole goes through.