You can often hear the opinion that welding pipes is not something too special and, if necessary, even an amateur can cope with such a task. Indeed, at first glance it may seem that this is so. Large surfaces with well-fitted and processed edges - all conditions for the formation of a high-quality seam are met. All that remains is to bring the electrode and...
But here practice begins, which has completely different laws than theory. It turns out that doing this kind of work is very difficult. Especially when it comes to creating a high-pressure pipeline. The slightest defect in the weld seam leads to a breakthrough in the main line. That is why only highly qualified specialists are attracted to such projects.
Types of pipelines
Pipelines are divided into types based on the conditions of their use. Basically, the type is determined by the hazardous production facility at which they are used, as well as by the conditions themselves and the environment that passes through them.
The following types exist:
- Main oil, gas and product pipelines;
- Hot water and steam pipelines;
- Internal and external gas pipelines;
- Technological;
- Sewage and water pipelines.
I make pipelines from various materials, mainly: steels and alloys, as well as polymer materials. The article will not consider pipes made of concrete, ceramics and other non-weldable materials.
Useful tips from experts
Main water supply system filled with water, a source of high humidity. There are professional secrets that allow you to carry out quality work. You need to reduce your exposure to water. This is achieved in several ways:
- A bolt of the appropriate diameter with a large head is driven into the fistula. The stream of water decreases and only drops form. If the fistula is round, it will clog completely. It will be enough to scald the cap and melt the metal around it. This method is suitable for any spatial location of the damage.
- A large nut is placed on the fistula, the leak is partially eliminated, the water does not fall on the electrode, but flows out through the internal hole of the hook. After this, the nut is scalded along the outer edge. After this, a bolt is screwed into it using fum or screwed in, a tight connection is formed, and the defect is eliminated. The appearance of the pipe becomes worse - this is a minus, but such repairs are quite effective and do not take much time.
- The volume of metal supplied to the weld pool increases. A few drops are not enough. The size of the drop depends on the thickness of the electrode. Sometimes they additionally take an electrode with a cleaned coating. The first electrode creates an arc, and when a melt pool is formed, a second one, which has no coating, is inserted into the holder. The volume of surfacing material increases, the hole is fused faster.
Taking into account the peculiarities of working with a filled pipe, you can repair the network yourself without flushing water from the system. It is necessary to select the correct electrodes according to the type of rod, type of coating, and regulate the operating current mode.
How to weld pipes - Welding methods
There are currently more than a hundred welding methods, but in practice no more than 4 methods are used. We will consider the main ones.
Manual arc with piece electrodes
One of the most common methods of welding pipes in installation conditions. It is used due to the simplicity of the equipment and the wide range of welding materials.
This method is used to weld all types of pipelines, from a diameter of 16 mm (although more often from 25 mm) and a wall thickness from 2.5 mm (although more often from 3 mm) to several meters in diameter and a thickness of up to 60-100 mm .
Welding is performed in all spatial positions: lower, vertical, horizontal and ceiling.
To complete the process, you only need a welding machine (inverter, rectifier, transformer, etc.) and electrodes and that’s it. There is no need to carry more gas cylinders or use additional flux to protect the welding arc and pool.
Welding in argon with a non-consumable electrode
Argon welding (TIG welding) is used when it is necessary to weld pipes made of structural or low-alloy steels (black steels) with a small wall thickness of up to 3.0 mm (1.8-2.0 mm is the most common thickness when working with argon arc welding).
This method is also used in conjunction with manual arc welding, when the root of the seam is welded in an argon environment with a non-consumable electrode, and then filled and lined with a manual arc welding. This method is called KRAD - combined manual arc welding. It is used when high demands are placed on the weld and the joint thickness is more than 6 mm.
Welding in an argon environment of pipelines with a wall thickness of more than 3 mm is used for welding high-alloy steels, chromium-nickel and titanium alloys, that is, where it is necessary to ensure a high degree of metal protection during the welding process.
A useful article about what the NAKS register of welders is, why it is needed and how to check certificates through it.
Semi-automatic gas welding
The use of semi-automatic welding for pipelines most often occurs in large industries. This is due to the fact that this method provides high productivity, especially in cases where large thicknesses need to be welded.
Using semi-automatic (mig/mag) welding, thicknesses ranging from 2 mm to 60-100 mm can be joined.
The use of this method in field conditions is infrequent, since it requires rather bulky equipment, in particular, a gas cylinder, and there should be no drafts or gusts of wind during the process. Otherwise, this leads to blowing out of the gaseous medium and the formation of defects.
Semi-automatic welding can be performed not only in a gas environment but also using flux-cored wire. In this case, mobility increases because gas equipment is no longer needed (if the wire is self-protecting, since there is a flux-cored wire that also needs gas protection).
Using self-shielding flux-cored wire is more expensive than using piece electrodes, although the process is faster, there is still a clear increase in cost.
You can learn more about how to set up a semi-automatic welding machine by clicking on the link.
Under a layer of flux
Performing the process under a layer of flux is used when it is necessary to weld large diameters and large thicknesses. This process allows you to boil up to 10-12 mm in thickness in one pass. It is used in large construction or production.
The method is highly productive, but at the same time it requires expensive equipment - pipe welding bases, rotators and welding heads.
Assembling joints
Pre-assembly of joints greatly simplifies the task. The features of this stage are as follows:
- The pipes are fixed in clamps. If the fastening is carried out at three points, the fixation will be more reliable.
- If there is only one connection point, it is recommended to start welding from the reverse side.
- If the walls are about 3 mm thick, then the thickness of the rod should be 2.5 mm.
The most difficulties arise with welding pipes that cannot be secured in a vice.
Selection of welding materials (electrodes, gas, etc.)
The choice of welding materials is made based on the material from which the pipes are made. Most often it became 4 groups:
- Low alloy and structural.
- Carbonaceous.
- Heat-resistant alloyed.
- Highly alloyed.
Welding electrodes for low-alloy, structural and carbon steels are very similar. Typically the following brands are used:
- SSSI 13-55;
- TMU-21U;
- TsU-5;
- SSSI 13-45
- TMU-46, etc.
For heat-resistant steels (KhM steels operating at temperatures of 500-570°), the following grades of electrodes are used:
- TML-1U;
- TsL-39;
- TML-3U, etc.
High-alloy corrosion-resistant steels are welded with electrodes:
- TsT-15;
- TsT-26;
- EA-400/10U, etc.
New electrodes must be tested before welding pipelines. When checking, you need to pay attention to the appearance of the electrode coating, which should not have chips, swelling, or sagging of the coating.
After a visual check, you need to try to weld a test piece with electrodes, and you need to pay attention to how the arc is ignited. The arc should ignite easily and burn stably. The electrode coating should melt on all sides without forming an overhanging peak, and the slag should be easily removed (in the case of rutile electrodes, it falls off on its own).
If the argon process or semi-automatic welding is used, then in this case a welding wire is used. The choice of wire as well as electrodes is made according to the type of steel being welded. For welding in argon, solid wire is used, and for semi-automatic welding, both solid wire and flux-cored wire are used.
The following wires are used for low-alloy and structural steels:
- Sv-08G2S;
- Sv-08GS.
For alloyed heat-resistant steels, the following grades of wire are used:
- Sv-08ХМ;
- Sv-08HMFA;
- Sv-08KhGSMFA, etc.
The most commonly used gases for steels are:
- Pure argon.
- Argon mixed with helium and/or carbon dioxide.
- Pure helium.
- Pure Carbon dioxide (CO2) - for semi-automatic.
Non-consumable electrodes that are used when welding in an inert gas environment are selected in accordance with GOST 23949-80:
- Made from pure tungsten.
- Made from tungsten with lanthanum oxide.
- With thorium oxide
- Tungsten with yttrium oxide.
The most commonly used electrodes are made of pure tungsten, marked - EHF.
Do you know how much an oxygen cylinder weighs? If not, follow the link.
How to ignite an electrode
There are two ways. Option one: ignite the electrode - end-to-end (by touching). Option two: strike. The methods are clear from the photo below.
The second method is similar to lighting a match on a matchbox. The first method is sometimes replaced by lightly tapping the workpiece. When the electrode is new and the metal of the rod is visible at the tip, ignition of the arc occurs easily.
If the electrode has been in use, a coating may appear around the rod. The protective coating of the electrode does not conduct electric current. Therefore, it needs to be knocked off by tapping the tip of the electrode on the part to be welded several times. Easy ignition of the electrode is a skill that has been brought to automaticity.
Types of connections (butt, corner, lap, T)
The main types of connections when welding metal pipes are:
- Butt joint (“butt” - denoted by the letter “C”) - in this case, the pipes are welded end to end;
- corner connection (“angular” - indicated by a beech “U”) - the ends of the pipes are at an angle relative to each other;
- T-joint - the arrangement of one product to another at a right angle, forming, as it were, the letter “T”. This type of connection, according to GOST-16037, is not used for pipelines (only for sheet structures in accordance with GOST 5264, designated by the letter “T”)
- Lap joints - roughly lap joints - are when one pipe is inserted inside another and welded (denoted by the letter “H”).
For pipelines, the types of connections are determined by GOST - 16037. It describes all types of butt, overlap and corner connections that are acceptable for pipelines. Dimensions and tolerances for deviation of finished connections are indicated.
What difficulties may arise
During repair welding of water pipes using electric welding, the quality of the seam from contact with water will be low. This repair of defects is a temporary measure. It is not provided for by GOST. When water pressure increases and the system is pressurized, the seam formed during welding can crack. Not all welders undertake this type of work. Surfacing of metal in the damaged zone often leads to multiple fistulas around the welding zone, because during welding the oxidation process is activated by contact with water. Instead of one fistula, many are formed.
Welding a pipeline containing water is a technologically complex job for a number of reasons:
- Due to the steam generated from the water during welding, you have to periodically wipe the mask; the work area is difficult to see.
- Water constantly cools the welding working area and prevents the metal from penetrating to great depths. Setting occurs immediately and crystallization begins.
- When pipelines located under the ceiling leak, work clothes get wet from the water. This is fraught with breakdown of current. The hand twitches and the electrode gets stuck.
Preparing pipes for welding
Preparing a pipe for welding is carried out in several stages, we list them:
- Stripping the pipe at a distance of 20-30 mm from the end on the outer surface and at least 10-15 mm on the inner surface.
- Dust removal and degreasing of lumps.
The pipe is cleaned with an abrasive tool mounted on a grinding machine, a file with sandpaper, etc. The cleaned surface should not have rough cuts.
The end of the surface should be 90 degrees in an ideal situation. In practice, deviations are allowed as shown in the figure below.
It is also worth mentioning the dents that occur on pipes. If the depth of the dent is less than 2.8-3.5% of its diameter, then it must be straightened using clamping devices or squeezed out using jacks.
When the depth of the dent exceeds the above values, it is necessary to remove the deformed section of the pipe. The process of straightening dents is performed without heating (cold) and with its use.
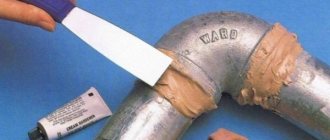
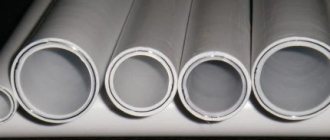
What are the tools for stripping polypropylene pipes?
Proper pipe stripping begins with tool selection. Its type and design depend on the type of reinforcement (external, internal) and diameter. For end brazing, special edge removal machines must be used. But polypropylene products are rarely made with a diameter of more than 60 mm. For this purpose, polyethylene pipelines are used.
Drill attachments
To install a pipeline with your own hands, you can buy several manual strippers for standard diameters - 16, 20, 25 and 32 mm. An example of a tool for external processing is the MasterProf or Newton series of models. Each is designed for two diameters, for example - 20x25 or 16x20. The knives are arranged vertically, they can be replaced and position adjusted.
Manual removal is convenient for small jobs. If this needs to be done en masse, it is recommended to purchase special drill attachments. They also differ in size, but all are designed to fit in a standard drill chuck. These are the optimal stripping tools for 20-25 mm polypropylene pipes.
How to choose manual or drill type cleaning:
- made of tool steel;
- corrugated surface for easy fixation;
- for manual models, the length of the knob is from 15 cm, it is possible to replace it;
- Drill attachments (shaver) can be of different diameters. This is achieved by adjusting the position of the blades.
An additional tool is a vice or clamp for fixing the pipe. This will make it more convenient to treat the surface; removal will not require much effort.
Working with a trimmer
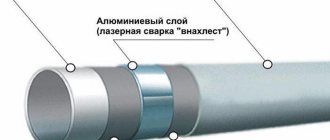
A trimmer is necessary for cleaning the ends. It differs from attachments and shavers in the arrangement of the knives. Their plane is in a horizontal position at a slight angle. The aluminum layer is chamfered up to 1 mm. The advantage of this tool is its versatility. It is used to level the plane of the pipes, which affects the soldering accuracy.
Features of end trimmers:
- the ability to adjust the location of the knives, which will allow you to use one nozzle for pipes of several diameters;
- There are models for manual processing or installed in a drill;
- standard diameters are 20/25, 32/40 and 50/63.
The depth of chamfering depends on the evenness of the cut of the pipe. Often a trimmer is used first to level the plane of the end and then to clean the surface. Only a small part of the foil layer is removed, which eliminates its appearance at the soldering site.
Tip: according to reviews from craftsmen, plastic end caps have proven themselves well. They are suitable for arranging central and autonomous water supply and heating.
How to join pipes
To assemble pipes, it is best to use centralizers or special mounting devices (for example, corners with studs that are welded to the pipe).
It is best to use centralizers that are not welded to the pipe itself.
In cases where electric welded pipes are used, it is necessary to shift the longitudinal joints by 100 mm or more. If the pipe has a diameter of less than 100 mm, then we shift the longitudinal joints by a length equal to three times the thickness of this pipe.
Having installed the pipes in the centralizer, the joint is assembled using tacks. The number and size of tacks depends directly on the diameters of the pipes being connected.
When the pipeline has a diameter of less than 50 mm, then 2 tacks are made, placing them on diametrically opposite sides. If the diameter of the pipeline is within the range of 50-100 mm inclusive, in this case two or three tacks are made, if it falls within the range of 100 to 400 mm, then 4 tacks are made, and if more than 400 mm, then the tacks are placed at the distance indicated in the table below .
It is advisable to tack using electrodes with a diameter of 2 - 2.6 mm (at most 3 mm).
After the tacks are made, their surface is cleaned of slag and metal splashes. If unacceptable defects are visible on them, the tack must be removed and remade.
If it is necessary to weld on the backing ring, then assembly will be performed as follows:
- Install the ring inside the pipe.
- Tack it at least 2 points from the outside and weld it to the pipe.
- Clean the completed seam.
- Slide the second pipe onto the ring; the gap should be maintained at around 4-5 mm between the seam and the edge of the second pipe.
- Weld the ring to the 2nd pipe.
- Clean the previous seam and fill the groove.
How to make a connection?
Let's figure out how to connect two parts of a pipeline without using welding and threaded fittings. Most often, the following methods are used:
- installation of Gebo coupling;
- installation of a clip or clamp;
- flange connection.
Gebo coupling
This is the name given to a special fitting; it can be used to manually combine two pipes into a single line. The coupling contains:
- frame;
- three rings - sealing, clamping, clamping;
- screw.
To install the coupling, put the nut and all other parts on the pipe in order, the coupling is put on last, it needs to be put on halfway, tightening the nut. Then the part that they want to connect to the pipe is joined to the fitting in the same sequence.
The reliability of the connection when using a Hebe coupling depends on how correctly the work was done. If everything is done correctly, the joint will be absolutely airtight and will last a long time.
Installing a repair coupling or clamp
The pipeline can be repaired or modified using a mounting clip. This part consists of two halves, which are bolted together, tightly gripping the pipe.
Carrying out work:
- If repairs or joining of previously used pipes are carried out, then the joint must be cleaned of scale, paint and any other contaminants. The surface must be completely clean and smooth;
- then a rubber seal is installed at the connection point, detachable parts are placed on top on both sides;
- the parts are tightened with bolts.
This method is very simple, but it does not provide a sufficient degree of reliability, so it should be used on non-pressure pipelines or as a temporary measure. Installation of the clamp is carried out in the same way. The difference between this part and the repair clip is that the clamp is tightened on one side, and the clip on both sides.
Flanges
Another simple way to connect pipeline parts is to install flanges. Flanges are parts in the form of a ring into the center of which a pipe or pipe is inserted.
Identical flanges are put on the ends of the parts to be connected, which are then connected to each other and tightened with bolts. A gasket is installed between the flanges. Making a connection:
- The parts to be joined are prepared; the ends must be cut exactly at an angle of 90 degrees, cleaned of paint and dirt. Chamfering is optional;
- flanges are put on the prepared parts;
- rubber or paronite gaskets are installed;
- two parts with flanges installed on them are connected;
- The bolts holding both flanges together are gradually tightened. The bolts should be tightened gradually and crosswise, not in a circle.
How to weld a pipe - welding technology
The execution of pipe welding depends on the chosen method. Let us consider in detail the most commonly used welding methods: manual arc welding (MAW) and inert gas welding with a non-consumable electrode.
For manual arc
For manual arc welding of pipes, the general sequence of technology is as follows:
- Check the quality of edge preparation and workpiece cleaning.
- Ignite the welding arc, retreating 5-10 mm from the bottom point (provided that we are welding a non-rotating joint). If we are welding a rotary joint, then we start in any place convenient for us.
- Wait for 2-3 seconds for the metal to warm up and a weld pool to form.
- Move the electrode up the weld.
- Perform the root pass without oscillating movements.
- Places where the welding arc breaks must be cleaned with an abrasive tool.
- Before completing the process, it is necessary to return the electrode to the already deposited (as if backwards) metal and break the arc on it (otherwise there will be a defect - a crater)
- Clean the root seam.
- Inspect the weld seam for defects; if there are any, select the defect using an abrasive tool and perform welding.
- Depending on the thickness, we perform either filling or facing seams. When performing them, we perform oscillatory movements with the electrode.
- The beginning of each subsequent layer should be shifted by 10-30 mm from the beginning of the previous one. So that those sections of the seam that overlap each other “locks” are shifted. The larger the pipe diameter, the greater the displacement should be.
- Upon completion, we clean the seam and heat-affected area from splashes of metal and slag.
- Each seam must be inspected for defects; if there are any, select them and weld them.
- We put a mark (in cases where this is a critical welded joint).
If you are just starting to understand the process, we recommend reading our article - electrode welding for beginners so that everything is clear to you.
For welding with non-consumable electrode in a gas environment
The technology of non-consumable electrode welding of pipelines in an inert gas environment is very similar to the technology of manual arc electrodes.
The general technological sequence is as follows:
- Just as in the previous case, we check the preparation and cleaning of the edges.
- Before igniting the arc, it is necessary to purge the gas lines; to do this, press the keys on the burner and purge the gas for 10-15 seconds.
- The arc is ignited, as with RDS, retreating 5-10 mm from the bottom point.
- The welding torch moves along the joint and the welding wire is fed towards it (the angle between the torch and the welding wire is about 90°).
- In places where the weld is broken, it is also necessary to clean the seam.
- Upon completion of the root pass, the seam and the heat-affected zone are also cleaned, as with RDS.
- When making the next layer, it is also necessary to perform an offset to overlap the “locks”
- When making a facing or filling seam, the torch as an electrode performs an oscillatory movement. most often these are Z-shaped or crescent-shaped movements.
- After each completed layer, it is inspected for defects.
- In cases where only the root of the seam is performed using the argon-arc method (a combined method is used), subsequent layers are performed using the technology for manual arcing with piece electrodes.
- After the weld is completed and the arc breaks, argon continues to be supplied for another 5-10 seconds, blowing onto the deposited metal.
- If you need to weld stainless steel, then the joints must be protected from the reverse side. This is done by filling the internal space of the pipe with argon or coating the edges of the pipe from the inside with specialized flux pastes.
Welding theory
A novice welder is wondering which welding inverter to buy, and what devices are needed for welding metal with electrodes. If we ignore the professional use of welding, buy a welding inverter, not a transformer or semi-automatic machine.
The welding inverter converts alternating current from the electrical network into direct current.
The advantages of an inverter welding machine compared to a semi-automatic machine and a transformer:
- Light weight and dimensions, on average the inverter weighs 3-5 kg.
- Easy to use for beginners.
- Allows you to quickly master welding.
You can talk endlessly about the advantages of inverters, but it’s better to see it once to understand what advantages this type of welding equipment has.
Now we will tell you what kind of process occurs during metal welding and how to evaluate the result. There are two metal blanks of different sizes. A constant voltage from a welding inverter is supplied to the metal through the electrode and ground. For an electric arc to occur, two conductive elements with a plus and a minus are needed. When electrodes of different polarities touch the metal, an electric arc is ignited, releasing high temperature. The metal begins to melt and, at the same time, when moving, the metal rod of the electrode melts with a special coating - coating.
When burned, the coating creates a gas protection for the seam, protecting it from the harmful effects of oxygen.
Also, during welding, a protective slag layer of the weld pool is formed, which is then beaten off with a special hammer from the welder.
After completing the welding of the parts, the metal cools, crystallizes, and a strong welded joint is formed.
How to weld two pipes - welding modes
Below are the main parameters for manual welding with stick electrodes
For argon-arc it is necessary to control more parameters than for RDS. Below are the main parameters for RAD.
Nuances of preparation and execution of work
Welding a steel pipe, especially with a rotary joint, is quite simple. But before doing the work, you need to prepare properly.
The surface of the ends of steel pipes is treated with a metal brush, then with a solvent, and if the thickness is over 3 mm, the edges are cut on one or both sides. Steel pipes should be connected and joined so that they lie in the same plane, without distortion.
When connecting and joining individual parts, tacks with a length of at least 3 mm are used for reliable fixation. The size of the tacks and their number depend on the diameter of the steel pipes.
Their minimum number must be at least 3, every 120°. The consumption of electrodes during welding should be taken into account. When operating with high currents on large cross-section pipes, the flow rate is significantly higher.
Installation of a galvanized pipe will require treating the ends of the workpieces with hydrochloric acid, which will prevent the zinc from burning out when heated.
Protection of the zinc layer on pipes can be carried out using HLS-B submerged arc welding. Before work, you will need to apply a thick layer of the substance to the edges of the pipes. Work is carried out with an increased level of oxygen supply to the burner flame.
The wire must be made based on UTP alloy. When performing work, it is necessary to melt the filler material onto the heated metal. The flux prevents the zinc from burning out, and the residues are removed from the pipe after completion of work.
Having completed the connection in this way, the consumer receives a high-quality seam that does not require corrosion protection.
How to weld pipes - welding fixed and rotary joints
In this section we will dwell in more detail on welding fixed and rotary pipe joints. Most often, a welder has to deal with non-rotating joints, so let’s start with them.
As already mentioned, welding a vertical joint should begin from the bottom point, retreating 10-40 mm and work upward.
The process must be carried out in reverse in a stepwise manner with a pipeline diameter of ≥219 mm. The length of the welded segment is 150-230 mm. To fill it, you can simply boil half the circumference of the pipe. Each subsequent layer must be shifted to overlap the locks by 10-30 mm.
If you need to weld a non-rotating horizontal joint, the starting point can be any convenient place. Otherwise, the requirements are the same as for vertical joints.
Below are diagrams for welding horizontal and vertical joints by one and two welders.
Now let's look at how rotary joints are welded. The process is performed in the most convenient position for welding - LOWER. The electrode should be at an angle of about 30° to the surface of the pipe.
The root passage is boiled back in a stepwise manner, the length of the section is usually a quarter of the circumference. Filling and lining are performed by continuously rotating the joint. The rotation speed is chosen equal to the speed of the process.
Below in the diagrams you can familiarize yourself with the method of welding rotary joints when turning 180 and 90 degrees.
Features of soldering in corners
Soldering under such conditions is no different from carrying out similar work on other sections of the walls, with the exception of some factors.
Fillet welding requires precision and compliance with increased requirements for the geometry of a right angle; a square is used to check it. To join the sections, special corner couplings with a rotation angle of 90 degrees are used, which should be purchased together with pipes from the same manufacturer - this will ensure high adhesion between the connected elements.
Rice.
5 Sequence of soldering pipeline from PPR Date: September 25, 2022
Welding pipes with water
If you need to weld a pipe from which water is leaking, and this happens quite often, there are a number of tricks that need to be applied.
We will not start welding from the bottom point, but step back from it even higher by 20-40 mm and rise up. Due to this, we warm up the metal of the pipe; it is also worth slightly increasing the current strength by 10 percent of the recommended one.
After the pipe metal has warmed up, you need to return to the point where the welding began and weld the area where the water is flowing. If suddenly the arc breaks and the electrode goes out, then you need to rekindle it by stepping back a little higher and heating the metal again. It is best to use rutile-coated electrodes for this method and pull-off welding. Welding points should be tried to be placed as closely as possible to one another.
What do you need to buy to start welding?
This question is answered in the article - Tools and accessories for manual arc welding: a basic set. In short, to start welding with an inverter at home, you will need:
- Electrodes.
- Welder mask.
- Gaiters or protective gloves.
- Protective trigger, trousers and closed shoes.
- Welder's hammer and brush for removing slag.
A specialist talks about choosing a mask for metal welding in this video.
The optimal choice for a novice welder is a mask with a “chameleon” type filter.
Its invaluable advantage, compared to a conventional protective shield with tinted glass, is that the welder can see the parts being welded. He does not need to raise and lower the mask, because... “Chameleon” automatically darkens when a welding arc appears and reliably protects the eyes.
When the welding process stops, the glass is automatically cleared. This makes the job easier. A beginner in welding will not pick up the so-called. “bunnies” from a bright arc flash if the mask with ordinary glass is not lowered in time.
Welding of small diameter pipes
For small-diameter pipes, especially for automatic pipelines (KIP), where the pipe diameter is 10-16 mm, manual argon arc welding with a non-consumable electrode is used. If the pipes used are electric welded, then they must maintain a displacement between the longitudinal seams of at least 3 pipe wall thicknesses.
As a rule, they are all welded in one pass. The main difficulty is the high risk of burning through thin metal. To avoid this, you need to use the shortest arc possible, set the welding current to the lowest value, and also try to do it as quickly as possible.
Edge processing scheme
Before assembling the pipes you must:
- clean the internal cavity of pipes and parts from pound, mud, snow and other contaminants;
- clean the edges and adjacent internal and external surfaces of pipes, gas pipeline parts, pipes, fittings to a width of at least 10 mm to a metallic shine;
- check the geometric dimensions of the edges, straighten smooth dents at the ends of pipes with a depth of up to 3.5% of the outer diameter of the pipe;
- Clean the edges and adjacent inner and outer surfaces of the pipes to a width of at least 10 mm to bare metal.
The ends of pipes that have cracks, tears, nicks, or chamfers with a depth of more than 5 mm are cut off.
At air temperatures below minus 5 °C, straightening the ends of the fubs without heating them is not recommended.
Pipe joints are assembled on inventory benches using external or internal centralizers.
The permissible displacement of the edges of the pipes being welded should not exceed 0.155 + 0.5 mm, where 5 is the smallest wall thickness of the pipes being welded.
Welding joints of different-thickness pipes or pipes with connecting parts is allowed without special processing of the edges with a wall thickness of less than 12.5 mm (if the difference in thickness does not exceed
2.0 mm). Welding of pipes or pipes with connecting parts and fittings with greater variations in thickness is carried out using a standard transition of at least 250 mm in length.
In the absence of standard transitions, it is allowed to make overlap joints “pipe in pipe” with dimensions */50x40, 40x32, 32x25, 25x20 mm on overhead and internal low-pressure gas pipelines.
Welding of lap joints is carried out in accordance with GOST 16037 with the following requirements:
- the gap between pipes connected with an overlap is no more than 1-2 mm and is equal around the perimeter;
- the amount of overlap along the length of the connected pipes is at least 3 cm;
- at the end of a pipe of smaller diameter, a chamfer is made inward at an angle of at least 45° throughout the entire thickness of the pipe wall;
- connection of welded ends after special preparation (thinning) of the edges from the inside or outside of a thicker-walled element with wall thickness S3 to thickness S2 of the welded end, which does not exceed 1.5 times the thickness of the less thick-walled element S1.
Welding large diameter pipes
The main features of welding joints of large-diameter pipes are that they are welded by several welders, usually two people. This is especially important when welding chrome-molybdenum (HM-ov) steels. There, this process is carried out by 2 welders simultaneously, in a reverse stepwise manner, welding sections up to 250 mm long.
Also, the process on large diameters is performed using mechanized rotators (rotary joint). Edge preparation is most often also done mechanized using a chamfer, or the chamfer is performed directly at the factory during pipe production.
For large diameters, mechanized methods are used, such as: semi-automatic in inert gases, under a layer of flux, and so on.
For large diameters, argon-arc is usually not used in its pure form, but only in a combined method (KRAD), when the root layer is boiled in an argon environment, and filling occurs manually using an arc or semi-automatically in an inert or active gas environment.
Indications
The instructions for using the product indicate the following ailments:
- the occurrence and accumulation of a large volume of gases in the esophagus, called flatulence, as well as Roemheld syndrome;
- intestinal colic in infants;
- symptoms of increased gas formation, which are formed due to functional dyspepsia;
- preparatory process for ultrasound examinations, x-rays, computed tomography;
- severe intoxication with cleaning solutions that include foaming ingredients such as detergents.
Welding of pipelines at low temperatures
If there is a need to carry out welding work at sub-zero temperatures, a number of requirements must be met that will ensure high quality welded joints.
- Immediately before tacking, the metal in the area of the welded joint must be heated to a temperature of +20 - +40 degrees (so that you can hold it with your hand);
- the metal is heated before welding;
- It is possible to heat the metal using a gas flame method (cutter), as well as using an inductor.
Core Technology
The most common and popular technique is electric arc welding.
Yes, it has alternatives in the form of gas welding, but its undeniable advantages lie in simplicity, a minimal set of equipment and a result that meets the most stringent standards.
Even when designing main pipelines, this method is used. To achieve high quality, you must treat your work with full responsibility.
Safety precautions when welding pipes
Safety rules are written in blood, so it is very important to follow them when performing welding operations. We list the main ones:
- Before starting welding, check the quality of the cable insulation, as well as the grounding of the welding equipment;
- check the serviceability of gas equipment, whether there are any gas leaks, whether there are cracks or deformations on the cylinder;
- The welder must perform all operations in a fireproof welding overall and leggings;
- It is necessary to protect your eyesight and use a welding mask, and wear a protective shield while working with an abrasive tool.
Where to start the preparatory stage?
The first thing those who want to learn how to cook need to do is purchase the necessary equipment . The complete kit that will be required to complete such work will include:
- welding machine;
- set of electrodes;
- hammer for beating off slag;
- brush.
When choosing an electrode, you need to pay attention to its diameter, which will be determined by the thickness of the metal sheet being welded . You should also take care of protection. For welding we need:
- welding mask with a special light filter;
- thick clothes with long sleeves;
- gloves, preferably made of suede.
The tools required for welding work must include a welding rectifier, transformer or inverter. It is with the help of these devices that the problem of converting alternating current into direct current will be solved, which will allow welding.
Manufacturing of detachable connections
To make detachable connections, you will need to weld the workpiece to the flange. Work is carried out in the lower position. The best option is semi-automatic arc welding. Welding of flanges can be performed using a non-rotating seam, and an operational method can be used.
The steel pipe is joined at an angle of 90° to the plane of the flange, thus simplifying the work of assembling detachable joints. The operation of welding a part to a flange is carried out similarly to the operation of connecting pipes.