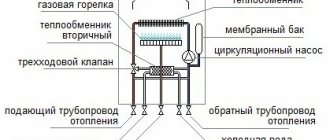
Gas boilers are often used for heating private houses, apartments, public buildings and industrial facilities. They are reliable equipment. However, why does the gas boiler turn on often? Modern units are divided into two categories:
- Single-circuit
- Dual-circuit
According to the installation method they are classified into:
- Wall mounted
- Floor-standing
Despite the fact that gas heating units are high-quality appliances, problems with their operation still occur. Frequent turning on and off of the boiler is one of the most common problems. Such a malfunction may occur due to incorrect installation or improper operation of the device. To extend the service life of a gas boiler, it is necessary to carry out high-quality maintenance of the device in a timely manner. Let's try to figure out why the gas boiler often turns on.
Review of domestic gas heating boilers from leading manufacturers
How to eliminate clocking of a gas boiler in DHW mode
For heating and hot water supply of apartments and small private houses with one bathroom, double-circuit gas boilers are usually used. The owners of such boilers are often faced with the fact that either cold or hot water flows from the tap. As people say, the boiler clocks, the boiler's DHW mode periodically turns off and then turns on again.
The principles of adjustment and adjustment of the hot water supply system described in this article are suitable for double-circuit gas boilers of many brands and manufacturers, as well as gas hot water heaters.
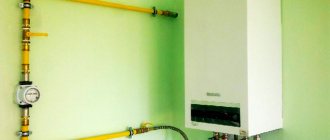
Incorrect installation of the circulation pump
Natural circulation of coolant is not always effective, so owners decide to install a circulation pump. It is especially important if heating a two-story house is required. The devices force water to circulate correctly through the heating system, ensuring its proper operation.
The pump must be installed in accordance with all rules. Their violation can lead to failures in the system, which will be the reason why the gas heating boiler often turns on.
To install the circulation pump, you need to choose a place in the system where there is always excess hydraulic pressure.
Violation of the integrity of the mechanism is the reason for frequent operation of the boiler
Why is there either cold or hot water coming from the boiler?
A double-circuit gas boiler in hot water supply (DHW) mode operates in a power range from minimum to maximum. For example, the operating manual for the Protherm Gepard 23 MTV boiler states that with factory settings for a maximum power of 23.3 kW, the boiler provides water heating for a temperature difference of dT = 30 °C, with a maximum hot water flow of 11.1 l/min.
The minimum boiler power in DHW mode is 8.5 kW. It is not difficult to calculate that this minimum power is enough to heat water by the same temperature difference, for example dT = 45-15 = 30 oC, with a hot water flow rate of 4 l/min. And to heat the water flow rate of 1.5 l/min, at which the boiler burner turns on, it is necessary to operate the boiler with a power less than the minimum - only 3.15 kW.
The design of modern faucets is made taking into account the need to save water. In addition, boilers and water heaters have hot water flow limiters. For example, in a house with a boiler connected to the central water supply, the following results were obtained for measuring the maximum hot water flow: through the bath mixer horn 6 l/min, in the washbasin 4 l/min, in the kitchen sink 5 l/min. It is convenient to measure water flow in taps by calling up line d.36 of the service menu of the Protherm Gepard (Panther) boiler, or measuring the time it takes to fill a 3-liter jar with water (there is a stopwatch in your smartphone).
Usually, in order to save money, users do not open the water taps to full flow. In addition, to obtain a comfortable temperature, hot water is always mixed with cold.
The boiler burner in DHW mode turns on at a water flow of 1.5 l/min. Switches off at 1.1 l/min. This hysteresis is a protection against periodic switching on/off of the burner when the flow rate fluctuates.
Taking into account all these circumstances, the actual amount of water that the boiler should heat per minute will be approximately equal to 1.5-4.5 l/min.
Obviously, the difference between the factory settings of the minimum and maximum boiler power, designed to heat 4-11.1 liters per minute, and the power required to heat the actual flow at the tap, will be significant. The boiler burner power within the minimum and maximum power settings (8.5 - 23.3 kW) is regulated automatically. Obviously, the huge difference between the boiler power settings and the power required to heat the actual water flow (3.15 - 9.4 kW) leads to the fact that the boiler automation is not able to bring the boiler power in line with the needs of the hot water system.
A large excess of the factory-set power of a gas boiler in DHW mode over the power required to heat hot water in users' water taps leads to cyclical (clocking) heating of hot water. The boiler burner in DHW mode periodically turns on and goes off. Accordingly, either cold or hot water comes out of the tap.
Setting and adjusting the temperature of hot water in the DHW system
Diagram of heating tap water with a double-circuit gas boiler depending on temperature ( T oC) and flow rate ( Q l/min) of hot water. The thick line shows the boundaries of the Working Area. Gray area, pos. 1 - boiler clock zone (switching between ON/OFF).
For normal heating of water by the boiler, in the diagram the point of intersection of the temperature and hot water flow lines (operating point) must always be inside the working zone, the boundaries of which are shown in the diagram with a thick line.
If the hot water consumption mode is selected so that the operating point is in the gray zone, pos. 1 on the diagram, then the boiler will clock. In this zone, with a small water flow, the boiler power turns out to be excessive, the boiler turns off due to overheating, and then turns on again.
The diagram shows that the boiler can normally heat water only when the flow of hot water from the tap is in a limited range, 4-9 l/min. When the flow rate is low, the boiler power is excessive and it cycles. And if it is high, the boiler power is not enough to heat the water to the required temperature.
As mentioned above, there is no need to prepare large streams of hot water in the house. It is much more important to ensure comfortable use of hot water with low consumption. For this purpose, the working area on the diagram must be moved to the left. This can be done by reducing the power of the boiler burner by reducing the gas supply by adjusting the gas valve.
How not to fight clocking
Some “experts” advise setting the hot water temperature lower, less than 45 °C, in order not to dilute the water in the mixer when dispensing water, and opening the taps to full flow. Thus, they propose to get rid of clocking, increasing the flow of heated water to the maximum. In many cases, this really helps, since the water flow and temperature fall into the working area on the diagram.
I don’t recommend doing this in DHW systems with a double-circuit boiler or a gas water heater , and here’s why. With this method, you have to consume much more water, and therefore gas, than is necessary. In addition, it is always necessary to keep a large flow of water from the tap; it is impossible to regulate the water temperature with a mixer - all this creates discomfort in using hot water.
In addition, in some boilers, for example Protherm, the display of a double-circuit boiler with a secondary DHW plate heat exchanger does not show the temperature of the hot water leaving the boiler, but the temperature of the heating water leaving the heating circuit of the DHW heat exchanger (return temperature from the DHW heat exchanger). In such double-circuit boilers, automation controls and maintains a constant temperature of heating water at the outlet of the primary circuit of the DHW heat exchanger (return temperature from the DHW heat exchanger), and the temperature of hot water at the outlet of the secondary circuit of the DHW heat exchanger is not controlled .
The temperature of the hot water leaving the boiler will be whatever it will be, depending on the degree of opening of the water tap, on the temperature and pressure of the water in the water supply, and on the thickness of the scale layer. That is, every time you open the water tap, the temperature of the hot water will be different.
Therefore, the required temperature of hot water leaving the boiler cannot be preset on the display. If you set the temperature of the heating water on the display, for example 50 oC, then the temperature of the hot water from the tap will always be less, and less each time differently.
In a DHW system with a double-circuit boiler, it is more convenient to regulate the water temperature directly at the tap at the time of disassembly, mixing it with cold water in a mixer . For this to be possible, it is necessary to have some reserve in the temperature of the water leaving the boiler.
For comfortable use of hot water from a double-circuit boiler or water heater, I recommend setting the temperature on the display in DHW mode to 54 °C.
The temperature value of 54 °C was chosen for the following reasons:
- At a temperature of 54 °C and above, an intensive release of hardness salts begins from tap water, which accumulate in the heat exchanger in the form of scale. Heating the water to a lower temperature protects the heat exchanger from scale deposits.
- The temperature of 54 °C remains quite high and allows you to adjust the comfortable temperature of the water in the mixer by mixing hot water with a small amount of cold. In rare cases when a higher temperature is required (for example, when filling a bath), it is more beneficial to increase the DHW temperature settings on the boiler display.
The intensity of scale deposits in hot water depends on the temperature and speed of water movement near the heating source. According to research, in still water, when the water in the tank is heated, stone begins to form already at a temperature of 40 ° C. At a high flow rate of hot water in a flow-through heat exchanger, stone begins to form at temperatures above 54 °C.
Possible reasons
There are times when you purchased a new boiler, installed it and started using it. But it starts turning on and off randomly. Of course, it must regulate its operation itself, but there should not be frequent shutdowns. In this case, it is necessary to understand the reason. After all, this indicates the presence of some problems. If the device is often turned off and on, its service life is significantly reduced due to wear of the working parts. And, consequently, the boiler will fail.
There are several reasons for frequent shutdowns of the heating boiler. But if you do not understand gas boilers, it is better to contact a specialist.
Let's look at the possible reasons:
- The boiler power is designed for a larger area than there is in the room.
- The circulation pump is not installed correctly.
- The boiler is not selected correctly.
- There is no thermostat in the room. The boiler is regulated according to the temperature of the coolant.
- The temperature range is incorrect.
The problem is not complicated, but sometimes it requires replacing the gas boiler.
Setting the boiler burner power in DHW mode
In order for the boiler in DHW mode to heat water evenly and not cycle even with minimal water consumption, it is necessary to reduce the burner power by reducing the gas supply by adjusting the gas valve. Thus, the entire work area in the diagram will move to the left. To do this, reduce the factory settings on the gas valve for the minimum and maximum pressure at the gas outlet from the valve, in front of the burner.
As a result of adjusting the gas valve, there will be no signs of burner clocking in DHW mode when the hot water flow rate changes over the entire range, from the maximum (6 l/min) to the minimum specified in the instructions (1.5 l/min). The temperature of hot water can be adjusted with a mixer, changing the water flow and mixing it with cold water within limited, but quite comfortable limits.
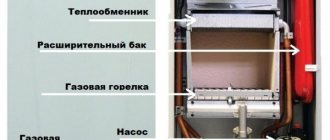
Malfunctions of electrical and gas equipment
Electric gas models need to be checked for voltage; to do this, just turn the plug over when inserting it into the socket to change the phase. In such devices, the main signs of failure are:
- There is no indicator light warning.
- No ignition when LEDs and operating display are on.
- The burner goes out after ignition.
The first step is to inspect the safety block. If the element burns out, a new fuse is installed. If this procedure does not help, you need to proceed to further study of the system:
- Cleaning the filter is carried out after completely turning off the device and closing the valves. The filter part is washed under running water and installed in place;
- If an air lock or excess fluid is detected in the pump, the main central screw is unscrewed, the air is released and the rotor of the device is turned with a screwdriver. After complete drying, the parts are installed back;
- low pressure in the system is eliminated by pumping the air mass into the area of the expansion tank located inside the structure. The pressure should be 0.2 bar lower than in the system itself.
These recommendations allow you to eliminate minor causes of breakdowns yourself without the help of professionals.
Setting up, adjusting the SIT gas valve
Gas valve SIT.
Gas valve SIT. 1 - gas pressure measuring fitting at the valve outlet, in front of the burner; 2 — adjusting nut for maximum gas pressure (flow); 3 — adjusting screw for minimum gas pressure (flow); 4 — cover of the adjusting device; 5 - gas pressure measuring fitting at the valve inlet in the gas network.
Manufacturers of double-circuit gas boilers of many brands install a gas valve from the Italian company SIT on their boilers. The maximum and minimum power settings of the boiler burner are made by rotating the gas pressure adjusting screws located on the valve body.
A U-shaped pressure gauge is attached to the measuring fitting (1) to monitor the gas pressure in front of the burner. The gas pressure value corresponding to the minimum and maximum power of the boiler is indicated in the factory instructions. For example, for a Protherm Gepard 23 MTV boiler with a minimum power of 8.5 kW, the pressure corresponds to 15 mm water column. (mm of water column). For a maximum power of 23.3 kW, the gas pressure at the fitting must be 85 mm.water column.
BAXI Forum
The largest professional forum BAXI in Russia
- Unanswered topics
- Active topics
- Search
- Users
- our team
- Acknowledgments
- 11/15/2019 — A separate section on the forum has been allocated for discussion of the ZONT device.
- 07/19/2019 — The BAXI seminar book 3Q was published. 2019 (119 MB). Download
- 06/20/2019 — BAXI Energy voltage stabilizers are on sale.
- 04/16/2019 — Sales of BAXI Eco Nova boilers have started.
- 11/16/2018 — The BAXI 4Q seminar notebook was published. 2018 (8 MB). Download
Adjusting the gas pressure in front of the burner in DHW mode
Setting the maximum gas pressure:
On the boiler display we set the maximum hot water heating temperature to 60 °C.
We remove the lid from the boiler and provide access to the gas valve and the ability to observe the height of the flame in the burner. I recommend connecting a U-shaped pressure gauge to the measuring connection (1) of the gas valve.
Remove the cover of the adjusting device on the gas valve (item 4 in the figure). Mark the original position of the adjusting devices - nuts and screws - relative to the body with a colored marker, if you need to restore their position.
Turn on the DHW mode on the boiler by opening the hot water tap to full flow with maximum water flow (horn in the bathroom 6 l/min).
Adjust (reduce) the gas pressure in front of the burner using the maximum gas pressure adjustment nut (item 2). When turning to the right, the gas supply increases, and when turning to the left, it decreases. Visually observe the height of the flame in the boiler burner. The purpose of the adjustment is to find the limit where further rotation of the adjusting nut leads to a decrease in the flame height in the burner, a decrease in the temperature of hot water from the tap and a decrease in gas pressure at the measuring fitting (1). Leave the nut in a position close to the found boundary.
As a result, the maximum power of the boiler will become less, and the right boundary of the working zone in the diagram will shift to the left, to the point with coordinates, for our example, 60 °C and 6 l/min.
Setting the minimum gas pressure in front of the burner:
On the boiler display, set the hot water temperature to 52 °C. (read about setting the DHW temperature above)
At the gas valve, disconnect the modulator power cable. The boiler will switch to minimum power mode.
Turn on the DHW mode on the boiler by opening to the minimum flow with a water flow rate sufficient to turn on the boiler burner.
Adjust (reduce) the gas pressure in front of the burner using the minimum gas pressure adjustment screw (item 3). When turning to the right, the gas supply increases, and when turning to the left, it decreases. Visually observe the height of the flame in the boiler burner. The purpose of the adjustment is to reduce the gas supply to the burner (flame height) so that the burner operates continuously and the temperature of the hot water from the tap remains constant, the boiler does not cycle.
As a result, the minimum boiler power will become less. The left border of the working area in the diagram will shift further to the left, to a point with coordinates, for our example, 52 °C and 2 l/min.
Do not attempt to reduce the minimum gas valve outlet pressure too much. Very low gas pressure on the burner can lead to disruption of combustion stability, to the failure and extinction of the flame.
Reconnect the modulator power cable and replace the modulator cover.
We control the gas pressure in the network
The gas pressure in the gas network may drop below that permissible for boiler operation. It is necessary to periodically monitor the pressure, especially in cold weather, when gas flow in the network is maximum.
At the boiler inlet, static and dynamic pressure are measured. Static pressure is when the boiler does not consume gas. Dynamic pressure is measured at maximum gas flow by the boiler.
The pressure in the gas network at the gas valve inlet is measured by connecting a U-shaped pressure gauge tube to fitting pos.5. To measure dynamic pressure, open the hot water tap to full flow.
The normal dynamic gas pressure at the gas valve inlet should be in the range of 1.3 - 2.5 kPa (13 - 25 mbar or 132 - 255 mm water column). If during measurement the dynamic pressure value falls outside the specified limits, then you must contact the gas service.
How to measure the gas inlet pressure and adjust the minimum and maximum gas pressure at the outlet of the SIT gas valve, see this video.
U-shaped pressure gauge
A simple pressure gauge for measuring a gas valve can be made from a clear plastic tube, filled with water and bent into a U shape. One end of the tube is placed over the valve fitting and the other is left open. A ruler is used to measure the difference in water levels in the branches of the tube. The measured distance will be equal to the pressure in millimeters of water column - mm.water column.
A tube with an internal diameter of 8 mm can be tightly pulled onto the gas valve fitting. For a tube of a different diameter you will have to select an adapter.
At the end of the measurements, do not forget to carefully tighten the shut-off screw on the measuring fitting and check its tightness.
Questions and answers
I called the technician, and he told me that the flame height was set incorrectly and this could lead to a leak in the near future. Is there any point in interfering with the burner?
If the master insists and sees a threat, then it is better to listen to the recommendations and do it before that very hour X comes.
I often notice drops of water on the drain, but I don’t understand whether the problem is condensation or a leaking joint, how to understand and what to do?
Dry the surface of the entire joint, then apply a paper towel to the joining area. Hold for 1-2 minutes. If there is a leak, it will show itself. In such a short period of time, condensation cannot a priori form. The squeegee can be slightly tightened using a gas wrench. If this does not help, then you need to completely replace it.
The boiler leaked. The repairman said there were two small holes in the water heater and advised us to replace it with a new one, since the boiler was almost 13 years old. I would like to try brewing it so as not to waste money. Is it possible to do this and what is the best way to proceed?
If the technician sees the need to completely replace the water heater, then it makes sense to listen, since the problem may not only be due to the presence of through holes. Welding, including cold welding, cannot always guarantee the serviceability of equipment.
To summarize, it should be noted that a leak in a gas boiler does not always occur due to a crack in the water heater. It is necessary to check all joints of the heating system, as well as the serviceability of the radiators. If holes are found, it is better to replace it, since welding will give a temporary effect, and you will still have to spend money on installing a new heating tank.
Adjustment, adjustment of the Honeywell gas valve
Gas valve Honeywell gas boiler.
The yellow connector with wires is installed on the stepper motor. Some modern boilers, such as Protherm Gepard and Protherm Panther, have Honeywell gas valves.
The gas pressure setting at the outlet of the Honeywell gas valve is changed using a stepper motor. The gas valve stepper motor is controlled from the boiler control panel through the service menu.
Products for construction and repair
⇆
Let's look at setting up a gas valve with a stepper motor through the service menu using the example of gas boilers Protherm Gepard and Protherm Panther.
Sensitivity guarantees rapid wear
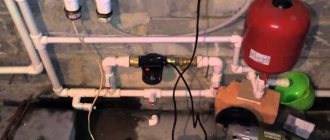
Of course, everyone likes a comfortable temperature. Modern systems offer fine-tuning of heat exchangers that are able to maintain a strictly specified temperature in the room.
With volumetric gas boilers, everything is clear - 100 or 200 liters of water will take an extremely long time to cool, even by one degree. However, the situation is completely different with wall-mounted appliances with a volume of up to 10-12 liters. There the count goes on in minutes, which causes clocking. The situation is especially typical during the off-season.
Near-zero temperatures outside the window are a difficult problem for boiler automation. Heat transfer to the environment is not strong enough for constant operation even at low powers, but still manifests itself in the absence of heating. A small range of 2-4 degrees causes constant starting and interruption of the cycle, which significantly wears out the boiler. The right decision would be to increase the spread to 10-12 degrees.
Access to the service menu of the Protherm boiler
The electromechanical devices of the boiler (electric valves, stepper and conventional electric motors, sensors) are controlled by a microprocessor of the electronic control board in accordance with the programmed program.
The boiler operating program settings can be changed on the control panel using two menus - a public user menu and a hidden service menu.
Access to the service menu of the Gepard boiler
The Protherm Gepard boiler is controlled from the control panel through a publicly accessible user menu. How the owner can operate the boiler is described in the operating manual.
On the control panel you can call up another, hidden menu - a service menu intended for specialists. The service menu becomes available on the display screen after entering the code.
Press and hold the mode button (1) for about 7 seconds; The display will change and the number 0 . — Using the + or — (2), enter the code, number 35 . — Confirm entering the code by pressing the mode button (1). After this, the display will show the 1st line of the menu in the form of symbols alternating on the screen: d. 0 .
— Using the + or — (2), enter the number with the required menu line number: d.** .
To change the value of a parameter in the menu bar: - Press the “mode” button to move from the menu line number “ d.** ” to the parameter value (the display alternates between the “=” symbol and the parameter value). — Change the values of the displayed parameters using the + or — buttons (3) on the boiler panel. — 3 seconds after the change, the new values are automatically confirmed. To return the display to its original state, press the “mode” button for 3 seconds. After 15 minutes of inactivity, the display returns to operating mode on its own.
Access to the service menu of the Panther boiler
The control panel of the Protherm Panther boiler has some differences from the Protherm Gepard boiler. The boiler control panel has a hidden service menu, which becomes accessible when the code is entered.
Boiler control panel Protherm Panther (Panther)
To access the service menu of the Protherm Panther boiler, you must: Press and hold the mode button (1) for about 7 seconds; The display appearance will change. — Using the buttons on the left + or — (2), enter the access code to the service menu — number 35 in the left half of the display. — Confirm entering the code by pressing the mode button (1).
After this, the display will display the 1st menu line in the form of symbols d.00 with the menu line number in the left half of the display, and the numerical value of the line parameter in the right half of the display. — Using the buttons on the left + or — (2), enter the number with the required menu line number: d.** .
To change the value of a parameter in the menu bar: - Change the values of the displayed parameters in the line using the buttons on the right + or - (3) on the boiler panel. — 3 seconds after the change, the new values are automatically confirmed. To return the display to its original state, press the “mode” button for 3 seconds. After 15 minutes of inactivity, the display returns to operating mode on its own.
The service menu commands and the procedure for setting the power of the Protherm Panther boiler are similar to those given for the Protherm Gepard boiler.
Description of some service menu commands
Line d.36 - shows on the display the hot water consumption measured by the flow sensor, l/min. when dispensing hot water (read only).
Let's determine the consumption of hot water in our apartment (in the house). Line d.36 of the service menu shows on the display the hot water flow measured by the flow sensor, l/min. We display line parameter d.36 on the display, then open the hot water taps in the apartment (in the house) one by one to full flow and record the water consumption readings from the display.
Line d.52 - setting the minimum power of the boiler burner by shifting the minimum position of the Honeywell gas valve stepper motor. The range of possible parameter values is from =0 to =99. The lower the parameter value, the weaker the intensity of gas combustion.
Line d.53 - setting the maximum power of the boiler burner by shifting the maximum position of the Honeywell . The range of possible parameter values is from =0 to =-99 (negative values with a minus sign). The lower the parameter value, the weaker the intensity of gas combustion.
Line d.88 - Protection against water hammer in cold water distribution (for KTV and KOV boilers). The ability to change the parameter eliminates the reaction to water hammer, which in some cases occurs in cold water pipelines. For example, when the automatic valve in the flush cistern of a toilet (or washing machine, or dishwasher) closes, a pressure surge (water hammer) may occur in the water supply pipes. The consequence of this may be a false activation of the flow sensor (turbine) of tap water, which will lead to a short-term unwanted activation of the boiler’s DHW mode. Factory setting 0 = activation of the ignition process for heating tap water at a flow rate of 1.5 l/min. Changing the parameter to value 1 = activation of the ignition process for heating tap water at a flow rate of 3.7 l/min. In this case, the flow duration should be at least 2 seconds.
Line d.96 - Setting the boiler to the parameters set from the factory. If the settings lead to incorrect operation or failures, it is possible to restore the boiler to factory settings. Setting: 0—replacement with factory settings will not be performed; 1 - will be returned to factory settings Note: when entering the setting of this parameter, the display always shows parameter “0”.
Setting, adjusting the minimum power of a boiler with a Honeywell gas valve
The boiler manufacturer Protherm Gepard (Panther) installs the SIT 845 Sigma gas valve on some versions of the boilers, instead of the Honeywell gas valve. The setting of this valve is described above. In the service menu of Protherm boilers with a SIT valve, lines d.52 and d.53 are missing.
Setting the maximum gas pressure:
On the boiler display we set the maximum hot water heating temperature to 60 °C.
We remove the lid from the boiler and provide access to the gas valve and the ability to observe the height of the flame in the burner. I recommend connecting a U-shaped pressure gauge to the measuring fitting at the valve outlet.
Turn on the DHW mode on the boiler by opening the hot water tap to full flow with maximum water flow (horn in the bathroom 6 l/min).
In the service menu, select line d.53 , press the “mode” button and see on the display the value of the gas valve stepper motor position parameter in maximum power mode. For example, on a new boiler, the factory setting for the maximum power parameter in line d.53 was = -17.
Step by step we reduce the value of the parameter in line d.53 and record the result. For example, set the line = -30 (minus 30 is less than minus 17) and click “mode” for the changes to take effect. We look at the height of the flame in the burner and the gas pressure. They haven't changed.
Next, we repeat everything with the parameter in the line =-40. If there are no changes, then reduce the parameter again.
The purpose of the adjustment is to find the limit where a further decrease in the parameter in line d.53 leads to a decrease in the flame height in the burner and to a decrease in gas pressure at the measuring fitting. In our example, the flame height and pressure began to decrease when setting the parameter in line d.53 to less than = -70 (remember, factory setting = -17)
As a result, the right border of the working area in the diagram will shift to the left, to a point with coordinates, for our example, 60 °C and 6 l/min. The maximum boiler power will decrease.
Setting the minimum gas pressure in front of the burner:
To adjust the gas valve, the boiler operation is switched to DHW mode. To do this, open to the minimum passage with a flow rate sufficient to turn on the boiler burner.
In the service menu, select line d.52 , press the “mode” button and see on the display the value of the gas valve stepper motor position parameter in minimum power mode. For example, on a new boiler, the factory setting of the minimum power parameter in line d.52 was = 72 and the burner was clocked in DHW mode.
We carry out experiments - we reduce the value of the parameter in line d.52 =60, click “mode” for the changes to take effect, and check the result. If the clocking has not stopped, then we further reduce the parameter in line d.52 =50 and observe the change in the temperature of the hot water in the tap. So, step by step, we reduce the parameter in line d.52 until we achieve no temperature fluctuations at a comfortable water flow.
We reduce the clock rate to an acceptable comfortable level. Do not attempt to reduce the minimum gas valve outlet pressure too much. Very low gas pressure on the burner can lead to disruption of combustion stability, to the failure and extinction of the flame.
For example, on a new boiler, the temperature of hot water in the tap reached 52 °C, after setting parameter =30 in line d.52 (remember, the factory setting was =72). There were no signs of burner clocking in DHW mode when the flow rate varied over the entire range, from the maximum (6 l/min) to the minimum 1.5 l/min. The temperature of hot water can be adjusted with a mixer, changing the water flow and mixing it with cold water within limited, but quite comfortable limits.
How gas valve settings for DHW will affect heating
Reducing the pressure setting at the outlet of the gas valve for DHW will also lead to a slight decrease in the boiler power in heating mode. But in most cases, the maximum power of a double-circuit boiler is selected to cover water heating requirements that exceed the required power for the heating system.
For our example, the maximum boiler power will decrease from 23.3 kW. up to 12-14 kW. This power will be enough to heat a house with a heated area of up to 140 m2.
The maximum power of a double-circuit boiler is usually greater than that required for heating operation. Therefore, after setting the DHW mode, in most cases, it is enough to increase the maximum power setting when the boiler is operating in heating mode. Read how to do this here.
If the boiler power in heating mode still turns out to be insufficient, you will have to restore the factory settings of the gas valve. In this case, to eliminate the DHW clocking, I recommend connecting a boiler to the boiler.
Read: “How to connect a boiler to a double-circuit gas boiler or water heater.”
Positioning the thermometer correctly
There are two types of thermostat:
- Built-in - measures the temperature of the coolant, does not respond to external conditions.
- Remote - measures the air temperature in the room, does not react to the temperature inside the boiler.
With the first type, everything is clear - nothing can be changed, the thermometer does not involve transfer. The remote type must be positioned correctly - otherwise, every ventilation or operation of household appliances will disrupt the heating operation throughout the house.
Experienced craftsmen advise placing the device in the part of the room that cools most slowly. As a rule, it is located at a considerable distance from the boiler, so heating is also extended over time. Reducing the temperature to the lower limit will mean cooling the entire room - the heating will begin to operate normally.
In order for the burner to perform long, uniform cycles, you should not install a thermometer:
- Near windows, doors, cracks in walls.
- Near household appliances.
- Close to the floor or ceiling.
- In the basements.
About the disadvantages of reducing boiler power settings
The service instructions for the Protherm Gepard 23 MTV boiler indicate its efficiency in heating mode: 93.2% at maximum thermal power (23.3 kW.) and 79.4% when operating at minimum power (8.5 kW.) Imagine how The efficiency will further decrease if this boiler has to operate with a minimum power of 4 kW. Please note that during the year, a double-circuit boiler operates most of the time in heating and hot water mode with minimal power. At least 1/4 of the spent gas will literally fly uselessly down the pipe. But clocking, as mentioned above, also reduces the efficiency of the boiler, leads to excessive consumption of water and gas, and makes using water uncomfortable.
In the comments to the article, reader Sergei writes: “The manufacturer set the minimum and maximum power of the boiler for a reason. According to you, if it were all that simple, then the manufacturer, with the help of its service representatives, would reconfigure the boilers the way you talk about it. But in these cases the manufacturer insists on fighting the pressure and not the boiler. As I understand it, this is due to the fact that changing the minimum/maximum range on the burner is dangerous, especially for the boiler. If you reduce the pressure of the gas supplied to the burner, will the flame go down, in which case will the burner be damaged over time?
And this is my answer to Sergei: “My boiler has been running for five years now. Every year in the summer I clean and inspect the burner. I don't see any signs of damage or overheating. I do the same for others. There is no protection against low gas pressure on boilers. This means that the manufacturer believes that it is not dangerous. Low pressure is dangerous for boilers with burners in which gas is pre-mixed with air and the finished mixture leaves the burner. Then yes, at low pressure, the flame can even jump inside the burner and really damage the burner. Most household boilers have a different burner. There is a danger of the flame going out or blowing out, but boilers have protection that will turn off the boiler and give an error. The choice is up to the owner - either live with the clock, or change the settings, or buy a boiler or another boiler. Manufacturers, sellers and specialists actually deceive buyers, with rare exceptions they do not inform them about the clocking of a double-circuit boiler at low water flow rates. Buyers think that there will be normal hot water at the minimum flow rate specified in the instructions, but then it turns out that this is not the case. Resetting greatly reduces the efficiency of the boiler. This information is not included in the instructions and descriptions for users. If all this was explained to customers, they would buy other boilers.”
Problems with the heating circuit
The pump must be selected according to the requirements of the heating circuit.
Malfunctions in the operating mode of the heating circuit are not always associated with a malfunction of the main heating element. If the boiler works, but does not heat the batteries, the reason must be sought in the wiring itself.
List of main heating circuit malfunctions:
- the filter on the return line or the needle tap (Maevsky tap) is clogged;
- insufficient power of the circulation pump;
- the rules for installing a heating circuit with natural circulation have not been followed.
Choosing the power of a gas boiler for your home correctly
Most commercially available gas double-circuit boilers are designed to operate with a minimum thermal output of more than 8 kW.
Some . The boiler control program limits the maximum thermal output in heating mode. And indicate its value in the designation of the boiler brand. Boilers have appeared on sale with the power indicated in the boiler brand, for example, 12 kW. At the same time, in the boiler passport, the maximum power in DHW mode remains 20 - 24 kW, and the minimum in all modes is more than 8 kW.
On sale you can also find double-circuit gas boilers with a maximum thermal power of 20 - 24 kW. and the minimum is less than 5 kW. Such boilers best meet the needs of heating and hot water systems of small private houses and apartments. At maximum power, the boiler operates in DHW mode. At minimum power - in heating mode.
To prepare hot water and heat houses and apartments with a heated area of up to 120 m2, with one bathroom, I recommend installing double-circuit gas boilers with an extended operating power range:
- with a maximum power of 20 - 24 kW.
- and minimum less than 5 kW.
I believe and recommend that for the economical and comfortable use of hot water in the house, install a heating boiler with a layer-by-layer (for a double-circuit boiler) or indirect (for a single-circuit) heating boiler.
How to connect a room thermostat?
Almost all Baxi gas boilers have the ability to connect a room thermostat. If the temperature in the room drops, the device will send a signal to the heating equipment and the boiler will automatically start working.
All indicators depend on the balance and type of heating system. Thanks to the programmable thermostat, you can set the desired temperature during the day. If the temperature in the room is reduced by 1 degree, then you can save about 5% of gas in a year.
In Europe, it is mandatory to install a room thermostat for the energy efficiency of the heating system.
Filter at the heating water inlet to the DHW heat exchanger
Problems with heating hot water sometimes arise and are aggravated due to a clogged filter installed at the heating water inlet to the DHW plate heat exchanger. The filter protects the hot water plate heat exchanger from dirt from the heating circuit.
If the filter is heavily clogged with dirt, then in DHW mode this most often manifests itself as an error: “overheating of the primary supply circuit (NTC2)”. Overheating protection is triggered and the boiler turns off.
For all brands of boilers, the filter is removed differently. But this procedure usually does not present any particular difficulties. No special tool is required. But it will be better to find instructions, a website, pictures or videos on the Internet on this topic. For the first time, you can invite a service specialist and watch how he removes the filter.
Cleaning the DHW filter for double-circuit gas boilers Protherm Gepard and Panther (Panther)
1 — mounting rails, heat exchanger holders; 2 — holder screw; 3 - gasket; 4 - heating water filter at the inlet to the heat exchanger; 5 - DHW heat exchanger of a gas boiler;
To clean the DHW heat exchanger filter you must:
- Close the taps on the heating water supply and return.
- Open the drain valve on the boiler, on the right under the pump, and drain the heating water from the boiler.
- Close the tap at the cold water inlet and disconnect the cold water tube from the boiler. Water will drain from the boiler through the open cold water pipe. Open the hot water taps to completely empty the DHW tract of water.
- Remove the screws (2) and holder (1) from both sides of the plate heat exchanger.
- Remove the DHW plate heat exchanger (5). The body of the plate heat exchanger is pressed to the base by mounting rails. After the tires are removed, pull the heat exchanger up and remove it.
- Remove the gaskets (3).
- Remove the filter (4) from the hydraulic group.
- Clean the filter and put everything back.
It is recommended to change the gaskets between the heat exchanger and the base (3) each time during installation. DHW heat exchanger gasket, rubber ring: 22.2x13.5x5 mm. There is a circular recess on the inside. Article number: 0020014166 (10 pieces).
When reinstalling, check that the heat exchanger is positioned correctly - the markings on its side wall should face forward. I recommend taking this moment and descaling the heat exchanger removed from the boiler . How to do this - read the next article on this topic.
More articles on this topic:
⇒ Connecting a layer-by-layer heating boiler to a double-circuit boiler ⇒ Hot water supply for a private country house ⇒ Solar collector - water heater for a house, pool ⇒ Setting up the power adjustment of a gas boiler ⇒ Descaling the DHW heat exchanger of a gas boiler or water heater
More articles on this topic
- DIY broken roof of a house with an attic
- Apartment redevelopment - fresh ideas
- Internal insulation from inside the walls of a house, apartment, loggia, balcony
- Sound insulation - sound insulation of a house, apartment
- Thermal block, thermal wall, flint granite, polyblock - three-layer wall block
- Ventilation in a private house - natural or forced?
- How to connect electricity to your home
- Wooden floor on joists on the first floor of a private house