A furnace is an effective way to heat your home. At the same time, it not only heats, but also creates a special comfort that cannot be compared with what an electric heater provides. In addition, this structure does not have to be large. The traditional Russian stove is certainly good, but the mini-stove also has many advantages .
The fuel for such a structure can be either firewood or other solid fuel, such as coal. A Russian mini-oven will create a comfortable temperature throughout the entire house, using fuel economically.
While developing a rational design for the “Housekeeper” stove without a stove bench, we modified its base. The result was a different version of the structure from the previous one: both fireboxes were arranged in a new way - the main one and the additional one. The use of a cooking chamber, which is closed with a damper when necessary, remains commonplace.
DIY baby oven
In our article on pechnoy.guru we are building a baby stove that will not take up much space, but will be no less effective.
It will create unique comfort in your house and bring warmth on cold evenings. Of course, it is best to build a stove for a garden house with your own hands from brick; it is not so expensive in terms of costs and is much cheaper than ready-made devices. The baby oven measures only 51*64 at the base, and the depth is 50cm. It will not take up much space in a garden house or summer kitchen. You can heat with wood, coal, peat, briquettes.
Materials and tools
Materials required for masonry:
- fireproof (fireclay bricks) - 40 pieces.
- red building brick M150 – 220 pieces.
- mortar for brickwork (clay, sand or ready-made).
- grate.
- roofing steel for pre-furnace sheet (size 50*70 cm).
- steel strip with parameters 25*4 - 350mm.
- slate sheet 510*300 mm.
- chimney channel valves - 2 pieces.
- firebox door (cast iron).
- 3 cleaning doors.
- blower door.
- oven (320*380*420 mm).
- metal stove measuring 380*350 mm (one burner).
- steel wire.
Required tools:
- pick for cutting bricks.
- broom for removing debris from bricks.
- level.
- shovel
- marker.
- goniometer.
- rasp for grinding in lumps.
- spatula, rule.
- Master OK.
- roulette.
- construction plumb line for checking the vertical of the walls.
Order and drawing
Stove diagram for a garden house with stove and oven:
The installation of brick stoves in a garden house is not complicated, but the skills of a craftsman must be present during construction. Even the baby stove has a stove and oven in its design, so it can be used not only for heating, but also for cooking.
Summer residents who have this stove say that a kettle can be boiled in a couple of minutes. The small dimensions were due to the vertical arrangement of all components. The chimney was laid in one brick, and the channels through which gases pass were placed behind the heating and cooking chamber. They then fall into the lying down chimney, go around the oven and end up in the chimney.
Ordering a stove for a garden house:
Description of the masonry
- The beginning (first row) of laying the furnace begins without mortar.
- After the second row, the installation of the blower door begins, it is secured to the wire, after which it will be covered with brick during the process.
- The firebox is formed from the third row.
- A grate is placed in the fifth row without mortar.
- The firebox door is installed and secured with wire on the sixth row.
- On the ninth row, the firebox door is closed from above, and the wire is embedded in the seams.
- The hob is placed in its place on the eleventh row.
- Next, the cooking chamber is displayed from rows 12 to 16.
- Next begins the laying of the chimney
- The diagram describes in some detail and clearly the further steps, this is the installation of the oven and valves.
To protect ceramic bricks from high temperatures when lining, fireclay bricks are laid in a separate row. You need to remember that you cannot tie different types of bricks together, this can lead to cracks and ineffective construction.
A little about the housekeeper stove
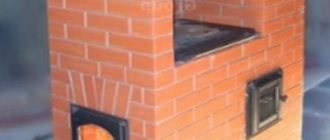
A housekeeper stove is a very common occurrence in rural or rural areas, and you’ve probably been visiting relatives or friends in the village, so you know exactly what we’re talking about right now. The photo shows the same housekeeper stove, made by hand.
So, ordering is a process that is responsible for the sequence of all work on the way to a single result. As a matter of fact, the video and photo show exactly the order.
The housekeeper stove is a kind of structure with small dimensions (apparently hence the name). As a rule, this is a length equal to a meter, a width reaching 90 centimeters, and a height that cannot exceed 2.5 meters.
Typically, the housekeeper, according to the reviews they write about it, includes two fuel compartments in its design (this is exactly what is demonstrated in the photo below):
- The main heating tank is used as the main one.
- An additional heating tank is provided just in case and for severe frosts.
It is worth mentioning that the housekeeper stove warms up first at the bottom, after which the temperature rises, so we get a high-quality heated room not from above (as is customary in the system of other heating units), but vice versa.
What tools are needed?
To build a heat source at home, you need to prepare a basic set of tools:
- hammer-pick;
- Master OK;
- rule;
- grinder, cutting wheels for stone, metal;
- measuring instruments - building level, ruler, square, plumb line;
- carpentry tools to assemble the foundation formwork;
- wooden arrangement;
- several containers and devices for mixing the solution and breaking up the clay.
For construction you will need bricks and a sand-clay mixture for mortar. The amount of material should be based on the scale of the work. You will also need stove fittings - a blower, combustion and cleaning doors, grates, a smoke damper, a hob.
Schemes of potbelly stoves
The main advantage of a rectangular stove
, unlike oval products made from pipes or gas cylinders, lies in a larger heated surface area, so its efficiency will be much greater. The optimal size for a potbelly stove is 800x450x450 mm. A stove of this size will not take up much space and will easily fit even in a small room.
An important difference between the Loginov stove
is the presence of two plates (
reflectors
) in the upper part of the combustion chamber.
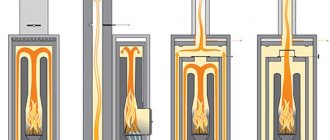
Since the path of gas movement
increases, the heat transfer of such a potbelly stove is significantly higher than that of a conventional metal stove.
Advice
. If you need to reduce the size of the Loginov oven, then it is advisable to change only its width. If the length and height of the structure changes, its efficiency may decrease significantly.
Detailed diagram of Loginov's potbelly stove
Rules for operating the "Economka" stove with a front firebox
When operating this stove, it is worth remembering that you should not burn fuel in both fireboxes at the same time. When you use one firebox, the second one must have the ash and combustion door closed. The stove is always heated with the damper closed. If you need to open the damper during combustion, you should first open the ventilation damper. You should use the upper chamber for cooking only after the firewood has ignited well, that is, this should happen 8-10 minutes after kindling. Cook food in the upper chamber - on the hearth - for several hours after heating the stove - after about 10-12 hours. To bake bread, the oven is heated in the winter way: fuel should be burned in the main firebox. Towards the end of the firebox, the view is covered, and when only coals remain in the firebox, the view is completely closed and the ventilation valve is left open. Leave the oven in this position for 15 minutes, after which the bread is placed in the oven. The readiness of the hearth is checked by throwing a handful of flour onto it. If the flour hardly changes its color, then the heat of the hearth is insufficient. If the flour turns black, then it is overheated, and the chamber should be cooled a little. The brown color will promote normal heating of the hearth.
Types of ovens
Considering the specificity of the garage heating system, it has a number of characteristics that it must meet:
- be small in size;
- allow the use of solid and liquid fuel fractions;
- high heating speed;
- ability to maintain high temperature for a long time;
- simplicity of design;
- budget cost;
- be convenient to use;
- ease of maintenance.
Based on these criteria for suitability of garage stoves, they are divided into several types. The classification is based on the type of fuel:
- Gas heating. Convenient in cases where there is central gas heating nearby. The price of such a system is acceptable, but there is a danger of explosion.
- A stove heated with solid fuel. The cost of installation and heating is low, the thermal effect is good. Convenient and easy to use.
- Electric oven. There will be no questions regarding the quality of heating for such a stove, but the cost of heat in the garage will not be cheap.
How to choose?
There are several factors to consider when purchasing such a stove.
- Weight. The differences in weight are huge, as is clear from the information above. In general, there are two large groups: backpack portable stoves and those that require a car for transportation. If you plan to transport equipment, then weight is not so important; it is better to focus on the characteristics and price.
- Pipe diameter. The diameter of this part of the structure can vary significantly. If there is already a chimney built into the tent, then you will have to select a stove according to size. The diameter is usually equivalent to the combustion power - the larger, the higher the indicator.
- Accessories. Some brands provide a long list of accessories for their stoves, but the cost of such models is much higher.
Features of safe operation
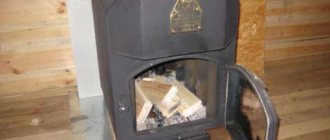
The Swede is intended for a permanent home, as it requires regular heating. Installing it at the dacha for periodic visits is less convenient - you will have to preheat the stove with preliminary kindling.
To prevent a coal accidentally falling from the firebox from causing a fire, it is recommended to place a sheet of iron in front of the stove or lay out the floor with tiles. The chimney, in the place where it comes into contact with the ceiling and roof, must be insulated. Also, for fire safety reasons, you should not stick wallpaper on the heating panel. Only cladding made of decorative stone or tiles is allowed.
Principle of operation
This device works simply:
- put firewood in the firebox and light the stove. Before this, the blowers and air dampers of the chimney are opened;
- heated gases enter the first chamber and pass through the connecting channel into the auxiliary firebox;
- heat flows to the 2-burner cooktop;
- through special openings, gases enter the common chimney channel;
- the flows mix, give off most of the heat to the brick walls and are released into the atmosphere.
The stove hearth is open in front and along the side walls. Thanks to this operating principle, such devices have a number of advantages, the main ones being a high level of performance and fuel economy. Especially in the summer, when only the small combustion chamber is used for cooking.
Furnace structure
Such ovens are not made large in size. The height is up to 2 m, and the width is maximum 1 m. Such heaters can be installed in small rooms. If desired, the oven can be equipped with an additional device - a water heating tank.
Before starting work, it is important to understand the design of the furnace itself and its structure:
- unit base. There are two combustion compartments equipped in an asymmetrical pattern. Each has its own compartment for collecting ash, a ash pit, and a grate. One firebox is the main one, and the second one performs secondary functions. Holes for storing firewood and a blower are placed on adjacent walls, but perpendicular to each other;
- in the first row of bricks, 4 inspection grooves are equipped to clean the chimney of the combustion compartment;
- The lower part of the stove is equipped with a hob located above 2 fireboxes. For better heating of the burners, a channel is laid between the fireboxes for the passage of gases. Such walls are laid out in half a brick, so the bottom of the “Housekeeper” heats up and transfers heat into the room;
- The auxiliary firebox is used during the warm period for cooking food during the warm season.
Sectional view of the housekeeper:
Preparatory work
So, now you can begin the preparatory work. At this stage, we need to take all measurements and purchase construction (and finishing, if necessary) materials.
The building material that we need to carry out the corresponding work should be selected based on the dimensions that were given, and taking into account the two heating chambers. We will need the following materials:
- Brick (red, fireproof) - approximately 750-800 pieces.
- Clay solution for fastening - approximately 35-40 buckets.
In addition, we need to purchase stove appliances. Don't forget that you can use old appliances, which can be borrowed from an old unit or found in an old shed. Reviews from owners who made the stove with their own hands speak about this.
- There are two grates, but of different sizes (180 by 250 mm and 120 by 140 mm).
- Fire door (any size according to your wishes, but also in quantity of two pieces).
- Blower door (preferably small).
- Cast iron stove.
- Chimney damper.
- Valve for ventilation.
- Wire (the more, the better). For the above dimensions, about 10 meters are needed. Wire thickness 6 mm.
But that is not all. Do not forget that additional materials are also needed. For example, it is also necessary to purchase strip and carbon steel. You will also need round steel, which can also be purchased at a hardware store in your city. And also do not forget about the stove damper, the size of which you will have to choose yourself.
But you can see how to carry out all the installation work yourself in the video we provided.
Rules for long-term use
I would like to dwell, so to speak, on the future of your unit. There are several rules that must be followed so that the housekeeper’s oven can please you for a long time with its continuous, and most importantly, uninterrupted operation. First, remember: you cannot melt both firebox compartments.
Secondly, the doors (furnace and ash room) of the room that is not working should be tightly closed, almost hermetically, pay attention to this. Thirdly, the unit damper must also always be closed
Fourthly, do not forget that before opening the damper, it is necessary to ensure that the ventilation duct extends. And finally, fifthly, the cooking chamber and stove can only be used after ten minutes from the start of the unit’s combustion. Don't forget the simple rules - enjoy the operation of the unit. Accuracy and attentiveness will allow you to save the stove for quite a long time, and you will save your finances and nerves.
As a result, I would also like to note the functionality of this heating stove, because now you can not only heat the room you need, but also cook food with it.
- DIY Slobozhanka oven
- How to repair cracks in a furnace
- Laying a wood stove for a home or cottage
- Long-burning heating stoves for summer cottages
Masonry
Start: installation of furnace appliances
There is no point in describing in detail the preparation of stove appliances and their installation in the description of the order. All the same, you will get confused and forget this or that nuance if you do not know in advance what the housekeeper requires of you during installation. Therefore, remember all the details at once:
- The grates will need to be placed on the furnace outlets. You need to select quarters in them using a grinder, and do not forget about allowances for thermal expansion of the material;
- It is advisable to cut the bricks that will be adjacent to the gratings into a wedge, and then rub the cut with sandpaper to obtain a smooth surface. Along these wedges, the fuel will definitely roll onto the grates, and the combustion process will be improved. These small nuances are what make an economical wood stove different. And a smooth surface will not fade much longer.
- All cut surfaces, every edge, must be rubbed with a liquid solution. Soot and other decomposition products during combustion will not settle and accumulate.
General structure of the “Ekonomka” stove
- wrapped with asbestos cord before installation , and not push the cord with a screwdriver into the gap formed after installation. Look at the position of the door in this row and saw off the excess clamps, then fastening them with wire twists. The upper clasps also need to be fixed. You can install doors without clamps and without asbestos cord. But after using the oven for a long time, the wire will simply burn out and all the doors will fall off.
- To install the valve correctly, first in the bricks on which it is installed, you need to select a quarter to a depth slightly greater than the thickness of the frame. It will turn out that when the frame is safely in place, at the junction there will be a small gap between the top brick and the valve itself. Then it will be more convenient to grip the valve. And to make it even more convenient, you need to cut off the top facing brick with a wedge.
- The plate must be installed in the same way as the valve. But here you will have to choose quarters over a much larger extent, along the perimeter. If this work is not done, your slab will lie higher than the hearth.
Foundation
The stove has impressive dimensions and weighs a lot, so it needs reliable support.
The work algorithm is as follows:
- Prepare the pit. Calculate the dimensions based on the stove base. On each side you need a margin of 15 cm. Go deep by 50-70 cm.
- Pour sand, pour water, compact it so that the thickness of the waterproofing becomes 15-20 cm. Pour more sand, pour water and level it.
- Lay out the roofing material in 2 layers.
- Install the formwork and cover it with film.
- Mix cement, sand and crushed stone 1:3:5. Use water to get a semi-liquid mixture.
- Pour cement mixed with gravel into the formwork, 20 cm high. Pierce this layer several times to let the air out, compact it.
- While the solution has not hardened, install the reinforcement. Height above concrete 5-7 cm.
- Fill another layer of 10-15 cm, when it sets, lay the reinforcing mesh.
- Fill the entire formwork with mortar and level it.
- Lay roofing felt in 1 layer.
If you are planning a small stove, then a guard base is allowed. Install it on the floor beams. Such a base is a frame made of timber or logs with 2 crowns. To strengthen the beams and stabilize the furnace, intermediate piles are driven into the center. Rubble is poured into the free space, with felt soaked in liquid clay on top. This base can support construction up to 700 kg. If the weight is greater, then a slab foundation is needed.
The best stoves for a tent for winter fishing (TOP rating)
Below are the products you should pay attention to when choosing a stove for your tent. The TOP 7 included:
Tramp TRG-036 1.3 kW
This small, portable stove heats small spaces easily. The design is made of good metal materials. Above the infrared emitter there is a convenient grill for heating food. The stove runs on gas, which is enough for about 3-4 hours of operation. A good solution for a small tent.
- Length, mm “290”.
- Width, mm "231".
- Height, mm “247”.
- Weight, kg "2.34".
- Power, kW “1.3”.
Price in Russia from 2500 rubles.
ADVANTAGES:
- high build quality
- light weight
- heats small rooms well
- all declared functions work
- warranty period 1 year
FLAWS:
- not detected
Tramp TRG-036 1.3 kW
Turbo stove-wood chipper “Ogonyok”
High power wood stove. The heat from the stove can boil water and warm the air in the tent in a short time. The high power of the device is achieved due to the built-in electric air blower, powered by batteries. The stove is easy to install, and due to constant inflation, it can heat well using wet wood.
- Supercharger power supply “AA batteries, 2 pcs.”
- Length, mm “120”.
- Width, mm "110"
- Weight, kg "0.6".
Price in Russia from 2000 rubles.
ADVANTAGES:
- three operating modes
- works stably at low temperatures
- Any available material is suitable as fuel
- One set of batteries lasts more than 50 hours
- On the stand you can place dishes not only with a diameter larger than the diameter of the stove itself, but also with a smaller diameter, for example, a tin can
FLAWS:
- not detected
Turbo stove Wood chipper
Small tourist stove with screen
A good wood-burning stove that looks like a small “potbelly stove”. The stove is made of high-quality metal, which allows it to withstand high temperature loads. Its cubic shape allows it to transfer heat well in all directions. Also on its upper part, it is convenient to use for heating water and food.
- Length, mm “230”.
- Width, mm “230”.
- Depth, mm “500”.
- Weight, kg "4.5".
Price in Russia from 1500 rubles.
ADVANTAGES:
- low weight and volume
- the best choice for hiking fishing trips
- safe and easy to use
- suitable for heating a 2-3 person winter tent
- very convenient for cooking, as well as hot and cold smoked dishes
FLAWS:
- not detected
Shore Economy Small with removable screens
Camping stove Savotta Stove with heaters
A fairly large and heavy stove for large tents. It has a lot of weight due to the high-quality steel from which it is made. Suitable for heating rooms that can accommodate up to 10 people. The stove has a high percentage of heat transfer and can be used to heat a bathhouse. Due to the adjustable power of the flame, you can quickly heat up the tent without spending a lot of firewood, and due to the compartment in which you can put stones, you can turn the tent into a camp sauna. A good travel solution that is suitable for a long hike.
- Length, mm “300”.
- Width, mm “280”.
- Depth, mm “450”.
- Weight, kg "18.5".
Has a compartment for dumping ash. Price in Russia from 28,000 rubles.
ADVANTAGES:
- The furnace body is made of steel 3 mm thick.
- long-term operation and high heat dissipation
- the volumetric combustion chamber allows the use of large firewood
- The legs design is removable, convenient for transportation and carrying.
- stable combustion even with minimal air access
FLAWS:
- not detected
Camping stove Savotta Stove with heaters
Mobile oven NMK Tourist
Small mobile wood-heating stove. It is easy to install, and due to high-quality steel walls, the tent quickly heats up. Suitable for both a small tent and a tent for 5-10 people. The stove performs well in extreme cold and, due to its elongated design, allows you to place several pots on it for cooking.
- Width, mm “280”.
- Depth, mm “450”.
- Height, mm “470”.
- Weight, kg "18.5".
Price in Russia from 14,000 rubles.
ADVANTAGES:
- made entirely of stainless steel
- compact, the legs fold easily and the oven takes up very little space
- the surface of the oven can be used as a hob on which you can cook food and heat water
- when using a special heater (purchased separately) and stones, it functions as a sauna stove
- Great for 5-10 person tent
FLAWS:
- not detected
Mobile oven NMK Tourist
Poshekhonka, Large, with screen
Lightweight and reliable portable stove, perfect for heating a small tent. Due to its light weight, the stove is suitable for hiking and does not take up much space in the tent. According to the manufacturer, the stainless steel from which the stove is made will allow it to last longer. It has 2 removable screens, due to which the heating area is adjusted.
- Length, mm “340”.
- Width, mm “230”.
- Depth, mm “330”.
- Height, mm “480”.
- Weight, kg “3.5”.
Price in Russia from 9500 rubles.
ADVANTAGES:
- small dimensions
- weight 6.5 kg, great for hiking and fishing trips
- the stove body is used as a heating surface for cooking food or boiling water
- can be used as a smokehouse
- bag-case included
FLAWS:
- steel thickness 0.5 mm.
Poshekhonka Small with screen
Gas stove TOURIST MINI AFRICA 1.2 kW
A compact gas heater will allow you to quickly warm up in a small tent. Has extremely mixed reviews from customers. Its main advantage is its size and fuel consumption. On one cylinder it is capable of heating a two-person tent for up to 6 hours. Can quickly boil small volumes of water.
- Length, mm “300”.
- Width, mm “130”.
- Height, mm “260”.
- Weight, kg "1.5".
Price in Russia from 3500 rubles.
ADVANTAGES:
- compactness
- neat assembly
- economical fuel consumption
- Stable burner operation even at minimum
- quickly heats up a small room
FLAWS:
- according to reviews, it doesn’t always light up the first time
Gas stove TOURIST MINI AFRICA 1.2 kW
Some rules for making a stove
To ensure that the stove turns out well and lasts a long time, before building it, consider:
- the materials you use must be of high quality. By skimping on high-quality components, you risk providing yourself with long and frequent repairs;
- However, it is better to use the instructions for making the stove. The experience of the master will protect you from mistakes and unnecessary expenses during construction;
- the first time after construction, be especially careful - you might not keep track of something during the work. Other problems may only become apparent during operation;
- follow safety precautions. You can get injured during construction. Be careful and don't take risks.
In general, the stove is quite safe for the home and its inhabitants. Spontaneous combustion from a spark or fallen coals is virtually impossible, even if the stove is used incorrectly. And even a beginner can handle the kindling - the stove is very simple.
Characteristics
Regarding appearance, the classic and economical stoves are quite similar. The laying process is also not much different. The whole secret is in the design and choice of materials that will reduce heat loss to a minimum. The modified furnace consists of several chambers connected by a common channel. Thanks to this feature, heat is not lost, but is concentrated below. The cooking chamber is equipped with a damper and can be used for cooking. There is a pole open on both sides, along the contour of which a frame called “faience” is made from a metal corner.
It is located on the lower and upper parts. To strengthen the building and provide protection from destruction, it can be reinforced with pipes or a metal frame. As a result, such a furnace rationally consumes thermal energy and requires a small amount of fuel. Any raw material for heating is suitable - the main thing is that it is solid. If all rules are followed, heating will occur evenly and smoothly, which will eliminate cracks in bricks and burning out of clay.
Recommendations for using a small stove
In order for the stove to be useful and save money, it is necessary to monitor its condition. Even a minor crack increases the loss of efficiency. For better heating, use only dry wood for kindling. Be sure to close the view.
Major cleaning of soot is carried out once - in the summer; in winter, minor cleaning is done, but at least 3-4 times per season. Accumulated soot reduces the heat output of the device. If the viewer, valves or door are faulty, you cannot light the stove, because they control the draft and help carbon monoxide evaporate.
Despite all the nuances in the construction and operation of a mini-oven, it acts as an excellent heating device and can compete with modern gadgets in the speed and delicacy of preparing many dishes. It’s not for nothing that our ancestors considered the stove to be the soul of the house and placed the structure in the middle of the hut.
Not even a few centuries passed before she returned to us, only in a slightly different form. But its small size is not the main thing, because in terms of its functions and the wonderful atmosphere that is created in every home, the device is very similar to the good old Russian stove.
Terms of use
Tourist tents are made of flammable materials, and sometimes fire situations occur in which people do not have time to get out of them and get burned. Therefore, when heating the space of a camp home, it is necessary to take all possible safety measures:
- Do not use fire-based heating devices unless the tent material is heat-resistant.
- The use of the stove must strictly correspond to its intended purpose. If the design does not provide for simultaneous cooking and heating, therefore, this is prohibited. You should also not use the stove to dry things.
- The chimney must have a spark arrester.
- Do not use flammable liquids for kindling.
- Go to bed as far away from the stove as possible.
- Avoid carbon monoxide poisoning and maintain proper ventilation.
- Do not use questionable structures for heating.
- Use an electric torch for lighting.
There are many ways to make your own tent heating. The main thing is to follow these tips and follow safety rules. And then, even in severe cold, your vacation will not only be exciting, but also comfortable.
Drying the lined stove
After completing the masonry process, the stove cannot be heated at full capacity immediately, since in this case it will dry unevenly and unsightly stains will appear on the surface of the walls. In addition, the mortar at the seams may crack, and the walls will depressurize.
To prevent this from happening, the oven must undergo a natural drying process for 10 ÷ 12 days. In this case, all latches and doors must be opened. In order to create favorable conditions for drying the furnace structure, in this case, an ordinary electric light bulb of 200 ÷ 250 W can be placed in the cooking chamber for the entire drying time.
After completing the first stage of drying, you can move on to forced measures - start heating the stove with a small amount of firewood, with the smoke valves open, but with the fireboxes closed.
The stove is heated for 7 ÷ 10 days according to a special system: in the first two days only 3 ÷ 4.5 kg of firewood is used for heating, every day adding 1 ÷ 1.5 kg of fuel to the initial amount, and so on throughout the entire forced period. drying.
If, after a long drying period and carrying out a control fire, minor cracks still appear in the seams between the rows of masonry, do not rush to repair them. They need to be monitored during the heating season. During this time, they will either stop in one position or expand a little more. Only after the end of the heating season can repairs be carried out, repairing all the defects that have appeared.
Features of the mini-stove
It is very convenient to cook on this stove because it has a separate firebox with a hob. The versatility of its design allows the housewife to prepare a huge number of dishes: porridge, pies, poultry, bread, pizza and much more. A few hours after the end of the fire, you can still fry, steam or cook on it. At the same time, it can be installed even in the smallest houses, because the size of a mini Russian stove is 100 by 130 centimeters. The owner of the house can build it with his own hands, because the design is simple and does not require special knowledge in the field of engineering.
The design of the fireboxes also has its own characteristics . The main large one is located on the front side, and the additional small one is located on the right wall of the stove. A cast-iron stove is placed on them, designed for preparing a wide variety of food, which has two burners of different sizes. The larger one covers the main firebox.
Fuel tanks have different functions.
The main one is used for heating when cold weather sets in, and without restrictions - for baking traditional Russian dishes. At the same time, it is possible to burn fuel in the cooking chamber itself. An additional firebox is used in the warm season mainly for cooking. It burns well a small amount of waste and fuel, including raw fuel. With the onset of cold weather, this firebox is also used for cooking, but only if the entire stove array is heated.
A Russian stove without a stove bench has its own peculiarities in the structure of the channels for removing hot gas and smoke. When the stove is lit, first all volatile combustion products flow from the main firebox into the first section of the heating chamber. Then, in the second, through the folds and, bypassing the gap in the hearth, they approach the rear wall of the cooking chamber, heating it. After which the smoke enters the front block of the cooking chamber, on the upper part of the roof of which there are four holes. Volatile substances enter the collection channel through these holes, and from the channel directly into the chimney. Smoke from a small firebox does not have its own exit system. It enters from there into the main firebox and from there, according to the above-described scheme, is discharged outside.
The design of the Russian mini-stove provides a channel for ventilation . If necessary, it can be closed with a valve.
Construction technology
For construction, it is important to find good drawings of the “Ekonomki” stove and an ordering diagram, or better yet, get acquainted with the recommendations of experienced stove makers and watch the entire work process
Dimensions
We take as a basis the dimensions of our stove:
- width – 890 mm;
- depth – 1400 mm;
- height – 2250 mm.
The dividing partition between the fireboxes is made with 3 cavities for the passage of gases, measuring 100/200 mm. The hob is heated by gases, so you can dry berries, fruits or mushrooms on it and cook food.
Materials and tools
For work we will prepare:
- pick and hammer;
- Master OK;
- a trough for soaking clay and preparing a solution;
- steel square for marking the corners of the furnace;
- plumb line, level;
- measuring instrument;
- large file for cleaning edges;
- up to 1300 ceramic bricks;
- 2000 kg of sand;
- 2500 kg of clay;
- air valve, 4 doors
Having prepared the tools and materials, we move on to the main work.
Description of the masonry
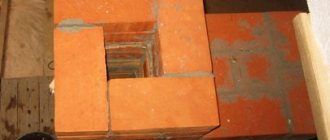
Photo of the arrangement of the “Housekeeper” stove:
A DIY wood-burning stove is made taking into account the ordering scheme and construction stages.
Row No. Description of work 1,2
We lay out 1 row on a solution of clay and sand. We lay the brick flat, maintaining the correct position and thickness of the entire row.
The entire design of the furnace depends on this. We lay the second row according to the diagram, begin to lay the ash pan channels and the ash pan.
3 We wrap the frame of the ash door of the main fuel compartment with asbestos cord and install them at the mounting points. We fix them with bricks and mortar. We install the frame and door of the ash pan of the small firebox.
4 We install and secure the blower door for the small combustion compartment on the other side of the stove. 5 We trim the edges of the inner row of bricks to install the grate. We carry out the laying according to the diagram. 6 Install the grate
It is important to provide a gap of 4 mm to the brick and fill it with asbestos cord. Such a device serves as a thermal gap. 7-10 We carry out the masonry according to the diagram
On the bricks of the 10th row, we select grooves for installing the hob. 11-14 On the 11th row, we fill the gaps with asbestos and install a hob with 2 burners. We carry out all work in order. 15 Bricks are cut at an acute angle. The formation of the roof of the brewing compartment begins. We install special ties on the sides to secure the structure. 16 We continue to install the couplers and form the mouth of the furnace. 17 We make a transition channel between the combustion compartments for the passage of heated gases.
All further rows are carried out strictly according to the ordering scheme and according to the drawing of the furnace. We determine and install an air damper on the chimney, making sure to seal the connection with a cord made of fire-resistant material.
Important! To bring the chimney to the roof, it is better to use sandwich pipes, connecting them to a brick pipe at the level of the floor slab. They are equipped with a layer of thermal insulation and do not heat up the wall surfaces
The internal pipes, made of stainless steel, are smooth. A layer of soot will not be able to settle on them.
All further work is carried out similarly to the process of drying and first firing of brick stoves. This work will take 3-4 days, but will allow you to check the stove for defects and smoke, eliminate faults and gradually dry the brick surfaces from moisture.
But before that, we open all the channels in the lower part of the furnace and combustion compartments and remove construction debris. We check the draft level in the chimney. If the torch flame does not draw into the firebox when the vent and air damper doors are open, this means that the chimney is clogged and needs to be cleaned. Only after achieving a normal level of traction can you start drying the “Housekeeper”.
Advantages and disadvantages of use
With the help of a housekeeper's stove, you can maintain a comfortable temperature in the room at different times of the year. The main advantages of using such a device in private homes are:
- low fuel consumption for heating the room;
- complete heating of the air in the room;
- the ability to heat the room and cook food at the same time;
- The stove can be heated with any different type of fuel.
The device is equipped with auxiliary ventilation channels, due to which odors released during the cooking process do not enter the room.
The disadvantage of using such a stove is the need for constant cleaning of the ash pans, as well as the relatively long heating time of the stove. To fire wood equipment, logs of the same length are required.
How to build a Russian stove with your own hands: main stages
First of all, you should prepare all the required materials:
- fireclay and red bricks;
- sand, clay;
- roofing felt;
- doors and smoke valves;
- asbestos cord;
- grate.
Tools you will need:
- level, tape measure, square;
- construction pencils;
- rubber mallet;
- container for preparing the solution;
- drill with mixer attachment.
Laying a stove with your own hands - how to lay a stove correctly The entire process of erecting a heating structure consists of the following main stages:
- They choose a project for a Russian stove with drawings that indicate the dimensions (read: “Diagrams and drawings of brick stoves - correct masonry”). Then they determine the place where the structure will be installed and assess the condition of the soil.
- Laying out the foundation. To do this, they dig a pit and put sand and crushed stone on the bottom. The mixture is compacted and poured with a concrete layer. They do waterproofing. It is worth noting that you can make outdoor stoves with your own hands using the same method.
- The rules for making a Russian stove with your own hands provide for the preparation of high-quality masonry mortar. The main trick is that you need to choose the right ratio of clay and sand (usually 1:2). But it should be remembered that clay can have different qualities. After the solution is prepared, it must be checked for “fat content”. For this purpose, roll the ball and hit it hard on the floor. If it crumbles, it means that the solution contains sand in excess. If the ball has survived, then the consistency of the composition corresponds to its purpose.
The main stages of making a potbelly stove
1. All the details are marked on a sheet of metal: 6 steel rectangles for the walls of the oven, 1 rectangle for creating a smoke reflector, plates for the grate and latch for the door. 2. Cut
sheet metal can be found at any metal depot.
The guillotine, unlike the grinder, allows you to cut (chop) it more accurately. In this case, there will be no need to do straightening (alignment of sheets).3. The furnace body is made in the form of a rectangle. Their sides are joined together at an angle of 90° and welded together. Welding the box
4. To avoid mistakes, the oven box is first only tacked by welding in several places, and only then, after checking its horizontal and vertical positions, its seams are welded.
Important! All connections in the body are thoroughly welded; To check the seams for leaks, you can coat the joints with chalk or kerosene. 5
Welding seams are cleaned with a wire brush.6. The internal space of the potbelly stove is divided into three parts: the firebox, the smoke circulation chamber and the ash pan. To separate the firebox from the ash pan, a grate is laid between them, on which the fuel will be placed. To do this, at a height of 10-15 cm from the bottom of the stove, 5x5 cm corners are welded on the sides and on the back of the box, on which the grate will be located
5. Welding seams are cleaned with a wire brush.6. The internal space of the potbelly stove is divided into three parts: the firebox, the smoke circulation chamber and the ash pan. To separate the firebox from the ash pan, a grate is laid between them, on which the fuel will be placed. To do this, at a height of 10-15 cm from the bottom of the stove, 5x5 cm corners
, on which the grille will be located.
Advice.
It is better to make the grate from 2-3 detachable parts. Otherwise, when replacing a burnt grate, it will be difficult to remove it from the firebox.
7. The grate is welded from thick steel rods or strips 30 mm wide. They are attached to 2 stiffeners - rods with a diameter of 20 mm. Since the grates burn out over time, it is better to make such a grate removable.
Manufacturing of grate
8. At a distance of 15 cm from the top of the box, two strong rods are welded, on which one or two removable reflectors
– thick-walled sheets of metal that will delay the flow of hot gases and send them for afterburning. However, they should not completely block the oven. To allow hot smoke to enter the chimney, an indent of about 8 cm is made from the front (for the first sheet) and back of the stove.
Diagram of the passage of gases in a simple potbelly stove and stove with an installed reflector
9. Next, the upper part of the box is welded, and then a hole for the pipe
.
Pipe hole
10. The front part of the stove with holes cut in it for the firebox doors and ash pan is welded last. 11. The size of the firebox door must be sufficient to allow fuel to be added and grates to be changed without effort. The hole for the ash pan is made a little smaller. 12. The hinges are welded first to the door, and then to the body of the potbelly stove. They can be bought ready-made or welded from two tubes of different diameters. Door handles can be made from a strip of metal or rod.
Welding the door
Important! When attaching the doors, you should fit them to the body as tightly as possible; To do this, they are straightened (leveled) and cleaned with an emery wheel. Wedge latches closing the doors are adjusted to the body as tightly as possible
13. You can cook food or heat water on such a stove. To do this, a hole of the required diameter is cut in the upper part of the box. Stove burner
, which will be inserted into this hole, can be purchased at any hardware store.14.
For ease of use, the structure is installed on legs
or a welded stand made of pipes.15.
The chimney pipe is connected to the stove using a sleeve
.
16. To insert a damper
to regulate the smoke output, two holes are drilled in the pipe. A metal rod is inserted into the holes and bent at 90°. A metal “penny” is attached to it in the center of the pipe - a gate, the diameter of which should be slightly less than the diameter of the pipe itself by 3-4 mm.
Gate valve for adjusting smoke output
Comrade BdfyPf's topic - www.nepropadu.com/blog/BdfyPf/3511.html brought back memories... Many, many years ago, when the trees were young, and so was I... All this happened. Without going into details, I will say that there was a wound in the stomach. The suture is approximately where all normal people have a suture from appendix surgery. Due to injury (he spent 2.5 months in the hospital), he was not accepted into the army, although he was prepared for service in the Airborne Forces. The doctors said that now I should not live, but exist! Walk lightly, do not lift heavy objects, breathe as hard as you can!!! WELL, OF COURSE!!! I passed the medical examination to become a seafarer with deception. (Graduated with honors and the free right to choose a place of work!). Flew to Sakhalin. Burned in Hawaii. We stopped for repairs in Petropavlovsk in Kamchatka. He went to work at the Kamchatka Military District. But, in 1971, he suffered from an attack of appendicitis (luckily it happened on the shore!). At the next annual medical examination, the doctors, seeing two stitches next to each other, interrogated me with passion. Before that, I had always insisted that my stitch was from the appendix, they were surprised that it was so rough and displaced, to which I made a face with a shovel - they say, what do I have to do with it? I didn’t cut it myself!!! After the second seam, my story ceased to exist, I had to tell everything... Holy shit... What started here! They forced me to drink Barium, then they x-rayed me, pinched me, kneaded me, and finally they made a verdict that I was temporarily unfit to go to sea! I need to be further examined, supposedly there are adhesions... It’s a shame, of course, but you can’t argue with the doctors... I’m getting in touch. Having looked at my files, the administration of the ETUS (operational and technical communication center) sent me to Leningrad for advanced training courses - or simply to study rural telephone exchanges. Two months, and I’m a local electrician at the Nachikinsky communications center! What it is? The village of Nachiki is an all-Union geothermal resort, like the well-known Paratunka. My telephone exchanges were located in three settlements - Nachiki (100 km from Petropavlovsk-Kamchatsky), 5 km away - the village of Sokochi, and another 5 km. - Dalniy village. And I had a lineman, Volodya. A man of about fifty, a mixture of Russian and Chukchi or Koryak. Because of his unique manner of speaking and his love of hunting, everyone called him “Volocha-zaisiki”... He lived in Dalny. I must say that the locations of these villages are a dream for hunters and fishermen! Taiga all around. About a hundred meters from the station (and my apartment was right in the station premises), the Plotnikova River flowed, where all the red fish went to spawn!!! What kind of fishing is there!!! Coho salmon, Chinook salmon, sockeye salmon, chum salmon, pink salmon, char... But when all this is nearby, you want something more romantic! And, knowing that Volodya was a local aborigine and knew everything in the area, I constantly begged him to take me fishing and hunting in the taiga. But Volodya, like all tight-knit men, always found a reason to avoid answering. I realized that he does not want to reveal his places and secrets... BUT! New Year 1972! 1st of January! In the morning I wake up to a knock on the door. Volodya is on the threshold with skis in his hands, but he looks completely lost... What happened?! From the confused story of the unhungover Volodya, I learned that... Having made a stash from his wife in the chamber of a gun, Volodya, from his salary, stuck two pieces of paper for twenty-five rubles each (at that time quite a lot of money!), and forgetting about it, in the heat of New Year's Eve, at 12 o'clock, I decided to make a fireworks out of two barrels!!! He showed me two burnt pieces of paper that he found in the snow of his garden! This is all that remains of the hope of getting a hangover on the first!!! Knowing that I always have something under the cot (I didn’t have a bed), he’s ten kilometers away. came to me in the hope of improving my health! Free cheese only in a mousetrap!!! After several stopars, I convinced Volodya to agree to take me fishing and hunting!!! This is just a saying - a fairy tale lies ahead! I already wrote about fishing, but I can talk for a long time about hunting in winter, but this topic is about something completely different... On one of the trips, Volodya led me to a taiga hut, where there was a miracle stove. There was no door, no grate... He couldn’t really explain anything about the stove. But when he lit it, I was surprised for a long time - the heat remained until the morning! Many years later I repeated this miracle, but with changes. First of all, I made a door that closes tightly - this made it more convenient to add firewood and remove ash. And, most importantly, sometimes you want to sit by a living fire... (it’s not without reason that they say - you never get tired of looking at two things - fire and water). And instead of a blower pipe, I made something like a carburetor air damper. Through it it was better to observe the combustion process. And recently, having bought the book “Hunting Crafts,” I discovered this article. L. POZDNYAKOV OVEN-ECONOMY
A - general view of the stove; B - side view; B - diagram of the sealing of the side of the combustion hole into the front wall and the vent pipe into the firebox cover; 1 — cover-plug of the combustion hole; 2 — blower pipe; 3 - chimney pipe; 4 — handle of the cover-plug; 5 — side of the combustion hole; 6 — blower cover; 7 — front wall of the stove (dimensions in cm)
Due to the nature of my work, my comrades and I had to live in tents for several months at a time for many years, often enduring late autumn and the harsh Yakut winter. And everywhere an iron stove, filling the tent with warmth in a matter of minutes, accompanied us on our taiga wanderings. But an ordinary iron stove, not quite correctly called a hunting stove, has one big inconvenience. It heats up quickly, but the wood burns out very quickly and you have to get out of bed and add more wood several times during the night. In Yakutia, in the Verkhoyansk region, stoves called housekeepers were widespread. They were widely used in tents, and 25-35 years ago they were used to heat many residential buildings. The difference between them and a conventional stove is that instead of a door, a round hole is made in the front part of the stove, tightly closed with a plug lid with a handle riveted to it. At the bottom of the lid, a blower is made in the form of a small pipe with rows of holes on a cylindrical surface, onto which a cap-cap equal to the length of the blower pipe is tightly placed. If the hood is removed, maximum air draft is created, the wood burns very intensely and the stove quickly heats up. By putting the cap on the nozzle and moving it along the blower nozzle, you can gradually block the ash holes and regulate the air draft force, reducing it within the required limits. If the cap is pushed onto the pipe all the way, then all the holes will be blocked, the draft will almost stop and the firewood will smolder slightly. Usually, thick logs are laid at night, and when they flare up, the ash pipe is closed and the stove emits even heat. Depending on the size of the stove, the thickness and quality of the firewood, smoldering lasts 5-7 hours and by morning there are still burning coals in the stove. It is enough to move away the ash cap, the fire flares up and the wood quickly flares up again. Any tinsmith or hunter himself can make a stove if he has a little skill in working with tin. The general view of the stove measuring 30x30x50 cm, as well as some details of its structure, are shown in the figure. The stove is made from ordinary roofing iron; it must have two elbows and three pipes, the length of which fits into the combustion space of the stove. The first elbow of the chimney, especially in a tent, where there is a danger of sparks flying out of loosely connected chimney pipes, is more securely placed on a short pipe 5-6 cm high attached to the back of the stove. It is convenient to use as a cap placed on the blower pipe. use a can of stewed meat or a tin box of natural coffee, adjusting the diameter and length of the blower pipe to fit them. If there is a regular hunting stove on sale with an opening door, then it can be easily converted into a housekeeper. To do this, remove the door and its lock from the stove. A round hole is cut out in a sheet of iron to the size of the front end of the stove and the side of the combustion hole is sealed into it, as shown in the figure. After sealing the side and fitting the combustion cover-plug to it, the sheet is riveted to the front wall of the stove. In order to create a tight seam, the rivets should be placed more often and in a checkerboard pattern. They can be made from pre-annealed nails. The rivet is inserted from the inside, pressed against the part to be riveted with a massive piece of metal, and the protruding end of the rivet is riveted. It should be noted that the stove does not have to be placed on legs or stones. It is enough to pour earth or sand under it. In our practice, stoves (and there were dozens of them) served under intensive use for 2-3 years and failed not from burning out the bottom, but mainly from various damages during transportation. I will add that V. Yankovsky is absolutely right when he says that if you have a stove, there is no need for various insulated tents. About thirty years ago we did not have modern factory tents and made them from unbleached calico or mattress teak. These tents served well even in frosts down to 20-25°. Only when it was necessary to work in winter at frosts of 50 degrees or more, tents made of two layers of teak were used. In all cases, heat was provided by heat-saving stoves. I’ll add a few words to V. Yankovsky’s recommendations about the structure of the tent and its installation. He rightly points out that it is better to hang the tent on a pole threaded through the holes under the ridge, since the ropes are pulled out, the tent sags and when it rains it easily gets wet, allowing water to pass through. But sleeves 25-30 cm long with ties should be sewn to the holes for the passage of the poles. After installing the tent, the sleeves are tied with ties around the pole, protecting the tent from sliding on the pole and from the penetration of cold. Where the roof panels of the tent are connected to the vertical walls (we are talking about a tent in the form of a house), it is also advisable to make holes and sew on the sleeves. Two poles, inserted into the holes on the sides and tied to the legs of the tripod, provide an almost rigid tension of the tent and its greater stability in strong winds. The tin cutting for the passage of the chimney through the wall of the tent is best sewn into a special hole cut in the side wall in the form of a pocket next to the door. It does not interfere with the folding of the tent and firmly fixes the chimney. It is better to make metal fireproof cutting from sheet aluminum. A housekeeper stove is very convenient not only in a tent, but also in a hunting hut.
True, in Volodya’s stove the lid-cap was lowered to the level of the bottom of the stove. This was done for the convenience of removing the ash. As in the next article from the same book.
V. GOREV, I. KORCHAGIN PORTABLE OVEN WITH ADJUSTABLE DRAFT
The furnace measuring 400x350x700 mm was made by welding from iron 1.5 mm thick. The stove has two openings - a firebox and one for the pipe. The diameter of the combustion hole is 250 mm, the pipe is 100 mm. The combustion hole around the entire circumference has a boss 25 mm wide, onto which a damper equipped with a pipe is placed. The pipe is welded at the very edge of the damper; it has a length of 120 mm and a diameter of 60 mm. Holes with a diameter of 5-6 mm are placed on the surface of the pipe in a checkerboard pattern. During operation of the stove, put a glass on the pipe (a metal tin can can be used). By changing the position of the glass, draft regulation is achieved. To ensure maximum traction, the pipe must be fully open and in its lowest position. At minimum draft, the pipe is closed tightly, and the damper is turned 180°, so that the pipe is in the uppermost position. With this position of the pipe, it is ensured that the temperature in the home remains above zero for 10-12 hours with minimal consumption of firewood. Before going to bed, place 3-4 logs of any (dry, wet) firewood 120*500 mm on hot coals. Then close the valve tightly so that the pipe is in the upper extreme position. When using the stove, the daily consumption of firewood is reduced by 4-5 times compared to normal.
When I read that 4700 was given for the sparkle, a toad choked my throat! Isn’t it easier to whip it up yourself if your hands are in place?! Well, in order to survive, your hands must be next to your head. I think so! Good luck everyone! PS By the way, at work, I equipped two furnaces with the same system. AND WORKING!!!
Materials
The composition of the mortar on which the masonry will be laid cannot be underestimated. Naturally, the easiest way is to buy a proven dry mixture for masonry. But if you are forced to save, you will have to study ways to determine the fat content of clay and the mixtures necessary for masonry. Don't miss the fact that you will need three different formulations:
- Durable, heat-resistant using fireclay, in the area of fireboxes.
- Moisture-chemical resistant, lime for smoke passages and pipes.
- Durable and at the same time elastic, clay for the base.
Methods for determining the fat content of clay by dried balls, the degree of sticking on a stick, or by throwing cakes are easy to find on the Internet. The thickness of the seams should be within 3 - 4mm. The masonry will be more stable, and the solution will have much less chance of crumbling.
Brick should also be given its share of attention.
Not every clay one is suitable. In short, a truly suitable one can be determined visually by the way it is produced. Date: September 25, 2022