The Planar air heating device, produced in Samara, is widely popular. If there is not enough heat in the car, it is an indispensable assistant, even in the most severe winter weather. In the cabin of a small passenger car model or a spacious van, the driver and passengers become as comfortable as possible in a short period of time.
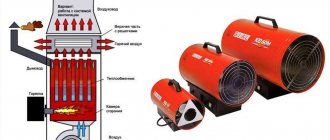
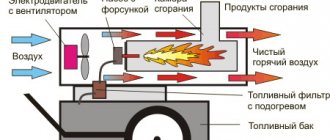
The operation of the device is based on a simple principle - drawing surrounding air masses into the heating chamber. When fuel burns, thermal energy is released. It is sent to heat the air, which then enters the cabin.
- 1 Operating principle and device features
- 2 Video of work
- 3 Features of work in various situations
- 4 Planar heater: the main advantages of its use
- 5 Operating instructions for the device
- 6 Safety precautions
Error codes from the Teplostar timer remote control
| Code | Malfunction | Trouble-shooting |
| 01 | Overheat. |
|
| 02 | Possible overheating detected. The temperature difference between the overheating sensor and the temperature sensor is too large. |
|
| 03 | Overheating sensor malfunction. | Check connecting wires. The output signal and voltage are linearly dependent on temperature (0°C corresponds to 2.73 V and with an increase in temperature by 1°C, the output signal increases by 10 mV, respectively). Check the overheating sensor and replace if necessary. |
| 04 | Temperature sensor malfunction. | Check connecting wires. The output signal and voltage are linearly dependent on temperature (0°C corresponds to 2.73 V and with an increase in temperature by 1°C, the output signal increases by 10 mV, respectively). Check the temperature sensor and replace if necessary. |
| 05 | Flame indicator broken. | Check connecting wires. Check the ohmic resistance between the flame indicator terminals. If there is a break, the ohmic resistance is more than 90 ohms. If broken, replace the flame indicator. |
| 06 | Flame indicator short circuit. | Check connecting wires. Check the ohmic resistance between the flame indicator terminals. During a short circuit, the ohmic resistance is less than 10 ohms. If there is a short circuit, replace the flame indicator. |
| 07 | Flame interruption in “SMALL” operating mode. | Check the air intake, gas exhaust pipe and fuel supply, eliminate faults, replace the fuel pump and flame indicator if necessary. |
| 08 | Flame interruption in “FULL” operating mode. | Check the air intake, gas exhaust pipe and fuel supply, eliminate faults, replace the fuel pump and flame indicator if necessary. |
| 09 | Faulty glow plug. | Check the glow plug and replace the glow plug if necessary. |
| 10 | Air blower motor malfunction. | Check the electrical wiring of the electric motor. Eliminate the malfunction and, if necessary, replace the air blower. |
| 12 | Shutdown, increased voltage more than 30.8 V. | This defect is possible when the heater is turned on while the car engine is running. The cause may be a faulty vehicle voltage regulator. |
| 13 | Startup attempts exhausted. | If the permissible number of starting attempts has been used, check the quantity and supply of fuel. Check the air intake and exhaust pipe. Check the spark plug. |
| 14 | Malfunction of the circulation pump (pump). | Check the electrical wires of the circulation pump for short circuits and breaks, check the pump and replace if necessary. |
| 15 | Shutdown, undervoltage less than 20 V. | Check the battery, vehicle voltage regulator and supply wiring. |
| 16 | Ventilation time exceeded. | The heater is not cooled sufficiently during purging. Check the air intake and exhaust pipe. Check the flame indicator and replace if necessary. |
| 17 | Fuel pump malfunction. | Check the fuel pump electrical wires for short circuits and breaks, check the fuel pump and replace if necessary. |
| 18 | Car fan relay malfunction. | Check the electrical wires of the relay, eliminate the short circuit, and replace the relay if necessary. |
| 19 | Flame interruption in “MEDIUM” mode. | Check the air intake, gas exhaust pipe and fuel supply, eliminate faults, replace the fuel pump and flame indicator if necessary. |
| 20 | There is no connection between the control unit and the timer. | Check the 5 A fuse. Check the circuits and contacts. |
| 23 | Voltage less than 21.6 V (Warning). | It is necessary to turn off the operating heater and charge the battery. |
| 25 | The heater is blocked from subsequent starts after three consecutive starts during which the heater did not start. | The blocking is removed by disconnecting the heater from the battery. Check the glow plug. Check the mesh and the hole in the combustion chamber for carbon formation. See also code 17. |
REPROGRAMMING BINAR 5-12V
- A set of programs for Binar 5-12V (board with a connector for connecting an alarm system/GSM) with instructions. VERSIONS 1004, 2005.1.23 MB (Added 11/10/2010)
- A set of programs for Binar 5-12V (board with a connector for connecting an alarm system/GSM) with instructions. VERSIONS 1008, 2008.105.66 Kb (Added 12/09/2010)
- A set of programs for Binar 5-12V (board with a connector for connecting an alarm system/GSM) with instructions. VERSIONS 1013, 2013.116.55 Kb (Added 06/08/2011)
- Set of programs for Binar 5-12V (board with connector for alarm/GSM connection). VERSIONS 1014, 2014.320.92 Kb (Added 11/03/2011)
- Set of programs for Binar 5-12V (board with connector for alarm/GSM connection). VERSIONS 1017, 2022.55.8 Kb (Added 08/28/2012)
- A set of programs for Binar 5-12V (board without a connector for connecting an alarm/GSM) with instructions. VERSIONS 1007, 2007.579.62 Kb (Added 11/08/2010)
- A set of programs for Binar 5-12V (board without a connector for connecting an alarm/GSM) with instructions. VERSIONS 1009, 2009.104.41 Kb (Added 12/22/2010)
- Set of programs for Binar 5-12V (board without connector for alarm/GSM connection). VERSIONS 1015, 2015.30.43 Kb (Added 09/30/2011)
- Programming guide Binar 5-12V using PICkit programmer 21.61 MB (Added 02/01/2011)
Advantages and disadvantages
The device can work autonomously when the car engine is turned off
The Planar heater helps out many drivers. Truckers, bus drivers, and travelers are forced to spend a lot of time in the car cabin. In the cold season, heating the interior due to engine operation is insufficient. Planar solves this problem.
Advantages of the device:
- In an hour, the heater, depending on its power, heats from 34 to 120 cubic meters. m. air.
- The planar is economical - with such high efficiency it consumes no more than 29–42 W. The same volume of heated air requires from 0.24 to 0.37 liters of diesel fuel per hour.
- Planar is effective at very low temperatures outside – below -20 C.
- The installation works without time restrictions. Automatically turns off when the specified temperature is reached and turns on when it drops. You can turn off the device manually.
- The device is safe. If it rolls over, has a weak flame, the flame goes out, or there is an interruption in the air or fuel supply, the Planar turns off.
- Noise level is low.
- If you connect air exhaust pipes, warm air can be directed not only into the cabin, but also into the bus interior or into the cargo compartment if the cargo being transported requires a certain temperature regime.
- The device operates autonomously from the car engine. This is a convenient option for spending the night in the car, as the Planar can heat the cabin all night long.
There are no disadvantages. Autonomous car heater Planar fully corresponds to its purpose.
Errors Planar 4DM2-12-S / 4DM2-24-S
| Code | Number of LED flickers | Problem | Reason for error |
| 13 | 2 | The device does not start after two attempts. | There is no fuel in the tank. The quality of the fuel does not meet the conditions of use in cold weather. Lack of fuel. The air intake or exhaust pipe is dirty. Poor heating of the glow plug, failure of the control unit. The impeller is in contact with the volute in the air blower, due to which insufficient air is supplied. Contamination of the hole in the combustion chamber (diameter - 2.8 mm). Contamination of the spark plug grid or incorrect installation in the fitting (not all the way). |
| 20 | The device does not start. | There is no connection between the remote control and the control unit. | |
| 01 | 1 | Exceeding the permissible temperature. | The temperature sensor sends a signal to turn off the autonomy. The heat exchanger in the area where the sensor is installed has reached a temperature of over 250?C. |
| 08 | 3 | The flame breaks out during operation. | Leaks in the fuel supply line, failure of the fuel pump or flame indicator. |
| 09 | 4 | Glow plug problems. | Broken or short circuited wiring, failure of the control unit. |
| 05 | 5 | Flame indicator is broken. | A break in the electrical wiring or a short circuit to ground (housing) of the indicator. |
| 04 | 6 | Error in temperature sensor in control unit. | Failure of the temperature sensor (located in the control unit, replacement is not possible). |
| 17 | 7 | Fuel pump error. | Open or short circuit in the electrical circuit of the fuel pump. |
| 12 | 9 | Shutdown, voltage exceeds 16 V (above 30 V for 24 V device). | Failure of the battery or voltage regulator. |
| 15 | 9 | Shutdown, voltage below 10V (below 20V for 24V device). | Failure of the battery or voltage regulator. |
| 10 | 11 | The electric blower motor does not reach the required speed. | Electric motor failure. Lack of lubrication in the bearings or contact of the impeller with the volute in the supercharger. |
| 16 | 10 | Ventilation is too weak to reduce the temperature of the heat exchanger and combustion chamber of the device. | During the purging process before starting work, the flame indicator is not cooled to the required value. Malfunction of the flame indicator, control unit or air blower. |
| 27 | 11 | The motor does not turn. | Jamming as a result of destruction of the rotor, bearing, or the ingress of various objects. |
| 28 | 11 | The engine rotation speed does not change, it does not respond to control commands. | Failure of the electrical motor control board or control unit. |
| 02 | 12 | Possibility of overheating based on temperature sensor. Its temperature exceeds 55°. | Before starting, during purging for 5 minutes there is not enough cooling or the control unit overheats during operation. |
Summary
Planar car heaters are a good choice for those who need to provide additional heating for the cabin or covered body of trucks or passenger cars. Please note that to achieve the required results, correct installation of the battery and timely maintenance of the device are extremely important. The price of heaters starts from 19.5 thousand rubles.
This section contains a complete list of error codes for “samarka autonomous cars” Planar Teplostar
A malfunction may occur during operation of the heater. The malfunction is determined by the number of blinks of the LED on the control panel or by the displayed code on the digital remote control. The number of LED blinks, the reasons that led to the failure, and methods for troubleshooting are indicated in the table.
How to determine if a stand-alone oven is faulty
1) Check the fuel level and quality. 1) Visually assess damage to wires, hoses, presence of parts (pump, fuel tank), etc. 3) Calculate error codes for models without a display 4) Carry out repairs according to the documentation
A malfunction may occur during operation of the heater. The malfunction is determined by the number of blinks of the LED on the control panel or by the displayed code on the digital remote control. The number of LED blinks, the reasons that led to the failure, and methods for troubleshooting are indicated in the table.
There may be other malfunctions that are not diagnosed by the control unit, for example: loss of tightness of the heat exchanger (burnout), or burnout of sealing gaskets, or a decrease in thermal performance as a result of carbon formation on the inner surface of the heat exchanger. The listed faults can be detected visually.
Webasto Air Top 2000/3500/5000 ST 12/24
If AT 2000/3500/5000 ST air heaters are equipped with a standard or combi timer, then after locking, a fault code will appear on the screen.
Combi-timer Webasto
If the heater is equipped with a switch as a control element, then a fault code is issued after the heater is turned off in the form of a flashing operating indicator light on the switch (blink code).
Webasto switch
After 5 short signals, long pulses are issued - the number of these pulses for various faults corresponds to the number after the letter F in the table below.
| Code | Possible causes of malfunction |
| F00 | The control unit is faulty. |
| F01 | 2 unsuccessful start attempts or no flame is formed. |
| F02 | Flame break (repeated more than 3 times). |
| F03 | Voltage drop below permissible or increase above permissible. |
| F04 | Premature flame detection. |
| F05 | Open circuit or short circuit of the flame sensor (Air Top 2000 ST gasoline only). |
| F06 | Open circuit or short circuit of the temperature sensor. |
| F07 | Open circuit or short circuit of the dosing pump. |
| F08 | Open circuit or short circuit of the blower motor, overload or blockage of the blower impeller. |
| F09 | Open circuit or short circuit of the glow pin. |
| F10 | The heater has overheated. |
| F11 | Open circuit or short circuit of the heating limiter. |
| F12 | Heater blocking: remove the fuse and insert it back. |
| F14 | Incorrect position of the overheating sensor. |
| F15 | Open circuit or short circuit of the potentiometer on the control. |
Warranty:
- The warranty period for the product is 18 months from the date of sale or 1000 operating hours for air heaters and 500 operating hours for liquid heaters, or the mileage of the vehicle with the installed product is no more than 50,000 km.
- Installation of the product must be carried out by organizations authorized by the Manufacturer.
- The manufacturer guarantees the normal operation of its products, subject to the consumer's compliance with all the rules provided for in the manufacturer's operating manual.
Advantages and disadvantages
- The device operates in autonomous mode - the engine can be turned off.
- Reports low fuel consumption. The latter is supplied to the heater from the tank.
- Combustion products are removed from the vehicle interior, providing a clean atmosphere inside.
- The device is compact in size and lightweight - up to 12 kg, depending on the model. At the same time, the cabin is heated literally in a matter of minutes. The photo shows a sample.
- Affordable price.
The disadvantages include some limitations in application - the installation cannot be placed in places where dust accumulates or accumulation of flammable vapors is possible, and the presence of a battery is also required.
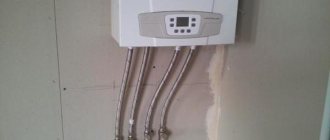
Installation requirements
The device can be installed anywhere in the car, the control panel is next to the driver.
Installation of the Planar is carried out strictly according to the instructions:
- The heater is mounted both on the wall and on the floor. The position is strictly horizontal, tilting is prohibited.
- The distance from the walls or partitions to the inlet is at least 5 cm.
- The distance from the cabin walls from the outlet is at least 15 cm.
- The heater is installed in a place where it can be repaired and dismantled.
- The housing must not come into contact with the walls or floor of the cabin.
- The fuel tank must not be mounted in the passenger compartment, trunk or engine compartment. It is secured so that in the event of a spill, diesel fuel does not end up on the wiring.
- Combustion air is taken from outside, not from the passenger compartment or cargo compartment. The suction port of the pipe is placed against the air flow while driving.
The inlet hole must be placed so that the Planar does not suck in exhaust gases during operation.
Specifications
Let's consider the popular model 4DM 12 24. This is also a Planar autonomous vehicle. Its price is 19,400 rubles. The device is a diesel autonomous heater. The device has the following technical characteristics.
Thus, the level of heat production is 3 kW in active mode, and 1 kW in low mode. Fuel consumption in active mode is 0.36 l/h. In low mode, the device consumes up to 0.12 l/h. Power consumption – up to 30 W. Injected air – 120 m3/h. The supply voltage is 12 and 24 V. All these characteristics were measured at rated supply voltages and a temperature of 20 degrees. There may be a slight measurement error.
Automatic electronic adjustment
"Planar" has an electronic control unit. It automatically regulates the temperature. The setting is carried out according to values preset by the driver. Range - from 15 to 30 degrees. When the temperature inside the car reaches the set value, the device will continue to operate in reduced power consumption mode - the heat transfer will be less.
If the difference between the set temperature and the actual one is large, then the electronics activates the ventilation mode. This allows the driver's workplace to be cooled. When the air temperature begins to drop, the equipment will go into active mode. As an option, the device can be equipped with a remote temperature sensor.
Error codes from the Teplostar timer remote control
| Code | Malfunction | Trouble-shooting |
| 01 | Overheat. |
|
| 02 | Possible overheating detected. The temperature difference between the overheating sensor and the temperature sensor is too large. |
|
| 03 | Overheating sensor malfunction. | Check connecting wires. The output signal and voltage are linearly dependent on temperature (0°C corresponds to 2.73 V and with an increase in temperature by 1°C, the output signal increases by 10 mV, respectively). Check the overheating sensor and replace if necessary. |
| 04 | Temperature sensor malfunction. | Check connecting wires. The output signal and voltage are linearly dependent on temperature (0°C corresponds to 2.73 V and with an increase in temperature by 1°C, the output signal increases by 10 mV, respectively). Check the temperature sensor and replace if necessary. |
| 05 | Flame indicator broken. | Check connecting wires. Check the ohmic resistance between the flame indicator terminals. If there is a break, the ohmic resistance is more than 90 ohms. If broken, replace the flame indicator. |
| 06 | Flame indicator short circuit. | Check connecting wires. Check the ohmic resistance between the flame indicator terminals. During a short circuit, the ohmic resistance is less than 10 ohms. If there is a short circuit, replace the flame indicator. |
| 07 | Flame interruption in “SMALL” operating mode. | Check the air intake, gas exhaust pipe and fuel supply, eliminate faults, replace the fuel pump and flame indicator if necessary. |
| 08 | Flame interruption in “FULL” operating mode. | Check the air intake, gas exhaust pipe and fuel supply, eliminate faults, replace the fuel pump and flame indicator if necessary. |
| 09 | Faulty glow plug. | Check the glow plug and replace the glow plug if necessary. |
| 10 | Air blower motor malfunction. | Check the electrical wiring of the electric motor. Eliminate the malfunction and, if necessary, replace the air blower. |
| 12 | Shutdown, increased voltage more than 30.8 V. | This defect is possible when the heater is turned on while the car engine is running. The cause may be a faulty vehicle voltage regulator. |
| 13 | Startup attempts exhausted. | If the permissible number of starting attempts has been used, check the quantity and supply of fuel. Check the air intake and exhaust pipe. Check the spark plug. |
| 14 | Malfunction of the circulation pump (pump). | Check the electrical wires of the circulation pump for short circuits and breaks, check the pump and replace if necessary. |
| 15 | Shutdown, undervoltage less than 20 V. | Check the battery, vehicle voltage regulator and supply wiring. |
| 16 | Ventilation time exceeded. | The heater is not cooled sufficiently during purging. Check the air intake and exhaust pipe. Check the flame indicator and replace if necessary. |
| 17 | Fuel pump malfunction. | Check the fuel pump electrical wires for short circuits and breaks, check the fuel pump and replace if necessary. |
| 18 | Car fan relay malfunction. | Check the electrical wires of the relay, eliminate the short circuit, and replace the relay if necessary. |
| 19 | Flame interruption in “MEDIUM” mode. | Check the air intake, gas exhaust pipe and fuel supply, eliminate faults, replace the fuel pump and flame indicator if necessary. |
| 20 | There is no connection between the control unit and the timer. | Check the 5 A fuse. Check the circuits and contacts. |
| 23 | Voltage less than 21.6 V (Warning). | It is necessary to turn off the operating heater and charge the battery. |
| 25 | The heater is blocked from subsequent starts after three consecutive starts during which the heater did not start. | The blocking is removed by disconnecting the heater from the battery. Check the glow plug. Check the mesh and the hole in the combustion chamber for carbon formation. See also code 17. |
DOCUMENTATION FOR AUXILIARY DEVICES
- Adapter for heaters and heaters instructions 479.09 Kb (Added 01/18/2016)
- RS232776.99 KB adapter diagram (Added 02/18/2011)
- Description of the stand for auto centers1.59 MB (Added 01/18/2016)
- Instructions for UPT-4285.62 Kb (Added 03/06/2017)
- Instructions for the swap device507.28 Kb (Added 01/18/2016)
- Instructions for Diagnostic Device 14TS-10, 14TS-20, 14TS-10MK, 11TS428.28 Kb (Added 01/18/2016)
- Instructions for the USB Adapter for heaters and heaters916.46 Kb (Added 06/03/2013)
- Instructions for Remote Timer for 14TS-10, 11TS (Not currently available) 318.93 Kb (Added 01/18/2016)
Possible error codes and malfunctions
Planar heater error codes
The Planar indicator system signals errors. A number of breakdowns can be repaired yourself:
- 1 on the screen or blinking indicator - heat exchanger overheating. You need to check the air flow through the heater.
- 2 or 12 short flickers after a pause – the device itself is overheating. Check the pipes and air supply to the combustion chamber.
- 12 or 15 or 9 quick flashes indicate power surges. The device turns off.
- 12 or 2 flickers - starting is impossible due to lack of fuel, air, or a violation in the exhaust gases.
- 20 or 30 and 8 flickers – communication between the module and the control panel is lost. Check the cables.
- 29 or 3 blinks of the LED – flame failure in the burner. You need to check the fuel supply.
- 35 or 13 flickers is an error unique to the 8DM model. Flame failure due to low voltage.
- 78 – marked only on the screen. This is a warning that flameouts are occurring too frequently.
Problems indicated by the following codes cannot be eliminated independently. Requires dismantling of the device and intervention of a specialist:
- 4 or 6 or 6 flickers – the temperature sensor has failed.
- 5 or 5 flashes – flame indicator is broken.
- 9 or 4 flickers – the problem is in the glow plug.
- 10, 27, 28 or 11 blinks – the electric drive is damaged;
- 11 on the screen or 18 flickers - the temperature sensor on the supply pipe is broken.
- Problems on the incoming pipe are coded by the number 23 or 15 flickers.
- 17 or 7 flashes – fuel pump failure.
- The appearance of the number 33 or 16 flashes after a pause indicates that the device is blocked, since overheating was recorded three times in a row. Unlocking is carried out only at a service center.
- 36 or 20 flickers – the flame temperature sensor detects the temperature is too high.
CERTIFICATES OF COMPLIANCE WITH ECE RULES No. 122 (TUV)
- 122 PLANAR 2D794.65 Kb (Added 03/22/2016)
- 122 PLANAR 4D1.65 MB (Added 03/22/2016)
- 122 PLANAR 44D1.52 MB (Added 03/22/2016)
- 122 PLANAR 8D1.45 MB (Added 03/22/2016)
- 122 BINAR 5D1.18 MB (Added 03/22/2016)
- 122 14 TS1.2 MB (Added 03/22/2016)
- 122 14TC-Mini930.9 Kb (Added 03/22/2016)
- 122 15TSG703.33 Kb (Added 03/22/2016)
- 122 20TCG983.45 Kb (Added 03/22/2016)
- 122 20TS461.74 Kb (Added 03/22/2016)
- 122 30TC1.13 MB (Added 03/22/2016)
- 122 30TCG965.36 Kb (Added 03/22/2016)
- 122 BINAR 6G1.82 MB (Added 03/22/2016)
- 122 PLANAR 44G1.01 MB (Added 03/22/2016)
- 122 BINAR-5S3.17 MB (Added 08/09/2018)
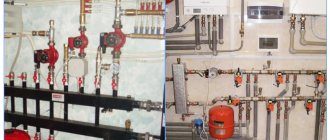
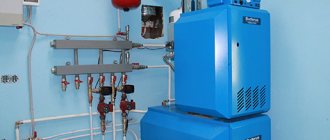
Monitoring and control system
Using the control unit you can regulate the amount of heat
The Planar heater operates in several modes. Operational safety, adjustment and diagnostics of systems are ensured by sensors and a control unit.
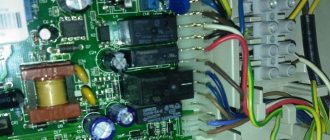
Control block
The module is housed in a housing and connected to executive units with switching loops. Its functions are as follows:
- turning the device on and off;
- control and management of the fuel combustion process;
- initial diagnostics in case of breakdowns during startup;
- automatic ventilation after Planar stops;
- emergency shutdown in case of breakdown of any component, flame extinction, power surges, heat exchanger overheating and other situations.
The control unit works together with the remote control.
Operating modes
The device simultaneously performs the function of interior ventilation
The autonomous air engine heater operates in 3 modes. However, use often depends on the model’s configuration:
- In terms of power, it heats up the interior as quickly as possible. The heater, set to a certain power level - from 1 to 8, operates continuously until the device is turned off manually.
- By temperature – the heater warms the air to the set temperature. The heater then turns off and automatically turns on again as soon as the air has cooled to the specified minimum. In automatic mode, the device operates until manual shutdown.
- Ventilation – provides air exchange. Combined with temperature or power control. The temperature is maintained with high accuracy and does not fluctuate within the specified range.
Control panels
The remote control is installed on the dashboard or hung on a container in any place convenient for the driver. The device is connected to the device via a cable. The remote control is convenient because it regulates the operation of the Planar and serves as a diagnostic tool.
The heaters are equipped with different types of remote control:
- PU-10M – allows the Planar to operate in power and temperature modes; ventilation is not provided. Equipped with LED indicator.
- PU-5 – allows Planar to operate in all modes. The potentiometer flywheel is equipped with a conditional graduation, so that the temperature can be set more accurately. An indicator indicates operation and malfunctions.
- PU-22 - functional buttons allow you to select a mode, a temperature sensor, the readings of which will be considered control, change the power and temperature indicators. Information about the Planar’s operation and breakdowns is reflected on the LED screen.
By the number, color and behavior of LEDs, you can determine the cause of the problem and quickly eliminate it.
Operating instructions for the Planar heater
You can install and run Planar yourself, but if you have no experience working with heating systems, you need to invite a specialist.
When turned on, Planar conducts testing, and if all elements are in working order, it begins ignition. First, the chamber is purged, then diesel fuel and air are supplied. The burner operates until the sensor registers the set value. After this, the device turns off if it is not operating in power mode.
After manual shutdown, the Planar is automatically ventilated.
Safety precautions
When refueling the Planar, you must turn it off.
The cabin or car interior is a very small room. Safety precautions must be strictly observed:
- there should be a fire extinguisher in the car, and at least a bucket of sand in the shed or garage;
- It is prohibited to lay the fuel wire inside the passenger compartment or cabin;
- during refueling the device is turned off;
- during repair and welding work, the heater is disconnected from the battery;
- It is prohibited to disconnect the device from the power supply until the purge is completed;
- after stopping the device, turn it on again no earlier than after 5–10 seconds.
If safety regulations are not followed, the manufacturer has the right to refuse warranty service.
General signs of malfunction of Pramotronic liquid heaters
| Symptoms of a problem | Possible reasons |
| The control lamp does not light up, the heater does not work. | There is no supply voltage, the fuse or control lamp has burned out, there is no voltage supply to the terminals of the control unit. |
| The heater often turns off. | The coolant flow is too low because:
The liquid in the circuit gives off too little heat because:
|
| There is no fuel supply to the heater. | The fuel tank is empty. Pipelines are leaking, bent, or clogged. There are large deposits of paraffin in the fuel filter, and the water is frozen. The vent in the tank is closed. The fuel lines on the heater are reversed. The fuel filter is dirty. |
Design and operating principle
The heater has a voltage regulator and a timer. Constant work in offline mode is possible. Ignition is started electronically only if all requirements are met and the components are in full working order, so there is no reason to worry about the safety of the design.
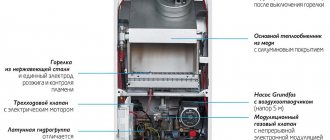
The main components of Planar:
- power unit;
- heating element;
- pump for pumping fuel.
The operating principle of the autonomous unit is to supply air from outside to the heating compartment. This air is heated by the energy generated by the combustion of fuel. The warm air is then released into the interior of the car, van or bus.
The planar consists of 3 main elements
Advantages of using air heaters:
- low cost;
- low fuel consumption;
- work is set according to temperature or power;
- when the engine is turned off during long periods of inactivity of the machine, very little electricity is consumed;
- does not make much noise;
- due to the brushless motor, the service life is increased;
- Design diagnostics are carried out automatically.
In this video you will learn how the heater works:
INFORMATION LETTERS
- Information letter Binar114.75 Kb (Added 01/31/2014)
- Information letter and description of counterfeit spare parts1.88 MB (Added 11/05/2012)
- PUMP information letter for 14TC243.52 Kb (Added 01/15/2018)
- Information letter counterfeit522.46 Kb (Added 12/09/2016)
- Information letter counterfeit (COMBUSTION CHAMBER)483.27 Kb (Added 12/29/2016)
282.28 Kb (Added 04/03/2017)
1.36 MB (Added 07/23/2018)