A stove in the garden will help out in many cases.
DIY garden stove
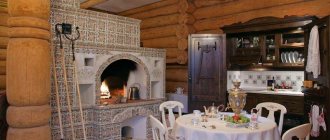
When you come to your dacha to relax, you don’t really want to stand at the stove in the kitchen to feed the whole family or invited guests. Cooking outdoors in good summer weather is much more pleasant, so you can’t do without such an assistant. But a garden stove can be built with your own hands if you carefully select the right model, understand its installation and purchase the necessary materials.
Furnaces may have several functions, or may be limited to one or two. To focus your attention on one of them, you need to consider their different types.
Stove for a cauldron
This version of the garden stove is designed for cooking in a cauldron or on a built-in stove. It has a simple masonry scheme, and can be done independently if you have certain skills.
Stove with built-in cauldron
You can, of course, just hang a cauldron over a fire and cook food, but such a stove, designed for a cauldron, will help distribute the fire evenly under it, and the dish will turn out exactly as it should be according to the recipe, and not with a burnt taste. In addition, a carefully constructed and decorated building will add a special warm note to the landscape of the site and become a decorative element.
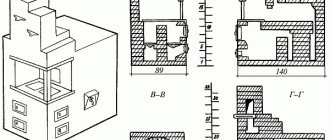
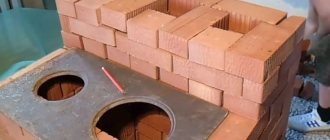
- The first thing to start working on a stove is site planning. To do this, you need to know the dimensions of the building - in this case they are 1010 × 1114 × 800 millimeters.
Schematic diagram of a stove with a cauldron
- Next, based on the diagram, the necessary materials are purchased: brick (preferably fireproof); mortar of fireclay dry mixture and sand for masonry; doors for the blower, firebox and cleaning chamber, grate and hob made of steel with a thickness of at least 3 mm.
- A well-designed site is a reliable basis for such a stove. Since it does not have the same weight as heating and cooking buildings, it is not necessary to make a capital foundation for it. The area under the stove should be raised above the soil surface by 10-15 centimeters. The base is made using formwork, and it is advisable to reinforce the structure with five-millimeter metal wire.
- The main feature of the internal design of a cauldron stove is its shape - it resembles a truncated cone. This is done to ensure that the surface of the cauldron is heated evenly.
An important feature of the stove is the channels for uniform heating of the cauldron
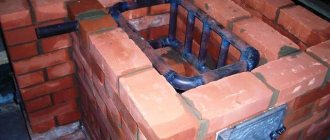
- On a prepared and fully set site, you can begin laying the masonry. In this case, the bricks are bandaged in the corners, so that even rows begin with half a brick, and odd rows with a whole brick. The firebox is laid out from halves of bricks, which are cut at an angle - this is done in order to achieve a semicircular shape.
- The diagram above clearly shows that starting from the first row, a hole for the blower chamber is marked, and a door is installed on it, which is secured with metal wire.
- A grate is installed on the third row, and the laying of the walls continues.
- On the fourth row, at the back of the building, a hole is left to remove smoke and a firebox door is installed, securing it in the same way as the blower.
- Fifth row - external and internal walls are laid.
- Sixth row - the masonry around the fire door is completed.
- From the seventh to the eleventh row, work proceeds according to the scheme and the inside of the firebox is laid out.
- On the twelfth row, the structure is strengthened with a metal corner, a plate is installed on top of it, in which a round hole is made in advance the size of the cauldron.
The hole can be made with a grinder, short cuts, or using a gas cutter. Then the hole needs to be leveled, since the cauldron must fit tightly into it at two-thirds of its height.
Such a stove will help you cook not only in a cauldron, but also use the stove for boiling water or frying vegetables or meat products in a frying pan. To do this, you need to provide a lid to cover the hole for the cauldron.
Handy tools
A set of necessary tools is also collected in advance. It should consist of:
- Angle grinders 230;
- Angle grinders 125 (not necessary, but preferable so as not to rearrange the wheel and cup);
- extension cord with a tee (so as not to switch sockets);
- level 80 cm;
- level 30 cm;
- metal ruler 1 m;
- tape measures 3m;
- masonry trowel;
- regular and rubber hammer;
- a mixer with a nozzle for preparing a solution or a drill with adjustable speed;
- buckets for mixing the solution;
- containers for soaking bricks;
- hand and brick rags;
- concrete mixers (although you can mix by hand);
- shovels.
BBQ oven
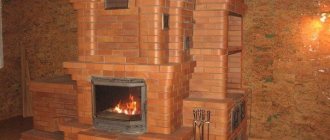
A very simple barbecue oven
This version of a stove for a summer residence is quite simple in design, and its construction is accessible even to a novice craftsman. To do this, you need to study the diagram, find a place for the stove, purchase materials and carry out the work with great care. The structure should be erected slowly, measuring the evenness of the horizontal and vertical sides.
"Ordering" the stove
The dimensions of the furnace shown in the diagram are 1500x1500x750. The order is given before the start of the firebox, which is lined with fireclay bricks inside. Covering large distances is done using metal strips, on which rows of bricks are laid on top. The chimney cap and chimney pipe, like the entire structure, can be made of brick, or they can be made of metal. The second option, of course, is easier to install; the only thing you need to do is take the dimensions and order it from a master tinsmith.
For this not too massive structure, there is also no need to build a foundation, which is required for large home stoves. A well-equipped cemented area is quite suitable for it.
For construction, you need to purchase the same materials as for the first version of the stove with a cauldron, and the amount of brick can be calculated according to the dimensions indicated in the diagram.
Stage 1. Selecting material for manufacturing
Despite the huge selection of building materials, there are actually not many of them that can be used in our case.
- fireclay brick or aerated concrete - both materials are very resistant to high temperatures;
- finished metal or cast iron products are an expensive option, but installation time will be significantly reduced.
Let's look at the problem from a practical point of view. Aerated concrete blocks will cost less than brick, but in terms of aesthetics they are definitely inferior. In addition, these blocks require additional cladding.
Note! Many people resort to buying ready-made stoves, and the reason for this is their undeniable advantages: easy installation (using glue) from a kit of parts according to the included instructions.
If we talk about the combustion chamber, then everything is more complicated here, because it is extremely difficult to purchase a suitable option. Therefore, you need to do it yourself. And the design itself, in theory, should be the way you want it to be - from the preferred design to the cladding method.
Complex brick oven
Multifunctional garden stove
A garden stove, which has many functions, will help out in any case and will help you prepare different dishes - from barbecue to smoked products. An oven built into the stove will be able to bake bread or a pie, thereby allowing you to avoid leaving the dacha for a long time to go to the nearest shopping center - you just have to stock up on all the necessary products when going out of town.
This design is heavier and has built-in elements and additional extensions. Therefore, to build it, you must first think about building a foundation. You don’t need to make it too massive and make a deep pit for it, but you can’t do without it if you want the stove to last for many years and not fall apart in the event of slight soil subsidence.
“Ordering” a garden stove with an expanded set of functions
The diagram shows an option that is slightly different from the photo, but also has a stove and barbecue grill. The figure clearly shows what each of the rows of a complex furnace looks like. Based on the proposed drawing and following the recommendations, it is quite possible to do the work yourself.
Peculiarities
The Russian outdoor stove, unlike the classic model, is equipped with a horizontal firebox and hearth.
Its chimney is shorter, and the side walls are insulated, which increases efficiency with less fuel consumption. For ease of use, the cooking chamber in such an oven is placed on the front, and the combustion chamber on the left side. The rational design of the frying chamber allows it to be used not only for cooking or frying food, but also as a kebab maker, smokehouse for meat or fish. And if you install a damper, it turns into an oven for baking culinary products and bread.
Oven with tandoor
An interesting option is a tandoor oven
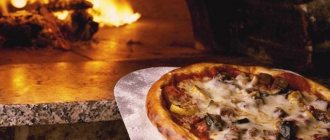
The complex may include a unique element that can completely replace many of the functions of a garden stove - this is a tandoor. Not a very familiar word, but most likely many have seen how oriental flatbreads are baked. But this oven can also become a roaster for cooking barbecue, vegetables or fish, and allows you to prepare pilaf or pizza. In addition, you can also make a smokehouse out of it. For each dish, there are various devices that are installed on or in this stove. Everything cooked using the tandoor has a special taste, so it is perfect for those who love either oriental dishes or just delicious food. If you look at this stove in cross-section, it looks something like this.
Sectional view of a tandoor oven
The tandoor can be built into a brick barbecue complex, which is located in a gazebo, or it can be installed separately. This oven looks like a large jug inside. It has a vent and a grate in its lower part - they make it possible to obtain coals from the firewood, with the help of which various dishes are prepared.
If the furnace is built separately from the complex, then a shallow reinforced cement podium needs to be prepared for it. When it is ready, you can begin laying it, which is quite complicated, since the tandoor has a semicircular shape, tapering at the top. It is this configuration that is necessary to retain the heat inside for a long time.
If additional walls will be laid around it later, this must be foreseen when laying the foundation, and space must be left for them, or better yet, the first row must be made common.
Stove diagram with tandoor
To lay the tandoor, they use clay mortar, and begin by laying out a brick base. If you work according to the presented scheme, the oven will gradually narrow towards the top and converge into a circle. In order for everything to work out as planned and a beautiful vault to be built, the bottom layer of brick is cut off.
After completing the work, the inner surface of the tandoor is well cleaned of any mortar that has protruded from the seams.
On the outside, the seams between the bricks are traditionally filled with dry ground clay, and the inside surface of the tandoor is coated with a solution that consists of soaked clay mixed with very finely chopped grass. Next, the stove is left to dry, after which it must be carefully fired. This is done first using plain paper, but newspapers should not be used, since printing ink consists of substances that are not entirely useful for the human body. After warming the tandoor with paper, you can gradually add dry firewood to it.
In the east, the tandoor is coated with a layer of clay on top and decorated with various ornaments. If you plan to build a stove with a tandoor in its design, smooth walls are placed around the jug, and the distance between the walls of the tandoor and the smooth walls is insulated using a mixture of clay and vermiculite. The top of the oven is placed in the same way as a regular barbecue oven. In autumn and winter, the tandoor must be closed from above, since precipitation and dirt can damage the interior decoration.
Which one to build?
First, let's see what kind of stove it is possible to build outdoors, taking into account the fact that it will not be heated intensively and irregularly, but will be exposed to climatic influences, freeze in winter, and it will be difficult to provide it with a high chimney. But the danger from the spread of carbon monoxide from an outdoor stove is reduced to the minimum possible, although it is not completely eliminated, especially in a gazebo, under a canopy and in calm weather. Don't forget about this: there is no stove that can be heated at random without fear of fumes. You can get burned just sitting by the fire.
Keeping these circumstances in mind, the choice of outdoor stove design is not so wide. The simplest garden stove is the well-known rough or rough stove. She can look terrifying, pos. 1 in Fig., but it can be heated with any fuel and it works properly, almost regardless of the quality of the materials used and the work: when building a rough structure, you can use broken simple red working bricks or stones from the surrounding area using ordinary cement-sand masonry mortar, i.e. .To. microcracks in the masonry have almost no effect on the technical performance of this stove. See, for example, the video below of how a 5-year-old child built a rough stove, which his family successfully uses and which can also be used for smoking. Which, by the way, not every oven allows, see below.
Video: a simple stove, a rough one, a design accessible to a child
An outdoor oven at a weekend cottage is often a barbecue roaster, pos. 2. Although, as we will see later, in fact this is not a barbecue at all. Such a stove takes about the same amount or less bricks as a rough one (about 200 pcs.), and you can use red working brick in the same way, but masonry mortar, due to the, so to speak, subtlety of the structure, is already needed for the stove for the street (see .further, about technology and materials).
Based on the brazier, the so-called. Finnish outdoor brick oven, which is a hearth, brazier or barbecue attached to a rough stove, pos. 3. In fact, the only Finnish thing about such a stove is that the Finns were the first to think of producing them in the form of a set - construction instructions with detailed instructions and procedures, dry mixture for preparing masonry mortar, embedded parts, fittings. Now domestic kits for building an outdoor brick oven are sold in the Russian Federation. Sometimes the set also includes bricks; if necessary, hemmed/trimmed and numbered. A kit for an outdoor Finnish stove is inexpensive, and even a completely inexperienced person can build a stove from it, which is why the Finnish outdoor stoves from the kit are very popular, see for example. track. video clip.
Video: Finnish outdoor stove
Note: a stationary smokehouse is also often attached to a wood-burning stove, pos. 4. But during use, it turns out that in the cooking mode the stove is quite gluttonous, and the quality of smoked meats is slightly above average. Why this is so and how to still combine an outdoor oven with a smokehouse, we’ll talk further.
Even less common in areas is an outdoor fireplace, pos. 5. The reason is limited functionality: you can admire the flames and cook something as if on a simple fireplace, although the material and labor intensity of an outdoor fireplace is quite high. A Russian stove is built on the street (item 6) even less often. The culinary qualities of products and dishes from a Russian oven are well known, but a small Russian oven requires 2500 bricks, a large one - 3500, the design is very complex and it is not easy to protect it from bad weather. For the same reasons, Neapolitan (item 7) and Sicilian ovens for pizza and pastries are not very common in private households; In addition, these are quite highly specialized devices.
Note: much more attention for the garden and picnics deserves the so-called. mobile rocket oven, pos. 8. Rocket stoves are a special article. Here we only recall that rocket stoves exist in 2 forms - a luxury item that allows you to get a warm bed at home without building a Russian stove, and a light, compact device on which you can quickly cook dinner using a minimum amount of waste fuel. In the latter case, the degree of heating of the cooking utensil is regulated as precisely as in a gas stove.
What to consider during construction and operation
After choosing any of the models of garden stoves and deciding to build it, in order for everything to be successful, you need to understand some of the nuances of its construction and care.
- The foundation of the furnace must be raised to a certain height so that the furnace structure is not affected by melt water or flooded by heavy rains.
- Since clay mortars do not respond very well to natural influences (humidity, precipitation, direct sunlight, etc.), it is better to use cement mortar to seal external joints.
- The best option would be to place a garden stove under the roof in a closed gazebo - this arrangement will allow it to be used in winter, as well as in any weather.
- A gazebo for a garden stove should be spacious, so that you can install a table in it and seat guests.
- On the site, the gazebo and stove should be located away from the gas pipeline and power lines, but closer to the water supply so that water can be piped inside the gazebo.
The first thing you need to do when planning a building is to find or draw up a project. How convenient it will be to prepare your favorite dishes will depend on it. Therefore, when dealing with this important matter, you need to think through all the nuances of the functionality of the future stove.
Foundation
Under a large complex, you will have to make a reliable foundation , with a depth below the freezing point of the soil (it is different for each region, you can check it with familiar builders). The foundation must be reinforced. On soils with heaving soils, it should have a trapezoidal shape.
If the garden stove is small, then an ordinary slab 10-15 cm thick is sufficient. To construct it, the fertile layer is removed, a hole 40-60 cm deep is dug, 10-15 cm of sand is filled in, compacted, after 30-40 cm of gravel. The formwork is being exposed. Reinforcing mesh is placed in it and everything is filled with concrete. It is better if the foundation is 50-100 mm above ground level.
Video description
The video will help you understand how to install one of the options for a small brick stove for a country house:
- On the 16th row, a continuous masonry is made above the cooking chamber and the smoke exhaust channel continues to be laid out.
- When installing the 17th row, a door is installed through which the chimney will be cleaned.
- During the laying out of the 18th row, the final fastening of the door is performed to clean the chimney.
- The laying of rows 19-22 is carried out according to the scheme depending on the selected furnace design.
- When installing rows 23-27, a wind niche is created. At the same stage, the oven itself is installed. It is first wrapped with asbestos rope. It allows you to improve the accumulation of thermal energy.
- When laying the 28th row, a second cleaning door is installed.
- During the laying of the 29th row, a chimney valve is installed.
- On the 30th row, the previously selected pattern is laid out.
- When installing 31 rows, a second chimney valve is placed.
Finally, the 32nd row is laid out, which serves as the basis for the chimney. Usually it is also mounted from brick. However, some homeowners choose to install a metal chimney.
Types of designs that are used today
Gas, electric and solid fuel boilers are the main heating devices in country cottages and private houses. Some connoisseurs of everything ultra-modern use solar panels for these purposes. But still, a large percentage of residents of the private sector use an old Russian stove to heat their premises.
Until the 19th century, stoves in village huts and even in noble mansions were a box for burning fuel with a hob, a stove bench, and sometimes an oven. For owners of a modern home, overflowing with newfangled household appliances, a Russian stove in the interior is more of a decorative detail than a practical one. Today, the range of designs has expanded and is represented by such structures.
A large percentage of private sector residents use an ancient Russian stove to heat their premises.
Nowadays, the stove acts as a decorative element
- “Dutch” - intended exclusively for heating rooms, is a compact one- or two-tier vertical structure with a chimney. This type is rarely found in modern buildings due to its inexpediency (it is easier to heat apartments using a central heating system - pipes and radiators).
- A Russian stove in a stove bench is a mandatory attribute of a village hut in Rus'. The firebox located in the lower part of the structure heated its upper part, and in the middle there was a cast-iron hob. The chimney in such a system is duct.
- “Shvedka” is an improved and simplified version of the traditional Russian stove, which is characterized by high efficiency while saving fuel. The “Swedish” can be equipped with a hob, a stove bench, and a platform for drying food (berries, mushrooms).
Each type can be built from scratch or an outdated version can be reconstructed. In order for a Russian stove to perform its functions 100%, the structure must be positioned correctly.
You can equip a place for rest on the stove
A stove in the kitchen interior will create a cozy and warm atmosphere
An imitation stove can be made using a modern fireplace
Chimney installation
The operation of the entire garden stove depends on a correctly installed chimney. The easiest way to make a chimney without errors is to use a modular system. Having collected a sufficient number of modules, you only need to assemble them like a construction set and cover the outside with bricks. It is important that the modules fit tightly together and are firmly connected with clamps or heat-resistant sealant.
There are several rules for installing a chimney:
- Installation must begin from the stove;
- The parts must fit tightly together without forming gaps or cracks;
- Good access must be provided to all parts of the chimney so that in case of blockage, the chimney can be cleaned;
- The joints of the modules should not be in the ceiling.