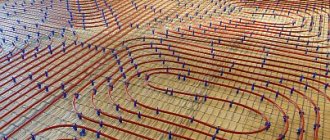
A heat exchanger is a device designed to efficiently transfer heat from one coolant to another.
Such a process can be carried out several times in one system, because a special case of a heat exchanger is a heating radiator and a gas or electric boiler.
The most common model of heat exchanger used in a heating system consists of 2 metal containers, which, like a nesting doll, are located one inside the other, and transfer heat through the metal wall.
The advantages of this mechanism are that, due to the hermetic design, mutual mixing of homogeneous media does not occur, and when using coolants with different physical properties, mixing does not occur.
Types of heat exchangers
Heat exchangers, depending on their purpose, are cooling and heating:
- The cooling device comes into contact with liquid or cold gas, while cooling the hot coolant.
- A heating device with heated gas or liquid gives off heat to circulating flows of cold liquid or gas, and an exchange occurs.
Structurally, heat exchangers are:
- surface, when media contact through an intermediate surface;
- regenerative, when either cold or hot water is supplied to the nozzle, the temperature regime is regulated and maintained due to heating and cooling;
- mixing, supplying media from one to another by mixing them.
Surface heat exchangers can have different shapes, they are:
- lamellar, consisting of many plates with liquid passing through their labyrinths;
- in the form of coils, thin tubes twisted into a spiral;
- a pipe in a pipe, consisting of two tubes of different diameters and placed one inside the other.
Peculiarities
This device makes it possible to significantly expand the functionality of equipment whose main purpose is to heat rooms. Since the supply of cold and hot water is a factor indicating the livability of a residential building, having efficient equipment for this purpose is a must.
With cold water supply in private homes, the situation is somewhat simpler than with hot water supply. Hot water supply is a more complex system, where productivity directly depends on the heating mechanism. The role of such an element is often played by a domestic heating boiler.
There are a huge number of similar units on sale, which differ in their design features. Based on this, the liquid will be heated in different ways. One of the options that has recently become widespread is a heat exchanger for hot water supply.
The device has this name due to its main function - temperature exchange processes occur in heat exchangers. And since it concerns hot water, it becomes clear that thermal energy from hot water from heating is transferred to cold water so that it reaches the desired temperature. Some enterprises use air heat exchangers with fans, in addition, there are chimney heat exchangers that save thermal energy.
The peculiarity of the process is that hot water from the heating system circulates through a heat exchanger, while giving off a certain part of the heat to the cold liquid located in a container. Usually a boiler acts as a reservoir. And the whole process is called indirect heating technology, since in the process of providing the required temperature to the water, there is no direct contact of the energy carrier with the heating structure of the water supply system.
The operation of the heat exchanger is influenced by the following factors:
- contact area between two media and the unit itself;
- thermal conductivity indicators of materials used in the manufacture of the structure;
- difference in temperature between cold water and water from the heating system. The higher this value, the less efficient the device will be.
Some craftsmen use homemade products for home use as such a device, which will transfer heat between liquid media.
Principle of operation
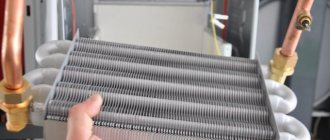
Not a single heating boiler system can operate without a copper heat exchanger. The operating principle is simple. Water begins to circulate through the coils in the pipes, heats up, flows into the system pipeline, into the radiators, from which it returns back, already cooled.
In private homes, a heat exchanger is installed to convert the stove into a water heating boiler. When making a homemade device, it is important to consider the size and shape so that the exchanger matches the dimensions of the stove chamber.
Radiators, a pipeline are connected to the exchanger, the pipes are heated evenly, and the heat is distributed throughout the house.
Pipe-in-pipe heat exchanger design
There are several options for assembling a pipe-in-pipe heat exchanger. Their design varies depending on different layout options. In any case, with the right drawings and quality parts at hand, you can assemble any type of heat exchanger.
This will require standard elements:
- Heat exchange pipe
- Shell pipe
- Support
- Shell tube grid
- Camera.
Using various diagrams and drawings, you can assemble a suitable heat exchanger quickly and without additional effort.
An important step is calculating the parameters of the heat exchanger
It is important to correctly evaluate all parameters in order to correctly design the heat exchanger. To do this, the following are assessed: coolant flow, order of heat loss, degree of resistance of the materials used, values of the starting and final temperatures, technological scheme, thermal load, hydraulic data, direction of heat traffic, balance of network performance, physical and chemical properties of the material, combination of associated factors
But the most important are other indicators: calculating pressure loss, determining economic efficiency, calculating the area of the heat exchanger, calculating the thermal insulation of equipment, determining the geometric dimensions of the “device”, including components. Based on these data, pipe-in-pipe heat exchangers are designed for industrial enterprises and home use. It is very difficult to carry out all the calculations yourself, without special education, so it is better to take ready-made drawings.
In any drawing, a pipe-in-pipe heat exchanger diagram represents links connected in a certain way. The calculations determine which materials should be used for each element. At the same stage, the limit values are calculated. For any type of construction, preference is given to stainless compounds, for example, specially treated steel or copper alloys.
Types of heat exchangers for heating a tent
To raise and maintain the air temperature in the tent at a sufficient level, various types of heating devices are used.
Alcohol candles
Can be used in a one-person tent at outside temperatures down to -5 degrees. Their power is not enough to heat a larger room.
Gas heaters
The fuel source in this case is a five-liter gas cylinder, and the heat source is a gas burner, often equipped with a convector. Such heaters are used not only as a heat generator; they can be used to cook or heat food.
Its main disadvantage is high fuel consumption. Therefore, they are used in places accessible to vehicle access. Portable gas heaters are not fire safe; they are the most common cause of fires.
Omsk Sibtermo heat exchangers seem to be the most reliable.
Gasoline heaters
They have been used for heating for quite a long time, and their design remains virtually unchanged over time. Such devices are also popular for the reason that the specific cost of purchasing fuel is the lowest in comparison with other heating methods.
In addition, in a room heated by a gasoline stove, the smell of fuel is always present. When using a gasoline-powered heater, you must strictly follow the operating instructions - a poorly cleaned burner can cause an explosion and fire.
Solid fuel units
Stoves using wood as an energy source have been and remain popular in forested regions. Here it is enough to simply collect dead wood and use it in a heat exchanger for a winter tent.
The following types are popular:
- Slow burning stoves based on the Bubafonya heater principle. The burning time of one stack of firewood is 4-6 hours. Disadvantage: replacing a portion of fuel is done when the stove is completely extinguished and after cleaning the internal contents.
- The same units, manufactured according to the Buleryan furnace type. One stack of firewood burns for up to 6 hours.
- Folding metal stoves of various designs. Convenient for transportation as they take up little space in the trunk of a car. When used, they require constant attention and fuel.
Other furnace designs based on other physical principles are constantly appearing on the market, but the most popular designs are mentioned here.
Flushing procedure
Any device during long-term operation requires mandatory maintenance. Monitoring its condition and cleaning it at regular intervals will prolong its life and keep the quality of work at its best. All heat exchangers are subject to mandatory cleaning. But special attention should be paid to the air one, in the combustion chamber of which there are combustion products of coal or firewood.
It is a known fact that solid fuel settles in the chimney, and a lot of slag remains in the ash pan. The same thing happens with the heat exchanger. If it works by analogy with a stove or fireplace, then inside the pipes there is a large amount of deposits that prevent the gas from circulating. The efficiency decreases, the heat is not felt.
To thoroughly clean the device and bring it into proper shape, you need to disassemble it. Each channel is treated with household chemicals and brushes. Separately, you need to wash the plates from dust and waste fuel.
Anti-scaling powders are usually used as a cleaning agent for lines, which are used to clean kettles in the kitchen. Tap water supplied to residential buildings contains large quantities of chemical elements. As a result of a long stay in the pipes, they leave a residue that interferes with the full operation of the heat exchanger.
To clean surfaces from scale, housewives often use citric acid.
Cleaning begins with the owner bringing a grinder and simply sawing off the heat exchanger. After cleaning, he returns it to its place and welds it back. Devices powered by air are cleaned in the same way.
How does a heat exchanger installed in a sauna stove work?
The design of a furnace with a heat exchanger has proven itself so well that various heat removal design options have emerged, with varying degrees of efficiency. The most common:
- Classic coil.
- Built-in flat-plate heat exchanger (similar to two hollow plates connected to each other).
- Samovar heat exchanger installed on a chimney.
A water jacket surrounding the combustion chamber is used extremely rarely and is found in only 1-2 models of factory-made stoves.
Meanwhile, sauna stoves with a heat exchanger have become the subject of consumer debate. Some argue that the use is not practical, others, on the contrary, point to convenience and comfort during operation.
What does a built-in or samovar heat removal device provide?
- A heat exchanger in a sauna stove is needed to produce hot water for washing. This task was the main one when designing the structure.
- The possibility of heating the bathhouse from a stove with a water circuit - in fact, a metal stove becomes a kind of heating boiler. During combustion, enough heat is released to warm up the coolant and heat the required volume of hot water.
The operating principle depends on the device used. Efficiency is determined by several parameters:
- Reliability.
- Sufficient heat dissipation.
- Possibility of operation without the use of a heat exchanger.
According to their design, all water heating devices can be divided into built-in and built-on (samovar type).
Built-in heat exchanger
Stoves for baths with a water circuit for heating and DHW needs began to appear after conventional water heat generators received good reviews. According to their design, furnace equipment with an integrated water heating circuit is divided into several classes:
- The coil is the simplest device used in classic solid fuel boilers. Inside the structure there is a bent metal tube. The shape is different and depends on the internal design of the furnace. The coil is positioned so that the flame does not directly affect it, and heating is carried out through flue gases.
- A flat heat exchanger is a more complex device compared to the previous one. A flat heat exchanger for a sauna stove looks like two hollow plates connected to each other. In terms of thermal efficiency, the design is superior to the coil and is used in modern models of furnace equipment.
- Built-in tank - a separate container is made in the furnace and installed on top of the combustion chamber. The built-in horizontal heat exchanger heats up quickly and maintains temperature while the oven remains hot.
- Water jacket - represents the cavity surrounding the entire combustion chamber and smoke channels. The design is often used in the production of solid fuel boilers, but is not widely used in the manufacture of sauna stoves.
The operating principle of the integrated heat exchanger in a sauna stove is as follows. The spiral or plate is heated by flue gases, the temperature of which reaches 450-500°C. When heated, pressure arises, forcing the coolant to circulate in the heating system. In schemes where an indirect heating boiler is used, the hot water supply is heated using heating heat.
Samovar type
Installing a heat exchanger on a sauna stove is a budget solution to the problem of hot water supply and heating. The water heating device is manufactured in two ways:
- Coil - a coil made of aluminum or copper is installed on the chimney pipe. For systems with natural circulation, up to a storage tank or water distribution taps, the dimensions of the coil should not exceed 3 m. The optimal dimensions of a heat exchanger with forced circulation are 5 m.
- The design of a samovar-type heat exchanger - experts agree that this particular design is optimally suited for a bathhouse. Hot water for showering is prepared gradually, preventing the liquid from boiling.
The movement of water in a samovar-type heat exchanger occurs according to natural physical laws. The heated liquid rises, creating pressure in the container.
The optimal volume of a samovar-type heat exchanger is selected so that the water reaches the required temperature after 2-3 hours of intense combustion. The design is optimal for providing hot water supply.
Pipeline installation
We have already mentioned that for pipelines it is better to use pipes with a diameter of 3/4″; this diameter is most often used in all heating systems and is suitable in all respects for a bathhouse heat exchanger.
Pipe diameter 3/4″
Pipes can be metal or plastic. You can also use flexible corrugated hoses, but you need to keep in mind that they have a significantly smaller nominal diameter, and this negatively affects the speed of water flow.
Let's give some tips on installing pipelines.
- Try to reduce the length of the pipelines as much as possible; do not make many turns or bends in the pipe. Your task is to create the most favorable conditions for water circulation.
- When using plastic pipes, do not allow them to overheat at the junction with the heat exchangers. The presence of water inside will prevent their complete breakthrough due to loss of strength caused by heating, but deformation is possible.
- Don't forget to place the drain valve in the lowest place. If the bathhouse is not used for a long time, then in winter you need to drain all the water from the system.
- When connecting pipelines, provide for the possibility of dismantling them to perform repair or routine maintenance work.
- Try to keep the length of horizontal sections of the pipeline to a minimum. Install all such sections at an angle of at least 10°. Such measures have a positive effect on the speed of water flow.
Gas equipment
A good alternative would be gas heating. Main gas is used here. Such boilers are efficient and reliable. The efficiency is 87% for the simplest modification. For expensive condensing modifications, this figure is close to 97%.
The heating device is compact, safe and automated. It requires maintenance no more than once a year. In this case, you have to go to the boiler room solely to change the settings and monitor their normal functioning. Compared to solid fuel, this is a fairly budget unit.
Gas equipment has its own nuances
Steel heat exchanger
Advantages of steel appliances:
- Increased thermal conductivity - like cast iron, steel quickly heats up and perfectly transfers heat to a cold carrier.
- Low weight - steel heat exchangers do not weigh down the overall heating system, so they can be used to provide hot water supply in large houses.
- Impact resistance – steel structures are very strong, so they are not afraid of mechanical damage.
- Resistance to thermal changes - steel can withstand sudden temperature changes within the system without consequences.
Disadvantages of steel heat exchangers:
- Susceptibility to corrosion – steel is characterized by low resistance to acidic environments, which significantly reduces the life of the heat exchanger.
- Inability to increase the power of the device by adding new sections.
- Rapid cooling - steel quickly releases temperature, which increases fuel costs.
Advice. To manufacture a high-quality and durable heat exchanger, it is recommended to use pipes made of heat-resistant steel with a diameter of at least 32 mm and a wall thickness of 5 mm or more.
Design Rules
When developing a design, it is important to ensure that the following conditions are met:
- internal voids in the heat exchanger must be greater than 5 mm. With a smaller width, water may boil;
- to avoid burning of the material, pipes with a wall thickness of more than 3 mm should be used;
- It is necessary to provide a gap of 10 - 15 mm between the firebox wall and the heat exchanger to compensate for the expansion of the metal when heated.
Making a heat exchanger with your own hands
It is not always possible to buy a ready-made furnace project with a heat exchanger. Also, not everyone can weld themselves. But building a heat exchanger for a heating stove with your own hands is not such a difficult task. By using aluminum or copper you can avoid welding work. With good preparation and correct calculations, this is possible and not burdensome. In addition, it saves the family budget.
Consumables
Having chosen the location and size, it is worth considering what is easier to build a heat exchanger from. You can use both the materials listed above and cast iron radiators, car radiators, and the like. The main thing is to correctly take into account thermal conductivity. Think through exactly what tool you will need and prepare it in advance. All these little things will make installation easier.
Assembly algorithm
You need to start with the project, thinking through the little things and choosing options. It is worth starting from the size; if the stove is weak, then a disproportionately large heat exchanger will only do harm. If you use copper as a pipe for the coil, then the length should not exceed three meters.
The simplest option for making a coil. It will require a copper pipe from 2 m to 3 m long.
The heating rate depends on the length of the pipe and the number of turns. But it’s worth remembering that you need to take into account the size of the stove and firebox and not overuse the enlargement of the coil. Distortions in size reduce the service life of the furnace.
To twist the pipe into a spiral, you need a template. This is any cylindrical auxiliary part. The diameter of the template must fit into the combustion chamber size.
Having prepared the materials, let's start:
- Bending the pipe, we wind it onto a prepared blank to obtain a spiral,
- We observe the dimensions in which the coil must be placed,
The average design power of the heat exchanger is 1 kW per 10 meters of area.
If you are not satisfied with this type of heat exchanger, you can make another type, for example by welding steel pipes. It looks something like this:
Examples of drawings on which to carry out work:
How to install?
It is convenient to install a heat exchanger in a stove when laying a new stove. This will allow it to be completely installed, observing all the gaps and dimensions. With this installation it is easier to maintain the correct size. Having mounted the heat exchanger on the foundation of the furnace, it is easier to cover it with bricks than disassembling the finished furnace and trying to fit it into place. But this is also possible.
There are also important points and requirements that should be observed to increase service life:
- Do not fix structural pipes with metal fasteners,
- Do not fill with ice water to avoid condensation,
- maintain the proportions between the furnace and the heat exchanger, avoiding large differences,
- use sealing materials with high heat resistance,
- fully comply with all fire safety measures,
Simple rules will help you avoid dangerous situations and help extend the life of the stove. Don't forget about fire safety.
Examples of installation in the photo:
Thermal generator stove - heating, hot water and electricity from wood
Hello everyone, I propose for consideration an interesting design of a wood-burning stove that you can make with your own hands.
The design feature is that the oven is capable of generating electric current to charge a mobile phone and other devices; Peltier elements are responsible for this. Water serves as the coolant in the furnace, although it can easily be replaced with oil or other liquid. This means that you can connect batteries to such a stove and heat the room, as an example. With the help of such a stove you can easily and simply get hot water. The maximum power produced by Peltier elements is 10 Watts, and the maximum voltage is around 15 V. If you need higher power and voltage, you can install more Peltier elements. Let's take a closer look at how such a stove works and how to make it. List of materials:
— ready-made housing for the furnace (or sheet steel, corner and other materials); - steel pipes; - chimney; — car radiator (from Volga or another, preferably larger volume); — Peltier elements (the author has 14 pieces); - thermal paste; — sheet aluminum: — fum tape; — square steel pipes (for heat exchangers); - water hose; — hydraulic valve (to relieve excess pressure); — tees for water supply; — battery, electronics for voltage control (and the like if desired).
List of tools:
- Bulgarian; - welding machine; - lathe; - drill; — broken keys.
Furnace manufacturing process:
Step one. Manufacturing of the furnace body
The oven body is made of metal; the author used an old container for such purposes. You can make a similar stove from sheet steel, old gas cylinders, and so on; you can simply upgrade the potbelly stove you already have.
We install the door, as well as the chimney. We make sure to make a valve in the chimney, and we make the oven door so that it closes hermetically. This is necessary in order to quickly extinguish the stove if necessary. If the Peltier elements overheat, they may fail.
The author's oven is small in size, but to get more heat, you can make a larger oven.
Step two. Manufacturing of heat exchangers
Step three. Heating circuit
A heating circuit is installed inside the furnace; our water will circulate in it, heated by coals and flames. To make this circuit, you will need steel pipes; we weld them into a structure like the author’s; everything must be sealed and must withstand high pressure. Of course, the design of the circuit may be different; the larger the heated area, the more efficiently the stove will heat the water.
Step four. Furnace assembly
Everything is almost ready, you can assemble the oven. We install the door, and install the heating circuit inside the oven. We weld the heating circuit to the furnace body so that it does not move. We also weld the legs to the stove; the author made them from round pipes, welding the ends with sheet steel.
Step five. Assembling the “sandwich”
We connect Peltier elements in series or parallel, depending on the current and voltage you want to receive.
Step six. Final assembly and testing
If the system is equipped with good batteries and smart electronics, quite good reserves of electricity can be stored from firing the furnace. Good luck and creative inspiration if you decide to repeat something similar! Don't forget to share your DIYs with us!
Source
Become the author of the site, publish your own articles, descriptions of homemade products and pay for the text. Read more here.
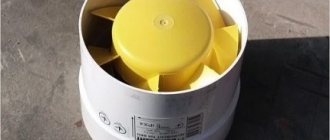
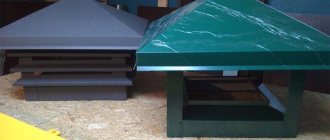
Air heat exchanger design
The air heat exchanger for the chimney is a hollow body that is connected to the heating system using special pipes. A special braking device is installed inside the housing for gases that are formed during fuel combustion. Most often this is a specific damper system with small cutouts for air flow. In some models of heat exchangers, it is possible to regulate the draft force in the smoke exhaust channel, which affects the productivity of the unit.
Air heat exchanger (convector)
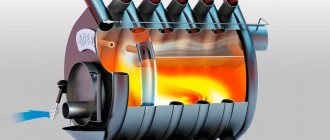
This device works thanks to the principle of convention. There is a hole at the bottom of the heat exchanger through which cold air enters the body. It quickly heats up from the high temperature of the chimney, after which it returns back into the room. Thus, in a few minutes the room where this unit is installed becomes noticeably warmer.
The advantage of this design is a significant increase in stove performance. When using the same amount of solid fuel, you can obtain several times more thermal energy.
Do-it-yourself water heat exchanger for a furnace
To increase the efficiency of a boiler with a water circuit. A metal structure made of large diameter pipes will be built into the furnace and connected to the heating pipeline.
A few general recommendations:
- The diameter of the pipes should not be less than 2.5 cm. Otherwise, the heat exchanger will slow down the movement of the liquid.
- Approximate calculation of the heat exchanger area: 1 m2 per 3-5 kW of furnace power.
- But if the stove not only heats the house, but also heats water, the heat exchanger must “take” more than 1/10 of the heat.
The design of the heat exchanger is two horizontal pipes, between which a battery of 6-9 pipes of the same diameter is welded.
- The heat exchanger outlet is in the upper part, the inlet (through which the return flow will be supplied) is in the lower part.
- Threads are cut on the inlet and outlet pipes for connection to heating pipes.
- Installation in the furnace cavity begins at the stage of laying the foundation of the furnace.
- As the rows of the furnace are built, the tubular structure is constantly attached and its position is monitored (towards the coolant outlet slightly higher from the level).
- When the furnace is finished, the heat exchanger is connected to the heating. This is done using a coupling. A long thread is cut at one end, a narrow nut is screwed on, then the coupling is screwed in until it stops. The threads on the second pipe are wrapped with FUM tape, tow, etc., then the coupling is twisted in the opposite direction. To prevent the joint on the first pipe from leaking, the thread is also wrapped with FUM tape and pressed with a nut.
- The system with the heat exchanger is filled with water and a test fire is performed.
The quality of the seams must be perfect, because the heat exchanger will have to work at high temperatures, there will be no access to it, and leaks will lead to the repair of the entire furnace!
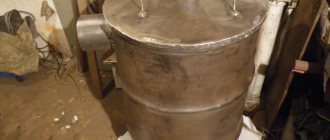
An option for a heat exchanger for a furnace can be a tank, inside which part of the hot chimney passes. Such a device is easier to maintain and dismantle if necessary, but somewhat more difficult to make.
Step by step guide
Manufacturing of a ductless heat exchanger
- Prepare a container, preferably metal, plastic will take longer to heat up.
- Place the tank at the beginning of the heating system.
- Make 2 holes in the container for exits. One is at the top, through which hot water will be discharged. The second is at the bottom, cold liquid will flow from the system pipes.
- Place the outlets correctly; the rate of heat transfer will depend on this.
- Seal the holes hermetically so that the air temperature is not wasted on the battery, and the room is evenly heated.
- Use copper for the tube; it should bend well and transfer maximum heat into the room.
- Bend the tube into a spiral shape to create a coil.
- Place the spiral in the tank, the ends of the tube need to be brought out, and secure them well.
- Connect a threaded fitting to the ends of the parts.
- Connect a power regulator to the pipe; you can buy it in a store, it’s inexpensive, so you shouldn’t get hung up on making it yourself.
- The system will work properly without a regulator, but it is needed to regulate power and save energy. The power can be set at your discretion.
- Connect the terminals to the thermostat, and then the power wires.
- To prevent the tank from wearing out due to temperature changes, install an anode.
- Close all elements hermetically.
- Fill the tank with water, the heat exchanger is ready.
Negative points
Along with the benefits of a heat exchanger on a chimney, it is worth noting a number of negative factors. Firstly, due to this design, the temperature of the exhaust gases is significantly reduced. This can provoke excessive soot accumulation, condensation formation and poor traction.
An important point in arranging such a heating system is to calculate how much water is needed for its full functioning. If there is not enough of it, the system may overheat, the water in it will boil, and the pipes may burst
In addition, it is important to ensure the tightness of the seams.
In any case, installing a heat exchanger allows you to increase the efficiency of any furnace. For safety reasons, at least twice a year, visual diagnostics of the system and its maintenance should be carried out - cleaning soot, replacing defective elements, and so on. Then it will be possible to confidently use the heat exchanger for heating the house and heating water in the bathhouse.
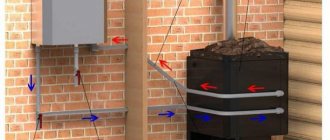
What should you keep in mind?
With natural circulation of the coolant, the heat exchanger should be placed above the furnace at a distance of 1.5 - 2.5 m. Due to the constant change in geometric parameters, the pipes cannot be fastened to the wall tightly enough. It is necessary to provide a small gap.
It is important to remember that if the stove is used not only to heat the house, but also to heat water, a maximum of 10% of the total amount of heat generated should go to the heat exchanger. When using a structure with an expansion tank for heating, the volume of the latter should be selected so that the water in it can heat up to the required temperature in two hours.
The return pipes should have a smaller diameter than the coolant supply pipes. The material intended for sealing threaded connections is selected with a sufficient level of heat resistance.
If the house is not intended for permanent residence, but is used only from time to time, then it is better to refuse water heating. It is advisable to fill in special antifreeze instead of water if you plan to heat a stove with a heat exchanger in the cold season. This will prevent pipes from bursting. Remember that adding coolant when the furnace is fully heated is unacceptable.
How to make this device yourself?
Making a heat exchanger for a chimney with your own hands is quite simple. To do this, use the following materials:
- metal sheet measuring 0.35 m x 0.35 m - 2 pcs.;
- pipe with a diameter of 0.032 m and a length of 2.4 m - 1 pc.;
- pipe with a diameter of 0.058 m and a length of 0.3 m - 1 pc.;
- cylindrical metal container with a volume of 20 l – 1 pc.
Water heat exchanger made of stainless steel
Step-by-step instructions for making a heat exchanger:
- Cut two circles with a radius of 0.15 m from sheets of metal. They will act as plugs.
- On a sheet of metal, mark the locations for placing the pipes. The largest circle with a diameter of 58 mm should be in the center, and along the contour there should be eight small circles with a diameter of 32 mm.
- A pipe with a diameter of 5.8 cm must be cut into eight equal parts using a grinder.
- Weld a plug to one end of the largest size pipe.
- Weld each pipe with a diameter of 3.2 cm to a metal circle one by one.
- Place another plug on the opposite side of the pipes, then weld it.
- Using a grinder, cut off the bottom of the metal container.
- On the side surface of the metal casing, cut two holes on opposite sides. Their diameter must correspond to the parameters of the chimney.
- Weld pipes to the prepared holes, with which the unit will be connected to the chimney.
- Insert the prepared core into the casing with pipes. Carefully secure the structure using welding.
- Connect the heat exchanger to the chimney.
- Treat the finished unit with heat-resistant paint.
Homemade heat exchanger
Buy or make it yourself
If you want to increase the heat transfer from an expensive purchased boiler, it is better to buy ready-made high-quality devices - the industry produces them in a sufficient range. But if you want to modernize a potbelly stove in a bathhouse or garage, or increase the efficiency of a fireplace with a steel pipe in the country, you can save a lot of money by making and installing a heat exchanger on the chimney yourself. Installing a heat exchanger by a hired specialist will cost the same as the structure itself.
The simplest option - a coil - can easily be made by a home hobbyist even without much experience, but a home craftsman with at least some welding skills can handle more complex designs.
approximate price
The cost of industrially manufactured chimney heat exchangers varies depending on the design and manufacturer.
Running heat exchanger tanks for a chimney with a diameter of 115 mm and a capacity of 6 liters cost rubles; those with a capacity of 12 liters cost rubles.
Spark extinguishing
Any tent has a hole for a hot smoke pipe (chimney). In addition, the area around the stove is always protected with a fireproof mat in case of hot coals flying out. Some tent manufacturers recommend rolling back the tent base and placing the product directly on the ground.
Not only hot carbon dioxide, but also sparks rise from the stove through the chimney pipe. If the pipe is short, they can get onto the roof of the tent and cause a fire. To prevent this from happening, the chimney pipe is made long so that it is at least 2–2.5 m long. While the spark flies along this path, it will have time to go out. Consequently, the chimney acts as a spark arrestor.
Safety precautions also mean that all objects that can catch fire should be kept away from the operating stove. Another danger is carbon monoxide. It must go strictly into the chimney. And the tent itself should be designed so that clean air regularly enters it.
DIY copper tube heat exchanger
Copper tube heat exchanger
This unit is a coil of copper pipe that wraps around the chimney. It heats up quickly, and the air that moves inside becomes warm. To ensure high efficiency of this system without the use of a pump, the length of the coil should not be more than 3 m.
This design can be made using argon welding. The option of fastening using tin is allowed. In this case, all surfaces must be degreased with phosphoric acid.
The ends of the copper pipe must have an external thread for connecting an external water tank. It must be located above the coil, which will ensure maximum productivity of the system.
Choosing material
The coil is traditionally made from a pipe, the length and diameter of which are determined by the desired level of heat transfer. The efficiency of the structure will depend on the thermal conductivity of the material used. The most commonly used pipes are:
- copper with a thermal conductivity coefficient of 380;
- steel with a thermal conductivity coefficient of 50;
- metal-plastic with a thermal conductivity coefficient of 0.3.
Copper or metal-plastic?
With the same level of heat transfer and equal transverse dimensions, the length of metal-plastic pipes will be 11, and steel pipes will be 7 times longer than copper ones.
That is why it is best to use annealed copper pipe to make the coil.
We are looking for improvised means
Considering the high cost of materials, it would be appropriate to consider the possibility of using products that have already served their purpose, but have not yet fully exhausted their service life. This will not only reduce the cost of manufacturing the heat exchanger, but will reduce the time for installation work. As a rule, preference is given to:
- any heating radiators that do not leak;
- heated towel rails;
- radiators from cars and other products of similar design;
- instantaneous water heaters.
What it is?
A heat exchanger is a device designed to exchange heat between two or more heat carriers not directly connected to each other. Most often used to heat water directly from the heating system.
This allows you to significantly save on heating and electricity, as it allows you to avoid spending additional energy on heating water, as is the case with an electric or gas water heater.
Theoretically, you can consider using water directly from the heating system, since its quality is not much different from water sold in supermarkets. However, in practice, it cannot be used for domestic purposes.
This is due to the following reasons:
- Replacing water in heating pipes is a costly process and requires money.
- The injection of new water has a negative effect on boilers and contributes to rapid wear of the system.
- Heating systems often use chemical additives to soften the water.
- The pipes in these systems themselves have a lot of deposits inside them; the standards for their use are designed for process water, and not for human consumption.
For the above reasons, it is not possible to use water directly from heating pipes for household and food purposes, and to heat water from a heating system, it is necessary to use a heat exchanger.
Types of recuperative heat exchangers
Recuperative heat exchange devices are in great demand today. According to the design, the following types of units are distinguished:
Shell and tube
This is a device consisting of bundles of pipes welded to a casing and attached to tube sheets with bolts. The movement of the first coolant in the annulus is carried out through the fittings present on the body. Another coolant flows through the pipes. There are partitions on the body or cover of the presented devices. In order to increase heat transfer, the pipes are subjected to a finning process using the knurling or tape winding method.
Immersed
Its design involves immersing one coolant in a container with another. Such devices are characterized by low cost and simplicity.
The movement of water in the interpipe space occurs at low speed, resulting in low heat transfer.
Heat exchange devices of the “pipe-in-pipe” type
It consists of several links located one above the other and interconnected. Each link is a structure of pipes inserted into each other, between which heat exchange occurs. It is advisable to operate them at high pressures and low water flow rates in the system.
Irrigation
It consists of several rows of pipes located one above the other, along the outer surface of which cooling water flows in a thin film
It is actively used in refrigeration units, as they act as capacitors.
Graphite
The design of the heat exchange device involves the presence of graphite blocks, sealed together using rubber gaskets and fixed with lids. Graphite is considered an excellent conductor of thermal energy. To eliminate porosity, it is treated with special compounds.
Used for chemically aggressive liquids.
Lamellar
This device is made of plates, the surface of which is stamped using a special method. The result of this work is the formation of channels through which the coolant moves. The plates are sealed together. The manufacturing process of such a device is distinguished by its simplicity, it is easy to clean, and has high heat transfer. Disadvantage: cannot withstand high pressure.
Lamellar-ribbed
It consists of a system of separating plates, between which there are ribbed surfaces - nozzles, attached to the plates by soldering in a vacuum.
Designed for heat exchange between non-aggressive liquid and gaseous media in the temperature range from plus 200 °C to minus 270 °C.
It has low weight and size, high strength and rigidity.
Finned plate
Its design involves the presence of ribbed panels of small thickness, the production of which occurs using high-frequency welding. Thanks to this design and the materials used, it is possible to achieve a high temperature regime of the coolant, low hydraulic pressure, high efficiency, long service life, and low cost.
It is advisable to use it when utilizing heat from gases.
Spiral
Equipped with two channels, which are wound in a spiral shape near the main dividing partition. Their purpose is to heat and cool liquids with a high viscosity index.
Specifications
Plates and gaskets can be made of various materials; their choice depends on the purpose of the unit, because the scope of application of such heat exchangers is very wide. We are considering heating and hot water systems, where they act as thermal power equipment. For this area, the plates are made of stainless steel and the gaskets are made of NBR or EPDM rubber. In the first case, a stainless steel heat exchanger can operate with water heated to a maximum temperature of 110 ºC, in the second - up to 170 ºC.
For reference. These heat exchangers are also used for various technological processes when acids, alkalis, oils and other media flow through them. Then the plates are made from titanium, nickel and various alloys, and the gaskets are made from fluorine rubber, asbestos and other materials.
Calculation and selection of a heat exchanger is carried out using specialized software according to the following parameters:
- required liquid heating temperature;
- initial coolant temperature;
- required flow rate of the heated medium;
- coolant consumption.
Note. The heating medium flowing through a plate heat exchanger for hot water supply can be water at a temperature of 95 or 115 ºС, or steam heated to 180 ºС. This depends on the type of boiler equipment. The number and size of the plates are selected in such a way as to obtain water at the outlet with a maximum temperature of no more than 70 ºС.
It must be said that the advantages of plate heat exchangers lie not only in their modest size and ability to provide high flow rates. The fact is that the range of selected exchange areas and costs for the units under consideration is extremely wide. The smallest of them have a surface area of less than 1 m2 and are designed to flow 0.2 m3 of liquid in 1 hour, and the largest - 2000 m2 with a flow rate of over 3600 m3/h. The table below presents the technical characteristics shown by the operation of plate heat exchangers of the famous ALFA LAVAL brand:
According to their design, heat exchange units are of the following types:
- collapsible: the most common option, allowing for quick and high-quality repair and maintenance of a high-speed heat exchanger;
- soldered or welded: such devices do not have rubber gaskets; the plates are rigidly connected to each other and placed in a solid body.
Note. It is brazed heat exchangers that many craftsmen use for private homes, adapting them for heating or cooling water.
Tips and tricks
As you can see, making a heat exchanger yourself is not difficult. For a simple design, a tank, two copper tubes of different diameters, a coil and a fan are enough. Thanks to the device, you can not only heat the room, but also cool it.
A thing like an exchanger in one form or another is found in almost every home. Approach the work constructively and thoroughly, prepare drawings, decide on the choice of material, follow the instructions described above for the manufacture, assembly and connection of the device.
If you wish and follow consistent steps, you will assemble a design no worse than a store-bought one, the house will be warm and cozy, and the device will work flawlessly for a long time.