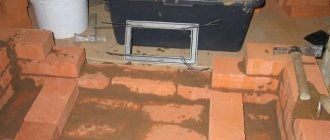
Many owners of private houses independently build a bathhouse on their property. Although they follow construction technology, no one is immune from mistakes. A real craftsman can easily build a log house for a bathhouse and cover the roof, but making a stove requires a lot of attention and the necessary skills.
For example, you should know exactly what solution is needed for these purposes and how to properly prepare such a mixture. And even experienced builders cannot always cope with this. This is explained by the fact that the bulk of the mortar for fastening the brickwork should consist of clay, and not ordinary cement. Therefore, the work pays special attention to the optimal composition of the mortar for laying the furnace.
Furnace design and masonry mortar
Brick sauna stoves are large structures, their parts function in different conditions. The humidity level and temperature conditions at the base of the stove, next to the firebox and in the chimney duct are different. Temperature delta can reach from 0 to 1000 degrees or more. Smoke passes through the firebox and chimney. In addition, the pipe is exposed to rain, wind and cold. A universal mortar that would fit all these parameters and withstand them with honor has not yet been invented.
Cement or lime, either together or separately, cannot withstand such a temperature range.
On a note. Clay spreads in water, lime allows gases to pass through. Therefore, where the steam room, washing room and rest room use at least three types of masonry mixtures. They will all be different in their performance characteristics.
In addition, it should be borne in mind that fire-resistant solutions are expensive. It is advisable to use them where the maximum temperature develops. But for the foundation and main structural parts of the furnace, you can prepare cheaper mixtures. Clay is considered a relatively inexpensive building material. If you wish, you can obtain it yourself, and then the solution will be practically free. All that remains is to determine its quality and suitability for masonry and prepare it in a special way.
Clay sand mortar for furnaces is also sold and manufactured in factories. There is already a calculated ratio of components. The big disadvantage is their high price; the oven will turn out golden, because you need quite a lot of solution. For comparison: for 100 bricks you need about 2-3 buckets of the mixture. The exact quantity depends on the thickness of the seams and the density of the rows. Each master has his own style of masonry and, accordingly, the consumption of mortar.
If you recalculate factory mixtures to the actual scale of construction, then thrifty owners will not be pleased with the price. Therefore, you can take a closer look at budget masonry mortars that you can make yourself. It is also possible to prepare clay for ovens with your own hands; the composition of the solution will not be affected.
Concrete and heat-resistant concrete mixtures
Concrete mortar is also used for the stove foundation and chimney above the roof. Its strength is not inferior to limestone, hardening begins after 45 minutes. Before mixing, the components are sifted through a sieve. First, sand is poured into the container, and cement is placed on top of it. Stir until smooth, then add water. It is important to achieve a viscous consistency, not thick and not too runny.
For a monolithic firebox, a heat-resistant concrete mixture is used. Its composition is as follows:
- Portland cement M400 1 part,
- crushed brick 2 parts,
- sand 2 parts,
- fireclay sand 0.3 parts.
Strength increases if you use quartz sand instead of ordinary sand. Refractory concrete is characterized by large fractions (up to 10 cm) and high density. The following proportions are used as standard: 8 liters of water per 20 kg of mixture. Mixing is carried out mechanically, for example, in a special mixer.
You can also use a shovel, but then the quality will be lower, since it is impossible to achieve good uniformity manually. It is undesirable to increase the amount of water, as this will reduce the physical properties of the mixture. At the same time, stirring is continued even if there is confidence that there is not enough water. It is necessary to work with such a solution quickly due to its rapid hardening.
What are masonry mortars?
The composition of the mixtures is not complicated: one or two components and water. Binding elements - clay, cement, lime. The filler is sand, which can be silicate or fireclay. It is important to take water that does not contain impurities or any technical additives. Water from a tap, well or open reservoir is suitable. But the ideal liquid for the solution is considered to be rain or melt water.
Porosity, gas conductivity, and thermal conductivity qualities of solutions vary. They are united by ease of application, good ductility and high strength after the solution hardens. Each type of solution must meet its declared properties.
Furnace masters classify solutions into the following categories:
- Fatty, with good plasticity, but susceptible to cracking after hardening.
- Normal - having average ductility and strength, with their help they create reliable masonry. This kind of clay should be sought for construction work.
- Skinny - fragile and low-plasticity, not durable, crumble after drying. Such clay is not suitable for the stove; it will immediately damage it the first time it is lit. It can only be used when brought to the desired condition in combination with other plastic components.
When the mixture contains one binder component (cement, clay), the solution is classified as simple. The ratio of components is designated as follows: 1:1, 1:2, 1:3. These designations help you understand what proportions are used in solutions. The first number indicates the binder component, the second the filler. When the solution is complex, consisting of two binder components (cement-lime mixture), the designation is as follows: 1: 2: 8. The first number is the most effective binder. Stove makers use mixtures that are normal in plasticity and strength. Fatty solutions are brought to the desired condition by adding sand; thin solutions are mixed with lime or clay.
If we exclude the reinforced concrete mortar used in the foundation, the following types of mortars are used when constructing the furnace:
- Calcareous . Used for brick plinths and chimney ducts. That is, it can be used in the construction of parts where there will be no heating of more than 450-500 degrees above zero. The seams with this solution will be strong, but fire resistance will suffer. It cannot be used to construct a chimney, since this part of the structure is exposed to aggressive atmospheric influences. Lime mortar cannot be called wear-resistant.
- Cement-lime . They are used in the construction of foundations. It is not heat resistant and is not suitable for chimneys. Withstands temperatures no higher than 250 degrees above zero.
- Cement-chamotte . They are made of cement and heat-resistant fireclay sand and water. Used to build a firebox. Such a composition will easily withstand temperature loads of 1300 degrees and above and will not collapse. Such a seam will not let smoke through, but condensation can escape through it. Heat resistance, fire resistance, and ease of use are features of cement-fireclay mortars. But it comes out at a rather expensive price. Therefore, when building stoves for baths, they often make do with an analogue, where cement is replaced with clay.
- Clay-fireclay . Such solutions are also used when laying the combustion chamber, as they have fire-resistant properties. It turns out much cheaper than the previous option. Clay is often a free element.
- Clay . They are used to construct the main structure of the stove, where heat is accumulated and transferred to the heated room. On the heat resistance scale, such solutions are in the middle position. The clay mixture will withstand temperatures of 1100 degrees. When the water evaporates, the mixture becomes solid, but under the influence of the liquid it will again become plastic. A very convenient property that allows you to sort out the stove for repair or restoration. To build a chimney, clay mortar for the stove can be used, but the upper part of the pipe cannot be laid with it, it will get wet.
This is the cheapest solution; it is used to lay the main part of the structure. The seemingly low cost of a ready-made, factory-produced clay mixture will actually add up to a considerable amount, since a lot of the mixture will be needed. But the components can be obtained for free. They are under your feet. Therefore, it makes sense to find out how to make clay mortar for laying a stove with your own hands; it doesn’t require much effort. Clay will also be needed when you need to make a mixture for laying the firebox.
Furnace solution: old recipes
The oven solution “the old fashioned way” is prepared, as a rule, according to a proven recipe. And every village stove maker has his own recipes for preparing solutions for stove masonry and finishing fireplaces. Such solutions, although considered outdated, are very affordable. And the ingredients for their preparation (cement, clay and sand) can be bought at any construction site.
Author: Matvienko Nikolay Nikolaevich
Despite the existence of ready-made dry mixtures for laying and plastering stoves, there are still stove makers in villages who make stove mixtures with their own hands according to old recipes. Let's see how this happens.
Traditional kiln solutions
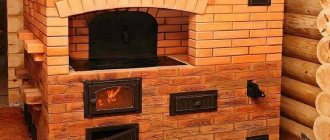
Brick stove for a bath
They can be divided into two groups:
- masonry mortars;
- finishing solutions.
According to their composition, masonry mortars are divided into:
- clay-sand;
- cement-sand;
- calcareous-sand;
- mixed.
Brick laying is usually done using clay-sand mortar. Some parts of the masonry - the foundation of the furnace, the pipe heads on top of the roof - are laid on lime, cement or mixed mortar.
Let's take a closer look at them.
Clay-sand stove mortar
Brick oven laying
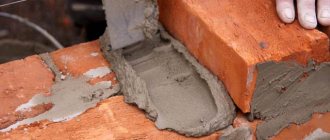
The clay-sand solution is prepared either in a trough or with a mixer. The clay is pre-soaked for a day or two days. The sand should be fine and clean; therefore, it should be sifted first. The ratio of the components depends on the degree of fat content and moisture content of the clay. Oily clay requires more sand. Usually no more than 1/4 of the clay volume is used to soak the clay. You should not wet it too much, as it is difficult to break up lumps in liquid clay. The stove maker finally imparts the required plasticity to the solution by adding water to it and mixing it with a trowel at the workplace just before laying. While mixing the solution, its quality is checked: whether enough sand has been added and whether the components are well mixed. When the greasy, clayey stove mortar dries, due to a decrease in its volume, it cracks and crumbles out of the seams. Lean kiln mortar does not bind (glue) bricks well and also crumbles. Therefore, there should be so much clay in the solution that it only fills the gaps between the individual grains of sand that form the monolith. Such a stove solution will not crack or dry out.
Lime-sand kiln mortar
Street bread oven in the village.
To prepare lime mortar, use so-called lime paste. If there is no ready-made lime dough, then take quicklime, called “kipelka,” and slak it into the dough. To do this, pour water over the lime and stir. If there is not much lime, the slaking is carried out in a solution box. If the quantity is large, they dig a hole in the ground and cover its bottom and walls with boards. Such a pit is called a tvoril. When the “boiling pot” is poured with water, it cracks and crumbles into powder. At the same time, it greatly increases in volume and hisses. The water is heating up. The lime seems to be boiling – hence its name. Lime that gets on the skin corrodes it. Therefore, extinguishing must be done carefully and beware of splashes.
To ensure that all the lime is slaked well, the dough should be prepared at least a week before use. Depending on the fat content of the lime, 3.5 to 4 volumes of sand are added to it. To find out how much sand the lime can absorb, sand is added to it gradually until the solution stops sticking to the trowel. Mix the lime stove mortar in the box. First, put the lime dough there and dilute it with water to the consistency of liquid sour cream, carefully stirring the lumps and adding water gradually. Then add sand and mix well until a homogeneous mass is obtained.
Cement-sand oven mortar
Preparation of cement-sand mortar
For masonry in damp places, cement mortar is used. It hardens in water even better than in air, which is why it is called hydrate. Cement is a very fine powder of a steel-gray or greenish color. It has the ability to set very quickly after soaking. Therefore, the cement kiln mortar is mixed in small portions to be used within an hour. First, the cement is thoroughly mixed with the required amount of dry sand and after that water is gradually added. Usually take from 3 to 7 parts of sand for 1 part of cement, depending on the purpose of the solution. Cement mortar produces stronger masonry than lime mortar.
Mixed stove solution
To improve the quality of lime mortar, cement is sometimes added to it. Such a solution is called mixed or complex. The ratio of the volumes of cement, lime paste and sand in a mixed solution varies. For example, take 1:1:6, that is, 1 volume of cement, 1 volume of lime paste and 6 volumes of sand, or 1:11/2:8 and so on.
Traditional kiln solution
Let's see what mixtures are traditionally used by stove makers in villages for what parts of the stove.
From the foundation to the first row of the ash pit, cement kiln mortar or lime is used. In a ratio of 1:4 or 1:6. Sometimes mixed.
Next, before the firebox, the brick is placed on a clay-sand mortar. The firebox is lined with bricks on edge on mortar.
Mortar is a fireproof mixture for masonry in those areas of the furnace where the temperature reaches 600-750 degrees.
The furnace body is laid using clay-sand mortar up to the pipe head. From the roof level, on the street, masonry is carried out using cement-sand or mixed mortar.
Plastering the stove
The most common and least labor-intensive method of decorative finishing is plastering.
Plastered stove in the village.
The disadvantage of this method of decorative finishing of the stove is the need for constant care of the plaster. A plastered stove needs to be whitewashed frequently, as the plaster cracks and crumbles quite easily. The most heated parts of the stove change color and turn yellow within a few weeks from the start of its operation.
Attention! Plastering the stove is done only after it is completely dry.
Before plastering, excess clay is removed from the front surface of the stove. Irregularities in the brickwork are smoothed over with dry bricks. The seams are cleared and deepened to a depth of at least 5-10 mm. After this, the oven is covered and secured with a plastic metal (stainless) mesh or cellular and thin glass wool. This will prevent the plaster from cracking when exposed to high temperatures. The mesh or fiberglass is secured with small self-tapping screws no more than 40 mm long. Self-tapping screws are fixed either into bricks or into masonry joints.
You can achieve a very strong connection between the plaster and the stove by placing the ends of the wire in the horizontal joints, even during laying. When applying the plaster, it will be firmly tied to the walls of the oven with this wire.
Plastered brick oven. Author: stove maker Sergey Kuznetsov, Lipetsk.
The first layer of plaster, 2-3 mm thick, is applied to the hot, damp surface of the oven. As soon as the plaster has set, the oven is immediately covered with a second layer of a thicker plaster solution. Then third, fourth and so on. Until the thickness of the plaster reaches 7-10 mm. The last layer is thoroughly leveled. As soon as the solution has set a little, the plaster is rubbed in a clockwise circular motion with a wooden grater or wool mitten dipped in the liquid solution.
Plastering solutions
Various recipes are used as a solution for plastering the stove:
- clay-sand mortar used to lay the furnace mass;
- clay-sand mortar, on which the furnace mass was laid, with the addition of lime dough, 1:10;
- a solution of 1 part clay, 1 part lime paste, 2 parts sand and 0.1 part non-flammable fibrous substance (asbestos, basalt, other fibers);
- a mixture of 1 part clay, 1 part cement, 2 parts sand and 0.1 part asbestos;
- a solution of 0.6 parts of gypsum, 2 parts of lime paste, 1 part of sand and 0.2 parts of asbestos (basalt, other fiber);
- a solution of 1 part clay, 1 part lime paste and 4 parts sand.
Fine asbestos is used as a plastic, reinforcing property of plaster. Asbestos cardboard is first soaked in water. It becomes loose. It is crushed and mixed into a paste, which is added to the plaster solution. The same can be done with other thermal materials: vermiculite, basalt, calcium silicate.
It is stronger, cheaper and more beautiful to use sanding (grouting) of the brick surface of the stove instead of plaster. To do this, uneven surfaces on the stove surface are filled with a thin clay-sand mortar (just a rag). And then the stove is polished with a piece of dry brick. In this case, the protruding unevenness of the masonry is erased, and the depressions and seams remain filled with mortar and become completely invisible. After this, the stove can be whitewashed or painted with adhesive paint.
Ready-made oven solution
Dry oven mixtures.
Today, stove makers use special modern factory-made dry masonry mixtures in their work. And also mortars, pastes, mastics, adhesives, heat-resistant silicones, ready-made pasty suspensions. When using these materials, it is possible to achieve a thickness of seams in the firebox from 1 to 3 mm. We must remember that these pastes and dry mixtures quickly lose their properties in the open air. Therefore, they must be opened and kneaded immediately before laying the brick.
Ready-made stove plaster mixtures are also used for plastering stoves and fireplaces. Packaged in bags, these mixtures meet all the requirements for plasticity, reinforcement and heat resistance. Two 25 kg bags are enough to plaster an entire stove (up to 8 sq. m).
Special pastes are used for lining stoves with tiles and porcelain stoneware. It must be remembered that many of them are applicable only in rooms with a constant positive temperature. When the house freezes and the temperature drops below zero, these pastes lose their adhesive ability, and the cladding cracks.
Thermal sealants, adhesives and silicones are used to close seams between metal products: at junctions on the roof of a metal chimney, for sealing seams in ovens and smoking cabinets.
Of course, it’s easier, more reliable and cheaper to use a ready-made mixture than to rely on “old-fashioned” recipes. But just in case, it will be useful for everyone to know how to prepare a stove solution with their own hands. It might come in handy.
A comment
Stove maker Evgeny Ivanov, city of Kvartsitny:
My grandfather was a stove maker... He also produced the clay-sand mixture by hand. First, the clay was soaked in a barrel or tub-like container for about a week. Then they pushed the mortar carefully to a certain fat content. It should have turned out something like sour cream. It was considered that good clay was red. Then it was mixed with sand. The sand was also selected with a medium or coarse grain size, approximately a fraction from 1 to 3 mm. Then we bought dry frozen clay, diluted it in water and stirred it with a mixer, and mixed the resulting mass with sand. Nowadays they are already selling a ready-made clay-sand mixture, which can be easily diluted with water and stir a 25-kilogram bag in 5 minutes, I timed it. I use both current and past technologies for making the mixture. The current one, of course, is easier and faster to manufacture. Well, the past... also has its advantages, because some stoves last for 100 years.
What tools will you need?
Before you start preparing solutions, you need to select a tool:
- a kneading oar (a specially hewn board with a handle);
- shovel;
- container for mixing the solution (a wooden trough or barrel, or a metal container);
- 5-6 buckets;
- trowel, which determines plasticity;
- a pair of metal sieves with 3x1.5 mm cells;
After the tool is prepared, you will need to prepare the components for the solution.
Tools and materials
Few tools are required. A container for water, a container for soaking clay, a container for mixing components, a mixer. As a rule, the mixer is a powerful, low-speed hand drill equipped with a mixing auger. You can knead the solution by hand, but then it will take a lot of effort and time. A concrete mixer is not suitable for such purposes - clay is a very capricious material. You also need a sieve for sand (a mesh with a mesh size of 2 or 1.5 mm) and, sometimes, a mesh for straining the clay solution.
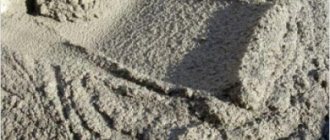
Only quarry sand is needed. Sea or river is unsuitable. The fact is that alluvial sand has rounded grains of sand that do not adhere well in the solution, so it comes out fragile. And quarry sand has irregularly shaped grains of sand with sharp edges that adhere well to clay.
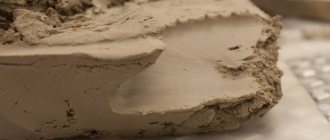
The most difficult thing is with clay. You need regular red, the most common one. It varies in sand content. There is fat, normal, skinny. The finished masonry mortar must have normal fat content. Skinny is fragile, fatty cracks a lot when dried. Fat content is adjusted to normal by adding sand. If the clay is thin, then you have to mulch it, removing excess sand. The procedure is quite lengthy and troublesome, so you should resort to it only in case of emergency.
How to get clay
To get by on a budget, you should first stock up on clay and sand. With their help, they not only make solutions, but also regulate plasticity. When the furnace part is laid out, clay will be needed. What is she? This is a material created by nature itself, very plastic when saturated with water. Varies in fat content. If it contains more than 40 percent sand, it is skinny. It is not suitable for laying stoves in its pure form, since the seams will be fragile. The normal sand ratio is 37-38 percent. When there are fewer of them, the clay is normalized by mixing regular or fireclay sand.
Where can I get clay for laying a stove? There are several methods:
- Unfired factory raw brick is soaked by dipping it in a container of water. The softened mass is filtered using a fine mesh sieve. Then sand is mixed in. The desired consistency is obtained by adding the required amount of water.
- Sometimes local clay is sold very inexpensively by local residents. But this is very dirty clay, it will have to be cleaned and expressed several times.
- You can extract clay yourself. Its deposits are found almost everywhere. If you go 4-5 meters deep, you can dig it up in your own garden. But it’s even better to look for clay on river banks, in ravines and other places where the soil has been washed away. In the section of banks and ravines, clay is usually visible in a single layer. Approximately 5 meters are measured from the surface and a piece of rock is broken off for testing. If you crush a lump, it should crumple like plasticine and not stick to your hand. You can try rolling it into five-centimeter flagella up to 5 mm thick. If they bend in an arc and do not break, then it looks like clay. If not, then you can look in another similar place.
On a note. You need to know that colors may vary. It depends on mineral inclusions. And this does not affect the quality of the clay. It is believed that the best clay is white, that is, kaolin. It is used to prepare a clay mixture when laying the firebox.
Gray, bluish-gray and greenish-gray breeds are more common. But there is clay in brown-chocolate and earthy shades. This indicates that the composition contains iron oxides, which give this color.
Experienced stove masonry masters not only know how to prepare clay for laying a stove, but also determine its suitability immediately, without laboratory testing. But novice craftsmen must test the clay experimentally. To do this, you need to take 5 measurements of clay, half a kilo each (or a kilogram).
Heat-resistant, heat-resistant, fire-resistant - what's the difference?
Beginner stove makers often experience some difficulties associated with a correct understanding of terminology. Regarding mortars for stove masonry, the greatest confusion arises with the concepts of heat resistance, heat resistance and fire resistance of the material. These parameters are fundamental in the furnace business, so we will now try to clarify their meaning and clarify the understanding of this issue.
Heat-resistant is a material that can withstand heating to high temperatures. At the same time, during its subsequent cooling, the structure and chemical composition are preserved and no irreversible changes in shape occur. In addition, heat-resistant materials in a heated state are still able to withstand the original specified physical overloads without the risk of possible destruction.
The main property of heat-resistant materials is resistance to temperature, provided that the original mechanical properties are maintained. Heat-resistant substances and compounds have an order of magnitude lower thermal expansion index than heat-resistant ones. Such materials are used in the construction of not only furnaces, but also mechanical devices operating in extreme temperature conditions, while being subjected to powerful dynamic effects.
Finally, fire-resistant materials are heat-resistant or heat-resistant compounds that, among other things, calmly withstand the action of chemically active (often aggressive) substances contained in gaseous substances. Specifically in the case of stove masonry, this may be smoke or products of thermal decomposition of fuel.
All solutions and materials used in the construction of furnaces must be heat-resistant and fire-resistant. This requirement applies even to those elements that, during normal operation of the stove, do not heat up by more than four hundred degrees. No standard building mixture meets these parameters.
How to find sand
Sand is sold packaged or in bulk, already sorted into fractions. But it is possible to obtain it yourself and use it for stove mortar. So, white quartz sand is perfect for laying any areas of the stove; yellow sand cannot be used for the firebox.
On a note. If you decide to buy sand, then it is better to take the mountain or lake version; such a building material is best suited for constructing a furnace and will bind the components of the solution well.
It is recommended to make the seams of the stove masonry about 2-3 mm. Therefore, sand is suitable with a fraction no larger than 1.6-1.8 mm. Craftsmen purchase sand of different grains. It is believed that it grips better.
Where can you dig up sand yourself? In abandoned quarries, ravines, river shallows, along steep river banks. The purest sand is not at a depth of one meter or one and a half meters. Otherwise, you will have to wash it for a long time.
If the sand has foreign inclusions, it needs to be cleaned. To do this, sand is poured into a trough and filled with ordinary water. After this, the mixture is thoroughly shaken. The turbidity and dirt that floats out are drained. And so on until the water is clear. For sifting, take a metal construction sieve with cells of 1x1.5 mm.
Drying masonry
Typically, clay masonry takes quite a long time to dry, because brick is a porous material that absorbs moisture and releases it weakly. Typically, oven drying is carried out in two stages:
- The first stage is natural drying. It lasts up to 5-7 days. The damper, all doors and the vent in the stove must be open. To speed up the process somewhat, you can turn on the fan and direct it to the mouth of the firebox. At this stage, the upper layers of the solution harden.
- The second stage is forced drying. Duration - up to 10 days in summer and up to 4 weeks in winter. Several small logs are burned in the stove twice a day. When, 3-4 hours after the completion of the firebox, condensation does not form inside the door, the stage will be considered completed.
Clay is an ideal material for making stove masonry. It is 100% environmentally friendly, inexpensive and can be applied without special knowledge and skills. Due to its many positive properties, clay is used everywhere and will not lose its relevance in the future.
How to determine the plasticity of clay
To understand how to properly dilute clay for laying a stove, clay samples must be placed in various containers. Add water gradually to obtain a plastic solution that does not stick to your hands, resembling well-kneaded dough. Each sample is marked with a serial number.
Then proceed as follows:
- the first sample is left in its original form;
- 10 percent sand is added to the second sample;
- for the third sample - 25 percent;
- by the fourth - 75 percent;
- to the fifth - the same amount as the volume of clay.
Sand is introduced gradually, in portions, stirring after each addition. When a lot of sand is added, you need to increase the volume of water.
Before soaking clay for laying a stove, you need to determine its quality. As samples, 2-3 balls with a diameter of 50 mm are made from each sample, as well as cakes 20-30 mm thick. Then they should be dried in a place where there is no draft. After ten days have passed, the cakes and balls need to be checked to understand where the best composition is. To do this, each ball is dropped from a meter height onto the floor. It should not break or crumble when compressed. Dried samples should not have large cracks. For the experiments to be successful, it is necessary to prepare several balls of each type of clay to be sure.
There are two more ways. First, each sample is rolled into balls 50 mm in diameter. They are placed under a press, the role of which is performed by two planks. If, after compression, the ball shrinks twice and small cracks appear, the clay is plastic. If shrinkage occurs only by a third of the diameter, cracks will be noticeable; this is clay with medium plasticity. Skinny clay will shrink only one quarter or less, or it will simply crumble.
The next method is with flagella up to 20 mm thick and 250 mm long. They need to be stretched one by one and bent around a wooden rolling pin or a shovel handle (50 mm in diameter). Skinny clay will not withstand the test; the flagellum will immediately break without stretching. With an average degree of plasticity, the flagellum will begin to tear, and the stretching segment will become 20 percent less in thickness. The folds of the “sausage” will crack. The plastic clay will not break off, but will smoothly bend around the handle.
Furnace mortars are made from clay, which has average plasticity. It is not difficult to determine the amount of solution required; its volume is a tenth of the volume of the oven.
How to prepare a clay mixture for laying a stove
Before soaking clay for the oven, you need to prepare convenient containers. This could be a barrel or a trough. The clay is loaded into a container and filled with water for 2-3 days. If during this period it does not completely soften, then you need to leave it for another day.
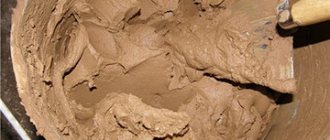
How to make clay for laying a stove so that it meets the standards and requirements? The softened clay must be mixed very well. The result should be a mass similar in structure to thick sour cream. If necessary, add water. Then the creamy mixture needs to be strained. The ratio of sand and clay is determined through experiments.
Clay mortar for laying a stove is made as follows. Pour the components into the container gradually, distributing them in layers. Then you need to mix everything thoroughly, adding water as needed. Do this until the solution becomes a homogeneous loose mass. If you stick a shovel into such a mixture, the solution will slowly slide, but not spread. Such a clay batch is stored by covering the top with roofing felt, polyethylene or plywood. The shelf life is unlimited, you just need to add water when needed.
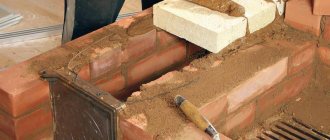
There is another way, but it requires physical strength. There is no need to sift anything. Sand in the required quantity is laid out in ridges on a wooden board. You will need a platform of approximately 1.5x1.5 meters. The width of the ridges is about 40 cm, the height is no more than 25 cm. A depression is made exactly in the middle of the ridge, which is filled with softened clay. The raw materials are shoveled, and sand from the edges is poured into the clay until everything becomes a homogeneous substance.
After this, a ridge is formed again, which is cut with force with the edge of a wooden oar. Use frequent blows to break up all the lumps. Add water if necessary. This method is not used often. This folk method is used to prepare small portions of the solution.
Crack repair work
This process can be divided into several stages:
- Diagnosis of existing damage.
- Preparation of the solution.
- Plastering the heating structure.
Stage one – damage diagnosis
Before coating the stove, you should assess the extent of the existing damage in order to find out the scope of the work to be done. If the cracks are minor, then surface measures will be sufficient. To do this, the bricks are cleaned of finishing materials and plaster, the damage is repaired and the stove is plastered.
Stage two - preparing the solution
Regardless of the size of the damage, you need to prepare a special solution to putty the oven. Depending on financial capabilities and the availability of materials, certain types of mixtures are used when carrying out repairs.
They are:
- from fireclay clay;
- from sand and ordinary clay;
- in the form of grout for the stove - you can make it yourself or buy it ready-made;
- from oven glue.
How to make lime mixture
Using lime mortar, they lay the foundation of the stove and the chimney pipe on the roof. It should be taken into account that when slaked, lime increases 3-5 times. Therefore, take the appropriate container.
Lime is well filled with water. Mix the solution and break the stones until the mixture resembles thick sour cream. Gradually add sand until pieces of the mixture begin to stick to the shovel. This solution can be stored for a long time, adding water as necessary.
This is a rather difficult procedure; you can buy a ready-made lime mixture. As a rule, you won’t need much lime when laying a stove. This material behaves very well when working; there are no special problems with preparing lime-based solutions.
Advantages and disadvantages
This material does not cause controversy both among professional builders and among those who like to do household work with their own hands, since it is practically indispensable in the manufacture of stoves and various fireboxes. Fireclay clay does not have any obvious disadvantages, but this does not exclude its negative properties. The advantages of the material include:
- Excellent heat resistance;
- Reliability and long-term durability during professional masonry;
- Environmental friendliness of the material;
- The presence of micropores for the passage of steam, which also prevents the expansion of the masonry and its destruction;
- High level of adhesion.
There are fewer disadvantages, and besides, they are typical for many high-quality materials:
- High cost, since the production of such clay is technologically more complex and dangerous than the production of ordinary building clay;
- Fireclay dust enters the respiratory tract, so it is necessary to use a respirator when working.
How to prepare a mixture for laying the firebox
How to make fireproof mortar for a stove so that the stove lasts a long time? To lay the firebox, use plastic white clay, which can be yellowish or gray. The role of filler is performed by fireclay sand. It is made from broken fireclay bricks, which are then crushed by crushing. It brings the solution to a higher level of resistance to high temperatures. This sand is used instead of the usual sand to prepare solutions intended for combustion chambers, which are laid out of fireclay bricks.
To reduce the cost, you can take fireclay sand mixed with ordinary quartz sand in equal proportions. The mixture will still retain its fireproof properties.
Plastic clay does not need additional testing. It is kneaded in clean, soft water. To facilitate the kneading procedure, construction mixers are used.
If you know what solution to lay the stove on and how to get cheap building material, you can save a lot when building a sauna stove.
How to mix mortar for plaster?
Fireproof mixture for masonry is not the only thing you can make with your own hands at home from fireclay sand.
It can be used to prepare decorative or intermediate type plaster. This composition is indispensable for repairing any premises if prepared correctly. Fireproof plaster will increase the reliability of the stove masonry if it is applied to the surface of the stove. The components for preparing the plastering solution are as follows:
- fireclay sand;
- quarry sand;
- Portland cement;
- salt.
We list the main recommendations for use.
It is very important not to rush, add water little by little in order to achieve a truly optimal composition and not overdo it. The right mixture should not be too light or resemble pancake batter.
This error is corrected by introducing an additional amount of proportional mixture without water. The ideal consistency of fireclay plaster resembles thick (but not excessively!) sour cream. In fact, it is similar to masonry mixture, but more pliable, easier to work with, and plastic. To work with plaster, you will need spatulas, the length and size of which are not the same. In addition, prepare a serpyanka, that is, a mesh tape that will make the seams stronger and help increase the adhesion of the composition and the surface. Under no circumstances apply the composition in a thick layer and tightly, otherwise this will affect the rate of heat removal and may impair the quality of work.