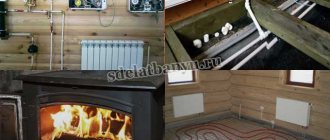
Attic heating
Attic is an attic-type room in residential buildings. Installation of utilities and heating of the attic are necessary conditions for comfortable use of the room as a bedroom, playroom, nursery, office. The attic heating system solves a number of problems:
- maintains a stable positive temperature during the cold season;
- does not allow the room to freeze;
- prevents the formation of ice and a decrease in the performance characteristics of building and finishing materials.
Properly designed attic heating in a house consumes a minimal amount of energy, does not increase energy consumption during the heating season, allows you to regulate the temperature in the room and is responsible for a healthy microclimate.
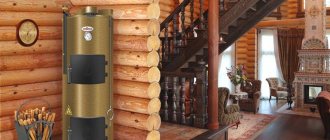
Requirements for a gas boiler room
Since gas boilers are devices with a high fire and explosion hazard, boiler rooms with such a boiler are subject to certain requirements.
Basic requirements for gas boiler rooms in a private home:
Installation of gas boilers in living rooms of the house is not allowed.
It is prohibited to install the boiler near sources of open fire.
At the same time, no more than 4 gas boilers are allowed to be installed in the boiler room, the total power of which should not exceed 100 kW.
Boiler houses based on gas boilers with a sealed (closed) combustion chamber are not subject to requirements establishing the minimum volume of the room.
The minimum volume of the boiler room for a gas boiler with an open combustion chamber is determined based on the boiler power: Up to 30 kW - 7.5 m³; From 30 to 60 kW – 13.5 m³; From 60 to 200 kW – 15.0 m³.
In the boiler room, the ceiling height for a gas boiler must be at least 2.2 m.
The required room area for a gas boiler is selected at the rate of 4 sq.m per one gas boiler.
The boiler is installed in such a way that there is unobstructed access to it from any side. The distance between the front surface of the boiler and the opposite wall should ensure ease of maintenance of the boiler and is at least 1 m.
The floor in the boiler room must be made of non-combustible materials.
When installing a floor-standing boiler, the floor surface must be level.
The doorway leading to the boiler room must have a minimum width of 0.8 m.
If a boiler with an open combustion chamber , then a window with an opening area of 0.25 sq.m. must be provided in the room. If a boiler with a closed chamber is used, then such a window is not required.
The boiler room must have a power supply with an individual circuit breaker and grounding.
A shut-off unit must be installed on each gas line supplied to the boiler.
To remove combustion products, you need to install a gas-tight chimney, the diameter and height of which must correspond to the characteristics of the boiler. The minimum height of the chimney should not be lower than the ridge of the building's roof to prevent back draft.
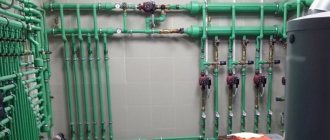
Attic heating: modern methods
There are several ways to heat the attic in a bathhouse and a country house. The first of them is connection to the common boiler room of the cottage. A pipeline is laid in the attic, radiators are installed through which the coolant circulates - water heated in the boiler room. When choosing the optimal method for heating the room, it is recommended to take into account the following disadvantages of a water heating system for the attic:
- The load on the boiler increases: if it was not originally designed to heat the attic, then the temperature in other rooms will drop and fuel consumption will increase.
- The attic is removed from the boiler: the coolant reaches the attic at a lower temperature, having already given off heat to other rooms. This reduces the efficiency of heating the attic, or leads to the need to install a large number of radiators.
The second method is “warm floor”. A heating cable is laid under the floor covering over the entire floor area, connected to the electrical network. The temperature is regulated using controllers; it is possible to program the operation of the attic heating system: it will automatically turn on at the desired hours, or when the temperature drops to a set minimum. But “warm floors” have their drawbacks. Their installation requires serious time and financial investment: you will have to completely re-lay the floors and select fireproof materials with a high heat transfer coefficient, for example, natural stone. To operate, you need a constant connection to the power grid; a lot of electricity is consumed; during the heating season, bills from energy sales companies rise sharply. This is an expensive solution, difficult to implement and maintain. Therefore, the owners of country cottages recognize that an economical way to heat the attic is an autonomous system . The principle of operation of air heating of an attic in a house is as follows: the heater heats the air entering it and forces it into the room using a fan. Heated air masses circulate, evenly transferring heat to the floor and walls. A positive temperature quickly sets in the attic. Additionally, excess moisture that rises from throughout the house and accumulates in the attic is removed from the air. Building materials are not at risk of becoming damp or freezing when the temperature drops sharply. The service life of roof insulation increases. To prevent air heating from creating a load on the electrical grid, devices powered by solar energy are selected.
Benefits of using solar energy for attic heating
- Autonomy.
Heating equipment powered by solar energy does not require connection to the electrical network or the use of other fuel. - Easy to install.
The products are installed on walls or on the roof. Installation is simple and fast; no complex design documentation is required. - Effective work.
The devices maintain a positive attic temperature throughout the autumn-winter period.
Attic heating using solar energy is used in residential buildings in the USA, Canada, Russia, Europe and the CIS.
Project
It is customary to start building an attic with your own hands by drawing up a project. The most obvious solution was to raise the pitched roof a couple of meters relative to its original position, but that was not the case:
- From the point of view of housing legislation, an insulated room with solid side walls automatically turned from a cold attic into a full-fledged residential floor and required registration - lengthy and expensive;
- The second floor would completely block the skylights in the wall of one of the adjacent houses.
That is why it was decided to build an attic with a gable roof. The roof ridge was oriented along the long side of the house.
A few details of the project.
The roof was supposed to be sloping
The sloping attic roof has an important advantage: with a minimum ridge height, it allows you to obtain the maximum attic area with an acceptable ceiling height; Mansard roof
Thanks to the bend of the slopes, the owner receives maximum usable area with a minimum ridge height
Mansard roof. Thanks to the bend of the slopes, the owner receives maximum usable area with a minimum ridge height.
- Gutters were needed to drain rainwater. The roof slopes had to move away from the adjacent walls of neighboring houses. The free space was occupied by gutters made of galvanized steel sheet sealed with bitumen mastic;
- A corrugated sheet was chosen as the roofing covering. Yes, it is noticeably noisy in the rain, but it is not afraid of impacts from slate torn from neighboring roofs (strong winds are typical for Sevastopol in winter), it is lightweight and easy to install;
- I decided to turn the gables of the attic into panoramic windows. This decision was favored by a beautiful view of the sea;
This is how Sevastopol Bay looks from my balcony.
- The attic received its own entrance from the attached balcony. In a slab floor, you cannot simply cut an opening for an internal staircase: support columns must be placed under the slab with a cutout, which would significantly increase costs. How things stand with the family budget after the move - I think it’s clear without my explanation.
The balcony attached to the house quickly turned into a relaxation area for guests and owners.
Heating a private house with an attic
Adding another level to the house or converting the attic space are the most common options for solving the housing problem in a limited area. Creating a favorable microclimate in the attic in the technical aspect is a rather difficult task. The main reason is that the additional “squares” are under the roof. It is through it that increased heat exchange occurs, since hot air, according to a well-known law, tends upward. And this part of the building is ventilated more intensively. This determines the specifics of attic heating. What heating technologies exist?
Warm floor
4.1. Water
If the boiler power allows, then it is a good solution for heating the attic. Plastic pipes will not create a significant load on the floor. For a small roof space (and height) this is a good option.
The question arises - what to do with the screed? She's needed. If you turn to a professional, he will tell you what technology allows you to do without it.
About the most popular pipes for underfloor heating, their characteristics and product prices - here.
4.2. Electric
There is a large choice of options here - cables, mats and IR films. What is preferable is decided individually, taking into account the characteristics of the attic.
The pros and cons of various schemes are discussed in detail in this article.
Insulation
One of the simplest and relatively cheap methods. The thermal insulation layer is installed from the inside, and polystyrene foam boards are most often used as the material . Their fastening has its own peculiarity due to the rigidity of the samples. The natural shrinkage of wood must be taken into account. In relation to the attic, this mainly applies to the rafter legs. To avoid further deformation of the heat-insulating layer, the plates are fastened with a gap of about 5 mm. The joints between them are sealed with polyurethane foam - the most convenient and effective method.
Judging by the correspondence on relevant forums, then with high-quality insulation of the attic, additional heating may not be needed at all. Except for heating in severe frosts. And that’s not a fact.
With this method of insulation, it is advisable to regulate the humidity in the attic. When its value is increased, fungus and mold develop on polystyrene foam, which will gradually spread to the lining of the walls and ceiling.
Mineral wool for attic insulation is used less frequently. The main reason is the need to ensure high-quality waterproofing of surfaces, since all types of products in this group are hygroscopic. That is, they absorb liquids.
Polyurethane foam . This is spray-on insulation. Its effectiveness, with a competent approach, is maximum. The difficulty is that you need to purchase the appropriate equipment or invite specialists with your own. And these are additional costs. There is another negative point - low maintainability. While it is quite easy to replace slabs (mats), it is much more difficult to replace polyurethane, which adheres tightly to the base (glued).
What to consider . One of the most difficult issues is choosing the optimal insulation thickness. Firstly, this layer (plus the cladding) conceals the usable area of the attic. Secondly, few people take into account such a factor as the position of the dew point. Incorrect calculation of the parameters of the heat insulator can lead to moisture condensing in the room. The result is constant dampness in the attic with all the attendant “charms”.
Features of the event
Usually in a cold attic only the ceiling is insulated. Then the roof truss system is left open so that it can be freely inspected and problems that arise can be corrected. If you insulate the roof with mineral wool, it becomes an attic, which can be used for a different purpose than the attic.
It is very important that the insulation is done correctly, otherwise condensation will form. Accumulating on the ceiling, moisture will seep through the ceilings
Mold and mildew may appear. And the rafters will rot from the inside.
When using mineral wool as insulation, consider its weight. The ceiling and floors must withstand the expected load with a margin, the structure must be reliable.
Instructions for insulating the attic floor with mineral wool on the video:
When planning your work, make calculations: how much material do you need to purchase? Its quantity depends on the area on which the material will be laid and the number of layers. The thickness of the thermal insulation layer depends on the climate of the region.
Step by step instructions
First, prepare the “territory”, clear the ceiling of possible debris and thyrsus. Metal roofing elements should be painted with oil paint to prevent condensation from accumulating on them.
Then a lining material is laid on the ceiling as a vapor barrier layer. If it is not there, the mineral wool will absorb all the moisture from the warm, humid air that rises from the living rooms.
Over time, it will lose its thermal insulation qualities. A budget option is to use glassine; a vapor barrier film will cost more. It needs to be laid with a slight overlap, the joints should be fixed (glued with tape or secured with wooden slats).
Place mineral wool between the joists tightly, without gaps or cracks. The joints of the material also need to be taped.
Place clean, dry, even boards on top of the joists. They will be the floor in the attic. And the mineral wool will be ventilated, “breathe” under them, and will dry out in case of moisture.
This installation is sufficient if waterproofing material is laid under the roof and there are no gaps in the attic.
If there is no waterproofing material under the roof, then it is worth covering the thermal insulating mineral insulation with a vapor barrier. The easiest way is to attach the plastic film with thin cross bars.
Mineral wool is ideal for insulating wooden floors. You can use any type: in rolls or in slabs. Choose a material of the desired density, follow the installation instructions, then the room will be warm and comfortable for a long time.
Radiator installation
They are included in the general heating system of the house. In principle, there is nothing particularly complicated. But there are a number of nuances that you should be aware of.
- Is the boiler's power sufficient to prevent it from operating at maximum capacity with the additional load of an attic? Otherwise, the heating device will not last long. And replacing with a new unit is also not a pleasant prospect. Firstly, such equipment is expensive. Secondly, the question will arise of what to do with a used boiler.
- Most likely, you will need to install another pump or purchase a more powerful one. The same thing - what to do with the old one, which is in working order? And the problem with the pumping device will have to be solved, since the attic means not only an increase in the length of the route, but also an increase in the coolant to a height.
Types and characteristics
The material is obtained from molten blast furnace slag, stone (rocks) or glass. The structure of these fibers is thin, randomly arranged villi, ranging from 2 to 60 mm in length. This insulation is produced in the form of mats or slabs. In order for the fibers to better adhere to each other, the slabs are additionally impregnated with special oil (to repel moisture) and phenol alcohol.
Depending on the origin, they differ:
- Glass wool. It is made from a molten mixture of broken glass, sand, limestone, and soda. The fibers are 15-50 mm long and their thickness is 5-15 microns. The material is chemically resistant, difficult to ignite (withstands up to +500 o C).
Stone wool. To make it, gabbro-basalt rocks are melted. The thickness of the fibers is 4-12 microns, and their length is up to 16 mm. It heats up to 300 o C without igniting.
Installation of a small boiler in the attic
There are also such recommendations, so it’s worth figuring out how appropriate this is.
- Significant costs for heat generating equipment.
- Difficulties in choosing a place to install it.
- You will have to make passages in the roof (wall) to bring the pipe out.
- This solution is only possible with a concrete floor.
It is unlikely that this technique can be considered acceptable. Only as an exception. For example, if it is planned to install a communal boiler in the attic. By the way, the option with a fireplace for this room is not the best, unless we are talking about its electric counterpart. The main reason is the massiveness of such a heater.
Heated attic for year-round use
Modern design does not ignore attic and attic spaces and considers them valuable living space. Very often, an empty room under the roof is converted into bedrooms, a study, a children's room, or used as a billiard room. It is the low ceiling, under the slope of the roof, that allows you to create a cozy atmosphere for relaxation.
Roof insulation scheme.
However, in order for this additional area to become a residential part at any time of the year, you need to take care of its heating. It is no secret that heating an attic is a rather complex technical task, which first of all begins with the process of thermal insulation of the roof. It is this kind of work that will allow you to retain heat and use the room for year-round use.
Preparation
In any case, we will first need to properly insulate the attic, otherwise the cost of heating it will be very high. Since the floor is located in direct contact with the roof, it is necessary to carry out work on its thermal insulation.
Advice: pay special attention to the insulation of the attic; the better you do it, the more comfortable the living conditions in it will be, and the less money you will have to spend on additional heating.
High-quality heating is impossible without proper roof insulation
Selecting a heating system
If the house is just being built, it is necessary to provide heating for the attic floor at the design stage. However, as construction practice shows, most often the attic space is turned into an additional living area after all the work has been completed.
In this case, you cannot do without additional costs associated with wiring the necessary communications and choosing the optimal option for heating the room:
Do-it-yourself attic heating using infrared panels
What to pay attention to
Whatever you choose, you must first develop a heating system design, in which you try to take into account all the design features of the building, the need for materials, their cost and quantity.
The heating diagram for a cottage with an attic will allow you to understand:
General heating scheme for a house with an attic
Don't hesitate to seek professional help to get a safe and effective system. Although, if you have certain abilities and the necessary materials, you can do the heating of the attic floor with your own hands.
| We connect to the general heating system of the house | When a heating system is already installed in the cottage, it may be necessary to install more powerful equipment to heat the attic. In this case, you will need a boiler, a pump, laying additional pipes and connecting radiators. If the house has strong floors and design features, the instructions allow for pipes to be laid under the flooring. If air heating is installed, an additional air duct system is required. |
| Autonomous heating method | A convenient, although quite expensive, heating method. It makes it possible to maintain a comfortable temperature on the floor at any time of the year. This method is usually used when heating the attic floor with a stove or when it is impossible to connect to a common system. It includes: The heating boiler should be selected depending on the availability and ease of use of certain types of fuel. Its power must correspond to the size of the room. You can calculate them yourself or get them from specialists. |
| "Warm floor" | An efficient and modern heating method. In this case, the heated air rises evenly from below over the entire floor area. The technologies used to create wooden floor coverings make it possible to conveniently use the system in a country house. Electric or water heating can be used. In the latter case, due to its large weight, it is usually used in buildings with concrete floors. |
Tip: the standard calculation of heating power is 1 kW per 10 m2. In this case, the ceiling height is assumed to be 2.5-2.7 m.
Stove or fireplace
An excellent option for a heat source in the attic, which can also become an interior decoration. The main question that remains to be resolved before installing the fireplace is whether the ceilings will withstand it, since the structure has significant weight. It may be necessary to carry out work to strengthen them.
Using a fireplace as a heat source
Tip: the load can be reduced by using metal pipes and lightweight refractory bricks.
You can also purchase ready-made structures made of cast iron or steel. Such fireplace stoves are capable of creating a comfortable temperature in a room up to 200 m2.
Tip: to reduce the risk of fire, install structures at some distance from the walls or place them in the middle of the room.
Using an electric fireplace does not require much maintenance and is safer, although electricity will increase your heating costs. To reduce them, you can install convectors that will automatically turn off after reaching a certain temperature in the room.
Installation of a steel water heating convector
Insulation
Styrofoam. The use of this material allows you to create excellent thermal insulation and save a lot of money. Attic insulation is usually carried out from the inside. Foam boards are laid together with a 5mm gap. The resulting cracks are filled with construction foam.
This technological process is designed for roof shrinkage, which occurs due to its own gravity, as a result of which slabs laid closely can begin to press against each other. Proper installation using polyurethane foam provides a complete guarantee of the absence of cold bridges. However, there are also negative aspects of using polystyrene foam: it is easily susceptible to mold and other fungi, so use in climates with high humidity is not recommended.
Comparative characteristics of roof insulation.
Minvata. A distinctive feature of this material is its low thermal conductivity, high fire-resistant properties, moisture resistance and good sound insulation. The insulation technology is almost the same as with polystyrene foam boards. However, there is a small nuance. To improve the moisture resistance of mineral wool, do not neglect additional insulating layers.
Polyurethane foam. Insulation, which is very similar to polyurethane foam and, after application, has the same properties as mineral wool. In addition, having high vapor barrier and water resistance, it does not need additional layers. For application you will need a special sprayer, thick clothing that covers all parts of the body and a mask. The process does not take much time (500 m² per day), which allows you to quickly insulate the attic.
Main load-bearing elements
The design includes the following components:
Rafter legs that transfer the load from the weight of the roofing and the wall to the walls of the house. The section is selected depending on the angle of inclination, span, pitch and design load. A professional can perform detailed calculations correctly. For private construction, you can use approximate values, but it is best to provide a small margin. Spreaders are rafter legs that rest on mowers on one or both sides. The cross section is calculated in the same way as for rafters. Sloping legs are a design that is used in a hip roof. This element serves as a support for the narodniks. The cross-section is taken depending on the load and span; in any case, it should be larger than that of the rafter legs. Mauerlat is an element that serves as a support for the footrails and transfers the load from the roof to the walls, distributing it evenly. It would be correct to choose a section with dimensions of 100 by 100 or 150 by 150, depending on the complexity of the object. Installation of the Mauerlat is not carried out during the construction of frame and wooden houses, since in this case its role is played by the upper crown of the walls or trim. The crossbar is a beam that also serves as a support for the rafters, but in the upper part. The crossbar is installed at the ridge of the roof or at a break in the slope, in the case of a broken structure. The cross-section should be taken depending on the conditions; the recommended value is 200 by 200 mm. Struts, racks, grips are additional elements for securing elements. They are used to reduce the cross-section of load-bearing structures. Their cross section is most often chosen constructively
It is important to consider the convenience of making connections.
A do-it-yourself attic roof must be erected starting with the selection of sections of all elements of the roof frame. The material for manufacturing is selected taking into account the following conditions:
- the wood must be coniferous (pine, spruce, larch);
- material grade – first or second;
- humidity no more than 15%.
Heating
Heating of the attic is envisaged at the initial stages of design and there are several ways:
- Connection to an existing heating system.
- Installation of an autonomous heating system.
- Fireplace.
- Warm floors system.
Connection to the heating system
In this case, connection to an existing heating system involves further laying additional pipes and radiators. It may be necessary to replace the equipment with more powerful models. This applies to the pump and boiler. With an air supply, you can connect the air ducts to the main line and lead them to the attic, which will allow you to have part of a well-heated room.
Heating diagram for a private house.
Autonomous heat supply system
Modern systems with autonomous heat supply allow you to maintain the required temperature in a heated room all year round. The main elements of this system:
- boiler;
- removal of waste products;
- air supply system;
- pipelines;
- pump;
- radiators.
Scheme of air heating of the attic.
The main equipment in an autonomous heating system is a boiler, which can be gas, electric, liquid fuel, solid fuel or combined. Before installing all the elements, at the initial design stage, the location for the boiler and the fuel on which it will produce heat, as well as the path for the removal of combustion products, are first determined.
A very important point in the design of the system will be the choice of circulation, which can be natural or forced. Natural (gravitational) circulation allows you to do without a pump and will not depend on electricity . However, the large diameter of the pipe, the mandatory observance of slopes, and some restrictions in control are its main disadvantages. It is usually recommended to use a forced circulation method.
It is necessary to correctly calculate the boiler power for the heated room, which is usually the responsibility of a specialist. But you can do this yourself, since complex calculations are not required: 1 kW of boiler equipment power heats about 10 m² of a well-insulated attic, with a room height of up to 3 m. Thus, the required boiler is selected without excess power, which will significantly save the cost of its exploitation.
Warm floor system
The most comfortable temperature conditions for a person are a small difference, about 2-3º C, between the top and bottom of the room, which can be achieved by heating the floor. As a rule, such a system is used under stone or tiles, however, thanks to modern technologies, it is also acceptable in combination with wooden floor coverings.
Classification of heated floors.
"Warm floor" using electricity. This system can be the only source of heat in the room, without using traditional radiators. There is a possibility of installation on any old covering. Heating electric cables distribute heat evenly and thus reduce heat losses. The average lifespan of such a system is about 50 years. Laying “warm floors” begins with placing thermal insulation between the joists, and the heating elements are laid on a mesh that is suspended above the thermal insulation. In the place where there is an intersection of logs and cables, a cut is made, which is protected with aluminum foil. The technological process ends by covering the floors with finishing material.
"Warm floor" using water heating. In this case, you will need to use a boiler that will provide a source of hot water. The heat transfer elements in the heating system are durable polymer pipes. One of the advantages of such a system is its fairly simple installation, but it is not often used for attic heating.
This heating system is acceptable in houses where the floors consist of concrete slabs, since the resulting additional load is about 250...300 kg/m². If, during the development of the project, such a heated attic was already laid, then before laying the polymer pipes, a concrete screed is made, after which heating elements are laid on it, which are filled with another layer of concrete. A vapor barrier and the main floor covering are installed on top of the well-seasoned layers. It is recommended to supply hot water no earlier than 20 days later.
Another good option for attic heating is underfloor water heating, which uses a metal plate with a trough to carefully surround the pipe. Thus, about 70 - 90% of the floor is covered with such heating elements that are located under the substrate or under the main covering. In this method, there is no need to use concrete, and the widespread distribution of heat is ensured by pipes filled with hot water. This method is most often used as additional heating.
Dormer windows
When planning an attic, you should take into account the recommendations of SNiP. They recommend making the window area no less than 10% of the floor area. So if the attic is divided into several rooms, each should have a window.
Installation of skylights in the roof
Of all the methods shown in the photo for installing skylights with an attic, inclined installation is the easiest to implement. In this case, it is necessary to ensure the proper degree of waterproofing of the junction, and also to use special models with reinforced frames and reinforced glass - the load on the surface can be significant.
Advantages of a sloping roof window:
- more light, less sharp boundaries of light and shadow;
- the roof surface remains flat, its relief is not complicated;
- relatively easy installation.
The steeper the slope relative to the floor, the smaller the window height should be.
The width of the window frame should be 4-6 cm less than the pitch between the rafters. Then it can be easily installed without disturbing the structure of the frame. If the window is wider, it is necessary to make a reinforced beam above it and calculate the load.
If you need to have a larger window, it is easier to place two narrow ones side by side. They look no worse than one big one, and there will be fewer problems.
Two windows side by side look no worse than one wide one
When installing a dormer window, the roof geometry becomes more complicated: a valley appears on top and on the sides. Because of this, the rafter system becomes more complex both during planning and during assembly. The complexity of laying the roof covering also increases. All valleys are the places where leaks are most likely to occur. Therefore, everything needs to be done very carefully. In regions with a lot of snow, it is advisable to install snow guards over such windows so that they are not blown away in the event of a sudden meltdown.
Installation of a vertical dormer window in an attic roof
The advantage of such a window is that you can stand next to it at full height. But they let in less light, the terrain becomes more complex and the roof becomes more problematic.
A recessed window is usually used if there is access to a balcony through it. In other cases, this method of arrangement is not the best option: little light gets in, the shadows turn out to be very deep, which is tiring for the eye, the geometry also becomes more complex, although not to the same extent as in the previous version.
The easiest way is to make a window at the end of the attic. In this case, a reinforced frame or reinforced glass is not needed. Just high-quality glass is quite enough. It is this option that can most often be seen in country attics: this is the most inexpensive option that can easily be implemented with your own hands.
Fireplace
When giving preference to a fireplace, you should remember some features when installing it. If this heating method was not taken into account when developing the project, the floor will have to be strengthened. For the simple reason that the fireplace itself already has sufficient weight, and when fired, its mass increases several times more. The ideal option to make the attic heated would be a lightweight fireplace with a lightweight pipe structure, or an electric fireplace. It is the latter heating method that is safe and easiest to use.
Autonomous heating
An autonomous attic heating system makes it possible to maintain the required temperature throughout the year.
Such a system includes the following mandatory elements:
The boiler is the heart of autonomous attic heating. At the request of the owner, it can be electric, gas, liquid or solid fuel, or combined. The location of the boiler, the type of fuel, as well as the method of removing combustion products are the main issues that need to be decided before heating the attic.
As for the type of coolant circulation inside the heating circuit, it can be natural or forced. As a rule, systems with modern boilers are supplemented with circulation pumps, which makes them energy-dependent. However, gravity systems also have a number of significant limitations - slopes must be observed, pipes of large cross-section are required, and it is impossible to regulate the temperature of the coolant.
Attic heating
Naturally, in the autumn-winter period, the first floor of the house is heated to the optimal temperature, allowing a person to feel comfortable.
The attic, located above the first floor, receives part of the heat from below, but as practice shows, it is not enough to make the room comfortable for living. So, to heat 1 sq. m. requires 8–100 W. Therefore, today many new heating schemes have been developed to create normal temperature conditions for rest and work in the attic during the cold season of autumn and winter. One of them is traditional - stove (wood, coal, fuel briquettes, gas, etc.), the other is a heat source - gas boilers, using hot water flowing through radiators in the attic room as a coolant. As a rule, to speed up the “release” of heat, a circulation pump is installed at the boiler, which increases the speed of hot water in the system, and, therefore, raises the temperature faster.
Attic/billiard room. Heating pipes in the floor
Recently, one of the possible types of attic heating has become the installation of water or electric heating in the floor. Polyethylene pipes made of cross-linked polyethylene or metal plastic are used as heat transfer elements. These pipes are installed under the floor covering. Warm water floors are a complex engineering system, including a boiler, expansion tank, manifold, circulation pump, and thermostat.
An expansion tank of an open or closed type, necessary to compensate for water in the system during expansion and contraction. An equally important and necessary element in such a structure is the device of thermal and waterproofing, which guarantees the preservation of the received heat, while simultaneously distributing it evenly and returning it to the floor surface. Thanks to this, the floor becomes a reliable source of comfortable heating of the attic. With the help of the distributor and control unit of the water system, the heating of water is regulated, the mixing of water coming from the boiler or other heating source and the water returning from the heated floor system is carried out.
The operation of a water system located in the floor will be more efficient and economically justified if the thermostat is combined with a timer. This will ensure that the system operates according to a given program for the day or several days in advance.
Structurally, it is advisable to install such a system during new construction of a house or during reconstruction of its floors, which makes it possible to efficiently and reliably distribute heating pipes that are installed on top of a thick layer of insulation (from 50 to 150–200 mm). Before laying the pipes, the surface of the heat-insulating layer is filled with a leveling screed. The next stage is a layer of concrete in which heat-radiating pipes are embedded.
The completion of the heating “layer cake” can be a vapor barrier and a finished floor covering material (parquet, laminate, ceramic tile, linoleum, etc.).
When installing heated floors, you can avoid the use of concrete - a “dry system”. In this case, the concrete solution is replaced by special metal plates with a groove in which the pipes are fixed. Their accidental displacement is excluded. Therefore, laying the substrate and clean floor material on their surface guarantees reliable operation and uniform heating of the floor.
One of the possible sources of attic heating can be fireplace stoves, the combustion process in which allows not only to heat the room, but also serves as an element of decorative interior design.
Raised roof attic with open rafter structure
Currently, a large number of designs of such heat sources and decorative elements have been developed. Depending on the location of installation, fireplaces are divided into front, corner and central. Each of them has its own advantages and features depending on its place in the interior. Most are made of brick, but there are fireplace stoves made of cast iron or heat-resistant steel, the weight of which is significantly less than brick models. The body is lined with ceramic tiles, which serves as additional decor and interior decoration. The last circumstance is very important, since a small load from a cast-iron fireplace on the ceilings of the second floor will not require significant reinforcement of the structure.
Equally important is that a metal fireplace takes up a small area and is lighter than other types of brick fireplaces. Its dimensions can range from 500–900 mm wide and 900–1200 mm high. Thanks to its compact size, installing such a heat source is not particularly difficult.
The chimney pipe, which is installed either on top or on the side (behind) of the fireplace, does not play a special role in the overall composition of the fireplace. In some cases, its decorative role can be “strengthened”. Then the chimney and fireplace turn into a single whole block, working for the entire interior space of the attic.
The peculiarity of metal fireplaces is the ability to quickly heat the room - no more than 45-60 minutes (due to heating the air inside the room (convection), and at the same time the fireplace quickly cools down without lowering the air temperature in the room. The air enters the space between the outer facing casing and the firebox through the lower holes, flowing around the firebox, heats up, then comes out of the upper holes, filling the room. This is the mechanism of operation of a convection fireplace.
In addition, in the attic you can successfully use the Buleryan stove, which is also based on the principle of air convection.
When installing a fireplace on wooden floors, it is advisable to strengthen the floor at the installation site with additional wooden beams, and lay a sheet of multi-layer plywood directly under the fireplace, and a sheet of tin on top, thus carrying out fire prevention measures to avoid overheating of the structures and to evenly distribute the load.
As operating practice shows, the most economical and safe solution for heating an attic can be an electric fireplace. It is light in weight, easy to install and operate.
Recent developments in the field of heating buildings, including attics, involve direct electric heating devices. They have proven themselves to be the most versatile and economical. The range of their use is wide and varied. They can be used not only as a stationary main heating system, but also for local or additional heating of premises for various purposes.
In this case, significant cost savings are often achieved not only due to reduced energy consumption, but also due to the ease of installation of infrared heaters.
Heating option using infrared heaters
The principle of their operation is based on the absorption of thermal radiation by other bodies-objects. When absorbing thermal infrared rays, any object heats up and begins to give off heat to the environment.
With convection heating, warm air is at the top and cold air is at the bottom. This feature is important for country and cottage construction. The temperature difference between the floor and ceiling reaches 6–7 °C. With infrared heating, the temperature at the floor surface is higher than at the ceiling.
By reducing the cost of heating the ceiling, infrared heating for residential premises is 20–25% more economical than convection heating.
For attic rooms, the most economical are infrared electric heaters with ceiling mounting, mounted in a rectangular metal casing. For fire safety purposes, all heaters have a fire-resistant heat insulator between the body and the heating module.
These devices are safe for humans and operate completely silently, do not burn oxygen, and do not emit combustion products. Natural humidity in the rooms is maintained. They are attached to the ceiling on hangers or directly to the surface of the finishing material, forming a decorative pattern of several devices.
Another type of the latest solution for infrared heating of attic interiors is carbon infrared film 0.4 mm thick, the operating principle of which is that it converts electrical energy into heat, heating not the air, but again objects in the area of their action. Used to heat floors, walls, including sloping ceilings and other surfaces. It is easy to install under any finishing coating (carpet, linoleum, laminate, etc.).
The main source of savings for this system is the thermostat, which reduces energy consumption by up to 20–30%.
Installation of frame system
Attic rafter system.
The frame structure is attached to the upper beam of the wall (both the house and the bathhouse made of timber usually have height differences along the upper perimeter, which must be included in the calculation).
At the top point we attach the bars with an overlap, connecting them with self-tapping screws.
The length of the slope was 4.5 meters, the block was sawn, from the remains on the upper beam of the wall (the pitch between the rafters is 50 cm) we fix the block (15-20 cm long) so that it protrudes outward from behind the wall by 6-7 cm, we will attach the lower part of the rafter to it.
When ready, we raise the first two rafters (they are already sawn off at the top point and fastened end-to-end with nails), fix the bottom to the protruding part of the beam, forming the frame of the future roof.
First, we install the outermost rafters with our own hands to avoid temporary fastenings; an assistant is needed here.
Insulation of the attic.
Next, we connect the upper parts of the rafters from below with a longitudinal beam - this will be the base of the ridge. We set up and secure the remaining rafters. We check the frame for strength and cover the entire structure with impregnation.
Then, on the outside of the upper part, we fasten two boards from the top down longitudinally to each slope - the frame is completed with a ridge. We make the lathing from the board from top to bottom, retreating from the edge of the previous board by 25-27 cm.
The length of the roof is 5 m, but we make the sheathing longer, leaving it to protrude beyond the gable by 20 cm on each side.
Attention! One of the sheathing boards on each slope must be placed so that the lower side is 3-4 cm below the level of the upper beam of the wall. We attach a longitudinal beam 5 m long to the lower ends of the rafters, the calculation is to visually close the lower part of the roof
We attach a longitudinal beam 5 m long to the lower ends of the rafters, the calculation is to visually close the lower part of the roof.
When finished, cover the entire frame with plywood on top, carefully adjusting the edges to obtain a continuous surface. We treat with impregnation.
The sheathing boards (discussed above) are laid so that the frame can be closed from the street. Otherwise, there will be a hole outside (the thickness of the rafters) of 50 mm. We take a board, mark the cutting locations and cut out grooves for the bars.
The insulation is laid between the frame beams.
Calculate the locations and depth of the cutouts so that the board from the inside is pressed tightly against the board of the outer sheathing, and the rafters fit tightly into the grooves. So we close the hole to the outside and isolate the frame from the street by securing this board to the wall beam. When they cover a house with a roof, they make lining on the outside, but the house is not a bathhouse, we’ll do it differently.
We will cover the lower part of the rafters of the already sheathed roof with decorative elements so that the rafters do not stick out. This is our board. We cut the required number of boards to size, choose a side that is more even, go through it with a planer and lightly sand it. After this, we will fasten it from the bottom edge towards the wall. Everything is ready to cover the roof with metal tiles.
We lay waterproofing and sheets of metal tiles on the base
It is better not to do this operation with your own hands, but to entrust it to specialists - the material is very demanding in terms of careful handling of the surface
You can order metal tiles in size, having decided on the color, texture and price, check with the seller how long it will take to complete the order, but we will order only when the roof is sheathed and we know exactly the size of the slopes and the length of the ridge. The house requires the installation of drains, but in practice the bathhouse does without them.
All that remains is to lay out a vapor barrier from the inside with your own hands; the film must be attached with an overlap, with an overlap of 5-10 cm, gluing with adhesive tape. The result was “trays” with a width of 500 mm and a depth of 50 mm. This is a plate of insulation, which we lay in it, securing it with adhesive tape. We secure the adhesive tape to the rafters with staples using a stapler.