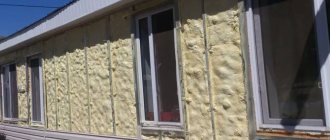
o Insulating the slopes of plastic windows from the street will help you solve the problem of high heat loss in the house, reduce the likelihood of condensation on the frame and fogging of the glass unit. In this article we will look at how to properly insulate the slopes of plastic windows using modern thermal insulation materials (mineral wool, polystyrene foam or extruded polystyrene foam). At the end of our review, watch detailed video instructions on this topic.
Independent insulation of the window slope from the street will help reduce the likelihood of glass fogging and condensation on the window frame. For finishing street slopes, mineral wool, polystyrene foam or extruded polystyrene foam are used. Finishing is done using siding or PVC panels. Let's consider further how to properly make external and internal insulation.
Causes of heat loss
The main places for blowing are: glass unit holders, rubber seal, places under the hinges and handle, around the perimeter of the frame.
There can be several reasons for cold air entering a room. The most common problem arises from improper installation of double-glazed windows, namely ignorance and non-compliance with window installation technology. Negligent attitude of the installation team towards work, poor sealing of cracks, failure to seal installation seams with sealing tape. And if the external slopes of the windows are not finished in a timely manner, then after a period of time, environmental influences will destroy the polyurethane foam.
Saving on construction foam, insulation, not using protective thermal insulation, using low-quality components during the assembly process - all these are the reasons for the necessary insulation work.
The situation of building shrinkage is relevant for those living in new buildings or a wooden house, because... this can lead to distortion of the frame. Another important reason is improper window care. Many people neglect primitive window cleaning. So, about 2 times a year, the window seal needs to be washed and lubricated with glycerin so that over time it does not begin to crack, which will naturally facilitate the transmission of heat.
Cold may enter the room if the clamping flaps are loosened. This can be solved by adjusting the fittings.
When is it necessary?
Most often, insulation of PVC windows may be required when :
- During installation of the frame, uncovered gaps or unclosed mounting foam formed between it and the opening. If it is not insulated, it will begin to absorb moisture or dry out.
- It is necessary to protect the window frame from external influences at the joints with the opening so that water does not get into them, and also to avoid the formation of blow-out spots or cold bridges. Also, temperature changes at fastening points can lead to their destruction and subsidence of the frame.
- After the window shrinks, empty spaces appear through which the cold will pass.
- It is necessary to shift the dew point so that condensation does not form on the window, which causes dampness, mold or mildew to appear.
- It is necessary to improve the appearance of the window opening from the outside.
It is always recommended to do insulation, as this greatly reduces heat loss, but in some cases this procedure is difficult to carry out or it is not necessary :
- In wooden houses, insulation of slopes is most often carried out using wooden panels that cover the seams, since the use of insulation can negatively affect the window opening.
- If the quarter is made of brick (a special protrusion that covers the top and sides of the opening from moisture), then insulating the slope may be difficult or simply not necessary.
- If the joints are plastered and there is no heat loss, then treating the slopes from the outside can lead to the opposite effect, that is, the room will be too hot, and the dew point will also shift, which will cause mold to appear.
Features of insulation of window slopes
Thermal insulation of external window slopes affects the comfort of living in the house, because... maintains an optimal and correct microclimate throughout the year. The procedure does not require the involvement of specialists or professional equipment. You can implement it yourself using available tools.
Since there are seams between the window frame and the wall, they are usually filled with foam to prevent drafts. This substance has good thermal insulation parameters, but can be destroyed by moisture. Boxes that do not have additional lining are not sufficiently protected from negative factors. If there is no insulation, the joints will be exposed to water, so over time the fasteners will begin to wear out and the window will sag.
After the structure shrinks, voids appear between the opening and the frame, which provokes freezing and the formation of cold bridges.
Insulated windows do not accumulate condensation inside the building, and therefore prevent the appearance of mold in residential areas.
How to determine where a draft is coming from a window
Even if there is one defect in the window structure, this will lead to drafts. To find out which direction it is blowing from, you can use the following methods:
- Run your hand around the perimeter of the window and check where there is a draft.
- Using a lighter, evaluate where the intensity of the flame changes.
You can also place a sheet of paper in an open window and then close the sash. Next, you should pull the tip of the sheet: if it comes out easily, the seal is not pressed well enough.
Adjusting the clamping mechanism
During operation, the window is exposed to mechanical and climatic factors. As a result, loss of sealing rubber volume may occur. What causes air to get inside the house. To solve this issue, it is not at all necessary to resort to replacing the gasket, unless, of course, it is completely in unusable condition. You just need to adjust the clamping mechanism.
To begin, find the protruding cylinder - the axle - in the cut places of the metal plug. Then move the hooks to the required position or adjust the trunnions. To change the position of the hooks, loosen the bolts. When moving to the street side, the pressure increases, and in the opposite direction decreases.
EuroStrip technology
Another name for this method is groove sealing. This insulation method is suitable exclusively for wooden windows. To implement this, all frames are removed from their hinges. Using a milling cutter, recesses are made around the perimeter of the sash, into which a special silicone sealant is placed with a roller. For reliable operation of the entire system, it is necessary to adjust the fittings, adjust the frame folds to each other with the smallest gaps, and fill cracks and crevices with silicone sealant. The result is high-quality, long-term insulation.
The downside is that the cost of such work can be almost the full cost of replacing a window with a plastic one.
How do you determine where it's blowing from?
Even if there is only one defect, there will be blowing from the window. You can determine where this is coming from in one of three ways:
- Run your hand along the perimeter of the window block;
- A lighter. Just like with a hand, in the place of a draft the light will change;
- Place a regular sheet of paper in the open window and close the sash. If, when you pull the tip of the sheet, it easily pulls out, this will indicate poor pressure on the seal.
How to insulate a window for the winter with your own hands
All measures to insulate a double-glazed window must be carried out before the onset of the cold period. Because materials such as dry mix and sealant should be used only at certain temperatures, as they may lose their properties. Air humidity should be optimal, there should be no draft. Insulation must be done simultaneously from the outside and inside.
Materials used Various materials and methods can be used here. Such as :
- Construction foam. It is the best means for window insulation. As it expands, all voids are filled. But the foam must be protected from direct UV rays and temperature fluctuations.
- Using mineral wool. It has good thermal insulation properties.
- Polystyrene foam or polystyrene foam for insulation of slopes.
Note: Rigid insulation is used in cases where the installation seam is no wider than three millimeters. In others it is better to use mineral wool.
Silicone sealant is used when processing plastic parts of windows to eliminate blows. Using dry mixtures, slopes on the street side are insulated. Construction tape is used instead of sealant or on top of it.
External insulation
External insulation work includes insulation of the slope and ebb on the street side. If insulation of the outer slope has not been done previously, then all actions will be useless. After time, the window will still be blown out, in addition, the inner wall may become damp and moldy. Caulking the external cracks will not lead to anything, because the plaster and foam will gradually become unusable.
Tools and consumables
Depending on the type of insulation chosen, the following materials and consumables may be required :
- drill or hammer drill;
- Master OK;
- putty knife;
- chisel;
- hammer;
- self-tapping screws;
- mushroom dowels;
- thermal insulation adhesive;
- silicone sealant;
- construction knife;
- roulette;
- marker;
- building level;
- vapor barrier film;
- sandpaper;
- concrete solution;
- plaster;
- antiseptics;
- individual protection means;
- construction tape;
- fiberglass reinforcing mesh;
- plastic (PVC) corners and plugs.
Why is it necessary to insulate slopes?
Often, after replacing windows, they are limited to only decorative finishing of the slopes, which is wrong and can lead to problems in the near future, because:
- The seams between the wall and the glass unit are filled with polyurethane foam. But this material is not sufficiently resistant to high humidity, ultraviolet radiation and low temperatures. Very quickly, unprotected polyurethane foam will begin to deteriorate under the influence of weather conditions, which will lead to heat loss through voids in the seams.
- Numerous cracks on untreated surfaces of slopes are a common cause of heat leakage from a room.
- Moisture can accumulate in the voids between the wall and decorative panels, which means condensation may form.
Protection for polyurethane foam
PSUL (abbreviation for self-expanding tape) is glued to the frame before installing it in the window opening. Within about half an hour (depending on the ambient temperature), it increases in volume, filling the space at the outer junction of the edge of the opening with the window frame.
PSUL tape serves as reliable protection for polyurethane foam from all possible destructive processes, because it:
- does not rot;
- moisture resistant;
- does not deteriorate from exposure to sunlight;
- has good vapor permeability;
- when expanded, it perfectly fills small protrusions and irregularities;
- retains its protective functions at temperatures from -50 to +90.
The service life of the self-expanding tape is 50 years and, in theory, its protection is sufficient for external slopes. But, unfortunately, there are no ideal finishing materials.
Therefore, the self-expanding tape also needs protection, and such finishing protection can be the installation of external slopes.
Insulation of window slopes from the street
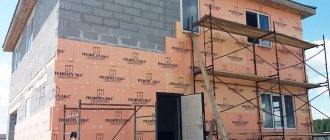
The entire process of insulating windows from the outside consists of the following steps:
- Preparatory work;
- Cleaning slopes from dirt and foam residues;
- Applying a primer to the surface;
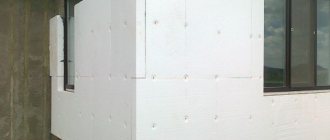
- Installing insulation with glue;
- Sealing cracks with glue;
- Arrangement of corners;
- Installation of polymer mesh;
- Plastering.
Important: When installing insulation, it must be laid so that it partially covers the window frame, and the installation seam is completely closed.
First you need to cut off all the remaining foam. The slopes are treated with an antibacterial primer mixture. Tiles equal to the size of the slope are cut from penoplex. They are smeared with assembly adhesive and pressed to the surface. Here you can use dowels. The corner is installed. A fiberglass mesh is placed on the tile over the applied adhesive. You need to give it time and apply glue on top again. Upon completion of the insulation work, water-based paint must be applied to the surface.
Important: Paint is applied only after the glue has completely dried.
Thanks to external insulation of windows, condensation does not form.
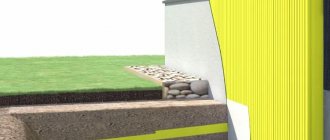
Insulation of ebbs To insulate ebbs of plastic windows, you need to fill all the cracks with heat-insulating material and foam them. To prevent water from getting on the insulating material, a metal strip should be installed on top of the flashing. The angle of its installation should be more than five degrees, and the horizontal edge should extend twenty to thirty millimeters beyond the facade, while the side edges should be turned up. The places where the plank is adjacent to the surface must be covered with a hermetic mixture.
Insulating windows from the inside Work on insulating a window unit from the inside of a house may include: replacing a worn rubber seal, adjusting fittings, sealing joints, replacing a double-glazed window with an energy-saving one, insulating it with film. The role of the rubber seal is quite significant, it ensures the tightness of the window. So it is extremely important to regularly inspect the seal and properly care for it. Sealing of joints is carried out by applying sealant to the blow-out areas. Today on the building materials market there is a huge selection of sealing compounds of different types - for different wall materials, for different temperature conditions, etc.
Additional methods of window insulation These methods include primitive window washing. After all, if the glass is dirty, then it does not fully transmit the sun's rays. You can use thick fabric for curtains, which will also help retain heat inside the building.
For insulation, it is possible to use available materials - foam rubber, soaked paper, window tape, etc. Energy heating of a window or double-glazed window can also be arranged. To do this, a heating cable is placed around the perimeter of the window, and a special conductive film is placed on the glass.
Using heat-saving film Insulating film for windows helps keep the house warm. To create the desired effect, you first need to properly prepare the surface. The tools we need are a hair dryer, scissors, and a knife. The surface is cleaned of dirt, the glass is well rubbed. Double-sided tape is glued around the perimeter of the glass box. The film is separated using a stationery knife, cut to the required size and pasted onto tape. The film is blasted with warm air from a hair dryer. If small swellings form, they will need to be burst with the tip of a knife. This is perhaps the most economical method of insulating plastic windows. In any case, for a high-quality result you need the right integrated approach.
What materials are suitable for thermal insulation?
In order for all the activities carried out to have a positive result, it is necessary to select the right materials. The following is used as a heat insulator for slopes:
- Mineral wool (basalt, slag or glass wool).
- Styrofoam.
- Extruded polystyrene foam.
- Polyurethane foam.
- Sandwich panels.
- Fiberglass, one side of which is covered with a layer of foil.
In the process of selecting the required material, the dimensions of the window opening and the places where the insulation will be installed are taken into account. Mineral wool, for example, performs its functions with a thickness of at least 10 cm, which is not always convenient for insulating a window from the outside.
In addition, cotton insulation requires the use of a water barrier on both sides. This is due to the fact that after getting wet the material loses its insulating properties.
An affordable and popular option is to use polystyrene foam and extruded polystyrene foam (penoplex). Moreover, the latter material is preferable because it has a higher density with a smaller thickness. It is important to protect the polymer insulation from the sun in a timely manner. When exposed to ultraviolet light, foam becomes brittle.
If polyurethane foam was used during the installation process, then there is no hope for complete thermal insulation. Of course, if the voids are densely filled, some of the heat will still be retained in the room, but if the house is located in a region with low winter temperatures, then you will have to take care of additional insulation.
A good option that solves two problems at once would be sandwich panels. The top layer is a decorative material, the bottom layer is insulation. At the same time, it is possible to choose an option for your home if the facade is already lined, but the slopes had to be insulated later. In addition, some creators of such panels offer options with different insulation materials.
A new option for insulating slopes is fiberglass with a foil base. It is difficult to install such material with your own hands, so you need to take the help of professionals. But you will be 100% sure of the result. The insulator perfectly protects against moisture and penetration of cold air currents.
Safety precautions
During work, it is necessary to comply with safety rules and requirements. This will help avoid unpleasant consequences. The main attention should be paid to the properties of the insulating material :
- Mineral wool. You need to work with it in a well-ventilated area. The cutting tool must be well sharpened, gloves, a respirator and special glasses must be worn.
- Sandwich panel. If the material needs to be cut, the respiratory tract must be protected from dust. To do this, just wet the panel with water or put on a mask (respirator).
Important! Before starting work, be sure to familiarize yourself with the safety precautions for each type of insulating material.
Sequence of work on internal thermal insulation
Those who want to get a positive result from insulating slopes need to be prepared for the fact that the process is carried out both outside and inside. Both options for carrying out work have features and a certain sequence of execution. Therefore, we will consider each of them separately.
The internal slope is insulated according to the following plan:
- Leave the new window for several days so that it is well fixed in one place.
- Inspect the foamed space. If there are gaps, add foam and leave until completely hardened.
- Trim off excess areas.
- Treat the surface of the slope with an antibacterial primer composition. The solution will help resist the growth of mold and mildew, and will also increase adhesion for subsequent stages.
- Level the slope using plaster. A flat surface will make a good base for tightly fixing the insulation.
- The plastered and dried base is again covered with antibacterial primer, for the same reasons.
- Glue the insulation. To do this, use liquid nails or glue suitable for the selected material.
- The corner is covered with a plastic or metal corner and plastered together with the total area of the slope; a reinforcing mesh must be used. Fiberglass will make the plaster layer strong and reliable.
After this, they begin decorating. Painting, tiling, or another option chosen by the home owner will do.
Self-installation of sidewalk curbs
The sidewalk curb is easy to install, which is an undeniable advantage of this type of product. It is enough to follow this order of work:
The territory is marked taking into account the features of the landscape.
According to the markings made, pegs are driven in and the thread is pulled between them. This will be the level of the top of the curb.
Then a trench is formed along the entire length of the marked area. Depth is 1/3
from the top point of the stone, the width is
10 centimeters
greater than the size of the block.
The bottom of the trench is compacted to prevent soil subsidence.
Install the border at the level of the cord. The stones are leveled in height by placing mortar underneath.
The joints are also filled with mortar, the installed borders are left for 24 hours
so that the solution sets.
Then the free space of the trench is filled with soil, which must be thoroughly compacted. At the final stage, the sidewalk is installed.
Sequence of work on external thermal insulation
The outer slope also needs to be insulated, and this process should be taken seriously. Material that is laid outdoors is constantly exposed to destructive factors such as:
- Atmospheric moisture.
- Negative air temperature.
- Ultraviolet radiation.
- Exposure to wind.
- Insects, rodents and birds love to make their nests out of insulation materials.
Therefore, unprotected material quickly becomes unusable. Insulation of external slopes is carried out according to the following points:
- Remove excess polyurethane foam.
- Cover the slope with soil with an antibacterial composition.
- If there are large differences, the surface is plastered. Select plaster for external use.
- Once again they resort to priming. The composition will protect against fungus and mold, and will also increase adhesion with the following materials. Don't skip this step.
- Start with insulation. For external treatment of slopes, a denser material is chosen, for example, penoplex. It is glued to an exterior adhesive suitable for polymer materials.
- For greater reliability, the heat insulator is fixed to the slope with dowels with a wide head. It is not necessary to do this indoors, since there is no exposure to gusts of wind.
- The corners of the slopes are covered with corner elements. They will make the edging more neat and attractive. In addition, making a beautiful corner will be much easier.
- The insulation is covered with plaster with mandatory reinforcement. If you do not use a mesh, during the first year of operation the layer may crack and crumble.
After the layer has dried, decorative finishing is performed. Sheathing materials are used only those that can withstand external load.
Platbands
Platbands or casing for internal slopes for PVC windows can be made of different materials, but its functional purpose is the same - protecting the installation seam from destruction and giving the window opening an aesthetic appearance.
Types of platbands
Platbands differ in appearance and functionality:
| Flat platbands. This is the easiest and most inexpensive type of cash withdrawal. |
| Profiled platbands have a convex surface of different profiles, aimed at enhancing the decorative function of cashing. |
| Shaped platbands can have a complex relief and imitate natural wood. |
| Carved platband is the most expensive type of cash, made to order according to individual sizes. |
Materials for production
The most common material for making cash is sheet plastic. It is used for the manufacture of budget flat platbands, which can be used for finishing windows indoors and outdoors.
This material is not afraid of temperature changes, exposure to moisture or sunlight. Its surface can be laminated and take on any color or imitate various types of natural wood. Therefore, choosing cash to match the color of the window facade will not be difficult.
Plastic platbands are not prone to deformation due to temperature changes and exposure to moisture.
Profiled PVC trims have the same properties, but may have a shaped surface. They are also used for interior and exterior window decoration.
MDF trims can also be flat or profiled, but they are used exclusively indoors, since the properties of MDF do not allow them to be used outdoors under the influence of surrounding natural phenomena.
For external use, dense foam casing can be used. This material is easy to process and install. The most intricate and complex shapes can be cut from polystyrene foam. It can be decorated with any finishing materials. It has negligible weight, so it does not put any load on the wall.
Foam trim can be used for exterior window decoration
The most expensive window design option is the installation of wooden carved cash. Carving can be done manually or mechanized. Handmade is very expensive due to its individuality and exclusivity.
Profiled and shaped platbands made of natural wood, made on a machine, will cost less.
Wooden platbands require careful care, since wood, when used in conditions of exposure to the external environment, has some disadvantages:
- wood can become deformed when absorbing moisture or crack as a result of drying out;
- Such cashing looks harmonious on wooden windows or on timber facades. On modern facades such cashing will look ridiculous.
Fastening
Most often, when installing platbands on a plastic window, mounting elements are used that are fixed to the frame or wall.
Platband installation diagram
Thermal insulation of slopes on doors
The area around the entrance doors also allows heat to escape to the outside, and if you do not create a barrier, cold air will enter the house without restriction. The process of insulating door slopes is not at all different from the same work around the window. Therefore, everything is done according to the same plan:
- Cleaning the surface of excess polyurethane foam or old decorative coating.
- Application of deep penetration primer.
- Plastering if necessary.
- Primer treatment.
- Installation of insulation - fixation with an adhesive solution and several dowels with a wide head.
- Application of primer to improve adhesion.
- Installation of corner elements.
- Fastening the reinforcing mesh with the same glue.
- Plastering insulation.
- Rubbing the dried layer.
- Decorative facing of the slope.
Exterior works
To more reliably protect the room from heat loss, it is necessary to insulate the window slopes from the outside as well. The best material for these purposes is penoplex. You will also need a special sealant for exterior use. In a private house, you can do the work yourself, but in a multi-story house it is better to use the services of professionals.
The technological sequence of operations is as follows:
- Clean the surfaces of external slopes from dust, dirt, paint residues, finishing and building materials.
- Level with cement mortar and allow the layer to dry.
- Cut the insulation into pieces of the required size.
- Coat the sheets with glue and install them on the slopes. Additionally secure in several places with dowels.
- Mount the corners. Do not neglect this stage. As a result, you will receive not only insulated, but also smooth slopes.
- Treat the front surface of the penoplex with special glue and secure the reinforcing mesh.
- Level with putty.
- After drying, apply water-based paint or other finishing materials.
The issue of slope insulation should not be ignored. The microclimate in the house and the size of the electricity bills depend on how well and timely this is done. Moreover, the whole process can be carried out independently.
Do-it-yourself insulation of slopes of plastic windows
If problems arise with the functionality of the existing structure, dismantling is performed. Preparations for work begin with the choice of insulation. After this, you can begin the operation.
The procedure is performed in several ways.
Method No. 1
If the slope has unevenness or is located at an angle, materials with high elasticity are used. Experts recommend mineral wool.
The technology includes the following actions:
- the remaining foam is cut off and the resulting cut is carefully sealed;
- A guide profile is attached to the edge of the frame. Its task is to fix the installed panels;
- A wooden strip is mounted on the outer edge of the window opening. She secures the panels. If the window opening is smooth, there are no irregularities or protrusions, the rail does not need to be installed;
- the surface is treated with a putty mixture. After drying, you need to go over it with a primer and an antibacterial solution;
- While the surface is drying, it is necessary to prepare the insulation. When using mineral wool, you need to remember to wear protective gloves. This material is hazardous to health;
- a panel is prepared, which fits into the initial profile. Between these elements there is a void into which the insulation is placed. The space is completely filled.
This method is considered the simplest. Users who do not have deep knowledge in the field of construction can cope with it.
Method No. 2
Several materials are used for insulation in a brick house. They will create maximum thermal insulation. Instead of insulation, a combination of mineral wool and foil is used. Finishing is done with three-layer sandwich panels.
The procedure is performed sequentially:
- preparatory work. It is worth eliminating defects and getting rid of cracks. All joints are treated with sealant;
- Profiles for panels are installed around the perimeter of the window. After this, you need to fix the wooden slats. They will serve as a guiding element. Foil with steam and heat insulating properties is applied to the slats;
- The sandwich panel is cut into pieces of the required size. They are superimposed on the main profile;
- free space appears between the slats and the foil. It must be filled with mineral wool.
The final step will be securing the panels. They are pressed tightly against a wooden block and secured with glue or dowels. After performing this operation, the corner is puttied. You need to wait until it dries. Then a plastic corner is mounted on it.
Process
- Clean the surface with a rag;
- We pass with a thin layer of primer;
- We install a profile located closer to the frame and on the outer part of the slope;
- We seal the seams between the frame and the wall with foam;
- We measure and cut foam sheets of the required size;
- Apply glue to polystyrene foam or mounting foam on the wall;
We wrote separately about whether it is worth attaching polystyrene foam to polyurethane foam.
- Carefully apply the foam sheet to the wall;
- We foam the seams on the inside of the profile.
This procedure will make it possible to avoid cold bridges, which will become the self-tapping screws screwed into the profile.
- Apply a layer of primer to cover small seams between the profile and the foam;
- Using self-tapping screws, we attach pre-cut sheets of drywall to the profiles.
The insulation of slopes with foam plastic can be considered complete. We move to the street.
Dismantling
Insulation of window sills begins with removing them from under the window. The operation is carried out using one of two dismantling options.
First method
It is necessary to very carefully remove the layer of plaster located under the slab. When wallpaper is pasted on the surface, remove it after soaking it in water.
Algorithm:
- The material is knocked down to the base of the wall. This gives full access to the structure, and it becomes easy to find cracks and chips.
- Dismantling requires breaking off the plaster near the window sill and slope.
- To complete the process, you need to get rid of the foam remaining from the initial installation of the object.
Afterwards, just pull the window sill slightly towards you and down. Do not use great force when removing - damage to the “sensitive” plastic coating may occur.
Another dismantling method
It is possible to remove the window sill of a plastic window using a fine-toothed hacksaw with a long and stiff blade.
Instructions:
The hacksaw is inserted under the object, then the old foam is cut along the entire length of the window sill. On the sides of the slopes, the sealant is cut, which created reinforced fastening of the structure. Carefully and slowly, the window sill rises upward and then extends towards itself.
To complete the dismantling, you need to clean the base of the window. Any dust collector will remove debris and expose all existing chips and cracks in the space. They are first covered with new insulation.
Useful tips
Knowledge of some of the subtleties that experts share will allow you to do the insulation of the slopes of plastic windows with your own hands more efficiently. As a result, the windows will not be damaged by the environment and will last a long time.
It is worth considering these recommendations:
- Polystyrene foam tends to expand in heat. When attaching it, it is not recommended to use a large amount of glue. Otherwise, it will quickly crack and lose its thermal insulation capabilities.
- To extend the service life of the insulation, outdoor work should be carried out only in dry times and in warm weather.
- The use of thermal liners will significantly improve heat retention in the room and protect against moisture penetration.
- When installing insulation on slopes, it is recommended to treat all wide cracks and joints with silicone sealant.
Expert recommendations
The insulation procedure is characterized by its peculiarities. Knowing the subtleties, you can avoid many problems. To ensure the highest quality work, adhere to the following rules:
- If there is no insulation of the required size, you can use separate pieces. They are placed tightly to each other.
- Ideal adhesion can be achieved through a combination of glue and reinforcing mesh.
- Preparatory work includes getting rid of cracks and defects. If the hole is larger than 3 mm, sealant must be used.
- Of all insulation materials, extruded polystyrene foam has the maximum thermal insulation function. This will be a plus when performing outdoor work.
- You need to choose thermal insulation based on the dimensions of the gaps. If the free space exceeds 4 cm, use polystyrene foam or polystyrene foam. If the gap is 2-3 cm - fiberglass, less than 2 cm - polyurethane foam, mineral wool.
You cannot take foam with a density of less than 30 kg/cubic meter. m. If you prefer mineral wool, the density should exceed 75 kg/cu.m. m. Otherwise, the insulation will not withstand the load and will quickly become unusable.
Sources
- https://domsdelat.ru/okna_i_dveri/uteplenie-okon-snaruzhi-svoimi-rukami-prichiny-poteri-tepla-metody-utepleniya-otlivov-i-otkosov-instrukciya.html
- https://ebtim.com/montazh/uteplenie-otkosov-okon-snaruzhi.html
- https://balkon4life.ru/osteklenie/okna/tyoplye-otkosy/.html
- https://1pofasadu.ru/uteplenie/otkosov-snaruzhi-svoimi-rukami.html
- https://uteplix.com/obyekty/okna/uteplenie-otkosov.html
- https://okna-dom.net/utepleniye-otkosov-plastikovykh-okon/
- https://vdome.club/remont/okna-dveri/teplye-otkosy-dlya-plastikovyh-okon-kak-sdelat-svoimi-rukami.html