The implementation of modern interior styles, with the exception of the loft, does not allow the display of engineering communications. Therefore, when carrying out repairs, you often have to decide how to cover the heating pipes in the room, where to hide the risers going upstairs to the neighboring apartment. The article describes the simplest ways to solve this problem and provides valuable advice on how to choose a camouflage method.
Masking heating pipes Source pilorama-chita.ru
Six different ways to hide pipes
Heating communications spoil the appearance of the room, they do not fit well into the decor of the room, therefore, if possible, many try to hide or disguise them. This can be done in different ways.
The loft style allows for display of utilities Source pinterest.com
Hidden broach
If you ask a builder or a craftsman specializing in apartment renovations how to cover a pipe in a room beautifully, he will definitely advise you to make a hidden broach. Its implementation becomes justified when a major overhaul is carried out and communications are assembled from scratch using new modern materials.
The groove is cut with a grinder Source sevparitet.ru
To do this, first, horizontal and vertical channels (grooves) are cut out in the wall with a grinder, then the plumber lays pipes directly into them, brings them to the heating devices and completely connects the entire system. The entire wiring remains deep in the wall; it is covered with plaster on top, so the technical filling becomes completely invisible.
When pipes are laid hidden, they are hidden in the wall Source uyut-remont.ru
Note! Before hiding communications in the wall, the pipes must be covered with insulation. If this is not done in the presence of coolant, condensation will accumulate on the surface of the wiring. It will cause wet spots to appear on an already repaired wall.
Thermal insulation of utilities in front of a hidden screed Source trubservice.ru
This option for masking heating pipes has its pros and cons. When the pipes are completely hidden, the appearance of the room is transformed and becomes more beautiful. Nothing prevents you from placing furniture close to the walls and building an even line with the furniture. But the practice of operating such premises shows that in the event of an accident it will be impossible to eliminate the leak. It will be difficult to discover where it formed. If this happens in an apartment building, there is a risk of flooding the neighbors. This threatens a scandal and large expenses for compensation for damage to other people's property.
The absence of heating pipes streamlines the interior Source www.stroykat.com
The risks of accidents are high even when polypropylene pipes are used to assemble the pipeline. In this case, fittings are used to connect two joints. Over time, they lose their tightness. Therefore, leaks form, which can only be detected using a water sensor. There are cases when plastic pipe joints leak due to poor soldering. In order to eliminate damage, you will have to re-open the grooves and replace the damaged area. And this is, at the very least, another major overhaul.
Water pressure sensor for heating system Source luvateknoloji.com
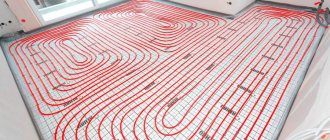
Floor screed
Sometimes the lower distribution of heating pipes is completely hidden in the floor screed. This technology is no different from the technology of hidden broaching in the wall. Only one thing: to save money, all pipes are laid in one large wide groove. Separate branches then run off from it in the required directions.
Laying the piping system in the floor Source logo-term.ru
This method of disguise is good if the apartment or house has not yet been screeded. Then it will be easier to create a plan indicating the location of the pipes on the floor, lay the pipes according to it, and then pour the screed. After the concrete has dried, the floor will be perfectly level. Experts advise maintaining the communication plan. It will later be useful for repairing the heating system.
The screed completely hides the wiring Source rousset-yves.fr
When the floor in a house or apartment is made of planks, it will be much easier to lay pipes along the bottom and then maintain them. After laying the finishing coating, it is important to leave one or two boards loose where you can quickly gain access to the main technical components of the pipe distribution.
Installation of heating pipes under a plank floor Source teplomir-nsk.ru
See also: Catalog of companies that specialize in insulating country houses.
False wall
Any decoration of heating pipes should not impede access to areas of possible accidents. Therefore, it is worth giving preference to those designs that meet these requirements. One of them is a false wall, erected using metal profiles. You can then cover them with anything: plasterboard, plastic, plywood. The main thing is to leave access in the form of opening hatches to the places where pipes connect with the heating device, to the locations of couplings and tees. Before assembling the box, it is important to inspect the pipeline and perform the following steps.
To disguise risers, it is better to erect a false wall Source otoplenie-gid.ru
- If the heating risers are assembled using metal-plastic pipes connected by dismountable fittings, the latter should be removed and replaced with press fittings.
- If the wiring is old, you will have to completely change it.
- It is advisable to first cover pipes made of copper or steel with any plastic heat insulator.
After covering, the frame will completely cover all technical components Source www.remontnik.ru
Please note! Experts, when talking about how to decorate a heating pipe in a room, do not recommend using the box where polypropylene pipes are used for laying utilities. When heated, they expand; the high temperature of the coolant makes them plastic. In such a situation, before choosing pipe decor, it is necessary to make a preliminary calculation of the thermal expansion of the pipeline. Only an experienced engineer can do this.
The box is closed with plasterboard Source cosmo.actorz.ru
The finished false wall can then be decorated with anything: you can paste wallpaper on it or lay ceramic tiles. It is important to remember that its construction will take away useful space from the room. For small rooms, this decor of heating pipes is not suitable. Here you can use another method.
The box can become part of the overall decor of the apartment Source master-st.pro
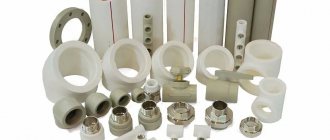
Polypropylene and its features
It is not without reason that polypropylene, widely known among the people, has gained such popularity. To a greater extent, this is due not to advertising companies, but to the unique characteristics of the material. To decide whether it is possible to embed PP pipes into a wall, it is useful to consider its main physical, chemical and operational parameters:
- Polypropylene is resistant and neutral to most aggressive chemicals.
- The polypropylene pipe shell has relatively good rigidity and strength, which allows pipes to be laid under the external pressure of building materials.
- PP pipes are installed by soldering at a temperature of 260 °C, and due to the mutual diffusion of materials, a strong and durable connection is obtained. The soldered joint is capable of ensuring tightness throughout the entire life of the pipeline.
- Due to the properties of the material (thermal conductivity coefficient 0.25 W/m °C) and the thickness of the shell, PP pipe has fairly low heat transfer and is superior to other pipe polymers in this indicator.
- The service life of polypropylene in cold water supply networks according to GOST is at least 50 years. In heating and hot water supply lines, the duration of its use depends on the temperature and pressure characteristics of the medium and should not fall below 25 years at a working fluid temperature of no more than 75 ° C (according to SNiP 2.04.01-85).
Rice. 2 Physical characteristics of polypropylene
- Since ordinary polypropylene does not have high heat resistance, it is reinforced with fiberglass and aluminum. Thanks to this, the material can be used in hot water supply and heating systems. Reinforced pipes have a lower linear expansion coefficient.
- There are several varieties of polypropylene from the 1st to the 4th generation. For the manufacture of the vast majority of pipes, the third development PP-R is used. Recently, the latest 4th generation products made from heat-stabilized polypropylene PP-CT have appeared on the market.
- The disadvantages of conventional polypropylene include a high coefficient of thermal expansion (linear elongation), reaching up to 10 mm over a meter area.
- The material also has high air permeability, which negatively affects the corrosion resistance of iron-containing compounds.
- The disadvantage of polypropylene, inherent in most thermoplastics, is its poor resistance to ultraviolet radiation. Therefore, it is not recommended to lay communications in places with natural light, but placing pipes in the wall is encouraged.
Video description
The video shows how to hide heating pipes in the wall:
Open methods
There is also open decoration of heating pipes. When using it, the pipes are simply painted to match the walls, then they become less noticeable. When choosing such a disguise, it is important to apply the paint to a cold contour. This means that pipes can only be painted in the warm season. Paint applied to a hot circuit will dry quickly and then crack. Correcting such a defect will be very problematic.
Heating pipes painted to match the walls Source www.indog.ru
How to hide communications behind a false wall
Heating hidden behind a false wall
Everything is quite simple here. You need to build a structure from metal guides and sew it up with any material you like:
- drywall;
- blockhouse;
- lining and others.
There is a myth that this reduces the usable area of the apartment. Fortunately, this remains a myth. If you need to hide pipes, these are usually places under or next to a window. All the space that is above a meter in these areas is absolutely not used in real life. The maximum that can be lost is 15 cm under the windowsill. At the same time, the window sill itself will accordingly become 15 cm wider. Agree that adding to the width of the window sill is much better than the same unused space under it. You can also insulate the walls from the inside.
There is an option to leave everything as it was originally, that is, the communications are attached to the wall and there is no need to hide anything. But, if we are talking about high-quality modern repairs, this option is unacceptable.
Installation recommendations
If the work of assembling the system will be carried out with his own hands, then the master will need a step-by-step description of the installation process.
It is important to follow these rules:
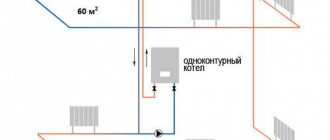
- it is required to equip 2 circuits: for hot and cold water;
- pipes must be laid with a slight slope directed towards the last radiator;
- both contours are laid parallel to each other;
- to prevent heat loss in the main riser, it is better to wrap it with an insulator;
- installation of a container to collect excess water is carried out at the highest point;
- the dimensions of the pipes and connecting parts must match;
- all parts of the system are made of the same material.
The sequence of work is as follows:
- Diverting the main riser from the boiler. An expansion tank is installed here.
- Dividing supply pipes.
- Simultaneous laying of a pipe through which cold liquid is supplied to the boiler.
- Fixing the pump.
- Attaching batteries or radiators.
Before refueling 2-pipe heating systems, you need to carefully inspect whether all connections are securely tightened.
Shredding brick walls with a hammer drill
A hammer drill is a universal construction tool that can be used to drill holes and knock out hard materials - thanks to these properties, the tool can quite effectively knock out channels for water supply or heating pipes. The work order is as follows:
- Pobedit drill for concrete with a diameter of 8 or 10 mm. in perforation mode, it makes a series of holes of the required depth along the entire length of two lines, the step can be chosen arbitrarily, but the smaller the distance between the holes, the better the quality of the groove edges.
- Next, insert a shovel-shaped attachment into the hammer drill, switching it to impact mode, and knock the brick between the drilled grooves, controlling the depth with a pipe section.
- Upon completion of the work, the groove is cleaned of dust and foreign debris; for this you can use a household vacuum cleaner.
Rice. 8 Angle shifter with two discs
How to hide heating pipes in an apartment using a box
The box is considered a good option when the heating system is already installed. The casing can be sheathed with plastic, plasterboard, or wood. Before work, you should ensure the integrity of communications.
Required tools for installation:
- Metal profile;
- Self-tapping screws with dowels;
- Material for the box;
- Screwdriver;
- Drill;
- Scissors for metal.
The box in the apartment can be made of any shape to suit the style of the room
First you need to make the frame of the box. The manufacturing material is secured using self-tapping screws. First, the location of communications is marked. The dimensions of the pipes, the thickness of the material and the interval between the walls of the box and the communications are taken into account.
Pipes cannot be installed close to the duct. It is optimal to leave a distance of 3 cm.
Next, building profiles are installed. Then the guides are secured. To fasten the profiles together, cutters are used.
Then the corner profiles are installed. If the interval between the posts exceeds 25 cm, then additional jumpers should be made. If the height of the racks is more than 150 cm, then install horizontal jumpers. When the frame is ready, its design begins. The plasterboard is chamfered before installation. But if tiling is planned in the future, then this process can be omitted.
They begin installing the walls of the box from the side parts and move towards the central ones. After installing the walls, the box must be decorated decoratively. To do this, use tiles, wallpaper, paint.
If you want to hide the batteries, you can build a false wall. The execution technology is similar to the box. First, the frame is made, then the walls are sheathed. A significant disadvantage of this method of decoration is the reduction in room area. If you don’t want to bother with installing these elements, you can purchase a ready-made box at a hardware store.
Do the work yourself or call a professional?
To install a heating system with hidden pipes, it is better to invite a specialist. Typically, this method of camouflage is used at the construction stage of a building or during its major renovation, when old pipes are replaced with new products.
Assembling the system requires a competent approach to ensure further reliable operation of the entire heating system.
You can cover the pipes with a box, a screen, or decorate them yourself. The maximum you risk in this case is that the design will not look beautiful enough. You will not cause much harm to the home heating system itself.
When a hidden heating system is unacceptable for safety reasons
Safety regulations contain provisions that access to communications must be ensured without interference. It follows from this that pipe joints cannot be tightly walled up; therefore, it is only permissible to close the area in which the probability of leakage is zero.
Do not use metal pipes for laying in the wall, as they are susceptible to corrosion
The competence of regulatory authorities includes assessing the thickness of the wall. So, if it is not enough, the permit will be denied.
Grilling technology using various construction tools
When deciding how to groove a wall in the bathroom for pipes or make channels in the floor to run hot heating pipelines through, they resort to dismantling work using the following methods and tools.
Hammer and chisel
An old-fashioned method, suitable for working on walls made of soft building materials (gas silicate blocks, foam concrete, gypsum plaster). During installation, at the beginning, special grooves are knocked out along two lines of the channel with a depth of about 10 mm, then the material is removed between the punched lines, after which the operation is repeated many times until the desired depth is obtained.
Hammer
To work with a hammer drill, a special construction attachment in the form of a spatula is used; the tool is used to break through any type of wall. The main disadvantage of the hammer drill is the not very aesthetic appearance of the punched channel and a large amount of excess debris - during operation, material is knocked out outside the outer perimeter of the groove.
Therefore, to optimize the work, before using a hammer drill, the boundaries of the grooves are cut with an angle grinder (grinder) or holes of the required depth are drilled into them in increments of about 10 mm.
Rice. 4 Chipping with a hammer and chisel
Bulgarian
When working with a grinder, special discs with diamond coating for concrete are used to cut through concrete or brick walls. The grinder is a dangerous tool, so it is imperative to use a protective cover on the body when working with it.
Using an angle grinder, smooth, deep lines are cut along the perimeter of the groove, after which the material between them is knocked out with a chisel or hammer drill.
The main disadvantage of working with an angle grinder is the high dust content in the air; for protection you should use dust goggles, thick clothing and a respirator.
Close the riser with a box
This is one of the two most popular solutions. Unsightly pipes are hidden in a box erected over a frame, and from this box an open line comes out to the heating radiator. The remaining open battery itself can be placed in a decorative perforated box.
Advantages of the box
- The riser pipes are no longer visible;
- The cheapest option for closing with a building structure;
- Does not require any permits or approvals.
Disadvantages of the box
- Having gotten rid of the riser pipes, we still left the supply pipes to the radiator open;
- The aesthetic appeal of the box is very questionable (in most cases, I’ll tell you about exceptions at the end of the publication);
- The hidden location of the riser makes it difficult to detect leaks and eliminate them. Even if an inspection hatch is installed in the box, dismantling the structure may be required to carry out repair work.
Optimal diameter for home heating
. After all, the system will operate effectively only if heat losses are correctly calculated. Without an accurate calculation of the cross-section, your heating system will not cope with its tasks.
When purchasing products for work, you need to consider not only what they are made of
It is also necessary to take into account the length and diameter of the pipeline
When choosing a diameter, it is better to take the following characteristics as a guide:
- Internal volume. This is the main indicator that shows the diameter of the internal section.
- External volume. This indicator is used to classify pipe materials. It can be: small (from 0.5 to 10.2 cm); average (from 10.2 to 40.6 cm); large (exceeding 40.6 cm).
- Conditional volume. Diameter indicator, which is displayed in inches or fractions thereof.
quite a difficult task. For this work, special formulas and tables are used.
At the same time, you can rest assured that the installation of the heating network will be carried out without errors, and nothing will have to be redone. And this will avoid additional financial investments.
Advantages of external installation of chimneys ↑
The external method of wiring the outlet pipe has the following obvious advantages:
- Removing the main part of the drainage channel from the house allows you to increase the usable living space of the room. The installation of a combustion product exhaust system can be carried out upon completion of the main construction activities. External installation of a chimney will not require you to spend a lot of time and effort.
Easily removable disadvantages of this approach include:
- The need for mandatory insulation of chimney pipes. Possibility of significant heat loss with low quality thermal insulation. The difficulty of combining the design of the chimney with the architectural style of the building.
Despite all these difficulties, when deciding how to make a chimney through a wall, preference is usually given to its external placement (full or partial).
Making walls for pipes with your own hands
After drawing up a plan for the placement of the pipeline, taking into account the fact that all branches and changes in direction in the line are carried out at right angles, begin marking. The work is performed in the following sequence:
- Checks for the presence of hidden wiring at the work site; if there is no layout diagram, you can use a special device to search for wires.
- Using a construction pencil and a level, two lines are drawn on the wall, corresponding to the width of the pipes with a small margin. If a heat insulator is used on a hot water pipeline, increase the width of the channel accordingly.
- Once you have finished marking the walls using a building level, tape measure and pencil, you can begin grooving; the above tools are used when carrying out the work.
If gating is necessary, there are several options for how to most effectively carry out this procedure; to carry out the work you can:
- Use the services of hired specialists; the cost of one linear meter of groove, depending on its parameters, wall material and region, fluctuates within 5 USD. per linear meter.
- If you don’t have the necessary tool, you can rent it and do the work yourself, saving some money.
- If you have your own hammer drill and the necessary attachments for it, you can drill the wall yourself using only this tool. If you only have a grinder, use it to cut through the wall, and you will have to knock out the material manually using a chisel and hammer.
Rice. 6 Cutting a channel using a grinder with a diamond blade
Which decorative screen is better?
At the moment, decorative boxes for pipes of heating systems are made from the following materials:
- plastic;
- metal;
- MDF;
- wood.
Plastic is one of the worst materials for making boxes designed to hide hot pipes. The fact is that in order to reduce prices, manufacturers use inexpensive types of plastic for these products. Such material quickly warps from heating, loses its appearance, or even turns yellow and becomes brittle. Of all types of screens, a plastic pipe box is the cheapest, but it does not last long and is well suited as a temporary solution to the problem. The plastic box made to look like a plinth deserves attention, but this is a different price category.
Metal, on the contrary, is the best solution for decorative fencing of heating risers and mains. Products with frequent perforations or lattice designs are especially good. Metal is an excellent conductor of heat and will successfully transfer it into the room, and through the holes the casing will allow enough air inside for heating. So from the technical side, metal has no equal.
From the point of view of operation, steel products are also at their best. They are coated with a durable polyester powder coating that can withstand high temperatures and various mechanical stress. Again, metal boxes can always be repainted if necessary, so they will last a long time. Well, the last argument in favor of steel screens: they are easy to clean in any way, even wipe with a rag, or remove and wash in the bathroom under running water.