Read in this publication: Battery in a niche: advantages and disadvantages of such an installation Niche for a battery: important points in the manufacturing process How to make a niche for a battery under a window: step-by-step instructions A few more subtleties of installing a niche with your own hands
Aesthetics and once again aesthetics - this is precisely the goal that any person pursues when making home renovations. For this reason, it is very important to pay attention to the various little things that make up the overall perception of the room - even carefully laid heating pipes can ruin the appearance of the room. By and large, this is the main reason why a battery in a niche is found in almost every second modern apartment or house. As a matter of fact, we will talk about it in this article, in which, together with the site stroisovety.org, we will talk about how to make a battery in a niche with your own hands.
Niche for battery photo
Is it worth hiding batteries behind a plasterboard structure?
In his home, the owner himself decides how to hide the radiators. Including using a box. That is, it CAN be done, and there are no problems from the legislative side either.
Only the owner of the apartment will feel the disadvantages of installing the box, and here’s why:
- convection of air flows will decrease, due to which heat transfer to the room will suffer - the room will warm up a little worse;
- If heating repairs are needed, the box will need to be dismantled - extra work and expense.
In any case, no one completely covers the battery with drywall. Only the side parts are masked. A box is constructed from the sheets, which forms a niche for the heating device. Behind this structure there is a pipe connection.
It is worth remembering that when installing the box it is important to follow two basic rules:
- Leave a small distance between the side parts of the radiator and the walls of the box. The drywall should not come into close contact with the battery. These gaps will maintain optimal air convection.
- Make the niche dimensions convenient to easily access the control units.
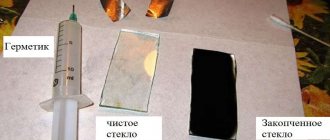
Don't forget to also check the radiators for leaks before masking them with a plasterboard box.
Installation of radiators in internal walls
Internal walls and partitions are thinner than external and load-bearing walls. Therefore, when installing a radiator, there is no danger of weakening the overall structure of the house.
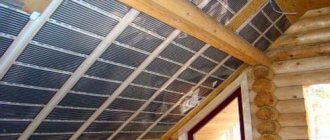
When installing a heat shield on the back of the battery, problems may arise - sometimes the walls are quite thin and you just have to sew up the back wall. It is best to use polystyrene foam for this.
As a rule, a radiator recessed into the partition transfers part of the heat to the adjacent room. Accordingly, you need to select the number of sections and location. To do this, you can use an online calculator to calculate the number of radiator sections.
Problems will also affect sound insulation. To improve it, you can use special multilayer composite sound-absorbing materials. Therefore, when calculating the depth of the niche, take into account the thickness of the sound insulation.
In some cases, it makes sense to visually hide the battery rather than install it inside the wall.
Pros and cons of battery cover material
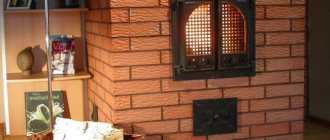
The plasterboard niche for radiators looks attractive. The material is very easy to work with, so you can make almost any structure: simple rectangular, interesting shaped, etc. Plus, you mask the pipe connections. Only the front part of the battery will be visible, although it can be covered with a screen.
As for the downsides, there are some too:
- if the heating radiators leak, the drywall will be hopelessly damaged, even if it is moisture resistant;
- behind the box it will not be possible to notice the first signs of a leak, which makes it more difficult to prevent an emergency;
- during scheduled heating repairs, the box will need to be removed;
- After installing the structure, the temperature in the room will drop by several degrees.
Whether it is worth making such sacrifices is up to the owner to decide. Installation of a plasterboard box is quite possible, and there are no restrictions for this.
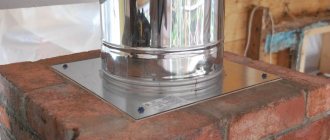
How to recess heating pipes into the wall
Many people believe that recessing pipes into the wall is too dangerous. But if everything is done correctly, problems can be avoided.
Use only high-quality and durable materials, and do not trust installation to just anyone. If the main is located inside a wall, it is not so easy to get to.
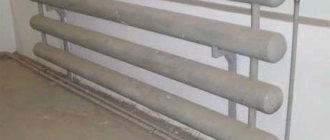
All materials tend to expand and contract with temperature fluctuations. Therefore, heating pipes cannot be cemented or covered with plaster - they will quickly wear out, and joints and connections will break.
Pipes must be covered with high-quality thermal insulation to avoid heat loss. It is preferable to use materials with a top heat-reflecting screen made of metal foil.
It is best to cover the gate with plasterboard so that, if necessary, you can easily reach the highway.
A groove of this size will fit a thermally insulated pipe and will leave enough space for covering it with plasterboard.
We make markings and drawings
- If you plan to build a floating structure, do the following:
- Measure the required distance from the bottom of the radiator and use a level to draw a straight line. This will be the bottom part of the future box.
- Draw the side lines using a construction angle. Do not forget to leave a distance between the edge of the box and the radiator (15 centimeters is enough).
- Connect the upper edges of the perpendicular lines by level.
- Review the direct lines.
For a structure standing on the floor, make the markings from the top of the heating radiator.
Mounting features
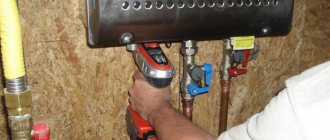
On the rear surface of the Kermi radiator, fastening elements - linings - are welded at the factory. If the length of the radiator is less than 1800 mm, then there are 4 of them, if it exceeds - 6. The radiator can be aligned both vertically and horizontally.
To hide the radiator from prying eyes, special screens or grilles are used. They can be used both standard ones, manufactured in industrial conditions, and homemade ones. This is a matter of taste and capabilities of each user.
Assembling the frame
Take profiles measuring 60x28 and 27x28. First, secure the elements that will not be on the wall:
- Place the profile against the line on the wall.
- Secure the profiles with dowels in increments of 20 cm.
- Check everything with a level.
Then install the second level of the frame. Divide the profile into sections of the required length. Then cut the edges 5 cm along the fold of the profile.
It turns out that the edges of the profile product are cut off, and the middle cut part is bent to the side. At the exit, a structure with an angle of 90° is formed.
Next, secure the vertical products to the front side of the structure. This way you will have a finished frame for drywall.
Drawing conclusions
The main thing that needs to be observed before starting to install the radiator is to take measurements of the space in which it will be located. And the radiator should fit into it as follows:
- – from the floor, window sill and back wall to the device there should be no less than 10 cm. In the most extreme case – 7 cm;
- – the efficiency of a radiator recessed into a wall or niche under a window is lower than that of a protruding one. But, it can be raised if you install a heat-reflective film. It is also possible to use a radiator with more power (on average 10%) compared to the planned one;
- – the thickness of the device is the determining factor when arranging a niche under the window;
- – a box or screen that completely covers the radiator will only get in the way.
You might be interested
Power of one section of aluminum radiator
Installation of bimetallic heating radiators
Connecting heating batteries with bottom supply
The cast iron radiator is leaking - what to do?
Repair of aluminum heating radiators
Heating radiator dimensions: height, width and thickness
How to choose bimetallic heating radiators for an apartment
Bimetallic radiator design
Calculation of the number of sections of a bimetallic radiator
Important points regarding redevelopment with the arrangement and placement of niches in the apartment
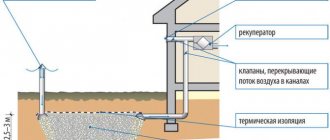
When we carry out redevelopment with the installation or laying of niches, we need to take into account the following nuances:
- If a niche is created/founded, then this is a redevelopment
- If we consider the process only in the context of a niche (without affecting the load-bearing structures), then this is agreed upon in a simplified manner, that is, according to a sketch after the fact.
- When considering the process comprehensively, usually the construction/laying of a niche goes together with other redevelopment activities and this is consistent with the development of design documentation as part of the technical report and the redevelopment project.
Installation of skirting boards
Any repair will be incomplete if joints and sharp transitions from one coating to another are left uncovered. The use of skirting boards has a positive visual effect and significantly improves any finish. Removing old cement aprons, half-decayed wooden baseboards and replacing them with new, plastic ones is an important component in upgrading heating niches.
It is preferable to use plastic rather than wooden skirting boards; they have many advantages:
- low price;
- great elasticity, which allows you to go around all the irregularities in the walls;
- availability of cable channels;
- very easy to install;
- easy to join in corners.
Three methods have been developed for securing skirting board elements:
- using glue;
- using fastening fasteners;
- using hardware.
The adhesive option is the fastest and easiest, but the requirements for the wall increase - it must be perfectly flat. If you use oil tape to protect against accidental ingress of glue, then the appearance of the finish and the baseboard itself will not be affected at all. The main disadvantage of this method of fixation is the impossibility of reusing the baseboards.
It is better to use fastening brackets in conjunction with perfectly flat floors and walls, since the baseboards will not be fixed tightly and there is a risk of large gaps forming. In addition, it is very difficult to repeatedly remove and reinstall elements on such fasteners.
The most inexpensive way to fix skirting boards is to use hardware and dowels. The fastening is rigid and quickly removable. This option is good if there are cable channels, when the caps of the fastening elements will be hidden under the latch.
Installation of the plinth should begin from the inner corner of the niche, having previously installed the connecting corner element. It is better to make holes in the plastic strip in advance using a hot nail. The wall is marked along these holes, and then sockets for hardware are drilled using an impact drill.
It is more convenient to screw in the self-tapping screws last, after first cutting the plinth to the size of the niche and joining it in the corner fasteners. After completing all these operations, the covers of the cable channels are inserted and latched.