During the process of a major overhaul, the question of reconstructing or modernizing the heating system may arise.
There may be several reasons for this: redevelopment of the premises, installation of an additional heat source (for example, a boiler), or simply the old heating system has become unusable and cannot cope with its direct task.
What is clear is that installation and dismantling work is only possible with written permission from the competent authorities, with the condition that the work will be carried out by qualified specialists.
Stages of installation of heating equipment
For simplicity, let’s assume that you already have a heating supply project, the necessary equipment (radiators, pipes, fittings, insulation), you just need to install it in the apartment.
Call us and outline the problem. Our manager will ask you a few questions to clarify the scope of work and make an approximate calculation of the cost of heating in your case. Approximate, because the final cost will be clear on the spot, after measuring the length of the pipes, the number of connections and clarifying other details. Professional heating work always begins with an on-site analysis of the project. It is not always possible to implement a planned project, but you can get as close as possible to the desired result with minimal costs. For example, the pipes may not be suitable for the coolant in your home, then they will have to be replaced, along with the fittings. Or the selected beautiful radiators turn out to be too weak; in order to avoid leaks, we recommend strengthening or replacing them too. Our heating installation company provides a guarantee for all work carried out, because we care about your safety.
Using glue
Holes of small and medium sizes, cracks can be sealed. This option is temporary and is only suitable so as not to drain water from the riser or deprive the room of a heat source. After the heating season, the aluminum radiator must be removed in order to carry out high-quality repairs.
You can seal the hole using:
- Epoxy glue.
- Cement.
- A solution called “cold welding”.
Repairing holes with epoxy glue
To use epoxy resin glue, you need to prepare fiberglass or thick fabric. Since any of these materials must be wrapped around the radiator, the use of such adhesive is limited. After all, not every place can be wrapped easily and tightly. For some versions of aluminum radiators, this method is not suitable at all.
To seal holes or cracks:
- Cut the fabric into long narrow strips.
- Clean the area from which water is flowing. That is, remove all paint that has peeled off and all particles that are easily removed. This is done with a spatula. Next, take a brush with metal bristles and clean the surface. There should be pure metal left. It happens that a crack appears in a place where it is impossible to reach with a brush. An iron cable can help in this situation. It is pushed through the desired part of the radiator and pulled by the ends one by one, cleaning the desired area. This area is then dried.
- Apply glue to the treated area and wrap it with cloth.
- Apply glue to the fabric and wind another turn. This should be done until there are 4-5 turns. No glue is applied to the top layer of fabric.
- Secure the fiberglass using clamps or wire.
- Wait for the glue to dry. It dries from 2 hours to 3 days. If the room temperature is 20-25 °C, then it will dry in 2-3 hours.
To enhance the properties of the glue, you can add aluminum or bronze powder to it. Such powder is obtained by grinding off an unnecessary aluminum or bronze part with a rasp. Before use, the glue and powder must be mixed well.
Cracks are repaired in the same way using cement. However, medical bandages should be used instead of cloth. They need to be soaked in the solution and wound around the radiator.
We use “cold welding”
It is very convenient for sealing cracks and holes. This is a putty that looks like plasticine. There are two types:
- Single color.
- Two-color.
The first type is easier to work with, since you need to cut off the desired piece and knead it with your hands. You should wear gloves on your hands, because the putty is chemically active and can harm the skin.
Two-color cold welding must be mixed until a homogeneous solution appears. It becomes sticky while mixing.
The fight against holes using “cold welding” is carried out as follows:
- Clean the damaged area from dirt and paint.
- Knead the cut piece of “cold welding”.
- Apply the solution to the hole and rub it in (this is done with a metal spatula). To prevent the putty from remaining on the spatula, it must be moistened with water.
- If after grouting the cork begins to come out (a bubble forms, which then bursts), it must be rubbed again with a spatula. This may have to be done before the “cold weld” has completely dried. It dries in 5 minutes.
- Secure the plug with a clamp or rubber.
You can also seal the hole with heat-resistant sealant. However, you need to use the right sealant because there are acidic sealants that can corrode aluminum. Practitioners advise using neutral solutions.
Extraneous noise
Sometimes noise may occur in the heating pipes - it can be either a knocking in the heating pipes, or various clicks, and a hum. Why are heating pipes noisy? There are several reasons:
- During operation, the diameter decreases.
- Pipes are leaking.
- A smaller pipe diameter was installed.
You may need to think about how to fix a leaking heating pipe. When you eliminate the leak, you will also eliminate the problem of noisy heating pipes.
Why are the heating pipes still humming? This may be a reduction in pipe diameter. You can hear the heating pipes knocking right on the spot. You need to walk along the pipes and find the reason why the heating pipes are clicking. Usually the source from which the heating pipes click is located in the basement - because there is more pressure here
It is very important to find in time the reason why the heating pipes are shooting, humming or making noise - because this could be a prerequisite for a serious problem
Non-standard situations
An unpleasant situation can happen when, when dismantling cast iron batteries, the bottom of the plug breaks off and the thread remains inside.
Proceed as follows:
- the collector is heated;
- put a chisel to the part in the direction of unscrewing it and try to turn it with a hammer;
- As soon as the edge of the thread is stuck out, it is turned out with pliers.
It is often necessary to remove old rusty batteries in which the threaded connection is corroded or even perforated.
In this situation, you need to do the following:
- “arm yourself” with a coupling made of brass or cast iron of the required diameter;
- cut off the thread from the liner, but leave the first five turns;
- drive the thread with a die;
- wrap the threads with plumbing linen soaked in paint (organic solvent), which dries quickly;
- screw on the prepared coupling;
- Now the wound thread is screwed into the coupling, and the problem is solved.
Replacement of vertical heating pipes can be done in three cases:
- Overhaul of an apartment building.
- Construction and repair work related to changing the interior of the premises.
- Impossibility of further use of risers due to technical reasons.
At whose expense is the replacement of heating risers carried out? In accordance with the current legislation of our country, replacing risers is the responsibility of the service organization.
Here we are talking about risers that are the common property of residents, that is, about pipes located in entrances, attics, and basements. All work is carried out at the expense of the owners of the apartment building.
You need to know that the property of all residents of the house are the pipes to the valve, which is installed at the entrance to the apartment. The section of pipe after the valve is the responsibility of the homeowner.
In addition, if you live in the premises on the basis of a rental agreement, then the housing department will repair and replace pipes, and if the housing is privatized, then all work is carried out by the owner.
Emergency riser replacement
If a riser bursts within one apartment, this is an obvious signal to the homeowners of the entire entrance about the need to take the most decisive action. The pipe was rusty not only on one floor.
The same picture is observed along the entire height of the pipe. Over decades of operation, scale has formed on the walls of the pipes, preventing the normal flow of coolant.
It is much more practical to replace the riser along its entire length, giving the heating system a new life.
- However, it happens that the residents of one or more apartments have recently made expensive repairs, and therefore categorically do not want to allow workers with an angle grinder and a welding machine into the apartment.
- In this case, the damaged section of the riser will have to be replaced within the same apartment in which the accident occurred. The pipes must be cut in such a way that the remaining “stumps” make it possible to cut the thread and screw on the adapter coupling.
Installation - heating, water supply, sewerage turnkey.
In a country house, installation of water supply and sewerage begins with the preparation of the project. It takes into account the location of each tap, washbasin and toilet. You will have to calculate the amount of insulation for sewer pipes and other nuances. If the system is installed in an apartment, you must first remove elements of old communications.
We will carry out installation of heating and water supply on a turnkey basis and with a quality guarantee. Our teams work in Moscow and the region, offering affordable prices. When we finish installing or repairing utility networks, the room will remain clean and all parts of the system will be neatly assembled.
It is better to start installing sewerage, heating and water supply during the construction of a country house or major renovation of an apartment. But we also work on finished objects. After drawing up the project, the employee will prepare an estimate, purchase the necessary materials and send a team to you to carry out the work. And the result will definitely please you.
What can be done?
There are many options for organizing heat supply: you can install individual heating with a gas or electric boiler, you can reschedule the heat supply so that it is convenient, you can simply replace the heating pipes with new ones. The first two options will save you from problems with heat, but in an apartment building they will require lengthy and complex approvals - independent major changes are illegal. However, simply installing heating with new pipes and radiators will solve many problems.
Most often, heating installation in Moscow is required for the following reasons:
a) due to scale, old batteries no longer heat up as before,
b) worn pipes leak and do not conduct coolant,
c) old batteries do not fit into the interior.
Our specialists will help you calculate the required number of batteries (sometimes you just need to add a couple of new radiators), select equipment that is suitable in design and construction, draw up a diagram and, finally, install and mount it all in the apartment. Qualified installation of water heating in your apartment will help you enjoy the warmth at any time of the year and protect you from leaks and unexpected accidents.
Why is this necessary?
Dismantling is necessary in the following cases:
In case of intersectional leaks of a cast iron battery at a short distance from the connections. If there are many sections, the length of the radiator wrench is often not enough to reach the required pair of nipples on the side of the blind plugs. The only solution is to disassemble the radiator from the supply side;
Leaking between sections is a typical disease of cast iron batteries.
- In case of fistulas on the connections to the radiator. To replace the hose (on threads or welding), you need to completely remove the heating device;
- When replacing radiators with new ones (with higher thermal power or more aesthetically attractive);
- When restoring radiators by annealing them;
Cast iron sections clogged with petrified silt can be brought into working condition by heating them (for example, in a fire) and tapping them with a wooden or rubber mallet. The burnt dirt is poured out through the collectors. Of course, after annealing, the intersection gaskets must be replaced.
When renovating a room. Plastering a wall or wallpapering behind a radiator, you will agree, is quite problematic.
To wallpaper a window sill niche, it is better to remove the battery.
Connecting radiators
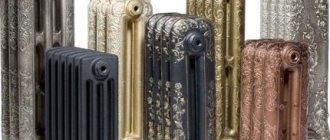
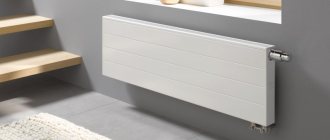
The modern building materials market is distinguished by a wide selection of radiators: aluminum, bimetallic, copper, traditional cast iron, etc., of all shapes, colors and sizes that can harmoniously fit into any interior.
Most often, batteries are installed under a window opening, at an equal distance from the floor and window sill, and at a distance of 5-10 cm from the wall. This allows you to evenly distribute thermal energy throughout the room, as well as eliminate the unpleasant effect of “crying” windows, shifting the dew point.
Radiators are suspended on special brackets, after which they are checked for level. Correctly set horizontal line will have a positive effect on flow and reduce air accumulation. To increase heat transfer, the wall behind the radiator can be additionally shielded.
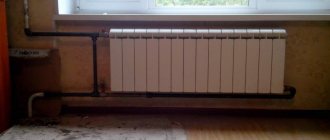
Next, pipes made of the selected material are connected to the batteries, the necessary shut-off elements, plugs, Mayevsky taps, etc. are connected.
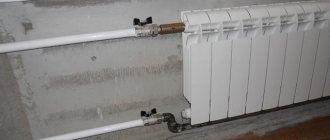
Upon completion of the required installation stages, air is bled from the finished heating system and a leak test is carried out. To do this, coolant is supplied to the system, and this should be done extremely carefully, avoiding the possibility of water hammer. The joints are carefully examined for leaks. If they are identified, the problematic connection will have to be redone.
Mounting radiators on the wall
One ball valve is replaced by a thermal head or valve to coordinate the degree of heating and cooling of heating equipment. The throttle (valve) is manually adjusted and the thermostatic element operates automatically.
Residents of upper floors install vents on radiators to remove accumulated air. Mayevsky taps or automatic devices are installed. In a multi-storey building, the connections to the battery are equipped with a jumper to the valves or chokes. The connection ensures the movement of water in the riser when covering the underwater section. Complete or partial blocking of the supply without a jumper will lead to cooling of the neighbors' batteries.
Installation and replacement of heating, water supply and sewerage pipes
The SantekhKomplekt company offers its services for the replacement (installation) of all types of pipes. In our company, you can independently choose the material from which installation, installation, and replacement of pipes will be carried out. be it a riser for cold and hot water supply, installation of pipes for a heating system or sewerage system. When performing pipe replacement work, we use only high-quality materials.
Types of installation (replacement) of heating and water supply pipes
- Installation of metal-plastic pipes
- Installation of polypropylene pipes
- Installation of copper pipes
- Installation of steel pipes
- Installation of various plastic and polymer pipes
Installation of metal-plastic pipes
This type of pipe is used for internal (inside walls and screed) and external distribution of water supply and heating pipes. These pipes are inexpensive, easy to use and easy to bend.
Installation of polypropylene pipes
Polypropylene is used for external plumbing and heating; they are also not difficult to work with and are more aesthetically pleasing. When installing pipes in cottages, polypropylene pipes are most often used. 85-90% of cottage owners choose them. When installing heating, pipes made of reinforced polypropylene are used.
Installation of copper pipes
Installation of copper pipes is carried out when laying heating and water supply pipes, mainly in apartments and country houses. Despite the higher cost, copper pipes are very popular due to their high technical characteristics and durability (the service life of copper pipes is more than 50 years).
Let's consider this example: you don't want to change the radiator, but the pipe going to the neighbors from above has already served its purpose, and the section from the ceiling to the radiator needs to be replaced. Find out if there is water in the system, and be sure to ask your neighbors above and below if they have replaced the radiators, is the original pipe still in place, or is it polypropylene? It is necessary to find out if heating radiators are installed in a new way. and connected with polypropylene transition couplings, then when you cut the pipe and start threading, the pipe in the ceiling may turn, and you will also redo it for your neighbor.
1 example. The neighbor above has radiators lined with polypropylene. You also need to run the riser with the same pipes (for heating, use only “shtabi” pipes) and the same diameter. We cut off the iron pipe, cut off the transition coupling, pull the pipe out of the ceiling, insert a polypropylene pipe into the ceiling, and solder to the neighbor through the polypropylene coupling,
the same as when replacing water pipes. Don't forget to remove the foil layer with a special stripper on the stacked pipe (soldering polypropylene pipes). If your radiators are connected without a jumper, then it’s easier, unscrew the rest of the pipe from the radiator, screw in a faucet with an American connection, screw the adapter into the faucet and solder it to the riser. If the radiator is of the chord type, then cut a thread on the pipe, screw in the tap, screw the adapter onto the American one, and solder it to the heating riser in the same way. If the connection to the battery is with a jumper, then do the same as when installing a radiator (correct installation of heating radiators).
When replacing old heating systems, more and more people are choosing polypropylene products.
Polypropylene pipes are especially distinguished by their ease of installation combined with sufficient practicality of the products.
Polypropylene has a number of advantages over metal:
- corrosion resistance;
- high strength, while it is several times lighter than metal;
- the inner surface of the pipes is protected from the formation of lime deposits;
- the material is heat-saving;
- does not affect the chemical composition of water;
- absence of water noise as it passes through the pipes;
- long service life without the need for repairs;
- aesthetic appearance;
- relative ease of installation.
Non-standard situations
An unpleasant situation can happen when, when dismantling cast iron batteries, the bottom of the plug breaks off and the thread remains inside.
Proceed as follows:
- the collector is heated;
- put a chisel to the part in the direction of unscrewing it and try to turn it with a hammer;
- As soon as the edge of the thread is stuck out, it is turned out with pliers.
It is often necessary to remove old rusty batteries in which the threaded connection is corroded or even perforated.
In this situation, you need to do the following:
- “arm yourself” with a coupling made of brass or cast iron of the required diameter;
- cut off the thread from the liner, but leave the first five turns;
- drive the thread with a die;
- wrap the threads with plumbing linen soaked in paint (organic solvent), which dries quickly;
- screw on the prepared coupling;
- Now the wound thread is screwed into the coupling, and the problem is solved.
Professional replacement of pipes in your apartment
Any water system, having served its life, requires replacement. This replacement of water pipes in an apartment is caused by several reasons:
— the presence of a large number of leaks;
- abundant sediment of salts and oxides;
- rust;
— low quality water at the outlet;
— incorrect laying and wiring;
— inconvenient and unaesthetic arrangement of pipes.
An old and clogged water supply is not only inconvenient, but also dangerous. Rust and salt deposits in pipes, even with very good filters, enter the body along with water. A dirty pipeline can lead to indigestion and infectious diseases if E. coli enters through microcracks in the pipe walls. Such water supply is especially dangerous in hot weather.
Replacing the water supply system in your apartment will help you get rid of all the troubles with drinking water, which will be carried out quickly and efficiently by qualified specialists of our company.
Modern pipes are more environmentally friendly and easier to install. They do not accumulate rust, almost no salts are deposited, they will last for many years, providing the apartment with clean water.
Our specialists work with any pipes. For this, there is the necessary equipment and tools for welding, gluing or soldering pipes, depending on their type.
What sets our company apart from others
There are several reasons that make people turn to us:
- extensive experience of our craftsmen - we can perform all plumbing work without exception;
- commitment - having taken on a job, we bring it to the end;
- responsibility – we are responsible for the quality of our work;
- reasonable prices - we do not inflate prices so that our services are accessible to everyone;
- efficiency – we do our work not only efficiently, but also quickly;
- politeness – our dispatchers respect their clients, they will politely and thoroughly answer all your questions asked by phone;
- preliminary agreement – you can agree with us in advance about any plumbing work in your home, our specialists will carry it out at a time convenient for you.
By choosing our company, you can be sure that all work will be completed with high quality and on time.
Creation of new heating
Installation of a new structure for conducting heat into the room is carried out using several schemes: single-pipe and two-pipe wiring. The latter option is considered more effective and reliable.
If the work is carried out in a private house, you will need to first install the boiler. Connection of heating and gas equipment can only be carried out by a specialist. After equipping the boiler room, it is necessary to mark out the future heating structure as a whole. Further work is carried out according to the following scheme:
- Connection of riser pipes with intermediate pipes to radiators is carried out;
- Bimetallic radiators are being installed. Before mounting the battery on the wall, you can glue a sheet of foil to reduce heat loss. You can also create a canopy on the battery that will protect the window sill from heating and allow hot air to be directed directly into the room;
- To connect plastic pipes, fittings are used, which must first be treated with sealant;
- Before pulling the pipes, wrap the end with film to prevent dirt from getting inside;
- Next, the system is filled with water and passes through all elements under maximum pressure;
- In new houses, they began to replace water with antifreeze in the heating system. The liquid is resistant to low temperatures. It does not freeze even at -50 degrees.
Installation of a new heating structure
The assembled structure must be checked. For this purpose, a special device is used - a presser. It creates increased pressure in the system to check the reliability and tightness of joints and pipes. If the sensor readings did not change during the test, then the tests were successful and there will be no leaks.
Using the information provided, you can replace and make a new high-quality heating system yourself.
When is heating removal necessary?
Partial or complete reconstruction of the system may be necessary in the event of a malfunction, defects or malfunctions. A private house needs to modernize the system when additional areas that need heating appear. And the apartment is often cold, in which case the owner can, with the written permission of the competent authorities, install an additional radiator. Dismantling steel heating pipes may be necessary in order to replace them with more modern plastic pipes that do not corrode. In the case of a complete redevelopment, both a private house and an apartment also need to change the heating system.
Dismantling old pipes and risers
Emergency replacement of heating risers is the most unpleasant and difficult case. According to the law, repairs must be carried out by the management company, but if this is your personal desire, you will need to comply with some rules.
If you are going to change the riser and the entire system inside the apartment. You will need permission from your neighbors, and you must notify them and the utility company about the upcoming repairs. In cases where the waste structure is changed from a valve indoors, no permit is required. Dismantling the old system is carried out in the following sequence:
- Liquid is drained from all pipes and batteries and the water supply is shut off;
- If the pipeline is made of metal, you will need a grinder, which is used to cut off old products. When the riser is replaced on all floors, it must be cut so that the structure does not crack and is easy to remove;
- Old radiators are disconnected from the pipeline using wrenches.
These steps will help you remove unnecessary elements and allow you to proceed with installing a new system.
Installation of continuous and blind plugs
Blind plugs are used if it is necessary to close further passage of the coolant.
The grouping of sectional collectors is completed by installing bushings in the required combination, which depends on the layout. Traffic jams can be either solid or through. Blind elements do not have through holes, and external threads do not differ from through threads.
Pass-through products are distinguished by a central hole. Both types are available with left and right threaded turns, since the battery section has two corresponding inputs. You can turn the bushing on a lathe from steel, cast iron or brass.
Materials
Steel. Reliable and the cheapest material available on the market. When used in combination with HMS, it is almost eternal. HMS is a system that prevents impurities contained in the coolant from settling on the inner surface of the pipes.
But when using metal pipes, there are several obstacles that are difficult to overcome on your own:
- tools are needed: a welding machine, pipe dies, a pipe bender, etc. - they will need to be either purchased or rented.
- You will need the ability to perform high-quality pipe welding, otherwise you will have to hire a specialist;
Polypropylene (PRP). Replacing the heating system with polypropylene is a worthy alternative to steel pipes. In terms of its characteristics, PRP is in no way inferior to them. In multi-storey buildings it is also valuable because the material does not transmit sound to all floors when hitting the pipes. The only thing you should remember is that the pipes should not be water pipes, but special ones for heating systems (pressure marking PN25 and higher).
Polypropylene pipes - Photo 2
https://youtube.com/watch?v=fKf2kG7gHvw
Important! It is not recommended to purchase fittings and pipes from different manufacturers. It may turn out that it will take different temperatures and times to melt them
The connection may become problematic.
Other polymers. Here we can definitely say that replacing heating in an apartment using pipes made of modified polyethylene (PER) is categorically not recommended. This material has a fundamental drawback - a very low softening point, only 65 degrees. In addition, due to its high “slipperiness”, metal fittings are poorly fixed on it and leaks often occur. Such pipes do not serve for more than 10 years - this is for the middle zone, and even less in high latitudes.
Metal-plastic. Slightly more expensive than PRP pipes. In addition, this material also has technical disadvantages: it is afraid of shocks, fitting connections often leak for no apparent reason, large heat losses in the mains due to the small thickness of the pipe walls. However, installing a heating system with your own hands using such pipes is beneficial: they bend easily without the use of tools, therefore, you can save on buying expensive fittings, and you can not pay attention to heat loss - it will not go anywhere - it will remain inside the apartment.
Copper. No matter what anyone says, copper cannot be used in heating systems. It's not even a matter of the high cost of non-ferrous metal - the main problem is in soldering, or more precisely in tin, a component of solder. During operation, it changes its structure and connections become unreliable and fragile. And at high temperatures this process only accelerates.
Copper pipes - Photo 3
Summarize. The optimal choice for apartments in high-rise buildings would be polypropylene risers and the same or metal-plastic wiring.
Before purchasing materials, it is necessary to finally decide what type of installation of the heating system was in the apartment and options for laying heating pipes. As for the schemes, there are only two of them: one-pipe and two-pipe, and it is impossible to change them in an already built house or in a separate apartment. There is a choice when it comes to routing options. If, simultaneously with the replacement of pipes, repairs are carried out with the opening of the floors, then hidden wiring can be made under the floor. After this, it will become clear how much and what materials you need to buy.
Important! Simultaneously with the purchase of pipes, it is necessary to purchase shut-off valves, one tap for the supply and return of each heating device. This will make it possible, if necessary, to replace radiators without shutting down the entire system.
First steps in the event of an emergency
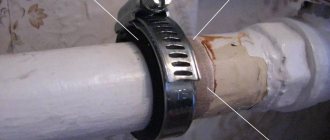
How to wrap a heating pipe? If you have a couple of clamps with rubber seals in stock at home, you can prevent some emergency situations. In the event of an accident, the most important thing to do is to shut off the coolant supply to the area where the heating pipe is leaking.
Covering the heating riser of a multi-storey building
You will need to stop the heating boiler, turn off the pump and turn off the necessary taps and valves. The clamp will solve the problem temporarily, so repairs will still be inevitable. Before you begin the repair, you will need to prepare the necessary materials and tools, turn off the heating, turn off all taps and drain the water from the system. Depending on the material from which the pipes are made, repairs can be carried out in various ways.
Step-by-step instructions for replacing the radiator
It doesn’t matter who installs the radiator - you yourself or a specialist. Everyone should read the replacement instructions. In the first case, the algorithm is needed for the correctness of the procedure, in the second, to understand how much time is spent on the work.
Do-it-yourself installation of heating radiators. Apartment renovation in a new building
Replacing radiators with shut-off valves
Replacement takes no more than 20 minutes. The easiest replacement option. Below are detailed instructions.
- Turn off the taps.
- Place a container under the bottom faucet and spread any moisture-absorbing rag on the floor.
- Open the Mayevsky tap, which is located at the top of the battery (but on older models it may not be there at all).
- Using a lever wrench, begin to unscrew the lower connection little by little.
- Drain the coolant from the radiator. Each compartment contains from 170 to 400 ml of liquid. Take this point into account when preparing the container for draining.
- Disconnect the battery completely.
- Assemble a new heating device. Install the plug, threaded adapters and Mayevsky tap.
- Without installing new gaskets, attach the new radiator. Place a support under the device - you cannot hang the battery with the support only on the pipes.
- Make markings for fastening, but only if you need to replace them.
- Install the brackets.
- Hang the radiator, check the horizontal installation using a building level.
- Take new gaskets for the “American”, screw on the new heating device. Do not use brute physical force. After the union nut has taken its working position, turn it 3/4 of a turn.
- Open the supply valve and check for leaks. This stage is relevant for private and multi-storey buildings during the heating period. If the batteries were changed during the warm season, then it is better to leave the taps in the closed position.
- Release the air from the heating device using the Mayevsky tap.
If the replacement work was carried out in the warm season, then on the day of pressure testing, open the taps and check the connections for leaks, bleed the air. Carry out the same operations at the beginning of the heating season.
You can find out when the pressure testing will be carried out by visiting in person (or calling) the office of the management company.
Features of markings and fastening schemes
Batteries are heavy. The reason for this is the material from which the device and coolant are made. Simply hanging the battery on the supply pipes is prohibited. Brackets are required for wall mounting.
Cast iron models can be equipped with legs for installation on the floor covering.
Professional craftsmen recommend using 2 fasteners for attaching radiators of up to 8 sections, which are installed under the upper manifold. If there are more than 8 compartments, then increase the number of supports. Perform the calculation as follows: 1 bracket for 5 sections.
It is recommended to install hooks at the bottom of the heater. This method helps to completely eliminate vibration coming from the coolant ceiling and extend the life of the radiator.
If only one battery needs to be replaced, mark the mounting location using a level. If you need to mount several batteries, you need to develop a template.
How to make a template is shown in the video:
Replacing heating radiators from A to Z
Replacing old radiators without taps
It is quite difficult to dismantle old radiators that were made of cast iron during the Soviet years. In this case, during work you must be careful and follow these instructions. The radiator itself is connected to a steel pipeline, which complicates the replacement task.
The algorithm in this case is as follows:
- Drain the water from the riser. You won’t be able to do this yourself in an apartment building. You will need to contact the management company. The work will be carried out by locksmiths, for a fee. The price varies depending on the region - from 200 to 1200 rubles. for one riser.
- Prepare a drainage bucket (or other container) and an absorbent rag.
- Try unscrewing the locknut and bushing. Do this in such a way as not to damage the pipeline.
- Remove the radiator by cutting the pipes using a grinder.
- Cut a new thread on the pipe. For this work you will need a clamp with a ratchet. Screw the shut-off valves onto the finished threads. They can be replaced by a thermostat.
- Try on the radiator, make markings, secure the brackets.
- Screw the battery on and check for leaks.
- Paint the pipe sections.
- Try starting the system.
- Release the air.
There are several tools you can use when cutting a pipe:
- the cutter is ready, but a lot of burning and smoke will be released;
- grinder, it's sparks, a burning smell and a smoke screen;
- an electric reciprocating saw for metal (power is selected depending on the thickness of the pipe), this does not create dust and dirt;
- a metal file that silently cuts pipes of any diameter.
If couplings are installed, then there is no need to cut the pipes at all. Just mark and cut.
Replacing central heating radiator
How to use plumbing flax correctly?
At the moment of connecting the tap to the thread on the steel tube, plumbing flax or another name “tow” is used as a seal. The material is not picky, but the efficiency of the radiator depends on its correct use.
How to work with sanitary flax:
- Take a needle file or a small triangular file. Make notches on the thread. The magazine elements already have such notches.
- Clean the threads from plaque, dirt, and dust using a metal brush.
- Determine in which direction the thread will be located.
- Apply a thin layer of plumbing paste.
- Separate a strand about 35 cm long from a common skein of flax. This is enough for a thread up to 2.5 cm. Straighten the piece into a flat strip.
- Press the tow with your finger against the winding and wind the section in the direction of the thread with one strand.
- Seal with your finger.
- Apply a thin layer of plumbing paste.
- Screw the desired part onto the thread.
An alternative option would be to use fluoroplastic tape. Where the pressure is low, the material will last about 10 years, but for apartments in multi-storey buildings this method is not practical.
System test
Tests can be carried out in the presence of housing office workers or independently. Algorithm:
- Resume the supply of coolant to the riser.
- From the new radiator, begin to gradually release air using the Mayevsky tap. After water comes out instead of air, this will mean that the coolant has reached the room.
- Close the Mayevsky tap. Open the tap that is responsible for letting water into the battery.
- Wait a few minutes. This is necessary to ensure that the radiator is accurately filled with liquid.
If there are no leaks or strange phenomena, then the replacement was carried out correctly.
In cases where replacement work was carried out in the summer, it is better to close the taps after checking. Otherwise, the water in the radiator may begin to have a negative effect on the device. At the beginning of the heating season, open the taps again and let water into the radiator.
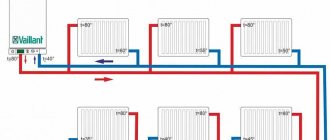
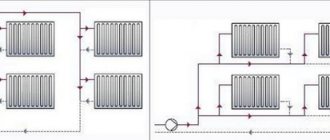
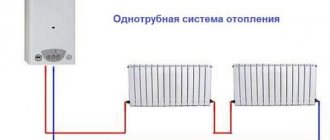
Features of installation of one-pipe and two-pipe heating systems
Before you start laying the pipeline, it is worth deciding which of the two heating schemes will be implemented in the apartment: one-pipe or two-pipe. Each option has the right to exist and has its own strengths and weaknesses:
- A single-pipe system assumes the presence of a single pipeline through which the media circulates. The heating of radiators in such a scheme occurs unevenly, since the carrier reaches the furthest fuel elements when it has already cooled down greatly. But you will definitely be able to save on the implementation of such a project, since much less pipes and connecting elements will be required.
- A two-pipe heating system has two working circuits through which the media circulates. Through the first (supply) hot water flows into the radiators, through the second, the cooled medium is collected from the radiators and removed for subsequent heating. In such a system, you can replace one or more elements at any time without disconnecting the entire riser. However, for all these advantages you will have to pay for double the number of pipes, taps and connecting elements.
We recommend that you read: Which gutters for water collection should you prefer: metal or plastic?