Thermocouples (TC) function in many thermal processes as primary temperature sensors of an automatic safety and control system. At household heat power facilities, they are installed to protect burners from flame separation on gas boilers, water heaters and stoves, for cooking.
They operate in the high-temperature zone of the gas torch, and therefore may fail. At the same time, the automatic safety system instantly turns off gas-using equipment. In order to ensure trouble-free and long-term operation of gas stoves, water heaters and boilers, it is necessary to exclude false triggering of the protection, and you also need to know how to test a thermocouple with a multimeter. This can be done at home without any problems.
Why is a thermocouple needed in a gas boiler?
A thermocouple (also known as a thermoelectric thermometer) is a control and measuring module that, when heated, produces a low voltage, which is sufficient to hold the gas supply solenoid valve in the open position. In fact, a thermocouple is needed solely for safety reasons: as soon as for some reason (for example, due to reverse draft) combustion stops in the combustion chamber of the boiler, the thermocouple will not be able to keep the gas supply valve open, the fuel supply will stop, gas leaks into the premises will be prevented.
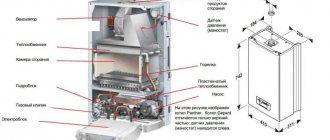
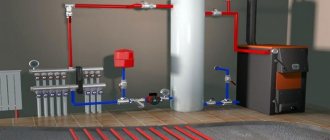
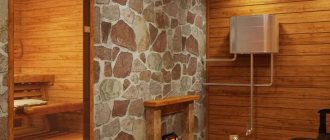
The photo shows the standard location of the thermocouple in a gas boiler. It can be identified by its copper tube.
In addition to gas boilers, thermoelectric sensors are used in household gas stoves, stoves, and water heaters. Therefore, when choosing, it is necessary to select a thermocouple specifically for gas boilers, or more precisely for a specific model of boiler unit or automation (usually the Italian automatic EuroSit 630 and its analogues).
Types of temperature sensors
In the production of thermoelectric sensors, various alloys of noble and ordinary metals are used. For certain temperature ranges, specific categories of metal are used.
Based on the metal vapors used in production, thermocouples are divided into a number of types. The following types of pairs are most commonly used to operate gas stoves:
- Type E, production mark THKn, made of chromel and constantan, for operating temperatures from 0 to 600 C.
- Type J - an alloy of iron and constantan, grade TZhK, for operating temperatures from -100 to 1200 C.
- Type K, brand TXA, is produced on the basis of chromel and alumel plates, for operating temperatures from -200 to 1350 C.
- Type L, THK grade, is produced on the basis of chromel and copel plates, for operating temperatures from -200 to 850 C.
In the protective systems of columns, stoves and boilers operating on gas fuel, TXA temperature sensors of types K/L/J are usually used. Thermocouples made of precious metal alloys are produced for significant temperature conditions that are achievable in metallurgical production and energy.
Design and principle of operation
It is known that in a closed circuit, which consists of two conductors of different metals (for example, chromel and copel), a thermoelectromotive force (EMF) arises, provided that their hot and cold junctions have different temperatures (Seebeck effect). The value of the EMF depends on the materials of the conductors, the temperatures of their cold and hot junctions.
Typically, the voltage of a household thermocouple is in the range of 20-60 millivolts (mV), which is enough to open the gas valve, but, of course, not enough to operate complex automation and other modules that already require an electrical connection.
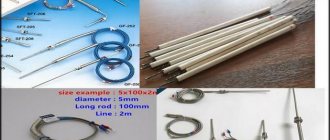
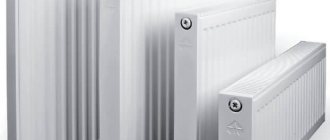
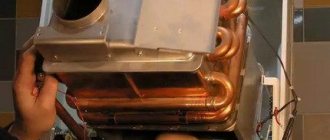
This is what a standard thermocouple looks like in the photo.
The module is not limited to a pair of junctions, but the thermocouple device is quite simple and understandable:
- The sleeve, inside of which there are thermoelectrodes with the “hot” junction of the conductors, is what is attached to the burner module of the boiler, next to the pilot burner (igniter).
- An extension cord, protected by a copper tube from external influence of electromagnetic fields, is used to connect the working part (hot junction) with the electromagnetic gas valve.
- A dielectric washer with a “cold” junction, it is this that is inserted into the socket of the gas solenoid valve.
Most often, thermocouples of domestic gas boilers use junctions made of chromel and alumel (TCA), chromel and copel (TCC), and iron and constantan (TLC). All alloys used, their markings and characteristics are listed in the table below.
| Thermocouple type (European classification) | Junction conductor materials | Russian markings | Temperature range, °C |
| K | chromel-alumel | THA | -200 – 1 300 |
| L | chromel-copel | THC | -200 – 850 |
| J | iron-constantan | TZHK | -100 – 1 200 |
| N | nikhrosil-nisil | TNN | -200 – 1 300 |
| T | copper-constantan | TMKn | -200 – 400 |
| E | chromel-constantan | THKn | 0 – 600 |
| S | platinum-rhodium-platinum | TPP10 | 0 – 1 700 |
How does a thermoelectric thermometer work as part of a gas boiler?
The operating principle of a thermocouple in a gas boiler is the same everywhere:
- First, a person mechanically opens the gas supply valve by holding the solenoid valve button for 15-30 seconds.
- Then the piezo ignition button is pressed once, a spark appears and the pilot burner lights up.
- The magnetic valve button is held down for another 30-60 seconds until the working junction of the thermocouple, located next to the igniter, heats up and produces the required voltage.
- After 30-60 seconds, the solenoid valve button is released, but combustion continues as the heated thermocouple produces enough voltage to hold the gas valve open. The boiler operates normally, without human intervention.
- Once combustion stops, the flame no longer heats the thermocouple, causing the voltage to be insufficient to hold the gas solenoid valve open and it closes, stopping the flow of gas.
What is a thermocouple
A thermocouple is a device consisting of soldered dissimilar conductors or semiconductors that form a single electrical circuit. TC works on the basis of the thermoelectric effect known as the “Seebeck effect”.
An effect when two dissimilar metals welded together at a certain temperature generate a voltage proportional to the resulting thermal energy. The higher the temperature difference at the junction point, the more the thermocouple produces E.M.F.
Instructions for diagnostics, repair and replacement
How to test a thermocouple for functionality
It is often possible to determine that the thermocouple is faulty even visually, without disassembling the boiler. During ignition, after releasing the solenoid valve button, it will not remain in the clamped position, since the solenoid valve does not receive the minimum required voltage. The valve will close and the gas supply will stop.
You can bypass the thermocouple by holding the button with a heavy object or taping it with tape, which is often done in practice. However, we strongly do not recommend doing this, because if the flame dies out, for example, when blown out by the wind, the supply will remain open, the gas will not be burned and will enter the room, which will cause an emergency. You can resort to such a bypass only temporarily, until the arrival of a specialist or a spare module, by constantly being at the boiler and monitoring the presence of a flame.
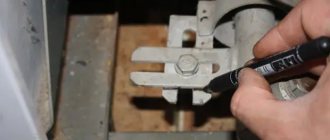
To ensure that it is working properly or malfunctioning, you should check the thermocouple with a multimeter (tester) set to mV or a voltmeter:
How and in what cases can it be restored?
The thermocouple is designed in such a way that any damage or contamination can reduce the voltage it produces below a critical level. A very common cause of malfunction is carbon deposits or a layer of soot on its working (heated) part. To restore the thermocouple, just clean it with a soft brush or cotton wool and alcohol, while avoiding scratches and other damage. After cleaning, it is worth checking the voltage again following the instructions above.
Oxidized contacts are also a common cause; they can be carefully treated with sandpaper. If the thermocouple has a deep black dent or hole due to burning, it is guaranteed to need to be replaced.
Repair and replacement of thermocouple for gas stove
Household gas equipment poses a high risk. Often the open fire of ovens and stoves may go out due to a draft or gas supply being cut off. To prevent leakage and gas supply, thermocouples are installed on the plates. Next, the topic will be covered: what is a thermocouple for a gas stove, the principle of operation, the main malfunctions and testing of this equipment. A description of how to do it yourself will also be given.
Possible malfunctions and methods for eliminating them
If, when you press the gas supply button, the burner turns on and immediately goes out, this indicates a malfunction of the thermocouple. It may also be the result of poor contact between the converter and the solenoid valve.
Repairing a gas boiler thermocouple malfunction is as follows:
- remove the end of the thermocouple by unscrewing the clamping nut with a wrench, with which the transducer is attached to the valve;
- if upon inspection the presence of contaminants or oxides is detected, clean the contact area with fine sandpaper;
- Next, use a multimeter to check the functionality of the device.
If, when checking, the sensor shows a voltage of 50 mV, you can try to start the boiler. If the problem persists and the burner goes out, this may indicate a faulty solenoid valve.
If the valve is in working condition, it is necessary to ensure the correct connection of the converter to the valve: find the appropriate position of the clamping nut for optimal contact.
You should know that if the gas boiler converter fails, the device cannot be restored. Here it is necessary to replace the thermocouple by installing a new sample in its place. Products in this category are offered by many domestic and foreign manufacturers, including Arbat, Zhukovsky AOGV plant, Honeywell concern and other industrial companies. The price range for this device varies between 600-2000 rubles.
The main areas of application of thermocouples are automation of gas equipment, foundry industry installations and many other areas of production. Based on this device, a whole range of thermostats and thermometers for household and industrial use has been developed. In the hands of folk craftsmen, a thermoelectric converter can become the basis for a mini power station; it is used to create chargers with which you can charge low-power devices from an open fire, including from a fire.
Device
The thermocouple for the oven and gas stove is designed according to the Seebeck principle. The scientist has found a way to produce a small fraction of electric current by heating various metals. The thermocouple consists of the following elements:
- Working tip with 2 types of metals inside. It is this part that is in direct contact with the open flame.
- Contact tube up to 1.5 meters long. This is the electrically conductive contact from the tip to the bolt mechanism.
- Solenoid valve. A mechanism that opens and shuts off the gas supply to the burners and oven. The valve is metal. Raised by magnetic attraction.
There are 2 main types of this device:
- Ungrounded. This type of pair has a split-coated tip. This approach made it possible to reduce susceptibility to external electromagnetic vibrations. The disadvantage is the connection method. Often the two halves are joined together by soldering or crimping. Both options lose their tightness with frequent and prolonged heating, due to an increase in volume.
- Grounded. A more common type of device. The tip is not separated by an insulating coating. This affected the sensitivity of the tip to electromagnetic vibrations from extraneous sources. Microwave ovens must not be installed near the oven. The electromagnetic field can cause the valve to open. Despite this, grounded thermocouples are the most reliable.
Principle of operation
A thermocouple is a fairly simple device. The working principle of a thermocouple can be explained as follows:
- The tip is located near an open flame.
- As soon as the gas stove or oven is turned on, the metal rods heat up and create an electric current.
- Current flows through the tube and enters the temperature sensor.
- An electromagnetic field is created in the sensor, which lifts the valve, opening the flow of gas to the burners.
If the flame goes out without human control, the thermocouple cools and the electrical voltage disappears. The electromagnetic field also disappears, thereby closing the valve. The flow of gas into the system is blocked.
Thermocouples are most often installed inside ovens. This is necessary due to the lack of visual control of the flame. This gas monitoring device has a number of advantages:
- High accuracy.
- Long working period.
- Easy to install, replace, maintain.
The gas supply control device is reliable and durable. But it also has its service life.
Malfunctions
Determining a malfunction of a gas control element is quite simple. A faulty sensor has the following symptoms:
- When the burner is turned on, the flame does not light up. The reason is the gas supply valve has not opened. If the stove is equipped with a push-button switch, the button will press back immediately after pressing.
- After switching on, the flame burns for a short time and goes out again. The reason is the same. On plates with push-button control, shutdown will occur immediately after pressing.
So, there are only two reasons and both lead to the valve. Subsequent testing is necessary to determine the problem.
Examination
Checking the thermocouple for functionality is quite simple. To do this, you must first dismantle the element. You can clean it before dismantling. It is performed as follows:
- It is necessary to clean the tip body using sandpaper. Accumulated carbon deposits do not allow heat to pass through, which leads to prolonged heating of the thermoelement.
- You also need to check all electrical contact connections. Often, when several burners are turned on, the temperature rises, which melts the insulation of the wires. Uninsulated wires may touch the stove body, creating a short circuit.
- It is worth paying attention to the rigidity of the shrinkage of the terminals. Heating the copper tips can reduce contact with the conductor, causing the valve to simply not receive voltage to create a magnetic field.
- After cleaning, you need to turn on the stove again. If the problem remains the same, the thermocouple must be removed.
Often, one stove has thermocouples installed on all burners and inside the cabinet. If cleaning does not lead to the desired result, you will have to dismantle and check all the elements.
- Close the main gas supply valve.
- Understand the top panel of the slab.
- If the device is located inside the oven, remove the door.
- Find the solenoid valve.
- Using a wrench, disconnect the element from the valve body. Gas regulators have different connections, simple fitting or in the form of terminals. The terminals must be disconnected carefully so as not to break the protruding tip. It will not be possible to restore it.
Next, you just need to inspect the surface of the element. If it is damaged, no inspection will be required. The part will have to be replaced. It is impossible to repair a melted pair. If the case is intact, you will need to check with a multimeter:
- Set the multimeter to the mode for measuring the minimum constant electrical voltage.
- The tube has a conductive contact; you need to connect the “+” probe of the multimeter to it.
- Connect the minus probe to the element body.
- Heat the tip over an open flame.
How temperature is measured with a multimeter, how to check a temperature sensor with a tester
Multimeters are universal instruments for measuring various indicators of electrical equipment. Most often they are used for work by electricians, but sometimes they are used to measure temperature. This is possible if the device has the appropriate functions, or if it is possible to attach a microcircuit to it.
Basic moments
A multimeter is used as a thermometer if it is necessary to measure temperature in difficult conditions - an open flame, toxic substances, difficult access to an object, an object that is too hot.
Many multimeters have a built-in temperature measurement function. In this case, using the device is not difficult, since you do not have to make any changes to its design, you just need to figure out which mode to choose. Usually this mode is marked with the letters “temp”, and the multimeter comes with a thermocouple, which is a wire with a sensor. There are two sockets on the housing to connect a thermocouple.
Most testers are capable of working with temperatures ranging from -40 to 1000 degrees Celsius. If you have purchased an inexpensive multimeter, you should pay attention to which thermocouple is included. The fact is that most multimeters have fairly thin wires that can melt when exposed to temperatures above 250 °C. It is also necessary to pay attention to whether it is possible to measure the temperature of liquids or only gases.
If you are going to work with high temperatures, then it is better to replace the standard thermocouple with a special one, the design of which is designed for measurements in more difficult conditions.
For some devices, you will need to use a special adapter, since multimeters have single inputs, and a professional thermocouple has a miniature plug. After connecting the thermocouple, you must select the temperature measurement mode: it can be in degrees Celsius or Fahrenheit.
In order to find out what the temperature is, you need to touch the tip of the thermocouple to the object of interest. The data will immediately appear on the electronic display.
The duration of contact with the object is only 2-3 seconds; for accurate measurements, the contact must be tight. You can check if your multimeter is working correctly by comparing its readings with those of a thermometer. It is also important to monitor the polarity of the thermocouple connection.
No special mode
Is it possible to measure temperature with a multimeter that does not have a special mode for this? It turns out that this can really be done, but the device will need to be slightly upgraded. You need to purchase an LM-35 microcircuit, with its help the temperature readings will be converted into voltage, and the device will be able to recognize the data, but will indicate them in Volts. For example, 0.30 Volts will need to be understood as 30 degrees Celsius.
The use of a microcircuit does not require complex intervention in the design of the device and allows you to use any multimeter to measure temperature. In order for the chip to work, you will need:
- three wires that can be connected to the 10-ohm output of the device;
- a separate power source of at least 4 Volts, that is, 2 flat batteries.
If you need to measure not only positive, but also negative temperatures, you will also need to connect a reference voltage source.
The microcircuit itself is easy to connect. It has three connectors for positive and negative wires and an output sensor. This approach will allow you to transform any multimeter, making it more functional, while the design will be inexpensive.
Checking the temperature sensor with a tester
The question of how to check a temperature sensor with a tester is quite relevant for motorists. In order to carry out the necessary measurements, you can use any multimeter; in addition, you will need to remove the sensor itself and prepare a kettle of water. The sensor will need to be immersed in boiling water (the liquid temperature is always 100 °C). It is most convenient to secure the wires coming from the sensor with crocodile clips and connect them to the measuring device. After this, the multimeter must be set to current resistance measurement mode.
If the resistance readings of the sensor when exposed to a temperature of 100° do not exceed 210 Ohms, then the sensor can be safely changed, since its readings are incorrect. With such sensor resistance, you will encounter the fact that your car will boil regularly. By using a multimeter, you will eliminate the need to disassemble the cylinder head and carry out complex repairs, quickly identifying the cause of the problem at home. You can also choose the sensor that will display the data correctly.
Which device to choose
In principle, it is possible to measure temperature with any multimeter, but there are several important nuances. Before purchasing, you need to pay attention not only to the price, but also to the quality. It will be much more convenient if the multimeter is initially designed to measure different temperature ranges and has a special mode for this. Then you won’t have to modify it using additional devices.
The higher the functionality of the device, the more convenient and useful it is to use. It is better to purchase a device from a trusted store, since quite a lot of products from even well-known companies are counterfeited, not to mention unscrupulous manufacturers offering low-quality products. It is better to overpay a little, but have a guarantee of the reliability of the purchased tester.
Standard functions of the devices include the ability to measure voltage, resistance, DC and AC current.
Most models will allow you to ring the chain. The price often depends on what kind of display the tester has. If this is a regular screen with numbers, the device will cost less than an analogue with a full color display and the ability to control it.
The choice of multimeters is quite wide. You can always choose the right device based on functionality, price and quality. The device will become indispensable in many situations; it will help check not only the condition of wiring, but also many parts of various electrical appliances.
evosnab.ru
Replacement
Replacing the thermocouple in a gas stove should only be performed at a specialized center. But it is quite easy to do it yourself, subject to strict safety measures. Before replacing the gas stove thermocouple, you must purchase it. The element body is marked with an English letter. It is this marking that indicates the chemical composition of the rods inside the housing. Installing an element with a different composition may affect the valve opening or closing time and the overall sensitivity of the part. Also, parts with different markings may have connecting parts, thickness and length of the tube that differ from the original. You need to purchase a complete analogue. Next you need:
- Unplug the stove from the electrical outlet.
- Turn off the gas supply at the main valve.
- Remove the top panel of the gas stove.
- Disconnect the thermocouple from the mount. The tip is constantly at high temperature and may be difficult to unscrew. Before dismantling, it is better to use a rust remover. It is strictly prohibited to bend or break the fastener.
- Replace the faulty part with a new one.
- Reassemble the plate in reverse order.
- Connect the oven to electricity.
- Open the gas supply.
- Check the operation of the device.
Before changing the thermocouple, be sure to protect yourself from gas leaks and electric shock.
When purchasing a new part to replace an old one, you need to pay attention to the length of the conductive tube. It must be identical to the factory counterpart. When installing on a gas stove, it is necessary to install the tube at the mounting points; it should not dangle, sag, or be located near the flame.
Also, when installing the thermocouple tip, you must maintain the distance between it and the burner. A close location will significantly reduce the service life of the part; if the location exceeds 1 cm, this can lead to problems with gas ignition.
Adviсe
Operation and subsequent repair of the thermocouple must be carried out in compliance with safety precautions.
- It is necessary to respond promptly to a gas leak. Even new gas protection may not work. This happens due to debris getting into the bolt seat. Debris appears in the gas supply system due to poor quality pipe repairs.
- Do not cool the thermocouple with water. A sudden change in temperature can destroy the rods that form the current.
- It is prohibited to operate thermocouples with adhered food or carbon deposits. Foreign coatings retain high temperatures. After turning off the stove, the shutter mechanism will not work, which will lead to a gas leak.
- After replacing the element, you need to monitor its operation for several days.
- It is prohibited to purchase parts from unknown manufacturers or low-quality counterfeits. For a new pair, it is better to contact a specialized store or service center of the gas stove manufacturer.
- If you have doubts that you will be able to check or replace the thermocouple yourself, it is better to entrust this to specialists and take the stove to a service center.
Replacing a thermocouple is an easy but very responsible process. Do not neglect simple safety rules.
Why do you need to check thermocouples?
Any power unit will be switched off in an emergency if the temperature sensor does not work. Replacing a thermocouple is an expensive process, especially since it is not needed in all cases. To exclude false triggering of the safety automatics by the flame, it is better to check the TP. Restoring its functionality begins with a visual inspection of the thermocouple.
As a rule, it fails due to the thermal indicator burnout, which happens quite often in boilers. In this case, a black dent or even a through hole can be found on the surface of the sensor. In this case, such a meter is immediately rejected and a new one will need to be installed.
Important! In some cases, the thermocouple has no external deviations. In this case, its performance can only be checked using a multimeter.