The use of boreholes and wells for water collection, in the absence of a central water supply in suburban areas, is the only solution to the problem of providing drinking water. The water in the source is not always located close to the surface - to obtain it, you have to install submersible pumping equipment and connect the deep pump to the water supply system.
The electric pump cannot operate continuously, supplying water to the main; to automate its operating mode and reduce the load on the water line during on and off cycles, automatic equipment consisting of several devices is installed.
Rice. 1 Lowering a deep-well electric pump into a well
What are the benefits of pump heating systems?
30 years ago, so-called steam heating was common in private homes, where the coolant circulated through pipes and radiators by gravity, and the heat source was a gas boiler or wood stove. Pumps for pumping water were used in district heating networks. When compact circulation pumps for heating appeared, they migrated to private housing construction, as they provided the following advantages:
- The speed of coolant movement has increased. The heat generated by the boiler has become faster delivered to the radiators and transferred to the premises.
- Accordingly, the process of heating the house has accelerated significantly.
- The higher the flow rate, the greater the throughput of the pipe. This means that the same amount of heat can be delivered to rooms through lines of smaller diameter. Simply put, the pipelines have become half the size thanks to the forced circulation of water from the pump, which is cheaper and more practical.
- Highways can now be laid with a minimum slope and water heating circuits can be made as complex and extensive as desired. The main thing is the correct selection of the pumping unit in terms of power and pressure created.
- The household circulation pump for heating has made it possible to organize underfloor heating and more efficient closed systems operating under pressure.
- It was possible to remove from view the ubiquitous pipes that run through the rooms and do not always harmonize with the interior. Increasingly, heating communications are laid in walls, under floor coverings and behind suspended (suspended) ceilings.
Note. A minimum slope of 2-3 mm per 1 m of pipeline is needed to empty the network in case of repair or maintenance. Previously, it was made at least 5 mm / 1 m.p.
Pumping systems also have disadvantages. This is a dependence on electricity and its consumption by the pumping unit during the heating season. Therefore, if there are frequent power outages, the circulation pump must be installed together with an uninterruptible power supply unit or connected to an electric generator. The second drawback is not critical; if you select the power of the device correctly, then the electricity consumption will be acceptable.
Leading manufacturers of heating equipment, such as Grundfos or Wilo, have developed new models of units that can save energy. For example, if you buy and install an Alpfa2 circulation pump from the Grundfos brand, it will automatically change its performance depending on the needs of the heating system. True, its price starts from 120 USD. e.
New generation circulation units from Grundfos – models Alpfa2 and Alpfa2L
Types of circulation pumps, design
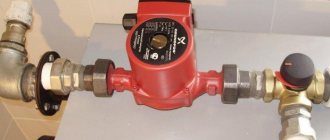
The devices in question are similar to the same products for pumping water for other purposes, the operating principle is similar, but in this case the device is created taking into account the nuances of heating: for high temperatures, their differences, as well as for the characteristics of the system, the need to regulate pressure, speed in a wide range range. The product is manufactured for insertion specifically into pipes and bypass (a whole unit with it and taps is often sold), taking into account their specifics.
Wet pump:
Dry type:
There are 2 types used: with a wet and dry rotor. The latter are more productive, but are less often used for home and domestic use, since they are noisy, with noticeable vibration, and more expensive.
The main disadvantage of all pumps is their dependence on electricity. If the facility has frequent power outages, then backup batteries are installed; a stabilizer is recommended to level out voltage surges.
As standard for a heating pump, for all types, manufacturers provide stepwise speed settings: you can select the optimal mode and control energy consumption.
A brief description of the disadvantages and advantages of the varieties is as follows. Dry type products are noisier, create vibration, are expensive, but more productive, the purity of the pumped resource is not significant. Wet - quiet, cheaper, more compact, but limited in pressure, the transported substance must be free of impurities.
There are dual models on the market used for backup in emergency situations.
Where to install the pump - supply or return
Despite the abundance of information on the Internet, it is quite difficult for the user to understand how to correctly install a heating pump in order to ensure forced circulation of water in the system of their own home. The reason is the inconsistency of this information, which causes constant debate on thematic forums. Most of the so-called specialists claim that the unit is installed only on the return pipeline, citing the following conclusions:
- the coolant temperature in the supply is much higher than in the return, so the pump will not last long;
- The density of hot water in the supply line is less, so it is more difficult to pump;
- The static pressure in the return line is higher, which makes the pump easier to operate.
Interesting fact. Sometimes a person accidentally ends up in a boiler room that provides central heating for apartments, and sees the units there embedded in the return line. After this, he considers this solution to be the only correct one, although he does not know that in other boiler houses centrifugal pumps can also be installed on the supply pipe.
We respond to the above statements point by point:
- Household circulation pumps are designed for a maximum coolant temperature of 110 °C. In a home heating network it rarely rises above 70 degrees, and the boiler will not heat the water more than 90 °C.
- The density of water at 50 degrees is 988 kg/m³, and at 70 °C – 977.8 kg/m³. For a unit that develops a pressure of 4-6 m of water column and is capable of pumping about a ton of coolant in 1 hour, the difference in the density of the transported medium is 10 kg/m³ (the volume of a ten-liter canister) is simply negligible.
- In practice, the difference in static pressure of the coolant in the supply and return lines is equally insignificant.
Hence the simple conclusion: circulation pumps for heating can be installed both in the return and supply pipelines of the heating system of a private house. This factor will not in any way affect the performance of the unit or the heating efficiency of the building.
Boiler room made by our expert Vladimir Sukhorukov. There is convenient access to all equipment, including pumps.
The exception is cheap solid fuel direct combustion boilers that are not equipped with automation. When overheated, the coolant in them boils, since burning wood cannot be extinguished at once. If the circulation pump is installed on the supply side, then the resulting steam mixed with water enters the housing with the impeller. The further process looks like this:
- The impeller of the pumping device is not designed to move gases. Therefore, the performance of the device decreases sharply, and the flow rate of the coolant drops.
- Less cooling water enters the boiler tank, causing overheating to increase and even more steam to be produced.
- An increase in the amount of steam and its entry into the impeller leads to a complete stop of the coolant movement in the system. An emergency situation occurs and, as a result of an increase in pressure, a safety valve is activated, releasing steam directly into the boiler room.
- If no measures are taken to extinguish the firewood, the valve cannot cope with the pressure release and an explosion occurs with the destruction of the boiler shell.
For reference. In cheap heat generators made of thin metal, the response threshold of the safety valve is 2 Bar. In higher quality TT boilers, this threshold is set at 3 Bar.
Practice shows that no more than 5 minutes pass from the start of the overheating process to the valve activation. If you install a circulation pump on the return pipe, then steam will not enter it and the time period before an accident will increase to 20 minutes. That is, installing the unit on the return line will not prevent an explosion, but will delay it, which will give more time to fix the problem. Hence the recommendation: it is better to install pumps for boilers running on wood and coal on the return pipeline.
For well-automated pellet heaters, the installation location does not matter. You will learn more information on the topic from our expert’s video:
Setting up and checking automation
After the first start, the automation is adjusted. If the system has a pressure switch, then at maximum values, which are pre-set in the settings, the pump turns off. When water is drawn in, the relay is activated again and starts the system when the pressure becomes minimal. In this case, the settings can be adjusted independently.
Automation setup:
- First you will need to turn off the pump and drain the water from the hydraulic tank. This is easy to do by unscrewing the tap, which is located at the bottom of the system. To open, use a screwdriver or wrench.
- Then the pump starts and water flows into the hydraulic tank.
- In this case, you should monitor the pressure gauge readings when switching off. These are the data that are considered maximum.
- Next, open the tap farthest from the pump. As water flows out, the pressure will decrease, causing it to start. When starting, it is important to record all indicators. They will serve as minimal pressure. Next, find the difference between the indicators.
- When testing the system, you should pay attention to the water pressure that comes from the farthest tap. If the indicators are unsatisfactory, you need to increase the pressure. To do this, turn off the pump and tighten the nut on the large spring located in the relay. To reduce the pressure, the nut is unscrewed.
- Next, proceed to adjusting the pressure differences. The data is obtained by subtracting the maximum from the minimum. The nut in the relay will need to be adjusted to correct the problem of too low or too high pressure. The norm is 1.4 bar.
- After adjustment, functionality is checked. If necessary, you can perform the setup again.
To check the automation of a pumping station, special equipment is used, which determines its performance.
In the absence of any relay settings, the adjustment scheme is slightly different. First, the pump starts, building up pressure so that the water pressure from the far end is good. Record the pressure gauge readings and turn off the pump.
When setting the maximum pressure, the indicator should not exceed the limit data for equipment operating under specific conditions.
Next, turn off the power and open the cover on the relay. Then they begin to tighten the nuts. When clicked, the adjustment stops. The cover is put in place and the pump is started. Next, tighten the nut on the smaller spring until it clicks. After checking the functionality, you can safely operate the pumping station.
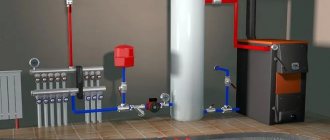
Installation diagrams in various types of systems
To begin with, let’s clarify the place where to install the flow pump, which circulates water through the boiler and forcibly directs it to the radiators of the heating system. According to our expert Vladimir Sukhorukov, whose experience is trustworthy, the installation location must be chosen in such a way that the unit is convenient to maintain. On the supply side it should be located after the safety group and shut-off valves, as shown in the installation diagram:
In order for the unit to be removed and serviced, shut-off valves must be installed on the sides
On the return line, the pump must be placed directly in front of the heat generator, and in tandem with a filter - a mud trap, so that you do not have to buy and install extra taps. The wiring diagram for the pumping unit looks like this:
When installing on the return line, it is better to place the mud collector in front of the pump unit
Recommendation. A circulation pump can be installed in this way in both a closed and an open heating system, there is not much difference. The statement also applies to the collector system, where the coolant moves to the radiators through separate connections connected to the distribution comb.
A separate issue is an open heating system with a circulation pump, capable of operating in 2 modes - forced and gravity. The latter is useful for homes where power outages often occur, and the owners’ income does not allow them to buy an uninterruptible power supply unit or a generator. Then the device with shut-off valves must be installed on the bypass, and a tap must be inserted into a straight line, as shown in the diagram:
This scheme can operate in forced and gravity mode
Important point. On sale there are ready-made bypass units with a pump, where instead of a tap on the flow there is a check valve. Such a solution cannot be called correct, since a spring-type check valve creates a resistance of the order of 0.08-0.1 Bar, which is too much for a gravity heating system. Instead, you can use a petal valve, but it must be installed only in a horizontal position.
Finally, we will explain how to install and connect a circulation pump to a boiler that burns solid fuel. As mentioned above, it is better to place the unit on the line coming from the heating system to the heat generator, as shown in the diagram:
As you can see, the piping uses a pump connection to the boiler circulation circuit with a bypass and a three-way mixing valve. The important role of these piping elements is described in detail in the manual on connecting solid fuel boilers.
Expansion tanks
One of the most important features of heating systems with an intermediate coolant, especially for water systems, is that when heated, the coolant expands, increases in volume, excess pressure is formed, it needs to go somewhere.
The expansion tank is able to equalize the pressure, which prevents deformation of the system as a whole. Therefore, without it, installation of the system is impossible.
Expansion tanks are produced in two types:
- open, actively used for open systems with natural or less often with forced (which is not recommended) circulation of coolant, advantages - simplicity of design, low cost, disadvantages - tendency to corrosion, the need for constant replenishment of coolant, installation at the highest point;
- closed, installation is carried out only in systems with forced circulation of the coolant, the tank is a sealed vessel with a very elastic membrane located inside a metal body, it can be diaphragm or bolted, the principle of operation is quite simple - in one part there is air or an inert gas is pumped under a given pressure, to another place for the resulting additional volume of coolant, advantages - no need to add liquid, corrosion resistance, disadvantages - higher cost.
Closed expansion tanks are available in two types - with a replaceable membrane (so-called flanged) or a membrane that cannot be replaced. The pressure can be monitored using a pressure gauge and adjusted by installing a safety valve.
Installation rules
The design of a household circulation pump from any manufacturer provides for its fastening to pipelines or shut-off valves using union nuts (American). This allows it to be quickly dismantled if necessary, for example, for replacement or repair. When installing the pump unit, follow these recommendations:
- Place the device on any sections of pipelines - horizontal, vertical or inclined, but with one condition: the rotor axis must be in a horizontal position. That is, installation “head down” or up is unacceptable.
- Please note that the plastic box with electrical contacts is located on top of the case, otherwise it will be flooded with water in the event of an accident. Yes, and servicing the product will not be easy. This is easy to achieve: unscrew the screws securing the casing and turn it to the desired angle.
- Remember to follow the flow direction indicated by the arrow on the housing.
- So that the product can be removed without emptying the system, install shut-off valves before and after it, as shown in the diagrams in the previous section.
A visual aid showing what position the pump unit should be in
Advice. It so happened that the load from the weight of the circulation unit will fall on 1 or 2 ball valves (depending on the orientation of the area in space). Hence the recommendation: do not save money and buy high-quality shut-off valves, whose body will not crack over time from mechanical stress.
Choosing a location for equipment
The pump or pumping station must be located in a specific location. This could be a caisson or a basement. The second option is most common. In this case, special attention must be paid to installation to avoid damage to the equipment due to possible rising water. In other words, the unit is fixed on a special stand away from the walls. It is important to take care of heating the basement.
If you choose a caisson, then this structure must also be insulated. Moreover, you should make sure that the depth at which the caisson will be installed is at least 2 m.
About installing additional units
As a rule, in a closed or open radiator heating system, where the heat source is a single boiler, it is enough to install one circulation pump. In more complex schemes, additional units are used for pumping water (there may be 2 or more of them). They are placed in the following cases:
- when more than one boiler installation is used to heat a private house;
- if a buffer tank is involved in the piping scheme;
- the heating system has several branches serving various consumers - radiators, heated floors and an indirect heating boiler;
- the same, using a hydraulic separator (hydraulic arrow);
- for organizing water circulation in underfloor heating circuits.
Correct wiring of several boilers operating on different types of fuel requires that each of them have its own pumping unit, as shown in the diagram for the joint connection of an electric and TT boiler. How it functions is described in our other article.
Connecting an electric and TT boiler with two pumping devices
In a circuit with a buffer tank, it is necessary to install an additional pump, because it involves at least 2 circulation circuits - boiler and heating.
The buffer tank divides the system into 2 circuits, although in practice there are more of them
A separate story is a complex heating scheme with several branches, implemented in large cottages with 2-4 floors. Here, from 3 to 8 pumping devices can be used (sometimes more), supplying coolant floor by floor and to different heating devices. An example of such a circuit is shown below.
Finally, a second circulation pump is installed when heating the house with water-heated floors. Together with the mixing unit, it performs the task of preparing coolant with a temperature of 35-45 ° C. The operating principle of the circuit presented below is clearly described in a separate material.
This pumping unit forces coolant to circulate through the heating circuits of underfloor heating.
Reminder. Sometimes pumping devices do not need to be installed for heating at all. The fact is that most electric and gas wall-mounted heat generators are equipped with their own pumping units built inside the housing.
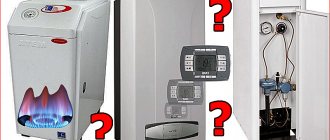
Selecting a fuel type
Any system is based on the need to obtain thermal energy from various types of fuel. Main options:
- gaseous (natural and liquefied gas);
- solid (firewood and wood products, brown and hard coal, peat, pellets, agricultural products and waste);
- liquid (in most cases this is diesel fuel);
- alternative sources (used as additional ones, these are solar, wind, less often thermal energy and even tidal energy, which is generally exotic).
Local heating system
Local air heating systems are rarely used and are used exclusively in houses of small area and with seasonal residence. Only in this case is the use of such a heating system configuration economically justified. Installation is quite simple. It is necessary to select and install a heat source and connect communications to it.
If it is an electrical device, you need an outlet and grounding.
Appliances operating on other types of fuel require the installation of combustion product removal systems (chimneys), and in some cases, obtaining permits if we are talking about gas heat sources.
Moreover, the heating source must be installed in each room or one for several adjacent rooms.
General, central heating system
A general heating system is a complex engineering solution consisting of many elements; it can be air or water (with liquid or gaseous coolant).
The centralized air duct scheme involves the use of special air heating devices to heat the air, which is transmitted through air ducts to the heated rooms. These systems come with forced or gravitational (natural) circulation. Moreover, three types of circulation are used: partial, recirculation and direct-flow. But these systems are rarely used, so we will focus on water heating and its elements.
Connecting the circulation pump to the electrical network
There are several ways to connect power to the device:
- through a conventional differential machine;
- with thermostat control;
- connection to the network together with an uninterruptible power supply unit (UPS);
- powering the unit from the boiler automation.
Warning. Often, homeowners simply plug the pump into a regular outlet, connecting the wires to a purchased plug. We cannot recommend this approach, because connection without grounding and a safety device is dangerous. If there is a problem with the device or if it is filled with water, you risk receiving an electric shock.
Typical connection diagram with a differential circuit breaker
The first connection diagram is quite simple and any user can assemble it with his own hands. You will need an 8 A differential circuit breaker, wires and contacts. Connect to grounding both in this circuit and in all others.
To automatically stop the movement of the coolant when cooling to a certain temperature, an electrical circuit is used to connect a circulation pump with a thermostat. The latter is attached to the supply pipeline and breaks the power supply circuit when the water temperature drops below a set value.
Connecting a phase wire to the pump through an overhead thermostat
Attention! To ensure that the thermostat does not lie and turns off the circulation in time, it must be attached to a metal section of the line. Polymers do not transfer heat well, so when mounted on a plastic pipe, the device will not work correctly.
There are no difficulties in connecting the power supply through a UPS, for which the latter has special connectors. The heat generator itself should also be connected to them if it needs electricity. But connecting the pump to the boiler control panel or to its automation is a more complicated procedure. It is advisable to have knowledge and skills in the field of electrical engineering.
The boiler is also connected to the uninterruptible unit if it needs electricity
How to fill water and start
Before starting the pumping station, it is necessary to fill the pump with liquid. To do this, you first need to unscrew the plug on the unit itself. It could also be a valve that needs to be unscrewed. Next, the system is filled with water.
The liquid must be poured until it begins to overflow, until the equipment is completely filled.
Before starting, you should check the pressure in the accumulator. The procedure is quite simple. You can increase the pressure by pumping air using a car pump. You can lower the indicator by releasing air through the nipple located on the hydraulic tank.
If you are not sure that the pumping station is connected correctly, then you should call a specialist
Rules for the first launch of the station:
- After filling the system with water, you must close the lid tightly or tighten the valve.
- Next, the pump is connected to the electrical network.
- To remove excess air, open the valve slightly.
- Then the pump should operate for 2-3 minutes. During this time, liquid should begin to flow from the open pipe or tap.
- If there is no water, turn off the pump and refill the water.
- Then a test switch-on of the station is performed again.
There are no difficulties in starting. But in addition to filling the system with water, you will need to check the automation. If there is a relay, the system turns off when the maximum pressure specified in the settings is reached.
At what speed should the pump in the heating system operate?
The purpose of forced circulation is to effectively heat the house through the reliable delivery of heat to all consumers of the system, right up to the furthest radiator. To do this, the pumping unit must develop the required pressure (otherwise known as pressure), which is ideally calculated by design engineers based on the hydraulic resistance of the pipeline network.
Most household pumps have from 3 to 7 rotor speeds, due to which the performance and pressure generated can be increased or decreased. In order not to torment you with hydraulic calculations, we offer the following method for selecting the optimal speed:
- Find a laser surface thermometer (pyrometer). Put the heating system into operating mode.
- Measure the surface temperature of the pipe at the inlet and outlet of the boiler.
- If the temperature difference is more than 20 °C, increase the rotor speed. After 30 minutes, repeat the measurement.
- When the temperature difference is less than 10 °C, the water flow rate must be reduced. The goal is to achieve a delta between supply and return of about 15 °C.
The minimum number of rotor speeds is 3, but sometimes 7 or more
Advice. Do not switch the pump to a different circulation speed “on the fly”. Disconnect it from the network, move the regulator to a different position, and then put it back into operation.
You can do without a pyrometer when thermometers are installed on the supply and return lines. If the adjustment limits do not allow you to enter the range of 10-20 °C temperature difference, your system is not working efficiently due to an incorrectly selected circulation pump. Too cold return water increases the load on the boiler and increases fuel consumption. Water that is too hot means that it flows too quickly and does not have time to transfer heat to the heating devices.
The leading European brand Grundfos offers the latest generation Alpfa3 circulation pumps, which can independently select performance depending on the load and thus adapt the work to changing conditions. With their help, you can even balance the heating system, which our expert will tell you about in the next video:
Pump installation
The installation location of booster pumps is very important and determines the efficiency of their operation. The flow sensor can only be activated if water flows through the pump, therefore, to supply water to the first or second floor, the device should be installed in the basement. At the same time, full-fledged operation is only possible in a complex installation with another pump, which will ensure the lifting of liquid through the pipes.
The operating diagram of the booster pump is easy to understand and will help you install the unit correctly. The injection device must be mounted on a pipe in front of the water intake points so that with low pressure it can turn on and supply water to all consumers. When you start one of them (turn on the washing machine or open the tap), the water moves, and the flow sensor instantly reacts to this movement, turning on the pump (usually it takes no more than a second). If you live on the 4th-5th floor and install a pump in the basement, then its power will not be enough to raise the water to the required height.
Booster pump connection diagram:
- On the pipe to which the pump will be connected, make markings in accordance with the length of the pump and adapters.
- Turn off the water in the apartment.
- Cut the pipe according to the markings.
- Make external threads on both ends of the pipe.
- Screw adapters with internal threads onto the pipes.
- Screw the fittings that should come with the pump into the adapters. During the installation process, check the instructions for the device and look at the arrows drawn on the body (they indicate the direction of flow).
- Run a three-wire cable to the pump from the electrical panel. It is recommended to organize an additional outlet near the installation site, and connect the pump itself through a separate RCD.
- Carry out a test test of the pump, paying special attention to all joints - there should not be a hint of leakage. For high-quality sealing, wrap FUM tape or tow around the threads.
Useful tips
As you can see, the installation diagram for a booster pump is not that complicated, but to do everything correctly, you need to have minimal plumbing skills - be able to cut pipes and make threads.
To ensure that the pump serves you for many years, follow these rules when installing:
- To make the pump work longer, it is advisable to install a mechanical filter at the inlet. In the city, the water is quite dirty, and the pipes are mostly old with many years of deposits on the inner walls, so it would be a shame if a piece of hard plaque accidentally came off the pipe and got into the new pump and ruined it.
- Install the pump in a dry, heated room. If the temperature drops below zero, the water inside will freeze and the device will fail.
- The installation of a shut-off valve must take place up to the point where the pump is installed, so that, if necessary, preventive work can be carried out by blocking the access of water.
- Any pump, even the quietest one, vibrates during operation, and this vibration over time can disrupt the stability of the device - weaken it. So get used to checking the strength of the fasteners from time to time and tightening them if necessary.
A pump that pressurizes water can significantly improve the quality of life in a city apartment or private house. You may have to invest a little money and spend a little time for this, but in the very first winter you will feel dramatic changes - the rooms will become warmer, and hot water will flow from the tap immediately, and not after 5 minutes of waiting.