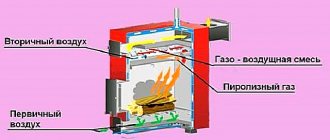
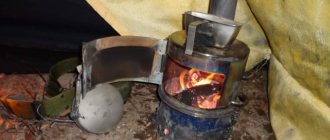
The operating principle of all types of rocket designs is approximately the same:
- Solid fuel (firewood) is placed in the firebox.
- Ignition is in progress.
- When heated by flame and combustion, gases are produced.
- Their movement begins along the vertical section of the pipe.
- The supply is provided by a special channel through which “secondary air”, which is already heated, quickly moves.
- Heated gases rise to the base of the pipe.
The basic operating principle is similar to pyrolysis boilers. As a result, at the outlet of the furnace, the maximum possible temperature is reached in the upper part of the structure. It is used for heating, heating water, and cooking. For convenience, you can make a special platform for placing containers by attaching it to the top of the pipe.
A big and significant advantage for the user of a rocket stove is its efficiency - firewood, as well as other types of solid fuel, are consumed little, the efficiency is high (about 65%). In order to improve the quality of functioning, it is enough to throw sawdust, paper, branches or dry grass into the firebox.
How to upgrade a long-burning stove yourself
To make a homemade stove less of a hassle, it can be improved.
Modernization of the Bubafonya stove
The weight of the Bubafonya stove structure usually reaches 150–170 kg. This creates inconvenience, since it must be turned over to clean it from ash and other combustion residues. To avoid this, you can improve the design by making holes in it with doors. However, it should be taken into account that the peculiarity of such a stove is precisely the absence of extra cracks through which air can penetrate. Therefore, when manufacturing doors, they will need to be carefully sealed in the closed position. This can be achieved by welding metal sides and seals to the body.
Air draft in the combustion chamber will be improved if the number and shape of the ribs on the round piston plate of the structure are changed. To do this, instead of channel sections, you need to weld steel plates. At the same time, they should have a slight bend along the entire length of the part. This shape will allow the incoming air to swirl, which will be evenly distributed in the combustion chamber. To obtain the desired effect, 6 to 8 plates are enough.
Curved ribs on the piston help improve traction
Modernization of a brick kiln
A long-burning stove made of brick will take up much less space if its design resembles the shape of a triangle and is placed in the corner of the room. The construction of such a structure will require less building material and, accordingly, less financial investment.
The brick version of the long-burning stove can be upgraded with a separate damper to switch between winter and summer heating modes. In the autumn-spring period, when there is no frost, but the air is saturated with dampness, this damper will help prevent the heating from being too hot.
An additional damper will make heating more comfortable
Spark extinguishing
Any tent has a hole for a hot smoke pipe (chimney). In addition, the area around the stove is always protected with a fireproof mat in case of hot coals flying out. Some tent manufacturers recommend rolling back the tent base and placing the product directly on the ground.
Not only hot carbon dioxide, but also sparks rise from the stove through the chimney pipe. If the pipe is short, they can get onto the roof of the tent and cause a fire. To prevent this from happening, the chimney pipe is made long so that it is at least 2–2.5 m long. While the spark flies along this path, it will have time to go out. Consequently, the chimney acts as a spark arrestor.
Safety precautions also mean that all objects that can catch fire should be kept away from the operating stove. Another danger is carbon monoxide. It must go strictly into the chimney. And the tent itself should be designed so that clean air regularly enters it.
Exploitation
A stove of this type, like any top-combustion heat generator, operates with maximum heat output only when the chimney is well heated. Therefore, before loading the main portion of fuel into the combustion chamber, the device must:
- warm up the chimney well. For these purposes, you can use any quickly flammable fuel, such as paper balls, sawdust or shavings. It should burn not in the firebox, but in the ash pit. The level of heating of the chimney can be judged by the attenuation of the sound or a change in its tone. Next, you can start adding the main fuel to the firebox. It is no longer necessary to set it on fire; it should flare up from the coals remaining from the burnt “fast” fuel;
- manually regulate the flow of air into the combustion chamber. A rocket stove in a garage is not capable of adjusting itself to changing environmental conditions and the quality characteristics of the fuel, so it must be adjusted manually. After loading the main fuel batch, the ash door should be opened completely, and when a characteristic hum appears in the furnace, it should be closed enough so that the tone of the sound in the furnace is reduced to a rustling sound. As the wood burns, the door needs to be closed more tightly, achieving the same rustling sound. If this is not done, then excess air will enter the furnace and cool the intermediate gas mixture. In this case, the pyrolysis process immediately stops and the oven begins to make a roaring sound.
Only dry wood can be used as fuel for such a stove, since the appearance of an excessive amount of moisture when burning wet wood can provoke reverse draft and interfere with the creation of the temperature necessary to begin the pyrolysis process.
To ensure the safety of users during operation, the following rules must be observed:
- do not use liquid fuels for kindling and do not add them to the stove during the burning period;
- avoid contact between open areas of the contact body and the surfaces of the furnace, since the cylinders and its other metal parts will become very hot during combustion;
- It is prohibited to place the device near flammable surfaces;
- Clean the chimney at least once a week, and preferably after each use of the device.
Making a stove - a rocket
It won’t be very difficult to make a light camp stove, shown in the drawing, if you find the following materials in the house:
- round profile pipe with a diameter of 133-150 mm and a length of 0.5 m;
- profile pipe 14 x 20 cm, length 0.4 m;
- metal sheet 2-3 mm thick for grates;
- rod O8-10 mm for legs;
- scraps of iron for the stand.
A vertical round pipe is welded to the profile at an angle of 45°, after which eyelets for the legs are attached to the body (they should be easily removed). A grate is placed inside the inclined firebox, and a lid is fixed on the outside. For the convenience of cleaning ash at the bottom, it would be nice to install a second door.
Advice. First of all, weld a stand to the upper edge of the fire channel - gases must penetrate between the bottom of the dish and the body, otherwise “rocket” thrust will not appear.
Drawing of an improved version of the mobile oven
The design of the furnace can be improved by organizing the supply of secondary air inside the smoke pipe. The update will make it possible to increase the efficiency and duration of firewood burning. Drill holes on both sides on both sides, covering them with rocket “nozzles” according to the presented drawing. How this stove functions is shown in the video:
From a gas cylinder
The following materials will be used to make a rocket stove with your own hands:
- round pipes with transverse dimensions of 70 and 150 mm; with a wall thickness of 4 mm;
- square profile pipe 150-200 mm in diameter;
- chimney pipe section O10-15 cm;
- low-carbon steel (grade St20) sheet;
- dense basalt thermal insulation (80-120 kg/m3) or bulk fire-retardant materials, for example, vermiculite or perlite gravel.
To begin, cut the rolled metal into blanks according to the drawing. Afterwards, you need to cut off the lid of the propane tank, unscrewing the valve in advance and filling the tank to the top with water. The tool is an ordinary angle grinder with a metal wheel.
The subsequent assembly procedure looks like this:
- Cut the profile pipe lengthwise, 35 mm from the edge. One part will be used to make an ash pan, the second - a blower.
- Join the firebox and smoke pipe at an angle of 90°, making the necessary cuts. Cut an opening on top of the firebox where the loading hopper will be welded.
- Weld the riser with the firebox, then put on the casing from a 150 mm pipe, making a cutout at the bottom to fit the width of the firebox.
- Install and scald the bunker for storing firewood. Secure the doors of the firebox and ash pan.
- Place perlite between the walls of the afterburner and the shell.
- Make a side opening in the cylinder to insert the finished structure. It is better to make the lid removable.
- Carry out the final assembly and weld the chimney section of the pipe.
A specialist will tell you in detail about making a rocket stove from a cylinder in the video:
Made of brick
The simplest rocket stove for cooking can be made of bricks without using mortar, as shown in the diagram with the order. Such a structure is easy to disassemble and rearrange if necessary.
The rocket stove with a stove bench must be placed on a concrete foundation or rubble stone. Material – ceramic or fireclay brick, sand-clay or fireclay mortar, depending on this. The finished base is covered with rolled roofing material to protect it from the negative effects of moisture, after which a continuous first row of bricks is laid. The following workflow looks like this:
- Lay out the firebox, placing the bricks on edge. Thus, overlap the chamber, leaving the mouth for loading firewood and the riser.
- Build an afterburner pipe from 9 rows of stones installed “on edge” with ligation.
- Place a pipe or tin buckets on the riser, fill the resulting cavity with heat insulation or simple sand.
- Place the barrel upside down, with a section of smoke gas pipe leading out from the bottom.
- Build a brick bed from 3-4 horizontal channels.
- Coat the barrel and bench with clay mortar.
Main. Construction is carried out in compliance with the rules for laying the stove, described in the detailed manual.
The length of the smoke channels from inside the stove is limited by the draft in the rocket stove and the external chimney. It is better to keep the total length of the flue pipes within 4 m. To prevent the heater from smoking back into the room, raise the top of the chimney to a height of 5 m, counting from the grate
How to build a brick stove - a rocket without a barrel, pay attention to the video:
DIY rocket stove
The rocket stove gets its name from its resemblance to an inverted rocket and its hum-like sound. Note that if the furnace makes a loud noise, then this is the most uneconomical and less efficient use of the unit.
The easiest one to make at home is a camping rocket stove.
This type of stove will allow you to heat food or water in any conditions. When wood burns in the bunker, the chimney heats up, where the gas burns out. To burn them without leaving a residue, the pipe must be long.
For more efficient operation, the fuel compartment must be equal to the horizontal section. To make a camping rocket stove you will need:
- two square pipes 45 cm long and another 30 cm
- 4 steel strips 300*50*3 mm
- 2 steel strips 140*50*3 mm
- metal grating 300*140 mm.
How to make a rocket stove with your own hands
It has several stages - choosing a suitable design; selection of materials and tools; direct production.
Project selection
When choosing a suitable project, consider the following factors:
- The purpose of the stove is whether it requires only cooking food or also heating the room.
- Available materials.
- Approximate power. It depends on how many servings of food or how much room the device will be enough for.
Materials
For a brick structure you will need:
- fireclay (fireproof) brick;
- fireproof mixture for masonry;
- concrete mortar (for the base);
- mineral wool;
- asbestos;
- a whole barrel or an empty gas cylinder for the cap (optional);
- stove doors - combustion chamber and ash pan;
- if the cap is brick - a thick sheet of stainless steel according to the size of its cross-section.
For finishing the stove the following are used:
- fireproof paint;
- clay;
- stones;
- and so on.
For metal, take:
- A round metal pipe with a diameter of about 150 mm and a length of no more than 90 mm (preferably about 60 mm).
- A profiled (rectangular) pipe with a cross-section of 100-120 mm and a length of about a third round.
- Instead of a rectangular pipe, you can take a sheet of steel 3 mm thick.
- 3 nuts.
- Steel rods, plates or long bolts for legs.
Reference. For better traction, take a profiled pipe with a side no larger than the round diameter.
Preparing tools
For production you will need:
- Master OK;
- level;
- welding machine;
- bayonet shovel;
- metal brush;
- level;
- Bulgarian.
Manufacturing, device sizes
There are many variations on this theme. Let's consider the manufacture of two fundamentally different types of reactive stoves. This is a brick stove with a stove bench, which is used indoors, and a camp stove, assembled from metal. If necessary, changes are made, combinations of methods are possible (for example, a heating and cooking device, but made of pipes covered with clay or stones).
How to make a brick oven with a stove bench
The first stage is the construction of the foundation. A rectangular recess is dug under it, which is then filled with concrete.
For strength, it is better to pre-install the reinforcement. The base must be strictly horizontal.
After the concrete mortar has hardened, laying of bricks begins. External walls are located along the perimeter of the concrete platform. A combustion chamber is formed. On one side of it there is a combustion chamber with a hole for loading firewood. On the other side there are air ducts.
Important! Each row of bricks is also checked with a level. This is done in both planes - horizontal and vertical
A hole is also left in the combustion chamber for cleaning ash, which is closed with a door.
When this chamber is ready, a metal barrel is put on it. The gaps are filled with insulation, for example, mineral wool
A hole is also left in the combustion chamber for cleaning ash, which is closed with a door. When this chamber is ready, a metal barrel is put on it. The gaps are filled with insulation, for example, mineral wool.
If the barrel is not in use, a stove for cooking is installed on top. Asbestos insulation is placed under it.
The chimney is connected to the air duct and discharged to the street.
Then the finished device is decorated. For example, it is coated with clay and covered with paint. Another option is to leave the brickwork.
Jet stove for camping
It consists of two compartments connected to each other. To assemble it, first cut the pipes at an angle of 45°. If you took a metal sheet instead of the second pipe, cut it into the following parts:
- two with sides 300 mm and 150 mm;
- two - 300 mm and 100 mm;
- and one 150 and 100 mm.
Photo 3. Ready-made jet stove for hiking. The device is made of metal pipes.
Then weld them together. You will also need another plate to separate the fuel compartment, its dimensions are 200 mm and 100 mm.
All fragments are welded together in accordance with the diagram. The round pipe is attached to the bottom of the rectangular pipe and in the middle relative to the sides.
A grate is welded from scraps of reinforcement. It is convenient to make it retractable in order to lay firewood and then slide it inside the firebox.
4 rings are sawn off from the pipe. They are attached to the top so that the dishes do not block the draft hole.
In the collapsible version, legs are installed. Nuts are welded from below, into which long bolts are then screwed. There is another way. Rods or scraps of steel sheet are welded to the bottom. It is less convenient to transport, but there is no need for assembly.
When the structure is ready, it needs to be painted. Only fireproof paint is used. This will protect against corrosion and also cover solder marks.
Homemade design
If you have no experience, you can choose a simplified design of several bricks and a bent pipe. If you have the skills to operate a welding machine, create a furnace from a square profile and sheet metal.
Furnace drawing and dimensions
The presented option can be adjusted taking into account the volume of the room, other personal requirements and preferences. The developers recommend setting the diameter of the riser channel in the range from 65 to 105 mm. The dimensions of the shell are changed accordingly.
Drawing with explanations for assembly
To accumulate thermal energy, adobe was chosen. This material is not heat resistant, so the temperature must be reduced to a safe level. Additional recommendations:
- the drum can be made from a standard 50-liter cylinder;
- provide perfect sealing of the smoke exhaust system to prevent soot from penetrating into the porous adobe;
- To remove residual mechanical impurities, a second ash pan is installed.
Step-by-step instruction
Homemade rocket wood stove
You can create a wood-burning rocket stove with your own hands using the following algorithm:
- To produce a mixture of the main heat-insulating layer (5b), crushed stone from chamotte brand ShL is used.
- The support frame for the stove is assembled from wooden logs (100 x 100) with cells no more than 600 mm; the distance under the deck can be increased.
- Mineral cardboard and tongue and groove boards are used for cladding.
- Wooden blanks are pre-treated with impregnation with biocidal additives.
- The area under the main part of the structure is covered with a metal sheet.
- After placing the structure at the planned location, formwork is installed and adobe is poured.
- A drum is made from a gas cylinder of suitable size.
- To create reliable welded joints, electrodes with a diameter of 2 mm and a direct current of 60-70A are used.
- The sealing seal is made from asbestos cord and fixed with heat-resistant glue.
- A riser is assembled from prepared steel blanks.
- A bottom layer of insulation is installed; plywood (20 mm) or boards are used for formwork.
- Filling with construction mixture is carried out to level B according to the drawing. It takes 1-2 days for this part to dry completely at room temperature.
- Install the firebox, controlling the accuracy of the vertical position.
- Part of the blower will protrude outward, so at the final stage the wall is leveled with adobe.
- After filling with the mixture to level G, it is recommended to speed up drying with a regular incandescent light bulb with a power of 60-75 W (placed under the riser).
- An ash pan made from a steel sheet 0.8-1 mm thick is installed.
- The drum tube is mounted, forming a wedge-shaped slope towards the outlet in the inner part (with mixture 5b).
- A lining is created with layer-by-layer filling (5g), the plug is made of clay.
- Continue assembly according to the diagram, install the corrugation, drum covers and ash pan.
- After drying is complete (2-25 weeks), the formwork is removed, the surface is formed, and visible metal parts are painted.
Explanations for the composition of building mixtures (5):
- a – adobe made of clay and straw, the consistency of thick dough;
- b – medium-fat clay with chamotte crushed stone;
- c – fireclay sand with clay in proportions of one to one;
- d – river sand without washing with a fixed granule size (2.5-3 mm);
- e – oven clay of medium fat content.
They purchase in advance the tools and consumables necessary to perform work operations. The purchase list is compiled on the basis of the prepared project documentation.
Manufacturing recommendations
The easiest way is to make a small portable stove with your own hands - the Robinson rocket, whose drawing is presented below. You will need cutting profile pipes, metal for legs and stands, as well as welding skills. Moreover, compliance with the exact dimensions indicated in the drawing is not necessary. You can take pipes of a different section, but you just need to reduce or increase them proportionally so that the parts fit together.
Drawing of an improved “Robinson” camping stove with nozzles made of a profile pipe, cut lengthwise into 2 parts
Watch this video on YouTube
The most common versions of large rocket stoves are made from a gas cylinder or a two-hundred-liter metal barrel. You must understand that these ready-made elements are used as an outer hood, and the internal parts of the stove must be made from pipes of smaller diameter or laid out from fireclay bricks. Moreover, from a cylinder you can make both a stationary heater with a small bench, and a unit that can be moved.
Please note that calculating the thermal power of a rocket-type furnace is quite difficult; there is no single calculation method. It’s easier to rely on ready-made drawings of already working samples and assemble according to them. You just need to compare the dimensions of the future stove with the dimensions of the heated room. For example, to heat a small room, the size of a cylinder is enough; in other cases, it is better to take a large barrel. The selection of internal parts for them is shown in the diagram:
2 options for potbelly stoves - from a gas cylinder and a standard iron barrel
Stove rocket from a cylinder
In addition to the gas cylinder itself, to assemble the stove you will need:
- profile pipe 150 x 150 mm for the firebox and loading hopper;
- steel pipes with a diameter of 70 and 150 mm will go to the internal vertical channel;
- the same with a diameter of 100 mm for the chimney;
- insulation (basalt fiber with a density of at least 100 kg/m³);
- sheet metal 3 mm thick.
For a master skilled in welding, this work will not be particularly difficult. The top of the cylinder should be cut off along the seam, after first unscrewing the valve and filling it to the top with water. Openings are cut on both sides for installing a firebox and inserting a chimney. A profile pipe is inserted and connected to a vertical channel, which is discharged through the bottom of the cylinder. Further work on the manufacture of the rocket furnace is carried out in accordance with the drawing:
At the end, the upper part must be welded into place, then carefully check all seams for permeability so that air does not flow uncontrollably into the oven. After this, you can attach a chimney with a water jacket (if available) and begin testing.
Masonry of a rocket-type heater made of bricks
This stove option will require the purchase of fireclay bricks; ordinary ceramic bricks will not work for a rocket stove. The masonry is done using fireclay clay mortar; it is also sold as a ready-made building mixture. How to make a stationary rocket stove:
- First you need to dig a hole, compact the bottom and pour a foundation measuring 1200 x 400 mm and 100 mm high, as shown in the photo.
- After hardening, the foundation is covered with a sheet of basalt cardboard and the combustion chamber, a bunker for loading firewood and a vertical channel are laid. A door is installed at the end of the combustion chamber to clean the ash pan.
- After the clay has dried, the pit is filled up, and a pre-selected pipe or small barrel with a diameter of 450 mm is placed on the vertical channel. The gap between the brickwork and the pipe walls is filled with fire-resistant insulation, for example, basalt wool, expanded clay, vermiculite.
- At the last stage, a cap made of a large metal barrel with a diameter of 600 mm is put on the structure. First, a cutout is made in its upper part and a pipe is installed to connect the chimney. When the barrel turns over, he will be at the bottom.
Then it’s a matter of technology; you can take the chimney directly outside or build another bench with smoke circulation. For this purpose, ordinary ceramic bricks and clay-sand mortar will do. The order of the brickwork of a rocket stove with a small bench is shown in detail in the video:
Watch this video on YouTube
Types of rocket stoves
In this section we will look at the most common types of rocket stoves used in field and stationary conditions.
Simple metal stoves
The simplest wood-burning jet stove is made from an L-shaped piece of large-diameter metal pipe. The horizontal part is short, it represents the firebox. The combustion chamber is located in the vertical part of the pipe, where wood actively burns. A small metal plate is often welded into the horizontal section, forming a blower. After warming up, the rocket furnace enters operating mode, and a flame bursts out of its vertical section (flame tube).
Such rocket stoves are used for cooking food in camping or outdoor conditions - due to their small area, they produce little heat, and the vast majority of the thermal energy is lost through the fire tube. Kettles, frying pans and pots are placed on this pipe so that the raging flame ensures their heating. To maintain traction, there are stands in the upper part of the pipe, on which the dishes are placed - combustion products can freely come out.
To make a metal rocket furnace made from an L-shaped piece of pipe more efficient, it is equipped with a metal casing made from an old barrel. A blower can be seen at the bottom of the barrel, and a fire tube peeks out from the top. If necessary, the internal volume is filled with insulation, for example, ash - it does not burn and retains heat well.
Metal rocket stoves with vertical fireboxes located at an angle to the flame tube are the most convenient. Often the combustion openings are closed with lids; in this case, air is taken through the ash pan. Sometimes the firebox is made larger in diameter than the flame tube to ensure long-lasting combustion.
Simple brick ovens
A small-sized brick rocket stove is another simplest option for building a rocket stove with your own hands. Its assembly does not require cement mortar; it is enough to stack the bricks on top of each other to get a convenient brick outdoor unit for cooking at your disposal. In the section on self-assembly of rocket stoves, we will invite you to familiarize yourself with the simplest procedure for self-assembly.
A rocket stove, made with your own hands from brick, can be used to heat households. In this case, a simple arrangement is not enough - you will have to build a stationary version using a special cement mortar. There are many procedures for this, you just have to choose the appropriate option. By the way, some versions of such furnaces include a water circuit.
Advantage of brick rocket kilns:
- Simple design;
- Long-term heat retention;
- The ability to create a comfortable warm bed.
Some models are made combined, using both steel and bricks.
Sophisticated rocket stoves
A jet stove for heating households or for a bath is characterized by increased complexity. The main link here is still the riser (fire tube), enclosed in a metal casing. Its upper part can be used for cooking, forming a kind of cooking surface. The firebox is made large to accommodate an increased amount of solid fuel. The starting materials are metal, bricks and clay.
Based on clay coating, streamlined rocket furnaces of irregular shape are made, which is well perceived by human vision.
There are projects for wood-burning rocket stoves that include additional modules. Their construction schemes include small boilers for preparing hot water, hobs, water jackets and even small ovens. Such stoves will help heat households and create comfortable living conditions for people.
A rocket boiler with a water jacket, created on the basis of a wood-burning stove, will help warm up a multi-room building. It is equipped with a water circuit for heating the coolant. Additional convenience is created by samples with beds - these beds are created on the basis of thermal channels between the flame and chimney pipes.
Principle of operation
An ordinary fire does not ensure rational use of fuel resources. A significant part of the energy is uselessly evaporated into the surrounding space. There are no convection processes or heat storage. Precise regulation of the combustion process is impossible. The access of oxygen is not limited in any way.
With the use of a chimney and a closed working area, the noted disadvantages are eliminated. However, a jet stove is more efficient than a standard stove. The main difference is the chimney located inside the main structure. An increase in the path of gas escape is accompanied by a gradual decrease in temperature in different areas (example, values are given in C°):
- central shaft (riser): 700-1100;
- gap between walls: 250-380;
- area under the bed: 30-90.
Improved Draft in Jet Stove Design
The drawings show design features that provide sufficient draft while increasing the length of the smoke exhaust path. Another advantage is the high-temperature decomposition of organic matter with a limited supply of oxygen (pyrolysis).
If a do-it-yourself rocket stove is created correctly, favorable conditions are provided for the formation of low molecular weight hydrocarbon compounds. Heating devices of this type can provide an efficiency of more than 90%. Similar solutions are used in the design of household boilers using long-burning solid fuel.
Stove "Antoshka"
This popular version of the tourist-camping type of stove will require a little more time to manufacture independently. The Antoshka model rocket stove is distinguished by its convenient design. A special feature of this type of furnace is the presence of an additional plane heated during operation of the unit.
It is also a stand for a container (hob) and a room heating amplifier. Consequently, the Antoshka stove can be used to provide hot water to a country house or a tourist camp.
Stove "Antoshka"
Materials
In order to make a stove yourself, you need to purchase the following set of materials:
- Square pipes (with material parameters 15 cm×15cm×3 mm. The length is also taken into account, which in this option should be 40.5 cm) - 1 piece and (15cm×15cm×3 mm, also the length of the element is 18 cm) - 1 piece and (10 cm×10cm×3 mm, with product length 60.5 cm) – 1 piece.
- Metal/steel plate (30cm×15cm×3mm) – 1 pc.
- The plate is also made of good, heat-resistant metal (the parameters should be as follows - 15cm × 15cm × 3 mm) - 1 pc.
- High-quality metal corner (5cm×5cm×3, length 30 cm) – 1 pc.
- Larger metal corner (5cm×5cm×3, length 40.5 cm) – 1 pc.
Additionally, you will need reinforcement/rod with a diameter of 8 mm, the length of the material in this version is 30 cm - you will need to purchase 4 such rods.
To make a grate with your own efforts, you will need reinforcement with a diameter of 8 mm, its length is 17 cm - 8 pieces
It is important not to forget to purchase triangular metal gussets that will need to be used to install the hob; the steel in them should be 3 mm - 2 pieces
Tools
To carry out all the necessary work you will need, as in the previous version:
- Bulgarian.
- Welding (for reliable fastening of all elements).
- Marker.
- Metal scissors (for working with small elements).
You should also have safety glasses and gloves.
Do it yourself: option one
Materials required for work:
- two tin cans with a diameter of 10 cm and a height of 6 cm; in general, the dimensions of the product must correspond to the parameters of the metal mug, taking into account an additional 10 mm;
- a small piece of tin;
- fasteners: bolts, washers;
- links taken from an old television antenna;
- metal mug.
