Modern interior designers are trying to maximize the space in any room. To create a work space or a place to relax, a battery on the balcony will be useful. There you can make a living room, a terrace and even a greenhouse. But such repairs will require perseverance, work and courage: after all, realizing such a dream is not at all easy. Removing the battery to the balcony is an important stage of repair. This is a difficult and lengthy task, and many obstacles will arise on the way to the implementation of this project.
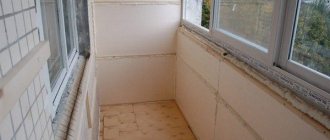
View from the insulated balcony Source dekormyhome.ru/
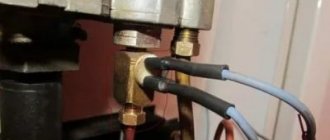
Main obstacles
Many doubt their choice and want to find out whether it is possible to place the battery on the balcony without legal consequences. This cannot be done, even if absolutely necessary. Unauthorized movement is illegal and is subject to fines. There are very good and significant reasons for this, knowing which, you want to refuse such a risky repair.
Causes:
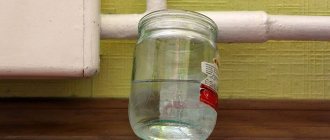
- Risk of flooding neighbors below. The heating radiator may freeze and burst, then boiling water will flood everyone who lives below. Even a pre-insulated balcony will not save you from this.
- Extra load on the central heating system. This is an extremely complex system that requires careful handling and strict adherence to operating conditions. If you add another balcony radiator to the already working radiators, the pressure of hot water in them will weaken. Then they won't be able to heat as well as before, so the whole house will become cold.
- Difficulties during the sale of an apartment. It is imperative to show the buyer documents indicating all the parameters, including the layout of the housing and the thermal circuit. After a major renovation, the heating circuit changes, then the apartment owner will have to make repairs again and remove the excess radiator. Therefore, you need to obtain permission for redevelopment in advance or not start it at all.
- The increased cost (due to the fact that heating will have to be stronger due to the cooling of the system) will be paid by all residents of the house, and not just the initiator of the repair. You need to understand how utility bills are calculated: the total total area is divided by the number of residents of the house. Moving the battery will lead to prices rising, and not only the initiator of the redevelopment will have to pay, but also all other people.
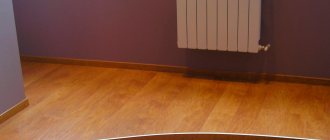
For these reasons, placing the battery on the balcony is prohibited by law. You need to take care of yourself and those around you and insulate the loggia using alternative methods - using high-quality heaters and floor insulation.
Illegal transfer of batteries to the balcony is prohibited Source okna-dom.net
Why can't you turn off the heating?
The requirements of the law are unambiguous, but still: why not, even if it is really necessary?
Heating cannot be placed on the balcony, and for good reason
Firstly, there is a risk of flooding. In winter, when the temperature is below 0 degrees on the balcony, the radiator or water floor may freeze and burst. In many cities, in order to obtain permission, they simply insulate the balcony. However, in Moscow, even for insulated balconies and loggias, the ban remains.
Secondly, if you connect a radiator or hydronic floor to the central heating system, they will create additional load. The water pressure in the system will weaken, and the pipes throughout the house will become colder. Who will like it?
Thirdly, the cost of heating, when the house has a central system, is calculated by square meters. And if you connect an additional device, all residents will pay for it. As long as they don't know, you're safe. But if the deception is discovered, they will sue or begin to sort it out without a trial - which is even worse...
Fourthly, if you are going to sell your apartment, you need a new technical plan (as the technical passport is now called), which you will order from the BTI. This also includes the boundaries of the apartment’s thermal contour, which you have changed without permission. Therefore, you have two options: dismantle all additional heating elements, or reveal your deception and seek legalization of the changes.
There is also an article on the site on how to properly use PVC windows. It examines the main problems that arise with windows and how to prevent them.
Difficulties
Knowing the laws, the owner of the apartment will understand why it is impossible to transfer batteries to the loggia. These places are not intended for living, so they are not heated. You can't do any redevelopment there, you can't radically change anything. But subject to a number of conditions and strict restrictions, it is still possible to move it. Achieving this goal and making accurate calculations will require a lot of time, money and effort. Therefore, it is best to insulate the floor and install a heater. This is much simpler, cheaper and safer; such repairs do not need to be coordinated with anyone.
Before remodeling, you need to close all the cracks. If all insulation work is not carried out efficiently, the heating effect will be minimal.
Layout of batteries on the loggia Source mastergrad.com
Heating options and their characteristics
Let's consider several alternative heating options.
Warm floor
Warm floors are one of the simplest and most elegant solutions when installing heating on a loggia. Warm floors are durable and practical. They heat the room with long-wave electromagnetic radiation, which has a beneficial effect on the human body. Due to the predominance of radiation heat exchange, the entire room is maintained at the same temperature, which corresponds to a greater level of thermal comfort.
The only drawback of heated floors is the price. And both installation and operation. On the loggia it is possible to install only floors with electric heating elements. It will not be possible to connect to centralized heating for the reasons already mentioned.
That is, you will have to spend money first on installation, and then regularly spend money on electricity.
Electric heaters
Electric heaters are less expensive in terms of electricity, but the heating elements of small heaters can become hot above the 90-degree mark, which creates the possibility of dust sublimation. Freeze-dried dust in the inhaled air increases the risk of cancer.
Electric heater on the loggia
In addition, electric heaters cannot heat the room evenly. The area that is closer to the heater will always be warmer than the upper areas of the room.
Oil radiators
Oil radiators are a kind of compromise between traditional heating and heated floors. There is an electrical connection from the heated floor here. Due to the electric heating element, the oil, which is the coolant, warms up and begins to circulate through the radiator.
Why not seal water inside? Yes, because water is more corrosive and has a lower heat capacity. In conventional systems, oil is too expensive to operate. Whereas in such small systems the use of oil is quite justified.
The temperature to which the oil radiator can be heated does not exceed 90 degrees, and the room warms up more evenly than when using electric heaters.
However, some disadvantages of conventional radiators still remain. Convective heat transfer, which predominates when using oil radiators, involves mixing layers of heated and cold air due to density differences. But this mixing also causes the movement of layers of dust, which is not very good for health.
In addition, convective heat exchange cannot provide uniform heating of the room to the same extent as radiation. And convection itself has a less favorable effect on the body.
Obvious advantages include noticeably lower energy consumption compared to underfloor heating and the ability to move the radiator around the apartment using wheels.
Convector heater
A convection heater is of the same nature as a conventional electric heater. The difference in the name is nothing more than just a marketing ploy
A large number of scientific concepts in the name attracts the attention of buyers. The operating principle and the devices themselves are no different from conventional electric heaters
Infrared heater
Infrared heaters warm the room using infrared rays. At the same time, energy costs are much less than the operation of heated floors. The device is a small radiator that is installed under the window and glows bright red.
This device uses mainly radiation heat transfer. This seems like an ideal replacement for heated floors. But no. These heaters are based on the use of short-wave radiation. Long-term exposure to short-wave radiation on humans is fraught with a whole range of unpleasant diseases. Yes, and constant light irritates some people, but heating systems should still be invisible.
To summarize, we can say that an ideal, but expensive option for heating a loggia is a warm floor. It meets all the requirements for heating systems. Of the analogues, only an oil radiator is worthy of attention; other systems are suitable in other situations, but specifically for a loggia and residential premises in general: they are not particularly suitable.
https://youtube.com/watch?v=rGjOsxiq3JQ
What to do?
Comfortable renovations and original interior design can be done with the simplest things. Instead of a battery, it is much easier to place a heater on the balcony by choosing a convenient model. There are now various types of home heaters on the market. Old equipment spent a lot of electricity, but now infrared heaters have appeared:
- ceiling;
- wall;
- floor
They spend little energy, but warm the room perfectly and can automatically turn off when warm.
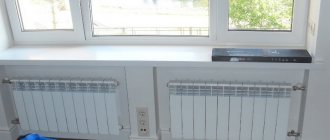
Two batteries on a closed loggia Source www.isstone.net
Alternative solutions for heating balconies - heaters
When it comes to heaters on balconies, apartment owners are skeptical about this - they consume a lot of electricity, take a long time to heat up, and are ineffective.
This was the case 5 years ago, when basically you could only buy a fan heater, popularly called a “wind blower”. They really consumed a lot of electricity, and after they were turned off, the room cooled down again. With the advent of infrared heaters, the situation with heating on the balcony has changed significantly for the better. They quickly heat the room, consume little energy, are safe to use, they can be left on overnight, and when the required temperature is reached, the system automatically turns off the device. If, in addition to such a heater, you install a warm floor, you can spend time on your balcony in complete comfort. Regardless of the temperature outside the window.
I talk more about the types of heaters in this article.
If you still have questions or need help regarding heating your balcony, you can always contact me by phone, email, or through social networks. Best regards, Vladimir Kozhushko!
Moving the battery to the balcony without violating the law
Installing a heating element on a balcony can be done quite legally, but in this case you need to be prepared for certain difficulties and inconveniences. The first thing that will be required of you is the exact parameters:
- temperature;
- how many sections need to be installed;
- section dimensions;
- future localization of heating sections;
- pressure in pipes.
An amateur will not be able to correctly carry out accurate calculations, so you need to turn to professional designers. Their services are quite expensive, so you will have to spend a significant amount.
Then they must write an application with a corresponding request to transfer the heating element to the housing and communal services inspection. They will require:
- results of accurate calculations;
- from experts - official confirmation that the risk of water freezing in the radiator is minimized;
- signed redevelopment project (from professionals);
- calculation of thermal conductivity.
The housing inspection has the right to require additional documents, for example, an apartment registration certificate. The list of documents may vary depending on the specific legislation of the region.
Two radiators on the loggia Source sofos-okna.ru
The housing inspectorate gives permission within several months. There is a high chance of getting rejected. Therefore, you should never get down to business until this permission has been received. This is a violation of the law, for which you can be fined.
While the documents are being approved, you can insulate the balcony. Without this, moving the radiator is pointless and dangerous. In addition, the lack of insulation will not allow you to prove that the permissible temperature is maintained on the loggia.
To achieve his goal, the apartment owner must perform several actions.
- Make accurate calculations.
- Report to the housing inspectorate.
- Carry out total and high-quality insulation of the room.
You cannot carry out work first and then seek permission. You cannot do illegal redevelopment: sooner or later the neighbors and the housing inspector will find out about it, and then you will have to pay a fine.
Radiator on the balcony Source royal-comfort.ru
Theoretical part
The fact is that in order to sell/donate/transfer real estate, a certificate from an engineer from the city technical inventory bureau (BTI) is required.
Here is another important nuance: in the Housing Code of the Russian Federation there is Article 25, and in it - paragraph 1. It states that the transfer of utilities is the reconstruction of residential premises. But the loggia and balcony are not such. This means that it is impossible to move the radiator there, that is, it is prohibited. And, by the way, this is no coincidence. Here are a few reasons why things are the way they are and not otherwise:
- As a rule, water is supplied to the heating system through pumps. They, of course, have a certain power reserve, but if you add one or more additional units to the overall system, the pumps may not be able to cope. This will lead to a decrease in pressure in the pipes and, as a result, to a catastrophic decrease in heating efficiency;
- but let's assume that the pumps worked. But an additional battery will increase the area of heat distribution - specifically in your room. Therefore, the water in the pipes will cool too quickly. This means that the overall temperature in your apartment will drop by several degrees. I think this is not at all what you need;
- Due to unauthorized intervention in the heating system, air jams may form, since the amount of water will be calculated exactly for the number of units that were originally installed in the house. But air jams can lead not only to a lack of heat in your or other apartments, but also to a local accident;
- if the balcony/loggia is not sufficiently insulated in all planes (walls/floor/possibly ceiling), the temperature there may drop below 0° during the cold season. Then the pipes may simply burst. Then both your balcony and the balconies of your neighbors below will be generously filled with water. Not the most pleasant prospect, is it?
In essence, there are two ways to achieve the desired result: on your own and with an intermediary. Now we will look in more detail at what these decisions are, and then we will provide a list of necessary documents that will be useful to you in any case for approval.
Method 2. Settlement through an intermediary
When working through an intermediary, everything is much simpler: you provide a package of necessary documents, draw up an agreement for the provision of services, pay the amount specified in the agreement - and simply wait until the office does the work for you.
But be careful when choosing a company, as there is a high risk of ending up with an unscrupulous company. If possible, check her reputation. Find reviews about its work in other sources (the Internet can help), read reviews of people who have already used their services, check the year the company has been providing services. The older she is, the higher the likelihood that the matter will go well and you won’t be left hanging.
Finding such an office will not be difficult. Just enter in the Yandex or Google search bar the query “how to install heating on a balcony agency” or “how to legalize the transfer of a battery company.” You can add the name of your city to the request - Moscow/St. Petersburg/Arkhangelsk... The search engine will first of all give you several landing-pages of companies that are ready to help you. Moreover, with a focus specifically on your locality. But, again, don’t rush to contact the first one you come across. Analyze and compare several options, compare prices for services, and only then draw a conclusion.
Documentation
- A document confirming your right to an apartment (sale and purchase agreement, gift, inheritance/privatization certificate).
- Consent of residents who have reached the age of majority to remodel the living space. The document must be certified by a notary, but this can also be done in a housing maintenance office.
- Technical passport. In this case, the inventory period should not exceed one year.
- Sketch. In the event that the battery has already been removed - and you are making a settlement retroactively - you will need to take a photo of the fruits of your “amateur work”.
- Consent to carry out work from neighbors above.
- Passport and its copy.
- Identification code with a copy.
Laws
Before interfering with construction and communication systems, you should carefully read the Housing Code of the Russian Federation:
- Art. 15, paragraph 5 - here are the conditions that make it possible to recognize that the premises are intended for living. Based on this article, you need to prove to the housing inspectorate that the loggia will also become a living room after renovation.
- Art. 25, paragraph 1 - heating and other utilities can be transferred, but only in living rooms, to which the loggia does not belong.
These parts of the law will allow legal redevelopment to be granted, subject to a number of strict conditions being met.
Infrared film
It is not always possible to use a cement-sand screed to install a heated floor, since its weight may exceed the maximum permissible for a floor slab. In such cases, infrared film is used. It is based on heating elements that emit heat rays. They heat not the air, but directly the floor covering and this differs from cable models.
Connection diagram for infrared floors
Infrared heated floors can be installed under any floor covering. Their operation is possible immediately after installation. But due to its design features and installation method, infrared film cannot be placed in areas where furniture will be located.
Comparing infrared and cable heating options, we can say with confidence that the first is more advantageous for use on a balcony or loggia. This is achieved through:
- film radiates heat from the entire surface, and cable only along the power rods
- the small thickness of the screed for infrared floors compared to electric floors saves energy
- heating objects (for infrared) rather than air allows you to achieve a comfortable room temperature much faster
After conducting this comparative analysis, we were able to verify the possibility of saving even with electric heated floors.
What do consumers choose?
Anyone can make a warm floor on a balcony or loggia. There are a lot of materials on the market for installing a specific system, which allows you to make the choice at your own discretion.
There are differences between manufacturers' offers, so you shouldn't skimp on quality. You should purchase products from well-known brands. This will help you get the most comfortable temperature on your balcony or loggia without additional costs.
If the choice is made in favor of infrared film, then its advantage is that it can be used with any floor covering. It does not require expensive screeding with cement mortar and can be turned on immediately after installation. Installation of infrared systems is very simple; if necessary, such a warm floor can be moved to another location. It is these qualities that have made infrared systems the most popular and brought them a huge number of positive reviews.
Film heated floors are also supported by the fact that their use is completely safe for people living in the house. But there are different opinions about cable. Many people believe that using them is harmful to health, and they also consume a lot of electricity. So draw your own conclusions.
What do you choose?
So, which model of heated floor did you decide to place on your balcony? If the choice has not yet been made, then explore two options: cable and infrared. Which one will be optimal for you depends on the characteristics of the room being insulated, the floor covering and the desired result.
Having chosen one of them, you can do the installation yourself, but it is better to invite specialists. Since they will be able to cope with this task much faster and better.
Punishment
Illegally removing the battery onto the loggia puts all residents of the house at risk and creates a number of difficulties for them. There is a penalty for unauthorized redevelopment. In 2022, individuals will pay a fine of 2,500 rubles, and legal entities - 70 thousand rubles.
In addition to paying a fine, the violator will have to remove the radiator from the balcony at his own expense and restore everything to its original condition. This decision can be challenged, but you will have to prove that the repairs will not harm anyone. You will need a conclusion from specialists and the signatures of all residents of the house.
Balcony after renovation Source proffstroygroup.ru
Main job
- Pipes.
- Fitting.
- Sealant.
- Bulgarian.
- Die and vice.
- Welding machine.
- Roulette.
Diagram of a heating radiator.
At this stage, it is best to start by making a connection to the main pipe. To do this, a small cut is made with a grinder, the external threads are cut on the pipes and they are fastened using a fitting, which has 1 additional branch
At the same time, it is important not to forget about waterproofing, which can be laid either with tow or with modern tape, which will completely protect the threaded connection from the passage of water
Pipes are brought out through the holes so that they extend 8-9 cm beyond the wall. Before installing these pipes, external threads should be cut in the same way at both ends, because this segment will only be an intermediary for passing the walls. At the second end, an angle fitting is screwed on, which will “look” vertically.
During this step, you will need to place the batteries as accurately as possible in the place where they will continue to be located. Pipes 25-30 cm long are taken out of them, at the end of which an angle fitting will again be screwed on, the second end is tightly welded to the battery, and the seams must be made so well that after 100 years they remain in their original form. It is better to cook pipes not on the balcony, but in another place in advance.
After these steps have been completed, you can begin installing the last element - vertical pipes that will supply and drain water from the battery. These pipes are also screwed on, but into ready-made fittings
During all fastenings, it is important not to forget about sealing the connections, because... otherwise, all the work will not only not be beneficial, but will also cause great harm
After successful completion of the work on the balcony, everything is covered with paint and you can begin to create a protective external frame, which will be designed not only to hide the battery itself from view, but also not to interfere with the heat exchange of the batteries with the environment.
Additional aspects:
- PVC pipes.
- Scissors for cutting polypropylene.
- Diffusion welding machine.
All work can be performed not only with metal, but also with modern PVC pipes, the removal of which will be inferior only in pricing, while a more aesthetic appearance will be created on the balcony. This type of installation will be even more convenient, because The pipe connection will no longer be threaded, but soldered, which will ensure the complete absence of leaks.
Removal of batteries should be done as quickly and efficiently as possible, because... Do not forget that installing them is illegal and penalties may follow.
The entire take-out time, if you exclude the fastening system, will take no more than a day, because... cutting, assembly and installation take a matter of minutes, and only high-quality welding can delay the process a little.
Types of batteries
After approval, you need to purchase suitable batteries. Their choice must be approached responsibly. To do this, you need to have a good understanding of their varieties and features.
There are three classes of radiators, which differ from each other in materials and their quality:
- Economy - cast iron, steel.
- Middle - bimetal, aluminum, tubular steel.
- Premium - made from the same materials, but improved, cast, designer.
Materials vary in quality and service life. You need to immediately choose the appropriate option.
Types of radiator for a loggia:
- Cast iron takes a long time to heat up and cools down slowly. They serve for 35 years, longer than all other types.
- Aluminum - have high thermal conductivity, heat up quickly, and weigh little. They serve for 15–20 years. But they can deteriorate due to the fact that the liquid inside the pipes has an inappropriate pH. Aluminum radiators are only suitable for an autonomous heating system, for example, in a private house.
- Steel panels are of high quality, have excellent heat dissipation, and are inexpensive. Service life - 15 years.
- Tubular steel - high quality and durable. In stores you can find a variety of design solutions for any interior. Expensive. They serve properly for about 15 years.
- Bimetallic - have a pipe frame on which an aluminum “jacket” is located. This is a prefabricated structure that may leak. You need to choose a model in which only steel parts are in contact with water, and aluminum serves as the outer covering. There is a way to check the quality of a bimetallic battery: you need to run a magnet over it. If the magnet sticks to the horizontal and vertical parts, then the battery is of high quality. If it does not stick to these parts, then there is no steel inside it. Bimetallic radiators are resistant to water hammer, mechanical damage and coolant water. This is the best option for any apartments and houses. They serve for 25–30 years.
Knowing the features of all types of radiators, you can make the right choice and install the appropriate model.
Bottom, side, diagonal arrangement and connection of pipes Source learnmech.com
Choosing a radiator
When the procedure for obtaining permission has been successfully completed, it is time to choose a room heating element that is suitable for the loggia.
All batteries are divided into 3 types:
- economy segment;
- middle class;
- premium
The main criteria for differences are cost, quality of materials and duration of operation.
Cast iron
The best and most durable metal of all times has been and remains cast iron. The shelf life of such radiators is more than 35 years. They are stronger than analogs made from other materials, but they weigh a lot. It is recommended to install it on the loggia only from the side of the house wall. The balcony can support no more than 600 kg of weight.
There is no need to additionally load it, because there is an installed double-glazed window, finishing, tiles on the floor (or other covering), and furniture. They look quite massive and the classic look does not always fit into a modern interior.
Aluminum
They weigh much less, are made in a modern design, and conduct heat well. The only negative: they can rust and deteriorate if the water they receive is of poor quality. Recommended for private homes where the source of water is known and autonomous.
Bimetal
Radiators of this type are most often used in apartment buildings. Bimetallic structures are compact and look laconic. They come in different sizes, conduct and release heat well. Ideal for a balcony or loggia due to its light weight and versatility in installation.
How to calculate the number of sections
There are standards that will allow you to make accurate calculations and indicate how many sections are needed to maintain warm weather indoors. The following conditions must be met:
- for 1.5 m2 - 1 part made of bimetal;
- for 2 m2 - 1 part made of aluminum;
- spare 1-2 parts.
All batteries are assembled from parts, so you need to know exactly the number of sections.
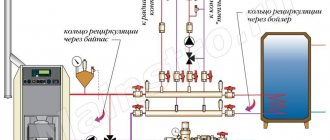
Scheme for moving a radiator to a balcony Source mastergrad.com
The main stages of installing a heating radiator on a loggia:
- Calculations of thermal conductivity and the conclusion that the radiator outside the apartment will not freeze.
- Redevelopment project and technical report from the author of the house on its feasibility.
- Obtaining permission from city authorities.
- Making changes to all documents for the apartment.
- Battery installation.
The most important stage is the redevelopment project with a change in the status of non-residential premises to residential, after which - a technical conclusion. If only the author of a house project (usually a design institute) can issue a conclusion, then either a specialized organization or the same institute can develop the project. In this case, the requirements of the standards - construction, sanitary and fire safety - must be fully taken into account, and engineering calculations must be carried out. The last thing is after you have completely insulated the loggia and calculated all the risks.
A conclusion can be issued only if the redevelopment (in our case, moving the radiator) does not affect the condition of the house. In old houses recognized as architectural monuments, installing a battery on the loggia will be very problematic, but in new buildings the chances of modernizing your balcony are much higher.
Then design documentation is drawn up. After all these tedious procedures, you need to coordinate the project with Rospotrebnadzor, fire supervision, the Directorate of the Single Customer and a number of other departments, and obtain permission to install the balcony battery from the city housing inspectorate.
After everything, approve the apartment redevelopment in the BTI, make changes to the title documents and, with a calm heart, install the equipment in the now residential premises.
The battery installation project must be agreed upon with the relevant authorities
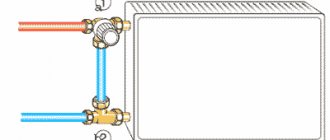
Connection options
It is very important to choose the right option for the location of the radiator pipes on the balcony. There are several types:
- Bottom - both heating pipes are located at the bottom of the battery. The inlet pipe is placed on one side, and the outlet pipe on the opposite side. In order for the radiator to heat up well and give off heat, you need to leave a sufficient distance between the fittings.
- Lateral - on one side of the battery there are inlet and outlet pipes. It is important that there is a large distance between the fittings so that the radiator heats up effectively.
- Diagonal - the inlet pipe is located on top of one half of the radiator, and the outlet pipe is located below on the other half. The best option because it provides the least heat loss.
It is necessary to remember the conditions of the loggia and choose the appropriate connection option:
- There is a tap and a jumper - the coolant evenly heats the pipes without heat loss. The best option.
- Only with a jumper - if it gets too hot, you can easily block the flow of boiling water into the pipes.
- Only with a tap - allows you to shut off the flow of coolant and temporarily remove the battery for repairs.
These options will allow you to regulate the degree of heating of the battery on the balcony.
Electric heated floor
Electric flooring takes a respectable second place in popularity as an option for additional assistance for central heating.
Although the water method of heating the floor on a balcony is used more widely, the performance characteristics of an electric floor are no worse.
Video:
https://youtube.com/watch?v=yQBRut27xNM
Perhaps the only noticeable disadvantage is the increase in electricity consumption.
On the other hand, if the house has an individual heating system, electric flooring will help reduce costs.
Cable electric floor
It must be taken into account that electric floor heating on the balcony has some installation nuances, regardless of central heating.
For example, installation eliminates the possibility of reducing the cable laying pitch.
Preparation of the concrete base is standard: carefully remove large and small debris, use a screed to make the base level, as in the previous case - to ensure waterproofing.
Although water is not used for heating, condensation can get into the insulation, which leads to a decrease in performance. Next comes the thermal insulation layer.
The electrical cable is laid on a mounting tape fixed to the heat-insulating layer in increments of 0.5-1 m.
It is very important during installation not to damage the waterproofing, but at the same time ensure reliable fastening to the base. The laying step is quite simple to calculate; you need to use the following formula: heated floor area * 100 / cable length
The laying step is quite simple to calculate; you need to use the following formula: heated floor area * 100 / cable length.
The minimum pitch is about 8-10 cm
Also keep in mind that it is important to make the distance between the wall and the heating element at least 5 cm - it cannot be placed close to the wall.
It is preferable to install the temperature regulator at a height of at least 30 cm from the floor.
The temperature sensor is installed as follows: it is placed shallowly in a corrugated tube, the connecting wire should come out of its opposite end.
The end of the tube with the sensor must be tightly closed with a special plug to prevent cement from getting inside.
Video:
The tube itself is installed in the wall, from the location of the temperature controller to the floor.
The sensor should extend 50-60 cm from the wall into the floor. The corrugated tube, like the heating elements, is fixed.
The ends of the wires need to be tinned and connected to the thermostat. The final stage is pouring a screed 3-5 cm thick.
For better heat transfer, plasticizers are added to the mixture. After the mixture has completely dried, you can lay tiles, linoleum or laminate.
Electric floor based on mats
Another easier option is heating the floors on the balcony using electricity.
The preparatory work is absolutely identical to the previous method, including laying grooves for cables, as well as preparing a hole in the wall for the thermostat.
The groove in the floor for the sensor should be approximately 20x20 mm.
It is important to make the base under the mats level, and also to remove cracks, if any. The prepared surface is also coated with a primer.
After a successful test run of the system, you can begin the final pouring of the mixture under the tiles. The optimal layer thickness is 8-10 mm.
In addition to the described methods of insulating the floor on a balcony, there is another option with insulating the floor using infrared thermal film.
It makes sense to make such a complete balcony under laminate or linoleum.
It is not difficult to install and connect a heated floor on a balcony with your own hands, the main thing is to follow the steps described in the instructions step by step, depending on what type of floor covering on the balcony you have chosen.
Installation Rules
All work on moving the battery to the loggia should be carried out only by highly qualified professionals, masters of their craft. This is an extremely difficult job: one wrong move and the whole house will suffer. All connecting nodes must be perfectly sealed. The owner of the apartment will have to order services from specialists. But no professional craftsman will perform such work if the owner does not have official permission to remove the battery to the balcony.
It is advisable to carry out this work in the summer, when there is no heating. Moving a heating radiator to a balcony is extremely undesirable and dangerous during the heating season. You will have to turn off the heating in the entire house. Such a permit costs money and the neighbors will not like it. In addition, you will need to shut off the riser at the appointed time, and this will deprive all neighbors of heat.
Radiator on the balcony near the wall Source sofos-okna.ru
Sequencing
It is necessary to thoroughly insulate and install double glazed windows!
So, the legal and technically correct sequence of actions if you want to place a heating radiator on the balcony consists of the following steps:
- insulation of external walls;
- coordination of redevelopment, obtaining relevant permits and conclusions;
- choosing the optimal type of radiator and installation method;
- wall preparation - installation of thermal insulation, finishing;
- direct installation.
If you are firm in your intentions, then for apartment buildings it is recommended to move the radiator from the room to the balcony, and not to install an additional one, which will immediately significantly reduce the efficiency of the general building system - this is unlikely to please the neighbors and will entail inspections.
Requirements
There are a number of strict requirements that must be met in order to achieve excellent heat transfer:
- you need to retreat at least 2–3 cm from the wall;
- place the supply pipes at a slope of 5–10 mm per linear meter;
- 10–12 cm from the window sill;
- 12–14 cm from the floor;
- the battery is placed evenly in all directions (use a level);
- the window sill covers the battery;
- to regulate the temperature on the loggia and the supply of coolant water, you need to make a jumper with a ball valve;
- You cannot bend the pipes too much or too often: these bends cause air pockets that block the supply of boiling water and have a bad effect on the operation of the entire heating system as a whole.
To comply with all these requirements, it is necessary to check each action using a tape measure, ruler and level. It is advisable to attach a screen wrapped in foil to the wall to better retain heat. The foil will glow and direct warmed air into the room.
Heated balcony floor Source kapiteltk.ru
How to warm
To solve the question of how to heat a balcony, you should use the simplest heating methods:
- Installation of electric oil heaters or convectors . Allows you to heat quickly and quietly. They waste a lot of electricity to maintain heat, high-quality installation of the electrical network is required, and the air becomes very dry;
- Infrared heaters allow you to warm up objects, ceilings, and walls. They are usually installed under the facing material, so they release heat and transfer it to the materials, providing heating to the room and without drying out the air. The operation of the heater has a positive effect on the body and is useful for diseases of the human cardiac and vascular systems. Consumes electricity, heating a large area requires a large heater area, fire hazard, plastic elements of walls and ceilings can be deformed;
- Electric “warm floors” – The balcony is heated by a cable laid in the form of a snake under the decorative floor. Allows you to regulate the temperature, uniform heating of the area. Warming up requires a long time, energy consumption, installation complexity and installation of floor finishing material. Materials that do not release harmful substances when heated should be used.
Also read on our website: Insulating a balcony with mineral wool: types, stages, advantages
The use of any of the listed systems for heating is possible provided that the room is well insulated, otherwise heating will not work.
How to install a battery on the balcony
After receiving the documents and concluding an agreement with the craftsmen, you can begin work. To move the battery to the loggia/balcony you will need a lot of professional equipment.
What you will need for work:
- battery;
- reinforced polypropylene pipes;
- level;
- brackets;
- Bulgarian;
- drill;
- all the necessary details;
- Mayevsky crane,
- roulette;
- soldering iron or welding device.
Ceiling, wall, floor infrared heaters Source nikotools.kz
How to install the battery on the balcony:
- Remove the old radiator.
- The pipes in the room from which the radiator is being removed must be cut - 10 cm from the place where the battery is connected.
- Use a drill to drill holes in the wall with a diameter of 2 cm. Pipes connecting the riser and the battery will pass through them.
- Cut threads on pipes.
- Pull the pipes through the holes so that they extend 8–10 cm into the room.
- Mount all the elements: first the roll, then the connections, fittings, and then the riser. All parts must fit in size and have threads.
Balcony with a single battery Source urs-ufa.ru
- Connect the pipes using a waterproofing agent (fum tape or tow).
- Place the radiator against the wall and use a level to mark the places where the fasteners will be installed.
- Attach the battery to three brackets. The first is located at the top, the remaining two are at the bottom. It is better to secure a massive battery on 4 brackets.
- Connect the Mayevsky tap, adjust other taps and plugs.
- Check the tightness of the entire structure.
- Connect the pipes.
It is advisable to entrust these works to professional craftsmen with experience and qualifications. It is dangerous to do such complex repairs with your own hands: any mistake can be fatal.
Stages of work
Before heating the loggia, it is necessary to dismantle the old radiator in the room, if planned.
In most cases, installation of a heating radiator in a loggia is carried out in the following sequence:
- The first step is to cut off the battery in the room (kitchen, living room, bedroom). You need to cut in two places: near the battery and the pipe (about 100 mm from the intended connection area). After this, you need to drill holes in the wall with a diameter of 20 mm, which will allow you to carry the riser into the loggia. First, the roll is removed, after which the fittings, connections, and finally the riser itself are installed.
- A good solution would be to choose polypropylene pipes, which have excellent performance characteristics. In addition, when using them, it will be easier to complete all installation work yourself.
- Next, you need to attach the new battery to the wall in the loggia in order to use a level to mark the areas for future fastenings. Then the brackets are installed. It was already noted above that it is necessary to install two lower and one upper bracket. For a small radiator this will be quite enough.
- Hanging the battery on the loggia on the installed brackets is quite simple. After installing the radiator, Mayevsky plugs and taps are installed.
- If polypropylene pipes were used, then various elements (fittings, connections) were attached to them.
- After this, the taps are installed and the pipes are connected. It is imperative to check the tightness of the installed pipes and all connections.
If permission has already been received, installation can begin!
Experts recommend using batteries made of light metals, such as aluminum. This material has high thermal conductivity, aluminum batteries are light, cheap and compact, and modern solutions will allow you to stylishly decorate your balcony or loggia. The size of the radiator is calculated very simply; for this you just need to know the area of the room where you want to place it.
One standard size aluminum section can warm up about two square meters of balcony; the bimetallic section has a maximum heated area of 1.5 square meters. The radiator is mounted on special brackets that are included in the kit. Two brackets are located at the bottom, and one at the top. Heavy batteries (twelve or more sections) must additionally be supported by fastenings at the top.
An important element is the distance from the floor and wall. The radiator should be installed exactly in the middle, between the window and the floor. The distance from above and below should be about 100-120 mm, and the clearance between the radiator and the wall on which it is mounted should be at least 20 mm. The last distance will allow you to glue the foil reflector for maximum heat retention indoors.
Please note: How to get rid of mold and mildew on the balcony?
Selecting pipes for supplying water to a new radiator
Traditional steel pipes, which we are used to seeing in our homes, are not suitable for these purposes. They are very difficult to install - they are difficult to bend, when joining you cannot get by with thermal paste and flax - it is advisable to weld them by electric welding, which is unacceptable when choosing an aluminum radiator, since these metals have different melting temperatures, and the aluminum will simply burn when the steel has not yet will heat up.
The modern market provides several pipe options specifically for these purposes - polypropylene, reinforced polypropylene and copper. The first option is strictly not recommended for heating; they look beautiful until hot water is pumped into them. The absence of a metal skeleton within the structure allows these pipes to stretch and flex over time when exposed to high temperatures.
To avoid this effect, a newer type of pipe was developed - now the polypropylene structure is pierced by a durable metal (most often aluminum) or fiberglass skeleton. It helps to completely get rid of unwanted deformation of pipes, while maintaining a high heat transfer coefficient and ease of installation. They bend very easily, allowing them to be installed in rooms with any complexity of layout; to connect them, it is enough to apply flux to the joint and solder it with a special blowtorch.
Copper pipes are the most expensive, but most effective option. They have the highest level of heat transfer, incomparable to polypropylene pipes, and are also easy to install.
Installing a battery on a balcony or loggia begins with removing the radiator from the adjacent room. Then the sections are transferred to the place where they will be installed, fixed on brackets or other fasteners provided by the manufacturer, and then connected to the general heating system. Below is a step-by-step technology for transferring the radiator:
- First of all, you need to take care of covering the required section of the system. The method of overlap depends on the design features and heating layout. It is recommended to carry out this work in the summer, when there is no water in the pipes!
- Then there are two installation options - either the battery is carefully cut out from the old place and attached to the new one, or it remains in place and branches are made to the balcony or loggia to install a new radiator. In the first case, new pipes will be attached to the old radiator, if the design allows it. To form a through circulation of water through the old radiator and close the cycle in the new one, the pipes must be attached to specially provided holes in the already installed battery. This option is possible if the heating in the house is modern and radiators are installed that have such a design capability. If the batteries are old, steel or cast iron, then it is customary to make branches from the old pipes to the balcony or loggia. To do this, holes are carefully drilled in the pipes, previously freed from water, the diameter of which is equal to the outer diameter of the connected pipes. A fitting must be welded into the drilled hole, onto which the new pipe is attached using soldering or a special fastening nut. To prevent loss of pressure due to the installation of a new unit in the system in front of the place where you will connect the branch to the inlet, it is recommended to install a small pump that will ensure a normal supply of hot water to both radiators. Please note that this installation option also requires approval from the BTI. Be sure to ensure that the battery on the balcony is installed strictly level. The fasteners must easily support the weight of the radiator itself and have a sufficient margin of safety, because when the heating system is filled with water, its weight will increase significantly.
- Holes are drilled in the wall into which copper or plastic pipes with pre-threaded threads are inserted. From the side of the room, they are attached to the cut points (in case of transfer) or to the battery or old pipes (in case of addition). Be sure to carefully seal the joint with flax sealant and thermal paste, then solder it with a torch, after first applying flux to the joints. The direction of supply of coolant must be strictly observed. If the pipes for hot water input/output are incorrectly connected, the efficiency of the radiator may drop by 30-40%. The correct connection diagram depends on the internal design of the battery, and is usually depicted graphically by the manufacturer in the operating document and on the radiator itself. Take a closer look - near the places on the radiator where you will supply pipes from the central heating, arrows may be drawn, pointing inward and outward to the radiator. This will let you know where to connect the coolant input and output. It is advisable to avoid a large number of bends in the pipes being carried out in order to avoid the constant formation of air pockets inside the system - this can stop the circulation of hot water and lead to an accident.
This problem is quite serious, as it can lead to damage to the heating element and sediment. If the pump does not replace water in the tank where it is heated, this will lead to instant heating of the system in one place, which will lead to the destruction of the tank, adjacent pipes and the heating element in particular.
Please note: Cellar on the balcony
If the air lock circulates along with the water flow, then if it gets on the rotating part of the pump, it can lead to a powerful water hammer, as a result of which the probability of pump failure is very high. Therefore, it is very important to avoid air getting inside, this can stop heating during the peak season for a long period.
If a small blockage occurs, the radiator and adjacent pipes will be much cooler than the rest of the system. Determining its presence is very simple - if the difference in the temperature of the pipes to the new system and in it itself is different, it means you made an error during installation, and air got into the pipes. To eliminate air locks, it is enough to install a Mayevsky valve near the radiator - using a screwdriver or a lever (depending on the modification), it is enough to unscrew the valve slightly so that the air immediately escapes from the system:
- From the balcony side, all the necessary nuts and plugs included in the kit are screwed onto the installed radiator. A Mayevsky valve must be installed to bleed air from the system. Everything is carefully packed with linen and sealant.
- When connecting pipes, take care to install a jumper and vertical pipes to drain water from the radiator. It will allow you to carry out any operations with the radiator, regardless of the time of year. To control the temperature in the radiator, it is recommended to install control valves at the coolant inlet into the battery.
Alternatives
If the previous point scared you, it’s worth considering alternative heat sources for such rooms. The list consists of only a few items:
- Oil radiators.
- Electric convectors.
- Fan heaters.
- Infrared heaters.
They have both advantages and disadvantages over water radiators. The advantages of such heat sources are primarily in mobility - most often they are equipped with wheels, with the help of which you can easily move the radiators to the place you need. They do not require additional installation - you just need to plug them into a power outlet and adjust the power of the radiated heat. There is mainly one drawback - a high degree of electricity consumption.
It is definitely worth considering the option of installing a “warm floor” system. When using electric or infrared heating elements, you do not need any design changes other than connecting to the mains. However, this option for heating a balcony or loggia is only relevant for a room where it is possible to re-equip the floors.
Connection diagram
The most effective option is the radiator mounting scheme with a jumper. This will allow you not to move the riser, leaving the kitchen or room radiator in place, and to manipulate the balcony radiator due to the presence of shut-off valves, including calmly dismantling the device. Therefore, after attaching the battery, you need to break through the wall and lead the pipe strictly horizontally from the riser.
After installing the device, connect the battery to the riser and enjoy the benefits of the heated additional room.
Thus, with a competent and legal approach, it is quite possible to increase the number of square meters in an apartment due to a heated balcony. But whether to do this with the use of a central heating battery or to use alternative options is up to the owner of the premises.
Source: vseprotruby.ru
Which pipes to choose
For work, it is recommended to choose reinforced polypropylene pipes because they:
- easy to bend, allowing installation of any complexity;
- do not deform during operation;
- do not require welding - flux is applied to the joints and sealed with a special blowtorch;
- have a high heat transfer coefficient.
It is possible to use copper pipes, but this is a more expensive and difficult to install option. Ordinary propylene quickly deforms and loses its attractive appearance.
Type and dimensions of the radiator for the loggia
Currently, the range of heating devices is quite diverse, depending on the type of material of the product:
- cast iron;
- steel;
- aluminum;
- bimetallic.
The last two options are the most preferable based on different design solutions, high thermal conductivity, small dimensions and weight, as well as resistance to water hammer.
All types of radiators are sectional, therefore, based on the area of the balcony, it is quite easy to independently calculate the required number of sections of the device, taking into account the technical characteristics specified in the passport. One section of a bimetallic radiator effectively heats 1.5 square meters of room area, and an aluminum section – 2. As a result, to determine the size of the battery depending on the selected type, we divide the area of the balcony by the indicated values. For more efficient operation in conditions of insufficient coolant temperature, you need to add one or two sections.