Distinctive features
A stove assembled by yourself has a number of advantages:
- it saves fuel;
- if desired, you can design a stove of any size, which will be the most suitable option for a given room;
- easy to transport;
- ease of use;
- The oven dripper can be used for cooking. To do this, when constructing a stove, the pipe is placed on the side.
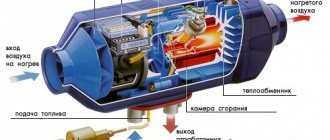
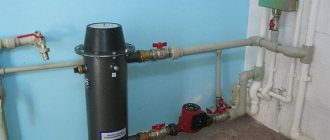
Diagram of a diesel-powered dropper stove. This is a very economical design. Complete combustion of compounds occurs in the furnace chamber
When making a drip stove with your own hands, you need to follow fire safety precautions:
- the device must be located in a draft-free room;
- flammable objects should be absent near the stove; it is advisable to have free space next to it (about half a meter);
- Do not use water to extinguish or cool the stove.
Materials needed to build the furnace:
- sheet metal;
- copper pipe;
- pipe branch;
- rubber hose;
- gas cylinder;
- screws;
- medical burner.
The main tools that will be useful for the job are a welding machine, a drill and a clamp.
A popular do-it-yourself device is a drip stove made from a gas cylinder
Step-by-step instruction
Wood-burning garage stoves, for example, the same potbelly stove, “eat” a lot of fuel. Now, if the consumption were lower, there would be no price for it. However, craftsmen came up with an alternative that solved this problem - a long-burning stove. Such a stove can use any solid fuel with minor modifications. The essence of the operation of such a stove is that combustion is replaced by smoldering - one bookmark is enough for 15 hours of operation.
Materials and tools
To make such a stove with your own hands you will need:
- an ordinary metal barrel;
- steel pipe, two sections with a diameter of 10 and 15 cm;
- steel sheet + channel;
- tools for working with metal: welding, hacksaw, hammer;
- roulette
Additionally:
- masonry material: mortar + brick (no more than 50 pieces);
- sheet of metal for the reflector.
Technical process
First of all, you need to carefully cut off the top of the barrel (we will need it later, so the work must be done carefully). Next, cut out a circle from a sheet of metal with a diameter slightly smaller than the diameter of the barrel. To this circle, on one side, you need to weld a channel (height - 15-20 cm), and on the other side, weld a pipe with a diameter of 10 cm. Be careful here: the length of the welded piece of pipe should be 20-25 cm longer than the height of the barrel. As a result, we got a steel pancake with a long handle that will move inside the barrel body and push through, “compact” the burnt fuel.”
Now we need to strengthen the stability of the structure. We weld a round or square steel sheet larger than the diameter of the barrel to the bottom of the barrel, thereby improving the stability of the structure.
Next, we cut a hole on the barrel itself and make a door for storing fuel (we cut this hole slightly above the middle of the barrel. And we make a second hole and a door at the bottom of the barrel body to remove spent fuel. Next, we adapt the previously cut off top of the barrel as a lid for a furnace, having previously made hole for passing a pipe with a diameter of 10 cm.
DIY potbelly stove
We make a pipe for the chimney from the second piece of work, 15 cm in diameter, welding it vertically closer to the upper edge of the stove and slightly to the side
Important! The vertical piece of the chimney must be longer than the diameter of the barrel, and then it can be mounted at angles, but not more than 45 degrees. The oven is ready
Further, if desired, the stove can be lined with brick.
Self-production
To do this, you will need a tank with a volume of at least 2 liters. There will be no smoke or soot during stove operation. During the process of igniting the stove, it will, so this process is recommended to be carried out outdoors.
Diesel from the fuel tank enters the wick cup. Using the dispenser, you can regulate the amount of incoming fuel. In the combustion cup, the fuel is heated until a gaseous mixture is formed, which then enters the combustion chamber. The spiral, which is located at the top of the chamber, is heated to a temperature of 800 °C. The smoke escapes through the chimney.
You can make your own apparatus weighing six kilograms. Diesel fuel is a fuel with a fairly high density, so its consumption is minimal. Overall, this stove is an efficient and easily transportable design.
Waste oil dripper stove
One type of cheap fuel is used oil. The stove can heat up to 800-900 °C. At the outlet the temperature will be 90 °C.
Pour a portion of oil and add 50-100 g of ignition agent (special fluid, heating oil, kerosene or diesel fuel). This is necessary to quickly ignite the stove. Wait until the combustion process stabilizes. Then you can pour in the next portion.
If there is any spilled oil, it must be removed immediately. Combustion occurs inside the pipe. This is a safe process. Fuel consumption is from 0.5 to 1.5 liters per hour. When the stove lights up, you can heat the water.
Waste oil dripper stove
Recommended for use: diesel oil, fuel oil, waste oil, heating oil. Do not use gasoline, acetone or other solvents. Avoid getting water into the fuel.
Special literature contains a large number of detailed instructions on how to make a drip stove with your own hands. Each of these designs is unique and has its own advantages and disadvantages. You can also use a store-bought version of the stove, but modify it at your own discretion.
Long-burning wood-burning garage stove: types and principle of operation
Any option for garage stoves has its pros and cons, and each of them can be made with your own hands. To have an idea of the process of creating a unit and to calculate your strength and resources, it is worth getting to know each type of device in more detail.
A potbelly stove is a compact, convenient and affordable option for a garage stove.
The popularity of long-burning garage stoves lies in their efficiency, since the combustion of ordinary firewood can produce the maximum amount of heat. The principle of operation is that a large amount of fuel is loaded one-time into the combustion chamber, where the process of prolonged combustion is due to poor access of oxygen. Thus, the firewood does not burn instantly, but gradually smolders, releasing flammable gas.
Long-burning garage stoves can vary in their design features; a popular variety is Bubafonya. The name of the unit comes from the name of its inventor. The high efficiency of the design lies in the fact that such a long-burning stove can operate on sawdust. If you try, you can connect Bubafonya to a water heating system. In this case, the principle of operation of the device will be to create a water jacket around the boiler.
Buleryan is also a popular model of long-burning stove; its design is very unusual. The device is widely used not only for office, but also for residential premises. This is a kind of modern hybrid of a classic potbelly stove and a long-burning stove. The unit operates by forced convection. Several curved pipes go to the firebox from below and above. Cold air enters through the lower ones, which is instantly heated in the firebox and comes out from above already hot.
Buleryan is a popular model of long-burning stove.
Diesel heaters: specifics of the device and options for self-production
Storing a vehicle in a heated and dry garage significantly extends its service life, and also allows you to significantly reduce the cost of purchasing antifreeze and car maintenance.
In addition, in a dry and warm room you have the opportunity to maintain your vehicle yourself. A diesel heater will help organize inexpensive, but at the same time high-quality heating in the garage. Now we’ll try to figure out how such a miracle stove works and how you can assemble it on your own.
Design of heating equipment running on diesel fuel
A factory or homemade diesel garage heater is multifunctional equipment. It can be used as the main, additional or alternative source of thermal energy if there is a heating system already installed in the room.
If necessary, the stove can be used as a hob: food can be quickly heated on it and the kettle can boil.
Important! Diesel heaters are strictly prohibited from being installed in poorly ventilated areas. And if during operation the stove almost does not emit harmful substances into the atmosphere, then during the ignition and extinguishing of the fire, emissions of a small amount of compounds hazardous to human health are observed in the smoke.
Many models of diesel stoves can operate not only on DP, but also on other types of liquid fuel. Judging by reviews from consumers and some experts, the best option in this case is kerosene. But due to a huge desire to save money, people prefer diesel fuel.
Heaters of this type consist of a fuel tank - in most cases it is removable, equipped with a valve, a replaceable block with a wick, an adjusting screw, a reflector and the burner itself. All structural elements are located in a common housing.
If we are talking about homemade equipment, then a barrel, a tank welded from sheets of heat-resistant steel, or even a used gas cylinder will work as a body.
The burner is placed in the center of the structure. Fuel is supplied to it from a tank located at the rear wall of the device body. In order to achieve the required temperature, an adjustment screw is used. And due to the reflector included in the design, quick and reliable heating of the room is ensured.
If you plan to purchase a factory heater, then it is better to give preference to compact models weighing 10-20 kg. Such equipment, if necessary, can be easily moved to another location using your own resources.
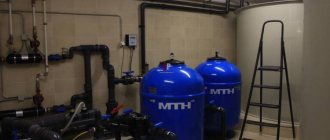
Diesel boiler for garage heating – Engineering systems
Diesel heater for garage
Diesel heaters for garages are not uncommon these days. After all, many people spend a lot of time near the car, and in the cold season this is simply a necessity. But a diesel heater for a garage will not always be effective, because the price of heating is not unimportant.
Today we will talk about what diesel stoves are available for the garage, where they should be used and how practical it will be. There are many videos and photos on this topic, today we will analyze this type of heating.
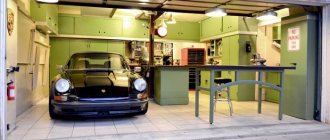
Garage oven
Creating a comfortable temperature in the garage is an important task, the solution of which will allow you to keep your car safe during autumn-winter weather and carry out repair work at low temperatures.
There are several types of heat generators used to heat a garage. The simplest among them is a potbelly stove for a small technical room.
Brick ovens are built for car boxes of significant size.
Features of using a potbelly stove for heating a garage
When creating a heating system for a car box, a number of important factors should be taken into account:
- It is possible to install such heating systems only in rooms where effective supply and exhaust ventilation is installed.
- The design of a potbelly stove for a garage must include safety elements that prevent sparks from reaching dangerous areas.
- There should be no flammable objects or building structures near the stove.
- A home-made garage stove must be reliable and durable. This can be achieved by using metal of the appropriate range, thickness and quality.
Main structural elements of a potbelly stove
The designs of potbelly stoves may differ from each other, but their main elements can be called the following:
- combustion chamber with lid;
- grate;
- chimney pipe;
- ash box.
You can buy a stove-stove for a car box, or you can make it yourself. It should be noted that making the unit yourself will allow you to save a decent amount.
The shape of a potbelly stove can be very different - rectangular, round or square. The design can be either framed or frameless. The body of frame stoves is welded from a steel profile, usually an angle, which is then sheathed with steel sheet.
Advice! To improve the operation of a homemade stove-stove for a garage, several holes are made in the lower part of the door. This measure provides additional air supply to the combustion space.
A round potbelly stove is made from a thick-walled pipe of large diameter. To install it, a piece is cut off from the pipe and holes are made in it for the vent and chimney. A perforated oval-shaped metal sheet is laid between the ash pit and the firebox, performing the function of a grate. A cover is mounted on top of the stove body, and supports are welded on the bottom.
To make a chimney for a homemade garage stove, use a regular pipe.
Source: https://in-service47.com/dizelnyy-kotel-dlya-otopleniya-garazha/
Homemade stoves: assembly options
If you want to save money, you can try making a diesel stove for the garage on your own. Let's consider the most basic design options of this type and understand the specifics of their manufacture.
Option No. 1 - from a used gas cylinder
A diesel fuel stove can be made from a used gas cylinder. And if there is one, then consider that half of the structure is already ready. The main requirement for the manufacture of such a design is the thickness of the cylinder wall - it should not exceed 1.5 mm.
The next step is selecting a pipe for the chimney. A piece of pipe with a diameter of at least 10 cm will do. The length of the chimney must be at least 4 meters. The recommended metal wall thickness is 2 mm.
To make a diesel stove for a garage on your own, in this case you will need the following tools:
- Bulgarian;
- drill;
- welding machine;
- roulette;
- building level.
Algorithm for creating a diesel heater:
- We free the container from condensation and rinse it from the odorant.
- Using a grinder, cut off the top part where the valve is located.
- The lower part of the cylinder will act as a chamber - we weld the legs to it, which are steel corners. The upper part is the lid of the future stove. In order to ensure the possibility of adjusting the fuel supply, a special valve is mounted in it.
- After the stove is assembled and installed in the required location, we proceed to installing the chimney. It must be positioned strictly vertically. This nuance should be taken into account when choosing a place to install the heater: it should be located only in a place where it is possible to mount a chimney pipe without bends or slopes.
For reference! The cylinder can be placed both vertically and horizontally. In the first case, it is possible to use the metal legs of the structure as air ducts.
This type of design operates exclusively on diesel fuel or purified waste oil without water and alcohol impurities. The use of gasoline and kerosene as fuel is strictly prohibited.
Option No. 2 - from a welded tank
The structure can be made by welding sheets of heat-resistant steel, 4-6 mm thick. The only thing is that you will need to purchase or rent a sheet bending machine. Other consumables and tools are more freely available.
Most of them are in the arsenal of any man, while others can be purchased at a hardware store.
It is possible to implement this version of a diesel furnace with the following tools and consumables:
- steel corners with a shelf size of 20 mm - future legs of the structure;
- burner pipe;
- smoke exhaust pipe – Ø10 cm and 4 m long;
- roulette;
- Bulgarian;
- file;
- welding machine;
- building level;
- hammer.
The result should be a compact -70x50x35 mm and relatively light heater - about 26 kg. The design, when assembled correctly, is stable, easy to use and effective in terms of the speed of heating the room. Also, if there is an opportunity and desire, such a device can be connected to a water heating system.
For reference! Heat-resistant steel stoves are characterized by high durability. Garages and workshops are often equipped with these. Such devices can operate on diesel fuel, waste oil and diesel fuel.
The bottom of the fuel tank and its lid are made of thick steel sheet - 6-7 mm, and the tank itself is made of sheets 4 mm thick. First of all, you should choose a diagram of the future design - it can be found on the Internet.
According to the chosen scheme, sheets are cut out, which then need to be welded together, and the seams processed with a file.
The tank pipe is not difficult to make: we cut out a strip of metal 4 mm thick and 115 mm wide, bend it into a ring and weld it to the tank. The result should be a pipe Ø34-34.5 cm. It must be equipped with a lid: it is cut from a sheet 6 mm thick and welded to the pipe. And then we move on to making the legs.
The fuel tank is made of steel sheets 6 mm thick. We cut out a round piece Ø35.2 cm and a strip 6 mm wide. In the center of the circle we drill a hole for the future chimney - its diameter depends on the diametrical size of the chimney.
The optimal hole size for efficient operation of the structure is 100 mm. You will also need another hole for filling oil. It is slightly smaller in size than the previous one - 50-60 mm, and is located at a distance of 40 mm from the smoke exhaust duct.
From a sheet 6 mm thick, cut out a rectangular partition 7x33 cm and weld it to the circle, moving it closer to the pipe. The exhaust pipe is made from a section of a smoke exhaust pipe - a length of 13 cm will be quite enough.
To make a burner, we drill 48 holes Ø9 mm in the pipe with a pitch of 60 mm from each other. As a result, we should get 6 rows, each of which has 8 holes.
Now we move on to installing the burner: we place it evenly and tightly in the tank lid, correcting inaccuracies with a file. A Ø16 cm pipe is inserted into the fuel tank, after which we connect the upper and lower parts without using a welding machine.
To seal the structure, it is advisable to use a Ø35.4 cm ring. All that remains is to completely assemble the structure and install the sliding plate into it.
Option No. 3 – drip type model
To implement this version of the stove, you will need a regular rubber burner with a hose with a volume of 2 liters. We attach a copper tube 1-1.5 meters long to the hose, having previously bent it into the letter G.
Next, bend the hose in half and secure it with screw clamps. The burner itself is placed on the wall and fuel is poured into it. The fuel supply intensity is adjusted via a screw.
Our wick will be made of rags: we form it using flexible metal wire, which must be wrapped in a rag and soaked in diesel fuel. The best option would be to use an old mattress, which must be chopped into fuel briquettes measuring 20x10x4 cm.
These briquettes soaked in fuel will burn perfectly. If the stove is large, then it is advisable to place a brick under the wick, thereby increasing the efficiency of the heating equipment.
If you make this hole on the side of the barrel, then the stove can be used not only to heat the room, but also as a cooking surface.
Tools
You only need cutting tools: grinder, jigsaw, knife. All work is carried out manually and does not require special equipment.
Installation diagram
There are several types of chimneys; the most suitable type of design is selected individually.
Installation methods
It is important to take into account the collection of condensate in the system, so it is necessary to have a plug, a condensate drain and a container for collecting condensate. If the potbelly stove is installed through a wall from a pipeline located on the street, then it would be advisable to lead the chimney through a window so that you do not have to prepare a hole for the pipeline in the ceiling
If the potbelly stove is installed through a wall from a pipeline located on the street, then it would be advisable to lead the chimney through a window so that you do not have to prepare a hole for the pipeline in the ceiling.
The outer part of the chimney is insulated using thermal insulation and covered with protective material. A fungus is installed at the end of the pipe, which will protect the chimney from debris, rain, various small animals and foreign objects.
Floor preparation
The chimney pipe for a potbelly stove is most often installed in such a way that it passes through the ceiling, therefore, before installing and fixing the pipeline structure, it is necessary to make a hole for it in the ceiling: using a jigsaw or other cutting tool, having a diameter suitable for the passage of a glass for elbows of the internal chimney.
Example of a hole for a chimney pipe
Pass-through glass
The passage glass is installed in the hole before the chimney for the potbelly stove is assembled. The diameter of the glass should be selected according to the diameter of the inner pipe, although sometimes the joint is made before the chimney passes through the ceiling
It should be understood that it is important to secure the glass tightly - it serves as a retainer. But in addition to this, the pipeline must also be attached to the wall surface
If installed incorrectly, the following consequences may occur:
If there are easily flammable materials, insulation or wooden parts in the ceiling, then they must be removed so that they do not come into contact with the passage glass.
Once the pipe has been inserted, the whole thing needs to be sealed with a fire-resistant material, such as heat-resistant sealant or special fire-resistant wool.
The following stages of work are shown in the photo:
Sealing
Pipe outlet to the roof
Roof work
At the last stage you need to put a deflector on the pipe
Tips for working
- The pipes used in the structure are located exclusively in a vertical position; to fix them, it is best to use special brackets with dimensions corresponding to the elbows of the system. To save money, you can make the brackets yourself using a metal corner.
- All connections must be treated with sealant so that there are no holes through which smoke can escape into the room air. There is a large selection of sealants on the market that are suitable for sealing pipeline seams for smoke exit:
- High temperature sealants;
- Heat-resistant sealants;
- Heat-resistant sealants;
- Heat-resistant sealants;
High temperature and heat resistant sealants are used to seal areas that reach temperatures of 350 degrees Celsius. Since the chimney for a potbelly stove heats up to higher temperatures, these types of sealants are only suitable for parts outside the piping system.
Heat-resistant and heat-resistant polymers can withstand enormous temperatures, up to 1500 degrees Celsius - they are the most suitable choice for a potbelly stove chimney.
Connecting the chimney to the stove
The chimney coming out of the potbelly stove, called internal, is connected to the street, external pipeline, in the attic or in the under-roof part of the roof. The beginning of the internal chimney is the segment coming out of the stove pipe, which is joined at the elbow to the ceiling.
When installing an internal chimney, it is important to correctly connect the pipe to the stove pipe - since if this is done incorrectly, smoke may escape into the air in the room, which will make it impossible for the heating system to function properly. Expert opinion
Expert opinion
Pavel Kruglov
Stove maker with 25 years of experience
The chimney is connected to the potbelly stove using a heat-resistant seal and a special clamp
It is important to make a completely sealed structure, since any breakthrough of gases can lead to poisoning of those inside the room
Chimney connected to potbelly stove
Rules for the safe use of heaters
It is known that the garage is a place of increased fire danger.
And given that it is planned to be heated with liquid fuel equipment, it is worth taking the issue of placing the heating unit with full responsibility:
- The oven is located in a place where there are no drafts. Also, it should not be near flammable liquids and objects.
- There should be enough free space around the heating device - at least within a radius of 50 cm.
- The most optimal would be to place the structure on a sheet of asbestos, metal or other non-combustible material.
- Fuel, wicks and other consumables should be stored as far as possible from sources of fire.
About security
Even a “correct” homemade diesel stove does not exist from the point of view of fire safety rules - PPB directly prohibit the use of homemade heating devices using liquid and gaseous fuels. The very presence of such a unit in a household makes any insurance against fire, explosion and poisoning by volatile substances invalid, and its owner and, possibly, the manufacturer, guilty of all the consequences of any incident due to the stove. Therefore, the task of making a homemade diesel stove comes down to purely technical measures to ensure its safety; the formal side is entirely your risk.
Diesel fuel vapors should be mentioned in more detail. They're not just smelly, they're toxic, carcinogenic, and will even saturate old concrete. Therefore, for residential premises, food storage facilities, greenhouses, premises for keeping livestock and poultry, only an industrial diesel stove certified for these operating conditions is clearly suitable, and not a stationary one for temporary use.
Stationary liquid fuel heating devices for individual homes are produced and can be manufactured independently, taking into account - see above. But in this case they must be double-circuit, i.e. transfer heat from fuel combustion to the coolant, and be located in a fireproof extension with a separate, i.e. from the street, entrance.
Advantages and disadvantages
Diesel stoves have a number of advantages over solid fuel boilers:
- compactness, mobility. Typically, such a device is small in size and occupies a small area. In addition, the diesel stove can be moved to any convenient place;
- high efficiency with low diesel consumption;
- lack of a chimney pipe. The construction of a chimney pipe in any room involves violating the integrity of the attic floor and roofing, which entails additional financial expenses both for the construction of the pipe itself and for the installation of heat-resistant materials in places where the pipe passes through the building envelope;
- combustion products during operation of a diesel fuel stove do not enter the room, which means you can be in it without fear for your health;
- the ability to adjust the temperature depending on the room temperature;
- the stove does not require blowing to reach full power.
The disadvantages of heating with a diesel stove include:
- the release of smoke and an unpleasant odor at the time of ignition, so to carry out this procedure it is better to take the unit outside;
- Diesel fuel has a specific smell, which is felt most strongly when refueling the device.
Device types
A diesel stove for a garage can have the following types of device:
double-circuit gas-air or heat gun. It warms up the room instantly, but uses a large amount of fuel. Difficult to manufacture, as it requires the use of turned, milled and stamped parts from heat-resistant materials;
wick furnace. Its device is similar to kerosene gas, only with increased consumption of flammable substances. When manufacturing it, it is important to observe the geometric parameters of all parts and assemblies, since in devices working with a wet wick, the amount of heat generated when the dimensions of the device increases grows much faster than it is released. A stove with an unfinished design may explode from overheating. This drawback limits the increase in thermal power;
A drip unit is an efficient, fuel-efficient, technically uncomplicated heating device, which can be easily built with your own hands from auxiliary materials.
What is better for the garage - Potbelly stove or Buleryan
Consistently positive reviews about the use of Buleryan when heating a garage box clearly indicate in favor of the latter. The advantages of a convection gas generator oven include the following:
- The presence of a gas generation mode - pyrolysis reduces fuel consumption and increases the battery life from one load of firewood. In a potbelly stove, fuel burns in 1.5-2 hours.
- Well-thought-out hot air removal - convection tubes are two-thirds immersed in the combustion chamber, which increases the thermal efficiency and efficiency of the stove.
- Economical - to heat a garage box with a potbelly stove, you will need approximately 2 times more fuel.
The thoughtful design of the economical solid fuel stove Buleryan allows you to quickly and at lower cost heat an unheated room.
The only drawback can be considered the relatively high cost of the stove, especially considering that a potbelly stove can be assembled from scrap materials. But if your financial capabilities allow you to purchase a branded boiler, then you won’t find a better option for heating your garage.
Criterias of choice
The main criteria for choosing a factory-made diesel fuel stove are:
- thermal power range;
- material of manufacture;
- product configuration and dimensions.
The device body must be made of corrosion-resistant and heat-resistant material. The best according to this criterion will be stoves made of stainless steel or cast iron.
The main part in factory models of diesel stoves is the burner or flask. After all, it is with its help that heat is generated. It can be made from:
The metal type of metal burner is less efficient than glass, but is more durable and can be used for cooking in the summer. If the device will be used only as a heating device, then it is better to choose a model with a glass burner. But it is better not to cook on it, since accidental ingress of water can lead to cracks on its surface.
The price of the device depends on the power of the device, the number of burners, dimensions and manufacturer. A domestically produced stove can be bought for 1,800 - 5,000 rubles; imported appliances of the same power are more expensive, ranging from 30,000 to 50,000 rubles.
Control systems
The device must be equipped with special automation that will turn it off when the flame control system overheats, regulate the temperature, and dose the diesel fuel to the burner. Therefore, it will be possible to leave such a stove for a long time without constant control from the owner.
Other versions
There are a large number of types of equipment for autonomous heating. Each type of garage heater has its own installation and application features. To correctly select a heating option that would be suitable for a particular room, you need to familiarize yourself in detail with the technical parameters of the heaters. Among the effective, efficient solutions are pellet stoves and coal-fired devices.
Pellet stoves
Pellet stoves are boilers that burn pellets made from pressed wood or wood waste.
Advantages of devices that run on this fuel:
- when the system runs out of fuel or the door suddenly opens, the device turns off automatically;
- pellets are much more efficient in terms of heat release than analogues that run on solid fuel.
Disadvantages of such systems:
- overpriced heaters compared to gas or electric counterparts;
- in garages remote from the city it is quite difficult to provide service;
- old models will need to be thoroughly cleaned (at least once every 15 days);
- Imported models are often not designed for use in harsh winters, since regular power surges can quickly cause breakdowns.
Pellet stovesPHOTO: avito.ru
Coal ovens
When installing any wood or coal heaters in a garage, it is necessary to ensure proper natural or forced ventilation. Advantages of such a device:
- simple design that you can make yourself from scrap materials;
- the device operates on any type of solid fuel;
- One load of the heater will provide positive temperature readings in an insulated garage throughout the day.
Disadvantages of the device, which are mainly characteristic of homemade designs:
- homemade appliances do not provide 99% of the efficiency that factory boilers provide;
- it is inconvenient to pull out the ash when there is no ash pan at the bottom;
- From the outside, the device has an unpresentable appearance; when aesthetics are required, it is recommended to buy a factory model.
Coal stoves PHOTO: drive2.ru
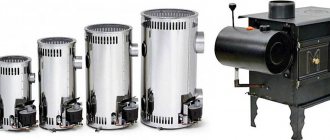
Popular models
Affordable, compact, economical, and not polluting the air with soot and harmful substances - solargas autonomous heaters are just such devices.
They have a simple design, are not picky about the quality of fuel, are made of stainless steel, therefore they are heat resistant, resistant to corrosion and do not rust. The characteristics of several models are shown in the table.
PO-1.8
PO-2.5
S-4.0
PO-5.0
Aeroheat HA S2600 BOXER
Aeroheat HA S2600 BOXER heaters use regular diesel fuel or kerosene to operate. They have great heat transfer and are able to heat a room of up to 30 square meters. meters.
- power -2.6 kW;
- fuel consumption - 0.2 l/h;
- fuel tank capacity - 2.5 l;
- weight - 4.5 kg;
- dimensions - 35 x 29 x 27 cm;
- burning time at 1 filling - 10-14 hours;
Master B35
Heat guns Master B35 CED (Italy) are of high quality. They are easy to use, do not create noise during operation, and ensure waste-free combustion of diesel fuel without polluting the air with combustion waste. The approximate price of products is from 18 to 20 thousand rubles.
- Efficiency - almost 100%;
- power - 10 kW;
- fuel consumption - 0.6 l/h;
- tank capacity - 15 l;
- air flow - up to 280 m³/h.
More powerful heating devices AOZH - 8.7 brand TRITON - are used for heating a room with an area of 60 - 70 m2.
- power -8.7 kW;
- fuel consumption - 0.18 - 0.8 l/h;
- fuel tank capacity - 2.5 l;
- weight - 45 kg;
- dimensions - 500 x 450 x 780 mm;
- burning time on 1 fuel fill is 10-14 hours.
Design examples
Potbelly stove
The easiest way is to convert a potbelly stove for diesel fuel. Thermal power will be up to 5-7 kW with a fuel consumption of 300-500 ml/hour. Fuel equipment of the same design can be used practically without changes in more powerful diesel heating boilers, as well as for starting with exhaust and kerosene.
The scheme for modifying a potbelly stove for diesel fuel is shown in Fig. below. Deflectors prevent fuel vapors from cooling before they burn. By the way, deflectors increase the efficiency of the stove when running on wood and coal. The height of the side of the flame bowl is 60-80 mm; its capacity should not be less than the capacity of the feeding reservoir (see below). The operation of a liquid fuel stove, so to speak, is reversed: air enters the wide open door of the firebox; the vent is closed. Otherwise, the stove becomes voracious and quickly becomes coked (overgrown with soot).
How to convert a potbelly stove to liquid fuel
Power, starting and running
A diesel fuel dropper stove will be quite safe and will show all its advantages only if the fuel equipment is assembled and adjusted correctly. The drip furnace must be fed in a 2-stage manner, with a buffer feed reservoir. The reason is a rather strong dependence of the drop frequency on the outside temperature and pressure in the supply pipeline. The pressure, in turn, is determined by the level of fuel in the tank or the degree of its pressurization. It dripped less often - the evaporator cooled down, the stove went out, the bowl overflowed and fuel flowed out. It began to drip more often - the drops did not have time to evaporate, there was a smoky flame in the bowl, the stove wasted fuel. If there is no nutrient reservoir, it can lead to disaster: a flaming stream will flow from the stove. Therefore, manufacturing and launching liquid fuel stoves with single-stage power supply is an activity for rabid extreme sports enthusiasts or those who have nothing else to lose and really want to sleep.
Both capillaries (see figure) are made of red copper. The point here is the wettability of the metal with fuel: it either will not leak through a narrow tube made of another material, or the power system will not be able to be established. Setting up begins with selecting the length of the safety capillary dia. 1.5 mm. The volume of the nutrient reservoir is required 0.25-0.5 l; its height is 7-12 cm. The length of the safety capillary is adjusted so that when the nutrient reservoir is filled to the top, the drop frequency is 25-30 drops per 10 s.
Next, adjust the nutrient capillary to dia. 0.6 mm; the fuel in the tank must be filled to full pressure H. With the needle valve fully open and the minimum permissible outside temperature, the frequency of drops from the fuel line into the feed tank should be 2-3 drops per 10 s less. The same drop frequency is set using a needle tap when starting the furnace at a higher outside temperature.
To start the furnace, a burning wick is placed in the fire bowl (see above). When it burns out as it should, pour fuel into the nutrient reservoir and let drops flow from the fuel line. The stove will be running for 4-5 hours; if shorter heating time is required, close the needle valve. Only from the nutrient reservoir the furnace operation will last 1-1.5 hours.
Drawings of a stove with a heater suitable for conversion to diesel fuel
For garage
Diesel and exhaust stove for garage
A diesel fuel stove for a garage should also be started during testing. The optimal design of a garage miracle stove is shown in Fig. on right; the flame bowl under the drips (extended) is also a container for non-pressure combustion of oil. Power - up to 5 kW per one afterburner column (riser), but making a stove with more than 2 risers is unacceptable, it can explode! Design data:
- Materials – square corrugated pipe 180x180x6 for the bed (combustion chamber) and afterburner, and 100x100x6 for risers.
- The length of the bed is 380 mm, the afterburner is 1000 mm, the height of the risers is 500 mm.
- There are 8 holes in the risers with a diameter of 10 mm on all 4 sides, evenly distributed along the axis.
- To start the furnace during mining, the feed tank must be disconnected and the dropper pipe must be plugged from the outside.
- A separate deflector is not needed; the sunbed cover serves as one.
How to do it yourself?
Materials and tools
First, you need to prepare a set of tools and necessary materials so that they are at hand and the process of assembling the stove is not interrupted for a long time. It should consist of:
- 50 liter cylinder for gas transportation;
- pipes Dn = 100 mm;
- profiled pipe 7x14 cm for making a fuel tank;
- copper alloy tubes;
- steel corner;
- sheet steel;
- welding unit;
- electric drill with a set of drills;
- roulette and level;
- hammer, pliers.
There are several options for the design of a diesel fuel stove for a garage, which you can make yourself. For example, consider a device based on an old gas cylinder. Pechnoy.guru will provide several examples of drawings, and the decision on implementation is up to you: