Now we will learn how to make a DIY induction heater that can be used for various projects or just for fun. You can instantly melt steel, aluminum or copper. You can use it for soldering, melting and forging metals. You can use a homemade inductive heater for casting as well.
My tutorial covers the theory, components, and assembly of some of the critical components.
The instructions are large and will cover the basic steps to give you an idea of what goes into a project like this and how to design it without anything exploding.
For the furnace, I built a very accurate, inexpensive cryogenic digital thermometer. By the way, in tests with liquid nitrogen it performed well against branded thermometers.
Characteristics and Features
It can be used to heat any metal parts. Under the influence of induction, the part heats up locally. Nearby areas are not subject to serious temperature effects. Therefore, an induction heater for bolts has an advantage over devices that are often used by car owners for similar purposes, in particular a blowtorch or gas torch. In addition, the above devices are a source of open flame, which means they create a fire hazard, just like an angle grinder, if you suddenly have to cut a bolt, sparks are formed in the process. Impact tools, such as a wrench, can mechanically damage hardware. Using an induction heater is much more profitable, safer and simpler from this point of view.
Advantages of household appliances:
- compact;
- universal;
- safe;
- there is no open fire;
- convenient to use;
- suitable for use in hard-to-reach places;
- reduces time and financial costs.
Briefly about the main thing
Induction heating is based on the ability of an alternating magnetic field to increase the temperature of objects made of electrically conductive materials. Heating is carried out in a non-contact manner and is characterized by high performance and low energy losses. For this reason, the method is widely used in various fields - melting, welding, soldering of metals, heat treatment of components and elements in production, disinfection of instruments in medicine.
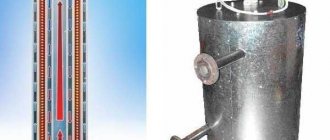
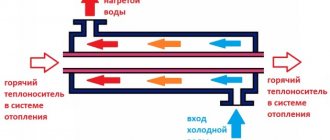
The same principle applies to the operation of a domestic water heater. The heating element through which the water passes is placed in an inductor coil. When a high-frequency current is applied, an alternating magnetic field is generated, heating the metal heater. Among the main advantages of such devices are:
- Durability.
- Economy.
- No scale.
- Leak-free operation.
- Natural convection.
Disadvantages are associated with the release of heat into the surrounding space, the need for a stable power supply, constant monitoring of performance characteristics, operating noise and harmful radiation. When manufacturing the device, you must follow the instructions and have sufficient experience.
A little theory
Anyone can make this device
Many people know that induction cookers exist, but not many know about the principle of their operation. And this is very simple - a special coil of the plate generates magnetic fields of a certain frequency, which, when exposed to metal, excite electric vortices in it.
The latter, in turn, heat it up due to the resistance of the metal. This is how kitchen utensils: pots and pans are heated. The main condition in this process is a metal with magnetic properties, for example, stainless steel, cast iron and iron, but aluminum and other non-ferrous metals will not heat up.
Vortex induction boiler is the best way to reduce heating costs
Vortex heater
Another advantage of using electric heating is the ease of maintenance of heating systems mounted on electric boilers. However, the convenience of using electricity for home heating is becoming an increasingly expensive way to obtain heat in the home - paying the bill for electricity consumption with each heating season becomes unaffordable for many.
Home owners are beginning to look for an alternative to electric boilers, the design of which is based on a standard heating element.
Induction electric boilers are gradually gaining popularity, also converting electricity into heat necessary for heating rooms. However, their design makes it possible to use energy much more economically, which significantly reduces the ongoing costs of maintaining a house during the heating season.
Energy savings occur due to the rapid heating of the heating system coolant. This happens thanks to an induction device that replaced the traditional heating element in the boiler.
In addition to reducing heating costs, these boilers have a significant number of advantages over other electric boilers - high efficiency, long service life (at least 25 years) and lack of scale.
Making a coil
As mentioned earlier, the coil is made from a pre-prepared pipe with a certain length and diameter. To create a coil, you need to screw a tube onto a round object with a five-centimeter diameter.
Notice that the reel has exactly seven circles. Mounting rings intended for radiators are installed from the top and bottom of the wire using a soldering station. Such a coil will help you assemble an inductive heater with your own hands.
Simple option
The simplest boiler can be assembled at home if you have the skills to work with a welding machine, as well as an angle grinder. Before making a boiler, you need to prepare a square metal pipe measuring 50x50 mm with a wall thickness of 2 mm. You can see the manufacturing process in the Video section.
The dimensions of the pipe and the shape of the pipe may differ, but the wall thickness should not be small.
- Using a grinder, you need to cut the profile pipe into pieces 50 cm long. You will need 5-6 pieces (everything will depend on the width of the induction cooker used).
- Additionally, you need to prepare two elements 25 or 30 cm long (it all depends on how many sections were selected).
- Parts of 50 cm are welded together. All of them must be positioned vertically. First, you can fix them with tacks, and then thoroughly weld all the joints.
- Two additional blanks need to be cut off on one side to form a U-shaped profile.
- To the finished module of 5 elements, two sections with one wall removed are welded onto the lower and upper parts. Their goal is to combine all the individual sections into a circuit.
- Next, you need to hermetically seal the resulting holes on the sides.
- The inlet and outlet pipes are inserted. They should be located diagonally, one at the bottom, the other at the top. You can use a ¾" pipe. Two threaded outlets are welded to them to make it easier to install into a finished heating system.
- All seams after welding are cleaned using a grinder. The finished structure is degreased and coated with paint.
- The device is mounted in the installed circuit. The return flow of the coolant is supplied from below, and the outgoing pipe is supplied from above.
- The heating element is a conventional induction cooker. It is necessary to purchase a stove with the ability to adjust the current and temperature.
- It is located behind the boiler close to its back wall.
- Water passing through this structure has time to warm up. The system must have an expansion tank, as well as a forced circulation pump.
The same option can be made horizontally. To do this, we need a 20x25 cm profile pipe. Its two ends are welded using metal plugs to form a closed vessel. Two holes are cut in the upper wall, an air release valve is installed in one, and a pipe through which water will flow into the system is installed in the other. The return pipe cuts into the side.
